
Chapter 2
Using iFrame Apps to Create Custom Tabs
In This Chapter
![]() Reviewing custom tabs
Reviewing custom tabs
![]() Defining iFrames
Defining iFrames
![]() Touring the Facebook Developers site
Touring the Facebook Developers site
![]() Creating your own iFrame application
Creating your own iFrame application
![]() Letting someone build your iFrame application
Letting someone build your iFrame application
![]() Using third-party applications to create your custom tab
Using third-party applications to create your custom tab
Do you have a vision for a special tab on your Facebook Page and haven’t been able to find an app that did exactly what you wanted? Maybe you want a certain function or a layout that you haven’t been able to find? Then it’s time to create your own custom tab! Luckily, plenty of options are available to help you create exactly what you need.
You can also have a fan gate tab on your Page, which means that people must become fans before they can see the content. This tab is also known as a reveal tab where the initial graphic tells people that they must click Like before they can see what’s below the image. These kinds of tabs are great at helping convert your visitors to fans because these tabs usually offer something good in exchange.
These custom tabs are sometimes called iFrame apps because they use an iFrame to pull in your designed content. In this chapter, you discover what iFrames are, how to create your own iFrame application, and how to add it to your Page. We also introduce third-party applications that make creating a custom tab easy if you aren’t comfortable coding your own iFrame (or don’t have the resources to do so).
 We cover the Facebook Developers site in depth in this chapter, but it’s not for the timid. Feel free to skip that section and go to the middle of the chapter, where we list some resources for hiring someone to write the code for you. Or move on to later in the chapter, where we cover simple third-party applications.
Looking at Tabs
Tabs on Facebook can be highly customized, with branding and links that highlight a company. These custom tabs usually have
- A strong call to action (such as Like our Page!)
- Some fun and practical links (such as a video message, a newsletter sign-up link, or coupons for fans)
The world is your oyster! Using a custom tab within your Facebook Page can further enhance your brand and make your Facebook Page stand out. Figures 2-1 through 2-3 show some examples of custom tabs.
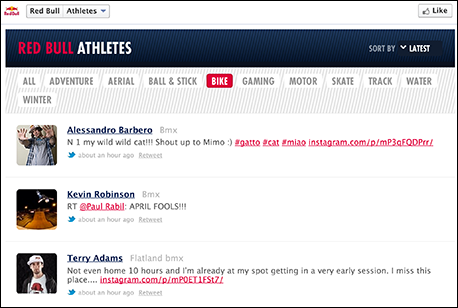
Figure 2-1: Red Bull has a tab that posts the most recent tweets by its athletes that can be filtered by sport.

Figure 2-2: The Yellow Dog Project has a tab the pulls in the latest pictures from Instagram that are tagged with #yellowdogproject.

Figure 2-3: ShortStack uses a reveal tab to entice people to click Like first.
Defining iFrames
iFrame — short for Inline Frame — is an HTML document embedded inside another HTML document on a website. An iFrame pulls the content from one website into another. So in the context of Facebook, an iFrame pulls the content of another website into an area on your Facebook Page.
iFrames are very powerful because anything that you can create on a website you can bring into your Facebook Page, creating a unique and rich experience for your community. To use iFrames on Facebook, you need to have a place on the web to put your content. By this, we mean that you need to have a server or host website where you can upload your photos, files, or whatever you’ll be displaying on your custom tab. If you don’t have a place to which you can upload your content, skip to “Using Third-Party Applications,” later in this chapter, where we introduce several third-party applications that can host your content for you.
Outlining the Options
For Facebook Pages, you have three choices:
- Build an iFrame application from scratch.
- Hire someone to build the application for you.
- Use a third-party application.
The following sections explain some of the considerations involved with each option.
Building an iFrame application
Building an application sounds daunting, but the process can be broken down into several easy steps. We walk you through the specifics a little later in the chapter, but for now, here’s an overview of the steps for building an iFrames application:
- Become a verified Facebook Developer.
This simple process requires a mobile phone (that can receive text messages) or a credit card (for verification purposes only).
- Design the content for your Facebook app.
Typically, this content is designed with HTML, JavaScript, and/or CSS.
- Upload the content for your Facebook app to your website.
You may need to use an FTP (File Transfer Protocol) program to upload the HTML document and necessary images to your server.
- Configure your Facebook application.
You configure your application in the Developer area of Facebook.
- Install the application on your Page.
When you create and install your own iFrames application, it shows up below your Cover photo with your other tabs.
 You need your own Secure Sockets Layer (SSL) certificate on your website to host your uploaded content for your Facebook app. SSL, which allows information on the website to be securely encrypted, is typically used when processing payments on a website. Facebook requires that any app have the content hosted by a secure server. An SSL certificate isn’t too expensive; typically, it costs around $50.
If you don’t have an SSL certificate, Facebook provides free hosting through a partnership with Heroku. You can read more about this partnership at http://developers.facebook.com/blog/post/558/.
Although building your own application can be challenging, it has some advantages, as follows:
- You have complete control of your application (no extra references to third-party applications).
- Developing your own application is free (unless you hire someone to help you do the development). Many third-party applications cost money.
- You don’t have to worry about something happening to the third-party application where you have your content stored. (For example, something goes wrong in the third-party application, or it goes out of business, and then your custom tab may not work properly.)
Hiring someone to build the application for you
If you aren’t savvy about HTML and are trying to do something fairly complicated (such as embedding videos or an opt-in form), you may want to hire an app developer to do the work.
To find an app developer
- Check within your own network first. You may be surprised to find that some of the website developers you may know can easily create an app for you, depending on your needs. Try doing a search on LinkedIn for Facebook app developers among your connections.
- Look at sites such as www.elance.com and www.odesk.com, which have a huge supply of freelancers who can help you out. Many of these developers have references and examples of their past work available. You can post your requirements, and the freelancers can bid on the project. You choose the freelancer who’s the best fit for your needs.
Using a third-party application
Third-party applications are created by another company (that is, a company other than Facebook) to simplify creating custom content on Facebook. The idea is that you can use a third-party application to create your Page and then add the app to your Facebook Page. You don’t need to code anything, and you don’t have to upload files to your website.
Many of these apps have a drag-and-drop design interface to make designing your app a snap. Be aware that many apps are available, and more are being developed every day. Do your homework before you settle on one app, though, because there may be something new tomorrow that’s a better fit for your needs.
Here are some of the applications that you can use to create a custom tab. We discuss these applications later in the chapter.
- Heyo: www.heyo.com
- AgoraPulse: www.agorapulse.com
- ShortStack: www.shortstack.com
- Static HTML: iFrame Tabs: www.facebook.com/apps/application.php?id=190322544333196
- TabSite: www.tabsite.com
 Third-party applications are developed by independent people or companies not connected with Facebook, and these applications may or may not work well.
Occasionally, you’ll come across some applications that are developed but then aren’t updated, or you’ll find that some applications don’t work well from the start. If you’re at all concerned about a particular application, we suggest visiting the website of the company that developed the app and noting which other companies are using the app. Many times, a website has links to the Facebook Pages using the company’s applications so you can see the apps in action and get an idea of how they work as well as gauge the applications’ popularity. All the apps that we cover in this chapter work very well; we just want to remind you to use caution when discovering new apps that may be available.
Exploring the Facebook Developers Site
The Facebook Developers site is where you begin your journey of creating your own application. To get to the site, log in to Facebook as your Profile and then go to www.facebook.com/developers. The Facebook Developers home page offers links to several areas of the developers platform: Build for Websites, Build for Mobile, and Build Apps on Facebook. You can also link to the blog, the App Center, and other sites, as shown in Figure 2-4.

Figure 2-4: The Facebook Developers site.
Here are some of the elements of the Facebook Developers site that you can access from the top navigation menu:
- Docs: Click this link to find information about creating code for the Facebook plug-ins, creating applications, and so on.
- Apps: Navigate to the apps you’ve created here.
- Products: Facebook's resources for building apps.
- Tools: Access debugger tools, the JavaScript Test Console, and more. You won’t need most of these tools for a simple Facebook app.
- Support: Get information about bugs, technical Q&A, and more.
Becoming a Verified Facebook Developer
Applications can be malicious and often created to spread spam messages and viruses. To combat developers of these types of applications, Facebook requires some method of developer tracking.
To become a verified Facebook Developer, you need to verify that you’re a real person by providing a mobile phone number (that can receive text messages) or a credit card number.
The verification process (and the pop-up boxes you see) can vary from person to person depending on when the user joined Facebook. Some people were required to verify their account with a mobile phone number when they joined Facebook; others weren’t. Also, if you’ve never set up an application before, your app creation might fail, as shown in Figure 2-5. So if you see the App Creation Failed message when creating your app (in the upcoming “Creating an iFrame Application” section), come back to the steps that follow to verify your account.

Figure 2-5: You might need to verify your account to become a Facebook Developer.
Verifying with a mobile phone number
If you want to verify your account with a mobile phone number, follow these steps:
- Click the Mobile Phone link (refer to Figure 2-5).
A pop-up window appears, asking for your country code and cellphone number.
- Select your country code and cellphone number.
- Click the Continue button.
You receive a text message with a string of letters or numbers, which is your confirmation code. On your computer, you see a box for your confirmation code.
- Enter the confirmation code and click Confirm.
You’re now a verified Facebook Developer, and you can create an iFrame application.
The mobile phone verification process may not work well outside the United States. People have reported having trouble receiving the text message, so if you’re outside the United States, you may want to use the credit card option.
Verifying with a credit card
If you don’t have a phone that can receive text messages, you need to verify your account by adding your credit card. Here’s how:
- Click the Credit Card link (refer to Figure 2-5).
You’re taken to a new window, and Facebook asks you to reenter your Facebook password.
- Reenter your password and click the Continue button.
- Type your credit card information in the text box.
- Click the Save button.
- Click the Send button.
You’re now a verified Facebook Developer, and you can create an iFrame application.
Creating an iFrame Application
So you decided to try your hand at creating your own iFrame application. Excellent! Although creating an iFrame app isn’t terribly difficult if you’re familiar with basic CSS and HTML code, you need to have a few things ready before you begin.
First, you need to create the web page on which you’ll be displaying in the iFrame. Creating a web page is beyond the scope of this book, but you need to create a page 810 pixels (px) wide to fit into the Facebook iFrame space.
The possibilities for your web page are literally endless. You can have a simple design with just an image or something more elaborate, such as a mini store. Here are some possibilities:
- A single image (very easy to code)
- Several images fitted together that allow for links
- Embedded video
- An opt-in box for your newsletter with additional photos, video, or both
- Photos or video combined with Facebook comments so that people can interact with your Page
If you create a web page wider than 810 px, it won’t fit into the space on your Facebook Page and will have scroll bars on the bottom.
Making the iFrame app
After you have your web page created and you’ve become a verified Facebook Developer, you’re ready to create your iFrame app. Log in to your Profile, and follow these steps:
- Go to www.facebook.com/developers.
- Click the Create New App under the App menu.
The Create New App dialog box appears, as shown in Figure 2-6.

Figure 2-6: Name your app.
- Type the name of your app in the Display Name text box.
The name you enter will appear on the tab of your Page.
- (Optional) Add a Namespace for your app.
This is a unique identifier for your app.
- Click the Continue button.
You’re taken to the Security Check Page. At this point, you might see the App Creation Failed message, and you must complete the verification process with your mobile phone or credit card. Refer to the earlier section, “Becoming a Verified Facebook Developer,” if necessary.
- Type the security-check text in the text box.
- Click the Submit button.
You’re taken to the application’s Settings page, as shown in Figure 2-7, landing on the Basic tab.

Figure 2-7: Edit your application.
Many of the fields on this page are for games or other Facebook applications designed to be used by many Facebook users; they’re optional for someone developing a custom tab with iFrames. For the purposes of an iFrame custom tab, you have to fill out only the information on the Basic tab. We explain which fields you need to worry about and which ones you can skip. - Fill out the information for your application as follows:
- Display Name: The name of your application that is displayed to users. This entry is the title of the tab and is populated with the name you provide in Step 2.
- Namespace: The Canvas Page URL name, which must be unique. The Canvas Page is the unique name of your URL for the application on Facebook and is in the form https://apps.facebook.com/Your_App_Namespace. (Note: This setting is optional for Page tabs.)
- Contact Email: Primary e-mail address for communication related to your application. This field should be populated by your Facebook login e-mail address, but you can change the address if needed.
- App Domain: The URL of the website where you’ll have the application. (Note: This setting is optional for Page tabs.)
- Category: The category that best fits your application (optional and directed toward other apps).
- Hosting URL: The URL address given to you by Facebook’s partner Heroku if you’re using its hosting option.
- Sandbox Mode: If enabled, only app developers can use and see your app. Switch to Enabled if you want to keep your app private while you develop it. There’s no need to make a custom tab private because it won’t be installed on your Page.
Then select how your app will integrate with Facebook. Each option requires you to enter additional information when you click the check mark next to it. The options are
- Website with Facebook Login: You want to allow people to log in to your website using Facebook.
- App on Facebook: You want to build an app on Facebook.com.
- Mobile Web: You have a mobile web app.
- Native iOS App: You have a native iOS app.
- Native Android App: You have a native Android app.
- Page Tab: You want to build a custom tab for Facebook Pages.
- Click the check mark next to the Page Tab option.
You see the fields shown in Figure 2-8.

Figure 2-8: The Page Tab fields.
Here are the descriptions of these fields:
- Page Tab Name: This field is the title of the tab and is populated from the Display Name entry. If it isn’t autopopulated, enter the text used in the Display Name field.
- Page Tab URL: Facebook pulls content for your tab from this URL. This URL is the full path to the web page that you want to have displayed on your Facebook Welcome Page.
- Secure Page Tab URL: The content of your tab needs to be hosted on a secure website that has an SSL certificate. The URL starts with https to indicate that it’s secure and is in the form https://www.yourwebsitename.com/folder/index.html. If you’re using the Heroku option, enter the URL you received from Heroku.
- Page Tab Edit URL: This URL is given to Page Admins to edit or customize the Page Tab app. This setting is optional.
- Page Tab Image: You have the opportunity to upload your image for your app Cover photo.
- Page Tab Width: You can choose a Normal width of 810 px or a Narrow width of 520 px centered on the tab.
- Click the Save Changes button.
The Page Tab is created. If you click the Apps link at the top of the page, you see all your apps listed, as shown in Figure 2-9. The app is available to you to edit at any time. Your next step is to navigate to the App Profile Page, where you can install this app on your Facebook Page, as we explain in the next section.

Figure 2-9: Your iFrame Page Tab has been created.
Installing the iFrame application on your Facebook Page
After you create your iFrame app, you need to install it on your Facebook Page. You can complete the steps in the preceding section, or you can go to the Developer page at https://developers.facebook.com/apps, select your app in the Recently Viewed section of the left sidebar, and then click the Edit App button in the top-right corner (see Figure 2-9).
To add the application to your Facebook Page, find your 15-digit app ID/API key at the top of the App page and then follow these steps:
- Type the following URL in your browser window, using your app ID and replacing YOUR_APP_ID with the 15-digit app ID/API key:
https://facebook.com/add.php?api_key=YOUR_APP_ID&pages=1.
You’re taken to the site where you add your app to your Page, as shown in Figure 2-10.
- From the Add This Application To drop-down menu (see Figure 2-10), choose the Page where you want to add your app.
- Click the Add App Name button.

Figure 2-10: Select the Page where you want to add your app.
Now your iFrame app is added as a custom tab to your Page. You can navigate to your page and change the position of your tab just as you would any tab.
Using Third-Party Applications
If you’re not an experienced HTML coder and don’t want to mess around with creating an iFrame app, there’s still hope! Several third-party applications exist to make installing an iFrame app easier.
Many third-party applications host your content for you, which means that you don’t need to have your own web host or server. (We go deeper into these applications and their capabilities later in this section.) Many apps give you the option of uploading an image or HTML code. If you’re good at coding a web page, you can use this space to create a mini web page, and the code is hosted by the app. If you’re using HTML to code a mini web page, you have to host the images that you’re putting on the Page.
Many of these applications allow you to have fan-only content. (Some call this content the reveal tab or fan gating.) This feature allows you to have one image on top of some hidden content, and visitors can’t see the hidden content until they click Like (refer to Figure 2-3). If they like your Page already, the hidden content is available to them at any time.
Here’s what you need before using a third-party application:
- Custom image: This image can be in any picture format, and it must be a maximum 810 px wide. There’s no limit to the height, but if you want the image to appear “above the fold” on computer screens, don’t make it higher (taller) than 500 px. Many apps also have a 520 px option that centers the image on the tab.
You can create a custom tab that shows only this image. Or you can add fan-only content, which requires another image with the same dimensions or HTML code that displays a web page hidden below the image.
- HTML code: You can use this code to display a mini web page. You can use the HTML code alone or use that code below a custom image for fan-only content.
You can tell what application was used to create a custom Page by the icons below the tab Cover photos. If you see a star that matches the icon on the Static HTML: iFrame Tabs Page, for example, the Page owner used this app to create the Page. This information is useful sometimes if you’re spying on the competition to see what they’re doing.
Setup of the apps is left to the user, but you can see a bit about the back end of the apps and their capabilities.
Heyo
Heyo has a drag-and-drop design process that makes it very easy to add different elements to your custom tab without knowing how to code HTML. Because of the flexibility and configurability of Heyo, we don’t cover all the steps here. Heyo has some nice video tutorials on its website. Free and paid options are available; you can find out more at https://heyo.com. Figure 2-11 shows an example of a custom tab created with Heyo.
In the dashboard area of Heyo, you can select different widgets to add to your custom tab, add a background, or use a template to get started. The Heyo dashboard is shown in Figure 2-12. When you have the custom tab in show-worthy condition, you can publish that tab to your Page.

Figure 2-11: A custom tab created with the Heyo application.
Static HTML for Pages
Involver’s application is called Static HTML for Pages, and the best place to access it is www.involver.com/applications. You can display an image on your custom tab or write HTML code to display something more complex.
Involver has also developed several Facebook applications, such as YouTube and Twitter apps that you can read more about in Book III, Chapter 4.
Involver allows you to use two of its applications for free; after that, you’re charged a monthly fee to use any additional applications. If you’re using two of Involver’s existing applications, you may want to choose one of the other iFrame applications for your custom tab.
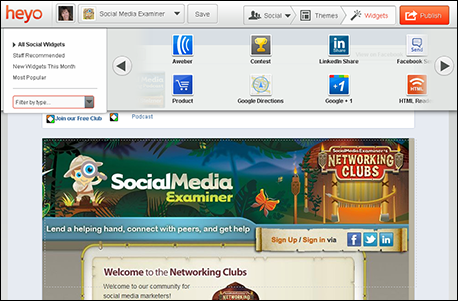
Figure 2-12: The Heyo dashboard.
To install the Static HTML for Pages app, log in to Facebook as your personal Profile and then follow these steps:
- Go to www.involver.com/applications and scroll down to the Static HTML app.
- Click the Free Install button.
A pop-up window appears, listing the Pages you manage. Choose which Page to install the app.
- Click the Add to Static HTML for Pages button next to the Page where you want to install this app.
You see a place where you get information about the app and select the visibility (who can see the app).
- Choose Everyone from the drop-down menu in the bottom-left corner (if it isn’t selected already).
- Click Go to App.
You see the permissions page.
- Click Allow.
You’re taken to a page where you enter your company name and phone number and accept the terms of service.
- Enter your company name and phone number, check the box next to the Terms of Service link, and click Save Changes.
You’re taken to a page where you can enter your HTML or select an image to display (see Figure 2-13).

Figure 2-13: Configure Static HTML for Pages.
- Select the radio button next to the type of information you want to display:
- Custom Image: A browser box appears, and you can browse your computer files to enter the image file.
- Custom HTML: A box appears, allowing you to enter your HTML code.
- Custom SML: SML stands for Social Markup Language and requires a license from Involver to use. You can find out more at www.involver.com/sml.
- Click Save Changes.
You see your images uploaded in a preview box. You’re finished and can click Return to Facebook Page in the top-right corner to verify that your custom tab is working properly.
ShortStack
ShortStack is a drag-and-drop custom tab editor that offers various widgets that you can add to your tab, as shown in Figure 2-14. With the widgets, you can add photos, text, forms, products, HTML code, and many more features. The widgets stack on top of one another, but templates divide the space into segments that you can edit separately. ShortStack also has a sweepstakes app that you can design yourself.

Figure 2-14: ShortStack has widgets that you can add to your custom tab.
ShortStack has a free plan for pages with fewer than 2,000 likes; the prices go up incrementally, depending on how many fans you have. The nice thing about a free option is that you can try your hand at the design tool before committing to purchase it.
To get started, go to www.shortstackapp.com, and click the Register Now link, or click the Login with Facebook button to link the app to your Facebook Profile.
Static HTML: iFrame Tabs
With the Static HTML: iFrame Tabs application, you can create fan-only content. This application allows you to upload an image directly (if you have a $29-per-month paid plan), or you can use HTML code to reference an image to display. You can have multiple Static HTML tabs on your page for free if you don’t need to have the images hosted.
To use this application, go to http://apps.facebook.com/static_html_plus. Alternatively, you can usually find it by searching for the title of the app in the search bar of Facebook; you should see it in the drop-down list of search results. You’ll know that you’ve found the correct app if you see a star icon on the application Page. (With all the similar application names, it helps to know what you’re looking for!) You must use HTML coding for this app, but the good news is that the app is free. Also, you can have multiple tabs on your Page with this app for free.
When you’re on the Static HTML: iFrame Tabs application Page, follow these steps to install the app on your business Page:
- Click the blue Add Static HTML to a Page button.
You’re taken to a screen with a drop-down menu that allows you to choose the Page where you want to add the app.
- Choose the Page from the Add Page Tab drop-down menu, as shown in Figure 2-15.

Figure 2-15: Select the Page where you want to add the app.
- When you have your Page selected, click the Static HTML: iFrame Tabs link.
You’re now taken to your Facebook Page.
- Click the Welcome tab with the star icon below your Cover photo.
You see the editor page for the app, as shown in Figure 2-16.

Figure 2-16: Enter your HTML content.
- Enter your HTML content and the optional fan-only HTML content.
- Click the Preview tab in the top-right corner.
You’re taken to another window, where you have to view your tab as a fan, view your tab as a nonfan, or go back to the editor.
- Click the View Your Tab as a Public and Fans link to make sure that the tab looks right if you are using the Fans-Only content option.
- Click the Edit Tab button to get back into the editor page.
- Click the Save and Publish button in the top-right corner.
You’ve set up your custom tab!
TabSite
TabSite is another iFrame application that you can use to create multiple subpages within one page. TabSite is very versatile, offering a variety of paid plans and a free plan that includes ads (not recommended). When you look at the pricing, note the Bronze plan, which features two tabs and no ads for $5 per month.
TabSite also has several engagement apps available, allowing you to give people deals on your products for sharing the link to your app or pinning the app in Pinterest, or to give a group deal to a certain number of people.
Figure 2-17 shows the design area of TabSite, where you can add widgets or use a template to get started. You can have multiple tabs within the custom tab so that you create a mini website within the page. We don’t cover all the steps for installing the app, but you can get started by clicking the Sign Up Free! button at www.tabsite.com.
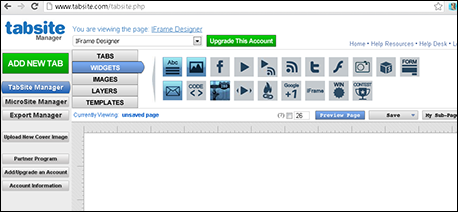
Figure 2-17: The TabSite dashboard.
FanPageEngine
FanPageEngine has some great templates that you can customize to give your tab a professional look. It also has photo and video contest apps, as well as a Deals app, as shown in Figure 2-18. Pricing starts at $27 per month for one Facebook Page.

Figure 2-18: FanPage Engine has video tutorials and contest apps.
FanPageEngine also has great videos that help you see exactly how to set up its apps. To watch some of the setup videos and to get started, go to www.fanpageengine.com, and scroll down to click the Choose Your Plan Now button.