
Before we start using the third-party volume plugins, we should take a look at what ships with Docker and how volumes solve the scenario we just worked through. Again, we will be using a docker-compose.yml file; however, this time, we will add a few lines to create and mount volumes:
version: '2'
services:
  wordpress:
    container_name: my-wordpress-app
    image: wordpress
    ports:
      - "80:80"
    links:
      - mysql
    environment:
      WORDPRESS_DB_HOST: "mysql:3306"
      WORDPRESS_DB_PASSWORD: "password"
    volumes:
      - "uploads:/var/www/html/wp-content/uploads/"
  mysql:
    container_name: my-wordpress-database
    image: mysql
    environment:
      MYSQL_ROOT_PASSWORD: "password"
    volumes:
      - "database:/var/lib/mysql"
volumes:
  uploads:
    driver: local
  database:
    driver: local
As you can see, here we are creating two volumes, one called uploads, which is being mounted to the WordPress uploads folder on the WordPress container. The second volume called database, which is being mounted in /var/lib/mysql on our MySQL container.
You can launch the containers and open WordPress, using the following commands:
docker-compose up -d
docker-compose ps
open http://$(docker-machine ip chapter03)/
Before we complete the WordPress installation in the browser, we should make sure that the uploads folder has the right permissions by running docker exec:
docker exec -d my-wordpress-app chmod 777 /var/www/html/wp-content/uploads/
Now that the permissions are correctly set on the uploads folder, we can go through the WordPress installation as per the previous test.
As WordPress creates a Hello World! test post as part of the installation, we should go and edit the post. To do this, log in to WordPress using the credentials that you entered during the installation. Once logged in, go to Posts | Hello World and then upload a featured image by clicking on Set featured image button. Your edit should look similar to the following screenshot once you have uploaded the featured image:

Once your image has been uploaded, click on Update button and then go to your WordPress homepage by clicking on the title on the top left-hand side of the screen. Once the home page opens, you should see your featured image:

Before we remove our containers, you can run the following command to show all the volumes that have been created in Docker:
docker volume ls
When running the command, you should the two volumes that we defined in our docker-compose.yml file:

Remember, as we discussed in the previous chapter, Docker Compose will prefix names with the project title (which is the name of the folder that docker-compose.yml is in), in this case, the project is called wordpress-vol and as - is not allow in names, it has been stripped out, leaving wordpressvol.
Now that we have the basic WordPress installation with updated content, let's remove the containers as we did before:
docker-compose stop && docker-compose rm
docker-compose ps

At this stage, you can probably guess what is going to happen next, let's relaunch our containers and open the WordPress site in our browser:
docker-compose up -d
open http://$(docker-machine ip chapter03)/
It may take a few seconds for everything to start up, so if you don't see your WordPress when the browser opens, refresh the page. If everything goes as planned, you should be presented with your edited Hello World! post:

While it looks like the same screenshot as earlier, you will notice that you have been logged out of WordPress. This is because, by default, WordPress stores its sessions on the filesystem, and as they are not stored in the uploads directory, the session files were lost when we removed the containers.
Volumes can also be shared between containers, if we add the following to our docker-compose.yml file anywhere in the Services section:
  wordpress8080:
    container_name: my-wordpress-app-8080
    image: wordpress
    ports:
      - "8080:80"
    links:
      - mysql
    environment:
      WORDPRESS_DB_HOST: "mysql:3306"
      WORDPRESS_DB_PASSWORD: "password"
    volumes:
      - "uploads:/var/www/html/wp-content/uploads/"
You can launch a second container with WordPress running on port 8080 and access the file we uploaded at http://192.168.99.100:8080/wp-content/uploads/2016/02/containers-1024x512.png.
Note that the preceding URL will differ for your installation as the IP address may be different, along with the upload date and file name.
You can get more information on a volume by running the following command:
docker volume inspect <your_volume_name>
In our case, this returns the following information:

You will have noticed that we have been using the local driver for our two volumes, this creates the volume on our Docker instance and mounts a folder from host machine, which is the Docker Machine host running under VirtualBox in this case.
You can view the contents on the folder by SSHing into the host machine and going to the folder listed under the mount point returned by the docker volume inspect command. To SSH into the host and change to the root user, run the following commands:
docker-machine ssh chapter03
sudo su -
You will then be able to change to the folder containing the volume, the reason for changing to the root user is to make sure that you have permissions to see the contents on the folder:

As you can see from the preceding terminal output, the files are owned by an unknown user with a user ID and group ID of 32, in the container, this is the Apache user. Be careful if you add files directly or make any changes, as you may find yourself causing all sorts of permission errors when it comes to your containers accessing the files you have added/changed.
So far so good, but what are the limits? The biggest one is that your data is tied to a single instance. In the last chapter, we looked at clustering Docker using Swarm, we discussed that the containers launched with Docker Compose are tied to a single instance, which is great for development, but not so hot for production, where we may have several host instances that we want to start spreading our containers across, this is where third-party volume drivers come into play.
There are several third-party volume drivers available, they all bring different functionality to the table. To start with, we are going to be looking at Convoy by Rancher.
Before we look at installing Convoy, we should look at launching a Docker instance somewhere in the cloud. As we already have launched Docker instance in both DigitalOcean and Amazon Web Services, we should terminate our local chapter03 instance and relaunch it in one of these providers, I am going to be using DigitalOcean:
docker-machine stop chapter03 && docker-machine rm chapter03
docker-machine create
    --driver digitalocean
    --digitalocean-access-token sdnjkjdfgkjb345kjdgljknqwetkjwhgoih314rjkwergoiyu34rjkherglkhrg0
    --digitalocean-region lon1
    --digitalocean-size 1gb
    chapter03
eval "$(docker-machine env chapter03)"

One of the reasons that we have launched the instance in a cloud provider is that we need a full underlying operating system to be able install and use Convoy, while the image provided by Boot2Docker is good, it is a little too lightweight for our requirement.
Tip
Before we do anything further, I would recommend you to attach a floating IP address to your DigitalOcean droplet. The reason for this is that, in this section of the chapter, we are going to be installing WordPress and then moving the installation to a new machine. Without a floating IP address, your WordPress installation may appear broken. You can find more details on floating IPs on the DigitalOcean website at https://www.digitalocean.com/community/tutorials/how-to-use-floating-ips-on-digitalocean.
As already mentioned, we need to install Convoy on our underlying Docker hosts operating system. To do this, you should first SSH onto your Docker host:
docker-machine ssh chapter03
Tip
As the machine has been launched in DigitalOcean, we have connected as the root user; this means that we don't have to use sudo in front of the commands, however, as you could have launched the instance in another provider, I will keep them there so that you don't end up getting permission errors if you are not the root user.
Now that you have used ssh command to get into our Docker host, we can install and start Convoy. Convoy is written in Go and ships as a static binary. This means that we don't have to compile it manually; instead, we just need to grab the binary and copy it into place:
wget https://github.com/rancher/convoy/releases/download/v0.4.3/convoy.tar.gz
tar xvf convoy.tar.gz
sudo cp convoy/convoy convoy/convoy-pdata_tools /usr/local/bin/
There are later versions of Convoy available at https://github.com/rancher/convoy/releases; however, these are flagged for use with Rancher only. We will be looking at Rancher in detail in a later chapter.
Now that we have our binary in place, we need to set up our Docker installation so that it loads the plugin:
sudo mkdir -p /etc/docker/plugins/
sudo bash -c 'echo "unix:///var/run/convoy/convoy.sock" > /etc/docker/plugins/convoy.spec'
The convoy.spec file tells Docker where it can access Convoy; for more details on how plugins work refer to Chapter 5, Building Your Own Plugin.
Convoy is installed and ready to go, now we just have to add some storage. For testing purposes, we are going to be creating and using a loopback device; however, do not do this in production!
Note
A Loopback Device is a mechanism used to interpret files as real devices. The main advantage of this method is that all tools used on real disks can be used with a loopback device. Refer to http://wiki.osdev.org/Loopback_Device.
To create the loopback device and mount it, run the following commands:
truncate -s 4G data.vol
truncate -s 1G metadata.vol
sudo losetup /dev/loop5 data.vol
sudo losetup /dev/loop6 metadata.vol
Now that we have our storage ready, we can start Convoy by running the following command:
sudo convoy daemon --drivers devicemapper --driver-opts dm.datadev=/dev/loop5 --driver-opts dm.metadatadev=/dev/loop6 &
You should see something similar to the following output:

Now that we have Convoy running, type exit to leave the Docker host and return to your local machine.
Now that we have Convoy up and running, we can make some changes to our docker-compose.yml file:
version: '2'
services:
  wordpress:
    container_name: my-wordpress-app
    image: wordpress
    ports:
      - "80:80"
    links:
      - mysql
    environment:
      WORDPRESS_DB_HOST: "mysql:3306"
      WORDPRESS_DB_PASSWORD: "password"
    volumes:
      - "uploads:/var/www/html/wp-content/uploads/"
  mysql:
    container_name: my-wordpress-database
    image: mariadb
    environment:
      MYSQL_ROOT_PASSWORD: "password"
    command: mysqld --ignore-db-dir=lost+found
    volumes:
      - "database:/var/lib/mysql/"
volumes:
  uploads:
    driver: convoy
  database:
    driver: convoy
Put the docker-compose.yml file in a wordpressconvoy folder if don't you will find you will need change the name of the volume in some of the later steps in this section.
As you can see, I have highlighted a few changes. The first being that we have moved over to using MariaDB, the reason for this is that as we now using an actual filesystem rather just a folder on the host machine, we have a lost + found folder created, presently the official MySQL container fails to work as it believes there are already databases on the volume. To get around this, we can use the --ignore-db-dir directive when starting MySQL, which MariaDB supports.
Let's launch our containers and take a look at the volume that is created by running:
docker-compose up -d
open http://$(docker-machine ip chapter03)/
docker-compose ps
docker volume ls
docker volume inspect wordpressconvoy_database
You should see something similar to the following terminal output:

Before we do anything further, complete the WordPress installation and upload some content:
open http://$(docker-machine ip chapter03)/
Remember to set the correct permissions on the volume before uploading content:
docker exec -d my-wordpress-app chmod 777 /var/www/html/wp-content/uploads/
So far, it's no different from the default volume driver. Let's look at creating a snapshot and then backing up of the volume, you will see why later in the chapter.
First of call, let's jump back to the Docker host:
docker-machine ssh chapter03
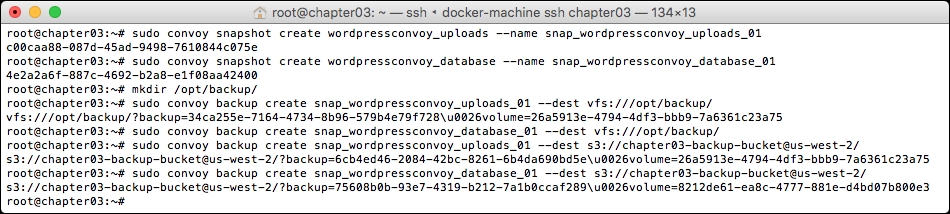
Let's create our first snapshot by running the following the commands:
sudo convoy snapshot create wordpressconvoy_uploads --name snap_wordpressconvoy_uploads_01
sudo convoy snapshot create wordpressconvoy_database --name snap_wordpressconvoy_database_01
Once a snapshot has been created, you will receive a unique ID. In my case, these were c00caa88-087d-45ad-9498-7610844c075e and 4e2a2a6f-887c-4692-b2a8-e1f08aa42400.
Now that we have our snapshots, we can use these as a basis to create our backups. To do this, we must first make sure that the destination directory where we are going to store it exists:
sudo mkdir /opt/backup/
Now that we have somewhere to store the backup, let's create it:
sudo convoy backup create snap_wordpressconvoy_uploads_01 --dest vfs:///opt/backup/
sudo convoy backup create snap_wordpressconvoy_database_01 --dest vfs:///opt/backup/
Once the backup has been completed, you will receive confirmation in the form of a URL. For the uploads, the URL returned is as follows:
vfs:///opt/backup/?backup=34ca255e-7164-4734-8b96-579b4e79f728u0026volume=26a5913e-4794-4df3-bbb9-7a6361c23a75
For the database, the URL was as follows:
vfs:///opt/backup/?backup=41731035-2760-4a1b-bba9-5e906e2471bcu0026volume=8212de61-ea8c-4777-881e-d4bd07b800e3
It is important that you make a note of the URLs, as you will need these to restore the backups. There is one flaw, the backups we have created are being stored on our Docker host machine. What if it was to go down? All our hard work would be then lost!
Convoy supports creating backups for Amazon S3, so let's do that. First, you will need to log in to your Amazon Web Services account and create an S3 bucket to store your backups.
Once you have created a bucket, you need to add your credentials to the server:
mkdir ~/.aws/
cat >>  ~/.aws/credentials << CONTENT
[default]
aws_access_key_id = JHFDIGJKBDS8639FJHDS
aws_secret_access_key = sfvjbkdsvBKHDJBDFjbfsdvlkb+JLN873JKFLSJH
CONTENT
Note
For more information on how to create an Amazon S3 bucket, refer to the getting started guide at https://aws.amazon.com/s3/getting-started/, and for details on credentials files, refer to http://blogs.aws.amazon.com/security/post/Tx3D6U6WSFGOK2H/A-New-and-Standardized-Way-to-Manage-Credentials-in-the-AWS-SDKs.
Now your Amazon S3 bucket is created. I have named mine chapter03-backup-bucket and created it in the us-west-2 region. Your Docker host has access to Amazon's API. You can make your backups again, but this time, push them to Amazon S3:
sudo convoy backup create snap_wordpressconvoy_uploads_01 --dest s3://chapter03-backup-bucket@us-west-2/
sudo convoy backup create snap_wordpressconvoy_database_01 --dest s3://chapter03-backup-bucket@us-west-2/
As you can see, the destination URL takes the following format:
s3://<bucket-name>@<aws-region>
Again, you will receive URLs once the backups has been completed. In my case, there are as follows:
s3://chapter03-backup-bucket@us-west-2/?backup=6cb4ed46-2084-42bc-8261-6b4da690bd5eu0026volume=26a5913e-4794-4df3-bbb9-7a6361c23a75
For the database backup, we will see the following:
s3://chapter03-backup-bucket@us-west-2/?backup=75608b0b-93e7-4319-b212-7a1b0ccaf289u0026volume=8212de61-ea8c-4777-881e-d4bd07b800e3
When running the preceding commands, your terminal output should have looked something similar to the following:
Now that we have off instance backups of our data volumes, let's terminate the Docker host and bring up a new one. If you haven't already, exit from the Docker host and terminate it by running the following command:
docker-machine stop chapter03 && docker-machine rm chapter03
As you can see from the following screen, we have backups of our snapshots in an Amazon S3 bucket:

Before we restore the backups, we need to recreate our Docker instance. Use the instructions for launching a Docker host in DigitalOcean, installing and starting Convoy, and also setting up your AWS credentials file from the previous sections of this chapter.
Once you have everything backed up and running, you should be able to run the following commands to restore the volumes:
sudo convoy create wordpressconvoy_uploads --backup s3://chapter03-backup-bucket@us-west-2/?backup=6cb4ed46-2084-42bc-8261-6b4da690bd5eu0026volume=26a5913e-4794-4df3-bbb9-7a6361c23a75
You should also be able to run the following command:
sudo convoy create wordpressconvoy_database --backup s3://chapter03-backup-bucket@us-west-2/?backup=75608b0b-93e7-4319-b212-7a1b0ccaf289u0026volume=8212de61-ea8c-4777-881e-d4bd07b800e3
The process of restoring the volumes will take several minutes, during which you will see a lot of output streamed to your terminal. The output should look similar to the following screenshot:
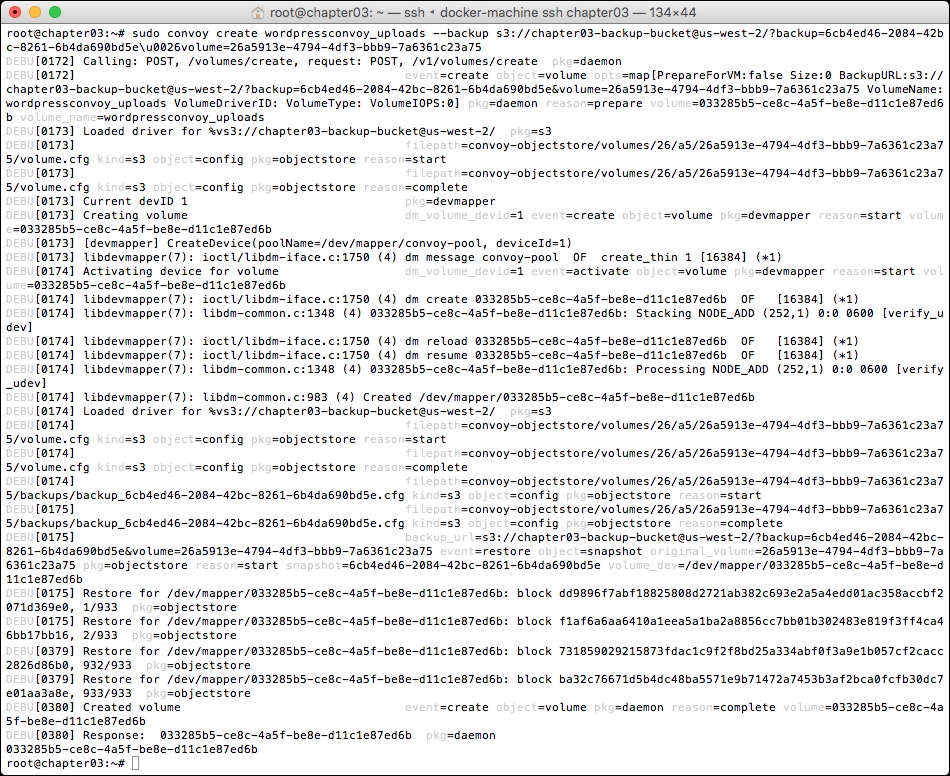
As you can see towards the end of the preceding terminal session, the restore process restores each block from the S3 bucket so that you will most see these messages scroll past.
Once you have both volumes restored, go back to your Docker Compose file and run the following command:
docker-compose up -d
If everything goes as planned, you should be able to open a browser and see your content intact and how you left it using the following command:
open http://$(docker-machine ip chapter03)/
Convoy is a great tool to start looking at Docker volumes, it is great to quickly move the content around different environments, which means that you can not only share your containers, but also share your volumes with fellow developers or sysadmins. It is also straightforward to install and configure, as it ships as a precompiled binary.
So far, we have looked at drivers that use local storage with backups to remote storage. We are now going to take this one step further by looking at remote storage that is directly attached to our container.
In this example, we are you going to be launching a Docker instance in Amazon Web Services and launch our WordPress example and attach Amazon Elastic Block Store volumes to our containers using REX-Ray, a volume driver by EMC.
REX-Ray supports several storage types on both public clouds and EMC's own range, as follows:
- AWS EC2
- OpenStack
- Google Compute Engine
- EMC Isilon, ScaleIO, VMAX, and XtremIO
The driver is in active development and more types of supported storage are promised soon.
As we are going to be using Amazon EBS volumes, we will need to launch the Docker host in AWS, as EBS volumes can not be mounted as block devices to instances in other cloud providers. As per the previous chapter, this can be accomplished using Docker Machine and the following command:
 docker-machine create
    --driver amazonec2
    --amazonec2-access-key JHFDIGJKBDS8639FJHDS
    --amazonec2-secret-key sfvjbkdsvBKHDJBDFjbfsdvlkb+JLN873JKFLSJH
    --amazonec2-vpc-id vpc-35c91750
    chapter03
Switch Docker Machine to use the newly created host:
eval "$(docker-machine env chapter03)"
Then, SSH into the host, as follows:
docker-machine ssh chapter03
Once you are on the Docker host, run the following command to install REX-Ray:
curl -sSL https://dl.bintray.com/emccode/rexray/install | sh -
This will download and perform the basic configuration of the latest stable release of REX-Ray:

Once REX-Ray is installed, we will need to configure it to use Amazon EBS volumes. This will need to be done as the root user, to the following to add a file called config.yml to /etc/rexray/:
sudo vim /etc/rexray/config.yml
The file should contain the following, remember to replace the values for AWS credentials:
rexray:
  storageDrivers:
  - ec2
aws:
  accessKey: JHFDIGJKBDS8639FJHDS
  secretKey: sfvjbkdsvBKHDJBDFjbfsdvlkb+JLN873JKFLSJH
Once you have added the configuration file, you should be able to use REX-Ray straight away, running the following command should return a list of EBS volumes:
sudo rexray volume ls
If you see the list of volumes, then you will need to start the process. If you don't see the volumes, check whether the user that you have provided accesskey and secretkey for has access to read and create EBS volumes. To start the process and check whether everything is OK, run the following commands:
sudo systemctl restart rexray
sudo systemctl status rexray
You should see something similar to the following terminal output if everything works as expected:

The final step of the installation is to restart Docker on the instance so that it picks up the new volume driver. To do this, run the following command:
sudo systemctl restart docker
Now its time to launch some containers. The only change we need make to the Docker Compose file from the Convoy one is to change the name of the volume driver, everything else stays the same:
version: '2'
services:
  wordpress:
    container_name: my-wordpress-app
    image: wordpress
    ports:
      - "80:80"
    links:
      - mysql
    environment:
      WORDPRESS_DB_HOST: "mysql:3306"
      WORDPRESS_DB_PASSWORD: "password"
    volumes:
      - "uploads:/var/www/html/wp-content/uploads/"
  mysql:
    container_name: my-wordpress-database
    image: mariadb
    environment:
      MYSQL_ROOT_PASSWORD: "password"
    command: mysqld --ignore-db-dir=lost+found
    volumes:
      - "database:/var/lib/mysql/"
volumes:
  uploads:
    driver: rexray
  database:
    driver: rexray
Once the application has launched, set the permissions on the upload folder by running the following command:
docker exec -d my-wordpress-app chmod 777 /var/www/html/wp-content/uploads/
In the AWS Console, you will notice that now there are some additional volumes:

Open your new WordPress installation in a browser by running the following command:
open http://$(docker-machine ip chapter03)/
If you have a problem opening the WordPress site in your browser, find the running instance in the AWS Console and add a rule for port 80/HTTP to the DOCKER-MACHINE security group. Your rules should look similar to the following image:

You will only have to add the rule once, as Docker Machine will reassign the docker-machine security group whenever you launch more Docker hosts.
Once you have the page open, complete the WordPress installation and edit or upload some content. You know the drill by now, once you have added your content, it's time to stop the containers, remove them, and then terminate the Docker host:
docker-compose stop
docker-compose rm
Before removing the host, you can check the status of the volumes by running the following command:
docker volume ls
You will see something similar to the following image:

Finally, it's time to remove the Docker host:
docker-machine stop chapter03 && docker-machine rm chapter03
Before we bring up a new Docker host with Docker Machine, it is worth pointing out that our WordPress installation will probably look a little broken.
This is because moving our containers to a new host changes the IP address that we will be accessing the WordPress site on, meaning that until you change the settings to use the second node's IP address, you will see a broken site.
This is because it is trying to load content, such as CSS and JavaScript, from the first Docker host's IP address.
For more information on how to update these settings, refer to the WordPress Codex at https://codex.wordpress.org/Changing_The_Site_URL.
Also, if you have logged into the AWS Console, you may have noticed that your EBS volumes are not currently attached to any instance:

Now that we have this out of the way, let's launch our new Docker host using Docker Machine. If you followed the instructions in the previous section to launch the host, connect, install REX-Ray, and launch the WordPress and Database containers. As we have already discussed, you could update the site's IP address by connecting to the database:
- Should you want to update the IP address, then you can run the following. First of all, connect to your database container:
docker exec -ti my-wordpress-database env TERM=xterm bash -l - Then make a connection to MariaDB using the MySQL client:
mysql -uroot -ppassword --protocol=TCP -h127.0.0.1 - Switch to the
wordpressdatabase:use wordpress; - Then finally run the following SQL. In my case,
http://54.175.31.251is the old URL andhttp://52.90.249.56is the new one:UPDATE wp_options SET option_value = replace(option_value, 'http://54.175.31.251', 'http://52.90.249.56') WHERE option_name = 'home' OR option_name = 'siteurl'; UPDATE wp_posts SET guid = replace(guid, 'http://54.175.31.251','http://52.90.249.56'); UPDATE wp_posts SET post_content = replace(post_content, 'http://54.175.31.251', 'http://52.90.249.56'); UPDATE wp_postmeta SET meta_value = replace(meta_value,'http://54.175.31.251','http://52.90.249.56');
Your terminal session should look similar to the following screenshot:

However, we can see that the content is present, even though the site looks broken.
REX-Ray is very much in early development, with more features being added all the time. Over the next few releases, I can foresee it getting more and more useful as it is slowly moving towards being a cluster-aware tool rather than the standalone tool it is at the moment.
However, even in this early stage of its development, it serves as a great introduction to using external storage with Docker Volumes.
The next tool that we are going to look at is Flocker by ClusterHQ. It's certainly the most feature-rich of the third-party volume drivers that we are going to be looking at in this chapter. As you can see from the following list of supported storage options, it has the widest coverage of storage backends out of all of the volume drivers:
- AWS Elastic Block Storage
- OpenStack Cinder with any supported backend
- EMC ScaleIO, XtremeIO, and VMAX
- VMware vSphere and vSan
- NetApp OnTap
- Dell Storage SC Series
- HPE 3PAR StoreServ and StoreVirtual (with OpenStack only)
- Huawei OceanStor
- Hedvig
- NexentaEdge
- ConvergeIO
- Saratoga Speed
There is also support for the following storage options coming soon:
- Ceph
- Google Persistent Disk
As most people will have access to AWS, we are going to look at launching a Flocker cluster in AWS.
Rather than rolling our sleeves up and installing Flocker manually, we are going to take a look at how to get Flocker up and running quickly.
For this part of the chapter, we will be launching a cluster using an AWS CloudFormation template provided by ClusterHQ to get a Flocker cluster up and running quickly.
Note
AWS CloudFormation is the orchestration tool provided by Amazon that allows you to define how you would like your AWS infrastructure to look and be configured. CloudFormation is free to use; however, you do pay for the resources that are launched by it. At the time of writing, the estimated cost for running the template for one month is $341.13. For more information on CloudFormation, refer to https://aws.amazon.com/cloudformation/, or for a breakdown of the costs, refer to http://calculator.s3.amazonaws.com/index.html#r=IAD&s=EC2&key=calc-D96E035B-5A84-48DE-BF62-807FFE4740A8.
There are a few steps that we will need to perform before we launch the CloudFormation template. First of all, you will need to create a key pair to be used by the template. To do this, log in to the AWS console at https://console.aws.amazon.com/, select your region, then click on EC2, and then on the left-hand side Key Pairs menu, the key pair you create should be called something like flocker-test:

After you click on the Create button, your key pair will be downloaded, keep this safe as you will not be able to download it again. Now that you have your key pair created and safely downloaded, it's time to create an account on the ClusterHQ Volume Hub, you can do this by going to https://volumehub.clusterhq.com/.
The Volume Hub (at the time of writing this book, it is in Alpha testing) is a web-based interface to manage your Flocker volumes. You can either signup for an account using your e-mail address or signin using your Google ID.
Once you have signed up/in, you will be presented with a notice pointing out that You don't appear to have a cluster yet. and the option of either creating a new cluster or connect to an existing cluster:

Clicking on Create new button will open an overlay with instructions about what you need to do to create a cluster using AWS CloudFormation. As we have already actioned step one, scroll down to step two. Here, you should see a button that says Start CloudFormation Configuration Process, click on this to open a new tab that will take you directly to the AWS CloudFormation page on the AWS console:

The first step of launching the AWS CloudFormation stack is selecting the template, this has already been done for us, so you can click on the Next button.
You will now be asked to give some details about your stack, this includes a name for the stack, EC2 key pair name, AWS access and secret keys, and also your Volume Hub token.
To get your Volume Hub token, visit https://volumehub.clusterhq.com/v1/token and you will be presented with a token. This token is unique to your Volume Hub account, it is important you don't share it:

Once you have filled in the details you can click on the Next button. On the next page, you will be asked to tag your resources, this is optional. You should follow your normal processes for tagging resources here. Once you have added your tags, click on the Next button.
The next page gives you an overview of the details that you have provided. If you are happy with these, click on the Create button.
After you click on the Create button, you will be taken back to the AWS CloudFormation page, where should see your stack with a CREATE_IN_PROGRESS status:

If you don't see your stack, click on the refresh icon on the right-hand top corner. Typically, it will take around 10 minutes to create your cluster. While the stack is being created, you can click on one of the Split pane icons on the bottom-right of the screen and view the events that are taking place to launch your cluster.
Also, as the cluster is launching, you should start seeing Nodes registering themselves in your Volume Hub account. It is important, however tempting, to not start using the Volume Hub until your stack has a CREATE_COMPLETE status.
Once your stack has been deployed, click on the Outputs tab. This will give you the details you will need to connect to the cluster. You should see something similar to the following:

The first thing we need to do is set the correct permissions on the key pair that we created earlier. In my case, it is in my Downloads folder:
chmod 0400 ~/Downloads/flocker-test.pem.txt
Once you have set the permission, you will need to log in to the client node using ubuntu as the username and your key pair. In my case, the client node IP address is 23.20.126.24:
ssh [email protected] -i ~/Downloads/flocker-test.pem.txt
Once you are logged in, you need to run a few more commands to get the cluster ready. For this, you will need to make a note of the IP addresses of the Control Node, which in the preceding screen is 54.198.167.2:
export FLOCKER_CERTS_PATH=/etc/flocker
export FLOCKER_USER=user1
export FLOCKER_CONTROL_SERVICE=54.198.167.2
Now that you have connected to the control service, you should be able to get an overview of the cluster using the flockerctl command:
flockerctl status
flockerctl ls
When running the flockerctl ls command, you shouldn't see any datasets listed. Now we should connect to Docker. To do this, run the following commands:
export DOCKER_TLS_VERIFY=1
export DOCKER_HOST=tcp://$FLOCKER_CONTROL_SERVICE:2376
docker info | grep Nodes
At the time of writing this book, the Flocker AWS CloudFormation template installs and configures Docker 1.9.1 and Docker Compose 1.5.2. This means that you will not be able to use the new Docker Compose file format. There should be, however, Docker Compose files in both the old and new formats in the GitHub repository, which accompanies this book.
You can find the repository at https://github.com/russmckendrick/extending-docker/.
Your terminal output should look similar to the following session:

Now that we have everything up and running, let's launch our WordPress installation using Flocker volumes.
First thing we should do is create the volumes. We could let Flocker use its defaults, which is a 75 GB EBS volume, but this is a little overkill for our needs:
docker volume create -d flocker -o size=1G -o profile=bronze --name=database
docker volume create -d flocker -o size=1G -o profile=bronze --name=uploads
As you can see, this is a more sensible size and we are choosing the same volume names as we have done in the previous examples. Now that we have our volumes created, we can launch WordPress. To do this, we have two Docker Compose files, one will launch the containers on AgentNode1 and the other on AgentNode2. First of all, create a folder to store the files:
mkdir wordpress
cd wordpress
vim docker-compose-node1.yml
As already mentioned, at the time of writing this book, only the original Docker Compose file format is support, due to this, our file should have the following content:
wordpress:
  container_name: my-wordpress-app
  image: wordpress
  ports:
    - "80:80"
  links:
    - mysql
  environment:
    - "constraint:flocker-node==1"
    - "WORDPRESS_DB_HOST=mysql:3306"
    - "WORDPRESS_DB_PASSWORD=password"
  volume_driver: flocker
  volumes:
    - "uploads:/var/www/html/wp-content/uploads/"
mysql:
  container_name: my-wordpress-database
  image: mariadb
  environment:
     - "constraint:flocker-node==1"
     - "MYSQL_ROOT_PASSWORD=password"
  command: mysqld --ignore-db-dir=lost+found
  volume_driver: flocker
  volumes:
    - "database:/var/lib/mysql/"
As you can see, it isn't too different from the new format. The important thing to note is the lines that bind the containers to a node, this has been highlighted in the preceding code.
To launch the containers, we have to pass the filename to docker-compose. To do this, run the following commands:
docker-compose -f docker-compose-node1.yml up -d
docker-compose -f docker-compose-node1.yml ps
Once the container's have launched, run the following to set the correct permissions on the uploads folder:
docker exec -d my-wordpress-app chmod 777 /var/www/html/wp-content/uploads/
Now that we have our volumes created and containers launched, let's take a quick look at the Volume Hub:
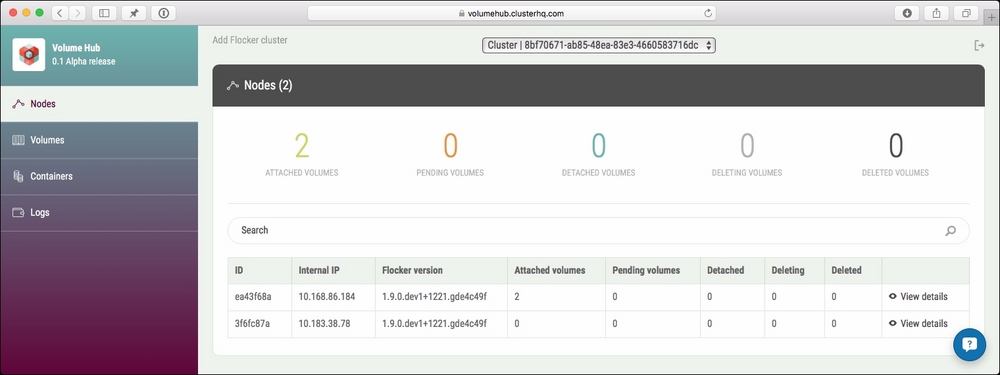
As you can see, there are two volumes being shown as attached to the node with the internal IP of 10.168.86.184. Looking at the Volumes page gives us a lot more detail:

As you can see, we have information on the size, name, its unique ID, and which node it is attached to. We can also see the information on the containers that are running within our cluster:

Before we stop and remove the containers, you should configure WordPress and then log in and upload a file. You will be able to get the IP address you can access WordPress on by running the following command and opening the IP address where port 80 is mapped to in your browser:
docker-compose -f docker-compose-node1.yml ps
Once you have made these changes, you can stop and remove the containers by running the following commands:
docker-compose -f docker-compose-node1.yml stop
docker-compose -f docker-compose-node1.yml rm -f
Now that you have removed the containers, it's time to launch them on the second node. You will need to create a second Docker Compose file, as follows:
vim docker-compose-node2.yml
wordpress:
  container_name: my-wordpress-app
  image: wordpress
  ports:
    - "80:80"
  links:
    - mysql
  environment:
    - "constraint:flocker-node==2"
    - "WORDPRESS_DB_HOST=mysql:3306"
    - "WORDPRESS_DB_PASSWORD=password"
  volume_driver: flocker
  volumes:
    - "uploads:/var/www/html/wp-content/uploads/"
mysql:
  container_name: my-wordpress-database
  image: mariadb
  environment:
     - "constraint:flocker-node==2"
     - "MYSQL_ROOT_PASSWORD=password"
  command: mysqld --ignore-db-dir=lost+found
  volume_driver: flocker
  volumes:
    - "database:/var/lib/mysql/"
As you can see, all that has changed is the node number. To launch the containers, run the following command:
docker-compose -f docker-compose-node2.yml up -d
It will take a little longer to launch, as Flocker has to unattach and reattach the volumes to the second node. Once the containers are running, you will see that they are now showing as being attached to the second node in the Volume Hub, as shown in the following screenshot:

This is also reflected in the other sections of the Volume Hub:

Finally, you can see your new containers on the Containers page:

Run the following command and open the IP address in a browser:
docker-compose -f docker-compose-node2.yml ps
As mentioned in the REX-Rey section of this chapter, opening WordPress should show you a broken-looking WordPress page, but this shouldn't matter as some content is being served out of the database volume; otherwise, you would be seeing the Install WordPress page.
So, there you have it. You have used Flocker and Volume Hub to launch and view your Docker volumes, as well as move them between hosts.
As mentioned at the start of this section, you are paying by the hour to have the cluster up and running. To remove it, you should go to the AWS Console, switch to the CloudFormation service, select your Stack, and then delete from the actions drop-down menu:

If you get an error about not being able to remove the S3 bucket, don't worry, all of the expensive stuff will have been terminated. To resolve the error, just go to the S3 bucket it is complaining about in the AWS Console and remove the content. Once you have removed the content, go back to the CloudFormation page and attempt to delete the stack again.
Flocker is the grandfather of Docker volumes, it was one of the original solutions for managing volumes even before the volume plugin architecture was released. This means that it is both mature and easily the most complicated of the volume plugins that we have looked at.
To get an idea of its complexity, you can view the CloudFormation template at https://s3.amazonaws.com/installer.downloads.clusterhq.com/flocker-cluster.cloudformation.json.
As you can see, there are a lot of steps. Viewing the template in the CloudFormation visualizer gives you more of an idea of how everything is linked:

Add to the mix that Docker itself is regularly being updated and you have a very complex installation process. This is the reason why I have not gone into detail about how to manually install it in this chapter, as the process will no doubt have changed by the time you come to read it.
Luckily, Cluster Labs have an extremely good documentation that is regularly updated. It can be found at https://docs.clusterhq.com/en/latest/.
It's also worth pointing out that, at the time of writing this book, Volume Hub is in early alpha and more functionality is being added regularly. Eventually, I can see this being quite a powerful combination of tools.