
So far in our exploration of the tools that ship with Docker Toolbox, we have been using services which manage our Docker host machines, the final service that we are going to look at in this chapter deals with containers. I am sure that you will agree that so far the tools provided by Docker are quite intuitive, Docker Compose is no different. It start off life as third-party service called Fig and was written by Orchard Labs (the project's original website is still available at http://fig.sh/).
The original project's goal was the following:
"Provide fast, isolated development environments using Docker"
Since Fig became part of Docker, they haven't strayed too far from the original goal:
"Compose is a tool for defining and running multi-container Docker applications. With Compose, you use a Compose file to configure your application's services. Then, using a single command, you create and start all the services from your configuration."
Before we start looking at Compose files and start containers up, let's think of why a tool such as Compose is useful.
Launching individual containers is as simple as running the following command:
docker run -i -t ubuntu /bin/bash
This will launch and then attach to an Ubuntu container. As we have already touched upon, there is a little more to it than just launching simple containers though. Docker is not here to replace virtual machines, it is here to run a single application.
This means that you shouldn't really run an entire LAMP stack in single container, instead, you should look at running Apache and PHP in one container, which is then linked with a second container running MySQL. You could take this further, running a NGINX container, a PHP-FPM container, and also a MySQL container. This is where it gets complicated. All of sudden, your simple line for launching is now several lines, all of which have to executed in the correct order with the correct flags.
This is exactly the problem Docker Compose tries to fix. Rather than several long commands, you can define your containers using a YAML file. This means that you will be able to launch your application with a single command and leave the logic of the order in which the containers will be launched to Compose.
It also means that you can ship your application's Compose file with your code base or directly to another developer/administrator and they will be able to launch your application exactly how you intended it be executed.
Almost everyone at some point would have installed, used, or read about WordPress, so for the next few examples, we will be using the official WordPress container from the Docker Hub, you can find details on the container at https://hub.docker.com/_/wordpress/.
Note
WordPress is web software that you can use to create a beautiful website, blog, or app. We like to say that WordPress is both free and priceless at the same time. For more information, check out https://wordpress.org/.
Let's start by getting a basic WordPress installation up and running, first of all create a folder called wordpress and then add the following content to a file called docker-compose.yml:
wordpress:
  container_name: my-wordpress-app
  image: wordpress
  ports:
    - "80:80"
  links:
    - "mysql:mysql"
mysql:
  container_name: my-wordpress-database
  image: mysql
  environment:
    MYSQL_ROOT_PASSWORD: "password"
You will be able to launch the application using your Swarm cluster by making sure that your local Docker client is configured to use it, run docker-machine ls and make sure that it is active and then run the following command:
eval $(docker-machine env --swarm swarm-master)
Once your client is configured to communicate with your Swarm cluster, run the following command within the folder containing the docker-compose.yml file:
docker-compose up -d
Using the -d flag at the end of the command launches the containers in detached mode, this means that they will run in the background. If we didn't use the -d flag, then our containers would have launched in the foreground and we would not have been able to carry on using the same terminal session without stopping the running containers.
You will see something similar to the following output:

As you can see, you can find out the IP address of the node where the WordPress application has been launched by running docker ps. If you were to go to the IP address shown in the figure, where port 80 is listed, you will see a WordPress installation screen:

One of the interesting things to note is that although the my-wordpress-app container was defined first in the docker-compose.yml file, Compose recognized that it was linked to the my-wordpress-database container and it launched that one first. Also, you may have noticed that the wordpress:latest and mysql:latest images were pulled down on all of the nodes in the Swarm cluster.
So, what of the docker-compose.yml file itself? Let's look at it again, but this time with some comments.
As far as Compose is concerned, our WordPress application is split into two applications, one called wordpress and another called mysql. Let's look at the docker-compose.yml file again:
wordpress:
  container_name: my-wordpress-app
  image: wordpress
  ports:
    - "80:80"
  links:
    - "mysql:mysql"
mysql:
  container_name: my-wordpress-database
  image: mysql
  environment:
    MYSQL_ROOT_PASSWORD: "password"
At the top level, we have the application name. From here, we then start to define the configuration for the application by giving a key and value, making sure that you pay close attention to the indentation. I tend to use two spaces to make it clear that the indent is there, but not so much that it becomes unreadable.
The first key that we are defining is container_name, we don't have to do this as Compose will name our containers automatically, based on the name of the folder we are in and the application name. If we hadn't defined this key, then our containers would have been called wordpress_wordpress_01 and wordpress_mysql_01.
The next key tells the application which image to use, this will pull the image straight from the Docker Hub.
Then we define the ports, not that we only define the ports for the wordpress application and not the mysql one. As we want our wordpress application to listen on port of the host machine, we have given 80:80. In this case, the first 80 is the host port and the second one is the container port that we want to expose.
Again, the next key is only used on the wordpress application, this defines the links. Links are used to link containers together, exposing, in this case, the mysql container to the wordpress container. This means that when the wordpress container is launched, it will know the IP address of the mysql container and only its ports will be exposed to the wordpress container.
The final key we are defining is environment, here are we passing further keys and values that will be set as environment variables on the containers when they launch.
A full break down of all of the keys available in compose files can be found in the official documentation at https://docs.docker.com/compose/compose-file/.
One of the advantages of using Compose is that each of the environments it launches is isolated, let's launch another WordPress installation using the following docker-compose.yml file:
wordpress:
  container_name: my-other-wordpress-app
  image: wordpress
  ports:
    - "80:80"
  links:
    - "mysql:mysql"
mysql:
  container_name: my-other-wordpress-database
  image: mysql
  environment:
    MYSQL_ROOT_PASSWORD: "password"
As you can see, other than the container names, it is exactly the same as the previous environment we launched:
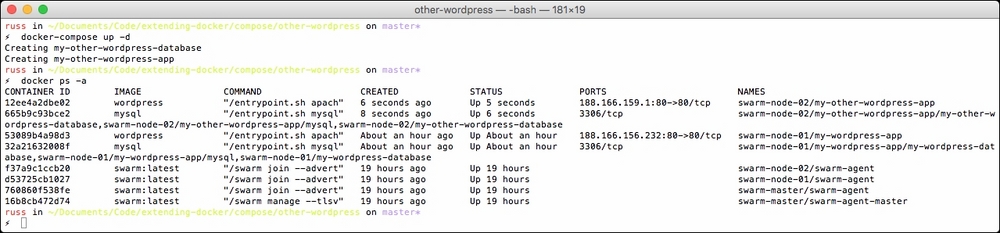
The other thing you will notice is that the my-other-wordpress containers launched on the second node in the cluster. At the moment, each Compose environment will launch on a single node. As we launch more, we will start to have to change port assignments as they will start to clash on the hosts (that is, you can't have two port 80 assigned to a single host).