This chapter will implement the business objects designed in Chapter 3 by following the business object coding structures from Chapters 4 and 5. This chapter will illustrate how to write code to create business objects that enjoy all the features and capabilities built into the CSLA .NET framework. The great thing is that almost all the code in the business objects will be focused on business. Each business class will largely consist of four areas:
Class declaration
Property declarations
Business and validation rules
Per-type and per-property authorization rules
I'll discuss object persistence and data access in Chapter 18. The focus in this chapter is on how business objects support the UI and other business consumers by providing a rich set of properties that automatically leverage business, validation, and authorization rules.
The example object model created in Chapter 3 includes editable objects and collections, parent-child collection relationships, read-only lists, a name/value list, and command objects. It also makes use of custom authentication, requiring the creation of custom principal and identity objects. The custom identity object will be a read-only object. In the end, the sample application makes use of every CSLA .NET base class available.
In this chapter, I won't walk through all the code in the ProjectTracker business object library. Instead, I'll focus on providing examples of how to implement common types of business objects and how to establish various object relationships. For the complete code, please refer to the code download for CSLA .NET 3.6, available at www.lhotka.net/cslanet/download.aspx.
Chapter 3 covered the creation of an object model for the sample project-tracking application. This object model, shown in Figure 17-1, includes some editable root business objects (Project and Resource), some editable child objects (ProjectResource and ResourceAssignment), some collections of child objects (ProjectResources and ResourceAssignments), and a name/value list (RoleList). It also includes two read-only collections (ProjectList and ResourceList) and an editable root collection (Roles).
The solid arrows indicate using relationships, where one object uses another for some purpose—either as a parent-child relationship or for collaboration. The dashed lines indicate navigation, where a method exists so the UI developer can easily get a reference to the target object. Of course, Chapter 3 has complete details on the object model.
By implementing these objects, you should get a good feel for the practical process of taking the class templates from Chapters 4 and 5 and applying them to the creation of real business classes.

Technically, business classes can be placed in a Class Library, Windows Application, or website-type project in Visual Studio. But to get the full advantages of mobile objects and the CSLA .NET framework, they really must be placed in a Class Library project.
By putting the business classes in a DLL, it becomes possible for the business objects to be used by different front ends. This is important, because Chapters 19 through 21 will use the exact same business DLL to create WPF, Web Forms, and WCF service interfaces. It's equally important in real-world applications, since they too often have multiple interfaces. Even if an application starts with a single interface, the odds are good that at some time in the future, it will need a new one.
I prefer to collect all my projects under a single Visual Studio solution, including the business library, the WPF and web UI projects, and the WCF service project. To this end, you'll find all the code in a ProjectTrackercs solution in the code download, with each project and website contained inside.
The ProjectTracker.Library Class Library project is a library of business classes based on the design from Chapter 3. This library contains all the business logic for the Project Tracker application.
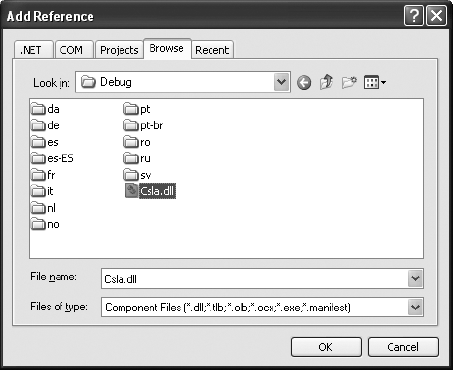
The code in ProjectTracker.Library uses the CSLA .NET framework, so the project references Csla.dll. This is a file reference that is set up through the Add Reference dialog box, as shown in Figure 17-2. This makes the CSLA .NET framework available for use within the project, and is typically all that is required.
However, remember that Csla.dll includes code that might run in Enterprise Services (COM+). In particular, this includes both the ServicedDataPortal and EnterpriseServicesPortal components of the data portal, as discussed in Chapter 15. If you choose to use the Enterprise Services features, then you might need to reference System.EnterpriseServices.dll as well.
The specific case in which this is required is if you configure the data portal to run locally in the client process and you mark your DataPortal_XYZ methods with [Transactional(TransactionTypes.EnterpriseServices)]. This combination causes the direct use of a ServicedComponent within the client process, so it requires a reference to System.EnterpriseServices.dll. It also has the side effect of requiring that Csla.dll be registered with COM+, which is handled automatically if the user is an administrator on the client workstation, but otherwise must be done manually by an administrator using the regsvcs.exe command line utility (or as part of a standard msi setup process).
Warning
By default, COM+ is not enabled on Windows XP SP2 or later, or Windows Vista. If you attempt to run your data access code on the client, and you use Enterprise Services, then you will need to enable COM+ on the client workstations where the application is deployed. This configuration typically has poor performance characteristics and is not recommended.
If you don't use the [Transactional(TransactionTypes.EnterpriseServices)] attribute on your DataPortal_XYZ methods, no code will use Enterprise Services in the client process, so you won't have to worry about these details.
The business classes implemented here follow the object-oriented design created in Chapter 3. That chapter identified not only the classes to be created, but also which CSLA .NET base classes each one will subclass.
I'll walk through the first few classes in detail. The other classes will be very similar, so for those I'll discuss only the key features. Of course, the complete code for all classes is available in the code download for the book.
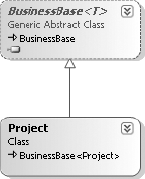
The Project class is an editable root class that represents a single project in the application. It will follow the EditableRoot template, as discussed in Chapter 5. This means that it inherits from BusinessBase, as shown in Figure 17-3.
Since this is the first business class to be created, I'll walk through the code in detail. You can assume that subsequent classes follow a similar structure overall.
The Project class uses a number of CSLA .NET features. To make this easier, it imports a couple of CSLA .NET namespaces in addition to the standard items in the C# class template.
using System; using System.Linq;using Csla;using Csla.Data;using Csla.Security;
The class itself is contained within the ProjectTracker.Library namespace and is declared as follows:
namespace ProjectTracker.Library{[Serializable]public class Project : BusinessBase<Project>
The BusinessBase class requires one generic type parameter. This is the type of the business object itself, and is used to provide strongly typed Save() and Clone() methods for the object as discussed in Chapter 6.
The class will contain the standard code regions discussed in Chapter 4:
Business Methods
Business and Validation Rules
Authorization Rules
Factory Methods
Data Access
In this chapter, I'll discuss the first three regions, leaving the last two for Chapter 18.
The class also has a region named Exists. This region implements an Exists() method that can be used to determine if a specific project's data exists in the database. I'll discuss the code in the Exists region in Chapter 18, because it deals mostly with database interaction.
Let's walk through each region in turn.
Business Methods
The Business Methods region includes the declaration of all instance fields, along with the properties and methods that implement business logic around those fields. Since Project is a parent class, it also includes some special code designed to work well with its child objects.
In this class, I am using managed backing fields, as discussed in Chapter 7. If you would like to look at an example of private backing fields, look at the Resource class. That class is very similar to the Project class; the only real difference is that it uses private backing fields instead of managed backing fields as shown momentarily.
Note
The ProjectTracker application intentionally uses different coding models in different classes. The purpose of this inconsistent coding is to illustrate various concepts within this one application, to meet the needs of this book. A real-world application should choose one model and use it consistently.
Read-Only Properties
The bulk of the code in the Business Methods region for most objects will be the properties. Some objects may include complex methods implementing business logic, but virtually all objects include properties to allow the UI to view or update the object's values.
The Id property of the Project is read-only. It also represents the object's unique primary key value in the database.
private static PropertyInfo<Guid> IdProperty =RegisterProperty(new PropertyInfo<Guid>("Id"));[System.ComponentModel.DataObjectField(true, true)]public Guid Id{get { return GetProperty(IdProperty); }}
Since this is the primary key for the data in the database, the value can also be considered to be a unique identifier for the object itself. The DataObjectField attribute is used to specify that the property is both a primary key and identity value. This attribute is used by data binding, and in particular by the CslaDataSource ASP.NET control discussed in Chapter 10. The attribute is optional, but is useful for helping to identify the nature of primary key properties.
Notice the use of the GetProperty() method in the get block. This helper method was discussed in Chapter 7, and it automatically checks the authorization rules before returning the value. If the user is not authorized to read the property, a default value is returned.
The Id property illustrates several things: a read-only property, a primary identity key value, and the use of the GetProperty() helper method.
Read-Write Properties
Now let's try something a bit more interesting by creating a read-write property: Name.
private static PropertyInfo<string> NameProperty =RegisterProperty(new PropertyInfo<string>("Name", "Project name"));public string Name{get { return GetProperty(NameProperty); }set { SetProperty(NameProperty, value); }}
Since this is neither a primary key nor an identity value, there's no immediate need to use the DataObjectField attribute. You may still opt to use this attribute on your properties to provide this extra information for other purposes such as automated unit testing.
Notice that the PropertyInfo() object is passed the property name, along with a human-readable friendly name for the property. That friendly name is provided to all business and validation rule methods, and is automatically used by the rules in Csla.Validation.CommonRules when generating broken rule descriptions.
The get block is virtually identical to that in the Id property. In fact, the get block for properties will always be the same—the only difference is the name of the property.
The set block is similar in that it uses the SetProperty() helper method. As discussed in Chapter 7, this method does the following:
Ensures the user is authorized to set the property; if not, it throws an exception
Ensures the new value is different from the existing value; if not, it exits silently
Raises the
PropertyChangingeventReplaces the existing value with the new value
Marks the object as having been changed
Executes all business and validation rules
Raises the
PropertyChangedevent for data binding
Assuming the user is authorized to change the property value, the code checks to see if the provided value is actually new. If it's the same as the value already in the object, then there's no sense in any work being done.
Additionally, since this is a string value, it is possible to receive a null as the new value. The SetProperty() method ensures that any null values are converted to empty strings before further processing.
So, if the user is authorized to change the value, and the value is different from what is already in the object, then the new value is stored in the object. It is important to realize that this occurs before any validation code runs. This means that the object could end up storing invalid values. That's OK, though, because the object has an IsValid property that can be used to determine whether any validation rules are currently being violated by values in the object.
Prior to the property value being changed, a PropertyChanging event is raised. This event is only used by LINQ to SQL and isn't used by any other part of the .NET Framework. I have chosen to raise this event from CSLA .NET because it may be useful for business or UI code to be notified that the property is about to be changed.
The business and validation rules to be checked are associated with the property in the AddBusinessRules() method, which is implemented later in the chapter. Most rule methods assume that the value to be validated is already in the object's property, which is why it is important that the property be set to the new value before the validation rules are invoked.
The IsDirty property indicates whether the object's data has been changed. Since a new value has been put into the object, this property will now return true.
Finally, since the object's data has changed, any UI bound to the object through data binding must update its display. This is done by raising a PropertyChanged event, as discussed in Chapter 10.
Most read-write properties look just like the preceding Name property. For instance, here's the Description property:
private static PropertyInfo<string> DescriptionProperty =RegisterProperty(new PropertyInfo<string>("Description"));public string Description{
get{return GetProperty(DescriptionProperty);}set{SetProperty(DescriptionProperty, value);}}
Notice that other than having a different property name, it is identical to the Name property. The vast majority of property methods will look exactly like this. In fact, you can find a code snippet for both read-only and read-write properties in the Snippets subdirectory in the CSLA .NET code download.
Tip
You can manually install the snippet files for use in Visual Studio 2008. By default, you should copy them to the Visual C#/My Code Snippets directory under My Documents/Visual Studio 2008/Code Snippets. I typically put them in a Csla directory beneath My Code Snippets.
SmartDate Properties
So far, you've seen how to implement properties for type Guid and string. Most types follow this same approach, with obvious small variation for formatting of values and so forth. But dates are a tougher issue.
One way to deal with dates is to expose them as DateTime values directly. This works well for date values that are required, for which an empty date isn't an option. And of course, it only works well if you are binding the property to a date-aware control. Unfortunately, most of the date-aware controls don't allow the user to just type a free-form date value, so they aren't good for any sort of heads-down data entry scenarios.
The SmartDate class from Chapter 16 is intended to help solve this dilemma by making it easy for a business class to expose a date value as a string, yet also be able to treat it like a date. Additionally, SmartDate allows for empty date values—it gives you the option of treating an empty date as the smallest or largest possible date for the purposes of comparison.
The Started and Ended properties utilize the SmartDate data type. Here's the Started property:
private static PropertyInfo<SmartDate> StartedProperty =RegisterProperty(new PropertyInfo<SmartDate>("Started"));public string Started{get{return GetPropertyConvert<SmartDate, string>(StartedProperty);}set{SetPropertyConvert<SmartDate, string>(StartedProperty, value);}}
Notice that this is a string property, so it can be data bound to any text input control. This means the user can enter the date value in any format that can be parsed, including the shortcuts added to SmartDate in Chapter 16 (like + for tomorrow).
The get block uses the GetPropertyConvert() helper method to return the SmartDate value but convert it into a string value. The SmartDate type automatically converts its value to a string that is formatted based on the format string in the SmartDate instance (by default it is d, the short date format).
The set block uses the SetPropertyConvert() helper to set the SmartDate with the string value provided by the user. The type conversion code in SmartDate automatically uses the parsing algorithm built into SmartDate. That way, the value is stored as a date internal to SmartDate itself. This is important because it allows SmartDate values to be compared to each other, as well as to DateTime values. This comparison capability will be used later when the validation rules are implemented in Project.
The end result is that the UI sees a string property, but all the features and functionality of a date type are available inside the business class. The Ended property is declared the same way.
You should be aware that this technique can be used to create properties of one type where the value is stored as another type, as long as the two types can be converted into each other by the CoerceValue() method in Csla.Utilities. For example, you can create a string property where the value is stored in an enum, or any other type that can be converted into and out of a string value.
Child Collection Properties
The final business property in this region provides client code with access to the collection of child objects.
private static PropertyInfo<ProjectResources> ResourcesProperty =RegisterProperty(new PropertyInfo<ProjectResources>("Resources"));public ProjectResources Resources{get{if (!(FieldManager.FieldExists(ResourcesProperty)))LoadProperty(ResourcesProperty,ProjectResources.NewProjectResources());return GetProperty(ResourcesProperty);}}
The collection itself is exposed as a read-only property, but since it is an editable collection derived from BusinessListBase, the UI code will be able to add and remove child items as needed.
This property is declared using a lazy creation scheme, so the child collection is only created when it is used. In Chapter 18, you'll see how it is created when the object is being loaded from a database, but for a new Project object, the child collection is created on demand the first time this property is invoked. I discussed lazy creation and lazy loading in Chapter 7.
Because CSLA .NET does a lot of work to simplify the use of child objects, I recommend always using managed backing fields for child object references, even if you use private backing fields for your other property values.
Overriding GetIdValue
The BusinessBase class defines a GetIdValue() method. This method was marked as abstract in earlier versions of CSLA .NET, but is no longer required or recommended. It exists now for backward compatibility only.
The purpose behind the GetIdValue() method was to allow BusinessBase to automatically implement the standard System.Object overrides: Equals(), GetHashCode(), and ToString(). It is still used to provide an override of ToString(), but not Equals() or GetHashCode(). I find it easier to simply override ToString() than to override GetIdValue(), and that is what I recommend.
public override string ToString(){return Id.ToString();}
The reason for essentially removing GetIdValue() and the Equals() implementation is that WPF has a strict interpretation of how Equals() should work, and that implementation does not include the concept of logical equality.
Logical equality is the idea that one object is equal to another based on some logical comparison that has meaning for your business logic. For example, you might decide two objects with the same Id property value are equal, even if other property values are different.
WPF, however, only works properly if Equals() uses one of the following models:
Two objects are the same if they are the exact same instance;
Equals()is effectively the same asReferenceEquals().Two objects are the same if they have the exact same property values for all properties.
Neither of these definitions is compatible with the idea of logical equality, so CSLA .NET no longer supports that concept either. If your application requires logical equality, you'll have to implement your own Equals() overload in your code, and you won't be able to data bind your objects to a WPF interface.
Business and Validation Rules
The Business and Validation Rules region implements the AddBusinessRules() method to associate validation rules to properties of the business object. As discussed in Chapter 11, validation rules are implemented as rule methods that conform to the Csla.Validation.RuleHandler delegate.
This region also implements any custom rule methods for the object. The rule methods provided in Csla.Validation.CommonRules are designed to handle most common validation requirements, but some objects have rules that aren't implemented in the CommonRules class.
AddBusinessRules
Let's look first at the AddBusinessRules() implementation.
protected override void AddBusinessRules(){ValidationRules.AddRule(Csla.Validation.CommonRules.StringRequired,new Csla.Validation.RuleArgs(NameProperty));ValidationRules.AddRule(Csla.Validation.CommonRules.StringMaxLength,new Csla.Validation.CommonRules.MaxLengthRuleArgs(NameProperty, 50));ValidationRules.AddRule<Project>(StartDateGTEndDate<Project>,StartedProperty);ValidationRules.AddRule<Project>(StartDateGTEndDate<Project>,EndedProperty);ValidationRules.AddDependentProperty(StartedProperty, EndedProperty, true);}
This method is automatically invoked by the CSLA .NET framework any time validation rules need to be associated with the object's properties. It is invoked just once for the lifetime of the application's AppDomain. For a smart client, this occurs once each time the application is run. On a server, it occurs once each time the server's AppDomain is created, often only when the server is rebooted.
The method should contain a series of ValidationRules.AddRule() method calls as shown here. Each call to AddRule() associates a validation rule with a property. In the simplest case, this means associating a rule method like StringRequired to a property like Name.
ValidationRules.AddRule(
        Csla.Validation.CommonRules.StringRequired, NameProperty);
With this done, any time the Name property is changed, the rule will be run by executing the StringRequired method. The implementation for this method was covered in Chapter 11.
Note
The rule will also be applied if ValidationRules.CheckRules() is called with no parameters, as that causes the validation rules for all properties to be checked. Or you can force the rules for a specific property to be run with a call such as ValidationRules.CheckRules(NameProperty).
Other rules are a bit more complex, requiring extra parameter values to operate. This is the case with the StringMaxLength rule, for instance.
ValidationRules.AddRule(
        Csla.Validation.CommonRules.StringMaxLength,
        new Csla.Validation.CommonRules.MaxLengthRuleArgs(
          NameProperty, 50));
Notice that in this case, a MaxLengthRuleArgs object is created, supplying both the PropertyInfo<T> representing the property against which the rule is to be run and the maximum length for a valid string.
Because MaxLengthArgs is a subclass of DecoratedRuleArgs, you could also accomplish the same thing with code like this:
var args = new Csla.Validation.DecoratedRuleArgs(NameProperty);
      args["MaxLength"] = 50;
      ValidationRules.AddRule(
        Csla.Validation.CommonRules.StringMaxLength,
        args);
This second approach requires more code, but is friendlier to code generation. I recommend writing all rule methods to accept their parameter as a DecoratedRuleArgs, because it simplifies the creation of code generation templates that create this code.
Both of the rules so far have been in the CommonRules class. But Project has a custom rule method as well: StartDateGTEndDate. This rule is associated with both the Started and Ended properties.
ValidationRules.AddRule(
        StartDateGTEndDate, StartedProperty);
      ValidationRules.AddRule(
        StartDateGTEndDate, EndedProperty);
As you'll see, this custom rule compares the two date values to ensure that the project doesn't end before it begins.
Interdependent Properties
Sometimes an object will have properties that are interdependent or at least have interdependent validation logic. The Started and Ended properties are good examples of this case. Later on, you'll see how to implement a business validation rule saying that the value of Ended must not be earlier than the value of Started—a project can't end before it begins.
This complicates matters slightly, because a change to either property can affect the validity of the other value. Suppose that Started and Ended begin with valid dates, but then Ended is changed to a date earlier than Started. At that point, the Ended property is invalid, but so is the Started property. Because the properties are interdependent, both should become invalid when the interdependent rule is violated. Similarly, if the interdependent rule later becomes unbroken, both properties should become valid.
This is the purpose behind the AddDependentProperty() method used in AddBusinessRules().
ValidationRules.AddDependentProperty(StartedProperty, EndedProperty, true);
This call to the AddDependentProperty() method tells the business rules subsystem in CSLA .NET that any time the rules for the Started property are checked, the rules for Ended should be checked too, because the last parameter is true.
The result is that any interdependent business rules are run on both properties, so both properties will become invalid or valid as appropriate.
Custom Rule Methods
Chapter 11 discussed the CommonRules class and the rule methods it contains. The basic concepts behind implementing a rule method were discussed at that time. The core requirement for all rule methods is that they conform to the Csla.Validation.RuleHandler delegate signature. They also must return true if the rule is unbroken and false if it is broken. Additionally, if the rule is broken, e.Description should be set to provide a human-readable description of the problem.
None of the rules in CommonRules are designed to ensure that one SmartDate value is greater than another, so Project implements this as a custom rule.
private static bool StartDateGTEndDate<T>(T target, Csla.Validation.RuleArgs e) where T : Project{if (target.ReadProperty(StartedProperty) >target.ReadProperty(EndedProperty)){e.Description = "Start date can't be after end date";return false;}else{return true;}}
This rule method is comparable to those in the CommonRules class, but it doesn't use reflection to do its work. It doesn't need to because it is inside the Project class and thus has direct access to all the private and protected members of the object.
Also notice that this is a generic method, and the target parameter is of type T. More importantly, T is constrained to be of type Project. This means the method can use the target parameter in a strongly typed manner to access the private or protected members of the object. It is the combination of being implemented in the business class and of using a constrained generic type for the target parameter that allows the rule method to be strongly typed like this.
The code accesses the ReadProperty() helper method directly to get the values of each property. It then uses those values to do the comparison. If the project start date is greater than the project end date, then the rule is broken and the method returns false; otherwise, it returns true.
This method is invoked any time either the Started or Ended properties are changed, or by an explicit call to ValidationRules.CheckRules() in the code.
Authorization Rules
The Authorization Rules region implements the AddAuthorizationRules() method to define per-property authorization rules. It also includes the AddObjectAuthorizationRules() to define per-type authorization rules.
AddAuthorizationRules
Like AddBusinessRules(), the AddAuthorizationRules() method is called automatically by the CSLA .NET framework any time the authorization rules for the object need to be configured. This method contains only a series of calls to AuthorizationRules, specifying which security roles are allowed or denied read and write access to each property.
protected override void AddAuthorizationRules(){AuthorizationRules.AllowWrite(NameProperty, "ProjectManager");AuthorizationRules.AllowWrite(StartedProperty, "ProjectManager");AuthorizationRules.AllowWrite(EndedProperty, "ProjectManager");AuthorizationRules.AllowWrite(DescriptionProperty, "ProjectManager");}
In this example, there are no restrictions on who can read properties, so there are no calls to AllowRead() or DenyRead(). Recall from Chapter 12 that if no roles are specified for allow or deny, then all users are allowed access.
Similarly, there are no restrictions on methods, so AllowExecute() and DenyExecute() are not used here.
Tip
If the default implementation for authorization as implemented in Chapter 12 doesn't meet your needs, the business object can override the CanReadProperty() and CanWriteProperty() methods from BusinessBase and you can implement your own algorithm.
However, there are restrictions on who can change property values. In particular, only users in the ProjectManager role are allowed to change any properties on the object, so each property is associated with this role—for instance:
AuthorizationRules.AllowWrite(NameProperty, "ProjectManager");
Remember, the ProjectManager role is a security role, so it is either a Windows domain or Active Directory group, or a custom security role loaded when the user is authenticated. This sample application uses custom authentication, so the user's roles come from a SQL Server database.
The AllowWrite() method, like all the methods on AuthorizationRules, accepts the property's PropertyInfo<T> identifier, followed by a comma-separated list of the roles allowed to alter this property. The list of roles is a params parameter, making it easy to specify several roles on one line.
AddObjectAuthorizationRules
The business developer can also specify the roles that are allowed to create, retrieve, edit, and delete Project objects. The data portal uses this information to automatically ensure only authorized users perform each action. This information is available to the UI developer so he can enable, disable, or hide UI elements based on the user's permissions.
The roles are defined by implementing the AddObjectAuthorizationRules() method in the business object.
protected static void AddObjectAuthorizationRules(){AuthorizationRules.AllowCreate(typeof(Project), "ProjectManager");AuthorizationRules.AllowEdit(typeof(Project), "ProjectManager");AuthorizationRules.AllowDelete(typeof(Project), "ProjectManager");AuthorizationRules.AllowDelete(typeof(Project), "Administrator");}
The AllowCreate(), AllowGet(), AllowEdit(), and AllowDelete() methods are used to specify the roles that are allowed to perform each action. If no roles are specified (for example, there's no call to AllowGet() here), then all users are allowed to perform that action.
The AddObjectAuthorizationRules() method is a static method. CSLA .NET invokes it automatically the first time any code attempts to call one of the methods that checks authorization. Table 17-1 lists the static methods of interest to a UI developer implemented by Csla.AuthorizationRules.
Table 17.1. Methods to Check Per-Type Authorization
Method | Description |
|---|---|
| Returns |
| Returns |
| Returns |
| Returns |
To use this functionality, each business object can implement AddObjectAuthorizationRules() to specify the roles allowed to perform each operation.
At this point, you should understand how to define read-only and read-write properties that utilize the authorization and business rules defined for each property. The Project class also includes Factory Methods and Data Access regions, which I'll discuss in Chapter 18. For now, I'll consider our discussion of the Project class complete.
A Project object contains a collection of child objects, each one representing a resource assigned to the project. The collection is maintained by a ProjectResources collection object, which is created by inheriting from Csla.BusinessListBase. The ProjectResources class has three regions:
Business Methods
Factory Methods
Data Access
The Business Methods region contains the Assign() method, which assigns a resource to the project. It also contains some helpful overloads of common methods, such as a Contains() method that accepts the Id value of a Resource. This is useful because the Contains() method provided by BusinessListBase() only accepts a ProjectResource object; however, as you'll see in Chapters 19 and 20, the UI code needs to see if the collection contains a ProjectResource object based on its Id value.
The Factory Methods region contains a set of internal-scoped factory methods for use by the Project object in creating and loading the collection with data. Finally, the Data Access region implements code to load the collection with data and to save the child objects in the collection into the database.
Before getting into the Business Methods region, let's take a look at the class declaration.
[Serializable]public class ProjectResources :BusinessListBase<ProjectResources, ProjectResource>
Like all business classes, this one is Serializable. It also inherits from a CSLA .NET base class—in this case, BusinessListBase. The BusinessListBase class requires two generic type parameters.
The first one is the type of the collection itself. That value is used to provide strongly typed methods such as Clone() and Save().
The second one is the type of the child objects contained within the collection. That value is used to make the collection itself strongly typed and affects many methods on the collection, including the indexer, Remove(), Contains(), and others.
Business Methods
The Business Methods region contains a set of methods that provide business functionality for use by UI code. In many cases, these methods are overloads of methods common to all collections, but they accept parameters that provide much simpler use for the UI developer. The methods are listed in Table 17-2.
Table 17.2. Business Methods in ProjectResources
Method | Description |
|---|---|
| Assigns a resource to the project |
| Returns a child object based on a resource |
| Removes a child object based on a resource |
| Searches for a child object based on a resource |
| Searches for a deleted child object based on a resource |
Of all these methods, only Assign() is truly required. All the other methods merely provide simpler access to the collection's functionality. Still, that simpler access translates into much less code in the UI, so it is well worth implementing in the object.
Assign
The Assign() method assigns a resource to the project. It accepts a resource Id value as a parameter, and adds a new ProjectResource object to the collection representing the assignment of the resource.
public void Assign(int resourceId){if (!Contains(resourceId)){ProjectResource resource =ProjectResource.NewProjectResource(resourceId);this.Add(resource);}elsethrow new InvalidOperationException("Resource already assigned to project");}
A resource can only be assigned to a project one time, so the collection is first checked to see if it contains an entry with that same resource Id value. Notice that the simpler Contains() overload is useful already—I'll get to its implementation shortly.
Assuming the resource isn't already assigned, a new ProjectResource child object is created and initialized by calling the NewProjectResource() factory method. Notice that the resource Id value is passed to the new child object, establishing the proper connection between the project and resource. The child object is then added to the collection, completing the process.
This means the UI code to add a resource to a project looks like this:
project.Resources.Assign(resourceId);
where resourceId is the primary key of the resource to be assigned.
GetItem
Collections have an indexer that provides access to individual items in the collection based on a numeric index value. It is also useful to be able to get a specific child object based on other data in the child objects themselves. In this case, it will be necessary to retrieve a child item based on the Id property of the resource that was assigned to the project, and this requires a method that accepts the Id property and returns the corresponding child object.
public ProjectResource GetItem(int resourceId){return this.SingleOrDefault((r) =>r.ResourceId == resourceId);}
In principle, this method operates much like an indexer—but the default indexer's parameter is a positional index, while the GetItem() method's parameter indicates the Id value of the resource. Simply overloading the indexer would be a cleaner solution, but this isn't possible because the default indexer accepts an int, and so does this new "overload." The result would be a duplicate method signature, so this must be a method rather than an overload of the indexer.
Remove, Contains, and ContainsDeleted
Collections that inherit from BusinessListBase automatically have Remove(), Contains(), and ContainsDeleted() methods. Each of these accepts a reference to a child object as a parameter, and often that is sufficient.
For this collection, however, it turns out that the UI code in Chapters 19 and 20 is much simpler if it is possible to remove or check for a child object based on a resource Id property value rather than a child object reference. To provide this capability, each of these three methods is overloaded with a different implementation. For instance, here's the Remove() method:
public void Remove(int resourceId){foreach (ProjectResource res in this){if (res.ResourceId == resourceId){Remove(res);break;}}}
This method accepts the resourceId value as a parameter, and that value is used to locate the child object (if any) in the collection. The Contains() and ContainsDeleted() overloads follow the same basic approach.
Not all collections will need overloads of this type, but such overloads are often useful to simplify the use of the collection and reduce code in the UI.
This completes the ProjectResources collection code, though I'll revisit this class in Chapter 18 to discuss the Factory Methods and Data Access regions.
A Project contains a child collection: ProjectResources. The ProjectResources collection contains ProjectResource objects. As designed in Chapter 3, each ProjectResource object represents a resource that has been assigned to the project.
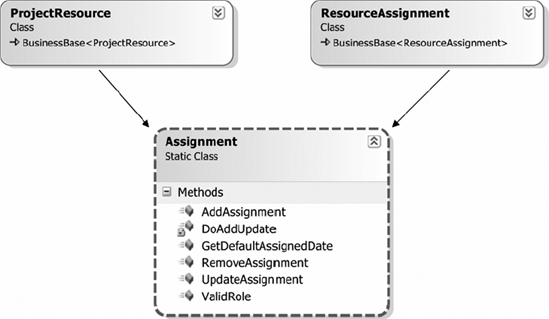
Also remember from Chapter 3 that ProjectResource shares some behaviors with ResourceAssignment, and those common behaviors were factored out into an Assignment object. As you look through the code in ProjectResource, you'll see calls to the behaviors in Assignment, as ProjectResource collaborates with that other object to implement its own behaviors. I'll discuss the Assignment class after ProjectResource.
ProjectResource is an editable child object, so that is the template (from Chapter 5) that I'll follow here. Editable child objects have the following code regions:
Business Methods
Business and Validation Rules
Authorization Rules
Factory Methods
Data Access
The class is declared as follows:
[Serializable]public class ProjectResource :BusinessBase<ProjectResource>, IHoldRoles
As with Project, the class inherits from BusinessBase, providing the type of the business object itself as the type parameter.
The class also implements an interface: IHoldRoles. This interface will be defined in the Assignments class later in the chapter, and it defines a Role property. This interface will be used by code that validates the Role property value.
I'll cover the Factory Methods and Data Access regions in Chapter 18, and I'll cover the Business Methods, Business and Validation Rules, and Authorization Rules regions now.
Business Methods
The Business Methods region is constructed in the same manner as Project. It contains read-only and read-write property declarations that are implemented using managed backing fields. If you want to see an example of an editable child using private backing fields, you can look at the ResourceAssignment class.
Because the property declarations are so consistent, I won't include any code here. As discussed in Chapter 7, one goal of CSLA .NET is to make property declarations standardized, which means they all look the same.
The ProjectResource class does include a GetResource() method.
public Resource GetResource(){CanExecuteMethod("GetResource", true);return Resource.GetResource(GetProperty(ResourceIdProperty));}
At first glance, through the use cases in Chapter 3, someone might think that a Project contains a list of Resource objects that are assigned to the project. That's a common mistake when doing object design, because both Project and Resource are clearly root objects. In reality, a Project contains a list of assigned resources, which are represented by the ProjectResource class.
But a ProjectResource does have a logical relationship with Resource. This is a sort of navigable using relationship, where you can envision navigating from a ProjectResource child object to a Resource root object. This is the purpose behind the GetResource() method: to implement this navigation relationship explicitly. A UI developer might use this method to show a modal dialog, so the user can edit the Resource data associated with a resource assigned to a project.
Notice the use of CanExecuteMethod() at the top of the implementation. This method checks the current user's authorization to make sure she's allowed to execute this method. If the user is not authorized, CanExecuteMethod() will throw an exception.
Business and Validation Rules
The Business and Validation Rules region is much like that in Project, in that it implements the AddBusinessRules() method and could include custom rule methods. In this case, however, the one custom rule required by ProjectResource is also required by ResourceAssignment. Since the rule is a form of common behavior, its implementation is located in the Assignment class.
protected override void AddBusinessRules(){ValidationRules.AddRule<ProjectResource>(Assignment.ValidRole, RoleProperty);}
The ValidRole rule from the Assignment class is associated with the Role property. That rule is designed to ensure that the Role property is set to a value corresponding to a role in the RoleList collection (which I'll discuss later in the chapter). The IHoldRoles interface will be used to allow the ValidRule method to access the Role property.
Authorization Rules
The Authorization Rules region implements the AddAuthorizationRules() method, establishing the roles authorized to read and write each property. For this object, the only restrictions are that the Role property can only be changed by a ProjectManager, and the Guest role isn't allowed to invoke the GetResource() method.
protected override void AddAuthorizationRules(){AuthorizationRules.AllowWrite(RoleProperty, "ProjectManager");AuthorizationRules.DenyExecute("GetResource", "Guest");}
These roles are checked by each property and by the CanExecuteMethod() method.
This completes the ProjectResource class, and really the whole Project object family. Of course, you don't quite have the whole picture yet, because ProjectResource collaborates with both Assignment and RoleList to do its work. I'll discuss those classes next.
The Assignment class contains the behaviors common to both ProjectResource and ResourceAssignment as designed in Chapter 3. Figure 17-4 shows the collaboration relationship between these objects.
Since Assignment only implements behaviors and contains no data, it is declared as a static class.
internal static class Assignment
Notice that it doesn't inherit from any CSLA .NET base classes. It has no need, since it is merely a collection of common behaviors. Specifically, it contains a business method, a custom validation rule, and a set of data access methods.
Business Methods
When a resource is associated with a project, the date of that association is recorded. Though it may seem somewhat trivial, the code to determine that date value is a common behavior between ProjectResource and ResourceAssignment, so it is implemented in the Assignment class.
public static DateTime GetDefaultAssignedDate(){return DateTime.Today;}
This is an example of the concept of normalization of behavior I discussed in Chapter 3.
Business and Validation Rules
Similarly, both ProjectResource and ResourceAssignment have a Role property, allowing the role of the resource on the project to be changed. When that value is changed, it must be validated. Of course, this is handled by implementing a rule method conforming to the RuleHandler delegate defined by CSLA .NET. This is common behavior, so it is implemented in Assignment.
public static bool ValidRole<T>(T target, RuleArgs e)where T : IHoldRoles{int role = target.Role;if (RoleList.GetList().ContainsKey(role)){return true;}else{e.Description = "Role must be in RoleList";return false;}}
This method uses the IHoldRoles interface to retrieve the value of the Role property from the specified target object. This interface is defined like this:
internal interface IHoldRoles{int Role { get; set;}}
Notice that the interface is internal in scope. It is only used within this assembly by the ValidRole() method, so there's no need to expose it as a public interface. Since both ProjectResource and ResourceAssignment implement this interface, the ValidRole() method has strongly typed access to the Role property on both objects.
Using the retrieved role value, the RoleList collection is asked whether it contains an entry with that value as a key. If it does, then the role is valid; otherwise, it is not valid, so e.Description is set to indicate the nature of the problem and false is returned as a result.
The RoleList object automatically caches the list of roles, so only the first call to GetList() by the application goes to the database, and subsequent calls are handled from the in-memory cache.
The Assignment class illustrates how to normalize behavior through collaboration, helping to ensure that a given behavior is only implemented once within the business layer.
The final object used by Project, ProjectResources, ProjectResource, and Assignment is the RoleList collection. This is a name/value list based on the Roles table from Chapter 3. The name (key) values are of type int, while the values are the string names of each role.
The CSLA .NET framework includes the NameValueListBase class to help simplify the creation of name/value list objects. Such objects are so common in business applications that it is worth having a base class to support this one specialized scenario.
Chapter 5 includes a template for name/value list classes, and RoleList will follow that template. It includes the Business Methods, Factory Methods, and Data Access regions. The class is declared like this:
[Serializable]public class RoleList : NameValueListBase<int, string>
Notice the generic type parameters. The first specifies the data type of the name or key, while the second specifies the data type of the value. These data types are used to define the name and value types of the NameValuePair child objects contained in the collection.
Business Methods
The only business method in this class is DefaultRole(), which returns the default role for a resource newly assigned to a project. Not all name/value collections will provide a method to specify the default role, but it is often helpful. Recall that this method is used by ProjectResource as a new ProjectResource object is created. Here's the method:
public static int DefaultRole(){RoleList list = GetList();if (list.Count > 0)return list.Items[0].Key;elsethrow new NullReferenceException("No roles available; default role can not be returned");}
The implementation in this application is very simplistic, as it just returns the first item in the collection. In a more complex application, the default value might be specified in the database.
The rest of the code in this class deals with loading the list from the database, and will be discussed in Chapter 18.
This completes the Project object family, including all collaboration objects. Next, I'll walk briefly through the Resource object family.
The other primary root object in the object model is Resource. Like Project, a Resource object can be directly created, retrieved, or updated. It also contains a list of child objects.
Since I've already walked through the creation of an editable root business object in detail, there's no need to do the same for the Resource class. However, the Resource and ResourceAssignment classes use private backing fields for their properties, rather than the managed backing fields I've shown thus far.
For example, here's the Id property from the Resource class:
private static PropertyInfo<int> IdProperty =RegisterProperty(new PropertyInfo<int>("Id"));private int _id = IdProperty.DefaultValue;[System.ComponentModel.DataObjectField(true, true)]public int Id{get { return GetProperty(IdProperty, _id); }}
In this case, a private field is declared to store the property value:
private int _id = IdProperty.DefaultValue;
The value is initialized to a default value from the ResourceInfo<T> object. This is absolutely required for string values, and is optional for other types. This is important for a string value, because the default for a string is null, but if your property provides a null value to data binding, an exception may result, as not all UI technologies support null values.
Also notice how the field is passed to the GetProperty() method.
get { return GetProperty(IdProperty, _id); }In this case, GetProperty() checks the user's authorization and returns either a default value (if the user isn't authorized) or the value of _id.
The FirstName property is an example of a read-write property.
private static PropertyInfo<string> FirstNameProperty =RegisterProperty(new PropertyInfo<string>("FirstName", "First name"));private string _firstName = FirstNameProperty.DefaultValue;public string FirstName{get{return GetProperty(FirstNameProperty, _firstName);}set{SetProperty(FirstNameProperty, ref _firstName, value);}}
Again, the field is declared and initialized.
private string _firstName = FirstNameProperty.DefaultValue;
The field is provided to GetProperty() just like in the previous example. However, notice how it is passed to SetProperty().
set { SetProperty(FirstNameProperty, ref _firstName, value); }The field is passed by reference, using the ref keyword. This means the SetProperty() method has a reference to the actual field, so it can set the field with the new value. This overload of SetProperty() follows the exact same steps I discussed earlier in the chapter for the Name property in the Project class, but this overload sets the private field value.
The Resource, ResourceAssignments, and ResourceAssignment objects are otherwise totally comparable to Project, ProjectResources, and ProjectResource, so I won't cover their code in detail here. You can look at the code for these classes by downloading the code for the book.
The ProjectList and ResourceList classes are both read-only collections of read-only data. They exist to provide the UI with an efficient way to get a list of projects and resources for display to the user.
On the surface, it might seem that you could simply retrieve a collection of Project or Resource objects and display their data. But that would mean retrieving a lot of data that the user may never use. Instead, it's more efficient to retrieve a small set of read-only objects for display purposes, and then retrieve an actual Project or Resource object once the user has chosen which one to use.
The CSLA .NET framework includes the ReadOnlyListBase class, which is designed specifically to support this type of read-only list. Such a collection typically contains objects that inherit from ReadOnlyBase.
Because these two read-only collections are so similar in implementation, I'm only going to walk through the ResourceList class in this chapter. You can look at the code for ProjectList in the code download.
The ResourceList class inherits from Csla.ReadOnlyListBase.
[Serializable]public class ResourceList :ReadOnlyListBase<ResourceList, ResourceInfo>
ReadOnlyListBase requires two generic type parameters. The first is the type of the collection object itself and is used to create the strongly typed Clone() method.
The only code in ResourceList deals with data access, and I'll discuss that in Chapter 18. There's no other code, because ReadOnlyListBase handles all the details required for a normal read-only list, which makes the business object developer's job easy.
The list contains read-only child objects of type ResourceInfo. This is a separate class that implements simple read-only properties to expose the resource data.
ResourceInfo
The ResourceList class is a collection of ResourceInfo objects. Each ResourceInfo object provides read-only access to a subset of data from the Resources table. The class is defined like this:
[Serializable]public class ResourceInfo :ReadOnlyBase<ResourceInfo>
It inherits from ReadOnlyBase, which requires one generic type parameter: the type of the business object. This type parameter is used to implement the strongly typed Clone() method.
Business Methods
The ResourceInfo object exposes two properties: Id and Name.
private int _id;public int Id{get { return _id; }}
private string _name;public string Name{get { return _name; }}public override string ToString(){return _name;}
I'm not using the field manager for this object, and I often don't use it for simple read-only objects. While ReadOnlyBase supports the field manager, if your read-only object has no authorization rules, then the field manager will provide no real value and you can write code similar to that shown here.
Note
If you intend to use CSLA .NET for Silverlight, then you should base all your objects off CSLA .NET base classes, and you should strongly consider using managed backing fields. While CSLA .NET for Silverlight is outside the scope of this book, it is designed to work best with objects that use the field manager and managed backing fields.
I've also chosen to override ToString() so it returns the _name field value. This is important, because when the collection is data bound to a list control like a ListBox, it is the ToString() value that will be displayed to the user.
As you can see, creating a read-only list is usually a very simple process.
The RoleList object provides a read-only, cached list of roles that a resource can hold when assigned to a project. But that list of roles needs to be maintained, and that is the purpose behind the Roles collection. This is an editable root collection that contains a list of editable child Role objects.
The Roles class illustrates how to create an editable root collection based on the template code from Chapter 5. The class inherits from BusinessListBase.
[Serializable]public class Roles :BusinessListBase<Roles, Role>
The first generic type parameter specifies the type of the collection itself, while the second provides the type of the child objects contained in the collection.
An editable root collection has Business Methods, Authorization Rules, Factory Methods, and Data Access regions. By this point, you've seen good examples of each region, so I'll just focus on the parts that are unique for a root collection. For instance, the Authorization Rules region includes only the static authorization rules discussed earlier in the chapter, so I'll bypass talking about that code here.
Business Methods
The Roles class implements an overloaded Remove() method that accepts a role's Id value rather than a Role object. This simplifies removal of child objects, especially in the Web Forms UI that will be created in Chapter 20.
public void Remove(int id){foreach (Role item in this){if (item.Id == id){Remove(item);break;}}}
It also implements a GetRoleById() method to retrieve a child Role object based on the role Id value.
public Role GetRoleById(int id){foreach (Role item in this){if (item.Id == id){return item;}}return null;}
Again, this exists to simplify the creation of the Web Forms UI.
Finally, and probably of most interest, is the AddNewCore() override.
protected override object AddNewCore(){Role item = Role.NewRole();Add(item);return item;}
When using WPF or Windows Forms data binding, it is possible to allow grid controls to automatically add new items to a collection when the user moves to the last row of the grid. The collection object itself controls whether this option is available, and the Roles collection supports the concept. Turning the option on is done in the collection's constructor.
private Roles()
      {
        this.Saved +=
          new EventHandler<Csla.Core.SavedEventArgs>(Roles_Saved);
      this.AllowNew = true;
      }
If AllowNew is set to true, then the object must override AddNewCore(), as shown here. I'll discuss the rest of the constructor code in Chapter 18 as part of the data access code.
Note
This option is not enabled for ProjectResources or ResourceAssignments because it isn't possible to add a new ProjectResource or ResourceAssignment child object to those collections without first gathering extra information from the user (specifically the resource or project to be assigned). You can only allow a grid control to add new child objects if you can implement AddNewCore() to create a new child object with no user interaction.
The AddNewCore() method is called by data binding when a new item needs to be added to the collection. The method is responsible for creating a new child object, adding it to the collection, and returning it as a result.
It is important to realize that this puts a serious constraint on the child objects, since it must be possible to create them without user input. In other words, it must be possible to create a child object based purely on default values provided by your code or from the database. If your child object has a parameterless factory method (like the NewRole() method in the preceding AddNewCore() method) for creating a new object, then you are ready to go.
The Roles object is an editable root collection that contains a list of editable child Role objects. Each Role object is an editable child, so it is similar in structure to ProjectResource and ResourceAssignment.
The design decision that makes this object unique and interesting is that its key value, Id, is a user-entered value. Unlike Project (in which the value is generated automatically by the object) or Resource (in which the value is generated by the database), this object's key value must be entered directly by the user.
From a data access perspective, this isn't overly complex. The Roles table views the Id column as a primary key, so it already ensures that duplicate values aren't allowed in the database. Of course, sending the object all the way to the database to find out about a validation rule being violated is wasteful. It is far better to detect the condition as soon as a duplicate key value is entered.
Additionally, the user shouldn't have to guess to find an appropriate value when adding a new role to the application. When a new Role object is created, it can set its Id property to an appropriate default value.
Setting a Default Value
The Id property contains code to find a default value if the Id property has never been set to a value:
private static PropertyInfo<int> IdProperty =RegisterProperty(new PropertyInfo<int>("Id"));private bool _idSet;public int Id{get{if (!_idSet){_idSet = true;SetProperty(IdProperty, GetMax() + 1);1);}return GetProperty(IdProperty);}set{_idSet = true;SetProperty(IdProperty, value);}}
If the Id property is read, and it hasn't been set prior to this point, the code calls a GetMax() method to determine the current maximum Id value in the list.
private int GetMax(){Roles parent = (Roles)this.Parent;return parent.Max(r => r.Id);}
This method loops through the objects in the parent Roles collection to find the maximum value for any existing Id property, and then it returns that value. Back in the Id property's get code, the property is set to that value plus one.
if (!_idSet)
          {
            _idSet = true;
            SetProperty(IdProperty, GetMax() + 1);
          }
Your first thought might be that this should be done in the object's constructor. The problem with that is that the Parent property in the base class isn't set to a valid value when the constructor runs.
Note
Both the data portal and .NET serialization create the object using constructors that can't provide parameters such as the parent object reference. To overcome this limitation, BusinessListBase includes code to call a SetParent() method on its child objects at key points in the object's life cycle.
Since the default value can't be set in the constructor, it is set in the Id property on the first request for the value—unless the value has been set previously, either through the property set block or when the data was loaded from the database.
Preventing Duplicate Values
The requirement to have no duplicate Id property values is simply a validation rule, so it is implemented as a rule method in the Role object's Business and Validation Rules region.
private static bool NoDuplicates<T>(T target, Csla.Validation.RuleArgs e) where T : Role{Roles parent = (Roles)target.Parent;if (parent != null){foreach (Role item in parent){if (item.Id == target.ReadProperty(IdProperty) &&!(ReferenceEquals(item, target))){e.Description = "Role Id must be unique";return false;}}}return true;}
When this rule is run, it loops through the list of Role objects in the parent Roles collection to see if any other child object has the same Id value. If there's a match, the method returns false; otherwise, it returns true.
The rule method is associated with the Id property in the AddBusinessRules() method.
protected override void AddBusinessRules()
      {
      ValidationRules.AddRule<Role>(NoDuplicates, IdProperty);
        ValidationRules.AddRule(
          Csla.Validation.CommonRules.StringRequired, NameProperty);
      }
This custom rule ensures that duplicate Id values are caught as they are entered, so that the data doesn't have to be sent to the database to find out about the problem. As you'll see in Chapter 19, this is particularly nice in a WPF (or Windows Forms) UI, since the user gets instant and automatic feedback about what is wrong.
The first object discussed in the chapter was Project, and I covered all the code in that class except for the Exists() command implementation. Many objects can benefit from the implementation of an Exists() command, as it allows the UI to quickly and easily determine if a given object's data is in the database without having to fully instantiate the object itself. Ideally, a UI developer could write conditional code like this:
if (Project.Exists(productId))
Implementing an Exists() command also provides an opportunity to make use of Csla.CommandBase to create a command object. This makes sense, since all an Exists() command needs to do is run a stored procedure in the database and report on the result. Because the Exists() command is so data-focused, I'll cover it in Chapter 18.
At this point, you should understand how the business objects in ProjectTracker.Library are implemented. The only classes yet to be discussed are the ones supporting custom authentication.
Applications may use either Windows integrated (AD) or custom authentication.
Using Windows integrated security requires no extra coding in the business layer, and the only code required in the UI is to tell .NET to use Windows authentication, by calling AppDomain.CurrentDomain.SetPrincipalPolicy() in WPF, Windows Forms, or in the web.config file for Web Forms or a WCF service.
Custom authentication requires some extra code in the business layer, however, because custom principal and identity classes must be created. The details of the design were discussed in Chapter 3, so I'll focus on the implementation here.
PTPrincipal is a custom principal object that can be assigned as the current principal on the Thread object and in the HttpContext. You set the current principal by setting the value of Csla.ApplicationContext.User, as I discussed in Chapter 12.
Within .NET, the principal object is the centerpiece for authorization. The object must implement System.Security.Principal.IPrincipal, which defines an Identity property and an IsInRole() method. CSLA .NET provides a helpful base class you can use when creating a custom principal, Csla.Security.BusinessPrincipalBase, so PTPrincipal inherits from that class.
[Serializable]public class PTPrincipal : Csla.Security.BusinessPrincipalBase
Principal objects typically have a constructor that accepts the identity object that represents the user's identity, and PTPrincipal is no exception.
private PTPrincipal(IIdentity identity): base(identity){ }
The BusinessPrincipalBase class also has a constructor that requires an identity object. This object is used to implement the Identity property in that base class, so it doesn't need to be implemented in PTPrincipal.
BusinessPrincipalBase also includes a default IsInRole() implementation that automatically delegates the IsInRole() request to its identity object, assuming the identity object implements the ICheckRoles interface defined in Csla.Security. The CslaIdentity class implements this interface, so it's an ideal base class to use when creating your own custom identity class.
The identity object actually represents the user's identity and profile, so it contains the list of roles for the user as well.
Login and Logout
The UI will need to collect the user's credentials and initiate any login or logout process. However, the actual login and logout process can be encapsulated within PTPrincipal to help simplify the code in the UI. To do this, static methods named Login() and Logout() are implemented in the class. This allows the UI to write code like this:
if (PTPrincipal.Login(username, password))
  {
  }
and this:
PTPrincipal.Logout();
As you'll see in Chapter 21, there are times when building XML services (and sometimes when building web applications) when you need to reload a principal object without authenticating the credentials. In some scenarios, you do the authentication on the initial call, but then just reload the principal and identity objects from the database on each subsequent call.
Using ASP.NET or WCF features, the application knows that the user was authenticated, but thanks to the stateless nature of some web architectures, the principal and identity objects must be re-created on each service or page request.
In this case, it is important to be able to reload the principal with code like this:
PTPrincipal.LoadPrincipal(username);
The LoadPrincipal() method works much like Login(), but it doesn't require the password because it doesn't authenticate the credentials.
Login and LoadPrincipal
The Login() and LoadPrincipal() methods call a SetPrincipal() helper method. This method creates an instance of PTIdentity and uses that identity object to create a new PTPrincipal object.
public static bool Login(string username, string password){return SetPrincipal(PTIdentity.GetIdentity(username, password));}public static void LoadPrincipal(string username){SetPrincipal(PTIdentity.GetIdentity(username));}private static bool SetPrincipal(PTIdentity identity){if (identity.IsAuthenticated){PTPrincipal principal = new PTPrincipal(identity);Csla.ApplicationContext.User = principal;}return identity.IsAuthenticated;}
Notice that PTIdentity has a GetIdentity() factory method with two overloads. The first accepts a username and password and performs authentication. The second accepts only a username and simply reloads the identity object with data.
With a PTIdentity object created, its IsAuthenticated property can be checked to see if the user's credentials were valid. If they were valid, the identity object is used to create a new PTPrincipal object, and that object is set to be the current principal by using the ApplicationContext object's User property, as discussed in Chapter 12.
PTPrincipal principal = new PTPrincipal(identity);
        Csla.ApplicationContext.User = principal;
If the credentials weren't valid, then the current principal value is left unchanged.
In any case, the IsAuthenticated value is returned as a result so the UI code can take appropriate steps based on whether the user was successfully logged in or not.
Logout
The Logout() method is much simpler. All it needs to do is ensure that the current principal value is set to an unauthenticated principal object—that means a principal object whose identity object has an IsAuthenticated property that returns false.
public static void Logout(){Csla.ApplicationContext.User = new UnauthenticatedPrincipal();}
To achieve this result, the User property is set to an instance of UnauthenticatedPrincipal() from the Csla.Security namespace. This class is designed to provide a simple unauthenticated principal and identity.
As you've seen, PTPrincipal isn't overly complex. It leaves most of the work to PTIdentity, including verification of the user's credentials and retrieval of the user's roles.
PTIdentity inherits from CslaIdentity from the Csla.Security namespace. CslaIdentity is designed to simplify the creation of a custom identity object.
[Serializable]public class PTIdentity : CslaIdentity
Because CslaIdentity handles most of the details, the only code in PTIdentity is the data access code required to authenticate the username and password against the database, and to load the list of roles for the user (assuming the credentials are valid). I'll discuss that code in Chapter 18.
This chapter implemented the property declarations, business and validation rules, and authorization rules for the business objects designed in Chapter 3, using the templates and concepts discussed in Chapters 4 and 5. The result is ProjectTracker.Library, the business layer for the sample ProjectTracker application, including the following:
ProjectProjectResourcesProjectResourceResourceResourceAssignmentsResourceAssignmentAssignmentRoleListRolesRole
The library also includes classes to support custom authentication:
PTPrincipalPTIdentity
This business library will be used to create WPF, Web Forms, and XML services interfaces in Chapters 19 through 21. First, though, in Chapter 18, I'll finish the implementation of these classes by walking through their factory methods and persistence code.