Chapter 19 covered the creation of a WPF UI based on the ProjectTracker business objects. Microsoft .NET also supports web development through the ASP.NET Web Forms technology. In this chapter, the same business objects are used to create a Web Forms interface with functionality comparable to the WPF interface.
While Web Forms can be used to create many different user interfaces, web development in ASP.NET is not the core of this chapter. Instead, I focus on how business objects are used within a web application, including state management and data binding.
Tip
ASP.NET is the .NET web server component that hosts web forms, web services, and other server-side handlers in IIS. ASP.NET is a very broad and flexible technology. Web forms are hosted within ASP.NET and provide one common approach to web development capabilities.
As in the WPF interface in Chapter 19, I won't cover the details of every web form in the application. Instead, I'll walk through a representative sample to illustrate key concepts.
In particular, I discuss the following:
Basic site design
The use of forms-based authentication
Adding and editing roles
Adding and editing project data
However, before getting into the design and development of the Web Forms UI itself, I need to discuss some of the basic concepts around the use of business objects in web development.
Historically, the world of web development has been strongly resistant to the use of "stateful" objects behind web pages and not without reason. In particular, using such objects without careful forethought can be very bad for website performance. Sometimes, however, it's suggested that instead of a stateful object, you should use a DataSet, which is itself a very large, stateful object. Most people don't think twice about using it for web development.
Clearly then, stateful objects aren't inherently bad—it's how they're designed and used that matters. Business objects can be very useful in web development, but it is necessary to look carefully at how such objects are conceived and employed.
Note
Objects can work very well in web development if they're designed and used properly.
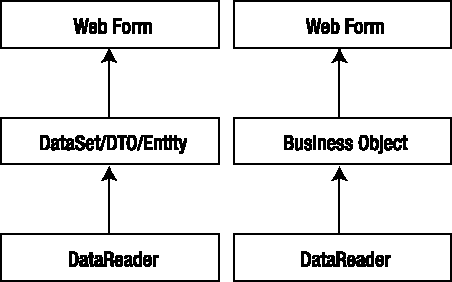
In general terms, web applications can choose from three basic data access models, as shown in Figure 20-1. Notice how all options get their data through an ADO.NET DataReader object. The DataReader is the lowest level data access object in .NET.

Using the DataReader directly can be very beneficial if the data set is relatively small and the page processing is fast because the data is taken directly from the database and put into the page. There's no need to copy the data into an in-memory container (such as a DataSet or object) before putting it into the page output. This is illustrated in Figure 20-2.

However, if the data set is large or the page processing is slow, using a DataReader becomes a less attractive option. Using one requires the database connection to remain open longer, causing an increase in the number of database connections required on the server overall and thereby decreasing scalability.
Direct use of a DataReader also typically leads to code that's harder to maintain. A DataReader doesn't offer the ease of use of the DataSet or an object. Nor does it provide any business logic or protection for the data, leaving it up to the UI code to provide all validation and other business processing.
Note
In most cases, use of the DataSet or an object offers better scalability when compared to direct use of a DataReader and will result in code that's easier to maintain.
Having discounted the use of a DataReader in all but a few situations, the question becomes whether to use the DataSet, DTO (data transfer object), entity object, or a business object as a stateful, in-memory data container. These options are similar in that the data is loaded from a DataReader into the stateful object and from there into the page, as illustrated in Figure 20-3.
This means that in general you can expect similar performance characteristics from a DataSet and objects. However, objects are often actually more lightweight than the ADO.NET DataSet object. This is because most objects are specific to the data they contain and don't need to retain all the metadata required by the DataSet object.
So the question becomes whether to use data container objects, such as a DTO or entity object, or a business object. Generally speaking, there is little or no performance difference between these options because the data is loaded into object fields from a DataReader in all cases. This means the decision should be based on the functionality provided by the objects.
Data container objects are simple containers for data. They don't provide any business behaviors, only shaped data. In this regard they are much like a DataSet. And if your application has little or no business or validation logic, these objects are a good choice. However, if your application does have business logic, these objects leave you with no clear location for that logic. Too often the business logic ends up in the UI, behind the web forms, which breaks the discipline of layering that I discuss in Chapter 1.
Business objects provide access not only to the application's data but also to its business logic. As discussed in Chapter 1, business objects can be thought of as smart data. They encapsulate the business logic and the data so that the UI doesn't need to deal with potential data misuse.
Overall, business objects provide the high-scalability characteristics of the DataSet or data container objects, though without the overhead of the DataSet. They offer a better use of database connections than the DataReader, though at the cost of some performance in certain situations. When compared to both DataSet and DataReader, business objects enable a much higher level of reuse and easier long-term maintenance, making them the best choice overall.
The Achilles' heel of web development is state management. The original design of web technology was merely for document viewing, not the myriad purposes for which it's used today. Because of this, the issue of state management was never thought through in a methodical way. Instead, state management techniques have evolved over time in a relatively ad hoc manner.
Through this haphazard process, some workable solutions have evolved, though each requires trade-offs in terms of performance, scalability, and fault tolerance. The primary options at your disposal are as follows:
State is maintained on the web server.
State is transferred from server to client to server on each page request.
State is stored in temporary files or database tables.
Whether you use a DataSet, a DataReader, or objects to retrieve and update data is immaterial here; ultimately, you're left to choose one of these three state management strategies. Table 20-1 summarizes the strengths and weaknesses of each.
Table 20.1. State Management Strategies
Approach | Strengths | Weaknesses |
|---|---|---|
State stored on web server | Easy to code and use; works well with business objects | Use of global fields/data is poor pro-gramming practice; scalability and fault tolerance via a web farm requires increased complexity of infrastructure |
State transferred to/from client | Scalability and fault tolerance easily achieved by implementing a web farm | Hard to code; requires a lot of manual coding to implement; performance a problem over slow network links |
State stored in file/database | Scalability and fault tolerance easily achieved by implementing a web farm; a lot of state data or very complex data easily stored | Increased load on database server since state is retrieved/stored on each page hit; requires manual coding to implement; data cleanup must be implemented to deal with abandoned state data |
As you can see, all of these solutions have more drawbacks than benefits. Unfortunately, in the many years that the Web has been a mainstream technology, no vendor or standards body has been able to provide a comprehensive solution to the issue of dealing with state data. All you can do is choose the solution that has the lowest negative impact on your particular application.
I will now go into some more detail on each of these techniques, in the context of using business objects behind web pages.
First, you can choose to keep state on the web server. This is easily accomplished through the use of the ASP.NET Session object, which is a name/value collection of arbitrary data or objects. ASP.NET manages the Session object, ensuring that each user has a unique Session and that the Session object is available to all Web Forms code on any page request.
This is by far the easiest way to program web applications. The Session object acts as a global repository for almost any data that you need to keep from page to page. By storing state data on the web server, you enable the type of host-based computing that has been done on mainframes and minicomputers for decades.
Note
The Csla.ApplicationContext object provides ClientContext and LocalContext objects. Neither of these are a replacement for Session. No data in Csla.ApplicationContext survives between page requests. If you want to keep values in memory between page requests, Session is the tool you must use.
As I've already expressed, there are drawbacks. Session is a global repository for each user, but as any experienced programmer knows, the use of global fields is very dangerous and can rapidly lead to code that's hard to maintain. If you choose to use Session to store state, you must be disciplined in its use to avoid these problems.
The use of Session also has scalability and fault tolerance ramifications. Achieving scalability and fault tolerance typically requires implementation of a web farm: two or more web servers that are running exactly the same application. It doesn't matter which server handles each user's page request because all the servers run the same code. This effectively spreads the processing load across multiple machines, thus increasing scalability. You also gain fault tolerance because if one machine goes down, the remaining server(s) will simply take over the handling of user requests.
What I just described is a fully load-balanced web farm. However, because state data is often maintained directly on each web server, the preceding scenario isn't possible. Instead, web farms are often configured using "sticky sessions." Once a user starts using a specific server, he remains on that server because that's where his data is located. This provides some scalability because the processing load is still spread across multiple servers but it provides very limited fault tolerance. If a server goes down, all the users attached to that server also go down.
To enable a fully load-balanced web farm, no state can be maintained on any web server. As soon as user state is stored on a web server, users become attached to that server to the extent that only that server can handle their web requests. By default, the ASP.NET Session object runs on the web server in the ASP.NET process. This provides optimal performance because the state data is stored in process with the application's code, but this approach doesn't allow implementation of a fully load-balanced web farm.
Warning
When the Session object runs inside the ASP.NET process, you can lose state without warning. ASP.NET may recycle the website AppDomain for many reasons, and when this happens the Session object is lost. Other Session configurations avoid this issue.
Instead, the Session object can be run in a separate process on the same web server. This can help improve fault tolerance because the ASP.NET process can restart and users won't lose their state data. However, this still doesn't result in a fully load-balanced web farm, so it doesn't help with scalability. Also, there's a performance cost because the state data must be serialized and transferred from the state management process to the ASP.NET process (and back again) on every page request.
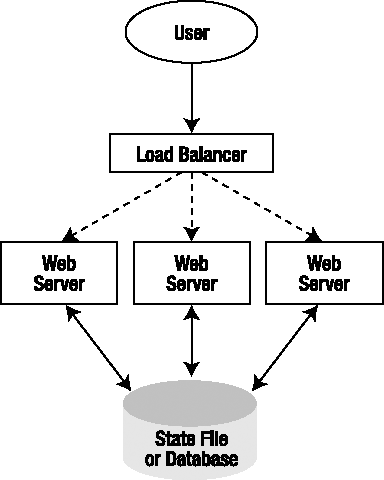
As a third option, ASP.NET allows the Session object to be maintained on a dedicated, separate server rather than on any specific web server. This state server can maintain the state data for all users, making it equally accessible to all web servers in a web farm. This does mean that you can implement a fully load-balanced web farm, in which each user request is routed to the least loaded web server. As shown in Figure 20-4, no user is ever "stuck" on a specific web server.

With this arrangement, you can lose a web server with minimal impact. Obviously, users in the middle of having a page processed on that particular server will be affected, but all other users should be redirected to the remaining live servers transparently. All the users' Session data will remain available.
As with the out-of-process option discussed previously, the Session object is serialized so that it can be transferred to the state server machine efficiently. This means that all objects referenced by Session are also serialized—which isn't a problem for CSLA .NET-style business objects because they're marked as Serializable.
Note
When using this approach, all state must be maintained in Serializable objects. Using the DataContract and DataMember attributes is not allowed because ASP.NET uses the BinaryFormatter to serialize the Session object.
In this arrangement, fault tolerance is significantly improved, but if the state server goes down, all user state is lost. To help address this, you can put the Session objects into a SQL Server database (rather than just into memory on the state server) and then use clustering to make the SQL Server fault-tolerant as well. In many cases, this SQL Server database is an entirely separate database from the application's database server.
Obviously, these solutions are becoming increasingly complex and costly, and they also worsen performance. By putting the state on a separate state server, the application will incur network overhead on each page request because the user's Session object must be retrieved from the state server by the web server so that the Web Forms code can use the Session data. Once each page is complete, the Session object is transferred back across the network to the state server for storage.
Table 20-2 summarizes these options.
Table 20.2. Session Object Storage Locations
Location of State Data | Performance, Scalability, and Fault Tolerance |
|---|---|
| High performance; low scalability; low fault tolerance; web farms must use sticky sessions; fully load-balanced web farms not supported; state is lost when ASP.NET |
| Decreased performance; low scalability; improved fault tolerance (ASP.NET process can reset without losing state data); web farms must use sticky sessions; fully load-balanced web farms not supported |
| Decreased performance; high scalability; high fault tolerance |
While storing state data on the web server (or in a state server) provides the simplest programming model, you must make some obvious sacrifices with regard to complexity and performance in order to achieve scalability and fault tolerance.
The second option to consider is transferring all state from the server to the client and back to the server again on each page request. The idea here is that the web server never maintains any state data—it gets all state data along with the page request, works with the data, and then sends it back to the client as part of the resulting page.
This approach provides high scalability and fault tolerance with very little complexity in your infrastructure: since the web servers never maintain state data, you can implement a fully load-balanced web farm without worrying about server-side state issues. On the other hand, there are some drawbacks.
First of all, all the state data is transferred over what is typically the slowest link in the system: the connection between the user's browser and the web server. Moreover, that state is transferred twice for each page: from the server to the browser and then from the browser back to the server. Obviously, this can have serious performance implications over a slow network link (like a modem) and can even affect an organization's overall network performance due to the volume of data being transferred on each page request.
The other major drawback is the complexity of the application's code. There's no automatic mechanism that puts all state data into each page; you must do that by hand. Often this means creating hidden fields on each page in which you can store state data that's required but that the user shouldn't see. The pages can quickly become very complex as you add these extra fields.
This can also be a security problem. When state data is sent to the client, that data becomes potentially available to the end user. In many cases, an application's state data includes internal information that's not intended for direct consumption by the user. Sometimes, this information may be sensitive, so sending it to the client could create a security loophole in the system. Although you could encrypt this data, it would incur extra processing overhead and could increase the size of the data sent to/from the client, so performance would be decreased.
To avoid such difficulties, applications often minimize the amount of data stored in the page by reretrieving it from the original database on each page request. All you need to keep in the page then is the key information to retrieve the data and any data values that have changed. Any other data values can always be reloaded from the database. This solution can dramatically increase the load on your database server but continues to avoid keeping any state on the web server.
In conclusion, while this solution offers good scalability and fault tolerance, it can be quite complex to program and can often result in a lot of extra code to write and maintain. Additionally, it can have a negative performance impact, especially if your users connect over low-speed lines.
The final solution to consider is the use of temporary files (or database tables of temporary data) in which you can store state data. Such a solution opens the door to other alternatives, including the creation of data schemas that can store state data so that it can be retrieved in parts, reported against, and so forth. Typically, these activities aren't important for state data, but they can be important if you want to keep the state data for a long period of time.
Most state data just exists between page calls or, at most, for the period of time during which the user is actively interacting with the site. Some applications, however, keep state data for longer periods of time, thereby allowing the user's "session" to last for days, weeks, or months. Persistent shopping carts and wish lists are examples of long-term state data that's typically stored in a meaningful format in a database.
Whether you store state as a single blob of data or in a schema, storing it in a file or a database provides good scalability and fault tolerance. It can also provide better performance than sending the state to and from the client workstation because communicating with a database is typically faster than communicating with the client. In situations like these, the state data isn't kept on the client or the web server, so you can create fully load-balanced web farms, as shown in Figure 20-5.
Tip
As I mentioned earlier, one way to implement a centralized state database is to use the ASP.NET Session object and configure it so that the data is stored in a SQL Server database. If you just want to store arbitrary state data as a single chunk of data in the database, this is probably the best solution.
The first thing you'll notice is that this diagram is virtually identical to the state server diagram discussed earlier, and it turns out that the basic model and benefits are indeed consistent with that approach. The application gains scalability and fault tolerance because you can implement a web farm, whereby the web server that's handling each page request retrieves state from the central database. Once the page request is complete, the data is stored in the central state database. Using clustering technology, you can make the database server itself fault tolerant, thereby minimizing it as a single point of failure.
Though this approach offers a high degree of scalability and fault tolerance, if you implement the retrieval and storage of the state data by hand, it increases the complexity of your code. There are also performance implications because all state data is transferred across a network and back for each page request—and then there's the cost of storing and retrieving the data in the database itself.
In the final analysis, determining which of the three solutions to use depends on the specific requirements of your application and environment. For most applications, using the ASP.NET Session object to maintain state data offers the easiest programming model and the most flexibility. You can achieve optimal performance by running it in process with your pages or achieve optimal scalability and fault tolerance by having the Session object stored in a SQL Server database on a clustered database server. There are shades of compromise in between.
Note
ASP.NET allows you to switch between three different state-handling models by simply changing the website's Web.config file (assuming you already have a SQL Server database server available in your environment).
The key is that CSLA .NET-style business objects are serializable, so the Session object can serialize them as needed. Even if you choose to implement your own BLOB-based file or data-storage approach, the fact that the objects are serializable means that the business objects can be easily converted to a byte stream that can be stored as a BLOB. If the objects were not serializable, the options would be severely limited.
For the sample application, I'll use the Session object to help manage state data; but I'll use it sparingly because overuse of global fields is a cardinal sin.
The UI application can be found within the ProjectTracker solution. The project is named PTWeb. The PTWeb interface uses a master page to provide consistency across all the pages in the site. The Default.aspx page provides a basic entry point to the website. Figure 20-6 shows what the page layout looks like.
Notice that the navigation area on the left provides links dealing with projects, resources, and roles. An authentication link is provided near the top right of the page. When the user clicks a link, she is directed to an appropriate content page. Figure 20-7 shows the user editing a project.
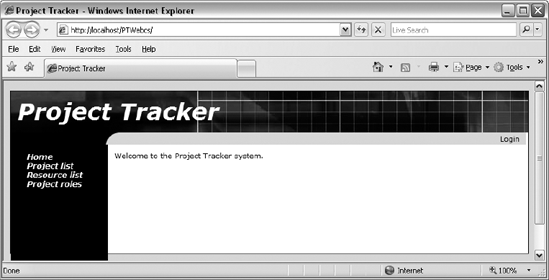

Table 20-3 lists the forms and controls that make up the interface.
Table 20.3. Web Forms in PTWeb
Form/Control | Description |
|---|---|
| Represents the main page for the application |
| Collects user credentials |
| Allows the user to edit the list of roles |
| Allows the user to select and delete projects |
| Allows the user to view, add, or edit a project |
| Allows the user to select and delete resources |
| Allows the user to view, add, or edit a resource |
All of the pages dealing with business data use the exact same objects as the WPF UI in Chapter 19. The same ProjectTracker.Library assembly created in Chapters 17 and 18 is used for the WPF, Web Forms, and WCF services interfaces in this book. The web forms using those objects are built using data binding, relying on the CslaDataSource control discussed in Chapter 10.
The site needs to provide some basic configuration information through the Web.config file. This includes configuring the data portal or database connection strings. It also includes configuring the CslaDataSource control.
In the Web.config file, you can either provide connection strings so that the site can interact with the database directly, or you can configure the data portal to communicate with a remote application server. The basic concept was discussed in Chapter 15 when the channel adapter implementation was covered. Recall that the data portal supports several channels: WCF, Remoting, Enterprise Services, and Web Services. You can create your own channels as well if none of these meets your needs.
In Chapter 1, I discuss the trade-offs between performance, scalability, fault tolerance, and security that come with various physical n-tier configurations. In most cases, the optimal solution for a web UI is to run the data portal locally in the client process. However, for security reasons, it may be desirable to run the data portal remotely on an application server.
The Web.config file is an XML file that contains settings to configure the website. You use different XML depending on how you want the site configured.
CslaDataSource Control
The data binding in this chapter relies on the CslaDataSource control discussed in Chapter 10. In order to use this control in Web Forms, the site needs to define a control prefix for any controls in Csla.dll. I'll use the prefix csla.
This prefix is defined either in each web form or in Web.config. Since most pages use the control, it is best to define the prefix in Web.config so it is available sitewide. You should add this within the <pages> element:
<controls><add tagPrefix="csla" namespace="Csla.Web" assembly="Csla"/></controls>
This globally defines the csla prefix to refer to the Csla.Web namespace from Csla.dll. With this done, all pages in the website can use the prefix like this:
<csla:CslaDataSource id="MyDataSource" runat="server"/>
Authentication
The way authentication is handled by CSLA .NET is controlled through Web.config:
<?xml version="1.0" encoding="utf-8" ?><configuration><appSettings><add key="CslaAuthentication" value="Csla" /></appSettings></configuration>
The CslaAuthentication key shown here specifies the use of custom authentication. The ProjectTracker.Library assembly includes the PTPrincipal and PTIdentity classes specifically to support custom authentication, and the UI code in this chapter uses custom authentication as well.
If you want to use Windows authentication, change the configuration to this:
<add key="CslaAuthentication" value="Windows" />
Of course, this change would require coding changes. To start, the PTPrincipal and PTIdentity classes should be removed from ProjectTracker.Library, as they would no longer be needed. Also, the login/logout functionality implemented in this chapter would become unnecessary. Specifically, the Login form and the code to display that form would be removed from the UI project.
Local Data Portal
The Web.config file also controls how the application uses the data portal. To have the website interact directly with the database, use the following (with your connection string changed to the connection string for your database):
<?xml version="1.0" encoding="utf-8" ?>
<configuration>
  <appSettings>
    <add key="CslaAuthentication" value="Csla" />
  </appSettings>
<connectionStrings>
  <add name="PTracker" connectionString="your connection string"
    providerName="System.Data.SqlClient" />
  <add name="Security" connectionString="your connection string"
    providerName="System.Data.SqlClient" />
  </connectionStrings>
Because LocalProxy is the default for the data portal's CslaDataPortalProxy configuration setting, no actual data portal configuration is required, so the only settings in the configuration file are to control authentication and to provide the database connection strings.
Tip
In the code download for this book, the PTracker and Security database files are in the solution directory, not in the website's App_Data directory. This means that you can't use a local data portal from the website without first copying the database files into the App_Data directory and changing the connection strings accordingly.
Remote Data Portal (with WCF)
To have the data portal use an application server and communicate using the WCF channel, the configuration would look like this:
<?xml version="1.0" encoding="utf-8" ?>
<configuration>
  <appSettings>
    <add key="CslaAuthentication" value="Csla" />
  <add key="CslaDataPortalProxy"
            value="Csla.DataPortalClient.WcfProxy, Csla"/>
  </appSettings>
  <connectionStrings>
  </connectionStrings>
<system.serviceModel>
  <client>
    <endpoint name="WcfDataPortal"
              address="http://localhost:4147/WcfHost/WcfPortal.svc"
              binding="wsHttpBinding"
              contract="Csla.Server.Hosts.IWcfPortal"/>
  </client>
  </system.serviceModel>
The CslaDataPortalProxy setting indicates that the WcfProxy should be used to communicate with the application server. This requires that you define a client endpoint in the system.serviceModel element of the config file.
The only value you need to change in this element is the address property. Here you must change localhost:4147 to the name of the server on which the data portal host is installed. You also need to replace the WcfHost text with the name of the virtual root on that server.
Note
You must create and configure the WCF host virtual root before using this configuration. I show how this is done in the next section.
As noted, the most important thing to realize about the site configuration is that the data portal can be changed from local to remote (using any of the network channels) with no need to change any UI or business object code.
Configuring the WCF Data Portal Server
The configuration of the remote data portal is the same for ASP.NET applications as it is for WPF applications, which is discussed in Chapter 19. For completeness and ease of reference, I'll cover it again here.
When using a remote data portal configuration, the client communicates with an application server. Obviously, this means that an application server must exist and be properly configured. When the client data portal is configured to use WCF, you must supply a properly configured WCF application server.
Note
No data portal server is required when the data portal is configured for local mode. In this case, the "server-side" components run in the website's process and no application server is used or required.
The WcfHost website in the ProjectTracker download is an example of a WCF application server hosted in IIS. You may also choose to host the WCF server in a custom Windows service or a custom EXE or by using Windows Activation Service (WAS). These various hosts are similar to IIS in many ways but are outside the scope of this book.
The WcfHost website is very simple because it relies on preexisting functionality provided by CSLA .NET, as discussed in Chapter 15. Table 20-4 lists the key elements of the website.
Table 20.4. Key Elements of the WcfHost Website
Element | Description |
|---|---|
| WCF service endpoint file, referencing the |
| Standard web |
| Standard |
Any website containing the elements in Table 20-4 can act as a WCF data portal host. The Web.config file must contain the configuration section for WCF, defining the endpoint for the data portal:
<system.serviceModel>
    <services>
    <service name="Csla.Server.Hosts.WcfPortal">
      <endpoint address=""
                        contract="Csla.Server.Hosts.IWcfPortal"
                        binding="wsHttpBinding"/>
    </service>
    </services>
  </system.serviceModel>
WCF services are defined by their address, binding, and contract.
For a WCF service hosted in IIS, the address is defined by IIS and the name of the svc file, so it is not specified in the Web.config file. As shown here, you may provide a "" address or provide no address at all. If you use some other hosting technique, such as WAS or a custom Windows service, you may need to specify the server address.
In the case of a CSLA .NET data portal endpoint, the contract is fixed; it must be Csla.Server.Hosts.IWcfPortal. The contract is defined by the interface implemented in the data portal, discussed in Chapter 15. It may not be different from this value.
The binding can be any synchronous WCF binding. The only requirement imposed by the data portal is that the WCF binding must be synchronous; beyond that, any binding is acceptable. You may choose to use HTTP, TCP, named pipes, or other bindings. You may choose to configure the binding to use SSL, x509 certificates, or other forms of encryption or authentication. All the features of WCF are at your disposal.
Remember that the data access code for your business objects will run on the application server. This means that the application server's Web.config file must define the connection strings required by your data access code:
<connectionStrings><add name="PTracker" connectionString="your connection string"providerName="System.Data.SqlClient" /><add name="Security" connectionString="your connection string"providerName="System.Data.SqlClient" /></connectionStrings>
This is the same configuration you'd put in the client's app.config file when using a local data portal configuration, but now these values must be on the server because that is where the data access code will execute.
The CslaAuthentication value must be the same on both client and server. You can change it to Windows as long as you make that change on both sides. If you do change this value to Windows, you must ensure that the WCF host website is configured to require Windows authentication and impersonate the calling user because in that case CSLA .NET will simply use the value provided by .NET.
At this point you should understand how to configure the application and how to configure the data portal for either local (2-tier) or remote (3-tier) operation.
The UI application can be found within the ProjectTracker solution. The project is named PTWeb.
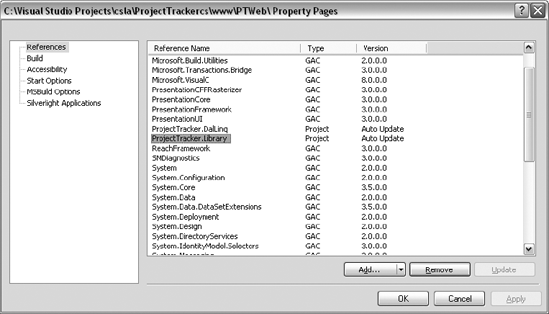
The site references the ProjectTracker.Library project, as shown in Figure 20-8. This causes Visual Studio to automatically put the associated ProjectTracker.DalLinq and Csla.dll files into the Bin directory as well, because those assemblies are referenced by ProjectTracker.Library.
The PTWeb website will only run within IIS, not within the ASP.NET Development Server (commonly known as Cassini or VS Host). The reason for this is explained later in the chapter in the "Forms-Based Authentication" section.
To host a website in IIS during development, you need to take the following steps:
Set up a virtual root in IIS that points to the directory containing the
PTWebproject files.Set the virtual root to use ASP.NET 2.0, using the ASP.NET tab of the virtual root properties dialog in the IIS management console.
Set the website's start options using the project properties dialog in Visual Studio 2008. Change the setting to use a custom server so it starts up using IIS with a URL such as
http://localhost/PTWeb.
It may seem odd that step 2 sets the virtual root to use ASP.NET 2.0 when this is actually an ASP.NET 3.5 application. However, .NET 3.5 uses the core .NET 2.0 runtime and it is the core runtime that is set in step 2.
With the basic website setup complete, let's go through the creation of the Web Forms UI. First, I'll discuss the use of a master page and then I'll cover the process of logging a user in and out using forms-based authentication.
With the common code out of the way, I'll discuss the process of maintaining the roles and project data in detail. At that point, you should have a good understanding of how to create both grid-based and detail pages.
To ensure that all pages in the site have the same basic layout, navigation, and authentication options, a master page is used. The master page provides these consistent elements, and all the rest of the pages in the site are content pages. This means they fit within the context of the master page itself, adding content where appropriate.
Look back at Figures 20-6 and 20-7 to see the visual appearance of the pages. Both Default.aspx and ProjectEdit.aspx are content pages, adding their content to that already provided by MasterPage.master:
<%@ Master Language="C#" CodeFile="MasterPage.master.cs"Inherits="MasterPage" %><!DOCTYPE html PUBLIC "-//W3C//DTD XHTML 1.1//EN""http://www.w3.org/TR/xhtml11/DTD/xhtml11.dtd"><html xmlns="http://www.w3.org/1999/xhtml" xml:lang="en"><head id="Head1" runat="server"><title>Untitled Page</title><meta http-equiv="Content-Type" content="text/html;charset=iso-8859-1" /></head><body><form id="form1" runat="server"><div id="mainTable"><div id="header"><asp:Label ID="PageTitle" runat="server"></asp:Label></div><div id="navigation"><div id="navigationContent">
<asp:TreeView ID="TreeView1" runat="server"DataSourceID="SiteMapDataSource1"ShowExpandCollapse="False" SkipLinkText="" ><NodeStyle CssClass="nav" /></asp:TreeView></div></div><div id="subnavigation"><div id="logout"><asp:LoginStatus ID="LoginStatus1"runat="server" OnLoggingOut="LoginStatus1_LoggingOut" /></div></div><div id="content"><asp:ContentPlaceHolder id="ContentPlaceHolder1"runat="server"></asp:ContentPlaceHolder></div></div><asp:SiteMapDataSource ID="SiteMapDataSource1" runat="server"ShowStartingNode="False" /></form></body></html>
MasterPage.master defines the header/title bar at the top of the page. The area immediately beneath the header/title bar contains the Login button, and there is a navigation area down the left. Perhaps most importantly, it also defines a content area containing a ContentPlaceHolder control:
<asp:ContentPlaceHolder id="ContentPlaceHolder1"
        runat="server">
      </asp:ContentPlaceHolder>
This is the area where content pages provide their content, and it is the main body of the page. You'll see how each content page provides content for this area later in the chapter.
Theme Support
ASP.NET supports the concept of the visual appearance of a website being defined by a theme: a group of files in a theme-specific subdirectory beneath the App_Themes directory in the virtual root. A theme is a group of style sheets, graphics, and control skins that describe the appearance of a site. A given site can have many themes, and you can even allow the user to choose between them if you so desire.
Note how all of the regions in the master page are set up using div tags. No appearance characteristics are specified in the page itself. Instead, the actual appearance is defined by a CSS style sheet contained within the current theme for the site. The PTWeb site includes and uses a Basic theme. The use of the Basic theme is set up in Web.config:
<pages theme="Basic" styleSheetTheme="Basic">
The theme property sets the default runtime theme, while styleSheetTheme sets the theme for use at design time in Visual Studio. The styleSheetTheme property should be removed when the website is deployed to a production server.
The files defining this theme are in the App_Themes/Basic folder beneath the virtual root. The files in this theme are listed in Table 20-5.
Combined, these files define the look and feel of the site. This includes defining the appearance of the regions in MasterPage.master. For instance, the header region is defined in the css file like this:
#header{background-image: url('images/background.jpg'),background-repeat: no-repeat;height: 64px;line-height: 60px;text-align: left;color: #FFFFFF;font-family:Verdana, Arial, Helvetica, sans-serif;font-size: 36px;font-weight: bold;font-style: italic;padding-left: 10px}
A control skin defines the appearance of specific controls in the website, such as GridView, TextBox, and so forth. For instance, the appearance of the Login control is defined in the skin file like this:
<asp:Login runat="server" BackColor="#DEDEDE" BorderColor="Black"BorderStyle="Solid" BorderWidth="1px" Font-Names="Verdana"Font-Size="10pt"><TitleTextStyle BackColor="Black" Font-Bold="True"Font-Names="Verdana" Font-Size="10pt"ForeColor="White" /></asp:Login>
Each type of control in Web Forms has different options you can set in a skin file, allowing you to set the appearance of each control in many ways.
By making the site theme-enabled, you can easily change the appearance of the site later by creating a new theme directory and similar theme files and setting the theme property in Web.config to use the new theme.
Header Region
The header region of the page is the title area across the top. It contains a single Label control named PageTitle. This control displays the title of the current content page, based on the Title property set for that page. The following code is included in MasterPage.master to load this value:
protected void Page_Load(object sender, EventArgs e){PageTitle.Text = Page.Title;}
As each content page loads, not only does the Load event for the content page run but so does the Load event for the master page. This means that code can be placed in the master page to run when any content page is loaded—in this case, to set the title at the top of the page.
Navigation Region
The navigation region displays the navigation links down the left side of each page. To do this, a web.sitemap file and associated SiteMapDataSource control are used to load the overall structure of the site into memory. This data is then data bound to a TreeView control for display to the user.
The web.sitemap file is an XML file that contains a node for each page to be displayed in the navigation region:
<?xml version="1.0" encoding="utf-8" ?><siteMapxmlns="http://schemas.microsoft.com/AspNet/SiteMap-File-1.0" ><siteMapNode url="" title="" description=""><siteMapNode url="~/Default.aspx" title="Home"description="Main page" /><siteMapNode url="~/ProjectList.aspx" title="Project list"description="Project list" /><siteMapNode url="~/ResourceList.aspx" title="Resource list"description="Resource list" /><siteMapNode url="~/RolesEdit.aspx" title="Project roles"description="Project roles" /></siteMapNode></siteMap>
The site map concept can be used to define hierarchical website structures, but in this case, I use it to define a flat structure. Notice how each <siteMapNode> element defines a page—except the first one. That root node is required in the file, but since I'm defining a flat structure, it really doesn't represent a page and is just a placeholder. If you were to define a hierarchical page structure, that node would typically point to Default.aspx.
Notice that MasterPage.master includes a SiteMapDataSource control:
<asp:SiteMapDataSource ID="SiteMapDataSource1" runat="server"
    ShowStartingNode="False" />
This special data control automatically reads the data from the web.sitemap file and makes it available to controls on the page. The ShowStartingNode property is set to False, indicating that the root node in web.sitemap is to be ignored. That's perfect because that node is empty and shouldn't be displayed.
In this case, a TreeView control in the navigation region is bound to the SiteMapDataSource, so it displays the items listed in web.sitemap to the user.
LoginStatus Control
In the subnavigation region of MasterPage.master, you'll see a LoginStatus control:
<asp:LoginStatus ID="LoginStatus1"
          runat="server" OnLoggingOut="LoginStatus1_LoggingOut" />
This is one of the login controls provided with ASP.NET, and its purpose is to allow the user to log into and out of the site. The control automatically displays the word Login if the user is logged out and Logout if the user is logged in. When clicked, it also automatically redirects the user to a login web page defined in Web.config. I cover the Web.config options later in the "Configuring the Site" section.
Because the control automatically directs the user to the appropriate login page to be logged in, no code is required for that process. However, code is required to handle the case in which the user clicks the control to be logged out. This code goes in the master page:
protected void LoginStatus1_LoggingOut(object sender, LoginCancelEventArgs e){ProjectTracker.Library.Security.PTPrincipal.Logout();Session["CslaPrincipal"] =Csla.ApplicationContext.User;System.Web.Security.FormsAuthentication.SignOut();}
This code covers a lot of ground.
First, the Logout() method of PTPrincipal is called, which sets the current principal on the current HttpContext and Thread objects to an UnauthenticatedPrincipal object. This is discussed in Chapter 12 and used in PTWpf in Chapter 19.
However, when users are logged in, their principal object is stored in a Session field so it can be easily reloaded on every page request. The details on how this works are discussed later in the "Reloading the Principal" section. When the user logs out, that Session field is updated to reference the new principal object.
Note
If you want to avoid Session, you can choose to reload the user's identity and roles from the security database on every page request. While that avoids the use of Session, it can put a substantial workload on your security database server. In PTWeb, I have opted to use Session to minimize the load on the database.
The final step is to tell ASP.NET itself that the user is no longer authenticated. This is done by calling FormsAuthentication.SignOut(). This method invalidates the security cookie used by ASP.NET to indicate that the user has been authenticated. The result is that ASP.NET sees the user as unauthenticated on all subsequent page requests.
This covers the logout process, but the login process requires some more work. While the LoginStatus control handles the details of directing the user to a login page, that page must be created.
Like the PTWpf smart client, the PTWeb site is designed to use custom authentication, so I can illustrate the custom authentication support provided by CSLA .NET. In this section, I briefly discuss the use of Windows integrated security and the ASP.NET membership service.
In Web Forms, when using custom authentication, you need to configure the site appropriately using Web.config and implement a login web page to collect and validate the user's credentials. That's the purpose behind Login.aspx.
Using Forms-Based Authentication
When using forms-based authentication, users are often automatically redirected to a login form before being allowed to access any other pages. Alternatively, anonymous users can be allowed to use the site and they can choose to log into the site to gain access to extra features or functionality. The specific behaviors are defined by Web.config.
Before moving on, remember that the following implementation only works within IIS. The ASP.NET Development Server provided with Visual Studio has various limitations; among them is the inability to load custom security objects from assemblies in the Bin directory. This means you can't use the ASP.NET Development Server to test or debug custom principal objects, custom membership providers, or other custom security objects if they're in an assembly referenced from the project.
Though this is an unfortunate limitation, it can be argued that the ASP.NET Development Server is not intended for anything beyond hobbyist or casual usage and that IIS should be used for serious business development.
Note
An alternative solution is to install the assembly containing your custom principal and identity classes into the .NET GAC. For PTWeb, this would mean giving ProjectTracker.Library a strong name and using the gacutil.exe command line utility to install the assembly into the GAC. ProjectTracker.Library would need to be updated in the GAC after each time you build the assembly. I find that using IIS is a far simpler solution than using the GAC.
Configuring the Site
Using forms-based security in ASP.NET means that Web.config includes elements such as the following:
<authentication mode="Forms"><forms loginUrl="Login.aspx" name="ptracker"/></authentication><authorization><allow users="*"/></authorization>
This tells ASP.NET to use forms-based authentication (mode="Forms"), yet to allow unauthenticated users (<allow users="*"/>).
Note
To require users to log in before seeing any pages, replace <allow users="*"/> with <deny users="?"/>.
It is important that you also ensure that the security on the virtual root itself (within IIS) is configured to allow anonymous users. If IIS blocks anonymous users, it doesn't really matter what kind of security you use within ASP.NET.
Note
Remember that IIS security runs first, and then any ASP.NET security is applied.
With the Web.config options shown previously, users can use the site without logging in, but the concept of logging in is supported. The goal is the same as with PTWpf in Chapter 19: allow all users to do certain actions, and allow authenticated users to do other actions based on their roles.
When users choose to log in, the <forms> tag specifies that they will be directed to Login.aspx, which will collect and validate their credentials. Figure 20-9 shows the appearance of Login.aspx.

Now this is where things get kind of cool. There is no code behind Login.aspx. This page uses the ASP.NET Login control:
<asp:Login ID="Login1" runat="server"></asp:Login>
This control is designed to automatically use the default ASP.NET membership provider for the site.
Warning
The user's credentials flow from the browser to the web server in clear text—they are not automatically encrypted. Due to this, it is recommended that Login.aspx be accessed over an SSL connection so that data traveling to and from the browser is encrypted during the login process.
You can write code to handle the events of the Login control if you desire, but a membership provider offers a cleaner solution overall. Of course, the membership provider that comes with ASP.NET doesn't understand PTPrincipal and PTIdentity objects, so PTWeb includes its own custom membership provider.
Implementing a Custom Membership Provider
A membership provider is an object that inherits from System.Web.Security.MembershipProvider to handle all aspects of membership. These aspects include the following:
Validating user credentials
Adding a new user
Deleting a user
Changing a user's password
More
Of course, PTPrincipal doesn't understand all these things, and ProjectTracker.Library doesn't implement a full set of membership objects either. If you want to support all these capabilities, you should create your own security library with appropriate objects.
But PTPrincipal does understand how to validate a user's credentials. Fortunately, it is possible to implement a subset of the complete membership provider functionality, and that's what I do in PTWeb.
The PTMembershipProvider class is in the App_Code directory, so ASP.NET automatically compiles it and makes it available to the website. This class inherits from MembershipProvider and overrides the ValidateUser() method:
public class PTMembershipProvider : MembershipProvider{public override bool ValidateUser(string username, string password){bool result = PTPrincipal.Login(username, password);HttpContext.Current.Session["CslaPrincipal"] =Csla.ApplicationContext.User;return result;}// other methods...}
All other methods are overridden to throw an exception indicating that they aren't implemented by this provider.
Notice how the ValidateUser() method already accepts username and password parameters. This is convenient because the Login() method of PTPrincipal accepts those parameters as well. The code simply calls the Login() method and records the result—true if the user is logged in, false otherwise.
The Login() method in PTPrincipal sets the User property of Csla.ApplicationContext, thus automatically setting both the Thread object's CurrentPrincipal property and the HttpContext.Current.User property to an authenticated PTPrincipal if the user's credentials are valid; otherwise, they are set to an UnauthenticatedPrincipal.
The code then sets a Session field, CslaPrincipal, to contain this principal value so it will be available to subsequent pages.
Then the result value is returned. The ASP.NET membership infrastructure relies on this return value to know whether the user's credentials are valid or not.
Before this custom membership provider can be used, it must be defined in Web.config as follows:
<membership defaultProvider="PTMembershipProvider"><providers><add name="PTMembershipProvider"type="PTMembershipProvider"enablePasswordRetrieval="false"enablePasswordReset="false"requiresQuestionAndAnswer="false"applicationName="/"
requiresUniqueEmail="false"passwordFormat="Clear"description="Stores and retrieves membershipdata using CSLA .NET business objects."/></providers></membership>
By making PTMembershipProvider the default provider, this definition tells ASP.NET to automatically use it for any membership activities, including validating a user's credentials.
Reloading the Principal
At this point, you've seen how the user can log in or out using the LoginStatus control on the master page. And you've seen how Login.aspx and the custom membership provider are used to gather and validate the user's credentials.
But how does the principal object carry forward from page to page? Remember that the web technologies are stateless by default, and it is up to the web developer to manually implement state management as she chooses. Unfortunately, this extends to the user's identity as well.
The forms-based security infrastructure provided by ASP.NET writes an encrypted cookie to the user's browser. That cookie contains a security ticket with a unique identifier for the user, the user's name, and an expiration time. This cookie flows from the browser to the web server on each page request, so that basic information is available.
Notice, however, that the cookie doesn't include the principal and identity objects. That is because those objects could be quite large and in some cases might not even be serializable. Though PTPrincipal and PTIdentity are serializable, they could still be large enough to pose a problem if you try to write them to the cookie. Cookies have a size limit, and remember that PTIdentity contains an array with all the role names for the user. Given a large number of roles or lengthy role names, this could easily add up to a lot of bytes of data.
Note
It is possible to serialize the principal and identity objects into the cookie (if the objects are serializable). Doing so isn't recommended, however, due to the size limitations on cookies.
It is quite possible to reload PTPrincipal and PTIdentity from the security database on every page request. Remember that the ASP.NET security cookie contains the username value, and you already know that the user was authenticated. You need another stored procedure in the database that returns the user information based on username alone; no password is provided or checked. Similarly, another static method such as Login() is required in PTPrincipal to load the objects based only on the username value. You can see an example of this by looking at the LoadPrincipal() method in the PTPrincipal class.
There are two drawbacks to this. First, reloading this data from the security database on every page request could cause a serious performance issue. The security database could get overloaded with all the requests. Second, there's an obvious security risk in implementing methods that allow loading user identities without having to supply the password. While that functionality wouldn't be exposed to the end user, it makes it easier for accidental bugs or malicious back-door code to creep into your website.
This is why I use Session to store the principal object in PTWeb. The user's credentials are validated, and the resulting principal object is placed in a Session field named CslaPrincipal. On all subsequent page requests, this value is retrieved from Session and is used to set both the current Thread and HttpContext object's principals.
The work occurs in Global.asax, as this file contains the event handlers for all events leading up to a page being processed. In this case, it is the AcquireRequestState event that is used:
protected void Application_AcquireRequestState(object sender, EventArgs e){if (HttpContext.Current.Handler is IRequiresSessionState){if (Csla.ApplicationContext.AuthenticationType == "Windows")return;System.Security.Principal.IPrincipal principal;try{principal = (System.Security.Principal.IPrincipal)HttpContext.Current.Session["CslaPrincipal"];}catch{principal = null;}if (principal == null){if (User.Identity.IsAuthenticated &&User.Identity is FormsIdentity){// no principal in session, but ASP.NET token// still valid - so sign out ASP.NETFormsAuthentication.SignOut();Response.Redirect(Request.Url.PathAndQuery);}// didn't get a principal from Session, so// set it to an unauthenticated PTPrincipalProjectTracker.Library.Security.PTPrincipal.Logout();}else{// use the principal from SessionCsla.ApplicationContext.User = principal;}}}
The reason for using the AcquireRequestState event, rather than the more obvious AuthenticateRequest event, is that Session isn't initialized when AuthenticateRequest is raised, but it usually is initialized when AcquireRequestState is raised.
The code shown here is relatively complex. This is because it must deal with a number of possible page request and Session time-out scenarios. Not all page requests are for Web Forms or initialize Session, so the code first ensures that this particular request requires Session. And if CSLA .NET is configured to use Windows authentication, there's no need to do any work to retrieve a custom principal. When using Windows authentication, CSLA .NET relies on ASP.NET and IIS to properly set the principal object based on the user's Windows credentials.
Assuming the request does use Session, and CSLA .NET is using custom authentication, the code attempts to retrieve the principal object from Session. This can result in an exception if Session doesn't exist (which can happen on some page requests), and so the value would end up being null. Also, if this is the first page request by the user, the Session field will return null. So the outcome is either a valid PTPrincipal object or null.
If the resulting principal value is null, the code deals with another possible scenario, where Session has timed out but the ASP.NET authentication security token is still valid. In other words, to ASP.NET, the user is still logged in but the user's Session state is expired. In this case I have chosen to sign the user out of ASP.NET:
FormsAuthentication.SignOut();
          Response.Redirect(Request.Url.PathAndQuery);
You could choose instead to simply reload the principal object from the database, based on the username in the ASP.NET token:
ProjectTracker.Library.Security.PTPrincipal.LoadPrincipal(
            User.Identity.Name);
This second option keeps the user logged in as long as the ASP.NET authentication security token remains valid, even if Session expires first.
If no principal is retrieved from Session, and the ASP.NET authentication security token isn't active, the user simply hasn't logged in yet. In this case, PTPrincipal.Logout() is called to set the current principal as an unauthenticated PTPrincipal, and the HttpContext is set to use that same principal object. This supports the idea of an unauthenticated anonymous guest user.
Both the web and business library code have access to valid, if unauthenticated, principal objects and can apply authorization code as needed. Additionally, by having the current principal be a valid PTPrincipal object, a remote data portal can be invoked and the application server will impersonate the unauthenticated user identity so that code can apply authorization rules as well. On the other hand, if a principal object is retrieved from Session, that value is set as the current principal.
Using Windows Integrated Security
If you wanted to use Windows integrated security, you don't need Login.aspx, the custom membership provider, or the code in Global.asax because the user's identity is already known. The user provides his Windows credentials to the browser, which in turn provides them to the web server.
This means that the virtual root in IIS must be configured to disallow anonymous users, thus forcing the user to provide credentials to access the site. It is IIS that authenticates the user and allows authenticated users into the site.
To have ASP.NET use the Windows identity from IIS, you must configure Web.config correctly:
<authentication mode="Windows"/><identity impersonate="true"/>
The authentication mode is set to Windows, indicating that ASP.NET should defer all authentication to the IIS host. Setting the impersonate property to true tells ASP.NET to impersonate the user authenticated by IIS.
If you use Windows integrated security and you are using a remote data portal, you must make sure to change the application server configuration file to also use Windows security. If the data portal is hosted in IIS, the virtual root must be set to disallow anonymous access, thereby forcing the client to provide IIS with the Windows identity from the web server via integrated security.
However, you should also remember that Windows will limit how far a user's identity can go, from machine to machine. A Windows computer will only allow a user's identity to impersonate one network hop away from the user. So if you use Windows security with an application server, you are already two network hops away from the user. This means your application won't be able to use the user's identity for impersonation when connecting to the database, for example.
There are some advanced networking techniques you can implement to enable more complex impersonation scenarios. Windows and Active Directory network configuration is outside the scope of this book.
Fortunately most web applications are 2-tier, with the web server communicating directly with the database server, so impersonation works as desired.
Using the ASP.NET Membership Service
ASP.NET not only supports the broad concept of membership as used previously but it provides a complete membership service, including all the code to make it work. The membership service is most often used with the SQL membership provider that comes with ASP.NET. This provider requires that you use a predefined database schema along with the membership objects provided by Microsoft to manage and interact with the database. By default, ASP.NET uses a Microsoft SQL Server 2008 Express database in the virtual root's App_Data directory, but you can override that behavior to have it use another Microsoft SQL Server database if needed.
The other membership provider shipped with ASP.NET is a connector to Active Directory. It does the same thing but stores the user information in AD instead of a SQL database.
CSLA .NET includes the MembershipIdentity class in the Csla.Security namespace. If you want to use the membership service to authenticate your users and the associated provider to manage their roles, you can create a custom identity object by subclassing MembershipIdentity.
Instead of implementing PTIdentity to interact with a custom database table, you could choose to use the MembershipIdentity class. The Login() method in the PTPrincipal class needs to change in this case because the factory method provided by MembershipIdentity is slightly different from the one in the PTIdentity class:
public static MyPrincipal Login(
      string username, string password)
    {
    var identity =
      MembershipIdentity.GetMembershipIdentity<MembershipIdentity>(
        username, password, true);
      return new MyPrincipal(identity);
    }
The highlighted line of code shows how the MembershipIdentity object is created. The third parameter to the GetMembershipIdentity() factory method is true, indicating that the membership provider database is on the same machine where this code is running. In other words, the data portal shouldn't be used to move the request to the application server before attempting to access the membership database.
If you are logging in on a smart client, such as in a WPF application, you'd want to pass false so the request is transferred to the application server (which would be hosted in IIS) where the membership database exists.
The PTWeb application does not use the membership provider because PTIdentity uses a custom security database.
At this point, you should have an understanding of how the website is organized. It references ProjectTracker.Library and uses a master page and theme to provide a consistent, manageable appearance for the site. It also uses a mix of ASP.NET login controls and the prebuilt ProjectTracker security objects to implement custom authentication.
Now let's move on and discuss the pages that provide actual business behaviors.
With the common functionality in the master page, Login.aspx, and Global.asax covered, it is possible to move on to the business functionality itself. As I mentioned earlier, I'll walk through the RolesEdit, ProjectList, and ProjectEdit web forms in some detail. ResourceList and ResourcEdit are available in the download available at www.apress.com/book/view/1430210192 or www.lhotka.net/cslanet/download.aspx and follow the same implementation approach.
All of these web forms are created using the data binding capabilities built into ASP.NET Web Forms and the CslaDataSource control discussed in Chapter 10. These capabilities allow the web developer to easily link controls on the form to business objects and their properties. The developer productivity gained through this approach is simply amazing.
Other key technologies I'll use are the MultiView control and the associated View control. These controls make it easy for a single page to present multiple views to the user and are often very valuable when building pages for editing data.
Finally, remember that all these pages are content pages. That means that they fit within the context of a master page—in this case, MasterPage.master. As you'll see, the tags in a content page are a bit different from those in a simple web form.
The RolesEdit.aspx page is a content page, so its Page directive looks like this:
<%@ Page Language="C#" MasterPageFile="~/MasterPage.master"AutoEventWireup="true" CodeFile="RolesEdit.aspx.cs"Inherits="RolesEdit" title="Project Roles" %>
Notice the MasterPageFile property, which points to MasterPage.master. Also notice the Title property, which sets the page's title. It is this value that is used in the master page's Load event handler to set the title text in the header region of the page.
Figure 20-10 shows what the page looks like in Visual Studio.
The content title bar across the top of the main page body won't be visible at runtime. It is visible at design time to remind you that you are editing a content area in the page. If you look at the page's source, you'll see that all the page content is contained within a Content control:
<asp:Content ID="Content1"ContentPlaceHolderID="ContentPlaceHolder1" Runat="Server"><!— page content goes here —></asp:Content>
The ContentPlaceHolderID property links this content to the ContentPlaceHolder1 control in the master page. This scheme means that a master page can define multiple content placeholders and a content page can have multiple Content controls—one for each placeholder.
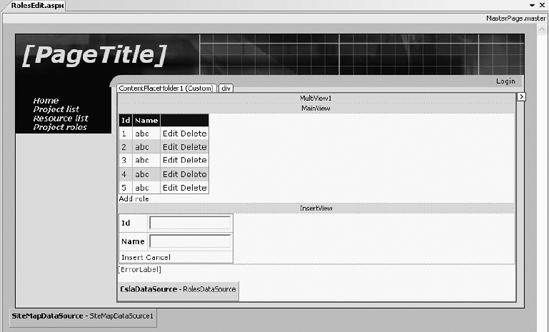
Using the MultiView Control
The MultiView control contains two View controls named MainView and InsertView. Only one of these views is active (visible) at any time, so this form really defines two different views for the user.
Within your code, you select the view by setting the ActiveViewIndex property of the MultiView control to the numeric index of the appropriate View control. Of course, using a numeric value like this doesn't lead to maintainable code, so within the page, I define an enumerated type with text values corresponding to each View control:
private enum Views{MainView = 0,InsertView = 1}
The Views type is used to change the page view as needed.
Using ErrorLabel
Beneath the MultiView control in Figure 20-10 is a Label control with its ForeColor set to Red. The purpose behind this control is to allow the page to display error text to the user in the case of an exception.
As you'll see, the data access code uses try...catch blocks to catch exceptions that occur during any data updates (insert, update, or delete). The text of the exception is displayed in ErrorLabel so it is visible to the user.
Using a Business Object As a Data Source
In Chapter 10, I discuss the CslaDataSource control and how it overcomes the limitations of the standard ObjectDataSource control. The RolesEdit page uses this control, making it relatively easy to bind the Roles collection from ProjectTracker.Library to a GridView control on the page.
The RolesDataSource data source control is defined on the page like this:
<csla:CslaDataSource ID="RolesDataSource" runat="server"TypeName="ProjectTracker.Library.Admin.Roles, ProjectTracker.Library"OnDeleteObject="RolesDataSource_DeleteObject"OnInsertObject="RolesDataSource_InsertObject"OnSelectObject="RolesDataSource_SelectObject"OnUpdateObject="RolesDataSource_UpdateObject"></csla:CslaDataSource>
The TypeName property defines the type and assembly containing the business class. The TypeAssemblyName property exists for backward compatibility and should not be used for new code. The TypeName property provides the control with enough information so that it can load the Roles type and determine the properties that will be exposed by child objects in the collection.
OnDeleteObject and similar properties link the control to a set of event handlers in the page's code. The code in those event handlers interacts with the business object to perform each requested action.
Of course, to get this data source control onto the web form, you can simply drag the CslaDataSource control from the toolbox onto the designer surface and set its properties through the Properties window in Visual Studio.
Then, when the GridView and DetailsView controls are placed on the form, you can use their pop-up tasks menu to select the data source control, as shown in Figure 20-11.

You can either write the tags yourself or use the designer support built into Visual Studio as you choose. The one caveat to this is that you cannot use the <New data source...> option to create a CslaDataSource object using the Data Source Configuration Wizard. Due to some very complex issues with how this Visual Studio wizard creates the new control, a control added using this wizard won't work properly unless you close and reopen the page designer. So I recommend adding the CslaDataSource control first, then binding it to any UI controls.
Caching the Object in Session
To optimize the performance of the website, business objects are stored in Session. While they could be retrieved directly from the database when needed, storing them in Session reduces the load on the database server.
To minimize the number of objects maintained in Session, all pages use the same Session field to store their business objects: currentObject. This way, only one business object is stored in Session at any time, and that is the object being actively used by the current page.
Of course, browsers have a Back button, which means that the user could navigate back to some previous page that expects to be using a different type of object than the current page. For instance, the user could be editing a Project object and then start editing a Resource object. Session would have originally contained the Project but then would contain the Resource.
If the user then uses the Back button to return to the ProjectEdit page, Session could still have the Resource object in the currentObject field. This possibility is very real and must be dealt with by checking the type of the object retrieved from Session to see if it is the type the page actually needs. If not, the correct object must be retrieved from the database.
In RolesEdit, the GetRoles() method performs this task:
private ProjectTracker.Library.Admin.Roles GetRoles(){object businessObject = Session["currentObject"];if (businessObject == null ||!(businessObject is ProjectTracker.Library.Admin.Roles)){businessObject =ProjectTracker.Library.Admin.Roles.GetRoles();Session["currentObject"] = businessObject;}return (ProjectTracker.Library.Admin.Roles)businessObject;}
The code retrieves the currentObject item from Session. If the result is null, or if the resulting object isn't a Roles object, a new Roles object is retrieved by calling the Roles.GetRoles() factory method. That newly retrieved object is placed in Session, making it the current object.
In any case, a valid Roles object is returned as a result.
Selecting an Object
The SelectObject event is raised when the web page needs data from the data source—the Roles object in this case. The page must handle the event and return the requested data object:
protected void RolesDataSource_SelectObject(object sender, Csla.Web.SelectObjectArgs e){ProjectTracker.Library.Admin.Roles obj = GetRoles();e.BusinessObject = obj;}
The GetRoles() helper method is called to retrieve the Roles collection object. Then the Roles object is returned to the RolesDataSource control by setting the e.BusinessObject property. The data source control then provides this object to the ASP.NET data binding infrastructure so it can be used to populate any UI controls bound to the data control. In this case, that's the GridView control in MainView. That control is declared like this:
<asp:GridView ID="GridView1" runat="server"AutoGenerateColumns="False"DataSourceID="RolesDataSource"DataKeyNames="Id"><Columns><asp:BoundField DataField="Id" HeaderText="Id"ReadOnly="True" SortExpression="Id" /><asp:BoundField DataField="Name" HeaderText="Name"SortExpression="Name" /><asp:CommandField ShowDeleteButton="True"ShowEditButton="True" /></Columns></asp:GridView>
The DataSourceID property establishes data binding to the RolesDataSource control.
The DataKeyNames property specifies the name of the property on the business object that acts as a primary key for the object. For a Role object, this is Id. Remember the use of the DataObjectField attribute on the Id property in Chapter 17, which provides a hint to Visual Studio that this property is the object's unique key value.
The first two columns in the GridView control are bound to properties from the data source: Id and Name, respectively. The third column is a CommandField, which automatically adds Delete and Edit links next to each element in the list. The Delete link automatically triggers the DeleteObject event to delete the specified object. The Edit link puts the row into in-place edit mode, allowing the user to edit the data in the selected row. If the user accepts the updates, the UpdateObject event is automatically raised. No code beyond that, handling those events, is required to support either of these links.
Of course, you don't have to deal with all these tags if you don't want to. Most of the code in the CslaDataSource control exists to support the graphical designer support in Visual Studio. Look back at Figure 20-10 and notice how the GridView control displays the Id, Name, and command columns. I configured the control entirely using the Visual Studio designer and setting properties on the controls.
Figure 20-12 shows the Fields dialog for the GridView control.
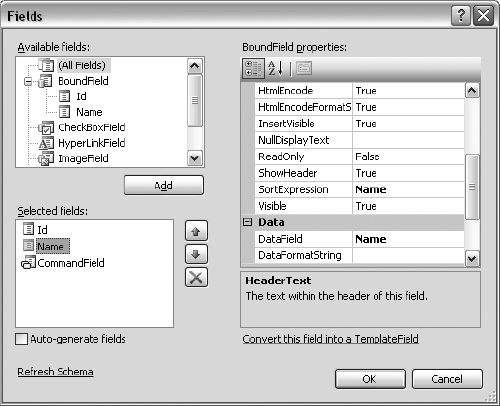
Notice that the Available Fields box contains a list of the potentially bound fields from the data source: Id and Name. The CslaDataSource control's designer support returns this list by using reflection against the data source object, as discussed in Chapter 10. You can use this dialog to choose which columns are displayed, to control the way they are displayed, to rearrange their order, and more.
Inserting an Object
The MainView contains not only a GridView control but also a LinkButton control named AddRoleButton. This button allows the user to add a new Role object to the Roles collection. To do this, the View is changed to InsertView:
protected void AddRoleButton_Click(object sender, EventArgs e){this.DetailsView1.DefaultMode = DetailsViewMode.Insert;MultiView1.ActiveViewIndex = (int)Views.InsertView;}
This changes the page to appear as in Figure 20-13.
Look at the address bar in the browser; see how it is still RolesEdit.aspx even though the display is entirely different from Figure 20-10. This illustrates the power of the MultiView control, which allows a user to remain on a single page to view, edit, and insert data.
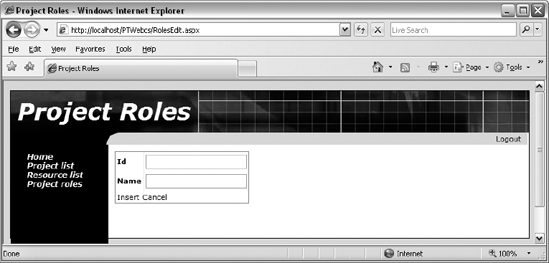
The control shown here is a DetailsView control, which is data bound to the same RolesDataSource control as the GridView earlier. This control is declared in a manner very similar to the GridView:
<asp:DetailsView ID="DetailsView1" runat="server"AutoGenerateRows="False" DataSourceID="RolesDataSource"DefaultMode="Insert" Height="50px" Width="125px"DataKeyNames="Id" OnItemInserted="DetailsView1_ItemInserted"OnModeChanged="DetailsView1_ModeChanged"><Fields><asp:BoundField DataField="Id" HeaderText="Id"SortExpression="Id" /><asp:BoundField DataField="Name" HeaderText="Name"
SortExpression="Name" /><asp:CommandField ShowInsertButton="True" /></Fields></asp:DetailsView>
It is bound to RolesDataSource, and its DataKeyNames property specifies that the Id property is the unique identifier for the object. The <Fields> elements define the rows in the control much as columns are defined in a GridView.
If the user enters values for a new role and clicks the Insert link in the DetailsView control, the InsertObject event is raised by RolesDataSource. This event is handled in the page to add the new role to the Roles collection:
protected void RolesDataSource_InsertObject(object sender, Csla.Web.InsertObjectArgs e){try{ProjectTracker.Library.Admin.Roles obj = GetRoles();ProjectTracker.Library.Admin.Role role = obj.AddNew();Csla.Data.DataMapper.Map(e.Values, role);Session["currentObject"] = obj.Save();e.RowsAffected = 1;}catch (Csla.DataPortalException ex){this.ErrorLabel.Text = ex.BusinessException.Message;e.RowsAffected = 0;}catch (Exception ex){this.ErrorLabel.Text = ex.Message;e.RowsAffected = 0;}}
This code retrieves the current Roles object and then calls its AddNew() method to add a new child Role object. Recall that in Chapter 17 the AddNewCore() method was implemented to enable easy adding of child objects to the collection. The public AddNew() method ultimately results in a call to AddNewCore(), which adds an empty child object to the collection.
This new child object is populated with data using the DataMapper object from the Csla.Data namespace:
Csla.Data.DataMapper.Map(e.Values, role);
All new values entered by the user are provided to the event handler through e.Values. The Map() method uses dynamic method invocation to copy those values to the corresponding properties on the object. Dynamic method invocation is only a little slower than directly setting the properties, but if you want to avoid that small bit of overhead, you can replace the use of DataMapper with code like this:
role.Id = Int32.Parse(e.Values["Id"].ToString());
    role.Name = e.Values["Name"].ToString();
For this simple object, this code isn't too onerous, but for larger objects you could end up writing a lot of code to copy each value into the object's properties.
Either way, once the data from e.Values has been put into the object's properties, the object's Save() method is called to update the database.
Note
This follows the typical web model of updating the database any time the user performs any action and results in a lot more database access than the equivalent WPF implementation from Chapter 19. You could defer the call to Save() by putting a Save button on the form and having the user click that button to commit all changes.
Once the Save() method is complete, the resulting (updated) Roles object is put into Session. This is very important because the result of Save() is a new Roles object, and that new object must be used in place of the previous one on subsequent pages. For instance, the newly added role data generates a new timestamp value in the database, which can only be found in this new Roles object.
This completes the insert operation, but the MultiView control is still set to display the InsertView. It needs to be reset to display MainView. That is done by handing the ItemInserted event from the DetailsView control:
protected void DetailsView1_ItemInserted(object sender, DetailsViewInsertedEventArgs e){MultiView1.ActiveViewIndex = (int)Views.MainView;this.GridView1.DataBind();}
The ActiveViewIndex is changed so that the MainView is displayed when the page refreshes. Also, the GridView control in MainView is told to refresh its data by calling its DataBind() method.
Calling DataBind() causes the GridView to refresh its display so it shows the newly added Role object. Behind the scenes, this triggers a call to RolesDataSource, causing it to raise its SelectObject event.
Figure 20-13 also shows a Cancel link. If the user clicks that link, she likewise needs to be returned to MainView. When the user clicks Cancel, it triggers a ModeChanged event on the DetailsView control:
protected void DetailsView1_ModeChanged(object sender, EventArgs e){MultiView1.ActiveViewIndex = (int)Views.MainView;}
So whether users click Insert or Cancel, they end up back at the main display of the list of roles.
Updating an Object
As shown in Figure 20-10, the CommandField column in the GridView control includes both Edit and Delete links for each row. I'll get to the Delete link shortly, but for now let's focus on the Edit link. When the user clicks the Edit link on a row, the GridView allows the user to edit that row's data, as shown in Figure 20-14.
The user can edit the Name column only. The Id column is set to read-only:
<asp:BoundField DataField="Id" HeaderText="Id"
              ReadOnly="True" SortExpression="Id" />
When done, users can either click the Update or Cancel links on the row. If they click Update, the UpdateObject event is raised by RolesDataSource to trigger the data update. This event is handled in the page:
protected void RolesDataSource_UpdateObject(object sender, Csla.Web.UpdateObjectArgs e){try{ProjectTracker.Library.Admin.Roles obj = GetRoles();ProjectTracker.Library.Admin.Role role =obj.GetRoleById(int.Parse(e.Keys["Id"].ToString()));role.Name = e.Values["Name"].ToString();Session["currentObject"] = obj.Save();e.RowsAffected = 1;}catch (Csla.DataPortalException ex){this.ErrorLabel.Text = ex.BusinessException.Message;e.RowsAffected = 0;}catch (Exception ex){this.ErrorLabel.Text = ex.Message;e.RowsAffected = 0;}}
This code is quite similar to that for the insert operation discussed earlier, though in this case, the specific Role object that is edited is retrieved from the collection:
ProjectTracker.Library.Admin.Role role =
      obj.GetRoleById(int.Parse(e.Keys["Id"].ToString()));
e.Keys contains all the values from the page that correspond to the properties defined in the GridView control's DataKeyNames property. Recall that the only property set in DataKeyNames is Id, so that's the only value provided through e.Keys. This value is passed to the GetRoleById() method to retrieve the correct Role object.
Note
Update and delete operations require that appropriate business object property names be specified in the GridView or DetailsView control's DataKeyNames property.
Since only one property can be edited, I opt to not use DataMapper and to set the property value manually. However, in a more complex edit scenario in which many properties are edited, you may choose to use DataMapper to simplify the code.
Finally, the Roles object's Save() method is called to commit the user's changes to the database. As with the insert process, the new Roles object returned from Save() is put into Session for use on all subsequent page requests.
Deleting an Object
Having seen how the update process works, you can probably guess how the delete process works. The user can click the Delete link next to a row in the GridView control. When they do so, RolesDataSource raises the DeleteObject event, which is handled in the page:
protected void RolesDataSource_DeleteObject(object sender, Csla.Web.DeleteObjectArgs e){try{ProjectTracker.Library.Admin.Roles obj = GetRoles();int id = (int)e.Keys["Id"];obj.Remove(id);Session["currentObject"] = obj.Save();e.RowsAffected = 1;}catch (Csla.DataPortalException ex){this.ErrorLabel.Text = ex.BusinessException.Message;e.RowsAffected = 0;}catch (Exception ex){this.ErrorLabel.Text = ex.Message;e.RowsAffected = 0;}}
The Id value for the Role object to delete is retrieved from e.Keys and used to call the Remove() method on the Roles collection. Recall from Chapter 17 that this overload of Remove() accepts the Id value of the Role object.
Of course, the child object is merely marked for deletion and isn't removed until the Save() method is called on the Roles object itself. Again, the resulting Roles object returned from Save() is put into Session for use on subsequent page requests.
At this point, you should understand the basic process for creating a grid-based data form that supports viewing, inserting, editing, and deleting data. The only thing left to do in RolesEdit is to add support for authorization.
Authorization
The RolesEdit authorization code is perhaps the simplest in the application. If the user isn't authorized to edit the Roles object, the CommandField column in the GridView control shouldn't be shown; and if the user can't add a new role, the LinkButton for adding a new object shouldn't be shown.
When the page is loaded, an ApplyAuthorizationRules() method is called:
protected void Page_Load(object sender, EventArgs e){if (!IsPostBack)Session["currentObject"] = null;ApplyAuthorizationRules();elsethis.ErrorLabel.Text = "";}private void ApplyAuthorizationRules(){bool canEdit =Csla.Security.AuthorizationRules.CanEditObject(typeof(ProjectTracker.Library.Admin.Roles));this.GridView1.Columns[this.GridView1.Columns.Count - 1].Visible = canEdit;this.AddRoleButton.Visible = canEdit;}
The ApplyAuthorizationRules() method asks the CSLA .NET authorization subsystem whether the current user is authorized to edit an object of type Roles. If the user isn't authorized, the appropriate controls' Visible properties are set to false and the controls are thereby hidden.
Since the user is then unable to put the GridView control into edit mode or ask it to delete an item, the display effectively becomes read-only. Similarly, without the LinkButton for adding a new item, the user can't switch the MultiView to InsertView; so again the page becomes a simple read-only page.
As you can see, creating a simple grid-based edit page requires relatively little work. You add a data control, bind the GridView and possibly a DetailsView control to the data, and write a bit of code. Most of the code in this page exists to react to user actions as they indicate that data is to be inserted, edited, or deleted.
The ProjectList web form is responsible for displaying the list of projects to the user and allowing the user to choose a specific project to view or edit. From this page, the user can also delete a project and choose to add a new project. Figure 20-15 shows the layout of ProjectList.
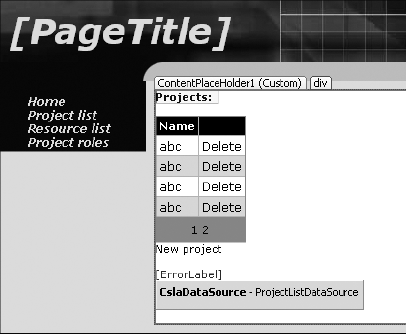
It is important to realize that the GridView control actually has three columns: Id, Name, and the CommandField column with the Delete links:
<Columns><asp:BoundField DataField="Id" HeaderText="Id"SortExpression="Id" Visible="False" /><asp:HyperLinkField DataNavigateUrlFields="Id"DataNavigateUrlFormatString="ProjectEdit.aspx?id={0}"DataTextField="Name" HeaderText="Name" /><asp:CommandField ShowDeleteButton="True"SelectText="Edit" /></Columns>
The Id column has its Visible property set to False, so it is there but invisible. Also notice that the Name column is a HyperLinkField not a simple BoundField. This makes each project name appear to the user as a hyperlink, though in reality it is more like a LinkButton—when the user clicks a project name, a SelectedIndexChanged event is raised from the GridView control.
Also of importance is the fact that the GridView control's DataKeyNames property is set to Id, so the Id property is specified as the unique identifier for each row of data:
<asp:GridView ID="GridView1" runat="server"
      AllowPaging="True" AutoGenerateColumns="False"
      DataSourceID="ProjectListDataSource" PageSize="4"
      OnRowDeleted="GridView1_RowDeleted"

      DataKeyNames="Id">
Without setting this property, the Delete link can't work.
The view, edit, and add operations are all handled by ProjectEdit, so ProjectList is really just responsible for redirecting the user to that other page as appropriate. The delete operation is handled directly from ProjectList through a CommandField column in the GridView control.
Notice that the GridView control displays paging links near the bottom. This is because paging is enabled for the control, as shown in Figure 20-16.
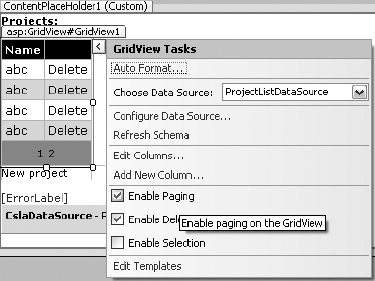
You can also set the GridView control's PageSize property to control how many items are shown on each page. All the paging work is done by the GridView control itself, which is fine because the ProjectList business object is maintained in Session, so the user can move from page to page without hitting the database each time.
Figure 20-17 shows the properties of the CslaDataSource control used on the page.

Like the RolesDataSource control in RolesEdit, the TypeName property is set to point to the appropriate class within ProjectTracker.Library. This data source control will be used to retrieve the list of projects and to delete a project if the user clicks a Delete link.
Since the ProjectList business object doesn't directly support paging or sorting, the TypeSupportsPaging and TypeSupportsSorting properties are left with False values. Paging and sorting are still possible but are handled by the GridView control itself, rather than by the business object. If the business object supports these concepts, the properties can be set to True and ASP.NET will automatically defer any paging or sorting to the business object.
Loading the Data
When the GridView control needs data, it asks the ProjectListDataSource for it. The data source control in turn raises its SelectObject event, which is handled in the page:
protected void ProjectListDataSource_SelectObject(object sender, Csla.Web.SelectObjectArgs e){e.BusinessObject = GetProjectList();}
As in RolesEdit, this page caches the business object in Session. The details of that process are handled by GetProjectList():
private ProjectTracker.Library.ProjectList GetProjectList(){object businessObject = Session["currentObject"];if (businessObject == null ||!(businessObject is ProjectTracker.Library.ProjectList)){businessObject =ProjectTracker.Library.ProjectList.GetProjectList();Session["currentObject"] = businessObject;}return (ProjectTracker.Library.ProjectList)businessObject;}
This method is the same as the GetRoles() method discussed earlier except that it ensures that a valid ProjectList object is returned instead of a Roles object.
This code allows the GridView control to populate itself with pages of data for display as needed.
Viewing or Editing a Project
The Name column in the GridView control is set up as a HyperLinkField, meaning that the user sees the values as a set of hyperlinks. If the user clicks one of the project names, the browser directly navigates to the ProjectEdit.aspx page, passing the selected Id value as a parameter on the URL.
Adding a Project
The ProjectList page contains a LinkButton to allow the user to add a new project. If the user clicks this button, a Click event is raised:
protected void NewProjectButton_Click(object sender, EventArgs e){// allow user to add a new projectResponse.Redirect("ProjectEdit.aspx");}
The ProjectEdit page takes care of viewing, editing, and adding Project objects, so all this code does is redirect the user to ProjectEdit. Notice that no parameter is provided to the page on the URL and this is what tells ProjectEdit to create a new Project rather than to view or edit an existing one.
Deleting a Project
The GridView control has a CommandField column, which automatically creates a Delete link for each row of data. If the user clicks a Delete link, the GridView deletes that row of data by calling its data source control, ProjectListDataSource. The result is a DeleteObject event handled in the page:
protected void ProjectListDataSource_DeleteObject(object sender, Csla.Web.DeleteObjectArgs e){try{ProjectTracker.Library.Project.DeleteProject(new Guid(e.Keys["Id"].ToString()));e.RowsAffected = 1;}catch (Csla.DataPortalException ex){this.ErrorLabel.Text = ex.BusinessException.Message;e.RowsAffected = 0;}catch (Exception ex){this.ErrorLabel.Text = ex.Message;e.RowsAffected = 0;}}
Again, the DataKeyNames property being set in the GridView means that the Id column value from the row automatically flows into this event handler through e.Keys. The Project object uses a Guid value for its Id property value, and its factory methods accept a Guid value to identify the object. The Id column value is a string in the web page, so it is converted to a Guid object so that the static DeleteProject() method on the Project class can be called. The result is immediate deletion of the related project data.
Authorization
Having discussed all the core business functionality of the page, let's look at the authorization code. Like in RolesEdit, the authorization rules themselves are in the business class, and the UI code simply uses that information to enable and disable various UI controls as the page loads:
protected void Page_Load(object sender, EventArgs e){if (!IsPostBack)Session["currentObject"] = null;ApplyAuthorizationRules();elseErrorLabel.Text = string.Empty;}private void ApplyAuthorizationRules(){this.GridView1.Columns[this.GridView1.Columns.Count - 1].Visible =Csla.Security.AuthorizationRules.CanDeleteObject(typeof(Project));NewProjectButton.Visible =Csla.Security.AuthorizationRules.CanCreateObject(typeof(Project));}
When the page is loaded, the ApplyAuthorizationRules() method makes sure that the CommandField column in the GridView is only visible if the user is authorized to delete Project objects. It also hides the NewProjectButton control if the user isn't allowed to add Project objects.
The end result is that users who can't delete or add data are still allowed to view the list of projects, and they can even click a project's name to get more details in the ProjectEdit page.
At this point, you've seen how to create two different types of grid-based web forms. The pages so far have illustrated in-place editing, adding of new items, and displaying a list of items for selection or deletion. The final web form I discuss in this chapter is ProjectEdit, which is a detail form that allows the user to view and edit details about a specific object.
Like RolesEdit, this form uses a MultiView control. Figure 20-18 shows the MainView layout, and Figure 20-19 shows the AssignView layout. There's also a Label control and some CslaDataSource controls on the page itself, below the MultiView. These are shown in Figure 20-20.
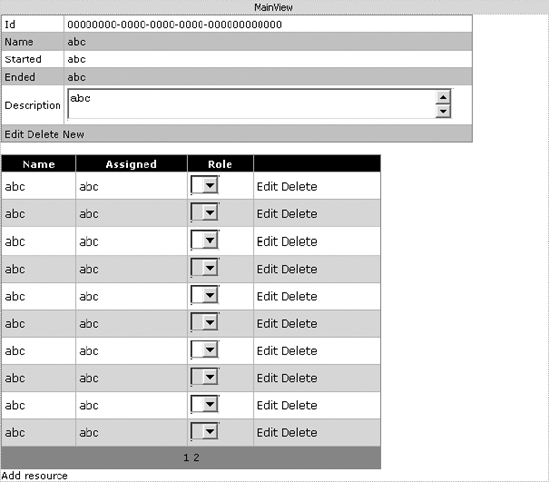
MainView includes a DetailsView control to allow display and editing of the Project object's properties. This control is data bound to the ProjectDataSource control shown in Figure 20-20, and so it is effectively data bound to the current Project object.
The Id row is set to read-only because the Project object's Id property is a read-only property. The Description row is a TemplateField, which allows the use of a TextBox control with its TextMode property set to MultiLine:
<asp:TemplateField HeaderText="Description"SortExpression="Description"><EditItemTemplate><asp:TextBox ID="TextBox1" TextMode="MultiLine"Width="100%" runat="server"Text='<%# Bind("Description") %>'></asp:TextBox></EditItemTemplate><InsertItemTemplate><asp:TextBox ID="TextBox1" TextMode="MultiLine"Width="100%" runat="server"Text='<%# Bind("Description") %>'></asp:TextBox></InsertItemTemplate><ItemTemplate><asp:TextBox ID="TextBox1" TextMode="MultiLine"ReadOnly="true" Width="100%" runat="server"Text='<%# Bind("Description") %>'></asp:TextBox></ItemTemplate></asp:TemplateField>
Notice that even the ItemTemplate, which controls what is displayed in view mode, uses a TextBox control, but with its ReadOnly property set to true. This allows the user to see the entire text of the Description property, even if it is quite long.
Finally, the DetailsView control has a CommandField row that allows the user to delete, edit, and add a Project.
Beneath the DetailsView control is a GridView to list the resources assigned to the project. This control is data bound to the ResourcesDataSource control shown in Figure 20-20. It is effectively data bound to the Resources property of the current Project object, meaning that it is bound to a collection of ProjectResource objects. Remember that each type of business object must have its own CslaDataSource control in order to act as a data source.
The GridView control also has a ResourceId column, which is not visible. Its DataKeyNames property is set to ResourceId, specifying that the ResourceId column contains the unique identifying value for each row. The Name and Assigned columns are read-only, while the Role column is a TemplateField:
<asp:TemplateField HeaderText="Role" SortExpression="Role"><EditItemTemplate><asp:DropDownList ID="DropDownList1" runat="server"DataSourceID="RoleListDataSource"DataTextField="Value" DataValueField="Key"SelectedValue='<%# Bind("Role") %>'></asp:DropDownList></EditItemTemplate><ItemTemplate><asp:DropDownList ID="DropDownList2" runat="server"DataSourceID="RoleListDataSource"DataTextField="Value" DataValueField="Key"Enabled="False" SelectedValue='<%# Bind("Role") %>'></asp:DropDownList></ItemTemplate></asp:TemplateField>
Notice how the DropDownList controls are data bound to the RoleListDataSource control shown in Figure 20-20. This data source control provides access to a RoleList business object, so the DropDownList controls are populated with the list of roles a resource can play on a project. This way, ASP.NET does all the hard work of mapping the Key values for each role to the corresponding human-readable text value. The numeric Key values are stored in the business objects, while the text values are displayed on the page.
The GridView control also has a CommandField column so the user can edit or remove assignments. Of course, "remove" in this case really means unassign, but those details are handled by the business object, not the UI.
Finally, there's a LinkButton to allow the user to assign a new resource to the project. When users click that button, the view is switched so that they see AssignView, where they can select the resource to assign. The layout of that view is shown in Figure 20-19.

AssignView is comparatively straightforward. It contains a GridView control that is data bound to the ResourceListDataSource control. Effectively, this means the GridView is bound to a ResourceList business object, so it displays the list of resources to the user. The CommandField column in the GridView provides a Select link, so the user can select the resource to be assigned.
There's also a LinkButton at the bottom to allow the user to cancel the operation and return to MainView without assigning a resource at all.
Finally, Figure 20-20 shows the bottom of the page, beneath the MultiView control.

The CslaDataSource controls are used by the various DetailsView and GridView controls discussed previously. And, of course, the ErrorLabel control is a simple Label control that has its ForeColor property set to Red. The exception-handling code in the form uses this control to display details about any exceptions to the user.
Working, in the top left corner of Figure 20-20, comes from an UpdateProgress control, to go along with the UpdatePanel control that wraps the entire MultiView control to provide AJAX support to the page.
Now let's go through the implementation of the page. I'll do this a bit differently than with the previous pages because by now you should understand how the pieces fit together using data binding.
Caching the Project Object in Session
The RolesEdit and ProjectList forms implement methods to retrieve the central business object from Session or to retrieve it from the database as necessary. This not only implements a type of cache to reduce load on the database but it provides support for the browser's Back button as well. The same thing is done in ProjectEdit:
private Project GetProject(){object businessObject = Session["currentObject"];if (businessObject == null ||!(businessObject is Project)){try{string idString = Request.QueryString["id"];if (!string.IsNullOrEmpty(idString)){Guid id = new Guid(idString);businessObject = Project.GetProject(id);}elsebusinessObject = Project.NewProject();Session["currentObject"] = businessObject;}catch (System.Security.SecurityException){Response.Redirect("ProjectList.aspx");}}return (Project)businessObject;}
As before, if there's no object in Session, or if the object isn't a Project, a Project is retrieved from the database. But the code here is a bit more complex than that in the other forms.
Notice that the Request.QueryString property is used to get the id value (if any) passed in on the page's URL. If an id value is passed into the page, that value is used to retrieve an existing Project:
Guid id = new Guid(idString);
          businessObject = Project.GetProject(id);
Otherwise, a new Project is created for the page:
businessObject = Project.NewProject();
Either way, the resulting object is placed into Session and is also returned as a result from the method.
It is possible for a user to navigate directly to ProjectEdit.aspx, providing no id value on the URL. In such a case, the user might not be authorized to add a Project, and so a SecurityException would result. In that case, users are simply redirected to the ProjectList page, where they can safely view the list of projects.
Creating a New Object
If users navigate to this page with no id value and they are authorized to add a new Project, they'd expect to see default values on the screen. Due to the way Web Forms works, this is harder than you might think.
It turns out that the DetailsView control, when in insert mode, doesn't ask its underlying data source control for any information. The assumption is that the user will enter all new values into an empty form. No provision is made to automatically load default values into the DetailsView control for a new object.
To overcome this, your page can handle the DetailsView control's ItemCreated event, where you can set default values. This is pretty ugly code because you need to manually index into the DetailsView control to find the detail controls it contains, so you can set their values:
protected void DetailsView1_ItemCreated(object sender, EventArgs e){if (DetailsView1.DefaultMode == DetailsViewMode.Insert){Project obj = GetProject();((TextBox)DetailsView1.Rows[1].Cells[1].Controls[0]).Text =obj.Name;((TextBox)DetailsView1.Rows[2].Cells[1].Controls[0]).Text =obj.Started;((TextBox)DetailsView1.Rows[3].Cells[1].Controls[0]).Text =obj.Ended;((TextBox)DetailsView1.FindControl("TextBox1")).Text =obj.Description;}}
This means that you must fully understand the row and column that contains each of the constituent controls, and you must know the type of each control. While this is not ideal, it is the solution for setting default values.
Notice how the GetProject() method is called first, so the code has access to a newly created Project object that automatically contains any required default values. The property values from that object are then used to set the control values in the web form.
This is not an issue when editing an existing object because the DetailsView control automatically invokes the data source control to retrieve an existing object.
Saving a Project
In this form, the Project object is saved in many scenarios, including the following:
Inserting the project
Editing the project
Assigning a resource
Unassigning a resource
Deleting the project
To simplify the code overall, the SaveProject() method handles the common behaviors in all these cases:
private int SaveProject(Project project){int rowsAffected;try{Session["currentObject"] = project.Save();rowsAffected = 1;}catch (Csla.Validation.ValidationException ex){System.Text.StringBuilder message = new System.Text.StringBuilder();message.AppendFormat("{0}", ex.Message);if (project.BrokenRulesCollection.Count > 0){message.Append("<ul>");foreach (Csla.Validation.BrokenRule rule in project.BrokenRulesCollection)message.AppendFormat("<li>{0}: {1}</li>", rule.Property,rule.Description);message.Append("</ul>");}this.ErrorLabel.Text = message.ToString();rowsAffected = 0;}catch (Csla.DataPortalException ex){this.ErrorLabel.Text = ex.BusinessException.Message;rowsAffected = 0;}catch (Exception ex){this.ErrorLabel.Text = ex.Message;rowsAffected = 0;}return rowsAffected;}
This method accepts the Project as a parameter and calls its Save() method. As always, the resulting object is placed in Session to replace the old version of the object. In case of exception, the ErrorLabel text is updated.
The code here is the same as in the other pages but it is worth consolidating in this page (and in ResourceEdit) because of the many places the Project object is saved.
The ProjectDataSource control takes care of data binding that deals with the Project object itself. The page handles its DeleteObject, InsertObject, SelectObject, and UpdateObject events. For instance, the SelectObject handler looks like this:
protected void ProjectDataSource_SelectObject(object sender, Csla.Web.SelectObjectArgs e){e.BusinessObject = GetProject();}
Thanks to the GetProject() method discussed earlier, this method is very simple to implement. The delete, insert, and update events are also comparatively simple due to the SaveProject() method. For instance, here's the InsertObject event handler:
protected void ProjectDataSource_InsertObject(object sender, Csla.Web.InsertObjectArgs e){Project obj = GetProject();Csla.Data.DataMapper.Map(e.Values, obj, "Id");e.RowsAffected = SaveProject(obj);}
The current Project object is retrieved from Session (or pulled from the database) and the new values entered by the user are mapped into the object's properties using the DataMapper from the Csla.Data namespace.
The Map() method requires two parameters. The first is the source object and the second is the target object. Any other parameters are the names of properties that should not be copied. So this code copies all the property values except the Id property. This is important because the Id property is read-only in the target object and an exception would result if the Map() method tried to copy the value.
Once the values are copied, the SaveProject() method is called to save the project and update Session with the newly updated data.
Once a new object is inserted, the user's display should be refreshed so it switches into edit mode. To do this, the page handles the DetailsView control's ItemInserted event:
protected void DetailsView1_ItemInserted(object sender, DetailsViewInsertedEventArgs e){Project project = GetProject();if (!project.IsNew)Response.Redirect("ProjectEdit.aspx?id=" + project.Id.ToString());}
If the insert operation succeeds, the object's IsNew property is false and the user is redirected to the ProjectEdit web form, passing the newly created Id property as a parameter in the URL. This not only ensures that the page switches into edit mode (as opposed to insert mode) but the URL in the browser is also updated to reflect the object's Id value.
The update operation works in a similar manner, so I won't detail it here. The one thing I do want to point out is that once an update is complete, the authorization rules are rechecked:
protected void DetailsView1_ItemUpdated(object sender, DetailsViewUpdatedEventArgs e){ApplyAuthorizationRules();}
This ensures that the UI properly responds to any changes in authorization rules based on the object's state. Some objects may have different authorization rules for a new or existing object.
DeleteObject is a bit different:
protected void ProjectDataSource_DeleteObject(object sender, Csla.Web.DeleteObjectArgs e){try{Project.DeleteProject(new Guid(e.Keys["id"].ToString()));Session["currentObject"] = null;e.RowsAffected = 1;}catch (Csla.DataPortalException ex){this.ErrorLabel.Text = ex.BusinessException.Message;e.RowsAffected = 0;}catch (Exception ex){this.ErrorLabel.Text = ex.Message;e.RowsAffected = 0;}}
If the user clicks the link in the DetailsView control to delete the project, the DeleteObject event is raised. e.Keys contains the Id row value from the DetailsView because the DataKeyNames property on the control is set to Id. This value is used to create a Guid, which is then passed to the static DeleteProject() method to delete the project. Of course, this immediately deletes the Project using the data portal, and so proper exception handling is implemented to display any exception messages in ErrorLabel.
Once the Project has been deleted, it makes no sense to leave the user on ProjectEdit. If the delete operation is successful, the DetailsView control raises an ItemDeleted event:
protected void DetailsView1_ItemDeleted(object sender, DetailsViewDeletedEventArgs e){Response.Redirect("ProjectList.aspx");}
The user is simply redirected to the ProjectList page, where he should no longer see the deleted project in the list. That is because the ProjectList page retrieves a new ProjectList business object each time the page is loaded.
The ResourcesDataSource control takes care of data binding dealing with the Resources collection from the Project object. The GridView control in MainView is bound to this control, and the page handles its DeleteObject, SelectObject, and UpdateObject events.
There's no need to handle the InsertObject event because the GridView isn't used to dynamically add ProjectResource objects to the collection. I discuss adding a new child object shortly.
The SelectObject event handler returns the collection of ProjectResource objects for the Project:
protected void ResourcesDataSource_SelectObject(object sender, Csla.Web.SelectObjectArgs e){Project obj = GetProject();e.BusinessObject = obj.Resources;}
It first gets the current Project object by calling GetProject(). Then it simply provides the Resources collection to the data source control, which in turn provides it to any UI controls requiring the data.
The DeleteObject and UpdateObject event handlers are worth exploring a bit. The DeleteObject handler gets the ResourceId value from the GridView control through e.Keys and uses that value to remove the ProjectResource object from the collection:
protected void ResourcesDataSource_DeleteObject(object sender, Csla.Web.DeleteObjectArgs e){Project obj = GetProject();int rid = int.Parse(e.Keys["ResourceId"].ToString());obj.Resources.Remove(rid);e.RowsAffected = SaveProject(obj);}
The current Project object is retrieved, and then the Remove() method is called on the Resources collection to remove the specified child object. SaveProject() is then called to commit the change.
UpdateObject is a bit more complex:
protected void ResourcesDataSource_UpdateObject(object sender, Csla.Web.UpdateObjectArgs e){Project obj = GetProject();int rid = int.Parse(e.Keys["ResourceId"].ToString());ProjectResource res =obj.Resources.GetItem(rid);Csla.Data.DataMapper.Map(e.Values, res);e.RowsAffected = SaveProject(obj);}
In this case, the actual child object is retrieved from the Resources collection. Then the values entered into the GridView by the user are pulled from e.Values and are mapped into the child object using DataMapper. And finally, SaveProject() is called to commit the changes.
The GridView isn't used to insert new ProjectResource child objects, so ResourcesDataSource will never raise its InsertObject method. Users are allowed to assign a new user to the project by clicking a LinkButton control. In that case, the MultiView is changed to display AssignView so the user can select the resource to be assigned:
protected void AddResourceButton_Click(object sender, EventArgs e){this.MultiView1.ActiveViewIndex =(int)Views.AssignView;}
Once AssignView is displayed, users can either select a resource or click the Cancel button. If they select a resource, the resource is assigned to the project:
protected void GridView2_SelectedIndexChanged(object sender, EventArgs e){Project obj = GetProject();try{obj.Resources.Assign(int.Parse(this.GridView2.SelectedDataKey.Value.ToString()));if (SaveProject(obj) > 0){this.GridView1.DataBind();this.MultiView1.ActiveViewIndex = (int)Views.MainView;}}catch (InvalidOperationException ex){ErrorLabel.Text = ex.Message;}}
To make the assignment, the current Project object is retrieved. Then the Resources collection's Assign() method is called, passing the SelectedDataKey value from the GridView control as a parameter. This GridView control, which displays the list of resources, has its DataKeyNames property set to Id, so SelectedDataKey returns the Id value of the selected resource.
Once the assignment is made, SaveProject() is called to commit the change. If SaveProject() succeeds, it will return a value greater than 0. And in that case, the GridView control in MainView, which displays the list of assigned resources, is told to refresh its data by calling DataBind(). Remember that ASP.NET tries to optimize data access, and so GridView and DetailsView controls don't refresh their data from the data source on every postback. You need to explicitly call DataBind() to force this refresh to occur.
Several things could go wrong during this whole process. The resource might already be assigned or the SaveProject() method could fail due to some data error. Of course, SaveProject() already does its own exception handling and displays any exception messages to the user through the ErrorLabel control.
But if the user attempts to assign a duplicate resource to the project, the Assign() method will raise an InvalidOperationException. This is caught and the message text is displayed to the user. Notice that in that case, users are not sent back to MainView but remains on AssignView so that they can choose a different resource to assign if desired.
The simplest course of action occurs if the user clicks the Cancel LinkButton control:
protected void CancelAssignButton_Click(object sender, EventArgs e){this.MultiView1.ActiveViewIndex =(int)Views.MainView;}
In that case, the user is simply directed back to the MainView display.
The RoleListDataSource is used by the GridView control in MainView. It provides access to the list of roles a resource can play on a project. This data isn't cached in the UI because the RoleList object handles caching automatically (see Chapter 18 for details). Also, because RoleList is read-only, the only event that needs to be handled is SelectObject:
protected void RoleListDataSource_SelectObject(object sender, Csla.Web.SelectObjectArgs e){e.BusinessObject = RoleList.GetList();}
The GetList() method returns the list of roles, either from the cache or the database. The beauty of this approach is that the UI code doesn't know or care whether the database was used to get the data; it just uses the result.
Note
Because the RoleList object is cached in a static field, the cached object is shared by all users of the website. A static field is global to the AppDomain, and so is effectively global to the entire website. In this case, that's a good thing because it means the RoleList object is retrieved once for all users, but it is a detail you should keep in mind when working with data that should be per-user instead of shared.
The ResourceListDataSource is used by the GridView control in AssignView to display a list of resources in the database. It is bound to the ResourceList business object, which is read-only—meaning that only the SelectObject event needs to be handled:
protected void ResourceListDataSource_SelectObject(object sender, Csla.Web.SelectObjectArgs e){e.BusinessObject =ProjectTracker.Library.ResourceList.GetResourceList();}
I'm making no special effort to cache the results of GetResourceList(), nor does that method do caching on its own. This is intentional.
Users will most likely come to ProjectEdit to view a project's details. A relatively small percentage of the time will they opt to assign a new resource to a project—so I made a conscious decision here to keep my code simple and just get the list each time it is needed.
If it turns out later that users are assigning far more resources than anticipated and that retrieving ResourceList is a performance bottleneck, the implementation can be changed to do some caching—in the UI, or in ResourceList itself.
Either way, I tend to default to implementing simpler code and only make it more complex when application usage patterns prove that some other solution is required.
Authorization
At this point, you've seen almost all the code in ProjectEdit. The rest of the code primarily deals with authorization, though there's a bit of UI magic as well.
When the page loads, an ApplyAuthorizationRules() method is called:
protected void Page_Load(object sender, EventArgs e){if (!Page.IsPostBack){Session["currentObject"] = null;ApplyAuthorizationRules();}
else{this.ErrorLabel.Text = string.Empty;}}private void ApplyAuthorizationRules(){Project obj = GetProject();// project displayif (Csla.Security.AuthorizationRules.CanEditObject(typeof(Project))){if (obj.IsNew)this.DetailsView1.DefaultMode = DetailsViewMode.Insert;elsethis.DetailsView1.DefaultMode = DetailsViewMode.Edit;this.AddResourceButton.Visible = !obj.IsNew;}else{this.DetailsView1.DefaultMode = DetailsViewMode.ReadOnly;this.AddResourceButton.Visible = false;}this.DetailsView1.Rows[this.DetailsView1.Rows.Count - 1].Visible =Csla.Security.AuthorizationRules.CanEditObject(typeof(Project));// resource displaythis.GridView1.Columns[this.GridView1.Columns.Count - 1].Visible =Csla.Security.AuthorizationRules.CanEditObject(typeof(Project));}
As with the previous forms, various controls, GridView columns, and DetailsView rows are made visible or invisible depending on the authorization values returned from the business objects.
Additionally, the mode of the DetailsView control is set based on the business object's IsNew property:
if (obj.IsNew)
        this.DetailsView1.DefaultMode = DetailsViewMode.Insert;
      else
        this.DetailsView1.DefaultMode = DetailsViewMode.Edit;
This ensures that users get the right set of options in the CommandField row of the DetailsView control based on whether they are adding or editing the object.
As noted earlier in this chapter, the ResourceEdit and ResourceList forms are very comparable to ProjectEdit and ProjectList, so I won't cover them in this chapter. You can look at their code in the download for this book at www.apress.com/book/view/1430210192 or www.lhotka.net/cslanet/download.aspx. This completes the PTWeb UI, so you should now have a good understanding of how to create both WPF and Web Forms interfaces based on business objects.
This chapter discussed the creation of a basic Web Forms UI based on the business objects in Chapters 17 and 18. As with the WPF technology in Chapter 19, there are many ways to create a Web Forms interface, and the one I've created here is just one of them.
The key is that the business objects automatically enforce all business rules and provide business processing so that the UI doesn't need to include any of that code. As you can see, it is very possible to create two very different user interfaces based on exactly the same set of business objects, data access code, and database design.
As shown here, the website is configured for optimal performance, running the Session and the data portal in the same process as the web forms. You could increase scalability and fault tolerance by moving Session into its own process or onto a state server. You could potentially increase security by running the data portal server components on a separate application server. In either case, all you need to do is change some settings in Web.config; the UI code and business objects will work in all these scenarios.
In Chapter 21, I wrap up the book by showing how you can create another type of interface to the business objects by using WCF.