Chapters 17 and 18 focused on creating business objects and enabling them with data access. The business objects, and the business logic they contain, are the centerpiece of any application, and those objects make the behaviors defined in your use cases (from Chapter 3) available for use when building applications.
But to the end user, the application is really more about the user interface than it is about data access or object-oriented design. The user experience is absolutely central to the application. So while the business logic and data access layers implement the majority of the application's functionality, it is the UI that makes or breaks the application.
In .NET 3.0, Microsoft introduced the WPF, which is the next-generation UI technology for the development of Windows applications.
Note
Closely related to WPF, Silverlight is used for building rich client applications that deploy and execute within a web browser. You can get more information about CSLA .NET for Silverlight at www.lhotka.net/cslalight.
In this chapter, I assume you have a basic understanding of WPF. This includes the concepts of XAML programming, how code-behind works in a WPF application, and XML namespaces.
WPF provides many of the best features of both Windows and web development. It is a rich, interactive, event-driven environment similar to Windows Forms, yet it uses an XML-based, stylable tag markup language to describe the presentation, much like the Web.
The challenge with WPF is that it has aspects that are similar to both Windows Forms and Web Forms development, yet it is fundamentally different from both of those technologies. This leads to a learning curve that you must overcome before you can be productive in the new environment.
Like Windows Forms, WPF provides powerful data binding support, using an event-driven model for interaction between the UI controls and the business objects. Like Web Forms, WPF uses a data control model (called a data provider control) to load data into a form. And like its ASP.NET equivalent, the ObjectDataProvider control is too limited to work with CSLA .NET-style business objects. To address this, CSLA .NET includes a CslaDataProvider control for WPF.
This chapter will cover the basic process of building a WPF UI on top of the business objects created in Chapters 17 and 18. To do this, I will use data binding, along with several CSLA .NET controls from the Csla.Wpf namespace. The resulting WPF forms have little code-behind, because most of the work is done through XAML or by the CSLA .NET controls.
Before getting into the creation of the UI, it is important to discuss one higher-level issue regarding custom authentication.
WPF is not thread-safe. This means that all UI work must be done on the single UI thread. Nevertheless, WPF does use background threads behind the scenes. The security infrastructure in .NET is driven off the current principal object, which is associated with a specific thread. This means that you can run into cases where your code is running on a thread that doesn't have the right principal.
This issue only applies if you're using custom authentication. If you're using Windows authentication, then all threads will use the WindowsPrincipal for the user logged into the workstation, and there's no issue.
There are a number of possible scenarios with custom authentication and custom principal objects, but they all have the same issue: one or more threads end up with the incorrect principal. This is problematic, because the authorization and data portal subsystems of CSLA .NET rely on the .NET principal object to do their work. If you can't rely on having a valid principal, authorization is difficult to implement, and the data portal can't reliably impersonate the client user identity on the application server.
The behavior of WPF in this area is intentional; Microsoft is trying to protect the application from a scenario in which one thread accidentally changes the principal on other threads. The unfortunate side effect of this protection is that it is nearly impossible to build a WPF application that uses custom authentication.
The core issue is that WPF doesn't allow a thread to alter the current principal for other threads. Even if you attempt to do this, the WPF infrastructure will often reset the principal to a default value.
Microsoft's recommended solution is to set the default principal value on the AppDomain:
AppDomain.CurrentDomain.SetThreadPrincipal(principal);
Once this line of code runs, all threads created from that point forward will use the new default principal. However, that's a serious limitation, because it means you need to execute this line of code before any background threads are created, including those on the thread pool. This means your login process can't use any asynchronous behaviors (no async data portal or service calls), and it must occur very early in your application's lifetime to ensure no other async operations have occurred.
Also, this line of code can only be called one time during the application's lifetime. So if your application allows the user to log out and then log in later (without closing the application), you won't be able to use this technique at all.
The CSLA .NET ApplicationContext object has a partial workaround to this issue that solves the problem for all CSLA .NET code, as well as code that uses ApplicationContext.User to access the current principal. It is a partial solution, because CSLA .NET can't ensure that the actual CurrentPrincipal on each thread is always correct, so while all CSLA .NET code will work fine, some .NET features—most notably Code Access Security (CAS)—may not function at all times.
I'm discussing this issue because WPF developers commonly encounter it. While CSLA .NET addresses this issue to a large degree, you should understand that it exists and that it is caused by WPF working to prevent one thread from altering the principal used by other threads.
As long as you use Csla.ApplicationContext.User to access the principal, which is what CSLA .NET itself does, you should be able to alter the principal value during the lifetime of the application and have a consistent value available to all threads.
The UI application can be found within the ProjectTracker solution. The project is named PTWpf. The PTWpf interface contains a single main form with a set of navigation links on the left and a content area on the right. The main form loads user controls into the content area dynamically, displaying them to the user. Figure 19-1 shows what the main form looks like.

Notice that the navigation items on the left deal with projects, resources, roles, and authentication. When the user clicks a link, a user control is loaded dynamically into the main area of the form. Figure 19-2 shows the application while the user is editing a project.
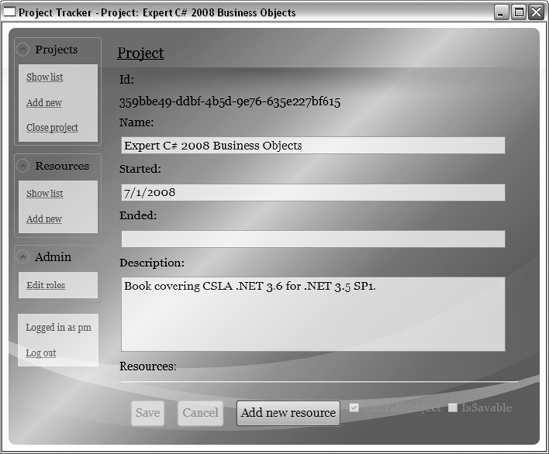
Of course, some dialog windows are used to collect input from the user as well, but the bulk of the application's functionality centers around the use of user controls hosted by the main form.
Table 19-1 lists the forms and controls that make up the interface.
Table 19.1. Forms and User Controls in PTWpf
Form/Control | Type | Description |
|---|---|---|
|
| The main form for the application |
|
| A custom base class for creating user controls |
|
| Converts a Boolean value to a |
|
| A login dialog to collect user credentials |
|
| Allows the user to edit the list of roles |
|
| A dialog prompting the user to select from a list of projects |
|
| Displays a list of projects |
|
| Allows the user to view, add, or edit a project |
|
| A dialog prompting the user to select from a list of resources |
|
| Displays a list of resources |
|
| Allows the user to view, add, or edit a resource |
|
| Converts a Boolean value to a |
The user control approach taken in this chapter gives you a great deal of flexibility. You can host the user controls in child forms in an MDI interface, as shown in this chapter, or you can host them in panes in a multipane interface. In short, by creating your "forms" as user controls, you gain the flexibility to use them in many different types of UI design.
Loading a user control dynamically isn't difficult. The code needs to follow this basic process:
Create the
EditFormcontrol.Remove any existing
EditFormcontrols from view.Add a new
EditFormto theChildrencollection.Hook the
TitleChangedevent for a newEditForm.
Although my intent with this chapter isn't for you to create a full-blown WPF UI framework, you must do some basic work to provide for a decent user experience.
The steps listed here require some interaction between each UserControl and the hosting MainForm. To standardize this process, I've created an EditForm class, which is a subclass of UserControl. This class provides some standard behaviors MainForm can count on for each control it hosts.
The EditForm Class
The primary purpose of the EditForm class is to standardize how each control is hosted in MainForm. However, it also provides some common behaviors that are useful to any data-bound form. Table 19-2 lists the behaviors provided by EditForm.
Table 19.2. Behaviors Implemented in EditForm
Behavior | Description |
|---|---|
Principal changed | Enables a scheme by which |
Provides a | Extends |
Error handling | Provides a standard way for any data provider to display exceptions that occur during data access |
I'll discuss each behavior individually.
Principal Changed
When the current .NET principal changes, it means that the user has logged in or out of the application, so any authorization rules must be reapplied for the currently displayed EditForm. The exact impact of a user logging in or out is up to the individual EditForm, so the base class simply notifies the EditForm subclass by invoking a virtual method.
void EditForm_Loaded(object sender, System.Windows.RoutedEventArgs e){ApplyAuthorization();}void IRefresh.Refresh(){ApplyAuthorization();}protected virtual void ApplyAuthorization(){}
The ApplyAuthorization() method is invoked both when the edit form is first loaded and then when MainForm calls the Refresh() method because the current principal has changed.
Each individual subclass can override ApplyAuthorization() to reapply authorization rules based on the new .NET principal. I'll show how this works when I discuss an actual edit form implementation.
Title Property
In this application, I want each edit form to be able to alter the top-level window caption. That caption is controlled by MainForm, so there needs to be some mechanism by which each edit control can ask MainForm to change the caption.
In WPF, data-bindable properties of controls are implemented as dependency properties. A dependency property is similar to a normal property, but it is tied into the WPF (and WF) infrastructure, so the property can be bound to values through XAML. Here's the Title property:
public event EventHandler TitleChanged;public static readonly DependencyProperty TitleProperty =DependencyProperty.Register("Title", typeof(string),typeof(EditForm), null);public string Title{get { return (string)GetValue(TitleProperty); }set{SetValue(TitleProperty, value);if (TitleChanged != null)TitleChanged(this, EventArgs.Empty);}}
The TitleChanged event is a standard event, and MainForm handles this event so that it's notified when the value has been changed. The property declaration itself is a dependency property, so the value can be set through XAML. For example, here's how an EditForm instance is declared:
<local:EditForm x:Class="PTWpf.ProjectEdit"
    xmlns="http://schemas.microsoft.com/winfx/2006/xaml/presentation"
    xmlns:x="http://schemas.microsoft.com/winfx/2006/xaml"
    Title="Edit a Project">
The Title property can be set here in the XAML or in the code behind the form. Either way, the TitleChanged event is raised, so MainForm can update the main window caption.
Error Handling
When using a WPF data provider for data access, handling exceptions is a little tricky. The reason is that the data access is triggered by the control, not by your code, so there's no way for you to wrap the operation in a try..catch block to handle any exception.
The standard technique is to handle the DataChanged event of the data provider control and to see if the Error property of the data provider is anything other than null. If it is, then an exception occurred.
For this sample application, I've chosen to simply display the exception details to the user. Rather than repeating that code in each individual edit form, the EditForm base class provides an event handler to handle all such exceptions.
protected virtual void DataChanged(object sender, EventArgs e){var dp = sender as System.Windows.Data.DataSourceProvider;if (dp.Error != null)MessageBox.Show(dp.Error.ToString(),"Data error",MessageBoxButton.OK,MessageBoxImage.Exclamation);}
Each edit form is responsible for hooking its data provider DataChanged events to this handler, which can be done through XAML or code-behind. I'll show how this is done when I discuss individual edit form implementations.
The MainForm Window
The other area of common plumbing code is in the MainForm class itself. MainForm acts as the overall application shell, hosting and coordinating all other windows and edit forms. In this section, I'll discuss only the code required for interaction with each EditForm, leaving discussion of the navigation and authentication for later in the chapter.
The content area of MainForm is a DockPanel control.
<DockPanel Grid.Column="1" Name="contentArea"Margin="5,15,20,15" />
This DockPanel fills all the available space on the right-hand side of the form, maintaining a bit of a margin to keep the content inside the rounded corners (see Figure 19-1). By naming the control contentArea, the code behind the form is able to manipulate the control.
Moving from one edit form to another by showing the correct content in contentArea, MainForm implements a ShowControl() method to enable navigation:
public static void ShowControl(UserControl control){_mainForm.ShowUserControl(control);}
private void ShowUserControl(UserControl control){UnhookTitleEvent(_currentControl);contentArea.Children.Clear();if (control != null)contentArea.Children.Add(control);_currentControl = control;HookTitleEvent(_currentControl);}
The ShowControl() method is easily accessible to all code in the project, because it is a static method that is public. However, the actual instance of MainForm must display the user control, so the static method delegates to an instance method on the actual MainForm instance. The _mainForm field references the one instance of MainForm, and its value is set in the constructor of MainForm.
The ShowUserControl() method unhooks the TitleChanged event from any existing control.
private void UnhookTitleEvent(UserControl control){EditForm form = control as EditForm;if (form != null)form.TitleChanged -= new EventHandler(SetTitle);}
The ShowUserControl() method then clears the Children collection of contentArea, ensuring the DockPanel is empty. Then it adds the new user control to the Children collection, effectively displaying the new content.
Finally, it hooks the TitleChanged event of the new control.
private void HookTitleEvent(UserControl control){SetTitle(control, EventArgs.Empty);EditForm form = control as EditForm;if (form != null)form.TitleChanged += new EventHandler(SetTitle);}
This method also immediately sets the main window caption based on the current title of the new user control. This is done by calling the SetTitle() method.
private void SetTitle(object sender, EventArgs e){EditForm form = sender as EditForm;if (form != null && !string.IsNullOrEmpty(form.Title))_mainForm.Title =string.Format("Project Tracker - {0}", ((EditForm)sender).Title);else_mainForm.Title = string.Format("Project Tracker");}
Notice how MainForm remains in control of the main window caption, using the Title property from the current user control to alter the overall value. This helps keep the application maintainable, because the window caption is controlled in a central location.
At this point, you should have an understanding of how MainForm hosts user controls and how the EditForm base class makes it easier to create standardized user controls for this purpose.
WPF allows you to do a great deal directly through XAML, minimizing code behind each window or user control. One powerful technique you can use to shift code into XAML is to implement a value converter control. These controls convert a value of one type, such as bool, to another type or value.
To create a value converter, you create a class that implements the IValueConverter interface from the System.Windows namespace. This interface requires that you implement the methods listed in Table 19-3. These methods are invoked by WPF data binding as needed.
Table 19.3. Methods Defined by IValueConverter
Method | Description |
|---|---|
| Converts a data source value into a UI value |
| Converts a UI value into a data source value |
One common use of a value converter is to change a DateTime property from a business object into a properly formatted string for display to the user. That fits into most people's conception of how data binding works.
However, in WPF, data binding is far more useful and widespread. You can use data binding to connect controls to other controls or objects. The potential is amazing. For example, in PTWpf, I use data binding and value converters so the UI responds to authorization rules automatically. Based on whether the user is authorized to create or edit the business object, I'll use data binding to enable or disable UI controls, hide some controls entirely, and even change the way data is displayed in a ListBox control.
Doing this requires a couple of value converters to convert a bool value to a DataTemplate (to change how a ListBox is displayed) or to a Visibility value (to show or hide parts of the UI).
I'll discuss the VisibilityConverter first, because it is the simpler of the two.
VisibilityConverter
The VisibilityConverter class implements IValueConverter and is designed to convert a bool value to a Visibility value. It is used when binding part of the UI to an authorization property such as CanEditObject. This way, when the user can edit the object, the Visibility value can return Visible, and if the user isn't allowed to edit the object, the Visibility value will return Collapsed.
public class VisibilityConverter : System.Windows.Data.IValueConverter{public object Convert(object value, Type targetType,object parameter, System.Globalization.CultureInfo culture){if ((bool)value)return System.Windows.Visibility.Visible;elsereturn System.Windows.Visibility.Collapsed;}public object ConvertBack(object value, Type targetType,object parameter, System.Globalization.CultureInfo culture){return false;}}
Only the Convert() method is fully implemented in this case, because the converter is used to bind from an ObjectStatus control to a UI control. Changes to the UI control don't bind back to ObjectStatus.
In the Convert() method, the value parameter is cast to a bool, and that value is used to determine which Visibility value to return as a result.
You'll see how this is used when I discuss the RolesEdit form.
ListTemplateConverter
The ListTemplateConverter is a little more complex, because it defines a couple of properties as well as implements IValueConverter.
public class ListTemplateConverter : System.Windows.Data.IValueConverter{public System.Windows.DataTemplate TrueTemplate { get; set; }public System.Windows.DataTemplate FalseTemplate { get; set; }#region IValueConverter Memberspublic object Convert(object value, Type targetType,object parameter, System.Globalization.CultureInfo culture){if ((bool)value)return TrueTemplate;elsereturn FalseTemplate;}public object ConvertBack(object value, Type targetType,object parameter, System.Globalization.CultureInfo culture){return value;}#endregion}
Again, only the Convert() method is fully implemented, because the converter is used to bind from an ObjectStatus control to a UI control. If there are changes to the UI control, they don't bind back to ObjectStatus.
The TrueTemplate and FalseTemplate properties are used to define the DataTemplate values to be returned based on the input bool value. In your XAML, this converter is defined as a resource, like this:
<local:ListTemplateConverter x:Key="ListTemplateConverter"
      TrueTemplate="{StaticResource editableTemplate}"
      FalseTemplate="{StaticResource readonlyTemplate}" />
The two properties are set to DataTemplate items defined in that same XAML. You'll see an example of this when I discuss the RolesEdit form later in this chapter.
Like the VisibilityConverter, this converter's logic simply uses the value parameter to determine which result to return. The value converter concept in WPF is powerful, and you can use it to shift a lot of code behind each page into reusable controls that can be used from the XAML defining each page.
The application needs to provide some basic configuration information through the application's configuration file. In the client application configuration file, either you can provide connection strings so that the application can interact with the database directly, or you can configure the data portal to communicate with a remote application server. I discussed this basic concept in Chapter 15 when I covered the channel adapter implementation. Recall that the data portal supports several channels, including WCF, Remoting, Enterprise Services, and Web Services. You can create your own channels as well if none of these meet your needs.
In Chapter 1, I discussed the trade-offs between performance, scalability, fault tolerance, and security that come with various physical n-tier configurations. The most scalable solution for an intelligent client UI is to use an application server to host the data access layer, while the most performant solution is to run the data portal locally in the client process. In this chapter, I'll show first how to run the data portal locally, and then remotely using the WCF channel.
The configuration is controlled by the application's configuration file. In the Visual Studio project, this is named App.config.
Note
Naming the file App.config is important. Visual Studio 2008 will automatically copy the file into the appropriate bin directory, changing the name to match that of the program. In this case, it will change the name to PTWin.exe.config as it copies it into the bin directories. This occurs each time the project is built in Visual Studio.
Authentication
CSLA .NET controls authentication through the configuration file.
<?xml version="1.0" encoding="utf-8" ?><configuration><appSettings><add key="CslaAuthentication" value="Csla" /><add key="CslaPropertyChangedMode" value="Xaml" /></appSettings></configuration>
The CslaAuthentication key shown here specifies the use of custom authentication. Chapter 8 implemented the PTPrincipal and PTIdentity classes specifically to support custom authentication, and the UI code in this chapter will use custom authentication as well.
If you want to use Windows authentication, change the configuration to the following:
<add key="CslaAuthentication" value="Windows" />
Of course, this change requires coding changes. To start, remove the PTPrincipal and PTIdentity classes from ProjectTracker.Library, as they will no longer be needed. Also, the login/logout functionality implemented in this chapter will become unnecessary. Specifically, the Login form and the code to display that form should be removed from the UI project.
The CslaPropertyChangedMode key shown here causes CSLA .NET to use the XAML model for raising the PropertyChanged event from all business objects. Recall from Chapters 7 and 10 that the PropertyChanged event must be raised differently for WPF/XAML data binding than for Windows Forms data binding, because the two data binding infrastructures treat the event a little differently.
It's important that this value be set for WPF applications; otherwise, data binding won't update the UI properly based on underlying changes to the business object.
Local Data Portal
The configuration file also controls how the application uses the data portal. To make the client application interact directly with the database, use the following (with your connection string changed to the connection string for your database):
<?xml version="1.0" encoding="utf-8" ?>
<configuration>
  <appSettings>
    <add key="CslaAuthentication" value="Csla" />
    <add key="CslaPropertyChangedMode" value="Xaml" />
  </appSettings>
<connectionStrings>
  <add name="PTracker" connectionString="your connection string"
    providerName="System.Data.SqlClient" />
  <add name="Security" connectionString="your connection string"
    providerName="System.Data.SqlClient" />
</connectionStrings>
</configuration>
Because LocalProxy is the default for the data portal's CslaDataPortalProxy setting, no actual data portal configuration is required, so the only settings in the configuration file are to control authentication and to provide the database connection strings.
Remote Data Portal
To make the data portal use an application server and communicate using the WCF channel, use the following configuration:
<?xml version="1.0" encoding="utf-8" ?>
<configuration>
  <appSettings>
    <add key="CslaAuthentication" value="Csla" />
    <add key="CslaPropertyChangedMode" value="Xaml" />
  <add key="CslaDataPortalProxy"
    value="Csla.DataPortalClient.WcfProxy, Csla"/>
  </appSettings>
  <connectionStrings>
  </connectionStrings>
<system.serviceModel>
  <client>
    <endpoint name="WcfDataPortal"
              address="http://localhost:4147/WcfHost/WcfPortal.svc"
              binding="wsHttpBinding"
              contract="Csla.Server.Hosts.IWcfPortal" />
  </client>
</system.serviceModel>
</configuration>
The key lines for the WCF configuration are in bold. Of course, you need to change localhost:4147 to the name of the application server on which the data portal host is installed. Also, the WcfHost text needs to be replaced with the name of your virtual root on that server.
Before using this configuration, you must create and configure the WCF host virtual root. I'll show how you do this in the next section.
The most important thing to realize about the application configuration is that the data portal can be changed from local to remote (using any of the network channels) with no need to change any UI or business object code.
Configuring the Data Portal Server
When using a remote data portal configuration, the client communicates with an application server. Obviously, this means that an application server must exist and be configured properly. When the client data portal is configured to use WCF, you must supply a properly configured WCF application server.
Note
No data portal server is required when the data portal is configured for local mode. In that case, the "server-side" components run in the client process, and no application server is used or required.
The WcfHost website in the ProjectTracker download is an example of a WCF application server hosted in IIS. You may also choose to host the WCF server in a custom Windows service, in a custom EXE, or using WAS. These various hosts are similar to IIS in many ways, but are outside the scope of this book.
The WcfHost website is simple, because it relies on preexisting functionality provided by CSLA .NET, as discussed in Chapter 15. Table 19-4 lists the key elements of the website.
Table 19.4. Key Elements of the WcfHost Website
Element | Description |
|---|---|
| WCF service endpoint file, referencing the |
| Standard web |
| Standard |
Any website containing the elements in Table 19-4 can act as a WCF data portal host. The web.config file must contain the configuration section for WCF, defining the endpoint for the data portal—for example:
<system.serviceModel>
    <services>
    <service name="Csla.Server.Hosts.WcfPortal">
      <endpoint address=""
                contract="Csla.Server.Hosts.IWcfPortal"
                binding="wsHttpBinding"/>
    </service>
    </services>
  </system.serviceModel>
WCF services are defined by their address, binding, and contract.
For a WCF service hosted in IIS, the address is defined by IIS and the name of the svc file, so it is not specified in the web.config file. As shown here, you may provide a "" address or no address at all. If you use some other hosting technique, such as WAS or a custom Windows service, you may need to specify the server address.
In the case of a CSLA .NET data portal endpoint, the contract is fixed; it must be Csla.Server.Hosts.IWcfPortal. The contract is defined by the interface implemented in the data portal, as discussed in Chapter 15. It may not be different from this value.
The binding can be any synchronous WCF binding. The only requirement imposed by the data portal is that the WCF binding must be synchronous; beyond that, any binding is acceptable. You may choose to use HTTP, TCP, named pipes, or other bindings. You may choose to configure the binding to use SSL, X.509 certificates, or other forms of encryption or authentication. All the features of WCF are at your disposal.
Remember that the data access code for your business objects will run on the application server. This means that the application server's web.config file must define the connection strings required by your data access code.
<connectionStrings><add name="PTracker" connectionString="your connection string"providerName="System.Data.SqlClient" /><add name="Security" connectionString="your connection string"providerName="System.Data.SqlClient" /></connectionStrings>
This is the same configuration you'd put in the client's app.config file when using a local data portal configuration, but now these values must be on the server, because that is where the data access code will execute.
The CslaAuthentication value must be the same on both client and server. You can change it to Windows, as long as you make that change on both sides. If you do change this value to Windows, then you must ensure that the WCF host website is configured to require Windows authentication and to impersonate the calling user, because in that case, CSLA .NET will simply use the value provided by .NET.
At this point, you should understand how to configure the application and how to configure the data portal for either local (2-tier) or remote (3-tier) operation.
The UI application can be found within the ProjectTracker solution. The project is named PTWpf and references the ProjectTracker.Library project, along with Csla.dll. ProjectTracker.Library is a project reference, while Csla.dll is a file reference.
When building applications using the CSLA .NET framework, it is best to establish a file reference to the framework assembly, but use project references between the UI and any business assemblies. This makes debugging easier overall, because it helps prevent accidental changes to the CSLA .NET framework project, while enabling fluid changes to both the business objects and UI code.
Let's go through the creation of the WPF UI. First, I'll discuss the layout and design of MainForm, then I'll cover the process of logging a user in and out.
With the common code out of the way, I'll discuss the process of maintaining the roles and project data in detail. At that point, you should have a good understanding of how to create lookup dialogs, as well as both grid-based and detail forms.
The MainForm form is the core of the application in that it provides navigation and hosts the user controls for display to the user. It coordinates the flow of the entire application.
As you can see from Figure 19-1 earlier in the chapter, the application has a graphic look and feel. This is implemented in MainForm by using a series of gradient-filled Rectangle and Path objects. All these graphic elements are contained in a Grid named BackgroundGrid; you can look at how this is done in the code download, which you can find either in the Source Code/Download area of the Apress website at www.apress.com/book/view/1430210192 or at www.lhotka.net/cslanet/download.aspx. My focus in this chapter is not on the graphics and layout concepts of WPF, so I'll focus on the navigation, data binding, and interaction with the business objects.
Navigation
The Grid named LayoutRoot contains the actual content of the form. This grid defines two columns: the left one contains the navigation controls, and the right one contains the contentArea control discussed earlier in this chapter.
Each section of the navigation area is contained in an Expander, which contains a list of Hyperlink controls—for example:
<Expander IsExpanded="True" Header="Projects" ><ListBox><ListBoxItem><Hyperlink Name="ShowProjectListButton"Click="ShowProjectList">Show list</Hyperlink></ListBoxItem><ListBoxItem><Hyperlink Name="NewProjectButton"Click="NewProject">Add new</Hyperlink></ListBoxItem><ListBoxItem><Hyperlink Name="CloseProjectButton"Click="CloseProject">Close project</Hyperlink></ListBoxItem></ListBox></Expander>
Each Hyperlink control has a Click event handler, which is implemented in the code behind the form. Each event handler is responsible for implementing the behavior required by the user. For example, the NewProject() event handler looks like this:
private void NewProject(object sender, EventArgs e){try{ProjectEdit frm = new ProjectEdit(Guid.Empty);ShowControl(frm);}catch (System.Security.SecurityException ex){MessageBox.Show(ex.ToString());}}
Creating a new project is a matter of displaying the ProjectEdit form to the user. You do this by creating a new instance of ProjectEdit with an empty Guid value (to indicate a new project should be added) and calling the ShowControl() method to display the form in the content area of MainForm. Any security exceptions are caught and displayed to the user in a dialog. Another example is the CloseProject() handler.
private void CloseProject(object sender, RoutedEventArgs e){ProjectSelect frm = new ProjectSelect();bool result = (bool)frm.ShowDialog();if (result){Guid id = frm.ProjectId;ProjectCloser.CloseProject(id);MessageBox.Show("Project closed","Close project", MessageBoxButton.OK, MessageBoxImage.Information);}}
This method is a little more complex, because it displays the ProjectSelect dialog to the user to choose which project to close. If the user chooses a project, the ProjectCloser business class (a command object stereotype) closes the specified project. This is an example of a navigation link that executes a behavior without displaying a new edit form to the user.
All the Click handlers for the navigation items work in a similar manner to those shown here. If you prefer, you could route the click events to some class other than the form itself—possibly a controller or presenter class that is responsible for implementing the behaviors triggered by the user clicking each item.
In any case, the code would be similar to what I'm showing here. Regardless of your UI design pattern, you'll need some code that is responsible for implementing the requested UI behavior and does so by leveraging the preexisting functionality in the business objects.
Login and Logout
The final bit of common functionality implemented in MainForm allows the user to log into or out of the application. It is important to realize that the ProjectTracker application allows unauthorized or guest users to view certain data, so those users can interact with the application even if they haven't logged in.
The login process is triggered when the application first loads and when the user clicks the Login button on the menu. In both cases, a LogInOut() method is called to handle the actual login/logout behavior.
void LogInOut(object sender, EventArgs e){if (Csla.ApplicationContext.User.Identity.IsAuthenticated){ProjectTracker.Library.Security.PTPrincipal.Logout();CurrentUser.Text = "Not logged in";LoginButtonText.Text = "Log in";}else{Login frm = new Login();frm.ShowDialog();if (frm.Result){string username = frm.UsernameTextBox.Text;string password = frm.PasswordTextBox.Password;ProjectTracker.Library.Security.PTPrincipal.Login(username, password);}
if (!Csla.ApplicationContext.User.Identity.IsAuthenticated){ProjectTracker.Library.Security.PTPrincipal.Logout();CurrentUser.Text = "Not logged in";LoginButtonText.Text = "Log in";}else{CurrentUser.Text =string.Format("Logged in as {0}",Csla.ApplicationContext.User.Identity.Name);LoginButtonText.Text = "Log out";}}ApplyAuthorization();IRefresh p = _currentControl as IRefresh;if (p != null)p.Refresh();}
If the current principal is authenticated, the following code will log that user out:
if (Csla.ApplicationContext.User.Identity.IsAuthenticated)
      {
        ProjectTracker.Library.Security.PTPrincipal.Logout();
        CurrentUser.Text = "Not logged in";
        LoginButtonText.Text = "Log in";
      }
On the other hand, if the current principal is not authenticated, then the following code will display the Login dialog to the user so he can enter his username and password:
Login frm = new Login();
        frm.ShowDialog();
The Login dialog form is a modal dialog that prompts the user for his credentials and provides those values to the calling code.
Back in the LogInOut() method, if the user clicks the Login button on the dialog, the username and password values will call PTPrincipal.Login() to validate the credentials.
string username = frm.UsernameTextBox.Text;
          string password = frm.PasswordTextBox.Password;
          ProjectTracker.Library.Security.PTPrincipal.Login(
            username, password);
The result is that Csla.ApplicationContext.User will either be an authenticated PTPrincipal or an UnauthenticatedPrincipal. Then the status of the principal object will be used to determine whether the user is logged in or not.
if (!Csla.ApplicationContext.User.Identity.IsAuthenticated)
        {
          ProjectTracker.Library.Security.PTPrincipal.Logout();
          CurrentUser.Text = "Not logged in";
          LoginButtonText.Text = "Log in";
        }
else
{
CurrentUser.Text =
string.Format("Logged in as {0}",
Csla.ApplicationContext.User.Identity.Name);
LoginButtonText.Text = "Log out";
}If the user was authenticated, then the button text will be changed to Log out, and the user's name will be displayed on the form. Otherwise, the button text will be changed to Log in, and text indicating that the user isn't logged in will be displayed.
In any case, an ApplyAuthorization() method is called so that MainForm can update its display based on the user's identity (or lack thereof). Then the current user control (if any) is notified that the principal has changed.
ApplyAuthorization();
      IRefresh p = _currentControl as IRefresh;
      if (p != null)
        p.Refresh();
Each user control is responsible for handling this event and responding appropriately. Recall that the EditForm base control defines the ApplyAuthorization() method, so each user control can override that method as necessary.
The ApplyAuthorization() method in MainForm is responsible for enabling and disabling navigation items.
private void ApplyAuthorization(){this.NewProjectButton.IsEnabled =Csla.Security.AuthorizationRules.CanCreateObject(typeof(Project));this.CloseProjectButton.IsEnabled =Csla.Security.AuthorizationRules.CanEditObject(typeof(Project));this.NewResourceButton.IsEnabled =Csla.Security.AuthorizationRules.CanCreateObject(typeof(Resource));}
Notice how the actual authorization check is delegated to the per-type authorization methods provided by CSLA .NET. These methods, which I discussed in Chapter 12, were implemented specifically to enable scenarios like this. The idea is that MainForm has no idea whether particular users or roles are authorized to add Project objects. Instead, the Project class itself has that knowledge, and MainForm simply asks the authorization subsystem whether the current user is authorized.
The end result is good separation of concerns: MainForm is concerned with the UI details of enabling and disabling controls, while the actual rules are contained within the business layer.
The LogInOut() method in MainForm calls a Login dialog form to collect and authenticate the user's credentials. After gathering credentials from the user, this dialog form calls PTPrincipal.Login() to do the authentication itself.
Figure 19-3 shows the Login form layout.

The form defines a Result property, which is a bool that indicates whether the user clicked Login or not.
private bool _result;public bool Result{get { return _result; }set { _result = value; }}void LoginButton(object sender, EventArgs e){_result = true;this.Close();}void CancelButton(object sender, EventArgs e){_result = false;this.Close();}
When the user clicks either Login or Cancel, the Result property is set to a corresponding value, and the dialog is closed. Even though the dialog is closed and disappears from the screen, the dialog object still exists in memory, and its properties are available to code in the application. The LogInOut() method relies on the Result property, as well as the values in the UserNameTextBox and PasswordTextBox controls, to do its work.
You've seen how the basic structure of the application works, from the MainForm and Login windows to the EditForm base class. I'll now move on and show how to implement a couple of the actual edit forms and dialogs. I won't cover all the elements in the UI, because they follow some basic themes; once you've seen a couple, you can understand the rest.
The RolesEdit user control allows an authorized user to edit the roles a resource can hold when assigned to a project. This is one of the simplest types of UIs to create, because the business objects and the controls in the Csla.Wpf namespace already handle most of the work.
Figure 19-4 shows the form with an authenticated user editing data.
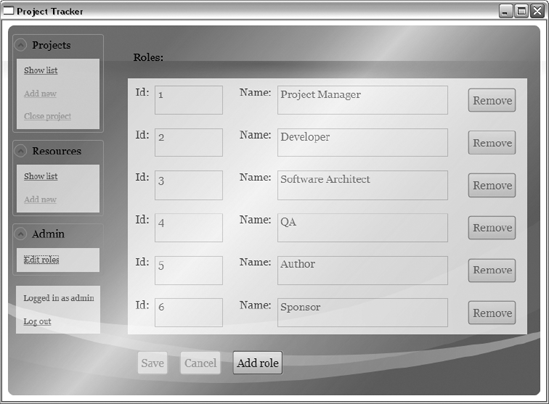
Most of the effort in building this form is in the XAML. I'll walk through it in some detail, since this is the first form I'm discussing.
Form Declaration
To start with, here's the form declaration:
<local:EditForm x:Class="PTWpf.RolesEdit"xmlns="http://schemas.microsoft.com/winfx/2006/xaml/presentation"xmlns:x="http://schemas.microsoft.com/winfx/2006/xaml"xmlns:local="clr-namespace:PTWpf"xmlns:csla="clr-namespace:Csla.Wpf;assembly=Csla"xmlns:ptracker="clr-namespace:ProjectTracker.Library.Admin;assembly=ProjectTracker.Library">
Rather than using a Window or UserControl base class, this uses local:EditForm, which is the EditForm class from earlier in this chapter. Notice that the local: prefix is defined in this header:
xmlns:local="clr-namespace:PTWpf"
You can think of this like a using statement, bringing a namespace into scope for use in this form. That's true for all the xmlns statements, so you can see the Csla.Wpf and ProjectTracker.Library.Admin namespaces are also made available.
Form Resources
The next section of XAML defines some global resources that are available to the entire form.
<local:EditForm.Resources><local:VisibilityConverter x:Key="VisibilityConverter" /><csla:IdentityConverter x:Key="IdentityConverter" /><csla:CslaDataProvider x:Key="RoleList"ObjectType="{x:Type ptracker:Roles}"FactoryMethod="GetRoles"DataChanged="DataChanged"ManageObjectLifetime="True"></csla:CslaDataProvider><csla:ObjectStatus x:Key="RoleListStatus"DataContext="{StaticResource RoleList}" /></local:EditForm.Resources>
I discussed the VisibilityConverter class earlier in the chapter; here you see how it is defined as a resource. The IdentityConverter, CslaDataProvider, and ObjectStatus classes were discussed in Chapter 10:
IdentityConverter: Works around a data refresh issue with WPF data bindingCslaDataProvider: Provides data binding access to theRolesbusiness objectObjectStatus: Elevates the status properties of the business object as dependency properties so they can be bound to UI elements
CslaDataProvider
I want to focus more on the CslaDataProvider, because this is the first time you've seen it in action. Like the WPF ObjectDataProvider, the CslaDataProvider control allows data binding to access an object as a data source. However, the CslaDataProvider goes far beyond the simpler ObjectDataProvider. It can not only create or retrieve a business object, but it can also cancel edits to the object and save the object—all entirely through XAML. Let's go through the previous code.
The ObjectType property specifies the type of business object to be retrieved. The ptracker:Roles type corresponds to the Roles class from the ProjectTracker.Library.Admin namespace.
The FactoryMethod property specifies the name of the static factory method on the Roles class that should be invoked to create or retrieve the object. In this case, the GetRoles() method is invoked.
The DataChanged property specifies an event handler for the DataChanged event. Remember that this form inherits from EditForm, which defines a DataChanged() method to handle this event, so the event is routed to that handler.
Finally, the ManageObjectLifeTime property specifies that the data provider should manage the lifetime of this business object. Setting this to True tells the CslaDataProvider to enable the abilities to cancel edits, add new items to the collection, and remove items from the collection through WPF commanding.
Because IsInitialLoadEnabled is not specified, it defaults to True, which means that the data provider will invoke the factory method and load the business object when the form is loaded initially. This means the form will automatically populate with data as it is loaded, which is what we desire.
Because IsAsynchronous is not specified, it defaults to False, which means that the data provider invokes the factory method on the UI thread. Setting that value to True causes the data to load on a background thread, and the UI displays the values when they have been returned to the UI thread.
ObjectStatus
The ObjectStatus control is bound to the data provider, so its DataContext, or data source, is the business object returned by the provider. This means it exposes properties such as IsSavable and CanEditObject from the business object, so you can use those values to control the state of the UI elements as needed. These properties are used, along with the VisibilityConverter and ListTemplateConverter controls discussed earlier in this chapter, to control how the UI reacts as the user logs in and out of the application.
Setting the DataContext
With the CslaDataSource defined as a resource, it can be used to set the DataContext for part or all of the form. In this case, it is set for all content controls of the form by specifying the DataContext on the Grid control that contains all other controls.
<Grid Name="MainGrid"DataContext="{Binding Source={StaticResource RoleList}}">
The DataContext property is set to a binding expression, so the source object becomes the RoleList data provider from the Resources defined earlier. Data binding understands that when a data source is a data provider control, it should really bind to the Data property of that data provider, which will be the Roles business object in this case.
Grid Resources
The Grid also defines its own Resources, including two DataTemplate elements and a ListTemplateConverter. A DataTemplate defines how each row of data in a ListBox (or similar control) is to be displayed. The default template for a ListBoxItem simply displays the ToString() value of the data object, which is rarely the desired result. Defining a DataTemplate allows you to control exactly how each row of data is displayed.
Two templates are defined in order to deal with authorization. If the user is not authorized to edit the values, a read-only template is used. The read-write template is used if the user is allowed to edit the values. This technique means that the form can define a single ListBox control, but the actual display can be easily altered based on the user's permissions by using the ListTemplateConverter.
Read-Only Template
Each DataTemplate defines a self-contained section of UI. For example, the read-only template looks like this:
<DataTemplate x:Key="lbroTemplate"><Grid><StackPanel Orientation="Horizontal"><TextBlock Text="{Binding Path=Name}" Width="250" /></StackPanel></Grid></DataTemplate>
This means that each row of data in the ListBox will be displayed in a Grid control that contains a StackPanel that displays a TextBlock with a fixed width.
Read-Write Template
The read-write template is more complex, containing a couple of editable TextBox controls and a Button so the user can remove the item from the list.
<DataTemplate x:Key="lbTemplate"><Grid><StackPanel Orientation="Horizontal"><TextBlock>Id:</TextBlock><TextBox x:Name="IdTextBox"Text="{Binding Path=Id,Converter={StaticResource IdentityConverter}}"Width="100" /><csla:PropertyStatus Source="{Binding}"Property="Id" Grid.Column="1"Target="{Binding ElementName=IdTextBox}" /><TextBlock>Name:</TextBlock><TextBox x:Name="NameTextBox"Text="{Binding Path=Name,Converter={StaticResource IdentityConverter}}"Width="250" /><csla:PropertyStatus Source="{Binding}"Property="Name" Grid.Column="1"Target="{Binding ElementName=NameTextBox}" /><ButtonCommand="ApplicationCommands.Delete"CommandParameter="{Binding}"CommandTarget="{Binding Source={StaticResource RoleList},Path=CommandManager,BindsDirectlyToSource=True}"HorizontalAlignment="Left">Remove</Button></StackPanel></Grid></DataTemplate>
There's a lot to this template, so I'll break it down.
Two TextBox controls allow the user to edit the Id and Name properties. Each TextBox has an associated PropertyStatus control, which provides visual cues for the authorization and validation rules associated with those business object properties. Let's look at the TextBox, which is bound to the Name property.
TextBox The TextBox bound to the Name property has an explicit name, because the PropertyStatus control will reference this control by its name. I'll discuss how that works when I cover the PropertyStatus control. Here's the TextBox control declaration:
<TextBox x:Name="NameTextBox"
                     Text="{Binding Path=Name,
                                    Converter={StaticResource IdentityConverter}}"
                     Width="250" />
The Text property is bound to the business object's Name property using a Binding expression. Notice that this expression also uses the IdentityConverter. This is required to avoid the field refresh issue I discussed in Chapter 10, where changes made by the business object to the user-entered value aren't always reflected in the UI. Having a value converter on the binding avoids that issue, and IdentityConverter should be used for any binding where you don't need a more specific value converter.
PropertyStatus The NameTextBox has an associated PropertyStatus control.
<csla:PropertyStatus Source="{Binding}"
                                 Property="Name" Grid.Column="1"
                                 Target="{Binding ElementName=NameTextBox}" />
As discussed in Chapter 10, the PropertyStatus control provides visual cues to the user based on the authorization and validation rules for the business object property. It enables and disables the target control (NameTextBox, in this case) depending on whether the user has read, write, or no access to the property. As shown in Figure 19-5, it displays any broken validation rule messages (for all three severities) for the property. Finally, if any async validation rules are being executed, it will display a busy animation so the user is aware that some background processing related to this property is underway.

Notice how the control is bound to the current DataContext by setting its Source property to {Binding}, and the business object property name is specified through the Property property.
I typically associate a PropertyStatus control with every detail control bound to a business object property to gain the visual cues it provides.
Using ValidatesOnDataErrors You should be aware that WPF itself does provide a more limited way to leverage the validation rules for the business object property. You could choose to declare the TextBox control's binding expression using the ValidatesOnDataErrors property.
Text="{Binding Path=Name,
                                    Converter={StaticResource IdentityConverter},
                                    ValidatesOnDataErrors=True}"
The ValidatesOnDataErrors property specifies that WPF should check the IDataErrorInfo interface of the business object, and if any Error severity rules have been broken, it will alter the display of the TextBox control. By default, it simply adds a thin red border around the control, as shown in Figure 19-6, but you can override that style as you choose.
You can use this feature with or without a PropertyStatus control; the feature and the control are totally unrelated and compatible.
Button Control with Commanding The Remove button uses WPF commanding to interact with the CslaDataProvider control. This is controlled through the Command, CommandTarget, and CommandParameter properties.
<Button
            Command="ApplicationCommands.Delete"
            CommandParameter="{Binding}"
            CommandTarget=
                 "{Binding Source={StaticResource RoleList},
                                   Path=CommandManager,
                                   BindsDirectlyToSource=True}"
              HorizontalAlignment="Left">Remove</Button>
These properties work as follows:
Command: Specifies the command to be sent to the target when the button is clickedCommandParameter: Uses a binding expression to pass a reference to the current child object (the child object representing this one row of data in theListBox) as a parameterCommandTarget: Uses a relatively complex binding expression to direct the command to theCommandManagerof theCslaDataProvider
As discussed in Chapter 10, the CslaDataProvider control understands several standard commands, including Save, Undo, AddNew, and Delete. Of these, the only one that requires a parameter is Delete, because the CslaDataProvider needs to know which object to remove from the collection.
Also, recall from Chapter 10 that commands can only be handled by visual elements, and that a data provider is not a visual element. To support commanding, the CslaDataProvider exposes a CommandManager property, which is an object that is a visual element and can accept commands. The binding expression sets the target to this CommandManager object.
The BindsDirectlyToSource property must be set to True, because the RoleList resource is a data provider. WPF data binding would normally see that the resource is a data provider and would route all bindings to its Data property. However, in this case, the binding needs to actually go to the data provider itself, not the business object it is providing. The BindsDirectlyToSource property causes data binding to work directly against the resource, not the Data property.
You'll see other examples of Button controls using commanding later in this form.
Form Content
The form's content consists of a TextBlock label, a ListBox with the items to edit, and some button controls.
<StackPanel><TextBlock>Roles:</TextBlock><ListBox Name="RolesListBox"ItemsSource="{Binding}"ItemTemplate="{Binding Source={StaticResource RoleListStatus},Path=CanEditObject,Converter={StaticResource ListTemplateConverter}}" /><StackPanel Orientation="Horizontal"Visibility="{Binding Source={StaticResource RoleListStatus},Path=CanEditObject,Converter={StaticResource VisibilityConverter}}">
<ButtonCommand="ApplicationCommands.Save"CommandTarget="{Binding Source={StaticResource RoleList},Path=CommandManager, BindsDirectlyToSource=True}"HorizontalAlignment="Left" IsDefault="True">Save</Button><ButtonCommand="ApplicationCommands.Undo"CommandTarget="{Binding Source={StaticResource RoleList},Path=CommandManager, BindsDirectlyToSource=True}"HorizontalAlignment="Left" IsCancel="True">Cancel</Button><Button Name="AddItemButton"Command="ApplicationCommands.New"CommandTarget="{Binding Source={StaticResource RoleList},Path=CommandManager, BindsDirectlyToSource=True}"HorizontalAlignment="Left" IsCancel="True">Add role</Button></StackPanel></StackPanel>
The core of the UI is the ListBox control, which displays the items from the Roles business object. It does this by specifying an ItemTemplate, which is a DataTemplate that defines how each item in the collection is to be displayed on the form.
As you've seen, two DataTemplate items are defined in the Grid.Resources element earlier in the XAML: one for a read-only display, and one for a read-write display. The ListTemplateConverter switches between those two templates automatically, based on the value of CanEditObject from the ObjectStatus control declared in the form's resources dictionary. That ObjectStatus control exposes the status properties from the business object being used by the form, so the result is that the user is shown the correct template (read-only or read-write) depending on whether she has permission to edit the data.
The various Button controls should also only be visible if the user is allowed to edit the data. Because these controls use WPF commanding to interact with the CslaDataProvider control, they'll automatically enable and disable based on whether the business object allows the user to save, cancel, or add a new item. Take the Save button, for example: the CslaDataProvider control uses the business object's IsSavable property to determine whether the object can be saved, so the button will only be enabled if the object's IsSavable property is true.
However, all the buttons are contained in a StackPanel control, and its Visibility property is bound to the CanEditObject property of the ObjectStatus control defined earlier in the form's resources. By using the VisibilityConverter control, the bool value of CanEditObject is converted to a Visibility value: either Visible or Collapsed.
<StackPanel Orientation="Horizontal"
                  Visibility="{Binding Source={StaticResource RoleListStatus},
                  Path=CanEditObject,
                  Converter={StaticResource VisibilityConverter}}">
The result is that the user will only see the contents of the StackPanel if she's authorized to edit the business object.
Going back to the Button controls, I mentioned that they use WPF commanding to interact with the CslaDataProvider control, just like the Remove button discussed earlier.
<Button
            Command="ApplicationCommands.Save"
            CommandTarget="{Binding Source={StaticResource RoleList},
            Path=CommandManager, BindsDirectlyToSource=True}"
              HorizontalAlignment="Left" IsDefault="True">Save</Button>
In this case, the Save command is sent to the CommandManager of the data provider control, causing any changes to the business object (the Roles collection) to be saved.
At this point, you've seen all the XAML that defines the form. Nearly all the behaviors required for an edit form are handled purely through XAML, with just one bit of code required behind the form.
The ApplyAuthorization Method
The only code required behind the form is an override of the ApplyAuthorization() method. MainForm calls this method when the user logs in or out of the application, so this is the location where any changes must be made based on the new user identity.
When the current .NET principal changes, all authorization rules must be rechecked. The XAML elements handle all the UI changes, but something needs to trigger them to recheck the authorization rules. The simplest way to do this is to rebind them to the business object; that's the purpose of the Rebind() method on the CslaDataProvider control.
protected override void ApplyAuthorization(){var dp = (Csla.Wpf.CslaDataProvider)this.FindResource("RoleList");dp.Rebind();if (!Csla.Security.AuthorizationRules.CanEditObject(dp.ObjectType))dp.Cancel();}
There's one other bit of functionality in this method: a call to the CslaDataProvider control's Cancel() method. The Cancel() method is called if the new user is not authorized to edit the business object.
The reason for doing this is that the user could have been in the middle of editing the data when he logged out. The business object and UI could have a lot of changed data, but now that the user has logged out, those changes can't be saved and shouldn't be displayed. Calling Cancel() causes the object to return to an unchanged state, and data binding updates the UI, ensuring that the user isn't viewing partially edited and effectively invalid data.
This concludes the RolesEdit form. I've covered most of the important concepts required for any WPF data entry form. In the rest of the chapter, I'll discuss a couple of other forms in the application, focusing on slight variations for different UI requirements.
It is common to build forms that display data, perhaps allowing the user to select an item from a list. By using data binding, building such a form is easy. The ResourceList form displays a list of resources from the database, allowing the user to select an item for editing. As with most WPF forms, most of the work is in the XAML.
The form defines a data provider resource.
<csla:CslaDataProvider x:Key="ResourceList"ObjectType="{x:Type PTracker:ResourceList}"FactoryMethod="GetResourceList"IsAsynchronous="True"/>
This is different from the one used in RolesEdit, because IsAsynchronous is True, and IsInitialLoadEnabled isn't set (so it defaults to True). The result is that the data retrieval is started as soon as the form is loaded, but the data retrieval occurs on a background thread. To the user, the form displays almost immediately, and the data appears when it has been retrieved.
In the content of the form, a BusyAnimation control is used to give the user a visual cue that some background task is executing.
<csla:BusyAnimation Height="20" Width="20" Margin="5"IsRunning="{Binding Source={StaticResource ResourceList},Path=IsBusy, BindsDirectlyToSource=True}" />
The IsRunning property is bound to the IsBusy property of the CslaDataProvider control, so, as shown in Figure 19-7, the animation turns on and off based on whether the data provider has an active query.

You can see part of the animation to the right of the Resources: label text.
The content of the form is displayed in a ListBox control, which has a simple DataTemplate to display each row. The ListBox control's MouseDoubleClick event is routed to an event handler, which is a method in the code behind the form.
<ListBox Name="listBox1"
                 ItemsSource="{Binding}"
                MouseDoubleClick="ShowResource"/>
Here's the ShowResource() method:
void ShowResource(object sender, EventArgs e){ResourceInfo item =(ResourceInfo)this.listBox1.SelectedItem;if (item != null){ResourceEdit frm = new ResourceEdit(item.Id);MainForm.ShowControl(frm);}}
This is the only code behind the form. It retrieves the selected item (if any) from the ListBox control, and it passes the item's Id property to a new instance of the ResourceEdit form. Then it uses the ShowControl() method on MainForm to change the user's display to the new form, allowing the user to view or edit the selected item.
The ProjectList form is nearly identical to ResourceList, with one slight twist. The ProjectList form allows the user to enter some filter criteria into a TextBox control. This value is used as a parameter to the GetProjectList() factory method for the ProjectList business object.
This is worth discussing, because I'm using data binding to connect the TextBox control to the parameter value in the CslaDataProvider control. In other words, no code behind the form is required to accept the user's input and use it as a parameter to the data provider.
Here's the data provider declaration with the parameter default highlighted:
<csla:CslaDataProvider x:Key="ProjectList"
ObjectType="{x:Type PTracker:ProjectList}"
FactoryMethod="GetProjectList"
IsAsynchronous="True"
IsInitialLoadEnabled="False">
<csla:CslaDataProvider.FactoryParameters>
<system:String><enter name></system:String>
</csla:CslaDataProvider.FactoryParameters>
</csla:CslaDataProvider>Figure 19-8 shows the form in the Visual Studio designer.

The IsInitialLoadEnabled property is False, ensuring that the data provider won't try to load data from the database using <enter name> as a filter parameter. This also means that the user must enter some filter value to get any results at all.
The interesting part is the declaration of the TextBox control, because it is the TextBox that binds its input value to the data provider's parameter.
<TextBox Name="NameTextBox" AutoWordSelection="True">
            <TextBox.Text>
            <Binding Source="{StaticResource ProjectList}"
              Path="FactoryParameters[0]"
              BindsDirectlyToSource="true"
              UpdateSourceTrigger="PropertyChanged">
            </Binding>
          </TextBox.Text>
I've highlighted the Binding element, because that's what is unusual in this case. The Text property has a binding that connects it to the ProjectList resource (the data provider), with its Path set to FactoryParameters[0], which is the first parameter in the list of parameters.
As with any binding expression that wants to interact with a data provider control, the BindsDirectlyToSource property is True. The UpdateSourceTrigger is set to PropertyChanged, which means the user doesn't need to tab out of the field for the update to occur. Figure 19-9 shows the result of a filtered query.

When the user double-clicks an item in the list, she's taken to the ProjectEdit form, using code just like that behind the ResourceList form.
The final form I'll discuss in this chapter is the ProjectEdit form. This form allows the user to edit the details about a project and the list of resources assigned to the project. This form provides the opportunity to discuss both detail edit forms and master-detail relationships.
Figure 19-10 shows what the form looks like when the user is editing a project.
This form is constructed much like the others you've seen in this chapter. It uses a data provider control and data binding to enable viewing and editing of the data. It uses the ObjectStatus and PropertyStatus controls to enable visual cues for the user, and it uses commanding to implement the buttons.

Data Provider Controls and Data Retrieval
However, this form uses two data provider controls: one to populate the ComboBox controls in the resources list, and one to get the Project business object.
<csla:CslaDataProvider x:Key="RoleList"ObjectType="{x:Type PTracker:RoleList}"FactoryMethod="GetList"IsAsynchronous="True" />
<csla:CslaDataProvider x:Key="Project"ObjectType="{x:Type PTracker:Project}"FactoryMethod="GetProject"IsAsynchronous="False"IsInitialLoadEnabled="False"DataChanged="DataChanged"ManageObjectLifetime="True"/>
The way the Project data provider is used is different from what you've seen so far. In this case, the Id value of the business object is passed into the form when it is created. That value is stored in a field and is then used in the form's Loaded event handler to retrieve the object. Here's the code with the relevant parts highlighted:
private Guid _projectId;private Csla.Wpf.CslaDataProvider _dp; public ProjectEdit() { InitializeComponent(); this.Loaded += new RoutedEventHandler(ProjectEdit_Loaded); _dp = this.FindResource("Project") as Csla.Wpf.CslaDataProvider; }public ProjectEdit(Guid id): this() {_projectId = id;} void ProjectEdit_Loaded(object sender, RoutedEventArgs e) {using (_dp.DeferRefresh()){_dp.FactoryParameters.Clear();if (_projectId.Equals(Guid.Empty)){_dp.FactoryMethod = "NewProject";}else{_dp.FactoryMethod = "GetProject";_dp.FactoryParameters.Add(_projectId);}}if (_dp.Data != null) SetTitle((Project)_dp.Data); else MainForm.ShowControl(null); }
The constructor puts the id parameter into a field, and that field is then used in the Loaded event as a parameter to the data provider control.
The fact that all code interacting with the data provider control is wrapped in a using block with a DeferRefresh() method is important. By default, each time a property of a data provider is changed, the data provider immediately refreshes its data from the database. If you need to set several properties at once, as in this case, you only want the control to go to the database once.
The using block with DeferRefresh() allows you to set many properties of the control, and only at the end of the using block will the control attempt to query the database.
Setting Up Data Binding
As with the other forms you've seen, this one uses data binding by setting a DataContext value for all the content of the form. This is done on the top-level Grid control, which contains all the other content.
<Grid Name="MainGrid"
      DataContext="{Binding Source={StaticResource Project}}"
        Margin="0 0 20 0">
However, this is a master-detail form. While the detail controls are bound to this DataContext (the Project object), items in the list of resources are bound to the ProjectResources collection of the project object.
In other words, the detail controls are bound like this:
<TextBox Name="NameTextBox" Grid.Column="0"
                 Text="{Binding Name,
                                Converter={StaticResource IdentityConverter}}" />
This kind of binding is used on the other forms in this chapter. However, the ListBox control that displays the ProjectResources collection is bound like this:
<ListBox ItemsSource="{Binding Resources}"
                 ItemTemplate="{Binding Source={StaticResource ProjectStatus},
                               Path=CanEditObject,
                               Converter={StaticResource ListTemplateConverter}}"/>
In the Project class, the ProjectResources collection is exposed through a Resources property. Since the Project object has a Resources property, you can use that as the target for a binding expression, making the ListBox control bind to that property.
Each row of data in the ListBox control is one item from the ProjectResources collection: a single ProjectResource object. A DataTemplate is defined in the form to display the values for read-only use, and another is defined for read-write scenarios. This is no different from the previous forms in this chapter.
The only interesting thing in the DataTemplates is the use of a ComboBox control. Remember that this form has two data provider controls, and one returns the list of roles in the RoleList business object. This is used to populate the ComboBox control.
<ComboBoxItemsSource="{Binding Source={StaticResource RoleList}}"DisplayMemberPath="Value"SelectedValuePath="Key"SelectedValue="{Binding Path=Role}"Width="150" />
As with ComboBox controls in Windows Forms or Web Forms, the control is really bound to two data sources at once. One data source is used to populate the items in the list by setting the ItemsSource, DisplayMemberPath, and SelectedValuePath properties. The control is also bound to a single property on the current DataContext by setting the SelectedValue property—in this case, to the Role property for the current ProjectResource business object.
Navigation Through Commanding
Each item in the resources list can be clicked, allowing the user to navigate directly to the ResourceEdit form for that resource. You could do this navigation with a simple event handler, like I did in the ResourceList and ProjectList forms. In this case, however, I'm using commanding to illustrate a different technique you may choose.
The FullName property from the business object is bound to a Button control that is styled to appear like a hyperlink so the user knows to click on it. When the user clicks the control, it sends an Open command with the ResourceId property as a parameter.
<Button Style="{StaticResource LinkButton}"Margin="0" Width="200"Command="ApplicationCommands.Open"CommandParameter="{Binding Path=ResourceId}"Content="{Binding Path=FullName}" Foreground="Blue" />
The ProjectEdit form itself handles the command, because a CommandBinding has been defined on the form for this command.
<UserControl.CommandBindings><CommandBinding Command="ApplicationCommands.Open"Executed="OpenCmdExecuted"CanExecute="OpenCmdCanExecute" /></UserControl.CommandBindings>
A CommandBinding allows you to express, through XAML, that a command should be routed to a specific method. You also need to provide a CanExecute method that returns a Boolean through its CanExecuteRoutedEventArgs parameter, indicating whether the command can be executed at any point in time. If this returns false, the associated Button control is disabled automatically.
In the code behind the form, the two methods are implemented.
private void OpenCmdExecuted(object sender, ExecutedRoutedEventArgs e){if (e.Parameter != null){ResourceEdit frm = new ResourceEdit(Convert.ToInt32(e.Parameter));MainForm.ShowControl(frm);}}private void OpenCmdCanExecute(object sender, CanExecuteRoutedEventArgs e){ e.CanExecute = true; }
The CommandParameter value is available in the OpenCmdExecuted() method through e.Parameter. In the XAML, the ResourceId value was passed as a parameter, so that value is available in the method. That value is used to create a new instance of the ResourceEdit form, which is then displayed to the user by calling the ShowControl() method.
This approach doesn't save any code over handling a Click event directly, but it can provide more flexibility. A full discussion of WPF commanding is outside the scope of this book, but you should know that commands can be routed to different locations, making them more flexible than tightly coupled event handlers.
Using a combination of data binding and the controls in the Csla.Wpf namespace, you can implement in XAML almost all common behaviors required for building a data display or entry form. In many cases, very little code is required behind any form, which improves maintainability of the application.
This chapter has walked through the process of creating a basic WPF UI using the business objects from Chapters 17 and 18. Obviously, there are many ways to create a UI using WPF, so the goal of this chapter was to highlight how you can use data binding to easily create forms to view and edit object data.
The key point to take from this chapter is that when you create your business layer using business objects, the UI developer doesn't need to worry about validation or authorization rules, data access, or most other complex issues. The UI developer can focus on user interaction, the look and feel of the application, and so forth. The result is a high degree of separation between the UI layer and the business layer.
At the same time, because the objects use the data portal mechanism to retrieve and update data, the application is able to exploit the capabilities of mobile objects: running business logic on both the client workstation and an application server as appropriate. Better still, you can simply change the application configuration file to switch between various physical n-tier configurations to meet different performance, scalability, reliability, and security requirements.
Chapter 20 will cover the implementation of a Web Forms UI based on the same set of business objects. Although there are obvious differences between the WPF and Web Forms environments, we'll achieve total reuse of the business logic and data access code when moving from one UI type to the next.