
Chapter 2 Manage databases and instances
Managing relational databases on the Azure platform requires the understanding of several key concepts and technologies that are crucial to a successful cloud implementation. While several of these concepts apply to both on-premises as well as the cloud, a more comprehensive understanding of effectively configuring security, monitoring database performance, and managing server instances in a PaaS offering is necessary.
Skills in this chapter:
Skill 2.1: Configure secure access to Microsoft Azure SQL databases
Skill 2.2: Configure SQL Server performance settings
Skill 2.3: Manage SQL Server instances
Skill 2.1: Configure secure access to Microsoft Azure SQL databases
Azure SQL Database secures your data at multiple layers to provide enterprise-level security and to meet industry security standards. SQL Database provides encryption for data in motion using Transport Layer Security, for data at rest using TDE (Transparent Data Encryption), and for data in use using Always Encrypted.
This skill focuses on the approach and steps necessary to effectively secure your relational databases and appropriately implement key security features in Azure SQL Database. Some of these steps can be quite different from an on-premises implementation of SQL Server.
This skill covers how to:
Configure firewall rules
As explained in Chapter 1, “Implement SQL in Azure,” one of the key concepts and benefits of Azure SQL Database is that it is accessible from nearly anywhere by exposing it over the internet with a TCP endpoint via port 1433., Microsoft provides multiple layers and levels of security to ensure that your database and data is secure and protected. One of those layers is firewall rules. The firewall is the means by which access is granted to a server and or database based on the originating IP address of the incoming request.
By default, all Transact-SQL (T-SQL) access (incoming requests) to your Azure SQL server is blocked by the firewall, and in order to allow incoming requests at least one server-level firewall rule is needed. Firewall rules specify which IP address ranges from the internet are allowed and can be applied at both the server and database levels.
Chapter 1 also provides an overview of how the firewall rules process works. Incoming connection attempts must pass through the firewall in order to access the specified database or server. The firewall first checks that the IP address of the incoming client request falls in the range of any of the specified firewall rules specified at the database-level of the database the client is trying to connect to (as specified in the connection string). If there is a match, the connection is allowed only on the specified database. If there is no match, the firewall makes the same request to the rules specified at the server-level. If there is still no match, the connection fails. If there is a match at the server level (the logical instance level), the client has access to all the databases on the Azure SQL server.
Server-level firewall rules
Server-level firewall rules grant access to all the databases within the same logical server. Server-level firewall rules are stored in the master database and can be created and configured through the following methods:
Azure Portal
T-SQL
Azure PowerShell
Azure CLI
REST API
Portal
Server-level firewall rules can be created and updated via the Azure portal through the Firewall Settings page, which can be accessed from either the Server Overview page shown in Figure 2-1, or the Database Overview page show in Figure 2-2.
From the Server Overview page, you can access the Firewall Settings page by either clicking Firewall in the left-hand menu under Settings, or by clicking the Show Firewall Settings link in the Server Overview page, as shown in Figure 2-1.

Figure 2-1 Accessing the Firewall Settings page via the Server Overview page
From the Database Overview page, you can access the Firewall Settings page by clicking Set Server Firewall on the toolbar, as shown in Figure 2-2.

Figure 2-2 Accessing the Firewall Settings page via the Database Overview page
Regardless of whether you go through the Server Overview page or the Database Overview page, either option will open the Firewall Settings page, shown in Figure 2-3. The Firewall Settings page is where firewall rules are managed at the server-level. By default, when a server and database are first created, no firewall rules exist and therefore at least one server-level firewall rule must be created, even before adding any database-level firewall rules.

Figure 2-3 Configuring Server-level firewall rules
The Firewall Settings page will automatically list your client IP address, and clicking the Add Client IP button on the toolbar will add a single firewall rule using the client IP address as the Start IP and End IP (don’t forget to click Save). In order to create server-level firewall rules via the Azure portal, you must be the subscription owner or a subscription contributor.
The Allow Access To Azure Services option, when enabled, allows applications and connections from Azure to connect to the Azure SQL server. Using this option, an internal firewall rule with a starting and ending IP address of 0.0.0.0 is created, indicating that connections from within Azure are allowed, such as from Azure App Services. It is important to understand that enabling this option allows connections from Azure, including connections from other subscriptions. Thus, care and best practices should be implemented to make sure login and user permissions are only allowed to authorized users.
Azure SQL Database supports a maximum of 128 server-level firewall rules, but creating a large number of server-level firewall rules is not recommended. Uses for server-level firewall rules will be discussed shortly.
The Firewall Settings page only allows one operation per save action. For example, adding multiple IP address ranges, or adding an IP address range and deleting another range before saving the changes is not permitted. A single create/delete/edit operation is permitted per save action.
Server-level firewall rule names must be unique. When adding a firewall rule via the portal, and the name of the new firewall rule matches the name of an existing rule, you will be informed that firewall rule names must be unique and you will not be allowed to create the new rule as shown in Figure 2-4. Existing rules can be edited simply by clicking in the appropriate field.
It is a best practice to name the firewall rule so it will help you remember what the server-level firewall setting is for.

Figure 2-4 Unique firewall rule names
T-SQL
Server-level firewall rules can be managed and maintained using T-SQL through a set of system stored procedures and catalog views, including:
sp_set_firewall_rule System stored procedure to create a new or update an existing server-level firewall rule.
sp_delete_firewall_rule System stored procedure to delete server-level firewall rules.
sys.firewall_rules Catalog view that lists the current server-level firewall rules.
The following code example uses the sp_set_firewall_rule system stored procedure to create a new firewall rule with the name “accting,” a starting IP address of 192.168.1.11, and an ending IP address of 192.168.1.30. The sp_set_firewall_rule system stored procedure must be run in the master database.
EXECUTE sp_set_firewall_rule @name = N'accting', @start_ip_address = '192.168.1.11',
 @end_ip_address = '192.168.1.30'
Figure 2-5 shows the results of the T-SQL execution. First, the sys.firewall_rules catalog view is called to display the existing firewall rules, followed by the execution of sp_set_firewall_rule system stored procedure to create the new firewall rule. The procedure sys.firewall_rules is again called to show the creation of the new firewall rule.

Figure 2-5 Creating a new server-level firewall rule in T-SQL
Both system stored procedures and the catalog view is available only in the master database to the server-level principal login or Azure Active Directory principal.
Unlike the Azure portal, when creating a new firewall rule via T-SQL and specifying an existing firewall rule name as a parameter to sp_set_firewall_rule system stored procedure, Azure will update the existing firewall rule and not generate an error. It should also be noted that the very first server-level firewall rule cannot be created using T-SQL, but all subsequent rules can be. Initial server-level firewall rules must be created using the Azure portal, the Azure PowerShell, the Azure CLI, or the REST API.
When creating server-level firewall rules via T-SQL, you must connect to the SQL Database instance as a server-level principal or an Active Directory Administrator.
Azure Powershell
Azure PowerShell provides a set of cmdlets in which to manage server-level firewall rules, including:
Get-AzureRmSqlServerFirewallRule Returns a list of the existing server-level firewall rules.
New-AzureRmSqlServerFirewallRule Creates a new server-level firewall rule.
Set-AzureRmSqlServerFirewallRule Updates an existing server-level firewall rule.
Remove-AzureRmSqlServerFirewallRule Deletes the specified server-level firewall rule.
Microsoft provides two ways to execute these PowerShell cmdlets; through the PowerShell IDE or through the Azure Cloud Shell in the Azure Portal. The Azure Cloud Shell brings the PowerShell experience into the Azure Portal and allows you to easily discover and work with all Azure resources. The above PowerShell cmdlets work seamlessly in both, but the example below uses the Azure Cloud Shell.
The following code example creates a new server-level firewall rule named “engineering” on the server “demo908” in the RG-WestUS resource group with a starting IP address of 192.168.1.31 and an ending IP address of 192.168.1.40. Be sure to replace the resource group name with the appropriate name for your resource group.
New-AzureRmSqlServerFirewallRule -ResourceGroupName "RG-WestUS" -ServerName "demo908"
-FirewallRuleName "engineering" -StartIpAddress "192.168.1.31" -EndIpAddress
"192.168.1.40"
Figure 2-6 shows the execution of the New-AzureRmSqlServerFirewallRule PowerShell cmdlet to create a new firewall rule. The cmdlet was executed in the Azure Cloud Shell which creates a Cloud Shell and a PowerShell environment. The benefit to this is that because you are authenticated in the portal already, you can execute cmdlets such as New-AzureRmSqlServerFirewallRule without the necessity of executing additional cmdlets to authenticate and obtain other Azure environment and subscription information. In addition, the Azure Cloud Shell maintains the latest version of the Azure PowerShell cmdlets, thus you can be confident that you are working with the latest version in every Cloud Shell session.
Figure 2-6 also shows the Firewall Settings page with the newly created server-level firewall rule. The takeaway here is that PowerShell makes it easy to manage server-level firewall rules through a small set of cmdlets.

Figure 2-6 Creating a new Server-level firewall rule in PowerShell
You’ll notice that there are differences in creating and managing firewall rules when using T-SQL versus PowerShell. For example, PowerShell provides individual cmdlets to create, update, and delete firewall rules, whereas T-SQL uses a single system stored procedure to create and update a firewall rule. Items such as these are good to keep in mind when navigating between the technologies.
Azure CLI
The Azure CLI 2.0 is Azure’s new command-line interface for working with and managing Azure resources. It is optimized to work with Azure resources via the command line that work against the Azure Resource Manager. The following commands are used with the Azure CLI to manage server-level firewall rules:
az sql server firewall create Creates a server-level firewall rule.
az sql server firewall delete Deletes a server-level firewall rule.
az sql server firewall list Lists current server-level firewall rules.
az sql server firewall rule show Shows the details of a server-level firewall rule.
az sql server firewall rule update Updates an existing server-level firewall rule.
Similar to PowerShell, there are two ways in which to work with the Azure CLI. The first is to download and install the Azure CLI installer, which provides the command-line experience through a command window. This client can be installed on Windows, Linux, and the macOS.
You can either run the Azure CLI through the Bash Shell or through a normal Windows command window. If using a command window, open a command prompt as an administrator and execute the following to log in with your default subscription:
az login
You will be prompted to log in and enter an authentication code. Once authenticated, you can execute commands simply and easily. The following code example uses the Azure CLI to create a new server-level firewall rule directly within the command prompt window. Be sure to replace the resource group name with the appropriate name for your resource group.
az sql server firewall-rule create --resource-group RG-WestUS --server demo908 -n mrking
 --start-ip-address 192.168.1.41
--end-ip-address 192.168.1.50
Figure 2-7 shows the execution of the Azure CLI command and the new firewall rule in the Firewall Settings page in the Azure portal as the result of the Azure CLI command execution.

Figure 2-7 Creating a new Server-level firewall rule with the Azure CLI 2.0
Similar to PowerShell, the Azure CLI can be accessed through the Azure portal via the Azure Cloud Shell. Launch the Cloud shell from the top navigation bar in the Azure portal, then select the Bash option from the shell drop-down list, as shown in Figure 2-8.

Figure 2-8 Using the Azure CLI in the Azure Cloud Shell
The Azure CLI via the Azure Cloud Shell provides a streamlined experience similar to the PowerShell experience. The Azure CLI is best used for building automation scripts to work with the Azure Resource Manager.
Here are some closing thoughts on server-level firewall rules. As firewall rules are temporarily cached, it is recommended that you execute DBCC FLUSHAUTHCACHE on occasion, which will remove any cached entries and clean up the firewall rule list, thus improving connection performance.
Server-level firewall rules should be used sparingly. Consider the following for using server-level firewall rules:
For administrative functions
Multiple databases have the same access requirements
Amount of time spent configuring each database individually
It is highly recommended that no firewall rules be created with a starting IP address of 0.0.0.0 and an ending IP address of 255.255.255.255.
Database-level firewall rules
Database-level firewall rules provide a more granular level of security by allowing access only to a specified database. Unlike server-level firewall rules, database-level firewall rules can only be created using T-SQL.
The following T-SQL system stored procedures and catalog views are used to manage database-level firewall rules:
sys.database_firewall_rules Catalog view which lists the current database-level firewall rules.
sp_set_database_firewall_rule System stored procedure to create a new or update an existing database-level firewall rule.
sp_delete_database_firewall_rule System stored procedure to delete database-level firewall rules.
The following code example uses the sp_set_database_firewall_rule system stored procedure to create a new firewall rule with the name “accting,” a starting IP address of 192.168.1.11, and an ending IP address of 192.168.1.30.
EXECUTE sp_set_database_firewall_rule @name = N'accting', @start_ip_address =
'192.168.1.1',
@end_ip_address = '192.168.1.10'
Figure 2-9 shows the results of the T-SQL execution. First, the sys.database_firewall_rules catalog view is called to display the existing firewall rules for the selected database, followed by the execution of sp_set_database_firewall_rule system stored to create the new firewall rule. The catalog view sys.database_firewall_rules is again called to show the creation of the new firewall rule.

Figure 2-9 Creating a database-level firewall rule with T-SQL
Similar to server-level firewall rules, you can have a maximum of 128 database-level firewall rules. It is also recommended that database-level firewall rules be used whenever possible to help ensure the portability of your database.
As a reminder, the order in which the incoming connection checks the firewall rules is important. The firewall first checks the incoming IP against the ranges specified at the database-level. If the incoming IP address is within one of the ranges, the connection is allowed to the SQL Database. If the incoming IP does not match one of the specified ranges at the database-level, the server-level firewall rules are then checked. If there is still no match, the connection request fails. If there is a match at the server-level, the connection is granted and the connection is granted to all databases on the logical server.
Troubleshooting the database firewall
Even though you may have your firewall rules configured correctly, there may still be times when you cannot connect, and the connections experience does not behave as you would expect. As such, the following points can help you pinpoint the connection issue.
Local firewall configuration Azure SQL Database operates over TCP endpoint 1433. If this port is not opened and enabled on your computer or company firewall, you will not be able to connect.
Login and Password issues Many times the connections issues are login and password related. For example, perhaps the user name and password are not typed correctly, or the login does not have permissions on the Azure SQL Database or server.
NAT (Network address translation) There will be times when the IP address displayed on the Firewall Settings page is different from the IP address being used to connect to Azure. You can see an example of this in Figure 2-10. This typically happens when your computer is behind a company firewall due to NAT. An example of this can be seen in Figure 2-10. The IP address that should be used is the external (NAT) IP address, shown in Figure 2-10, is the one specified from the SQL Server login dialog.

Figure 2-10 Different IP address due to NAT
Microsoft states that it may take up to five minutes for the new firewall rules to take effect. Additionally, if your IP address is a dynamic IP (for example, your network provider changes your IP address every few days), this could also be a symptom.
A key takeaway from these points is that the firewall rules only provide clients with an opportunity to attempt to connect to the server and database. Appropriate and necessary credentials must still be provided to connect.
Configure Always Encrypted for Azure SQL Database
SQL Database provides encryption for data in use using Always Encrypted, a featured designed specifically to protect and safe-guard sensitive data such as social security numbers, national identification numbers, credit card numbers, and phone numbers, just to name a few.
One of the main benefits of Always Encrypted is that it provides client applications to safely and securely encrypt and decrypt data without ever revealing the encryption keys to the database engine. Thus, by providing a necessary separation between those who can view the data and those who manage the data, Always Encrypted ensures that no unauthorized users have access to the encrypted data.
Always Encrypted is achieved by installing an Always Encrypted enabled driver on the client machine (for example, .NET Framework 4.6 or later, JDBC, or Windows ODBC), making encryption completely transparent to the application. The driver has the responsibility of automatically encrypting and decrypting sensitive data at the client within the application. When data is generated at the client, the driver encrypts the data before sending it to the database engine. Likewise, the driver transparently decrypts incoming data from query results retrieved from encrypted database columns.
As mentioned earlier, Always Encrypted uses keys to encrypt and decrypt data. Two types of keys are used; a column encryption key (CEK) and a column master key (CMK). Column encryption keys are used to encrypt data in an encrypted column. Column master keys are key-protecting “keys,” in that they encrypt one or more column encryption keys. It is up to you to specify the information about the encryption algorithm and cryptographic keys to be used when configuring column encryption.
The database engine never stores or uses the keys of either type, but it does store information about the location of the column master keys. Always Encrypted can use external trusted key stores such as Azure Key Value, Windows Certificate Store on a client machine, or a third-party hardware security module. Since this skill focuses on Azure SQL Database, the example will use Azure Key Vault.
Whenever the client driver needs to encrypt and decrypt data, the driver will contact the specified key store, which contains the column master key. It then uses the plaintext column encryption key to encrypt the parameters. The retrieved key is cached to reduce the number of trips to the key store and improve performance. The driver substitutes the plaintext values of the parameters for the encrypted columns with their encrypted values, which it then sends to the entire query for processing.
To enable Always Encrypted within the application, you must first set up the required authentication for the Azure Key Vault (for this example), or whatever key store you are using. When the application requests the key from the key store, it needs authentication to do so. Thus, the first step is to set up a user that will be used to authenticate the application.
In the Azure portal, select the Azure Active Directory option from the left navigation pane. In the App registrations pane, click the New application registration button on the toolbar, which will open the Create pane, shown in Figure 2-11. In the Create pane, provide a Name and Sign-on URL. The Sign-on URL can be anything as long as it is a valid URL. For example, in Figure 2-11 the Name is myClientApp and the Sign-On URL is http://myClientApp. Leave the Application type as Web App / API. Click Create.

Figure 2-11 Registering a new Azure active directory application
Back in the App registrations pane, click on your newly created app, which will open the Settings pane. In the Settings pane, click on the Required Permissions option, which will open the Required Permissions pane, shown in Figure 2-12.

Figure 2-12 Adding application permissions
In the Required Permissions pane, click on the Add button on the toolbar, which will open the Add API access pane. In the API access pane, select the Select API option, which will open the Select an API pane shown in Figure 2-13.

Figure 2-13 Selecting the Windows Azure Service Management API
In the Select an API pane, select Windows Azure Service Management API option, then click Select to close the Select an API pane. The Enable Access pane will automatically open, shown in Figure 2-14. Check the box in the Delegated Permission section for Access Azure Service Management as organization users (preview), then click Select.

Figure 2-14 Enabling delegated permissions to the API
Back on the Add API access pane, ensure that there are green checkmarks for items 1 and 2, then click Done. The Required Permission pane should now list two APIs: the Windows Azure Service Management API which you just added, and the Windows Azure Active Directory API. Close the Required Permissions pane.
Back on the App registrations settings pane for the client application, click the Keys option which will open the Keys pane, shown in Figure 2-15.

Figure 2-15 Creating the Application Key
In the Keys pane you need to create a new key. Enter a description and set the expiration date. Your options for the expiration date are 1 year, 2 years, or Never Expires. The key value will be assigned with the key that is saved. Select 1 year, then click the Save button. As shown in Figure 2-16, the key is automatically generated.

Figure 2-16 Copying the new Application key
You will need this key in your application, so copy this key and save it somewhere, then close the Keys blade. You also need the Application ID for this application, so back on the Settings blade, click the Properties option and copy the Application ID from the Properties pane, shown in Figure 2-17. Save this value somewhere as you will use it shortly as well.

Figure 2-17 Getting the Application ID
The next step is to create the Azure Key Value in which to store the Always Encrypted keys. In the Azure portal, click New, then select Security + Identity, then select the Key Vault option shown in Figure 2-18.

Figure 2-18 Creating a new Azure Key Vault
The Create key vault pane will open, shown in Figure 2-19. In this pane, provide a Name, select the appropriate Resource Group (or leave the Create new option selected if a Resource Group does not exists), accept the default values for the Pricing Tier Access Policies, and Advanced Access Policies, ensure the Pin to dashboard option is checked, then click Create.

Figure 2-19 Configuring the Azure Key Vault
When the Key Vault is created, open the Key Vault by clicking on the tile on the dashboard. In the Key Vault Properties pane, click the Access Policies tile, which will open the Access Policies pane. One user should be listed, which should be you, becauseyou are the creator and owner of the Key Vault.
However, the client application needs to authenticate to the Key Vault via a user that has permissions to the Key Vault. That could be you and your user listed, but that is not best practice. This is the reason you went through the steps of creating a new Active Directory application for authenticating to the Key Vault.
Click Add New in the Access Policies pane, then in the Add Access Policy pane, expand the Select principal option that opens the Principal pane, shown in figure 2-20.

Figure 2-20 Adding a new user access policy
In the Principal pane, start typing the name of the application you created in Azure Active Directory. In this example, the application was named myClientApp, so as I started to type “myc,, the myClientApp was displayed. Click on the appropriate principal and click Select.
In the Add access policy pane, click on the dropdown arrow for the Key permissions. Select the following Key permissions as shown in Figure 2-21:
Get
List
Create
Unwrap Key
Wrap Key
Verify
Sign
The above list are the minimal permissions needed for the principal to access and use the keys for Always Encrypted. You may choose more, but the list above is the minimum needed.
The Wrap Key permission uses the associated key to protect a symmetric key, while the Unwrap Key permission uses the associated key to unprotect the wrapped symmetric keys.

Figure 2-21 Configuring access policy permissions
Click OK on the Add access policy pane. The Access policies pane should now look like Figure 2-22.

Figure 2-22 Newly added User Access Policy
So far you have used the portal to configure the Azure Key Vault, but this configuration can also be done via PowerShell. PowerShell contains two cmdlets that allow you to create the Azure Key Vault and set the access policy. Again, in your code be sure to replace the name of the Resource Group with the name of your Resource Group. If you already have an Azure Key Vault with the name specified below, be sure to supply a different name in the code.
New-AzureRmKeyVault -VaultName 'aekeyvault' -ResourceGroupName 'RG-WestUS' -Location
 'West US'

Set-AzureRmKeyVaultAccessPolicy -VaultName 'aekeyvault' -ResourceGroupName 'RG-WestUS'
-ServicePricipleName 'myClientApp' -PermissionsTokeys
 get,wrapkey,unwrapkey,sign,verify,list,get,create
At this point you are ready to implement and configure Always Encrypted. First, create a database in which you can work with. You can do that via the Azure portal or via T-SQL.
CREATE DATABASE [database1]  (EDITION = 'Basic', SERVICE_OBJECTIVE = 'Basic', MAXSIZE =
2 GB);
GO
With the database created, use the following T-SQL to create a table.
CREATE TABLE [dbo].[Customer](
  [CustomerId] [int] IDENTITY(1,1),
  [FirstName] [nvarchar](50) NULL,
  [LastName] [nvarchar](50) NULL,
  [MiddleName] [nvarchar](50) NULL,
  [StreetAddress] [nvarchar](50) NULL,
  [City] [nvarchar](50) NULL,
  [ZipCode] [char](5) NULL,
  [State] [char](2) NULL,
  [Phone] [char](10) NULL,
  [CCN] [nvarchar](16) NOT NULL,
  [BirthDate] [date] NOT NULL
  PRIMARY KEY CLUSTERED ([CustomerId] ASC) ON [PRIMARY] );
 GO
The created table has several columns in which sensitive data is gathered, such as credit card number (CCN) and birth date. This example will use those columns to implement and configure Always Encrypted.
Once the table is created, right-mouse click on the table in the Object Explorer window in SQL Server Management Studio and select Encrypt Columns, as shown in Figure 2-23.

Figure 2-23 Starting the Always Encrypted wizard
The Always Encrypted Wizard opens with the Introduction page. Click Next to move to the Column Selection page, shown in Figure 2-24. The Column Selection page is where you select the columns you want to encrypt, the type of encryption, and what column encryption key to use. Select the CCN and Birthdate columns as shown in Figure 2-24.
Once those columns are selected, you now need to select the encryption type. Click the encryption type dropdown arrow for each column. Notice that you have two options for the encryption type: Deterministic and Randomized.
Deterministic encryption uses a method that always generates the same encrypted value for any given plain text value. Deterministic also allows you to group, filter, join tables, and do equity searches on encrypted values.
Randomized encryption uses a method that encrypts data in a less predictable manner. This encryption is more secure, but does not allow grouping, indexing, joining, or equity searches.
Notice that the Encryption Key value defaults to CEK_Auto1 (New), meaning that since you have yet to create any keys, the wizard will create a new column encryption key for you.

Figure 2-24 Selecting the columns to be encrypted
Also notice in Figure 2-24 that there is a warning on the CCN column. This is just for informational purposes, alerting how it will change collation of the column to binary collation. Always Encrypted only supports binary collations, so the wizard will be changing the collation for that column so that it can encrypt the column. You should take note of what the current collation of the column is in case you need to roll it back. The wizard has no knowledge of the columns prior state.
Also note that indexed columns encrypted using randomized encryption is not supported. Additionally, the following column characteristics are not supported:
Columns that are keys for nonclustered indices using a randomized encrypted column as a key column.
Columns that are keys for clustered indices using a randomized encrypted column as a key column.
Primary key columns when using randomized encryption.
Click Next to take you to the Master Key Configuration page of the wizard, shown in Figure 2-25. Since a column master key has not been created previously, the default value is to auto generate a column master key, which is what is needed.
By default, the wizard selects to store the column master key in a Windows certificate store, so change the option to store the key in Azure Key Vault. When selecting the Azure Key Vault option, you will be asked to authenticate and sign in to Microsoft Azure, at which point the wizard will retrieve your Azure Key Vault names. If you have multiple Azure subscriptions, select the appropriate subscription in which you created the Azure Key Vault.
Select the appropriate Azure Key Vault from the dropdown and then click Next.

Figure 2-25 Master Key configuration
The Run Settings page of the wizard simply gives you a couple of options of proceeding. One of the options will generate a PowerShell script that you can then run later to set up and configure Always Encrypted, and the other option is to proceed and finish now.
Also on this page is several warnings. The first warning states that while the encryption/decryption is taking place, no write operations should be performed on the table. Any write operations that are performed during the encryption/decryption process may cause a loss of data.
The other warning simply states that depending on the SQL Database performance SKU (Basic, Standard, Premium), the performance may vary. In this case, it’s a small table with no data so it does not take too long. Click Next on the Run Settings wizard to kick off the process and take you to the Results page, shown in Figure 2-26.
There are three steps in the process. The first step creates the column master key, the next step creates the column encryption key, and the last step performs the actual encryption. Again, since there is no data to encrypt, the process is quite fast. Depending on how much data exists in the table and the type of data, the last step in the process could take some time.
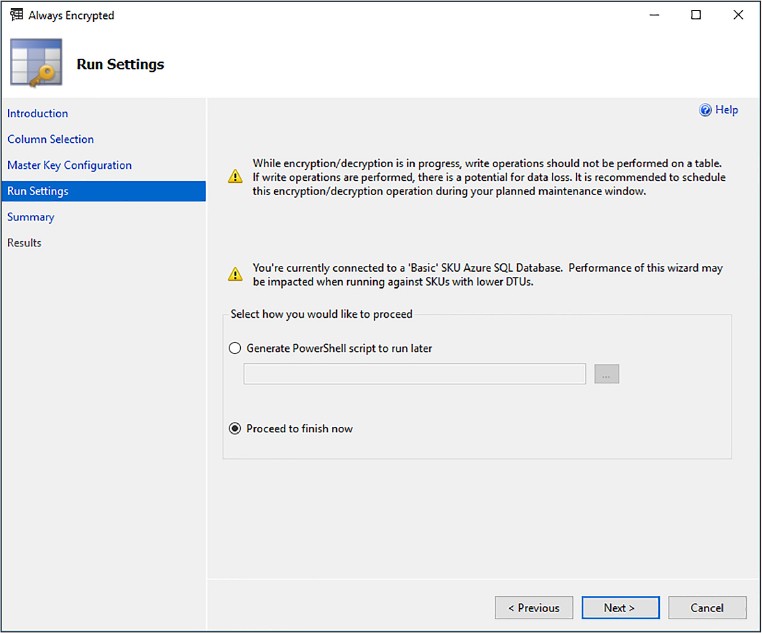
Figure 2-26 Always Encrypted process completion
When the encryption process is complete, click Close. At this point, Always Encrypted for Azure SQL Database has been configured. The following code snippets show how to implement Always Encrypted in your application. The full code can be downloaded from this book’s homepage.
First, you will need the database connection string, which you can get from the Azure portal. You will then need the ClientId and Secret key. The ClientId is the ApplicationId you copied in Figure 2-17. The Secret is the key value you copied in Figure 2-17.
static string connectionString = @"<connection string from portal>";
static string clientId = @"";
static string clientSecret = "";
The following code snippet is the critical piece of code that enables Always Encrypted in your database connection string. You can either use the SqlConnectionStringBuilder class as shown in the code snipped below, or you can simply add the keywords “Column Encryption Setting=Enabled” manually to your connection string. Either is fine, but to enable Always Encrypted, you must use one of these methods.
SqlConnectionStringBuilder connStringBuilder = new SqlConnectionStringBuilder(connectionString);
connStringBuilder.ColumnEncryptionSetting = SqlConnectionColumnEncryptionSetting.Enabled;
connectionString = connStringBuilder.ConnectionString;
The code below registers the Azure Key Vault as the application’s key provider and uses the ClientId and Secret to authenticate to the Azure Key Vault.
_clientCredential = new ClientCredential(clientId, clientSecret);
SqlColumnEncryptionAzureKeyVaultProvider azureKeyVaultProvider =
new SqlColumnEncryptionAzureKeyVaultProvider(GetToken);
Dictionary<string, SqlColumnEncryptionKeyStoreProvider> providers =
new Dictionary<string, SqlColumnEncryptionKeyStoreProvider>();
providers.Add(SqlColumnEncryptionAzureKeyVaultProvider.ProviderName,
 azureKeyVaultProvider);
SqlConnection.RegisterColumnEncryptionKeyStoreProviders(providers);
As discussed previously, client applications must use SqlParameter objects when passing plaintext data. Passing literal values without using the SqlParameter object will generate an exception. Thus, the following code shows how to use parameterized queries to insert data into the encrypted columns. Using SQL parameters allows the underlying data provider to detect data targeted encrypted columns.
string sqlCmdText = @"INSERT INTO [dbo].[Customer] ([CCN], [FirstName], [LastName],
[BirthDate])
VALUES (@CCN, @FirstName, @LastName, @BirthDate);";
SqlCommand sqlCmd = new SqlCommand(sqlCmdText);
SqlParameter paramCCN = new SqlParameter(@"@CCN", newCustomer.CCN);
paramCCN.DbType = DbType.String;
paramCCN.Direction = ParameterDirection.Input;
paramCCN.Size = 19;
sqlCmd.ExecuteNonQuery();
When running the full application code, the encrypted data is decrypted at the client and displayed in clear text as seen in Figure 2-27.

Figure 2-27 Viewing decrypted data via an application
However, as seen in Figure 2-28, querying the data directly from within SQL Server Management Studio shows the data encrypted, as it should be.

Figure 2-28 Viewing encrypted data in the database
To test this further, right mouse click in the query window in SQL Server Management Studio and select Connection > Change Connection from the context menu, opening up the SQL Server connection dialog, shown in Figure 2-29. In the connection dialog, click the Options button to display the connection properties. Click the Additional Connection Parameters tab and add the following (as shown in Figure 2-29):
Column Encryption Settings=Enabled
Click the Login tab and type in your authentication password, then click Connect. Once authenticated, re-execute the SELECT statement to query the table, and you will see that the encrypted data now comes back as clear text, as shown in Figure 2-30.

Figure 2-29 Setting the Always Encrypted additional connection string parameter in SSMS
The data comes back as clear text because the same client driver used in the client application was also called and used when the query was executed in the query window. When the SELECT statement was issued, the Column Encryption Setting=Enabled connection string parameter was added to the query connection string, at which point the data was encrypted.

Figure 2-30 Viewing decrypted data in the database
The principal objective of Always Encrypted is to ensure that sensitive data is safe and secure, regardless of where your data resides (on-premises or in the cloud). A key value-proposition of Always Encrypted is that it assures users that sensitive data can be stored in the cloud safely and securely.
To further ensure proper security, there are a few key management considerations to keep in mind.
Never generate column master keys or column encryption keys on a computer that is hosting your database. Use a separate computer to generate the keys which should be dedicated for key management.
Implement a key management process. Identify roles of who should and should not have access to keys. A DBA, for example, may not generate keys, but may manage the key metadata in the database since the metadata does not contain plaintext keys.
Periodically replace existing keys with new keys, either due to compliance regulations or if your keys have been compromised.
Always Encrypted can be configured either using SQL Server Management Studio, PowerShell, or T-SQL. T-SQL has a limitation in that you cannot provision column master or column encryption keys, nor can you encrypt existing data in selected database columns. The following table details what tasks can be accomplished with SSMS, PowerShell, and T-SQL.
Table 2-1 Always Encrypted functionality with the different tools
Task |
SSMS |
PowerShell |
T-SQL |
Provision CMK and CEK |
Yes |
Yes |
No |
Create key metadata in the database |
Yes |
Yes |
Yes |
Create new tables with encrypted columns |
Yes |
Yes |
Yes |
Encrypt existing data in selected database columns |
Yes |
Yes |
No |
Configure cell level encryption
Another method for encrypting your data is via cell-level encryption (CLE) to help protect and secure your data at the data tier. Similar to Always Encrypted, in which specific columns are encrypted, cell-level encryption is used to encrypt specific columns or cells. Cell-level encryption uses a symmetric encryption and is often referred to or called column-level encryption. A key benefit of cell-level encryption, like Always Encrypted, is that you can encrypt individual cells/columns with different keys. Cell-level encryption is also quite fast and is a great option when working with large amounts of data.
With Cell-level Encryption, encryption and decryption is done by explicitly calling the ENCRYPTBYKEY or DECRYPTBYKEY functions. These functions require the use of a symmetric key, which must be opened to be used. Both ENCRYPTBYKEY or DECRYPTBYKEY return a varbinary type, thus when storing CLE-encrypted data, the column type must be varbinary with a maximum size of 8000 bytes.
Cell-level encryption uses a database master key for its encryption, which is a symmetric key used to protect private keys and asymmetric keys within the database. When created, the database master key is encrypted using the AES_256 algorithm along with a user-supplied password. A database master key is created by issuing the following T-SQL statement:
CREATE DATABASE [database2]  (EDITION = 'Basic', SERVICE_OBJECTIVE = 'Basic', MAXSIZE =
2 GB);
GO
USE database2
GO
CREATE MASTER KEY ENCRYPTION BY PASSWORD = 'AwesomeP@ssw0rd'
GO
In order to create the database master key and any certificates, you need the following permisions:
CONTROL permission on the database
CREATE CERTIFICATE permission on the database
ALTER permission on the table
With the master key created, you need to create a certificate and symmetric key, which can be done via the following T-SQL:
CREATE CERTIFICATE CreditCardCert01
   WITH SUBJECT = 'Customer Credit Card Numbers';
GO

CREATE SYMMETRIC KEY CreditCards_Key01
    WITH ALGORITHM = AES_256
    ENCRYPTION BY CERTIFICATE CreditCardCert01;
GO
The Create Certificate statement creates a database-level securable that follows the X.509 standards. Because the certificate was created with the database master key, the ENCRYPTION BY PASSWORD option is not required.
The certificate can be time-based, meaning, by supplying a START_DATE and EXPIRY_DATE parameter you can specify when the certificate becomes valid and when it expires. By default, if the START_DATE parameter is not specified it becomes valid when the certificate is created. Likewise, if the EXPIRY_DATE parameter is not specified, the certificate expires one year from when after the START_DATE.
The Create Symmetric statement creates a symmetric key in the database and is encrypted using the certificate created above. A symmetric key must be encrypted using either a certificate, password, another symmetric key, or asymmetric key. A single symmetric key actually be encrypted using multiple encryption types.
In this example, the key was encrypted with the AES_256 algorithm. Starting with SQL Server 2016, all algorithms other than AES_128, AES_192, and AES_256 are no longer supported.
To be cell-level encryption to work, execute the following T-SQL to create a table and insert records into the table.
CREATE TABLE [dbo].[Customer](
  [CustomerId] [int] IDENTITY(1,1),
  [FirstName] [nvarchar](50) NULL,
  [LastName] [nvarchar](50) NULL,
  [MiddleName] [nvarchar](50) NULL,
  [StreetAddress] [nvarchar](50) NULL,
  [City] [nvarchar](50) NULL,
  [ZipCode] [char](5) NULL,
  [State] [char](2) NULL,
  [Phone] [char](10) NULL,
  [CCN] [nvarchar](19) NOT NULL,
  [BirthDate] [date] NOT NULL
  PRIMARY KEY CLUSTERED ([CustomerId] ASC) ON [PRIMARY] );
  GO
INSERT INTO Customer (FirstName, LastName, CCN, BirthDate)
VALUES ('Brady', 'Hunter', '1234-5678-1234-5678', '01/04/1964')
INSERT INTO Customer (FirstName, LastName, CCN, BirthDate)
VALUES ('Scott', 'Gaster', '5678-1234-5678-1234', '06/20/1976')
INSERT INTO Customer (FirstName, LastName, CCN, BirthDate)
VALUES ('Phillip', 'Green', '7890-1234-7890-1234', '09/02/1973')
INSERT INTO Customer (FirstName, LastName, CCN, BirthDate)
VALUES ('Joey', 'Klein', '3456-7890-3456-7890', '08/31/1985')
INSERT INTO Customer (FirstName, LastName, CCN, BirthDate)
VALUES ('Robert', 'DAntoni', '6789-4321-6789-4321', '05/06/1991')
GO
Next, execute the following T-SQL, which will modify the table and add a column in which to store the encrypted credit card numbers. As mentioned earlier, the EncryptByKey and DecryptByKey functions return a varbinary type and since the encrypted data will be stored in this new column, the data type will be varbinary.
ALTER TABLE Customer
    ADD CCN_Encrypted varbinary(128);
GO
In order to use the EncryptByKey function, the symmetric key must first be opened to encrypted data. The next statement encrypts the values in the CCN column using the EncryptByKey function (which uses the symmetric key) and saves the results in the CCN_Encrypted column.
OPEN SYMMETRIC KEY CreditCards_Key01
    DECRYPTION BY CERTIFICATE CreditCardCert01;
UPDATE Customer
SET CCN_Encrypted = EncryptByKey(Key_GUID('CreditCards_Key01')
    , CCN, 1, HashBytes('SHA1', CONVERT( varbinary
    , CustomerId)));
GO
You can view the results of the encryption by executing a simple SELECT statement. The encrypted data is shown in Figure 2-31.
SELECT FirstName, LastName, CCN, BirthDate, CCN_Encrypted FROM Customer
GO
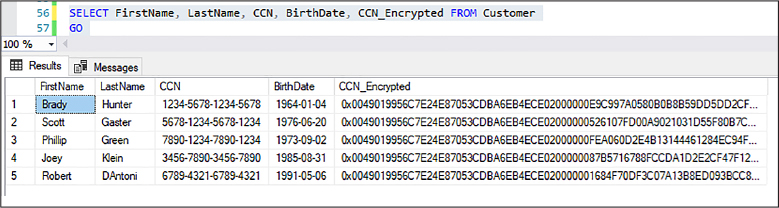
Figure 2-31 Viewing encrypted data with Cell-level Encryption
To verify that the encryption, reopen the symmetric key and then issue the following T-SQL which uses the DecryptByKey function to decrypt the values in the CCN_Encrypted column. If the decryption was successful, the original number will match the decrypted number, as shown in Figure 2-32.
SELECT CCN, CCN_Encrypted
    AS 'Encrypted card number', CONVERT(nvarchar,
    DecryptByKey(CCN_Encrypted, 1 ,
    HashBytes('SHA1', CONVERT(varbinary, CustomerID))))
    AS 'Decrypted card number' FROM Customer;
GO

Figure 2-32 Using symmetric keys to decrypt data
In this example, the HashBytes function was used to hash the input. When using the HashBytes function, algorithms of MD2, MD4, MD5, SHA, SHA1, and SHA2 can be used. Also, in this example an authenticator was used. Authenticators are additional data that gets encrypted along with the data to be stored encrypted. When the data is decrypted, the authenticator is also specified. If the incorrect authenticator is not specified, the data is not decrypted and a NULL is returned. In this example, the column CreditCardID is used as the authenticator.
You likewise could encrypt data using simple symmetric encryption. For example:
UPDATE Customer
SET CCN_Encrypted = EncryptByKey(Key_GUID('CreditCards_Key01'), CCN);
GO
While a case for using TDE and CLE together could be made, they are typically used for different purposes. CLE has advantages over TDE when encrypting small amounts of data, but when performance is not too much of a concern, then CLE should be considered. With CLE, the data is still encrypted when it is loaded into memory and allows for a higher degree of customization.
On the other hand, TDE can be very simple to deploy with no changes to the application or database and the performance is better over CLE.
Configure Dynamic Data Masking
Dynamic Data Masking (DDM) is a security feature that limits data exposure by masking it to non-privileged users. It provides the ability to designate how much of the sensitive data should be readable with minimal impact on the application layer. Dynamic data masking simply hides the sensitive data in the result set of a query, while keeping the database unchanged. Masks are applied at query time when the results are returned.
Dynamic data masking can be applied to any data deemed as sensitive data by you, such as credit card numbers, social security or national identification numbers, email address, or phone numbers. Dynamic data masking includes several built-in masking functions, but also provides the ability to create a custom mask.
The following example will walk through implementing Dynamic Data Masking. To begin, create a new Azure SQL Database either via SQL Server Management Studio or the Azure portal. Once created, connect to that database with SQL Server Management studio and execute the following T-SQL which creates a Customer table with several columns that will contain sensitive data (such as email, credit card number, and social security number). The script then inserts five rows of data.
CREATE TABLE [dbo].[Customer](
  [CustomerId] [int] IDENTITY(1,1),
  [FirstName] [nvarchar](50) NULL,
  [LastName] [nvarchar](50) NULL,
  [MiddleName] [nvarchar](50) NULL,
  [StreetAddress] [nvarchar](50) NULL,
  [City] [nvarchar](50) NULL,
  [ZipCode] [char](5) NULL,
  [State] [char](2) NULL,
  [Phone] [char](10) NULL,
  [Email] [nvarchar] (50) NULL,
  [SSN] [char] (11) NOT NULL,
  [CCN] [nvarchar](19) NOT NULL,
  [BirthDate] [date] NOT NULL
  PRIMARY KEY CLUSTERED ([CustomerId] ASC) ON [PRIMARY] );
  GO

INSERT INTO Customer (FirstName, LastName, Email, SSN, CCN, BirthDate)
VALUES ('Brady', 'Hunter', '[email protected]', '999-99-0001', '4833-1200-7350-8070',
 '01/04/1964')
INSERT INTO Customer (FirstName, LastName, Email, SSN, CCN, BirthDate)
VALUES ('Scott', 'Gaster', '[email protected]', '999-99-0002', '5145-1800-0184-8667',
 '06/20/1976')
INSERT INTO Customer (FirstName, LastName, Email, SSN, CCN, BirthDate)
VALUES ('Phillip', 'Green', '[email protected]', '999-99-0003', '3767-6401-5782-0031',
 '09/02/1973')
INSERT INTO Customer (FirstName, LastName, Email, SSN, CCN, BirthDate)
VALUES ('Joey', 'Klein', '[email protected]', '999-99-0004',
'3797-0931-5791-0032', '08/31/1985')
INSERT INTO Customer (FirstName, LastName, Email, SSN, CCN, BirthDate)
VALUES ('Robert', 'DAntoni', '[email protected]', '999-99-0005',
'4854-1299-2820-4506', '05/06/1991')
GO
Once the script executes, log in to the Azure Portal and go to the database you created and click on the Dynamic Data Masking option that will open the Masking Rules pane, shown in Figure 2-33.

Figure 2-33 Selecting the columns to mask
No masking rules have been created, but the pane does show recommended columns to mask. You can click on the Add Mask button for the specific column, or you can click on the Add Mask button on the toolbar.
Clicking the Add Mask button next to the recommended field is a quick way to add the mask. Many times the portal is smart enough to recognize what type of field it is and apply the appropriate mask. However, it is not guaranteed, so the quickest and most efficient way to add the column mask is to click the Add Mask button on the top toolbar that opens the Add masking rule pane, shown in Figure 2-34. This pane will also open if the portal can’t appropriately apply the mask when clicking the Add Mask button next to the recommended field.
In the Add masking rule pane, simply select the column you want to mask and then select the appropriate mask. In Figure 2-34, the credit card number column is select and thus the credit card mask is selected.

Figure 2-34 Configuring a column mask
Notice the different types of default masks, including:
Default Full masking according to the data types of the designated fields.
Credit Card Exposes the last four digits of the credit card number and adds a constant string as a prefix in the form of a credit card.
Email Exposes the first letter, then replaces the domain with XXX.com.
Random Number Generates a random number based on the supplied upper and lower boundaries.
Custom Text Exposes the first and last characters based on the supplied Prefix and Suffix, then adds a custom padding string in the middle.
The custom text masking function can be used to mask a social security number. Figure 2-35 shows how to use the Prefix and Suffix and padded string to mask all but the last four numbers of a social security number.

Figure 2-35 Creating a custom data mask
Be sure to click the Add button on the Add masking rule pane once the masking rule is configured. After all the masks are applied, click the Save button back on the Masking rules pane. If you don’t click Save, the masking rules will not be applied.
Querying the data shows data unmasked, as shown in Figure 2-36. Even though the masking rules have been applied, the data is returned in clear text because the user that is logged in is an administrator.

Figure 2-36 Query data with unmasked results
To test the masking, a new user can be created, which simply has SELECT permissions on the table. The following T-SQL creates a new user called TestUser and grants SELECT permission on the Customer table.
CREATE USER TestUser WITHOUT LOGIN;
GRANT SELECT ON Customer TO TestUser;
To test masking, the execution context of the current session can be changed to the TestUser, as shown in the following T-SQL. Once the session execution context is changed, the SELECT statement can be reissued, which will be executed in the context of the TestUser.
Execute AS USER = 'TestUser'
SELECT FirstName, LastName, Email, SSN, CCN FROM Customer
As shown in Figure 2-37, the Email, SSN, and CCN columns are displayed with their appropriate masks. It should be noted that the data in the underlying table is not masked, but rather the data is displayed with the corresponding mask.

Figure 2-37 Querying data with masked results
The session execution context can be switched back simply be executing the following T-SQL statement:
REVERT;
Dynamic Data Masking policies are made up of three components:
Users excluded from masking These are either SQL users or Azure Active Directory identities that get automatically unmasked data.
Masking rules Rules that define the designated fields to be masked and their corresponding masking functions.
Masking functions The methods/functions that control the data exposure.
Figure 2-33 shows these three components on the Masking rules blade. The top portion of that blade lists any defined masking rules. Once a masking rule is defined, such as the ones defined in Figures 2-34 and 2-35, it will be listed in the Masking Rules section.
Directly below that section is a section on the blade titled SQL Users Excluded From Masking. This is where you can specify a semicolon-separated list of users (either SQL users or Azure Active Directory identities) in which data masking will not apply.
Lastly, the masking functions are the built-in functions used to mask the data, which you can see in Figure 2-34. Together, these three components help define the data masking policies.
Managing DDM using T-SQL
Dynamic Data Masking can also be configured using T-SQL. The following T-SQL creates a table called Customer2 and defines built-in masking functions applied during table creation.
CREATE TABLE [dbo].[Customer2](
  [CustomerId] [int] IDENTITY(1,1),
  [FirstName] [nvarchar](50) NULL,
  [LastName] [nvarchar](50) NULL,
  [MiddleName] [nvarchar](50) NULL,
  [StreetAddress] [nvarchar](50) NULL,
  [City] [nvarchar](50) NULL,
  [ZipCode] [char](5) NULL,
  [State] [char](2) NULL,
  [Phone] [char](10) NULL,
  [Email] [nvarchar] (50) MASKED WITH (FUNCTION = 'email()') NULL,
  [SSN] [char] (11) MASKED WITH (FUNCTION = 'partial(0, "XXX-XX-", 4)') NOT NULL,
  [CCN] [nvarchar](19) MASKED WITH (FUNCTION = 'partial(0, "xxxx-xxxx-xxxx-", 4)')
NOT NULL,
  [BirthDate] [date] NOT NULL
PRIMARY KEY CLUSTERED ([CustomerId] ASC) ON [PRIMARY] );
A mask can be removed from a column by using the DROP MASKED statement. For example:
ALTER TABLE Customer
ALTER COLUMN Email DROP MASKED;
Managing DDM using PowerShell
Dynamic data masking can be configured using PowerShell cmdlets. Azure PowerShell comes with six cmdlets to create and configure masking rules and policies.
Get-AzureRmSqlDatabaseDataMaskingPolicy Gets the data masking policy for a database.
Get-AzureRmSqlDatabaseDaaMaskingRule Gets the data masking rules from a database.
New-AzureRmSqlDatabaseDataMaskingRule Creates a data masking rule for a database.
Remove-AzureRmSqlDatabaseDataMaskingRule Removes a data masking rule from a database.
Set-AzureRmSqlDatabaseDataMaskingRule Sets the properties of a data masking rule for a database.
Set-AzureRmSqlDatabaseDataMaskingPolicy Sets data masking for a database.
A masking policy is simply the combination of the set of rules that define the columns to be masked, the SQL or AAD users that get unmasked data in the query results, and the masking functions that control the exposure of data for the different scenarios. Thus, by creating a rule that applies the credit card mask to a CCN column, and optionally specifying the SQL or AAD users, a policy has been created. The PowerShell cmdlets allow the creation, modification, and retrieval of the rules and policies.
For example, you can create a new masking rule by executing the following (replacing the appropriate resource group and server names to match your names):
New-AzureRmSqlDatabaseDataMaskingRule -ResourceGroupName "RG-WestUS" -ServerName
 "demo908"
-DatabaseName "database3" -SchemaName "dbo" -TableName "Customer2"
-ColumnName "Email" -MaskingFunction "Email"
It should be clear that dynamic data masking should be used in conjunction with other security features to better secure sensitive data. Dynamic data masking can be used and is a complimentary security feature along with Always Encrypted, Row Level Security, and other security features. The purpose of dynamic data masking exists to limit the exposure of sensitive data to those who should not have access to it.
Creating a mask on a column does not prevent updates to that column. Meaning, even though a user many see the data as masked, that same user can update the data if they have permissions to do so. This means that a proper access control policy should be implemented to limit update permissions.
When using the SELECT INTO or INSERT INTO statements to copy data, if the source data has a masked column, the destination table will result in masked data in the target table. Also, Dynamic Data Masking is applied when running an import or export. Any database that contains masked columns will result in a backup file with masked data.
The system view sys.masked_columns can be queried to see what columns have a mask applied to them and what masking function is used. This view inherits from the sys.columns view that contains an is_masked column and masking_functions column. The following T-SQL returns a good summary view into the columns that are masked and their corresponding masking functions.
SELECT c.name, tbl.name as table_name, c.is_masked, c.masking_function
FROM sys.masked_columns AS c
JOIN sys.tables AS tbl
    ON c.[object_id] = tbl.[object_id]
WHERE is_masked = 1;
For some final notes, a masking rule cannot be defined on the following column types:
A column encrypted with Always Encrypted
FILESTREAM
COLUMN_SET or a sparse column that is part of a column set
A computed column
There are a couple of caveats. If a computed column depends on a column with a MASK, then the computed column will return the masked data. Also, a column with data masking applied cannot be part of a FULLTEXT index.
Configure Transparent Data Encryption
Similar to cell-level encryption, Transparent Data Encryption (TDE) is used to encrypt data at rest. There are several differences between cell-level encryption (CLE) and TDE, one of which is that TDE will automatically encrypt and decrypt the data when it reads and writes the data to/from disk, whereas CLE required the use of the EncryptByKey and DecryptByKey functions. Transparent data encryption also differs from cell-level encryption by encrypting the storage of an entire database, not just a single cell or column. Other differences between CLE and TDE were discussed at the conclusion of the CLE section.
Transparent data encryption helps secure and protect your data by performing database encryption real-time without requiring changes to an application. Encryption is accomplished through a symmetric key called a database encryption key (DEK). The DEK key is protected by the transparent data encryption protector, which is either a service-managed certificate or an asymmetric key stored in Azure Key Vault. The transparent data encryption protector is set at the server level.
When the database starts up, the encrypted DEK is decrypted and then used for the encryption and decryption of the database files. Transparent data encryption performs real-time I/O encryption and decryption of the data at the page level, thus each page is encrypted before it is written to disk, and decrypted when read from disk and into memory.
For Azure SQL Database, TDE is enabled by default at the database level, as shown in Figure 2-38. At this level, TDE can either be turned on or off.

Figure 2-38 Configuring TDE
At the server level, the default setting for TDE in Azure SQL Database is for the database encryption key to be protected by a built-in server certificated. This certificate is unique for each server, but if geo-replication is enabled and a database is participating in a geo-replication relationship, the geo-secondary database will be protected by the primary server key. As a best practice, Microsoft rotates these certificates every 90 days. As shown in Figure 2-39, the Use Your Own Key option is disabled by default, thus the database encryption key is protected by a built-in certificate.

Figure 2-39 configuring bring your own key encryption
As mentioned previously, Azure SQL Database also supports Bring Your Own Key (BYOK), which provides the ability to have control over the TDE encryption keys and stores them in Azure Key Vault. To turn on BYOK, simply select Yes for the Use Your Own Key option for TDE at the server level, as shown in Figure 2-40.

Figure 2-40 selecting the key for bring your own encryption key
When selecting the option to Use Your Own Key, you will be prompted to select the Azure Key Vault and the symmetric key from that vault. When selecting the key, an existing key can be selected, or you have the option to create a new key, as shown in Figure 2-41.

Figure 2-41 creating a new encryption key
Once a key is selected or a new key is created, click Save back on the TDE pane.

Figure 2-42 saving the new encryption key
Clicking save will save the Transparent Data Encryption settings for the server, which is essentially setting the appropriate permissions, ensuring that the database encryption key is protected by the asymmetric key stored in the key vault.
When TDE is configured to use a key from the Azure Key Vault, the server sends the database encryption key of each TDE-enabled database to the Key Vault for a wrapkey request. Key Vault returns the encrypted database encryption key, which is stored in the user database. It is vital to remember that once a key is stored in the Key Vault, that key never leaves the Key Vault. The server can only send key operation requests to the TDE protector material with Key Vault.
The benefits of using Azure Key Vault are many, including:
Support for key rotation.
Key Vault is designed such that no one sees or extracts any encryption keys.
Central management of TDE encryption keys.
More granular control and increased transparency to self-manage the TDE protector.
Separation of keys and data management.
Managing TDE using T-SQL
Transparent Data Encryption can be managed with T-SQL at the database level through a small handful of T-SQL statements and DMVs (dynamic management views). TDE can be enabled and disabled at the database level through the ALTER DATABASE command as follows:
ALTER DATABASE Database1
SET ENCRYPTION OFF
The sys.dm_database_encryption_encryption_keys DMV shows information about the database encryption state and associated encryption keys. A corresponding DMV for the SQL Data Warehouse exists that provides the same information: sysdm_pdw_nodes_database_encryption_keys.
Currently there are no T-SQL statements that allow you to manage TDE at the server level.
Managing TDE using PowerShell
PowerShell provides a nice set of cmdlets with which to configure TDE. In order to use these cmdlets, you must be connected as an Azure owner, contributor, or SQL Security manager.
Set-AzureRmSqlDatabaseTransparentDataEncryption Enables or disables TDE for a database.
Get-AzureRmSqlDatabaseTransparentDataEncryption Gets the TDE state for as the database.
Get-AzureRmSqlDatabaseTransparentDataEncryptionActivity Checks the encryption progress for a database.
Add-AzureRmSqlServerKeyVaultKey Adds an Azure Key Vault key to a SQL server.
Get-AzureRmSqlServerKeyVaultKey Gets a SQL server’s Azure Key Vault keys.
Set-AzureRmSqlServerTransparentDataEncryptionProtector Sets the TDE Protector for a SQL server.
Get-AzureRmSqlServerTransparentDataEncryptionProtector Gets the TDE protector.
Remove-AzurermSqlServerKeyVaultKey Removes an Azure Key Vault key from a SQL server.
The following code snipped uses the Set-AzureRmSqlDatabaseTransparentDataEncryption cmdlet to enable TDE on database on server demo908 and database database4. When executing, be sure to replace the resources with the appropriate names in your environment.
Set-AzureRmSqlDatabaseTransparentDataEncryption -ResourceGroupName "RG-WestUS"
-ServerName "demo908" -DatabaseName "database4" -State Enabled
Skill 2.2: Configure SQL Server performance settings
The most recent releases of SQL Server have come with significant built-in performance enhancements to ensure databases perform well. However, simply installing SQL Server is not enough, and there is not a built-in “make it go faster switch.” There are several post-installation steps to ensure SQL Server itself, as well as the databases, perform appropriately and effectively.
The knowledge and skill necessary to effectively optimize and improve database performance whether you are on-premises and in the cloud, and the skills in this section focus on the approach and steps necessary to monitor and configure your database for optimum database performance.
This skill covers how to:
Configure database performance settings
This section will focus primarily on the common configuration steps and tasks necessary to improve overall database performance. While the majority of the configuration settings can be done at the database level, there is one or two which are configured at the server level and should not be overlooked. The server and database level performance configuration settings include:
Power Plan (Server)
Trace Flags
Parallelism
Query Plan
Many of these performance configuration settings can be done with very little effort but can have a significant performance impact overall, but left unchecked (and improperly configured) can cause your SQL Server to unnecessarily slow down and work harder than it needs to.
Power Plan
Windows Power Plan is a Control Panel configuration setting that was introduced in Windows 2008. A “Power Plan” is a collection of hardware and software settings with the responsibility of managing how your computer manages power. The goal with Power Plan is two-fold; save energy and maximize performance. Thus, the idea behind the “Power Plan” is that Windows may, and does, throttle power to the CPUs to save energy.
The idea and concept behind the Windows Power Plan is good and for the most part, Windows Power Plan does a great job. However, it can wreak havoc on SQL Server. Power Plan throttles CPUs down when they are idle, and throttles them back up when the server is busy, essentially running your server, and SQL Server, at anywhere between 50-70% power.
The reality of this is that CPU-throttling does not respond well to CPU pressure, because in order to get the CPUs back up to 100% utilization, the CPUs need a sustained period of high CPU utilization (of the existing 50-70%) in order to trigger the throttle-up back up to 100% CPU utilization. This does not bode well for SQL Server because overall SQL Server performance will suffer. Queries will take longer to run, transactions will take longer, and on down the line. This applies to both on-premises environments as well as cloud-based IaaS environments.
By default, Windows sets the Power Plan to Balanced, meaning, that Windows will manage the hardware and software and come up with a plan to save energy and maximize performance. Luckily, there are two ways to check the throttling of your CPUs. The first is a third-party tool called CPU-Z (https://www.cpuid.com), and the other is through a Windows performance counter.
Figure 2-43 show the output from the CPU pressure on a real SQL Server box. The Specification is the speed that the processor is rated for, and the Core Speed is the actual running speed of the CPU. Here, the rated speed is 4.00 GHz, but the Core Speed is well below that.
In this case there is not a lot of activity on the server so the CPU was fluctuating quite a bit, and would fluctuate as low as 20-25% for the Core Speed.

Figure 2-43 Comparing rated CPU speed with actual CPU speed
Similar CPU performance information can be obtained through the Windows performance counter Processor Information\% of Maximum Frequency which shows current power level of the CPUs of the maximum frequency. As seen in Figure 2-44, the blue graph bar is tracking the % of Maximum Frequency, and while there are occasional spikes, the average level is around 20%.

Figure 2-44 Using Performance Monitor to track actual CPU utilization
While the Windows Power Plan is not a SQL Server configuration setting, nor is it a setting that is configured at the database level, it is something that needs to be addressed when configuring performance for SQL Server.
This configuration setting can be changed either through the Power Settings option in the Control Panel, or through the BIOS. Depending on the server model, and if the configuration is via the BIOS, power throttling might need to be disable in the BIOS.
To configure the Power Plan in the Control Panel, open the Control Panel and search for Power Options. In the search results, select Power Options, which should show that the Balanced power option is selected. Click the Change plan settings option, then select the Change advanced power settings option, which opens the Power Options dialog.
Figure 2-45 shows the Power Options dialog and the Balanced power plan selected by default. To change the plan, select the drop down, and select High performance to make that power plan the active plan.

Figure 2-45 Configuring Windows Power Plan
With no other changes to the system, either Windows or SQL Server, simply changing this setting alone can improve SQL Server and database performance.
While in the Advanced Settings dialog, also change the setting to Turn off hard disks. By default, the value for this setting is 20 minutes. Set this value to 0.
For Microsoft Azure virtual machines that are created from the Azure portal, both of these settings (Power Plan and Disk sleep setting) are configured appropriately and do not need to be changed. This applies to Windows VMs and SQL Server VMs.
Parallelism
Parallelism is both a server-level and database-level configuration setting that affects the database performance and applies to scenarios where SQL Server runs on a server that has more than one CPU.
Parallelism is the number of processors used to run a single T-SQL statement for each parallel plan execution. When SQL Server is installed on a multi-CPU system, SQL Server does its best to detect the best degree of parallelism.
Parallelism is configured by setting the Maximum Degree of Parallelism, or MaxDOP, value. There is both a server-level configuration value and a database configuration value for MaxDOP. Setting the server-level configuration value sets MaxDOP for all databases on the server. Setting MaxDOP at the database level configures MaxDOP and overrides the server-level configuration value for that database. This section will discuss configuring the setting at the server level.
By default, SQL Server sets the value to 0, which tells SQL Server to determine the degree of parallelism that essentially tells SQL Server to use all the available processors up to 64 processors.
Most PCs today that SQL Server is installed on are NUMA (Non-Uniform Memory Access), meaning that the CPUs are clustered in a way in which they can share memory locally, thus improving performance. Typically, a cluster will consist of four CPUs that are interconnected on a local bus to shared memory.
The easiest way to tell how many NUMA nodes you have is to open Task Manager and select the Performance tab. On the Performance tab, click on the CPU graph that displays a graph on the right. Right-click the graph on the right and select Change Graph To from the context menu. You should see a NUMA node option. If the NUMA node option is grayed out, you have one NUMA node. If it isn’t grayed out, then select that option. The number of graphs you see on the right hand side is how many NUMA nodes the computer has.
Knowing the number of NUMA nodes is important to appropriately configuring the MaxDOP setting. Best practice states that for NUMA computers, MaxDOP should be set at the number of CPUs per NUMA node, or eight, whichever is less. Put simply, the proper setting comes down to whether or not you have eight logical cores inside a NUMA node. For a single NUMA node with less than eight logical processors, keep the MaxDOP at or below the number of logical processors. If more than eight, set it to eight. The same thing applies to Multiple NUMA nodes.
Configuring MaxDOP appropriately can have a significant performance implication. Setting the value too high can decrease concurrency, causing queries to back up on worker threads, thus awaiting time to be executed on a CPU. When the number of parallel threads is high, SQL Server will take the path of keeping parallelized tasks within a single NUMA node. Often times this will cause threads of the same query to share CPU time with other threads of the same query. This can cause an imbalance if some CPU threads are handling parallel threads and other threads are handling single threads, resulting in some threads finishing much more quickly than others.
It is recommended that Maximum Degree of Parallelism, or MaxDOP, not be set to a value of one, because this will suppress parallel plan generation.
Another parallelism setting that should be looked at is Cost Threshold for Parallelism, which is an estimate of how much work SQL Server will do to complete a particular query plan task. The default value is five, which may or may not be good because at this value, queries do not need to be particularly large to be a considered for parallelism.
Cost Threshold for Parallelism is a server-level configuration setting. There is no database-level configuration setting for Cost Threshold for Parallelism.
Best practice states that this value be larger, which will prevent smaller queries being parallelized, thus freeing up threads on the CPU to concentrate on larger queries. Smaller queries might take a bit more time to complete, but it will increase concurrency without reducing MaxDOP for larger queries.
While the default value for this configuration setting is five, this is known to be low in most environments. Best practice states that this value be configured with a higher value depending on your workload, with suggested starting values ranging from 25 to 50 and adjusting appropriately.
Cost Threshold for Parallelism does not apply if your computer has only one logical processor, or if your MaxDOP is configured with a value of one.
Both of these settings can be configured through the Advanced page in the Server Properties page in SQL Server Management Studio, as shown in Figure 2-46. In this example, Maximum Degree of Parallelism has been set to a value of four and the Cost Threshold for Parallelism has been configured with a value of 30 for all the databases on the server.

Figure 2-46 Configuring Max Degree of Parallelism
Cost Threshold for Parallelism can also be configured in SQL Server using T-SQL as follows:
USE master
GO
EXEC sp_configure 'show advanced options', 1 ;
GO
RECONFIGURE
GO
EXEC sp_configure 'cost threshold for parallelism', 30 ;
EXEC sp_configure 'max degree of parallelism', 4;
GO
RECONFIGURE
GO
The Cost Threshold for Parallelism cannot be configured in Azure SQL Database, because this is a server-level setting. Configuring MaxDOP at the database level will be discussed later in this chapter.
Query Store
The SQL Server Query Store is a feature introduced in SQL Server 2016 that provides real-time insights into query performance proactively. The idea and goal with Query Store is that it aims to simplify performance troubleshooting of queries by providing detailed look at query plan changes quickly and efficiently to identify poor performing queries.
Query store does this by capturing a history of all executed queries, their plans, and associated runtime statistics. This information is then available for you to examine through a nice user interface. The data is viewable via time slices so that you can see over a given period of time what changed and when and obtain detailed information about the usage patterns of each query.
It is commonly known that query execution plans can change over time for a variety of reasons. The most common reason is due to the change in statistics, but other reasons can include the modification of indexes or schema changes. Regardless of the reason, the problem has been that the cache where the cache plans are stored only stores the most recent execution plan. Additionally, plans can also be removed from the cache for a number of reasons as well, such as memory pressure. Add these all up and it makes troubleshooting query performance a problem.
The query store solves these problems by capturing and storing vital information about the query and their plans and keeps the history so you can track over time what happened and why that caused the performance issues. The benefit of keeping multiple plan information is that allows you to enforce a particular plan for a given query. This is similar to use the USE PLAN query hint, but because it is done through the query store, no application or code changes are needed.
The query store actually is a combination of three separate stores:
Plan store Contains the execution plan information
Runtime stats store Contains the execution statistics information
Wait stats store Contains the wait statistics information
To improve query store performance, plan execution information is written to all three stores asynchronously, and you can view the information in these stores via the query store catalog views.
By default, Query Store is not enabled and must be enabled either via SQL Server Management Studio or via T-SQL. The reasoning behind this is due to the fact that the capture of the query data requires storage space within the database, and while the amount of data is minimal, the option to take up disk space for this purpose is up to the administrator.
The query store can be enabled either via SQL Server Management Studio, or through T-SQL. To enable query store via SSMS, right mouse click on the database for which you want to enable the query store, and select Properties from the context menu. Select the Query Store page, and change the Operation Mode (Request) value from Off to Read Write, as shown in Figure 2-47.

Figure 2-47 Enabling Query Store
To enable query store via T-SQL, simply execute the following T-SQL statement in a query window on the database for which you want to enable query store. This statement works for both on-premises SQL Server, SQL Server in an Azure VM, and Azure SQL Database. Replace the database name with the name of your database.
ALTER DATABASE database1 SET QUERY_STORE = ON;
Once query store is enabled, a new Query Store folder will appear in the Object Explorer windows for the database you have enabled query store. As shown in Figure 2-48, this folder contains a number of built-in views in which to troubleshoot query performance.

Figure 2-48 SQL Server Database Query Store
The built-in views provide the real-time insight into query performance within your database. For example, double-clicking the Regressed Queries view displays the top 25 regressed queries and associated plans, as shown in Figure 2-49. Other views include:
Overall Resource Consumption Identifies resource utilization patterns to help optimized overall database consumption.
Top Resource Consuming Queries shows most relevant queries that have biggest resource consumption impact.
Queries with Forced Plans Shows all queries which currently have forced plans.
Queries with High Variation Identifies queries with a wide performance variant.
Tracked Queries Use this view to track the execution of your most important queries real-time.
The Tracked Queries view is a great resource to use when you have queries for forced plans and you want to make sure the query performance of each query is where it should be.

Figure 2-49 Query Store Regressed Query View
Given all of this information, simply turning on query store provides a lot of benefit and information. However, to get the most out of query store, ensure that it is properly configured. The Query Store page in the Database Properties dialog allows you to configure the following query store options:
Data Flush Interval The frequency, in minutes, in which the query store data is flushed and persisted to disk. The default value is 15 minutes.
Statistics Collection Interval The granularity in which runtime statistics are aggregated. Available values:
1 Minute
5 Minutes
10 Minutes
15 Minutes
30 Minutes
1 Hour
1 Day
Max Size The maximum size in MB to allocate to the query store within the host database. The default size is 100 MB.
Query Store Capture Mode Indicates the how queries are captures. The default value is All. Available values:
All Captures all queries
Auto Captures queries based on resource consumption
None Stops the query capture process
Size Based Cleanup Mode Data Cleanup mode when the amount of data reaches maximum size. The default value is Auto. Available values:
Auto Automatically performs the cleanup.
Off Data cleanup does not take place
Stale Query Threshold The duration, in days, to retain query store runtime statistics. The default value is 30 days.
However, these and additional query store configuration options that can be configured through T-SQL, including the following Max plans per query. The following T-SQL statement sets the max plans per query to a value of five. This statement works for both on-premises SQL Server, SQL Server in an Azure VM, and Azure SQL Database. Be sure to replace the database name with the name of your database.
ALTER DATABASE database1 SET QUERY_STORE (MAX_PLANS_PER_QUERY = 5)
By default, the Max plans per query option value is 200. Once that value is reached, query store stops capturing new plans. Setting the value to zero removes the limitation with regards to the number of plans captured.
Query store also contains a number of catalog views which represent information about the query store. These catalog views are what the user-interface pull their information from. These catalog views include:
sys.database_query_store_options Displays the configuration options of the query store.
sys.query_store_plan Displays query plan execution information.
sys.query_store_query_text Shows the actual T-SQL and the SQL handle of the query.
sys.query_store_wait_stats Shows wait stat information for the query.
sys.query_context_settings Shows information about the semantics affecting context settings associated with a query.
sys.query_store_query Shows query information and associated aggregated runtime execution statistics.
sys.query_store_stats Shows query runtime execution statistics.
The key takeaway from the query store is that simply enabling query store provides a wealth of information to help troubleshoot and diagnose query performance problems. However, properly configuring the query store to ensure the right amount of information is also critical.
As eluded to a few times, Query Store is supported in Azure SQL Database as a fully managed feature that continuously collects and displays historical information about all queries. Query Store has been available in Azure SQL Database since late 2015 in nearly half a million databases in Azure, collecting query performance related data without interruption.
There are minimal differences between the Query Store in Azure SQL Database and on-premises SQL Server. Most, if not all, of the best-practice configuration settings are the same including MAX_STORAGE_SIZE (100MB), QUERY_CAPTURE, MODE (AUTO), STALE_QUERY_THRESHOLD_DAYS (30), AND INTERVAL_LENGTH_MINUTES (60). As such, migrating from on-premises to Azure becomes a lot easier.
Missing Index DMVs
One could technical think of identifying missing table indexes as “configuring database performance settings.” While working with indexes isn’t a configuration setting in and of itself, indexes do play a vital role in database and query performance.
When a query is submitted for execution, it is routed to the query optimizer. The query optimizer has the responsibility of finding or creating a query plan. As part of this process, it analyzes what are the best indexes for the query based on several factors, including particular filter conditions. If the optimal index does not exist, SQL Server does its best to generate a good query plan, but the plan generated will be a suboptimal plan.
To help troubleshoot query performance problems, Microsoft introduced a number of dynamic management views (DMVs) which assist in identifying possible index candidates based on query history. The DMVs that are specific to missing indexes are the following:
sys.dm_db_missing_index_details Shows detailed information about missing indexes.
sys.dm_db_missing_index_columns Shows information about table columns that are missing an index.
sys.dm_db_missing_index_groups Shows information about what missing indexes that are contained in a specific missing index group.
sys.dm_db_missing_index_group_stats Shows information about groups of missing indexes.
Lets’ see these in action. In the WideWorldImports database, the following query selects a few columns from the Sales.Order table filtering on the CustomerID column.
USE WideWorldImporters
GO
SELECT OrderDate, CustomerPurchaseOrderNumber, ExpectedDeliveryDate
FROM sales.orders
WHERE CustomerID = 556
As shown in Figure 2-50, the sys.dm_db_missing_index_details and sys.dm_db_missing_index_group_stats DMVs are queried. The first query only returns 99 rows (filtering on CustomerID 556), but the important point is the two results that follow. The sys.dm_db_missing_index_details DMV results show that CustomerID was used in the WHERE clause with an equals operator, so the CustomerID is listed in the equity_columns column. Thus, SQL Server is suggesting that CustomerID would be a good index. The inequality_columns column would have data if other operators had been used, such as not equal. Since our filter was an equal operator, no value is listed in this column. The included_columns field is suggesting other columns that could be used when creating the index.

Figure 2-50 Using DMVs to find missing indexes
The sys.dm_db_missing_index_group_stats DMV provides additional insight and important information that is useful, including the unique_compiles, user_seeks, and user_scans columns. With this information it is possible to determine how many times the query has been called, and whether a seek or scan performed when the query was executed. The more times this query is run, these numbers should increase.
This information can be nicely laid out by combining the sys.dm_db_missing_index_details and sys.dm_db_missing_index_columns DMVs, as shown in Figure 2-51.

Figure 2-51 Joining missing index DMVs
The missing nonclustered index can be applied using the following T-SQL.
CREATE NONCLUSTERED INDEX [FK_Sales_Orders_CustomerID]
ON [Sales].[Orders](
[CustomerID] ASC
)
GO
With the index applied, the same query can be executed followed by querying the sys.dm_db_missing_index_details DMV, and as shown in Figure 2-52, the query optimizer has found or generated an optimal query plan and therefore does not recommend any indexes.

Figure 2-52 Missing index query results
The following DMVs are not specific to missing indexes, but are useful in helping identify how indexes are used and if they are providing any value.
sys.dm_db_index_usage_stats Shows different types of index operations and the time each type was last performed.
sys.dm_db_index_operation_stats Shows low-level I/O, locking, latching, and access activity for each partition of a table in index.
sys.dm_db_index_physical_stats Shows data and index size and fragmentation.
sys.dm_db_column_store_row_group_physical_stats Shows clustered columnstore index rowgroup-level information.
Information stored in the sys.dm_db_missing_index_* DMVs are stored until SQL Server is restarted and not persisted to disk.
Configure max server memory
Probably one of the most misunderstood configuration options in SQL Server is the memory configuration option max server memory. The Maximum server memory option specifies the maximum amount of memory SQL Server can allocate to itself during operation. During operation, SQL Server will continue to use memory as needed, up until the point where it has reached the maximum server memory setting.
As SQL Server runs it will intermittently reach out to the operating system to determine how much free memory is left. The problem with this setting is that if you don’t allocate enough memory to the operating system, the operating system will start paging and not enough memory is available to the OS and other applications. SQL Server is designed to release memory back to the operating system if needed, but SQL Server tends to hang on to the memory it already has.
Something else to consider here is the effect that Locked Pages In Memory has on this setting. Locked Pages In Memory is a Windows policy that determines which accounts can use a process to keep data in physical memory and not page it to virtual memory on disk. This policy is disabled by default, and best practice states that this be enabled for SQL Server service accounts. The reason for this is that setting this option can increase SQL Server performance when running in a virtual environment where disk paging is expected. As such, Windows will ensure that the amount of memory committed by SQL Server will be less than, or equal to, the installed physical memory, plus age file capacity.
Leaving the default value in the Maximum server memory configuration setting potentially allows SQL Server to take too much memory and not leave enough for the operating system and other application and resources. SQL Server will, by default, change its memory requirements dynamically as needed, and the documentation recommends that SQL Server be allowed to do that by keeping the Maximum server memory default configuration value.
Depending on the server environment this may not be the best setting. If you need to change the max server memory value, best practice states that you first determine the amount of memory needed by the operating system and other resources, then subtract that number from the total physical memory. The remaining number is the value with which to set the max server memory configuration setting.
If you are unsure of what the best value is for max server memory, a general rule of thumb has been to set it much lower than you think it needs to be and monitor system performance. From there you can increase or lower the value based on analysis. A good way to analyze the available free memory is to monitor the MemoryAvailable Mbytes performance counter. This counter will tell you how much memory is available to processes running on the machine. After monitoring this information for a period of time, you should know how much memory to dedicate to SQL Server, and this value becomes the value for the max server memory setting.
If you are unsure of the workloads and not sure what value to specify for max server memory, a general practice is to configure as follows based on the amount of physical memory and number of CPUs:
4 GB memory with up to 2 CPUs At least 1 GB RAM
8 GB memory with up to 4 CPUs At least 2 GB RAM
16 GB memory with up to 8 CPUs At least 4 GB RAM
32 GB memory with up to 16 CPUs At least 6 GB RAM
64 GB memory with up to 32 CPUs At least 10 GB RAM
SQL Server uses the memory specified in the max server memory setting to control SQL Server memory allocation for resources, including the buffer pool, clr memory, all caches, and compile memory. Memory for memory heaps, thread stacks, and linked server providers are not allocated or controlled from max server memory. When planning maximum memory though, you should account for these settings. Essentially, take the totally physical memory, subtract memory for the OS itself (rule of thumb is 1GB for every 8GB of RM), then subtract memory needed for the additional settings, such as thread stack size (number of worker threads multiplied by thread size). What remains is what you can allocate for SQL Server.
Max server memory can be configured through the Server Properties page in SQL Server Management Studio, or through T-SQL. To configure through SSMS, right mouse click the server in Object Explorer and select Properties from the context menu. In the Server Properties dialog, select the Memory page on the left. Enter the appropriate memory amount in the Maximum server memory field.

Figure 2-53 Configuring Maximum Server Memory
Likewise, max server memory can be configured with T-SQL using the advanced configuration options, as shown in the following code.
sp_configure 'show advanced options', 1;
GO
RECONFIGURE;
GO
sp_configure 'max server memory', 6144;
GO
RECONFIGURE;
GO
For multiple SQL Server instances running on a single server, configure max server memory for each instance, ensuring that the total memory allowance across the instances is not more than the total physical memory of the machine based upon the memory criteria discussed earlier.
Keep in mind that setting the maximum server memory only applies to on-premises SQL Server or to SQL Server running in an Azure virtual machine. You cannot set the maximum server memory in Azure SQL Database, because this is a server-level configuration setting.
Configure the database scope
Earlier in this chapter, several performance configuration settings were discussed to help improve the performance of SQL Server and databases. There are similar settings at the database level, which also pertain to performance, but also help define the overall behavior of a database. The database-scoped configuration settings that will be discussed are the following:
Max Dop
Query Optimizer Fixes
Parameter Sniffing
Legacy Cardinality Estimation
Max DOP
The Max DOP configuration setting is the similar to the server-level Max Degree of Parallelism configuration setting, but Max DOP is a database-level configuration setting. As a refresher, Parallelism is the number of processors used to run a single T-SQL statement for each parallel plan execution.
Setting MaxDOP at the database level overrides the server-level configuration value for that database. The same best practices and guidelines that apply at the server-level also apply to the Max DOP setting at the database level. Once configured the setting takes effect immediately without restarting the server.
When using MaxDOP, SQL Server using parallel execution plans when executing queries, index DDL operations, parallel inserts, online alter column statements, and more.
To configure Max DOP, open the Database Properties dialog and select the Options page on the left, then enter the appropriate Max DOP value as shown in Figure 2-54.

Figure 2-54 Configuring Max DOP at the database level
Likewise, Max DOP can be configured at the database level using T-SQL as follows:
USE Database1
GO
ALTER DATABASE SCOPED CONFIGURATION SET MAXCOP = 4;
GO
Something to keep in mind is that the MaxDOP value can be overridden in queries by specifying the MAXDOP query hint in the query statement.
Query Optimizer Fixes
Prior to SQL Server 2016, whenever a hotfix or CU (Cumulative Update) was released that contained query optimizer improvements, those improvements were not automatically turned on or enabled. This makes sense because of the possibility of the change in query behavior. While you want to assume that optimizer changes were indeed positive, there is always the small chance that the affect could be a negative one. In order to enable the optimizer changes, trace flag 4199 needed to be turned on. This is of course assuming that you installed and tested the hotfix or CU on a test box.
Beginning with SQL Server 2016, query optimizer improvements are now based on the database compatibility level. What this means is that any and all improvements to the query optimizer will be released and turned on by default under consecutive database compatibility levels.
The Query Optimizer Fixes configuration setting, added in SQL Server 2016, enables or disables query optimization hotfixes regardless of the compatibility level of the database, which is equivalent to trace flag 4199. What this means is that with SQL Server 2016 and later, you can safely ignore this setting, which is why by default it is OFF. However, if you are using SQL Server 2016, but have databases that have a previous version compatibility setting, you can consider turning this setting on.
Figure 2-55 shows the Query Optimizer Fixes configuration setting for a database with compatibility level 130 (SQL Server 2016) disabling query optimization hotfixes for the database Database1.
Likewise, this configuration setting can be configured via T-SQL as follows:
ALTER DATABASE SCOPED CONFIGURATION SET QUERY_OPTIMIZER_HOTFIXES=ON ;

Figure 2-55 Configuring Query Optimizer fixes
Parameter sniffing
Parameter sniffing takes place when SQL Server interrogates, or, “sniffs,” query parameter values during query compilation and passes the parameters to the query optimizer for the purpose of generating a more efficient query execution plan. Parameter sniffing is used during the compilation, or recompilation, of stored procedures, queries submitted via sp_executesql, and prepare queries.
By default, this configuration is enabled, as shown in Figure 2-56. In earlier versions of SQL Server parameter sniffing was disabled by turning on trace flag 4136.

Figure 2-56 Configuring Parameter Sniffing
To illustrate how parameter sniffing works and the effect it has on the query plan, the following query as shown in figure 2-57 was run against the AdventureWorks database. The two queries are similar but use different values listed in the WHERE clause. As you can see, different execution plans were generated. The first query performs a clustered index scan while the second query uses a key lookup with a non-clustered index scan. The AdventureWorks database can be downloaded from here: https://github.com/Microsoft/sql-server-samples/releases/tag/adventureworks2014.

Figure 2-57 Different query parameters with different execution plans
As stated earlier, parameter sniffing works when executing stored procedures, so the following code creates a stored procedure which passes in the city name as a parameter.
CREATE PROCEDURE sp_GetAddressByCity (@city nvarchar(50))
AS
SELECT AddressLine1, AddressLine2
FROM Person.Address
WHERE City = @city
GO
Once the stored procedure is created it can then be called twice passing in the two cities from the queries earlier as parameters. The execution plans of both queries are now the same.

Figure 2-58 Using a stored procedure and parameters with similar execution plans
Stored procedures are precompiled on the initial execution along with the execution plan, and therefore the stored procedure will use the same plan for each execution thereafter notwithstanding the parameter being passed in.
Turning parameter sniffing off will tell SQL Server to ignore parameters and generate different execution plans for each execution of the stored procedure. Best practice states that unless you want more control of the execution plans, leave the Parameter Sniffing configuration setting to ON and don’t enable the trace flag.
Legacy Cardinality Estimation
Simply put, cardinality estimation is used to predict how many rows your query is most likely to return. This prediction is used by the query optimizer to generate a more optimal query plan. The better the estimation, the better the query plan.
By default, the Legacy Cardinality Estimation configuration setting is set to OFF because starting with SQL 2014, major updates and improvements were made to the cardinality estimator that incorporated better algorithms and assumptions that are more efficient with the larger OLTP workloads and todays modern data warehouses.
Thus, the Legacy Cardinality Estimation configuration setting exists to allow you to set the cardinality estimation model to SQL Server 2012 and earlier independent of the database compatibility level. Leaving the value to OFF sets the cardinality estimation model based on the database compatibility level of the database.

Figure 2-59 Configuring Legacy Cardinality Estimation
Unless you are running SQL Server 2012 or earlier, the recommendation is to leave this value to OFF simply due to the fact that the latest cardinality estimator is the most accurate.
The Legacy Cardinality Estimation configuration setting is equivalent to trace flag 9481.
Configure operators and alerts
A lot of the information covered so far in this chapter, and especially here in this skill, has to do with being proactive when it comes to working with and troubleshooting SQL Server. As a database administrator, you will want to know as soon as possible when something goes wrong and what the problem is without too much digging.
SQL Server makes that possible through the SQL Server Agent and the Alerts and Operators, which can be configured to provide proactive insight necessary regarding all aspects of SQL Server, including performance problems. Figure 2-60 shows the Alerts and Operators nodes within the SQL Server Agent in which Operators and Alerts will be created and configured.

Figure 2-60 SQL Server agent alerts and operators
Alerts and Operators are a case of what gets configured first. Alerts are created and assigned to operators. But Operators can be assigned Alerts. So, which do you create first? It doesn’t matter really, so Operators will be discussed first because it is easier from a configuration standpoint.
Operators
SQL Server Operators are aliases for people, or groups, which can receive notifications in the form of emails or pages when an alert has been generated.
Creating and defining an operator is quite simple. To create an operator, expand the SQL Server Agent node and right mouse click on the Operators node, and select New Operator from the context menu. In the New Operator dialog, enter an operator name and contact information and make sure the Enabled checkbox is checked. The name must be unique within the SQL Server instance and be no longer than 128 characters. For the contact information, either provide an email address or pager email name, or both. The Pager on duty schedule defines work schedule when the operator can be notified.
In Figure 2-61, the operator has been given a name of Perf_Alerts and an email name of [email protected]. The pager on duty schedule is set for Monday-Saturday from 8am to 6pm. In this example, if an alert is generated on Wednesday after 6pm, the Perf_Alert operator will not be notified via the pager, but will receive an email if an email address is specified.
The Notifications page is where Alerts can be assigned to an Operator. However, since no Alerts have yet been created, we’ll come back to this step. Once the Operator has been configured, click OK.
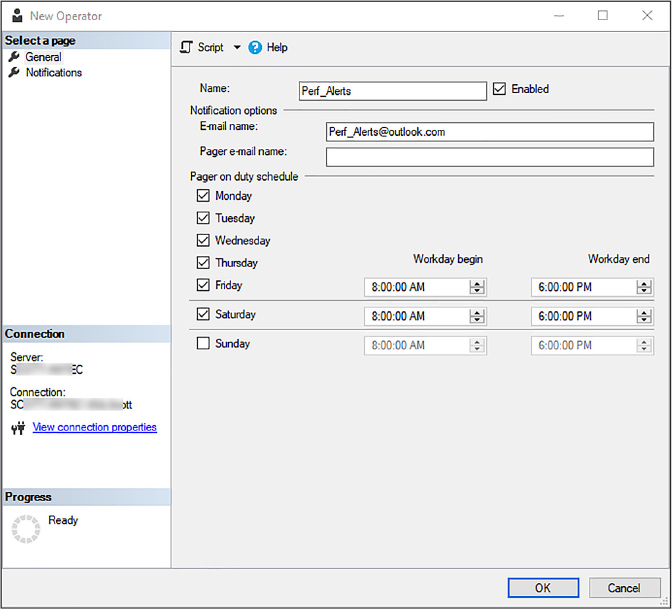
Figure 2-61 Creating a new Operator
Best practice for Operators states that pager and net send options not be used as this functionality will be removed in future version of SQL Server.
Operators can also be created with T-SQL as follows (if the Perf_Alerts alert already exists, change the name of the alert in the code below):
USE [msdb]

GO

EXEC msdb.dbo.sp_update_operator @name=N'Perf_Alerts',
@enabled=1,
@weekday_pager_start_time=80000,
@weekday_pager_end_time=180000,
@saturday_pager_start_time=80000,
@saturday_pager_end_time=180000,
@pager_days=126,
@email_address=N'[email protected]',
@pager_address=N''
GO
Alerts
During SQL Server operation, events are generated by SQL Server and saved into the Windows application log. The SQL Server Agent reads the application log and compares the events to defined and configured alerts. If and when SQL Server finds a match, it kicks off an alert. Alerts are automated responses to the events found in the application log. These alerts are then sent via email or pager to defined operators who can then take action on the alert.
Creating and defining an alert has a few more steps than create an operator, but it’s still not rocket science. To create an alert, expand the SQL Server Agent node and right mouse click on the Alert node, and select New Alert from the context menu. In the New Alert dialog, enter an Alert name and make sure the Enabled checkbox is checked. The name must be unique within the SQL Server instance and be no longer than 128 characters.
There are three types of events from which to generate an alert:
SQL Server events
SQL Server Performance conditions
WMI events
SQL Server events occur in response to one or more events such as a SQL syntax error or syntax error. There are 25 severity codes as shown in Figure 2-62. The error level describes the importance of the error. For example, Severity 10 is information, and 19-25 are fatal. You will definitely want to be notified if a fatal error occurs. A good example of this is severity 23, which suggests that you probably have a corrupted database, or a corruption in one of your databases.
Along with specifying the severity, you also need to select the database name for which this alert is being monitored. You can monitor all database, as shown in Figure 2-62, or a specific database by selecting it from the list.
The Message text allows you to add granularity to the alert by having the alert fire if the event contains certain words or string in the event message.

Figure 2-62 Selecting the Alert Severity and Alert Type for a new Alert
Instead of raising an alert by severity, you can raise it by Error Number in which case the alert will fire when a specific error occurs. There are too many error messages and their associated numbers to list here, but this link is a good place to start: https://technet.microsoft.com/en-us/library/cc645603(v=sql.105).aspx
DBAs are very interested in the performance of their server and databases, and SQL Server Performance Conditions event type allows you to specify alerts which occur in response to a specific performance condition.
For performance conditions, you specify the performance counter to monitor, a threshold for the alert, and the behavior the counter must exhibit for the alert to fire. As shown in Figure 2-63, performance conditions need the following to be configured:
Object The performance counter to be monitored.
Counter The attribute of the object area to be monitored.
Instance The SQL Server instance or database to be monitored.
Alert counter One of the following:
falls below
becomes equal to
rises above
Value A number which describes the performance condition.
In Figure 2-63, the Query Store object has been selected to be monitored with the Query Store CPU usage counter area to be monitored. A specific database has been selected to be monitored (Database 1 in this example), and if the counter rises above a value of 75, then the alert will fire.

Figure 2-63 Select the Alert Type and Performance Conditions for a new Alert
There are over 45 performance condition objects to monitor, each one with their corresponding counters. Another interesting one is the Transactions object and the corresponding Free space in tempdb (KB) counter, which will alert you if the space in TempDB falls below a specific size. These objects are similar to counters you would monitor in Performance Monitor, so if you are planning on working with Alerts, it is recommended that you become familiar with the different objects and their associated counters.
Once the alert type has been defined, the Response page is where the alert is associated to an operator. In Figure 2-64, the alert currently being created is being assigned to the operator Perf_Alert which was created earlier.

Figure 6-64 Selecting the Operator for a new Alert
It is possible to create a new operator or view existing operators.
The Options page of the New Alert dialog is where additional information is configured for the alert. As shown in Figure 2-65, you have the ability to include the alert error text in the message sent either by email or pager, as well as include additional information.

Figure 2-65 Configuring Alert options on a new Alert
Similar to the Operator, Alerts can be created with T-SQL. Using T-SQL is much easier to reuse and include as part of a build script. The following is the T-SQL for the Alert created using the UI above.
USE [msdb]
GO

EXEC msdb.dbo.sp_add_alert @name=N'QueryStoreCPUAlert',
@enabled=1,
@delay_between_responses=0,
@include_event_description_in=1,
@performance_condition=N'Query Store|Query Store CPU usage|Database1|>|75',
@job_id=N'00000000-0000-0000-0000-000000000000'
GO
EXEC msdb.dbo.sp_add_notification @alert_name=N'QueryStoreCPUAlert',
@operator_name=N'Perf_Alerts', @notification_method = 1
GO
As mentioned, Alerts are a great way to proactively know what is going on in your database and SQL Server. However, it is possible to “over alert,” and there is a need to find the right balance between being notified when a response is required and not getting notified when a response isn’t required.
To help with this you will want to define an alerting strategy, which defines severity categories that alerts fall in to. For example, you might consider categorizing the alerts into three or four buckets of severity such as Critical, High, Medium, and Low, or a subset of these. A critical response is something that requires a response and needs attention immediately. High might be something that is not quite as urgent. For example, the alert can happen overnight, or on the weekend, and can wait until the next day or weekday to address. Medium alerts are good to see on occasion and you might route those to a daily or weekly report. Low alerts are information only and might rarely be looked at.
While the above is an example, the idea is to create a strategy and approach that works best for you and doesn’t get into an “over alerting” situation.
Skill 2.3: Manage SQL Server instances
DBAs have the responsibility of configuring and managing each SQL Server instance to meet the needs and the SLA (Service Level Agreement) demands appropriate for the database and workloads planned for the instance.
This skill covers the management of SQL Server instances and the associated databases in order to affectively meet appropriate performance and availability requirements.
This skill covers how to:
Manage files and filegroups
SQL Server uses files and filegroups that contain the data and objects necessary to provide the performance and availability of an enterprise database system. This section will discuss both files and filegroups.
Database Files
SQL Server databases have, at a minimum, two file types, but can have up to three types. The database file types are the following:
Primary Data Contains the startup information for the database and contains pointers to other files in the database. Every database has one primary data file. File extension is .mdf. User data and objects are stored in this database.
Secondary Data Optional, user-defined data files. Secondary files can be spread across multiple disks. The recommended file extension is .ndf.
Transaction Log Holds the log information that is used in database recovery. At least one log file is required for each database. The recommended file extension is .ldf.
When creating a database in SQL Server Management Studio using the Create New Database dialog, the General page automatically fills in the Database files with a single data file on the PRIMARY file group and a single log file, as shown in Figure 2-66. Transaction log files are never part of any filegroups.

Figure 2-66 Data file and transaction log file for a new database
A secondary data file can be added to the database by clicking the Add button on the New Database dialog, as shown in Figure 2-67, and a logical file name is provided.

Figure 2-67 Adding an additional data file
SQL Server files have two names: a logical file name, and an operating system file name. The logical file name is the name used to refer to the physical file in all of the T-SQL statements, and must be unique among the logical file names in the database. The operating system file name is the name of the physical file in the operating system, including the directory path.
Figure 2-68 shows both the logical file given to the secondary data file as DemoDBData2, and a physical file of Data2.ndf. If a physical file name is not supplied, the physical file name will be derived from the logical file name.
It is recommended that when supplying physical file names that they are given names to make it easy to identify which database the files belong. The same can be said about logical file names as well.

Figure 2-68 Specifying a physical file name
Once the database is created the physical file names can be verified by navigating to the Data directory as shown in Figure 2-69. Notice the Primary data file and transaction log as well as the secondary data file named Data2.

Figure 2-69 Viewing the physical database files
SQL Server files, both data and transaction log, can and will automatically grow from the original size specified at the time of creation. More about databases and file growth will be discussed later in the “Create Database” section.
Included in every database is a DMV called sys.database_files, which contains a row per file of a database. Querying this view returns information about each database file, including database logical and physical file name (and path), file state (online or not), current size and file growth, and more.
For example, a popular query used to determine current database size and the amount of empty space in database, which uses the sys.database_files view is the following:
SELECT name, size/128.0 FileSizeInMB,
size/128.0 - CAST(FILEPROPERTY(name, 'SpaceUsed') AS int)/128.0 AS EmptySpaceInMB
FROM sys.database_files;
The basic, yet fundamental, unit of storage in SQL Server is a page. The disk space assigned to a data file in a database, whether it is a .mdf or .ndf, is logically divided into pages numbered contiguously 0 to n. When SQL Server reads and writes data, these operations are done at the page level. In other words, SQL Server reads and writes entire, whole, data pages. Each file in a database has a unique file ID number, and you can see this by querying the sys.database_files view and by looking at the file_guid column.
Pages in SQL Server are 8K in size, which means that a database has 128 pages per MB. Each begins with a small header that contains information about the specific page, which includes the page number and the amount of free space on the page. When SQL Server writes to the page, data rows are added to the page serially. Data rows cannot span pages but portions of a row may be moved off the row’s page.
While a deep understanding of data file pages are outside the scope of this skill, it helps to understand the makeup of database files and how SQL Server uses them to store data.
With the foundation of database files, we now turn our attention to database filegroups.
Filegroups
Filegroups are used to group data files together for multiple purposes. Besides administrative reasons, creating different databases and filegroups and locating those file groups on different disks provides a necessary and needed performance improvement.
There are two types of file groups: Primary and User-defined. The primary filegroup contains all of the system tables and is where user objects are created by default. User-defined filegroups are specifically created by the user during database creation.
Every database contains a default PRIMARY filegroup. As seen in Figure 2-66, when creating a database, the primary data file is placed by default on the primary filegroup. This filegroup cannot be deleted. Subsequent, user-defined filegroups can be created and added to the database to help distribute the database files for the reasons previously explained.
When objects are created in the database, they are added to the primary file group by default unless a different filegroup is specified. The PRIMARY filegroup is the default filegroup unless it is changed by the ALTER DATABASE statement.
Filegroups can be created and added during initial database creation, and can be added to the database post-database creation. To add filegroups during database creation, click on the Filegroups page in the New Database dialog and click the Add Filegroup button as seen in Figure 2-70. Provide a name for the new filegroup and make sure the Read Only checkbox is unchecked.

Figure 2-70 Creating new Filegroups
Next, click on the General page and as you did with Figure 2-67, add new database files to the database. With additional filegroups created you can now select the new filegroups on which to add the database files, as seen in Figure 2-71.

Figure 2-71 Specifying the Filegroups for new database files
Once the database is created the physical file names can be verified by navigating to the Data directory as shown in Figure 2-72. Notice the Primary data file and transaction log as well as the secondary data files and additional transaction log.

Figure 2-72 Viewing the physical files of a new database using Filegroups
You might think that creating databases with additional files and filegroups is difficult, but it is quite the contrary. The following T-SQL statement shows how to create the above database with additional filegroups and database files. When running this script, change the file location to the appropriate drive letter and folder destination that matches your environment.
USE [master]
GO

CREATE DATABASE [DemoDB]
 CONTAINMENT = NONE
 ON  PRIMARY
( NAME = N'DemoDB',
FILENAME = N'D:Program FilesMicrosoft SQL
ServerMSSQL14.MSSQLSERVERMSSQLDATADemoDB.mdf' ,
SIZE = 8192KB ,
MAXSIZE = UNLIMITED,
FILEGROWTH = 65536KB ),
 FILEGROUP [Data1]
( NAME = N'DemoData1',
FILENAME = N'D:Program FilesMicrosoft SQL ServerMSSQL14.MSSQLSERVERMSSQLDATADemoData1.ndf' ,
SIZE = 8192KB ,
MAXSIZE = UNLIMITED,
FILEGROWTH = 65536KB ),
 FILEGROUP [Data2]
( NAME = N'DemoData2',
FILENAME = N'D:Program FilesMicrosoft SQL ServerMSSQL14.MSSQLSERVERMSSQLDATADemoData2.ndf' ,
SIZE = 8192KB ,
MAXSIZE = UNLIMITED,
FILEGROWTH = 65536KB )
 LOG ON
( NAME = N'DemoDB_log',
FILENAME = N'D:Program FilesMicrosoft SQL ServerMSSQL14.MSSQLSERVERMSSQLDATADemoDB_log.ldf' ,
SIZE = 8192KB ,
MAXSIZE = 2048GB ,
FILEGROWTH = 65536KB )
GO
ALTER DATABASE [DemoDB] SET COMPATIBILITY_LEVEL = 140
GO
Using filegroups with database files is a great way to improve performance, because it lets a database be created across multiple disks, disk controllers, or RADI systems. For example, if the machine in which SQL Server is installed has four disks, consider creating a database that is made up of three data files (each on a separate filegroup), one file on each disk, and then the transaction log on the fourth disk. Thus, I/O is spread across the disks and can be accessed in parallel.
Additionally, files and filegroups helps with data and object placement, again increasing performance. For example, an I/O heavy table can be placed in a separate filegroup, which is then placed on a different disk.
Create databases
The last section spent some time on database creation as part of talking about database files, so this section will focus on best practices for creating databases and some of the important database properties to set during database creation.
One of the critical things overlooked when creating a database is the file growth and max size. Beginning with SQL Server 2016, the default autogrowth for both the data file and transaction log file is 64 MB. When creating the database, it is recommended that you make the data files as large as possible, based on the maximum amount of data you initially expect in the database.
It is also recommended to specify a maximum file size so that the database does not take up the entire disk space, especially if the data file is on the OS disk. Best practice states to put the data and transaction log files on separate disks than the OS disk, but sometime this is not possible. Regardless of where the data files reside, put a limit on the growth by specifying a maximum growth file size so that space is left on the hard disk. You should also make certain that the sum total for all databases is less than available disk space.
It is OK to let the data files grown automatically, but this can cause fragmentation. Whenever possible, create the files or filegroups on as many different physical disks. As recommended above, put space and resource intensive objects in different filegroups. While this is a best practice, it still will not solve the issue of fragmentation due to growth events, thus following standard maintenance plans to address fragmentation is needed.
Figure 2-73 shows how to set the autogrowth and maximum file size via SQL Server Management Studio. The UI sets these values in terms of MB, so if the value you need to specify is in GB or larger, you’ll need to do that math. For example, in Figure 2-73, the file growth is set to 1GB, or 1,024 MB. The maximum file size is set to 100 GB, or 102,400 MB.

Figure 2-73 Configuring database File Growth and Maximum File Size
Setting the file growth size and maximum file size is easier to do in T-SQL when creating databases because you can specify the file growth in terms of MB, GB, TB, and so on, and not have to worry about doing the math for the UI. Again, when running this script, change the file location to the appropriate drive letter and folder destination that matches your environment.
CREATE DATABASE [DemoDB]

 CONTAINMENT = NONE

 ON  PRIMARY

( NAME = DemoDB, FILENAME = N'D:Program FilesMicrosoft SQL ServerMSSQL14.MSSQLSERVERMSSQLDATADemoDB.mdf' , SIZE = 8192KB , FILEGROWTH = 1GB )

 LOG ON

( NAME = N'DemoDB_log', FILENAME = N'D:Program FilesMicrosoft SQL ServerMSSQL14.MSSQLSERVERMSSQLDATADemoDB_log.ldf' , SIZE = 8192KB , FILEGROWTH = 1GB )

GO
While on the topic of user databases and transaction logs, a concept worth discussing is that of VLFs, or Virtual Log Files. VLFs split physical database log files into smaller segments, which are required for how log files work in the background. VLFs are created automatically, but you still need to keep an eye on them.
Virtual log files have no fixed size and there is no fixed number of virtual log files for a physical log file. The database engine chooses the size of the virtual log files dynamically when it is creating or extending the log files. The size or number of virtual log files cannot be configured or set by an administrator.
VLFs affect performance based on whether the log files are defined by small size and growth_increment values. If these log files grow to a large size because of many small increments they will have lots of virtual log files, slowing down the database startup and log backup/restore operations. The recommended approach is to assign the log file size to the final size required and have a relatively large growth_increment value.
The model database is a template for all new databases, and SQL Server uses a copy of the model database when creating and initializing new databases and its metadata. All user-defined objects in the model database are copied to newly created databases. You can add any objects to the model database, such as tables, stored procedures, and data types. Thus, when creating a new database, these objects are then applied to the new database. The entire contents of the model database, including options, are copied to the new database.
It is therefore recommended to set the initial database size, filegrowth, and max size in the model database for all new databases created on the server, along with other user-defined objects that are wanted in the new database.
A few more words about the model database. Tempdb is created every time SQL Server is started, and some of the settings of the model database are used when creating tempdb, so the model database must always be present and exist on every SQL Server system. A recommended method is to set the model database to what you want for tempdb and only allow new databases to be created with specified file and filegrowth options.
We’ll close this section talking about some of database configuration settings that can be set when creating a database. Some of the configuration settings were discussed in Skill 2.2, including the settings found in the Database Scoped Configurations section of the Database Properties dialog, such as Max DOP, Query Optimizer Fixes, and Parameter Sniffing. These configuration settings have an effect on the database performance, and it is recommended that you review Skill 2.2 to understand how these settings work and affect the performance of your database.
Figure 2-74 shows a few more database configuration settings, from which we will discuss a few. In the Miscellaneous section:
Delayed Durability Applies to SQL Server transaction commits that can either be fully durable (the default), or delayed durable which is also known as a lazy commit. Fully durable transaction commits are synchronous and are reported as committed only after the log records are written to disk. Delayed durable transactions are asynchronous are report a commit before the transaction log records are written to disk.
Is Read Committed Snapshot On Controls the locking and row versioning behavior of T-SQL statements via connections to SQL Server.
In the Recovery section:
Page Verify This setting pertains to data-file integrity. When this value is set to CHECKSUM, the SQL Server engine calculate the checksum over the contents of the whole page and stores the value in the page header when the page is written to disk. When the page is run, the checksum is recomputed and compared to the checksum value stored in the page.
In the State section:
Database Read-Only Specifies whether the database is read-only. When the value is true, users can only read data, they cannot modify data or database objects.
Restrict Access Specifies which users may access the database. Values include Multiple, Single, and Restricted. Normal is the default setting, which allows multiple users to connect. Single is for maintenance and allows a single user to connect at any given time. Restricted allows only members of the db_owner, dbcreator, or sysadmin roles to use the database.

Figure 2-74 New Database properties dialog
Turning our attention to the Page Header of the database properties dialog, there are a couple of options to point out there.
Recovery Model Specifies one of the models for recovering the database: Full, Bulk-Logged, or Simple.
Compatibility Level Specifies the version of SQL Server that the database supports.
An example of both Recovery Model and Compatibility Level. In Figure 2-75, the AdventureWorks2014 database has been restored to a computer running SQL Server 2017. The recovery model is Simple and the Combability level is set to SQL Server 2014.

Figure 2-75 Compatibility level of a restored SQL Server 2014 database
Similarly, the WideWoldImports sample database was downloaded and restored to the same SQL Server 2017 instance. When restored, the recover model is also Simple and the Compatibility level is set to that for SQL Server 2016.

Figure 2-76 Compatibility level of a restored SQL Server 2016 database
Database recovery models are designed to control transaction log maintenance. In SQL Server, all transactions are logged, and the Recovery Model database property controls how the transactions are logged and whether the log allows backing up and what kind of restore operations are available. When creating and managing a database, the recovery model can be switched at any time.
With Simple, there are no log backups. With Full, log backups are required and no work is lost due to a lost or damaged data file, Full allows data recovery from an arbitrary point in time.
Manage system database files
When installed, SQL Server includes, and maintains, a set of system-level databases often called system databases. These databases control the overall operation of a single server instance and vigilant care must be taken to ensure they are not compromised.
Depending on your installation options, you will see a list of system databases within the System Databases node in the Object Explorer window in SQL Server Management Studio. A typical installation of a SQL Server instance will show the four common system databases as shown in Figure 2-77.

Figure 2-77 SQL SERVER SYSTEM DATABASES
A complete list of system databases is summarized in Table 2-2.
Table 2-2 Backup best practices of the System Databases
System Database |
Description |
Backup |
master |
Contains all system-level information for SQL Server |
Yes |
model |
Template for all databases created on the SQL Server instance |
Yes |
msdb |
Used by the SQL Server Agent for scheduling alerts and jobs. Also contains backup and restore history tables. |
Yes |
tempdb |
Holds temporary or intermediate result sets. Created when SQL Server starts, deleted when SQL Server shuts down. |
No |
distribution |
Exists only if SQL Server is configured as a Replication Distributor. Stores all history and metadata for replication transactions. |
Yes |
resource |
Read-only database that resides in the mssqlsystemresource.mdf file, which contains copies of all system objects. |
No |
The Backup column in Table 2-2 provides the suggested option for whether the system database should be backed up. The master database should be backed up quite frequently in order to protect the data and instance environment sufficiently. It is recommended that the master database be included in a regularly scheduled backup plan. It should also be backed up after any system update.
The model database should be backed up only as needed for business needs. For example, after adding user customization options to the model database, you should back it up.
The msdb database should be backed up whenever it is updated, such as creating alerts or jobs. A simple recovery model and back up is recommended for the msdb database as well.
Configure TempDB
TempDB is a system database that is a global resource to all user connected to a SQL Server instance.
TempDB is used by SQL Server to do and hold many things among which is the following:
Temporary user objects Objects that are specifically created by a user, including local or global temporary tables, table variables, cursors, and temporary stored procedures.
Internal objects Objects that are created by the SQL Server engine such as work tables to store intermediate results for sorting or spooling.
Row versions Items that are generated by data modification transactions in a database that uses read-committed row versioning isolation or snapshot isolation transactions. Row versions are also generated by data modification transactions for features, including online index operations.
Configuring tempdb is crucial for optimal SQL Server database performance. Prior to SQL Server 2016, the SQL Server installation would create a single tempdb file and associated log. However, starting with SQL Server 2016, the SQL Server installation allows you to configure the number of tempdb files, as shown in Figure 2-78.
The recommended practice for tempdb is to create multiple database files, one per logical CPU processor, but not more than eight. By default, the SQL Server installation does this for you and sets the number of tempdb files the number of logic processors. If the machine has more than eight logical processors, this should still default to eight. If the number of logical processors is greater than eight, set the number to eight to begin.
Having tempdb configured during installation is preferred because it prevents the additional, post-installation steps of configuring multiple tempdb files and setting the size and growth for each file.
The TempDB tab also allows the configuration initial size and growth configuration for all tempdb data and log files, as well as their location. These files should be equal in size with the same autogrowth settings.
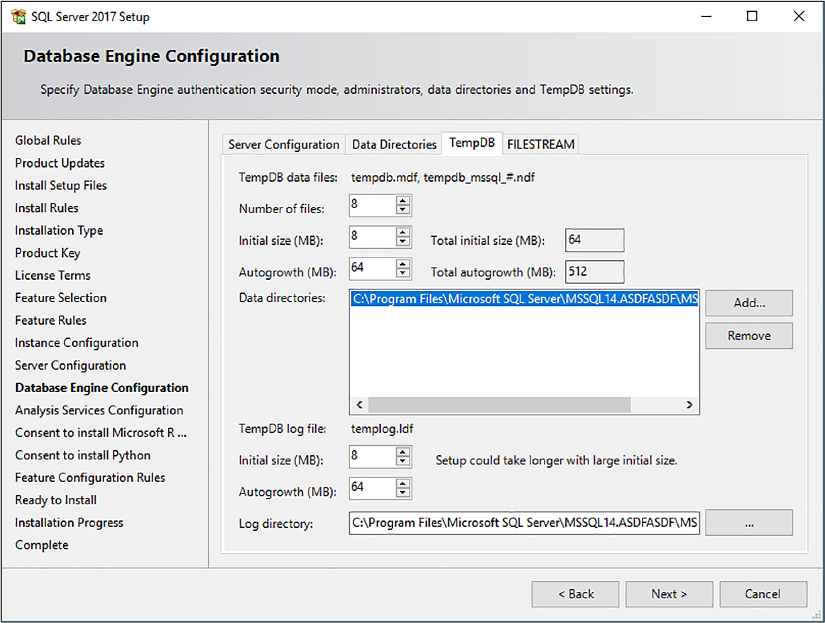
Figure 2-78 Configuring TempDB during SQL Server installation
While the SQL Server installation wizard is smart enough to figure out the number of cores and logical processors the machine has, you can find the number of cores and logical processors from Task Manager, as shown in Figure 2-79.
You probably won’t need to change anything in the SQL Server setup, but this information is good to know and verify in case you do want to make any configuration changes to tempdb during installation.

Figure 2-79 Determining the logical process count
When the database is created, the physical and logical tempdb configuration is shown in Figure 2-80.

Figure 2-80 Tempdb database files
For backward compatibility, the primary tempdb data logical name file is called tempdev, but the physical file name is tempdb. Secondary tempdb logical file names follow the temp# naming pattern, and the physical file names follow the tempdb_mssql_# naming pattern. You can see this in both Figure 2-80 and Figure 2-81.

Figure 2-81 Tempdb physical files
Best practice recommends to set the recovery model of tempdb to SIMPLE, allowing tempdb to recover and reclaim log space requirements small. It is also recommended to set the file growth increment to a reasonable size. If set too small, tempdb will need to frequently expand which will have a negative impact on performance. Best practice also states to place tempdb on different disks from those where the user database is placed.
Thought experiment
In this thought experiment test your skills covered in this chapter. You will find the answers to this in the next section.
You are a consultant to the Contoso Corporation. Contoso is a mid-sized wholesaler, which currently has an internal customer management and ordering system. Contoso has around 100 customers to track, and different departments within Contoso manage different customer segments and at the rate Contoso is growing, performance is important to keep pace with demand and their expected workload.
Contoso’s CIO has made the decision to move their on-premises data center to Azure, but has concerns about PCI compliance, security, and performance. Contoso is looking for guidance around securing their data in Azure to ensure their data and their customers sensitive data is safe-guarded. Contoso is also looking to ensure that their application performance is just as good or better than on-premises. For the most part, the security and performance solutions should work both on-premises and in Azure as they work to migrate.
With this information in mind answer the following questions.
What security feature should they consider to ensure data security that works in both environments, requires minimal changes to the application, and secures data in both in motion and at rest?
How should Contoso secure their data environment in Azure to ensure only those who are allowed have access to the data?
What SQL Server feature should Contoso implement to be able to troubleshoot query performance and query plans to help them with their planned growth?
What SQL Server insights can Contoso use to get query improvement information?
Thought experiment answers
This section provides the solution to the thought experiment. Each answer explains why the answer is correct.
Contoso should implement Always Encrypted, which provides encryption for data use, is supported in SQL Server and Azure SQL Database, and requires little changes to the application.
Once the database and application has been migrated to Azure, Contoso should implement firewall rules at both the server and database levels to ensure that only those who are within the specified environment can access the data. Additionally, with the logins migrated, Contoso should implement Azure Active Directory to centrally manage the identities of the database users.
Contoso should use Query Store to provide real-time insight into query performance and provide easier troubleshooting of poor performing queries. Query store is support in both SQL Server and Azure SQL Database, so Contoso can use this feature as they plan for their move to Azure.
Contoso should look at using existing missing index DMVs.
Chapter summary
Azure SQL Server firewall rules can be configured using T-SQL, the Azure Portal, PowerShell, the Azure CLI, and a REST API.
Azure SQL Database firewall rules can only be configured using T-SQL.
Azure firewall rules must be unique within the subscription.
NAT (Network address translation) issues could be a reason your connection to Azure SQL Database is failing.
Always Encrypted is a must feature either in SQL Server or Azure SQL Database to protect and safe-guard sensitive data.
If you are using Azure SQL Database, use Azure Key Vault for the Always Encrypted key store provider.
Consider using Dynamic Data Masking to limit data exposure of sensitive data to non-privileged users for both on-premises and in Azure SQL Database.
Transparent Data Encryption (TDE) is similar to cell-level encryption, but TDE will automatically encrypt and decrypt the data when it reads and writes data to/from disk. CLE (cell-level encryption) does not.
TDE requires no changes to your application code.
TDE supports Bring Your Own Key.
Instant SQL Server performance can be obtained by changing the Windows Power Option from Balanced to High Performance.
Use Performance Monitor and the % of Maximum Frequency counter to track the current power level of the CPUs maximum frequency.
Consider configuring MaxDOP to improve database performance and not leave it at its default configuration setting of 0.
MaxDOP can be configured at both the server level and the database level. The database-level setting overrides the server-level setting for that database.
The Query Store is an excellent way to easily capture performance information from your SQL Server instance.
Consider using the missing index DMVs to identify potential missing indexes to improve performance.
Change the Maximum server memory configuration option.
Configure Operators and Alerts to proactively be alerted to SQL Server performance issues.
Configure tempdb appropriately to improve performance.