
Chapter 1 Implement SQL in Azure
Moving or provisioning new databases on the Azure platform requires a different set of skills than managing traditional on-premises installations. You need to have a broader understanding of cloud computing concepts and technologies like platform as a service, infrastructure as a service, and scripting.
Important: Have you read page xiii?
It contains valuable information regarding the skills you need to pass the exam.
Skills in this chapter:
Skill 1.1: Deploy a Microsoft Azure SQL Database
Skill 1.2: Plan for SQL Server installation
Skill 1.3: Deploy SQL Server instances
Skill 1.4: Deploy SQL Server databases to Azure virtual machines
Skill 1:1: Deploy a Microsoft Azure SQL Database
This skill deals with the process of setting up an Azure SQL Database. Azure SQL Database is a Platform as a Service (PaaS) offering that can be quite different from a traditional on-premises implementation of SQL Server.
This skill covers how to:
Choose a service tier
Unlike traditional on-premises architecture, or even Infrastructure as a Service (IaaS) architecture, Azure SQL Database is not configured by choosing CPU, RAM, and storage metrics. Microsoft has categorized several different service tiers:
Basic
Standard
Premium
Premium-RS
Your service tier affects several critical factors about your database including size, performance level, availability, and concurrency. Each tier of service has limits on sizing and performance capacity, which is measure in Database Transaction Units (DTUs). Let us examine each performance level in detail.
Basic The basic service tier is best suited for small databases that are in early stages of development. The size of this tier is limited to 2 gigabytes (GB) and computing resources are extremely limited.
Standard The standard tier offers a wide range of performance and is good for applications with moderate performance needs and tolerance for small amounts of latency. Your database can be up to 250 GB in size.
Premium The premium tier is designed for low latency, high throughput, mission critical databases. This service tier offers the broadest range of performance, high input/output (I/O) performance, and parallelism. This service tier offers databases up to 4 terabytes (TB) in size.
Premium RS The premium RS service tier is designed for databases that have I/O intensive workloads, but may not have the same availability requirements of premium databases. This could be used for performance testing of new applications, or analytical applications.
The fundamental concept of performance in Azure SQL Database is the Database Transaction Unit or DTU (you are introduced to this concept when you learn about elastic pools with the elastic Database Transaction Unit or eDTU). As mentioned earlier, when sizing an Azure SQL Database, you do not choose based on various hardware metrics, instead you choose a performance level based on DTUs.
There is one other significant feature difference as it relates to standard and basis tiers versus the premium performance tiers—in-memory features of SQL Server. Both columnstore and in-memory OLTP, which are features that are used for analytic and high throughput OLTP workloads are limited only to the premium and premium RS tiers. This is mainly due to resource limitations—at the lower service tiers there is simply not enough physical memory available to take advantage of these features, which are RAM intensive.
The basic performance level has a max DTU count as shown in Table 1-1.
Table 1-1 Basic performance level limits
Performance level |
Basic |
Max DTUs |
5 |
Max database size |
2 GB |
Max in-memory OLTP storage |
N/A |
Max concurrent workers (requests) |
30 |
Max concurrent logins |
30 |
Max concurrent sessions |
300 |
The standard performance level offers size increases, and increased DTU counts and supports increased concurrency (see Table 1-2).
Table 1-2 Standard performance tier limits
Performance level |
S0 |
S1 |
S2 |
S3 |
Max DTUs |
10 |
20 |
50 |
100 |
Max database size |
250 GB |
250 GB |
250 GB |
1024 GB |
Max in-memory OLTP storage |
N/A |
N/A |
N/A |
N/A |
Max concurrent workers (requests) |
60 |
90 |
120 |
200 |
Max concurrent logins |
60 |
90 |
120 |
200 |
Max concurrent sessions |
600 |
900 |
1200 |
2400 |
Recently, Microsoft made several additions to the standard database performance offerings (Table 1-3), both increasing the size and performance limits of the standard tier.
Table 1-3 Extended Standard Performance Tier Limits
Performance level |
S4 |
S6 |
S7 |
S9 |
S12 |
Max DTUs |
200 |
400 |
800 |
1600 |
3000 |
Max Database Storage |
1024 GB |
1024 GB |
1024 GB |
1024 GB |
1024 GB |
Max in-memory OLTP storage (GB) |
N/A |
N/A |
N/A |
N/A |
N/A |
Max concurrent workers (requests) |
400 |
800 |
1600 |
3200 |
6000 |
Max concurrent logins |
400 |
800 |
1600 |
3200 |
6000 |
Max concurrent sessions |
4800 |
9600 |
19200 |
30000 |
30000 |
The Premium performance tier (see Table 1-4) offers larger capacity, and greatly increased storage performance, making it ideal for I/O intensive workloads.
Table 1-4 Premium Performance Tier Limits
Performance level |
P1 |
P2 |
P4 |
P6 |
P11 |
P15 |
Max DTUs |
125 |
250 |
500 |
1000 |
1750 |
4000 |
Max database size |
500 GB |
500 GB |
500 GB |
500 GB |
4096 GB |
4096 GB |
Max in-memory OLTP storage |
1 GB |
2 GB |
4 GB |
8 GB |
14 GB |
32 GB |
Max concurrent workers (requests) |
200 |
400 |
800 |
1600 |
2400 |
6400 |
Max concurrent logins |
200 |
400 |
800 |
1600 |
2400 |
6400 |
Max concurrent sessions |
30000 |
30000 |
30000 |
30000 |
30000 |
30000 |
The Premium RS tier (see Table 1-5) is similar to the Premium tier in terms of performance, but with lower availability guarantees, making it ideal for test environments.
Table 1-5 Premium RS performance tier limits
Performance level |
PRS1 |
PRS2 |
PRS4 |
PRS6 |
Max DTUs |
125 |
250 |
500 |
1000 |
Max database size |
500 GB |
500 GB |
500 GB |
500 GB |
Max in-memory OLTP storage |
1 GB |
2 GB |
4 GB |
8 GB |
Max concurrent workers (requests) |
200 |
400 |
800 |
1600 |
Max concurrent logins |
200 |
400 |
800 |
1600 |
Max concurrent sessions |
30000 |
30000 |
30000 |
30000 |
 Exam Tip
It is important to understand the relative performance levels and costs of each service tier. You do not need to memorize the entire table, but you should have a decent understanding of relative performance and costs.
More Info Database Transaction Units
For a single database at a given performance level, Microsoft offers a performance level based on a specific, predictable level of performance. This amount of resources is a blended measure of CPU, memory, data, and transaction log I/O. Microsoft built this metric based on an online transaction processing benchmark workload. When your application exceeds the amount of any of the allocated resources, your throughput around that resource is throttled, resulting in slower overall performance. For example, if your log writes exceed your DTU capacity, you may experience slower write speeds, and your application may begin to experience timeouts. In the Azure Portal you can see your current and recent DTU utilization, shown in Figure 1-1.
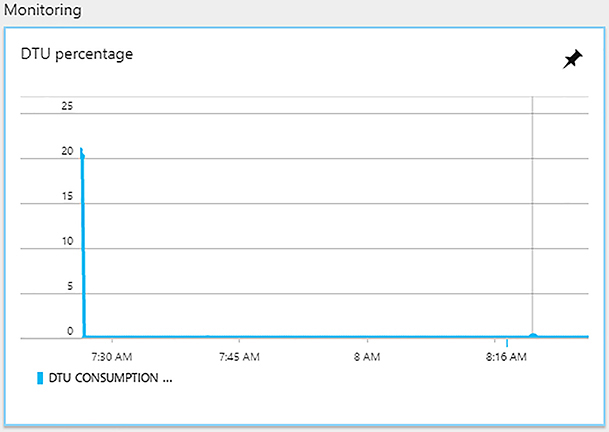
Figure 1-1 A screen shot of the DTU percentage screen for an Azure SQL Database from the Azure Portal
The Azure Portal offers a quick glance, but to better understand the components of your application’s DTU consumption by taking advantage of Query Performance Insight feature in the Azure Portal, you can click Performance Overview from Support and Troubleshooting menu, which shows you the individual resource consumption of each query in terms of resources consumed (see Figure 1-2).
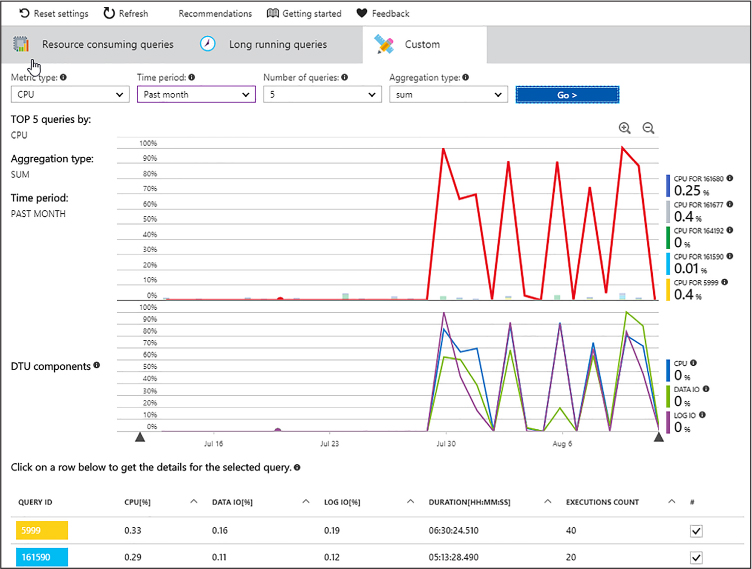
Figure 1-2 A screen shot of the DTU percentage screen for an Azure SQL Database from the Azure Portal
The graphic in Figure 1-2 is built on top of the data collected by the Query Store feature that is present in both Azure SQL Database and SQL Server. This feature collects both runtime data like execution time, parallelism, and execution plan information for your queries. The powerful part of the Query Store is combining these two sets of data to make intelligent decisions about query execution. This feature supports the Query Performance Insight blade on the Azure Portal. As part of this feature you can enable the performance recommendations feature, which creates and removes indexes based on the runtime information in your database’s Query Store, and can changes query execution plans based on regression of a given query’s execution time.
More Info About Query Performance Insight
You can learn more about query performance insight at: https://docs.microsoft.com/en-us/azure/sql-database/sql-database-query-performance.
The concept of a DTU can be very confusing to a DBA or developer who is used to choosing hardware based on specific requirements like amount of RAM and number of CPU cores. Microsoft has built the DTU model to abstract those hardware decisions away from the user. It is important to understand that DTUs represent relative performance of your database—a database with 200 DTUs is twice as powerful as one with 100 DTUs. The DTUs are based on the Azure SQL Database benchmark, which is a model that Microsoft has built to be a representative online transaction processing (OLTP) application, which also scales with service tier, and runs for at least one hour (see Table 1-6).
Table 1-6 Azure SQL Database Benchmark information
Class of Service |
Throughput Measure |
Response Time Requirement |
Premium |
Transactions per second |
95th percentile at 0.5 seconds |
Standard |
Transactions per minute |
90th percentile at 1.0 seconds |
Basic |
Transactions per hour |
80th percentile at 2.0 seconds |
More Info About SQL Database Benchmark
You can learn more about SQL Database Benchmark insight at: https://docs.microsoft.com/en-us/azure/sql-database/sql-database-benchmark-overview.
Performance tuning
Before the Query Store and Query Performance Insight was available, a database administrator would have had to either use a third-party monitoring tool or build their own repositories to store information about the runtime history of their database. With these features in conjunction with auto-tuning features that have been released, the administrator can focus efforts on deeper tuning, building more optimal data structures, and developing more robust applications.
Automatic tuning
This is a feature that is unique to Azure SQL Database, and is only possible because of the power of cloud computing and machine learning elements that support Microsoft Azure. Proper index design and management is the key to relational database performance, whether you are in an on-premises environment or a platform as a service one. By monitoring your workloads Azure SQL Database can teach itself to identify and create indexes that should be added to your database.
In a traditional environment, this process consisted of the database administrator trying to track many queries, write scripts that would periodically collect data from various system views, and then take a best guess effort at creating the right set of indexes. The Azure SQL Database automated tuning model analyzes the workload proactively, and identifies queries that could potentially be run faster with a new index, and identifies indexes that may be unused or duplicated.
Azure also continually monitors your database after it builds new indexes to ensure that the changes help the performance of your queries. Automatic tuning also reverts any changes that do not help system performance. This ensures that changes made by this tuning process have no negative impact against your workloads. One set of relatively new automatic tuning features came with the introduction of compatibility level 140 into Azure SQL Database.
Even though Azure SQL Database does not have versions, it does allow the administrator or developer to set the compatibility level of the database. It does also support older compatibility levels for legacy applications. Compatibility level does tie back to the level at which the database optimizer operates, and has control over what T-SQL syntax is allowed. It is considered a best practice to run at the current compatibility level.
Azure SQL Database currently supports compatibility levels from 100 (SQL Server 2008 equivalent) to 140 (SQL Server 2017 equivalent). It is important to note that if you are dependent on an older compatibility level, Microsoft could remove them as product versions go off support. You can check and change the compatibility level of your database by using SQL Server Management studio, or the T-SQL, as shown in Figure 1-3.

Figure 1-3 Options Windows from SQL Server Management Studio showing compatibility level options
To determine the current compatibility levels of the database in T-SQL, you can execute the following query:
SELECT compatibility_level
FROM   sys.databases
WHERE  [name] = 'Your Database Name';
To change the compatibility level of the database using T-SQL, you would execute the following command replacing “database_name” with the name of your database:
ALTER DATABASE database_name SET COMPATIBILITY_LEVEL = 140;
Performance enhancements in compatibility level 140
Compatibility level 140 introduces several new features into the query optimization process that further improve the automated tuning process. These features include:
Batch mode memory grant feedback
Batch mode adaptive join
Interleaved query execution
Plan change regression analysis
Let’s look at each of these features in detail.
Batch mode memory grant feedback
Each query in SQL database gets a specific amount of memory allocated to it to manage operations like sorting and shuffling of pages to answer the query results. Sometimes the optimizer grants too much or too little memory to the query based on the current statistics it has on the data, which may affect the performance of the query or even impact overall system throughput. This feature monitors that allocation, and dynamically changes it based on improving future executions of the query.
Batch mode adaptive join
This is a new query operator, which allows dynamic selection to choose the most optimal join pattern based on the row counts for the queries at the time the query is executed.
Interleaved Execution
This is designed to improve the performance of statements that use multi-statement table valued functions (TVFs), which have traditionally had optimization issues (in the past the optimizer had no way of knowing how many rows were in one of these functions). This feature allows the optimizer to take count of the rows in the individual TVF to use an optimal join strategy.
Plan change regression analysis
This is probably the most interesting of these new features. As data changes, and perhaps the underlying column statistics have not been updated, the decisions the query optimizer makes may be based on bad information, and lead to less than optimal execution plans. Because the Query Store is maintaining runtime information for things like duration, it can monitor for queries that have suddenly had execution plan changes, and had regression in performance. If SQL Database determines that the plan has caused a performance problem, it reverts to using the previously used plan.
More Info About Database Compatibility Levels
You can learn more about database compatibility levels at: https://docs.microsoft.com/en-us/sql/t-sql/statements/alter-database-transact-sql-compatibility-level.
Choosing an initial service tier
While Microsoft gives guidance for the type of application that should use each database, there is a wide range of potential performance tiers and costs associated with that decision. Given the importance of the database tier to overall application performance, it is important to choose correctly.
The first part of making this decision is understanding the nature of your application—is it an internet-facing application that will see large scale and requires the database to store session state? Or is it a batch processing application that needs to complete its work in an eight-hour window? The former application requires extremely low levels of latency and would mostly be placed in the premium storage tier, with adjustments to up the performance curve for peak times to optimize cost. An example of this might mean keeping the database at the P4 performance level during off-peak times, but using P11 for high loads like peak business hours, or holidays for retailers. For the batch processing application, an S2 or S3 may be a good starting point. The latency incurred does not matter so long as the batch processing occurs within its eight-hour window.
For most applications, the S2 or S3 tiers are a good starting point. For applications that rely on intensive CPU and I/O operations, the premium tier is a better fit, offering more CPU and starting at 10x I/O performance over the standard tier. The premium RS tier can be a good fit for performance testing your application because it offers the same performance levels as the premium tier, but with a reduced uptime service level agreement (SLA).
More Info About Azure SQL Database Performance Tiers
You can learn more about Azure SQL Database service tiers at https://docs.microsoft.com/en-us/azure/sql-database/sql-database-service-tiers.
Changing service levels
Changing the service level of the database is always an option—you are not locked into the initial size you chose at the time of creation. You review elastic pools later in this chapter, which give more flexibility in terms of scale. However, scaling an individual database is still an option.
When you change the scale of an individual database, it requires the database to be copied on the Azure platform as a background operation. A new replica of your database is created, and no data is lost. The only outage that may occur is that in-flight transactions may be lost during the actual switchover (should be under four seconds, and is under 30 seconds 99 percent of the time). It is for this reason that it is important to build retry logic into applications that use Azure SQL Database. During the rest of the resizing process the original database is available. This change in service can last a few minutes to several hours depending on the size of the database. The duration of the process is dependent on the size of the database and its original and target service tiers. For example, if your database is approaching the max size for its service, the duration will be significantly longer than for an empty database. You can resize your database via the portal (Figure 1-4), T-SQL, or PowerShell. Additional options for making these changes include using the Azure Command Line Interface or the Rest API for Azure SQL Database.
Exam Tip
Remember how to choose the right service tier based on the application workload and performance requirements.

Figure 1-4 Portal experience for changing the size of Azure SQL DB
You can also execute this change in T-SQL.
ALTER DATABASE [db1] MODIFY (EDITION = 'Premium', MAXSIZE = 1024 GB, SERVICE_OBJECTIVE =
'P15');
The only major limitation around resizing individual databases is size. Performance level has some correlation with storage. For example, the database that is being resized in the above T-SQL example is now a P15, which supports up to 4 TB of data. If for example the database contained 2.5 TB of data, you would be limited to the P11 or P15 performance level because those support 4 TB, whereas the P1-P6 databases only supports 500 GB.
Create servers and databases
When talking about Platform as a Service offerings there are always many abstractions of things like hardware and operating systems. Remember, nearly everything in Microsoft Azure is virtualized or containerized. So, what does this mean for your Azure SQL Database? When you create a “server” with multiple databases on it, those databases could exist in different virtual machines than your “server.” The server in this example is simply a logical container for your databases; it is not specific to any piece of hardware.
Now that you understand that your “server” is just a logical construct, you can better understand some of the concepts around building a server (see Figure 1-5). To create your server, you need a few things:
Server Name Any globally unique name.
Server admin login Any valid name.
Password Any valid password.
Subscription The Azure subscription you wish to create this server in. If your account has access to multiple subscriptions, you are in the correct place.
Resource Group The Azure resource group associated with this server and databases. You may create a new resource group, or use an existing resource group.
Location The server can only exist in one Azure region.

Figure 1-5 Creating an Azure SQL Database Server in the Azure Portal
In earlier editions of Azure SQL Database, you were required to use a system-generated name; this is no longer the case; however, your name must be globally unique. Remember, your server name will always be servername.database.windows.net.
Other Options for creating a logical server
Like most services in Azure, Azure SQL Database offers extensive options for scripting to allow for automated deployment. You can use the following PowerShell command to create a new server:
PS C:>New-AzureSqlDatabaseServer -Location "East US" -AdministratorLogin "AdminLogin"
-AdministratorLoginPassword "Password1234!" -Version "12.0"
The Azure CLI is another option for creating your logical server. The syntax of that command is:
az sql server create --name YourServer--resource-group DemoRG --location $location
    --admin-user "AdminLogin"  --admin-password "Password1234!"
To run these demos you need Azure PowerShell. If you are on an older version of Windows you may need to install Azure PowerShell. You can download the installer at: https://www.microsoft.com/web/handlers/webpi.ashx/getinstaller/WindowsAzurePowershellGet.3f.3f.3fnew.appids.
You can also install using the following PowerShell cmdlet:
# Install the Azure Resource Manager modules from the PowerShell Gallery
Install-Module AzureRM
More Info About Azure CLI and SQL Database
You can learn more the Azure CLI and database creation at: https://docs.microsoft.com/en-us/azure/sql-database/sql-database-get-started-cli.
Database and server firewall rules
One of the concepts of Azure SQL Database is that it is exposed over the Internet via a TCP endpoint over port 1433. This can sound a little bit scary—your database is open over the Internet? However, Microsoft provides you with multiple levels of security to secure your data and databases. Figure 1-6 provides an overview of how this security process works. There are two sets of firewall rules. The first is the database level firewall rule, which is the more granular of these two rules. The database level rule is set within the individual database where it can be viewed in the catalog view sys.database_firewall_rules. You can set these database rules using T-SQL within the database, however they may also be set using PowerShell, the Azure CLI, or the REST API interface. These rules as mentioned are specific to an individual database, if you need to replicate them across multiple databases you need to include that as part of your deployment scripts. You may also delete and update these firewall rules using all aforementioned methods. An example of the T-SQL to create a database level firewall rule is as follows:
EXECUTE sp_set_firewall_rule @name = N'ContosoFirewallRule',
   @start_ip_address = '192.168.1.1', @end_ip_address = '192.168.1.10'
Server level firewall rules on the other hand, can only be set through the Azure Portal, PowerShell, Azure CLI, the Rest API, or in the master database of the logical server. You can view server level firewall rules from within your Azure SQL Database by querying the catalog view sys.firewall_rules.
A server-level firewall rule is less granular than the database rule—an example of where you might use these two features in conjunction would be a Software as a Service application (SaaS) where you have a database for each of your customers in a single logical server. You might whitelist your corporate IP address with a server-level firewall rule so that you can easily manage all your customer databases, whereas you would have an individual database rule for each of your customers to gain access to their database.

Figure 1-6 Azure SQL Database firewall schematic
As mentioned, there are several ways to set a firewall rule at the server level. Here is an example using PowerShell.
New-AzureRmSqlServerFirewallRule -ResourceGroupName "Group-8" '
-ServerName "servername" -FirewallRuleName "AllowSome" -StartIpAddress "192.168.1.0"
-EndIpAddress "192.168.1.4"
Here is an example using the Azure CLI
az sql server firewall-rule create --resource-group myResourceGroup
    --server yourServer  -n AllowYourIp --start-ip-address 192.168.1.0 --end-ip-address
192.168.1.4
In both examples, a range of four IP addresses is getting created. All firewall rules can either be a range or a single IP address. Server level firewall rules are cached within Azure to improve connection performance. If you are having issues connecting to your Azure SQL Database after changing firewall rules consider executing the DBCC FLUSHAUTHCACHE command to remove any cached entries that may be causing problems, from a machine that can successfully connect to your database.
Exam Tip
Remember how to configure firewall settings using both PowerShell and the Azure Portal.
Connecting to Azure SQL Database from inside of Azure
You may have noticed that in Figure 1-5 there was a check box that says, Allow Azure Services To Access This Server.” This creates a server level firewall rule for the IP range of 0.0.0.0 to 0.0.0.0, which indicates internal Azure services (for example Azure App Services) to connect to your database server. Unfortunately, this means all of Azure can connect to your database, not just your subscription. When you select this option, which may be required for some use cases, you need to ensure that the security within your database(s) is properly configured, and that you are auditing traffic to look for anomalous logins.
Auditing in Azure SQL Database
One of the benefits of Azure SQL Database is its auditing functionality. In an on-premises SQL Server, auditing was commonly associated with large amounts of performance overhead, and was used rarely in heavily regulated organizations. With Azure SQL Database, auditing runs external to the database, and audit information is stored on your Azure Storage account, eliminating most concerns about space management and performance.
Auditing does not guarantee your regulatory compliance; however, it can help you maintain a record of what changes occurred in your environment, who accessed your environment, and from where, and allow you to have visibility into suspected security violations. There are two types of auditing using different types of Azure storage—blob and table. The use of table storage for auditing purposes has been deprecated, and blob should be used going forward. Blob storage offers greater performance and supports object-level auditing, so even without the deprecation, it is the better option.
More Info About Azure Compliance
You can learn more about Azure compliance practices at the Azure Trust Center: https://azure.microsoft.com/support/trust-center/compliance/.
Much like with firewall rules, auditing can be configured at the server or the database level. There are some inheritance rules that apply here. An auditing policy that is created on the logical server level applies to all existing and newly created databases on the server. However, if you enable blob auditing on the database level, it will not override and change any of the settings of the server blob auditing. In this scenario, the database would be audited twice, in parallel (once by the server policy, and then again by the database policy). Your blob auditing logs are stored in your Azure Storage account in a container named “sqldbauditlogs.”
More Info About Azure SQL Db Audit File Formats
You can learn more about Azure SQL Database Auditing here: https://go.microsoft.com/fwlink/?linkid=829599.
You have several options for consuming these log files from Azure SQL Database. You can view them within the Azure Portal, as seen in Figure 1-7. Or you can consume them using the Sys.fn_get_audit_file system function within your database, which will return them in tabular format. Other options include using SSMS to save the audit logs into an XEL or CSV file, or even a SQL Database table, or using the Power BI template created by Microsoft to access your audit log files.

Figure 1-7 View Audit Log option in Azure SQL Database Blade in Azure Portal
Much like the rest of the Azure SQL Database platform, auditing can be configured using PowerShell or the Rest API, depending on your automation needs.
More Info About Azure SQL Db Audit Data Analysis
Learn more about auditing, and automation options for configuring auditing here: https://docs.microsoft.com/en-us/azure/sql-database/sql-database-auditing.
SQL Database Threat Detection
Unlike auditing, which is mostly replicating the behavior of auditing in an on-premises SQL Server, Threat Detection is a feature that was born in Azure, and is very dependent on background Azure compute resources to provide higher levels of security for your databases and applications. SQL Threat Detection uses more advanced methodology to protect your database from common security threats like SQL Injection, suspicious database activities, and anomalous login patterns.
SQL Injection is one of the most common vulnerabilities among web applications. This occurs when a hacker determines that a website is passing unchecked SQL into its database, and takes advantage of this by generating URLs that would escalate the privileges of an account, or get a list of users, and then change one of their passwords.
Threat detection gives you several types of threats to monitor and alert on:
All
SQL Injection
SQL Injection Vulnerability
Anomalous client login
The best practice recommendation is just to enable all threat types for your threat detection so you are broadly protected. You can also supply an email address to notify in the event of a detected threat. A sample email from a SQL Injection vulnerability is in Figure 1-8.

Figure 1-8 SQL Injection Vulnerability email
Microsoft will link to the event that triggered the alert to allow you to quickly assess the threat that is presented. Threat detection is an additional cost option to your Azure SQL Database, and integrates tightly with Azure Security Center. By taking advantage of machine learning in the Azure Platform, Threat Detection will become smarter and more reactive to threats over time.
Backup in Azure SQL Database
One of the benefits of Azure SQL Database is that your backup process is fully automated.
As soon as your database is provisioned it is backed up, and the portal allows for easy point in time recovery with no manual intervention. Azure SQL Database also uses Azure read-access geo-redundant storage (RA-GRS) to provide redundancy across regions. Much like you might configure in an on-premises SQL Server environment Azure SQL Database takes full, differential, and transaction log backups of your database. The log backups take place based on the amount of activity in the database, or at a fixed time interval. You can restore a database to any point-in-time within its retention period. You may also restore a database that was deleted, if you are within the retention period for that database.
It is important to note that the service tier of your database determines your backup retention (the basic tier has a five-day retention period, standard and premium have 35 days). In many regulated industries backups are required to be retained for much longer periods—including up to seven years for some financial and medical systems. So, what is the solution? Microsoft has a solution that is used in conjunction with the Azure Recovery Services component that allows you to retain weekly copies of your Azure SQL Database backups for up to 10 years (see Figure 1-9).

Figure 1-9 Azure Portal Long-Term Backup Retention configuration
To take advantage of the long-term retention feature, you need to create an Azure Recovery Vault in the same Azure region as your Azure SQL Database. You will then define a retention policy based on the number of years you need to retain your backups. Because this feature uses the Azure Backup services infrastructure, pricing is charged at those rates. There is a limit of 1000 databases per vault. Additionally, there is a limit of enabling 200 databases per vault in any 24-hour period. It is considered a best practice to use a separate vault for each Azure SQL Database server to simplify your management.
Restoring a database from long-term storage involves connecting to the backup vault where your database backups are retained and restoring the database to its server, much like the normal Azure SQL Database restore process.
More Info About Restoring Long-Term Azure SQL Database Backups
Restoring from long-term backup involves a different process than normal restores—learn more here: https://docs.microsoft.com/en-us/azure/sql-database/sql-database-long-term-backup-retention-configure.
Azure SQL Database pricing includes up to 200 percent of your maximum provisioned database storage for your backups. For example, a standard tier database would have 500 GB of backup associated with it. If your database exceeds that 200 percent threshold, you can either choose to have Microsoft support reduce your retention period, or pay extra for additional backup storage, which is priced at the standard RA-GRS pricing tier. Reasons why your database may exceed the 200 percent threshold are databases that are close to the maximal size of the service tier that have a lot of activity increasing the size of transaction log and differential backups.
Azure SQL Database backups are encrypted if the underlying database is using transparent data encryption (TDE). As of early 2017, Microsoft has automatically enabled TDE for all new Azure SQL Databases. If you created your database before then, you may want to ensure that TDE is enabled, if you have a requirement for encrypted backups.
Exam Tip
Remember how to configure long-term backup retention and how to restore an Azure SQL Database to a point-in-time.
High availability and disaster recovery in Azure SQL Database
One of the benefits of using the platform as a service offering is that many things are done for you. One of those includes high availability—local high availability is configured automatically for you. There are always three copies of your database to manage things like patching and transient hardware failures. This protects you in the event of any failures that happen within a local Azure region. However, to protect your database and application against broader regional failures or to give your application global read-scale, you will want to take advantage of the Active Geo-Replication feature in Azure SQL Database.
Active geo-replication allows you to have up to four readable secondary replicas of your database in the region of your choosing (see Figure 1-10). These secondary replicas can be used strictly for disaster recovery or can be used for active querying. This protects your application against larger regional failures, and provides resiliency to allow you to perform operations like rolling application upgrades and schema changes. Azure makes recommendations as to the best region for your geo-replica—this is based on the paired region concept in Azure. This paired region concept is not a limiter—you can build your replicas in any supported region in Azure. Many organizations do this to provide global read-scale for applications that are distributed globally. You can put a replica of the database much closer to your users reducing latency and improving overall performance.
More Info About Azure Paired Regions
Azure uses paired regions as a key DR concept that respects geo-political boundaries, learn more about this concept here: https://docs.microsoft.com/en-us/azure/best-practices-availability-paired-regions.

Figure 1-10 Geo-Replication for Azure SQL Database from Azure Portal
Configuring geo-replication requires you to have a logical server in each region you want to geo-replicate to. Configuring a second logical server is the only configuration that is required; no network or other infrastructure components are required. Your secondary database can run at a lower DTU level than your primary to reduce costs, however it is recommended to run with no less than half of the DTUs of the primary so that the replication process can keep up. The important metric to monitor for this is log IO percentage. For example if your primary database is an S3 (with 100 DTUs) and its log IO percentage was at 75 percent, your secondary would need to have at least 75 DTUs. Since there is no performance level with 75 DTUs, you would need an S3 as your secondary. Azure SQL Database requires that your secondary be on the same performance tier as the primary, for example it would not be supported to have a P1 primary and an S0 secondary, but you could have a S3 primary and an S0 secondary.
The administrator typically manages the failover process under normal circumstances, however in the event of an unplanned outage, Azure automatically moves the primary to one of the secondary copies. If after the failure, the administrator would like to be moved back to the preferred region, the administrator would need to perform a manual failover.
Automatic failover with failover groups
Failover groups increase the utility of geo-replicas by supporting group level replication for databases and automated failover processing. More importantly this feature allows applications to use a single connection string after failover. There are few key components to failover groups:
Failover Group Unit of failover can be one or many databases per server, which are recovered as a single unit. A failover group must consist of two logical servers.
Primary Server The logical server for the primary databases.
Secondary Server The logical server, which hosts the secondary databases. This server cannot be in the same region as the primary server.
There are a few things to keep in mind with failover groups—because data replication is an asynchronous process, there may be some data loss at the time of failure. This is configurable using the GracePeriodWithDataLossHours parameter. There are also two types of listener endpoints: read-write and read-only to route traffic to either the primary (for write activity) or to a group of secondary replicas (for read activities). These are DNS CNAME records that are FailoverGroupName.database.windows.net.
Geo-replication and failover groups can be configured in the Azure Portal, using PowerShell (see below example), or the REST API.
# Establish Active Geo-Replication
$database = Get-AzureRmSqlDatabase -DatabaseName mydb -ResourceGroupName ResourceGroup1
 -ServerName server1
$database | New-AzureRmSqlDatabaseSecondary -PartnerResourceGroupName ResourceGroup2
-PartnerServerName server2 -AllowConnections "All"
Create a sysadmin account
Unlike SQL Server, where many users can be assigned the System Admin role, in Azure SQL Database there is only one account that can be assigned server admin. If your Azure subscription is configured with Azure Active Directory, this account can be an Azure Active Directory (AAD) group (not to be confused with on-premises Active Directory). Using an AAD group is the best practice for this admin account, because it allows multiple members of a team to share server admin access without having to use a shared password.
You can set the Active Directory admin for a logical server using the Azure Portal as seen in Figure 1-11. The only requirement for implementing this configuration is that an Azure Active Directory must be configured as part of the subscription.

Figure 1-11 Azure Portal Azure Active Directory Admin configuration screen
Azure Active Directory and Azure SQL Database
Azure Active Directory gives a much more robust and complete security model for Azure SQL Database than merely using SQL logins for authentication. Azure AD allows you to stop the spread of identities across your database platform. The biggest benefit of this solution is the combination of your on-premises Active Directory being federated to your Azure Active Directory and offering your users a single-sign on experience.
In configurations with Active Directory Federation Services (ADFS), users can have a very similar pass-through authentication experience to using a Windows Authentication model with SQL Server. One important thing to note with ADFS versus non-ADFS implementations of hybrid Active Directory—in non-ADFS implementations the hashed values of on-premises user passwords are stored in the Azure AD because authentication is performed within Azure. In the example shown in Figure 1-12, where the customer is using ADFS, the authentication first routes to the nearest ADFS server, which is behind the customer’s firewall. You may notice the ADALSQL in that diagram which is the Active Directory Authentication Library for SQL Server, which you can use to allow your custom applications to connect to Azure SQL Database using Azure Active Directory authentication.
Azure Active Directory offers additional benefits, including easy configuration for multi-factor authentication, which can allow verification using phone calls, text messages, or mobile application notification. Multi-factor authentication is part of the Azure Active Directory premium offering.

Figure 1-12 Azure AD Authentication Model for Azure SQL Database
Configuring logins and users with Azure AD is similar to using Windows Authentication in SQL Server. There is one major difference concerning groups—even though you can create a login from an on-premises Active Directory user, you cannot create one from an on-premises Active Directory group. Group logins must be created based on Azure Active Directory groups. In most cases, where you will want to replicate the on-premises group structure, you can just create holding groups in your Azure AD that have a single member, the on-premises Active Directory group. There are several options for authentication to your Azure SQL Database, as shown in Figure 1-13.

Figure 1-13 SQL Server Management Studio Options for Authentication
Windows Authentication Not supported for Azure SQL Database.
SQL Server Authentication Traditional authentication model where the hashed credentials are stored in the database.
Active Directory Universal Authentication This model is used when multi-factor authentication is in place, and generates a browser-based login experience that is similar to logging into the Azure Portal.
Active Directory Password Authentication This model has the user enter their username in [email protected] format with their Azure Active Directory password. If MFA is enabled this will generate an error.
Active Directory Integrated This model is used when ADFS is in place, and the user is on a domain joined machine. If ADFS is not in place, connecting with this option will generate an error.
Some other recommendations from Microsoft for this include setting timeout values to 30 seconds because the initial authentication could be delayed. You also want to ensure that you are using newer versions of tools like SQL Server Management Studio, SQL Server Data Tools, and even bcp and sqlcmd command line tools because older versions do not support the Azure Active Directory authentication model.
Exam Tip
Remember how to configure Azure Active Directory authentication for Azure SQL Database.
Configure elastic pools
All the topics you have read about so far refer to single database activities. Each database must be sized, tuned, and monitored individually. As you can imagine, in a larger organization or SaaS application that supports many customers it can be problematic to manage each database individually, and it may lead to overprovisioning of resources and additional costs associated with meeting performance needs. Elastic pools resolve this problem by provisioning a shared pool of resources that is shared by a group; like individual databases, elastic pools use a concept of eDTUs, which is simply the concept of DTUs applied to a group of databases. This concept allows databases to better share resources and manage peak processing loads. An easy thought comparison is that of a traditional SQL Server instance housing multiple databases from multiple applications.
Within a given pool a set eDTU is allocated and shared among all of the databases in the pool. The administrator can choose to set a minimum and maximum eDTU quota to prevent one database from consuming all the eDTUs in the pool and impacting overall system performance.
When to choose an elastic pool
Pools are a well suited to application patterns like Software as a Service (SaaS) where your application has many (more than 10) databases. The performance pattern that you are looking for is where DTU consumption Is relatively low with some spikes. This pattern can lead to cost savings even with as few as two S3 databases in a single pool. There are some common elements you want to analyze when deciding whether or not to put databases in a pool:
Size of the databases Pools do not have a large amount of storage. If your databases are near the max size of their service tier, you may not get enough density to be cost effective.
Timing of peak workloads Elastic pools are ideal for databases that have different peak workloads. If all of your databases have the same peak workload time, you may need to allocate too many eDTUs.
Average and peak utilization For databases that have minimal difference between their average and peak workloads, pools may not be a good architectural fit. An ideal scenario is where the peak workload is 1.5x its average utilization.
Figure 1-14 shows an example of four databases that are a good fit for an elastic pool. While each database has a maximum utilization of 90 percent, the average utilization of the pool is quite low, and each of the databases has their peak workloads at different times.
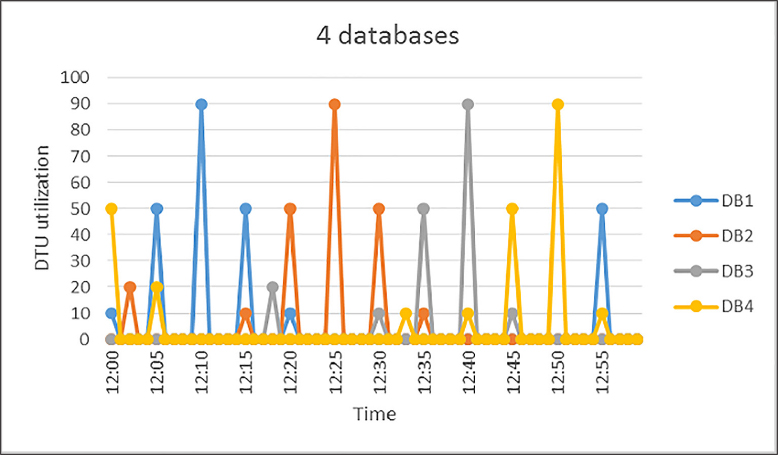
Figure 1-14 Image showing DTU workload for four databases
In Figure 1-15 you can see the workload utilization of 20 databases. The black line represents aggregate DTU usage for all databases; it never exceeds 100 DTUs. Cost and management are the key inputs into this decision—while eDTUs costs 1.5x more than DTUs used by single databases, they are shared across databases in the pool. In the scenario in Figure 1-15, the 20 databases could share 100 eDTUs versus each database having to be allocated 100 DTUs, which would reduce cost by 20x (this relies on S3 performance level for individual databases).

Figure 1-15 Chart showing the DTU workload for twenty databases
Exam Tip
Understand when to choose an elastic pool versus a standalone database, both from the perspective of management and cost.
Sizing elastic pools
Sizing your elastic pool can be challenging, however elastic pools are flexible and can be changed dynamically. As a rule of thumb, you want a minimum of 10-15 databases in your pool, however in some scenarios, like the S3 databases mentioned earlier, it can be cost effective with as few as two databases. The formula for this is if the sum of the DTUs for the single databases is more than 1.5x the eDTUs needed for the pool, the elastic pool will be a cost benefit (this relating to the cost difference per eDTU versus DTUs). There is fixed upper limit to the number of databases you can include in a pool (shown in Table 1-7), based on the performance tier of the pool. This relates to the number of databases that reach peak utilization at the same time, which sets the eDTU number for your pool. For example, if you had a pool with four S3 databases (which would have a max of 100 DTUs as standalone) that all have a peak workload at the same time, you would need to allocate 400 eDTUs, as each database is consuming 100 eDTUs at exactly the same time. If as in Figure 1-14, they all had their peak at different times (each database was consuming 100 eDTUs, while the other 3 databases were idle), you could allocate 100 eDTUs and not experience throttled performance.
Table 1-7 Elastic Pool Limits
Tier |
Max DBs |
Max Storage Per Pool (GB) |
Max DTUs per Pool |
Basic |
500 |
156 |
1600 |
Standard |
500 |
1536 |
3000 |
Premium |
100 |
4096 |
4000 |
Premium-RS |
100 |
1024 |
1000 |
Configuring elastic pools
Building an elastic pool is easy—you allocate the number of eDTUs and storage, and then set a minimum and maximum eDTU count for each database. Depending on how many eDTUs you allocate, the number of databases you can place in the elastic pool will decrease (see Figure 1-16). Premium pools are less dense than standard pools, as shown by the maximum number of databases shown in Table 1-7.

Figure 1-16 Elastic Pool Configuration Screen from the Azure Portal
You can also build elastic pools using PowerShell and the Azure CLI as shown in the next two examples.
Login-AzureRmAccount
New-AzureRmSqlElasticPool -ResourceGroupName "ResourceGroup01" -ServerName "Server01"
-ElasticPoolName "ElasticPool01" -Edition "Standard" -Dtu 400 -DatabaseDtuMin 10
-DatabaseDtuMax 100
az sql elastic-pool create ñname "ElasticPool01" --resource-group "RG01"
        --server "Server01" --db-dtu-max 100 --db-dtu-min 100 --dtu 1000 --edition
"Standard" --max-size 2048
The process for creating an elastic pool is to create the pool on an existing logical server, then to either add existing databases to the pool, or create new databases within the pool (see Figure 1-17). You can only add databases to the pool that are in the same logical server. If you are working with existing databases the Azure Portal makes recommendations for service tier, pool eDTUs, minimum, and maximum eDTUs based on the telemetry data from your existing databases. You should note that these recommendations are based on the last 30 days of data. There is a requirement for a database to have existed for at least seven days to appear in these recommendations.

Figure 1-17 Elastic Pool Configuration Screen from the Azure Portal
Managing and monitoring an elastic pool is like managing an individual database. The best place to go for pool information is the Azure Portal, which shows pool eDTU utilization and enables you to identify databases that may be negatively impacting the performance of the pool. By default, the portal shows you storage and eDTU utilization for the last hour, but you can configure this to show more historical data. You can also use the portal to create alerts and notifications on various performance metrics. You may also move a database out of an elastic pool, if after monitoring it is not a good fit for the profile of the pool.
More Info About Azure SQL Database Elastic Pool Limits
The elastic pool limits and resources are changing regularly. You can learn more about the limits and sizing of elastic pools here: https://docs.microsoft.com/en-us/azure/sql-database/sql-database-elastic-pool.
It is important to know that the limits of the pools are changing frequently as Microsoft makes updates to the Azure platform, so you should refer to books online and the portal before making decisions around designing your architecture.
If all the eDTUs in the elastic pool are consumed, performance in the pool is throttled. Each database receives an equal amount of resources for processing. The Azure SQL Database service ensures that each database has equal amounts of compute time. The easiest comparison to how this works is the use of the resource governor feature in an on-premises or IaaS SQL Server environment.
Changing pool sizing
There are two tiers of changing sizes in an elastic pool—one is changing the minimum and maximum eDTU settings for individual databases. These changes typically take less than five minutes. Changing the size of the elastic pool takes longer, and is dependent on the size of the databases in the pool, but in general a rule of thumb is that changing pool eDTUs takes around 90 minutes per 100 GB of data in your pool. It is important to keep this in mind if planning to dynamically alter the size of your pools for varying workloads—you may need to do this far in advance for larger pools.
Elastic jobs
One of the challenges to Azure SQL Database has been the inability to perform cross-database transactions. If we use the SaaS example, where each customer has a database, if you need to update master data, or issue a schema change across all customer databases, your deployment process would require a query to be issued against each individual database. While this process could be automated, it is still messy. Elastic pools allow for the concept of elastic jobs you can execute SQL across a group of databases in an elastic pool, and manage the results in a single place (see Figure 1-18).

Figure 1-18 Elastic Database Jobs workflow
Running elastic jobs as a few requirements—you need to install elastic jobs components in your Azure environment, and your jobs must be idempotent, which means for the script to succeed and run again it must have the same result. For example, if you were creating a new stored procedure, you would want to use the CREATE OR ALTER PROCEDURE syntax versus simply using the CREATE PROCEDURE option, which would fail the second time the script was executed.
Elastic jobs do require an additional database, which is designated a control database to store all metadata and state data. In an elastic pool scenario, this database would have minimal additional cost. The job service talks to the control database and launches and tracks jobs. If you are using elastic pools, you can access the elastic jobs interface through the portal, however if you wish to use this feature for group of standalone databases, you need to use PowerShell or the Azure CLI.
Elastic pools and geo-replication
Databases that are in an Elastic pools do have the same architecture as standalone databases, so features like backup and high availability are already in place. Just like standalone databases, you have the option to configure active geo-replication for databases in an elastic pool. The geo-replication is quite flexible because you do not have to include every database in the pool in your geo-replication set, and you may geo-replicate either to a standalone database, or an elastic pool. The only hard requirement is that the service tiers of the pools be the same.
Skill 1:2: Plan for SQL Server installation
This skill deals with planning for SQL Server installation. This includes choosing the right infrastructure, whether you are on-premises or in the cloud, configuring storage to meet your performance needs, and understanding best practices for installation.
This skill covers how to:
Plan for an IaaS or on-premises SQL Server deployment
Planning is needed for any SQL Server deployment, whether it is in the cloud or on-premises. It can be quite a challenge to gather the information you need to properly size and build out your environment. There are many questions you want to ask before beginning any deployment project:
What is your licensing situation?
What edition are you licensed for, and for how many cores?
If Azure, are you renting the license or bringing your own?
Do you have Software Assurance?
Are you migrating an existing application?
Are you upgrading versions of SQL Server?
Are you able to capture workload from the existing application?
What are the availability needs of the application?
Do you need a multiple data center solution?
Do you need high availability?
How long can the application be down?
What are the performance needs of the application?
Is this a customer facing latency-sensitive application?
Or is it a batch processing application that only needs to complete its jobs in a large time window?
How much data are you going to have to store?
How much data is accessed regularly?
How many concurrent sessions are you expecting?
Licensing
Licensing is not the most interesting topic; however, it is very important to many architectural discussions. You do not need to be a licensing expert; however, you do need to understand the basic rules and how they work. An important change Microsoft made with SQL Server 2016 is that all non-production environments (development, QA, test) only need to be licensed with developer edition. They also made developer edition free—this combination can greatly reduce license costs. Express Edition is also free for production use, but is limited to database sizes of 10 GB.
Standard Edition is licensed by either a Server/Client Access License (CAL) model or a core based licensing model. The server/CAL model is best suited for smaller organizations who do not have a lot of users (the “users” here refer to users of the application and not database users), where the core model is best suited for Internet facing applications that effectively have an unlimited number of users. One important thing to note is as of Service Pack 1 of SQL Server 2016, Standard Edition has the same programming surface area as Enterprise Edition.
Enterprise Edition is licensed in the core model only. Enterprise Edition is designed for applications that need scaling. It supports unlimited memory, larger scale-out farms, and the support needed for tier-1 workloads.
Software Assurance is effectively an annual support contract with Microsoft that entitles you to upgrades and more importantly grants you the right to have a second idle server for either high availability or disaster recovery. For example, if you have a license of Enterprise Edition for 16 cores, and you ran your production application with that, you would be entitled to have a second server (as part of an Availability Groups, Log Shipping Partner, Failover Cluster Instance, etc.) with no additional licensing charge. You may not use that server for any operations like backups, integrity checks, or restores, otherwise a license is required.
More Info About SQL Server Editions and Features
You can learn about each edition of SQL Server and what the differences are in this post: https://docs.microsoft.com/en-us/sql/sql-server/editions-and-components-of-sql-server-2017.
Azure VMs have two options for licensing SQL Server—you can rent the license as part of your monthly Azure cost, or you can bring your own license (BYOL), which lowers your monthly cost (see Figure 1-19).

Figure 1-19 Bring Your Own License SQL Server VMs in Azure Portal
You do need to have Software Assurance to choose this option.
It is important to choose a BYOL image if you are using an existing license; otherwise, you will be charged for the cost of the SQL Server licensing and a support ticket will be required to switch to your own license. Additionally, you can bring your own Windows license; this is a different process that you can see in Figure 1-20 that happens at VM deployment. Similarly, this option must be configured at deployment, or you will be charged the cost of the Windows license as part of your monthly bill. A support ticket can also resolve this issue, if you need to change after the fact.
Exam Tip
Have a good understanding of the comparative costs associated with running SQL Server on Azure including infrastructure (compute and storage) and licensing. Understand the licensing rules as they relate to high availability and disaster recovery.

Figure 1-20 Bring Your Own License for WINDOWS VMs in Azure Portal
More Info About SQL Server Licensing
To learn more about the costs of SQL Server licensing by edition and software assurance visit: https://www.microsoft.com/en-us/sql-server/sql-server-2016-pricing.
Existing application
If you are migrating an existing application to a new SQL Server, you can bypass a lot of assessment. Whether as part of a migration to an Azure VM or a new on-premises server, you have access to all the working data you need. The first thing you want to do is use performance monitor to gather a performance profile of the source system. To do that, you can execute the following steps:
Launch Performance Monitor from the Windows menu.
If you are running this remotely, select Action > Connect To Another Computer and enter the name of the server in the Select Compute dialog box. (Note: you will need permission to run Perfmon on a remote server)
Click Data Collector Sets.
Right click User Defined and select New > Data Collector Set as shown in Figure 1-21.

Figure 1-21 New Data Collector Set Performance Monitor
Name your collection set SQL Server Baseline and click the radio button to create manually.
On the screen that says, What Kind Of Data Do You Want To Include? click the radio button next to Performance Counters.
On the next screen click, Add, and you should then see the screen in Figure 1-22.

Figure 1-22 Performance Monitor counter add screen
Add the following counters:
Processor Information

Processor(*)% Processor Time
Process(sqlservr)% Processor Time
Processor(*)% Privileged Time
Process(sqlservr)% Privileged Time


Memory

Available Mbytes
Memory Pages/sec
Process(sqlservr)Private Bytes
Process(sqlservr)Working Set
SQLServer: Memory Manager Total Server Memory
SQLServer: Memory Manager Target Server Memory


Physical Disk

PhysicalDisk(*)Avg. Disk sec/Read
PhysicalDisk(*)Avg. Disk sec/Write
PhysicalDisk Avg. Disk Queue Length
Disk Bytes/sec
Avg Disk Bytes/Transfer
Process(sqlservr)IO Data Operations/sec


Network

Network InterfaceBytes Received/sec
Network InterfaceBytes Sent/sec
Network Interface(*)Output Queue Length

SQL Server: SQL Statistics Batch Requests/sec
SQL Server: SQL Statistics SQL Compilations/sec
SQL Server: SQL Statistics SQL Recompilations/sec

SQL Server: Wait Statistics
Latch Waits > 15 sec
Locks > 30 sec
IO Latch Timeouts
Typically, when assessing a server workload you want to capture this performance monitor data over a period of at least a week, or even a month for systems that have heavy month end processing. Once you have completed your data capture you can use the performance analysis of logs (PAL) tool, an open-source project to analyze and format your logs. You can use this analysis to help you design your target environment.
More Info About Pal Tool
The Performance Analysis of Logs tool is a Microsoft created open-source tool which allows for easier analysis of Performance Monitor input: https://github.com/clinthuffman/PAL.
Managing availability
You need to plan your SQL Server deployment for high availability and disaster recovery. If your application is critical to the business you need to design your underlying infrastructure to reflect that criticality. SQL Server offers many features for that high availability and disaster recovery in the form of AlwaysOn Availability Groups and Failover Cluster Instances. Or you can choose to deploy a more manual solution like log shipping either by itself or in conjunction with another option. Both of these options are dependent on Windows Server Failover Cluster (WSFC), though starting with SQL Server 2017, Availability Groups may be deployed for migration purposes only, without an underlying WSFC. These techniques all protect against machine and operating system failure, and allow you to minimize downtime during maintenance operations like patching Windows and SQL Server.
Failover Cluster Instances are an option that provides local high availability. This option depends on shared storage, where a single copy of your instance floats between two or more nodes running SQL Server. Failover cluster instances require a dedicated cluster installation of SQL Server. Most installations of failover cluster instance are in one location; however, they may be combined with storage replication to provide disaster recovery. To implement failover cluster instances in Azure, you need Windows Server 2016 Storage Spaces Direct to provide shared storage. A failover cluster instance has a single point of failure at the shared storage layer, so you need to use an additional technique like Availability Groups if you need additional data protection.
A failover cluster instance encompasses your while instance. This means things like logins and SQL Agent jobs are always on all nodes where your instance is installed. There is no process required to sync because the instance contains a single copy of that master data. The unit of failover is at the instance level.
Availability Groups are an option that can provide a level of high availability locally and disaster recovery in a remote data center. Like Failover Cluster Instances, Availability Groups (AGs) are built on top of a WSFC. However, AGs use standalone instances of SQL Server, and do not encompass the entire instance. The AG is a group of databases that are organized together to send transaction data to one or more secondary replicas. An AG can have up to eight replicas for a total of nine nodes. These replicas can be used for reading and backups to offload work from the primary replica. An AG provides an additional measure of protection over a failover cluster instance because there are inherently multiple copies of the data in the environment. Additionally, there is automatic page repair for any data page that is deemed corrupt from the primary replica.
Each AG has its own listener, which serves as a virtual IP address for the group. By default, the listener always routes a connection to the primary instance, however if used in conjunction with read-only routing and the application intent flag in a SQL Server connection string, connections can be routed to a secondary for read offload. An AG offers two types of replicas, synchronous and asynchronous, which are typically used for local and remote copies respectively. If you are using synchronous mode, you should be aware that a write transaction will not complete on the primary replica until it reaches the transaction log on the secondary replica, so it is important to ensure that there is minimal latency between the replicas. Additionally, you can only have automatic failover between nodes that are synchronous. Asynchronous replicas require manual failover due to the potential data loss of in-flight transactions.
One challenge with AGs is keeping users and jobs in sync between replicas—because the feature uses standalone instances there is nothing to keep the jobs or users in sync. For users, the solution is relatively straightforward—you can use contained database users, which are local to the database in question, rather than stored in the master database.
More Info Contained Database Users
You can learn about creating contained database users and the security requirements around them here: https://docs.microsoft.com/en-us/sql/relational-databases/security/contained-database-users-making-your-database-portable.
Agent jobs are a little bit more challenging because you would need to build some intelligence into the job to determine which node is currently primary. One solution is to regularly copy the agent jobs from the primary to the secondary server(s), and to add logic to the job to ensure that it only operates on the primary replica.
As shown in Figure 1-23, these two technologies (FCIs and AGs) can be combined to provide higher levels of data protection. The one caveat to combining the techniques is that automatic failover can no longer be used within the AG due to the presence of the FCI. It should be noted that the WSFC is using a file share for quorum. This is common configuration for multi-subnet distributed clusters. Another option if you are using Windows Server 2016 is to use Azure Blob Storage for your cloud quorum option. You should always try to use the latest supported version of Windows for your SQL Server installations because enhancements to the failover clustering software stack have been numerous in recent releases.
Choosing the right high availability solution comes down to budget and the needs of your business for your application. You should have an understanding from your business of what the availability needs for each application are, and design your architecture appropriately.

Figure 1-23 Availability Group and Failover Cluster Instance Combined Architecture
Managing performance
Performance is one of the more challenging components in developing new deployments. Whether you are in Azure or on-premises, or on physical hardware or virtual hardware, all database systems have differing performance requirements, based on both available hardware resources, workload of the application, and business requirements of the application.
For example, a database that paints web pages for a customer facing application needs to have extremely low latency, whereas an application that does overnight back office processing typically just needs to have enough resources to finish its batch within an eight-hour timeframe.
The official requirements for installing SQL Server are as follows.
Table 1-8 SQL Server Installation Requirements
Component |
Requirement |
MEMORY |
Minimum: |
Express Editions: 512 MB |
|
All other editions: 1 GB |
|
Recommended: |
|
Express Editions: 1 GB |
|
All other editions: At least 4 GB and should be increased as database size increases to ensure optimal performance. |
|
PROCESSOR SPEED |
Minimum: x64 Processor: 1.4 GHz |
PROCESSOR TYPE |
Recommended: 2.0 GHz or faster x64 Processor: AMD Opteron, AMD Athlon 64, Intel Xeon with Intel EM64T support, Intel Pentium IV with EM64T support |
STORAGE |
A minimum of 6 GB is required to install SQL Server |
Table 1-8 shows the minimum hardware requirements as specified by Microsoft for SQL Server 2016. It is important to note that these are absolute minimum supported values, especially when talking about memory—4 GB is required just to get SQL Server up and running. In a production environment, you should use at least 16 GB, and adjust depending on your workload.
Storage
You will notice the only disk requirement is the 6 GB required to install SQL Server. You learn more about proper disk layout for SQL Server on Azure later in this section, however there are two other important metrics around disk to know about—I/O Operations Per Second (IOPs) and latency. IOPs are a measure of how fast your disk can read and write data, while latency is a measure of how long it takes the data to be read from disk. Latency will be reduced greatly when using solid state drives—in fact in Azure, it is effectively a requirement to use Premium Storage (which is SSD based) with SQL Server workloads. More and more on-premises SQL Server workloads are using SSD based storage due to the reduced latency and higher IOPs that the SSDs offer. Storage performance is critical to database performance, so it is important to properly design your storage subsystem.
More Info About SQL Server Storage Configuration
You can learn more about SQL Server storage performance at: https://technet.microsoft.com/en-us/library/cc298801.aspx.
Storage architecture is complex, especially given the number of different storage options on the market. The important thing is to perform testing of your storage configuration to ensure that it meets the expected needs of your application. Microsoft supplies a tool named DiskSpeed, which is a benchmarking tool to help you understand the performance of your storage subsystem, and lets you assess any changes. If you are migrating an existing application, you can use the following Performance Monitor (Performance Monitor) counters from SQL Server to get an assessment of your current IOPs:
SQL Server Resource Pool Stats: Disk Read IO/Sec
SQL Server Resource Pool Stats: Disk Write IO/Sec
Those two counters will get the number of IOPs performed by your SQL Server instance. If you want latency metrics you can also use Performance Monitor to get that data:
Physical Disk/Logical Disk->Avg. Disk Sec/Read
Physical Disk/Logical Disk->Avg. Disk Sec/Write
You can also get this data from the SQL Server dynamic management views and functions (DMVs and DMFs) including sys.dm_io_virtual_file_stats, however, that DMF is not resettable (its stats exist for the life of the instance) so using Performance Monitor gives you more real-time information.
Memory
One of the biggest keys to database performance is having enough available memory so that the working set of data does not have to be read from disk. As fast as modern disk is, it is still orders of magnitude slower than reading and writing from memory. It is a common myth that database servers are memory hogs, while a SQL Server instance will use all the memory allocated to it, which is by design as opposed to any runaway processing. Memory does tend to be a little bit of a black box, however there is a Performance Monitor metric from SQL Server that can give you a good idea of memory utilization.
So how do you decide how much memory to include in your SQL Server? If you are running in Azure, this is relatively straightforward. Choose what you think is best and then adjust the size of your server up or down to better suit the needs of your application. If you are running the standard edition of SQL Server you are limited to 128 GB, however, with Enterprise Edition having unlimited memory, this can be a tough decision. There are a few inputs you can use to guide this:
What is your largest table?
Are you using in-memory features like OLTP and columnstore?
Are you using data compression?
There is no hard and fast rule for how much memory your SQL Server instance needs. There are a couple things you will want to monitor: disk usage and page life expectancy (PLE) in SQL Server (how long a page is expected to last in the buffer pool). If you do not have enough RAM, you will see significantly more disk activity as the database needs to reach out to the storage to bring pages into memory. Additionally, you will see PLE decease rapidly when you do not have enough memory. If you are using data compression, that can give you better utilization of RAM, by allowing your largest tables in indexes to fit into fewer data pages. If you are using features like in-memory OLTP or columnstore, you need to account for that in your calculation. Sizing your system’s memory is challenging and does require changing over time, however, buying additional RAM tends to be cheaper than buying additional storage IOPs, and can mask a lot of bad development practice, so it is best to err on the high side of RAM.
More Info About SQL Server Memory Utilization
SQL Server memory utilization can be complicated; here are some examples of how to monitor SQL Server’s memory internals: https://docs.microsoft.com/en-us/sql/relational-databases/performance-monitor/monitor-memory-usage.
CPU
Like memory, CPU for a new application tends to be a black box. Unlike memory, due to the way SQL Server is licensed, increasing the amount of CPU allocated to your SQL Server can carry a very expensive cost beyond the hardware involved. If you are migrating an existing workload, you can look at the output from your Performance Monitor around processor utilization, and adjust up or down based on current processor utilization. As a rule of thumb for adequate throughput, you would like to see your database servers running at under 70-80 percent processor utilization during normal operation. There will be spikes during heavy processing, but if your server is constantly running at 80-90 percent, your throughput will be limited and latency may increase.
If helps to understand the nature of your application as well—most online analytical processing databases (OLAP) benefit from a higher CPU count, due to the parallel nature of reporting. On the other hand, OLTP systems benefit from pure CPU speed, so when building your servers, you may want to go with a lower core count, but with faster individual cores. Also, on some virtual platforms over allocating CPU can lead to poorer performance because of scheduling operations. So, do not needlessly over allocate CPU in virtualized environments.
Select the appropriate size for a virtual machine
One of the differences between using a cloud platform like Azure, and working in a traditional on-premises model, is that the cost for cloud platform is right in front you, giving a clear indication on spend for a given a system. This tends to make administrators conservative because they have an opportunity to save their organization money by choosing the right size VM. A very undersized VM can lead to a very poor user experience, however, so it is important to find a proper balance between cost and performance.
Table 1-9 shows the guidance for VMs running SQL Server. Microsoft recommends using a DS2 or higher VM for Standard Edition, and a DS3 or higher for Enterprise Edition. You may also notice that in the disks section, P30 disks are mentioned. It is implied that premium storage should be used for SQL Server production workloads. You learn more about properly configuring storage later in this section.
Table 1-9 Microsoft Guidance for SQL Server on Azure VMs
Area |
Optimizations |
VM SIZE |
DS3 or higher for SQL Enterprise edition. |
DS2 or higher for SQL Standard and Web editions. |
|
STORAGE |
Use Premium Storage. Standard storage is only recommended for dev/test. |
Keep the storage account and SQL Server VM in the same region. |
|
Disable Azure geo-redundant storage (geo-replication) on the storage account. |
|
DISKS |
Use a minimum of 2 P30 disks (1 for log files; 1 for data files and TempDB). |
Avoid using operating system or temporary disks for database storage or logging. |
|
Enable read caching on the disk(s) hosting the data files and TempDB. |
|
Do not enable caching on disk(s) hosting the log file. |
|
Important: Stop the SQL Server service when changing the cache settings for an Azure VM disk. |
|
Stripe multiple Azure data disks to get increased IO throughput. |
|
Format with documented allocation sizes. |
Types of Azure VMs
Azure offers several types of VM including general purpose, compute optimized, storage optimized, GPU (graphic processing unit optimized), and memory optimized. Given the memory intensive nature of database servers, we will focus on the memory optimized VMs here. However, it helps to be aware of the other types of VMs that may meet the needs of unusual workloads. Also, the range of VMs offered by Microsoft is constantly changing and evolving, so it helps to stay up to date on the offerings that are available in the Azure marketplace.
More Info Microsoft Azure VM Sizes and Types
The sizes of Azure Virtual Machine offerings are constantly changing, visit books online to see what is current: https://docs.microsoft.com/en-us/azure/virtual-machines/windows/sizes.
Memory optimized VMs have a high memory to CPU ratio, which is a good fit for the nature of relational databases and their needs for large amounts of RAM to buffer data. Let’s talk about the components that make up a given Azure VM:
vCPU The number of cores or hyperthreads that are available to a VM. Hyperthreads are a recently added concept and are not in all VM types. They offer slightly lower performance at a lower cost versus dedicated cores.
Memory This is simply the amount of RAM allocated to your virtual machine. This memory is fully allocated, there is no oversubscription in Azure.
Temp Storage (SSD) This is local SSD storage that is directly attached to the physical host running your VM. It has extremely low latency for writes, but in most cases, is temporary. When the VM reboots, whatever is on the volume is lost. It can still have use cases for transient data like tempdb and caches.
Max Data Disks Depending on the size of your VM, you can have a maximum number of data disks. If you have a particularly large database, this can lead you to choosing a larger VM than you may otherwise need. It may also limit your options for down scaling during idle times.
IOPs/Storage Throughput In addition to limiting the number of disks, the amount of bandwidth to them is also controlled. This means your latency and IOPs should be predictable.
Network Bandwidth The network bandwidth is correlated to the size of the VM.
Azure Compute Units
Like DTUs in Azure SQL Database, Azure VMs have a measurement to compare system performance based on CPU and relative performance. This number is called the Azure Compute Unit or ACU (see Table 1-10). ACUs allow you to easily compare CPU performance across the various tiers of compute within Azure. The ACU is standardized on the standard A1 VM being 100 ACUs. The ACUs are per CPU, so a machine with 32 vCPUs and an ACU of 100 would have a total of 3200 ACUs.
Table 1-10 ACU Chart for Azure VM families
SKU Family |
ACU vCPU |
A0 |
50 |
A1-A4 |
100 |
100 |
|
100 |
|
100 |
|
225* |
|
160 |
|
210 - 250* |
|
160 |
|
210-250* |
|
210-250* |
|
210-250* |
|
180 - 240* |
|
180 - 240* |
|
290 - 300* |
|
180 - 240* |
|
160-180** |
* Use Intel® Turbo technology to increase CPU frequency and provide a performance boost. The amount of the boost can vary based on the VM size, workload, and other workloads running on the same host.
** Indicate virtual cores that are hyperthreaded.
Azure VMs for SQL Server
As mentioned, you should focus on the memory optimized VMs for SQL Server, but you should also focus on the VMs that have “S” in the name (DS_v3, GS5) because they support premium storage. If you do not choose an S VM, you cannot change to a premium storage VM without a migration. In this section, you learn about all the premium storage VM options.
ES_V3 series
The ES_v3 instances use the 2.3 GHZ Intel XEON E5-2673 v4 processor, which is in the Broadwell family and can achieve up to 3.5 Ghz with Intel Turbo Boost (see Table 1-11).
Table 1-11 Es-V3 Series VMs
Size |
vCPU |
Memory |
Temp storage (SSD) GiB |
Max data disks |
Max cached and temp storage throughput: IOPS / MBps (cache size in GiB) |
Max uncached disk throughput: IOPS / MBps |
Max NICs / Expected network performance (Mbps) |
Standard_E2s_v3 |
2 |
16 |
32 |
4 |
4,000 / 32 (50) |
3,200 / 48 |
2 / moderate |
Standard_E4s_v3 |
4 |
32 |
64 |
8 |
8,000 / 64 (100) |
6,400 / 96 |
2 / moderate |
Standard_E8s_v3 |
8 |
64 |
128 |
16 |
16,000 / 128 (200) |
12,800 / 192 |
4 / high |
Standard_E16s_v3 |
16 |
128 |
256 |
32 |
32,000 / 256 (400) |
25,600 / 384 |
8 / high |
Standard_E32s_v3 |
32 |
256 |
512 |
32 |
64,000 / 512 (800) |
51,200 / 768 |
8 / extremely high |
Standard_E64s_v3 |
64 |
432 |
864 |
32 |
128,000/1024 (1600) |
80,000 / 1200 |
8 / extremely high |
The Es-V3 VM series is relatively new, but offers some of the largest memory and the highest amounts of CPU in all of Azure. It can handle your largest workloads. The Es-V3 series has an ACU of 160-190.
DS Series
Before the introduction of the DSv2 and EsV3 series of VMs, these VMs were the core VMs for running mid-tier SQL Server workloads, which made up the bulk of Azure workloads (see Table 1-12).
Table 1-12 DS Series VMs
Size |
vCPU |
Memory |
Temp storage (SSD) GiB |
Max data disks |
Max cached and temp storage throughput: IOPS / MBps (cache size in GiB) |
Max uncached disk throughput: IOPS / MBps |
Max NICs / Expected network performance (Mbps) |
Standard_DS11 |
2 |
14 |
28 |
4 |
8,000 / 64 (72) |
6,400 / 64 |
2 / 1000 |
Standard_DS12 |
4 |
28 |
56 |
8 |
16,000 / 128 (144) |
12,800 / 128 |
4/2000 |
Standard_DS13 |
8 |
56 |
112 |
16 |
32,000 / 256 (288) |
25,600 / 256 |
8/2000 |
Standard_DS14 |
16 |
112 |
224 |
32 |
64,000 / 512 (576) |
51,200 / 512 |
8 / 6000 - 8000 |
The DS series has an ACU of 160, and while it was the core of SQL Server VMs, going forward workloads should move DSv2 and newer VM types with faster vCPUs.
DS_V2 series
The DS_V2 series is now the current core of VMs for SQL Server workloads. These VMs have a good memory to CPU ratio, and range from 14 to 140 GB of memory, which is extremely well suited to most mid-tier SQL Server workloads. These VMs have a good amount of temp SSD storage, which can be used for tempdb or buffer pool extensions to improve performance without added cost (see Table 1-13). The VMs can also support storage up to 40 TB with 80,000 IOPs offering the high levels of I/O performance required at an affordable cost.
Table 1-13 DS_V2 VM Sizes
Size |
vCPU |
Memory |
Temp storage (SSD) GiB |
Max data disks |
Max cached and temp storage throughput: IOPS / MBps (cache size in GiB)* |
Max uncached disk throughput: IOPS / MBps |
Max NICs / Expected network performance (Mbps) |
Standard_DS11_v2 |
2 |
14 |
28 |
4 |
8,000 / 64 (72) |
6,400 / 96 |
2 / 1500 |
Standard_DS12_v2 |
4 |
28 |
56 |
8 |
16,000 / 128 (144) |
12,800 / 192 |
4 / 3000 |
Standard_DS13_v2 |
8 |
56 |
112 |
16 |
32,000 / 256 (288) |
25,600 / 384 |
8 / 6000 |
Standard_DS14_v2 |
16 |
112 |
224 |
32 |
64,000 / 512 (576) |
51,200 / 768 |
8 / 6000 - 12000 ** |
Standard DS15_v2 |
20 |
140 |
290 |
40 |
80,000/ 640 (720) |
64,000/ 960 |
8/20000*** |
*The maximum disk throughput (IOPS or MBps) possible with a DSv2 series VM may be limited by the number, size, and striping of the attached disk(s).
**Instance is an isolated node that guarantees that your VM is the only VM on our Intel Haswell node.
***25000 Mbps with Accelerated Networking.
The DS_V2 VMs have an ACU of 210-250, and the largest VM the DS15_V2 offers dedicated hardware so that there is no chance of any other workloads causing contention.
GS Series
While the DS and DS_V2 series of VMs are the bulk of SQL Server workloads, the largest workloads require the memory and dedicated processing power of the GS series of VMs (see Table 1-14).
Table 1-14 GS Series VM Sizes
Size |
vCPU |
Memory |
Temp storage (SSD) GiB |
Max data disks |
Max cached and temp storage throughput: IOPS / MBps (cache size in GiB) |
Max uncached disk throughput: IOPS / MBps |
Max NICs / Expected network performance (Mbps) |
Standard_GS1 |
2 |
28 |
56 |
4 |
10,000 / 100 (264) |
5,000 / 125 |
2 / 2000 |
Standard_GS2 |
4 |
56 |
112 |
8 |
20,000 / 200 (528) |
10,000 / 250 |
2 / 4000 |
Standard_GS3 |
8 |
112 |
224 |
16 |
40,000 / 400 (1,056) |
20,000 / 500 |
4 / 8000 |
Standard_GS4 |
16 |
224 |
448 |
32 |
80,000 / 800 (2,112) |
40,000 / 1,000 |
8 / 6000 - 16000 |
Standard_GS5* |
32 |
448 |
896 |
64 |
160,000 / 1,600 (4,224) |
80,000 / 2,000 |
8 / 20000 |
*Instance is isolated to hardware dedicated to a single customer.
The GS series of VMs has an ACU 180-240. While the lower end VMs in the GS series are comparable to some of the other tiers, the CPU and memory in the GS4 and GS5 represent some of the largest VMs in all of Azure and in all the public cloud. The GS5 is a dedicated machine that can perform 160,000 IOPs with the maximum disk configuration.
Choosing your VM size in Azure is a little bit easier than buying physical hardware on-premises because it is possible to change after the fact. The first decision you want to make is how much data you need to store, followed by how much memory you need. This should narrow down your selection to two to three VM options, and you can pick what matches your workload best from there.
Exam Tip
It is not a requirement to have the individual VM’s sizes memorized, however you should know the families and their relative sizes in case you are asked to size a solution on the exam. You should also know which VMs support premium storage.
Plan storage pools based on performance requirements
When Azure began many years ago, there were two things that administrators working in Azure managed quite differently—storage and networking. As classic Azure was replaced by Azure Resource Manager (ARM) networking became relatively close to what exists in most on-premises environments. However, storage is still managed differently mainly due to the Azure Infrastructure and the way storage is deployed. Azure uses what is known as Object Based Storage, which means that all storage objects are managed as files. When you attach “disks” to a virtual machine they are simple VHD (Hyper-V file format) files that are presented to the guest virtual machine. This is different from the traditional on-premises approach of using block-based storage, which manages data as sectors and tracks of data. Some newer on-premises storage subsystems are built using object based storage as well, so some of these concepts are common across Azure and on-premises.
What this object-based storage model does is abstract the physical layer away from the actual disks and allow them to be managed by the virtualization hypervisor, which allows more flexibility in management. One of the other elements that is built into the Azure storage infrastructure is RAID (Redundant Array of Independent Disks)—RAID is typically used on-premises to provide data protection amongst disk. The general assumption is that disks will always fail so they must use striping or mirroring to protect against data loss. Azure takes a similar approach, but it maintains three copies of all data within the same region using its own software defined RAID. In the event of disk failure, one of the secondary copies of storage is promoted to the new primary. What does this mean for you? It means your data is protected on the back end, so when you present disks to your VM you can pool them without introducing any RAID that would limit your performance and your capacity. In the view of your VM, you are using RAID 0, because the Azure storage infrastructure is protecting your data. This is executed by using Storage Spaces in Windows Server with simple recovery.
In Figure 1-24 you can see a representation of what RAID 0 would like if we were writing directly to disk. The values are split across the three disks, and the loss of any one disk would result in complete data loss. However, because in Azure our data is protected by the infrastructure, you can use RAID Windows Storage Space in your VMs.

Figure 1-24 RAID 0 Example
Disks in Azure
There is a focus in premium storage for SQL Server VMs, however we also discuss standard storage because it can be used for backups and perhaps the O/S drive on your systems.
Table 1-15 Premium Storage Disk Options
Premium Disks Type |
P4 |
P6 |
P10 |
P20 |
P30 |
P40 |
P50 |
DISK SIZE |
32 GB |
64 GB |
128 GB |
512 GB |
1024 GB |
2048 GB |
4096 GB (4 TB) |
IOPS PER DISK |
120 |
240 |
500 |
2300 |
5000 |
7500 |
7500 |
THROUGHPUT PER DISK |
25 MB per second |
50 MB per second |
100 MB per second |
150 MB per second |
200 MB per second |
250 MB per |
250 MB per |
There is no service level agreement (SLA) for standard storage, however disks on basic VMs can have up to 300 IOPs and disks on standard VMs can have up to 500 IOPs per disk. As you can see from Table 13, the P30 disk balances performance and capacity (and cost) nicely, offering 5000 IOPs per disk. To get more IOPs for your SQL Server workloads, you need to pool disks together. To do this in Windows you need to use the Storage Spaces feature to pool the disks to get the total IOPs and capacity of the disks.
It is also recommended that you use managed disks for your SQL Server workloads; managed disks have higher levels of availability, and removes the limits on IOPs to a given storage account that were present with unmanaged disks in Azure.
More Info Microsoft Azure Premium Storage
You can learn more about the differences between managed and unmanaged storage and the different types of premium storage options here: https://docs.microsoft.com/en-us/azure/storage/common/storage-premium-storage.
Premium storage only offers resiliency within a single data center by providing its three copies of your data. You can also use geo-redundant storage (GRS) and read-access geo-redundant storage (RA-GRS) to store your backup files. GRS and RA-GRS use standard storage, which is replicated to a paired region; however, this model is not supported for database data and log files because there is no guarantee of consistency across regions.
Storage spaces
After you have allocated disks to your VM, you need to use storage spaces to pool them. If you are using a SQL Server template (which you learn more about in the next section) this may be done for you, however these guidelines presume that you are doing this manually.
To begin, go to the Azure Portal and add disks to your VM:
Click Disks on the Blade for your VM (Figure 1-25).

Figure 1-25 Add Disk to VM Screen in Azure Portal
In the data disks area, click the pull down under Name and click Create Disk. You need to assign a name to each disk. If you are not using managed disks, you may need to assign a storage account. You repeat this process for each disk that you want to assign to your VM. For this example, there are four disks. Click Save in the disk screen and wait until the operation completes (this could take up to a couple of minutes).
Log into your VM using Remote Desktop.
Open Server Manager and click File And Storage Services (Figure 1-26).

Figure 1-26 The Server Manager Screen from Windows Server 2016
From there, click Storage Pools. In the bottom right, you should see the four physical disks you created that are ready for assignment.
In the top right of the screen, click Tasks and select New Storage Pool (Figure 1-27).

Figure 1-27 Server Manage Storage Pool Screen
The New Storage Pool pops up. Assign a name to your storage pool. For this demo, the pool is named Data Pool (Figure 1-28).

Figure 1-28 The New Storage Pool Wizard
Click next to continue.
Next you add your disks to the pool. Click the check boxes next to each of your disks, and then click Next (Figure 1-29).
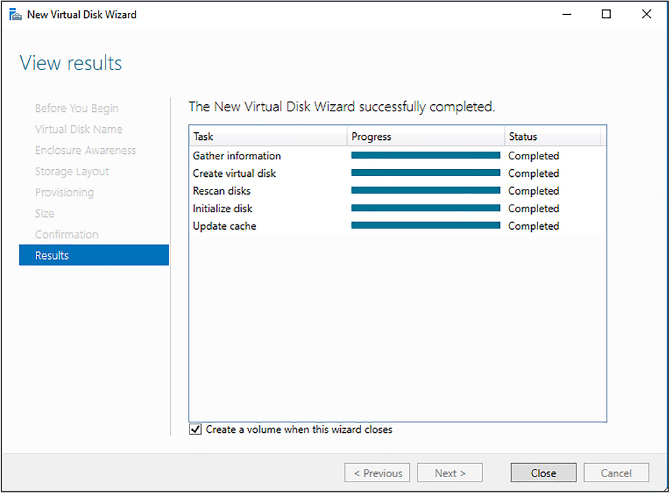
Figure 1-29 Storage Pool Wizard - Select Disks
On the Confirmation screen, click Create.
On the Progress screen check the box next to Create A Virtual Disk When This Wizard Closes, and click Close after the storage pool is completed (Figure 1-30).

Figure 1-30 Completed Storage Pool Wizard
After the wizard launches you will select the pool you just created for your virtual disk, as shown in Figure 1-31.

Figure 1-31 Select the storage pool from the Volume Wizard
You will assign a disk name to your new Virtual Disk, for this demo, you can use the name Data Disk.
You will then select a storage layout. Because you are using Azure storage, you can use the simple layout (Figure 1-32).
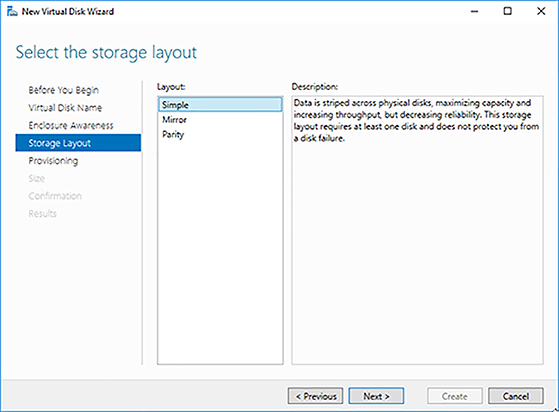
Figure 1-32 Storage Layout screen from the Virtual Disk Wizard
Click Next. On the next screen, you can choose a size for your disk. Click the button next to Maximum Size, and Click Next.
On the Confirmation screen click Create, and click the check box next to Create A Volume When This Wizard Closes.
The new Volume Wizard will launch. Click Next on the first two screens for server and disk, and size (Figure 1-33). You then choose a drive letter. Please note that you cannot use the letter E: in Azure because it is reserved.

Figure 1-33 The The Assign To A Drive Letter Or Folder screen from the New Volume Wizard
Click Next. On the File System Settings screen (Figure 1-34), accept the default for NTFS, change the allocation unit size to 64k (which is best practice recommendation for SQL Server), and assign a label to your volume. The label used here is a DataVolume.

Figure 1-34 The Select File System Settings screen... Screen in the New Volume Wizard
Your process of creating a storage pool is now complete. If you open Windows Explorer (see Figure 1-35) you should see your new disk with its full storage allocation.

Figure 1-35 Screen shot of Windows Explorer after disk creation
In this example, you created a storage pool that can perform 20,000 IOPs and has a capacity of 4 TB. There are two major inputs into creating a storage system for your SQL Server the first being the total amount of data, and second being the number of IOPs. You can adjust both capacity and IOPs by adding more disks to an existing pool, however be warned that when adding new disks to the pool your data will not automatically be balanced across all the disks. You need to run the optimize-storagepool PowerShell cmdlet to rebalance your data. This command may take a long time to complete. This is an I/O intensive operation, so performance may be degraded during the process, however your disks are available during the process.
One other thing to note is that you should set the interleave (stripe size) to 64 KB (65536 bytes) for OLTP workloads and 256 KB (262144 bytes) for data warehousing workloads to avoid performance impact due to partition misalignment. You will learn more about optimal storage configuration for SQL Server later in this section.
More Info About Optimizing Storage Spaces Pools
Storage pools are the key to designing proper storage solutions in Azure VMs. It is important to understand them. Learn more here: https://technet.microsoft.com/en-us/itpro/powershell/windows/storage/optimize-storagepool.
Evaluate best practices for installation
A default SQL Server installation does not necessarily contain all the best practices for all workloads. Microsoft has worked to improve this particularly with the releases of SQL Server 2016 and 2017, which have some of the settings that many SQL Server experts used to apply after installation, built into the product. There are still many settings that should be changed before releasing your database server into production. Some settings are workload dependent, and some of the settings you learn about are specific to running in Azure VMs.
SQL Server settings
While SQL Server is the same product whether you install on-premises or in Azure VM there are some recommendations, due to the nature of Azure, to optimize your installation. It is recommended to install your binary files to C drive—there is no real benefit to installing them anywhere else. You should also only install the SQL Server components you need for your installation. If you are installing Analysis Services, Reporting Services, or Integration Services alongside your database engine, you should be aware that those processes running can take memory and resources away from the database engine, impacting your overall performance. For production configurations, it is a best practice to install one component per VM.
Disk Caching The default caching policy on your operating system (C: drive) disk is read/write. It is not recommended to put database or transaction log files on the C: drive. It is recommended to use read caching on the disks hosting your data files and TempDB files, but not your transaction logs. Do not use read/write caching on any SQL Server data disk, as it can potentially lead to data loss. Additionally, stop your SQL Server service before changing any cache settings to avoid the possibility of database corruption.
NTFS Allocation Unit Size The best practice for all SQL Server databases is to use the 64-KB allocation unit size.
Data Compression It is recommended to use data compression (page) on your larger indexes and tables in SQL Server when running on Azure. There is no fixed guideline fr what size tables to compress, however a good way to evaluate is to review your largest 10 tables, and start from there. While it may increase CPU consumption, it will greatly reduce the number of I/Os required to service a query. For workloads that are analytic in nature you should consider using clustered columnstore indexes, which offer an even bigger reduction in I/O.
Instant File Initialization This option is part of the SQL Server 2016 installer, and is a check box, which should be checked. If you are running an older version of SQL Server, you can enable this by granting the service account running SQL Server the Perform Volume Maintenance Tasks permission in Windows security policy. This feature enables SQL Server to grow data (but not transaction log) files without zeroing them out, making data file growth less costly to your I/O performance.
Data File Management Proactively grow your database and transaction log files to what you expect them to be. Do not rely on autogrowth, because growing those files (especially transaction logs) will be detrimental to performance.
Shrink You should almost never shrink a database. This is an I/O intensive operation, and fragments the database extensively. It is ok to shrink a transaction log, after runaway growth, but you should use backups and proper transaction management to manage the size of your transaction log.
Log and Trace Files You should move the errorlog and trace files for SQL Server to one of your data drives. This can be performed by editing the startup parameters of SQL Server using configuration manager, as seen in Figure 1-36.

Figure 1-36 SQL Server Configuration Manager Log and Trace File Settings
Set Default Backup and Database File Location These should be set to one of your data file volumes. It is important that your backup volume exist, even if you are backing up to an Azure URL. The SQL Server service may not start after patching if the backup location does not exist.

Figure 1-37 Server Properties screen
Patching It is important to apply all Service Packs and Cumulative updates to your SQL Server instance. In addition to security patches, there are performance enhancements and new management features that are frequently built-in to these patches.
Locked Pages in Memory Enable locked pages in memory to reduce I/O and paging activities. This is a Windows level setting.
More Info About Locked Pages in Memory
The locked pages in memory setting is somewhat complicated to configure, learn more about it here: https://docs.microsoft.com/en-us/sql/database-engine/configure-windows/enable-the-lock-pages-in-memory-option-windows.
You learn more about other database configuration options in Chapter 2, “Manage databases and instances.”
Design a storage layout for a SQL Server virtual machine
In the previous section, you learned how to create a disk pool using Storage Spaces to aggregate IOPs and storage capacity. Now you are going to learn about the best practices for configuring storage for SQL Server running on an Azure VM. Given the important of I/O performance to overall database performance you should follow these guidelines closely.
First let’s examine the disks that come with an Azure VM:
O/S Disk This disk can be either a HDD or SSD because its performance will have minimal impact on the overall performance of the server. If you are trying to reduce cost, consider using an HDD for this volume. You should enable read/write caching.
Temporary Disk This will be the D drive on your Windows VMs. Data is not persisted on this drive, so you should never store data files or transaction log files there. For D, Dv2, Ev3, and G series VMs this disk is solid state and direct attached. This disk can be used for very write intensive TempDB workloads, as TempDB is recreated every time SQL Server starts. You need to write a startup script to create a folder to put TempDB on the D drive.
More Info Using the D Drive on Azure VMS for Tempdb
Configuring the D drive for SQL Server use, requires some startup scripts and configuration: https://blogs.technet.microsoft.com/dataplatforminsider/2014/09/25/using-ssds-in-azure-vms-to-store-sql-server-tempdb-and-buffer-pool-extensions/.
Data and Log Volumes At a minimum you should use two premium storage P30 disks where one disk contains the data and log files. If you have a good understanding of your IOPs required, you should pool as many disks as required to reach your IOPs requirements. If your workload is not IOPs intensive you can put both logs and data in the same storage pool. Otherwise create one storage pool for the data files and one storage pool for the transaction log files. You can include TempDB on the data file pool, if your TempDB workload is not write intensive, otherwise consider placing it on the D drive.
Caching Policy You should enable read caching for the data disks hosting your data files. This is performed at the portal under Disks. Before changing cache settings stop your SQL Server service to avoid any possible disk corruption.
Backup to Azure Storage Because the number of volumes that are assigned to a given VM are limited based on your VM size, one of the ways you can reduce space utilized in those volumes is by backing up directly to Azure Blob storage. Starting with SQL Server 2012 SP1 CU2 this feature has been available and allows for native SQL Server backups to blob storage. This storage account can be running in standard storage. Many customers use RA-GRS storage for their backups to provide some level of disaster recovery.
More Info Backup to URL in SQL Server
Setting backup to Azure storage requires some information from your Azure storage account. Learn more here: https://msdn.microsoft.com/library/dn435916.aspx.
SQL Server Data Files in Azure This is another option to potentially reduce the number of disks associated with your Azure VM running SQL Server. This feature allows you to attach your data and transaction log files as Azure blobs and offers comparable performance to that of regular storage. However, your data files are limited in size to 1 TB when using this model.
Skill 1:3: Deploy SQL Server instances
This skill deals with deployment of your SQL Server instances and databases, you learn about how to perform command line installation, strategies for deployment, and the use of ARM templates to deploy new SQL Server VMs.
This skill covers how to:
Deploy a SQL Server instance in IaaS and on-premises
There are several approaches you can take to deploying SQL Server instances either in Azure on IaaS or in your own on-premises environments. Many organizations have moved to a private cloud model where machines are templated and cloned to rapidly deploy new environments to development teams and business units. Azure can simplify this process by providing templates and the Azure Resource Manager (ARM) framework for automation and deployment. However, many organizations like to manage their own templates to manage custom settings and configurations.
Building your own SQL Server template
There is a basic process to creating a SQL Server VM template for deployment. While the specific operations depend on which toolset you are using, there are some common patterns that apply. The first is that you will want the SQL Server binaries installed as part of your template. This may seem counterintuitive, however trying to install SQL Server at deployment time delays your deployments and may lead to network timeouts.
There is no harm in having SQL Server installed on your template. At deployment time your Windows administrator needs to execute sysprep.
More Info Using Sysprep in VM Deployments and Creating VM Templates with System Center
Sysprep is used to remove the server name from the registry and other places. Learn more here: https://technet.microsoft.com/en-us/library/hh427282(v=sc.12).aspx.
The minor issue you will encounter is that SQL Server will initially have the wrong name listed in the sys.servers catalog view. You learn how to address this later in this section.
When you deploy your template, there are many other settings based on the server name and physical setting you may want to configure, as showing in the following SQL script. This code sets best practices on a SQL Server installation based on the current hardware, which means it should be run as a post deployment task in your environment.
/******  BEST PRACTICES  ******/
     --Trace Flag 3226    Suppress the backup transaction log entries from the SQL
Server Log
     USE MASTER
     GO
     CREATE OR ALTER PROCEDURE dbo.enable_trace_flags
     AS
         DBCC TRACEON (3226, -1);
         DBCC TRACEON (1222, -1);
     GO
EXEC sp_procoption @ProcName = 'enable_trace_flags', @OptionName = 'startup',
         @OptionValue = 'true';
     EXEC enable_trace_flags;
     /* Disable SA Login */
     ALTER LOGIN [sa] DISABLE;
GO
     --modify model database
     ALTER DATABASE model SET RECOVERY SIMPLE;
     GO
     ALTER DATABASE model MODIFY FILE (NAME = modeldev, FILEGROWTH = 100MB);
     GO
     ALTER DATABASE model MODIFY FILE (NAME = modellog, FILEGROWTH = 100MB);
     GO
     --modify msdb database
     ALTER DATABASE msdb SET RECOVERY SIMPLE;
     GO
     ALTER DATABASE msdb MODIFY FILE (NAME = msdbdata, FILEGROWTH = 100MB);
     GO

     ALTER DATABASE msdb MODIFY FILE (NAME = msdblog, FILEGROWTH = 100MB);
     GO
     --modify master database
     ALTER DATABASE master SET RECOVERY SIMPLE;
     GO
     ALTER DATABASE master MODIFY FILE (NAME = master, FILEGROWTH = 100MB);
     GO
     ALTER DATABASE master MODIFY FILE (NAME = mastlog, FILEGROWTH = 100MB);
     GO
     sp_configure 'set advanced options', 1
     GO
     RECONFIGURE WITH OVERRIDE
     GO
     /******  CONFIGURE TEMPDB  DATA FILES ******/
     DECLARE @sql_statement NVARCHAR(4000) ,
         @data_file_path NVARCHAR(100) ,
         @drive_size_gb INT ,
         @individ_file_size INT ,
         @number_of_files INT
     SELECT  @data_file_path = ( SELECT DISTINCT
                                         ( LEFT(physical_name,
                                                LEN(physical_name) - CHARINDEX('',
                                                                   REVERSE(physical
_name))
                                                + 1) )
                                 FROM    sys.master_files mf
                                         INNER JOIN sys.[databases] d ON mf.[database_
id] = d.[database_id]
                                 WHERE   d.name = 'tempdb'
                                         AND type = 0
                               );
     --Input size of drive holding temp DB files here

     SELECT @DRIVE_SIZE_GB=total_bytes/1024/1024/1024 from sys.dm_os_volume_stats (2,1)
     SELECT  @number_of_files = COUNT(*)
     FROM    sys.master_files
     WHERE   database_id = 2
             AND type = 0;
     SELECT  @individ_file_size = ( @drive_size_gb * 1024 * .2 )
             / ( @number_of_files );
     /*
     PRINT '-- TEMP DB Configuration --'
     PRINT 'Temp DB Data Path: ' + @data_file_path
     PRINT 'File Size in MB: ' +convert(nvarchar(25),@individ_file_size)
     PRINT 'Number of files: '+convert(nvarchar(25), @number_of_files)
     */
     WHILE @number_of_files > 0
         BEGIN
             IF @number_of_files = 1 -- main tempdb file, move and re-size
                 BEGIN
                     SELECT  @sql_statement = 'ALTER DATABASE tempdb MODIFY FILE (NAME =
tempdev, SIZE = '
                             + CONVERT(NVARCHAR(25), @individ_file_size)
                             + ', filename = ' + NCHAR(39) + @data_file_path
                             + 'tempdb.mdf' + NCHAR(39)
                             + ', FILEGROWTH = 100MB);';
                 END;
             ELSE -- numbered tempdb file, add and re-size
                 BEGIN
                     SELECT  @sql_statement = 'ALTER DATABASE tempdb MODIFY FILE (NAME =
temp'
                             + CONVERT(NVARCHAR(25), @number_of_files)
                             + ',filename = ' + NCHAR(39) + @data_file_path
                             + 'tempdb_mssql_'
                             + CONVERT(NVARCHAR(25), @number_of_files) + '.ndf'
                             + NCHAR(39) + ', SIZE = '
                             + CONVERT(VARCHAR(25), @individ_file_size)

                             + ', FILEGROWTH = 100MB);';
                 END;

             EXEC sp_executesql @statement = @sql_statement;
             PRINT @sql_statement;
             SELECT  @number_of_files = @number_of_files - 1;
         END;

     -- TODO: Consider type
     DECLARE @sqlmemory INT
     ;with physical_mem (physical_memory_mb) as
     (
      select physical_memory_kb / 1024
      from sys.dm_os_sys_info
     )
     select @sqlmemory =
      -- Reserve 1 GB for OS
      -- TODO: Handling of < 1 GB RAM
      physical_memory_mb - 1024 -
      (
      case
      -- If 16 GB or more, reserve an additional 4 GB
      when physical_memory_mb >= 16384 then 4092
      -- If between 4 and 16 GB, reserve 1 GB for every 4 GB
      -- TODO: Clarify if 4 GB is inclusive or exclusive minimum. This is exclusive.
      -- TODO: Clarify if 16 GB is inclusive or exclusive maximum. This is inclusive.
      when physical_memory_mb > 4092 and physical_memory_mb < 16384 then physical_
memory_mb / 4
      else 0 end
      )
      -
      (
      case
      -- Reserve 1 GB for every 8 GB above 16 GB
      -- TODO: Clarify if 16 GB is inclusive or exclusive minimum. This is exclusive.
      when physical_memory_mb > 16384 then ( physical_memory_mb - 16384 )/ 8
      else 0
      end
      )
     from physical_mem
      EXEC sp_configure 'max server memory', @sqlmemory;
      -- change to #GB * 1024, leave 2 GB per system for OS, 4GB if over 16GB RAM
     RECONFIGURE WITH OVERRIDE;
     /*SELECT MaxDOP for Server Based on CPU Count */
     BEGIN
         DECLARE @cpu_Countdop INT;
         SELECT  @cpu_Countdop = cpu_count
         FROM    sys.dm_os_sys_info dosi;
         EXEC sp_configure 'max degree of parallelism', @cpu_Countdop;
         RECONFIGURE WITH OVERRIDE;
     END;

     EXEC sp_configure 'xp_cmdshell', 0;
     GO
     RECONFIGURE;
     GO
     EXEC sp_configure 'remote admin connections', 1;
     GO
     RECONFIGURE;
     GO
     EXEC sp_configure 'backup compression default', 1;
     RECONFIGURE WITH OVERRIDE;
     GO
     RECONFIGURE WITH OVERRIDE;
     GO
     sp_configure 'Database Mail XPs', 1;
     GO
     RECONFIGURE;
     GO
     RECONFIGURE;
     GO
     EXEC sp_configure 'cost threshold for parallelism', 35;
     GO
     RECONFIGURE;
     GO
You may wish to customize some of these settings. You learn about their proper configuration values in Chapter 2.
Changing your SQL Server name
If your server admin has changed the name of your Windows Server in template deployment, you may need to change the name of your SQL Server instance. Having the wrong name for your server will not stop SQL Server from running, however you will experience connection failures and features such as replication will not function properly. Fortunately, you can include the following T-SQL in your post deployment scripts to rename SQL Server.
use master
declare @old varchar(50)
declare @oldsql nvarchar(4000)
select @old=@@servername;
select @oldsql='exec sp_dropserver '''+@old+''';'
exec sp_executesql @oldsql
declare @new varchar(50)
declare @newsql nvarchar(4000)
select @new=convert(sysname,serverproperty('servername'));
select @newsql='exec sp_addserver '''+@new+''',local;'
exec sp_executesql @newsql
This code uses dynamic SQL to reset your server name. You also need to restart the SQL Server service to complete the renaming process. You can verify that you have the correct server name by executing the select @@Servername T-SQL command.
Manually install SQL Server on an Azure Virtual Machine
The process of installing SQL Server on an Azure IaaS is the same as you would do on-premises. You can use the setup GUI, however many organizations use a command line installation process with a configuration file, and a post-installation configuration script as shown earlier in this section. This allows the installation process to be automated, and more importantly to be done consistently and with best practices across your SQL Server environments. In the following steps, you learn how to generate a configuration file (and see a sample configuration) using the GUI, and then how to install SQL Server from the command line.
Launch setup.exe from the SQL Server installation media. Click New SQL Server stand-alone installation or add features to an existing installation.
SQL Server will run a rules check, and check the box for Microsoft updates.
Select Perform a New Installation and choose the edition you will be using. Click Next
Accept the License Terms and click next.
You should be on the feature selection screen as shown in Figure 1-40. Carefully select only the features you want to include in your installation to limit the surface area installed.
It is important to note that if you are installing R or Python as part of your installation, your server either needs to be on the Internet, or you will need follow the installation directions at: https://docs.microsoft.com/en-us/sql/advanced-analytics/r/installing-ml-components-without-internet-access.
Another note about this setup screen—starting with SQL Server 2017, SQL Server Reporting Services has been decoupled from the SQL Server installation, so you need to download and install it separately from the Database Engine and Analysis Services.
After selecting your features and clicking Next twice, you should be on the Instance configuration screen. Accept the default setting of a default instance, and click next.
On the next screen, you can either change your service accounts or accept the defaults. Many customers choose to use Active Directory accounts for their service accounts Additionally, you should click the check box next to Grant Perform Volume Maintenance Task Privilege To SQL Server Service, as seen in Figure 1-38.

Figure 1-38 Service Account configuration SQL Server setup
On the Server Configuration screen, click the Add Current User button to make your account an admin. You may wish to add other users or groups here, and if you wish to enable Mixed Mode authentication, set the SA password here.
On the Server Configuration screen click the TempDB tab. You will note that SQL Server has configured multiple files based on the number of CPUs in your server. You can choose to adjust the size and location of your TempDB files in this screen, in accordance with best practices and your preferred configuration. Click next after this configuration. You can also change the location of TempDB (such as locating it on the D: drive) on this screen (Figure 1-39).

Figure 1-39 TempDB Configuration screen
The feature configuration rules will run and you will be on the Ready to Install screen.
On the Ready To Install screen you see, on the bottom, a configuration file location (Figure 1-40).

Figure 1-40 Configuration File Location
Navigate to that file location and make a copy of the configuration file. In Figure 1-43 it has been copied to C: emp. Cancel out of SQL Server Setup. You can only run one copy of setup.exe at a time, so your command line install will fail if both are running.
Open your configuration file in notepad. Remove the line that begins with UIMODE and change the value of QUIETSIMPLE from False to True.
Launch a PowerShell window in Administrative mode.
Change to the drive where your SQL Server iso is located and issue the following command:
./setup.exe /IacceptSQLServerLicenseTerms /SAPwd=P@ssw0rd!
/ConfigurationFile=C:	empConfigurationFile.ini /Action=Install
Your installation should complete in a few minutes. You should note that tools such as SQL Server Management Studio are not installed as part of the SQL Server installation process, and must be installed separately, starting with SQL Server 2016.
A sample configuration file is as follows:
;SQL Server 2017 RC2 Configuration File
[OPTIONS]
; By specifying this parameter and accepting Microsoft R Open and Microsoft R Server
 terms, you acknowledge that you have read and understood the terms of use.
IACCEPTPYTHONLICENSETERMS="False"
; Specifies a Setup work flow, like INSTALL, UNINSTALL, or UPGRADE. This is a required
 parameter.

ACTION="Install"
; Specifies that SQL Server Setup should not display the privacy statement when ran
 from the command line.
SUPPRESSPRIVACYSTATEMENTNOTICE="False"
; By specifying this parameter and accepting Microsoft R Open and Microsoft R Server
 terms, you acknowledge that you have read and understood the terms of use.
IACCEPTROPENLICENSETERMS="False"
; Use the /ENU parameter to install the English version of SQL Server on your localized
 Windows operating system.
ENU="True"
; Setup will not display any user interface.
QUIET="False"
; Setup will display progress only, without any user interaction.
QUIETSIMPLE="True"
; Specify whether SQL Server Setup should discover and include product updates.
The valid values are True and False or 1 and 0. By default SQL Server Setup will
 include updates that are found.
UpdateEnabled="True"
; If this parameter is provided, then this computer will use Microsoft Update
to check for updates.
USEMICROSOFTUPDATE="True"

; Specify the location where SQL Server Setup will obtain product updates. The
valid values are "MU" to search Microsoft Update, a valid folder path, a relative
 path such as .MyUpdates or a UNC share. By default SQL Server Setup will search
 Microsoft Update or a Windows Update service through the Window Server Update Services.
UpdateSource="MU"
; Specifies features to install, uninstall, or upgrade. The list of top-level
 features include SQL, AS, IS, MDS, and Tools. The SQL feature will install the
Database Engine, Replication, Full-Text, and Data Quality Services (DQS) server.
The Tools feature will install shared components.
FEATURES=SQLENGINE,REPLICATION,CONN,BC,SDK
; Displays the command line parameters usage
HELP="False"
; Specifies that the detailed Setup log should be piped to the console.
INDICATEPROGRESS="False"
; Specifies that Setup should install into WOW64. This command line argument is not
 supported on an IA64 or a 32-bit system.
X86="False"
; Specify a default or named instance. MSSQLSERVER is the default instance for
non-Express editions and SQLExpress for Express editions. This parameter is required
 when installing the SQL Server Database Engine (SQL), or Analysis Services (AS).
INSTANCENAME="MSSQLSERVER"
; Specify the root installation directory for shared components.  This directory remains
 unchanged after shared components are already installed.
INSTALLSHAREDDIR="C:Program FilesMicrosoft SQL Server"

; Specify the root installation directory for the WOW64 shared components.  This
 directory remains unchanged after WOW64 shared components are already installed.
INSTALLSHAREDWOWDIR="C:Program Files (x86)Microsoft SQL Server"
; Specify the Instance ID for the SQL Server features you have specified. SQL Server
 directory structure, registry structure, and service names will incorporate the
 instance ID of the SQL Server instance.
INSTANCEID="MSSQLSERVER"
; TelemetryUserNameConfigDescription
SQLTELSVCACCT="NT ServiceSQLTELEMETRY"
; TelemetryStartupConfigDescription
SQLTELSVCSTARTUPTYPE="Automatic"
; Specify the installation directory.
INSTANCEDIR="C:Program FilesMicrosoft SQL Server"
; Agent account name
AGTSVCACCOUNT="NT ServiceSQLSERVERAGENT"
; Auto-start service after installation.
AGTSVCSTARTUPTYPE="Manual"
; CM brick TCP communication port
COMMFABRICPORT="0"
; How matrix will use private networks
COMMFABRICNETWORKLEVEL="0"
; How inter brick communication will be protected

COMMFABRICENCRYPTION="0"
; TCP port used by the CM brick
MATRIXCMBRICKCOMMPORT="0"
; Startup type for the SQL Server service.
SQLSVCSTARTUPTYPE="Automatic"
; Level to enable FILESTREAM feature at (0, 1, 2 or 3).
FILESTREAMLEVEL="0"
; Set to "1" to enable RANU for SQL Server Express.
ENABLERANU="False"
; Specifies a Windows collation or an SQL collation to use for the Database Engine.
SQLCOLLATION="SQL_Latin1_General_CP1_CI_AS"
; Account for SQL Server service: DomainUser or system account.
SQLSVCACCOUNT="NT ServiceMSSQLSERVER"
; Set to "True" to enable instant file initialization for SQL Server service. If
 enabled, Setup will grant Perform Volume Maintenance Task privilege to the Database
 Engine Service SID. This may lead to information disclosure as it could allow
deleted content to be accessed by an unauthorized principal.
SQLSVCINSTANTFILEINIT="True"
; Windows account(s) to provision as SQL Server system administrators.
SQLSYSADMINACCOUNTS="DOMAINjoey"
; The default is Windows Authentication. Use "SQL" for Mixed Mode Authentication.
SECURITYMODE="SQL"
; The number of Database Engine TempDB files.
SQLTEMPDBFILECOUNT="4"
; Specifies the initial size of a Database Engine TempDB data file in MB.
SQLTEMPDBFILESIZE="8"
; Specifies the automatic growth increment of each Database Engine TempDB data
file in MB.
SQLTEMPDBFILEGROWTH="64"
; Specifies the initial size of the Database Engine TempDB log file in MB.
SQLTEMPDBLOGFILESIZE="8"
; Specifies the automatic growth increment of the Database Engine TempDB log file in MB.
SQLTEMPDBLOGFILEGROWTH="64"
; Provision current user as a Database Engine system administrator for
 %SQL_PRODUCT_SHORT_NAME% Express.
ADDCURRENTUSERASSQLADMIN="True"
; Specify 0 to disable or 1 to enable the TCP/IP protocol.
TCPENABLED="1"
; Specify 0 to disable or 1 to enable the Named Pipes protocol.
NPENABLED="0"
; Startup type for Browser Service.

BROWSERSVCSTARTUPTYPE="Disabled"
More Info Using Configuration Files for SQL Server Installations
Using configuration files is good way to automate your SQL Server installs, you can learn more about the options around using them here: https://docs.microsoft.com/en-us/sql/database-engine/install-windows/install-sql-server-2016-using-a-configuration-file.
Provision an Azure Virtual Machine to host a SQL Server instance
There are several ways to provision a virtual machine for deploying SQL Server. In this section, you learn how to do it both in the Azure Portal and via PowerShell.
Build a Virtual Machine using the portal
To deploy a new VM from the portal first login to the portal as a user who has permissions to create a VM. You will need to be a contributor in the resource group where you are creating this VM.
From the portal click the + New in the top left (as highlighted in Figure 1-41).

Figure 1-41 Azure Portal Open Screen
On the next screen, type Windows Server 2016 in the New box. It will start to auto-populate.
Select Windows Server 2016 Datacenter, and click it (see Figure 1-42).

Figure 1-42 Selecting Windows Server 2016 Datacenter
Accept the default of resource manager and click Create.
On the next screen (Figure 1-43), you need to enter a few values for your VM including server name, admin user, admin password, subscription, resource group, and location. Your password is at least 12 characters. Click Next.

Figure 1-43 VM Configuration Screen
On the next screen choose the size of your VM. For the purposes of this demo a D4S_v3 is chosen, but feel to choose any size.
On the Configure Optional Features screen, accept all of the defaults and click OK.
On the final screen click Purchase, and your VM will deploy in approximately five to 10 minutes.
Your VM is now ready for adding disks. You can go back to the configuring Storage Spaces section and add disks for your data files and transaction logs.
Deploying an Azure VM with PowerShell
One of the most powerful parts of cloud computing is the ability to transform building infrastructure, which in the past was a time consuming physical process, into repeatable use parameterized code. This process was part of the shift to Azure Resource Manager, which transforms each infrastructure component into objects, with dependencies on each other. ARM also includes a common framework for scripting and automation. This enables you to rapidly deploy large-scale infrastructures like an AlwaysOn Availability Group with minimal effort. One of the things Microsoft has done to make this easier for you is that you can build components using the Azure Portal and then download the template at the end of the process, like you did earlier.
Exam Tip
Having an understanding of concepts around Azure Resource Manager helps you better understand PowerShell, automation, and other concepts you may be tested on.
After you install Azure PowerShell execute the following steps to deploy your VM.
Launch the PowerShell integrated scripting environment by launching the Windows run diaglog (Win+R) and typing powershell_ise.
On the Powershell_ise, click View, and check the box next to script pane. You will have an interactive scripting window.
Paste the following code into the ISE:
Login-AzureRmAccount

New-AzureRmResourceGroup -Name myResourceGroup -Location EastUS

# Create a subnet configuration
$subnetConfig = New-AzureRmVirtualNetworkSubnetConfig -Name mySubnet
-AddressPrefix 192.168.1.0/24

# Create a virtual network
$vnet = New-AzureRmVirtualNetwork -ResourceGroupName myResourceGroup
-Location EastUS `
    -Name MYvNET -AddressPrefix 192.168.0.0/16 -Subnet $subnetConfig

# Create a public IP address and specify a DNS name
$pip = New-AzureRmPublicIpAddress -ResourceGroupName myResourceGroup
-Location EastUS `
    -AllocationMethod Static -IdleTimeoutInMinutes 4 -Name
"mypublicdns$(Get-Random)"
    # Create an inbound network security group rule for port 3389

$nsgRuleRDP = New-AzureRmNetworkSecurityRuleConfig
-Name myNetworkSecurityGroupRuleRDP  -Protocol Tcp `
    -Direction Inbound -Priority 1000 -SourceAddressPrefix * -SourcePortRange
* -DestinationAddressPrefix * `
    -DestinationPortRange 3389 -Access Allow

# Create an inbound network security group rule for port 80
$nsgRuleWeb = New-AzureRmNetworkSecurityRuleConfig
-Name myNetworkSecurityGroupRuleWWW  -Protocol Tcp `
    -Direction Inbound -Priority 1001 -SourceAddressPrefix * -SourcePortRange
* -DestinationAddressPrefix * `
    -DestinationPortRange 80 -Access Allow

# Create a network security group
$nsg = New-AzureRmNetworkSecurityGroup -ResourceGroupName myResourceGroup
-Location EastUS `
    -Name myNetworkSecurityGroup -SecurityRules $nsgRuleRDP,$nsgRuleWeb

    # Create a virtual network card and associate with public IP address and
 NSG$nic = New-AzureRmNetworkInterface -Name myNic -ResourceGroupName
 myResourceGroup -Location EastUS `
    -SubnetId $vnet.Subnets[0].Id -PublicIpAddressId $pip.Id
-NetworkSecurityGroupId $nsg.Id

# Define a credential object
$cred = Get-Credential

# Create a virtual machine configuration
$vmConfig = New-AzureRmVMConfig -VMName myVM -VMSize Standard_DS2 | `
    Set-AzureRmVMOperatingSystem -Windows -ComputerName myVM -Credential $cred | `
    Set-AzureRmVMSourceImage -PublisherName MicrosoftWindowsServer -Offer
WindowsServer `
    -Skus 2016-Datacenter -Version latest | Add-AzureRmVMNetworkInterface
-Id $nic.Id

#Build the VM
New-AzureRmVM -ResourceGroupName myResourceGroup -Location EastUS -VM $vmConfig

Get-AzureRmPublicIpAddress -ResourceGroupName myResourceGroup | Select IpAddress
When you execute this, you will be prompted twice, the first time will be to login to your Azure account, and then a second time to enter credentials for the virtual machine in your environment. This script will also give you the public IP address at the end. You can then launch a remote desktop session to connect to that IP address with the credentials you created at the second prompt.
You should note the way the VM is created in the resource manager model—the resource group and the network are created first, then the IP addresses and the network security group, and then finally the virtual machine is created. Each of these resources has built-in dependencies and that is the reason for that order. This gives you a quick introduction of what it’s like to use PowerShell in Azure. Microsoft has a lot of additional templates on GitHub that you can explore, and in many cases one-click deploy.
More Info Templates for Azure Features
Azure offers a wide variety of templates to meet your needs. You can review some of the offerings from Microsoft at Github: https://github.com/Azure/azure-quickstart-templates.
Automate the deployment of SQL Server Databases
One of the most prominent programming methodologies in recent years has been the widespread adoption of the Agile methodology, and continuous deployment and continuous integration. This trend has been enhanced by the automation framework that is built into cloud computing—not only can you generate code for your application, you can generate all its underlying infrastructure, and potentially even build out scale-out logic for your application tiers. However, database developers have been slow to adopt these methods, due to the rigorous requirements of databases to ensure and protect production data. There has traditionally been friction between the development and operations teams because the developers wish to push out more changes, and faster, while operations wants to protect the integrity of the data.
Databases can be the bottleneck
It is relatively easy to deploy new code for the front end of a website, for example. The application is still interfacing with the same libraries and classes, and is just calling some new graphic files or style sheets. Changing the database can be significantly more challenging. The challenge with deploying database is that data cannot be dropped in-place, unlike application code which is easily replaced in a deployment. So any changes to the database backend must incorporate and reflect any schema or application changes, while at the same time not having any downtime.
Introducing DACPAC
There are several database version control tools on the market, including many from third-party vendors. However, Microsoft makes a freely available tool called SQL Server Data Tools, which includes a shell version of Visual Studio, and a feature called Data-Tier Application Package or DACPAC. A DACPAC is a single file that contains all the data definition language (DDL) for the schemas in your database. You may also hear of the term BACPAC, which is similar, but includes all the data in the database. You can download SQL Server Data Tools at https://docs.microsoft.com/en-us/sql/ssdt/download-sql-server-data-tools-ssdt.
To take advantage of these features, you need to create a Database Project within SQL Server Data Tools. You can create a new project from an existing database, as you’ll see in the following example. For this demo, you need SQL Server installed and the AdventureWorks2014 database restored. You can get the database at https://github.com/Microsoft/sql-server-samples/releases/download/adventureworks2014/adventure-works-2014-oltp-full-database-backup.zip. Instructions for restoring the database are at https://github.com/Microsoft/sql-server-samples/releases/download/adventureworks2014/adventure-works-2014-readme.txt. If you are using Visual Studio 2017, you also want to make sure you have the latest updates. Visual Studio will update as part of Windows Update, you extensions can be updated by clicking the flag next to the “Quick Launch” box in Visual Studio.
Launch SQL Server Data Tools.
Select File > New Project > SQL Server Database Project.
Right-click the Project Name, and Click Import > Database.
You will be presented with the dialog box shown in Figure 1-44.

Figure 1-44 Import Database Screen from a SQL Server Project
Click the Select Connection Box. You will be directed to a dialog to connect to your SQL Server. Choose the AdventureWorks2014 database and login. Accept the default settings, and click Start. Your database schema (and not your data) will import shortly.
In your project in Solution Explorer, click to expand Human Resources > Stored Procedures. Right-click and select Add > New Item (Figure 1-45).

Figure 1-45 Add New Item in SQL Server Data Tools
Enter the following T-SQL to create a new stored procedure.
CREATE PROCEDURE [dbo].[uspGetDate]
AS     SELECT GETDATE()
RETURN 0
Click the Save icon.
Right-click the project Database1 and click publish (Figure 1-46).
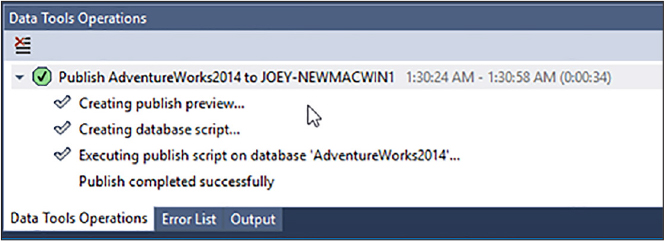
Figure 1-46 The Data Tools Operation screen
Launch SQL Server Management Studio and connect to your database (Figure 1-47).

Figure 1-47 Object Explorer View from SQL Server Management Studio
In this example, you have learned how to create a DACPAC from an existing database and add an object in deployment, and then deploy it. This is a small effort, however it helps you understand the process for automating your deployments. You can use this same methodology to deploy objects and data to your Azure SQL Database and your SQL Server.
Deploy SQL Server by using templates
Earlier in this chapter you learned about building your own Azure VM for SQL Server, and the process of adding disks, configuring Storage Spaces, and optimizing your settings. In this section you learn about deploying a new SQL Server using the Azure provided templates. Microsoft has added some built-in features to automate some aspects of SQL Server management that you can only take advantage of by using the template. You might ask why would you choose building your own VM versus using a template, if the template has these benefits. Well, much like any other aspect of cloud computing, you are trading control for automation. You make similar decisions when choosing between Platform as a Service offerings where you have less control, versus Infrastructure as a Service offerings where you have more control.
Login to the Azure Portal and click +New in the top left corner.
In the search box (see Figure 1-48), type SQL Server 2016 SP1 Developer.

Figure 1-48 Search Screen from within Azure Portal
You will be taken to the screen to fill in the details of your VM. Enter a name, an admin account and password, a resource group, and a location (Figure 1-49).

Figure 1-49 The Server Name screen in the Azure Portal
Note that it is important to create a VM Disk Type of SSD for the purposes of this demo.
Next, you choose a size for your VM (see Figure 1-50). Click the View All button, as shown in figure 1-52. It is also important to choose the correct size here; you should choose DS3_V2.
On the Settings > Configure Optional Features blade, click OK to accept the defaults and continue.

Figure 1-50 “Choose a Size Screen” from Azure Portal
On the SQL Server Settings Blade, click Enable SQL Authentication. Your username and password from the server should auto populate the field. You should note that logins such as SA and admin are reserved, and cannot be used from this screen.
Next, click the Storage Configuration button. This is a cool feature that allows your Storage Spaces volumes to be automatically configured based on the IOPs and Capacity you need (see Figure 1-51). If you have that data from an existing server you can use it here, or just adjust the sliders and watch the number of disks change. You should note that the max IOPs and capacity are correlated to the size of your VM, so if you need more space, you may need a larger VM. You may also choose General, Transaction Processing, or Data Warehousing as the Storage Optimization type. This affects the stripe size of your storage spaces environment.

Figure 1-51 Storage Configuration Screen for SQL Server VMs
Click OK.
Click the Automatic Patching button. Click the Enable button and set a time window for when you would like your VM to be patched. Note that if you make this selection, you will incur downtime when the server is patched, so exercise with care in production environments.
Click the Automated Backup button. From the blade click Enable. Adjust the retention period slider to meet your requirements (see Figure 1-52). Click Enable on the Encryption button, and supply a password (a minimum of 12 characters is required). You may also wish to configure a custom backup schedule or accept the default value of automated.

Figure 1-52 SQL Automated Backup Blade from the Azure Portal
The next button is Key Vault. You can use this to store your keys for encryption if you are using a key vault.
Click OK on the SQL Server Settings screen, and click Purchase on the confirmation screen. You VM should deploy in four to five minutes.
Using the Microsoft supplied templates give you more automation and consistent configuration in your Azure deployments. Additionally, you can take advantage of more complex deployment templates like the AlwaysOn Availability Group template to quickly deploy complex environments.
More Info Azure Key Vault
Azure Key Vault is highly secured service to store certificates, keys, and secrets: https://azure.microsoft.com/en-us/services/key-vault/.
Skill 1:4: Deploy SQL Server databases to Azure virtual machines
This skill deals with migrating your existing data to Azure, and then supporting your new environment once your workloads are running in the cloud.
This skill covers how to:
Migrate an on-premises SQL Server Database to an Azure virtual machine
There are several approaches you can take for migrating on-premises workloads into Azure virtual machines. Surprisingly, one of the key components is your network configuration to Azure. Latency and bandwidth and your tolerance for downtime determine your strategy. In this section, you learn about the following approaches:
Backup and restore to Azure
Log shipping
AlwaysOn Availability Groups
Azure site recovery
Backup and restore to Azure
Of all the options you are going to learn about it, this is the most straightforward. Since SQL Server 2012 SP1 CU2, SQL Server has supported a backup to URL feature that allows you to backup and restore databases directly into an Azure blob storage account. This feature uses HTTPS endpoints, so there is no need for a VPN or any advanced networking configuration like the other options. To get started with this service, you need a storage account in Azure, and a SQL Server instance running either on-premises or in an Azure VM.
Login to the Azure Portal and navigate to your storage account. If you do not have a storage account create one. Once your storage account is created, click Blobs in the overview screen, as shown in Figure 1-53.

Figure 1-53 Azure Storage Account overview screen
In the Blob Service screen click the +Container button to create a new container, as shown in Figure 1-54. You should note that both your storage account and your container names must be lower case and not contain spaces or special characters.

Figure 1-54 Add Container Screen
You may notice the access level in this screenshot. It is set to Private, which is what you should use for storing backups.
Next, you need to generate a shared access signature for your storage account. Navigate back to the overview of your storage account, and then click the Shared Access Signature button, as highlighted in blue in Figure 1-55.

Figure 1-55 Shared Access Signature generation screen
A couple of things to note here—you may want to limit the allowed services to blob storage, because that is all SQL Server needs, and the allowed resource types to just containers. You may also want to extend the time on the shared access signature. By default, the expiration is set to eight hours, but for backups it is recommended to set it for much longer. Azure will not remind when your SAS is going to expire, so make note of the date. In this instance, the expiration is set for two years. When you click the blue Generate SAS button, you should copy the SAS token that is first on the screen.
NOTE: SAS TOKENS
When you copy your SAS token from the portal there is a question mark that proceeds the SAS token. You need to remove it before creating your SQL Server credential in T-SQL.
Launch SQL Server Management Studio and connect to your instance. Launch a new query window. Execute the following T-SQL to create your credential.
CREATE CREDENTIAL
[https://$yourstorageaccount.blob.core.windows.net/$yourcontainer] WITH IDENTITY
 = ‘shared access signature’,
SECRET=’$yourSASToken’
You need to replace the $yourstorageaccount with the name of your storage account, and $yourcontainer with the name of your storage container, and then $yourSASToken with the value of your SAS token. This credential will be used when you backup your database in the next step.
Now you can backup your database to Azure. Execute the following T-SQL to run this backup.
BACKUP DATABASE AdventureWorks2014
TO URL =
 ‘https://$yourstorageaccount.blob.core.windows.net/$yourcontainer/aw2014.bak’
WITH COMPRESSION, STATS=5
You need to replace $yourstorageaccount and $yourcontainer in the T-SQL with the correct names for your storage account and containers. It is necessary to use the COMPRESSION option when backing up to Azure to reduce network traffic.
You are now ready to restore your database to a new VM in Azure. Repeat step 1 to create your credential on your target instance. In order to do that, login to your new SQL Server instance, and execute the following T-SQL:
RESTORE DATABASE AdventureWorks2014
FROM URL =
‘https://$yourstorageaccount.blob.core.windows.net/$yourcontainer/aw2014.bak’
WITH REPLACE, STATS=5
That is the process of backup and restore to and from Azure. It is a very easy method with the only negative being some amount of downtime for the backup and restore process.
Hybrid network connections
This may seem slightly off-topic, but is a requirement for what you are going to learn about next. Azure supports three types of network connections between your on-premises and cloud environments. For features like AlwaysOn Availability Groups, and Azure Site Recovery having a direct connection to Azure is a necessity.
Point to Site VPN Point to Site VPNs are a single machine to network VPN using a certificate based VPN. These are best reserved for test and demo systems, and should not be used for a production environment.
Site to Site VPN This is a dedicated VPN device that connects an on-premises site to Azure. These are best used for smaller migrations with small to medium data footprints.
ExpressRoute This is an enterprise class, dedicated network connection between your on-premises site and one or more Azure regions. This should be used for large-scale migrations and real-time migrations using Azure Site Recovery.
More Info Azure Hybrid Networking
You can learn more about Azure networking and the various architectures here: https://docs.microsoft.com/en-us/azure/architecture/reference-architectures/hybrid-networking/.
AlwaysOn Availability Groups
Many organizations choose to take advantage of AlwaysOn Availability Groups for their migrations into the cloud, or even to new hardware. As you read earlier, Availability Groups use Windows Server Failover cluster to orchestrate failover. Many organizations have extended into Azure for Disaster Recovery using Availability Groups. The most important thing in this scenario is to have a very reliable connection to Azure either via a site-to-site VPN or ExpressRoute. In this scenario, you learn about extended an on-premises AG into Azure, with a few mouse clicks. The only prerequisite is that you have an on-premises Availability Group (even if it’s one node).
From SQL Server Management Studio Connect to your instance, expand AlwaysOn High Availability > Availability Groups, then right-click the name of your Availability Group. Select Add Another Replica.
The Add Replica To Availability Group Wizard will then launch. Click Next on the splash screen, then on the next screen click the Connect button to connect to your existing replica(s).
On the Add Replica screen, click the button that reads Add Azure Replica as shown in Figure 1-56.

Figure 1-56 Add Availability Group Wizard--Add Azure Replica
In the next step, you need your subscription ID. You can get your subscription ID by running the PowerShell cmdlet login-azurermaccount and logging in with your credentials. You should paste your subscription ID in the subscription field as shown in Figure 1-57.

Figure 1-57 Add Azure Replica Wizard
Once you have authenticated to your subscription, you will be able to populate the other fields. The options are standard for a VM, like you have created earlier, but do require the name of your On-Premises domain.
When you have completed this, legal terms will be displayed, and you need to click OK. The Add Replica to Availability Group screen will again be displayed. Click OK.
The next screen has you select a data synchronization option. You should select Full Synchronization. Note that if you are working with very large databases (> 1 TB) this performs a full backup and restore and may take an extended period.
One other thing you need to do differently for your Availability Group in Azure is to use an Internal Load Balancer in Azure to provide the IP address for your listener. If you are creating a hybrid availability group you still need to do this step.
More Info Availability Group Listeners in Azure
Creating an Availability Group listener requires creating an Internal Load Balancer. You can learn more about that here: https://docs.microsoft.com/en-us/azure/virtual-machines/windows/sqlclassic/virtual-machines-windows-classic-ps-sql-int-listener.
Azure Site Recovery and SQL Server
Azure Site Recovery (ASR) is a fully featured disaster recovery system. It allows you to do full scale disaster recovery testing with no impact to your production environment. One approach many customers have taken is to use ASR to perform an on-premises to Azure migration. Azure Site Recovery can run with an agent on physical servers and VMWare virtual machines, and natively with Hyper-V virtual machines.
To perform a migration using ASR, you would need to have an Express Route connection, as it replicates block level changes across all of your machines. In terms of SQL Server you can use the following HA/DR options in conjunction with site recovery:
AlwaysOn Availability Group
Failover Cluster Instances with Shared Storage
Database Mirroring
Standalone instances
Using ASR for migration is good approach for many customers, especially enterprises who still support back versions of SQL Server due to its variety of support. Additionally, ASR offers the ability to migrate all of your infrastructure in one group, versus attempting to do it piecemeal.
More Info Azure Site Recovery and SQL Server
Using SQL Server in conjunction with Azure Site Recovery requires some specialized configuration. You can learn about that here: https://docs.microsoft.com/en-us/azure/site-recovery/site-recovery-sql.
Generate benchmark data for performance needs
Trying to size your VMs for SQL Server workloads can be quite challenging. Earlier in this chapter you learned about using Windows Performance Monitor to capture data from existing applications. The other workload capture and replay tool that you will learn about is Distributed Replay in SQL Server.
Distributed Replay
Distributed Replay (see Figure 1-58) is a tool that was introduced in SQL Server 2012 that allows you to capture and replay workloads to test performance of your target environment.

Figure 1-58 Distributed Replay architecture
You need to install the distributed replay controller and between 1 and 16 distributed replay clients. You need to add this to your installation of SQL Server, as shown in Figure 1-59.

Figure 1-59 SQL Server Setup Screen
From there you need to configure both your server and clients. The components install is as follows:
Distributed Replay administration tool A console application, DReplay.exe, used to communicate with the distributed replay controller. Use the administration tool to control the distributed replay.
Distributed Replay controller A computer running the Windows service named SQL Server Distributed Replay controller. The Distributed Replay manages the distributed replay clients. There is only one controller instance in each Distributed Replay environment.
Distributed Replay clients One or more computers (physical or virtual) running the Windows service named SQL Server Distributed Replay client. The Distributed Replay clients work together to simulate workloads against an instance of SQL Server. This client simulates a client application.
Target server An instance of SQL Server that the Distributed Replay clients can use to replay trace data. In this case this would be your Azure environment.
More Info SQL Server and Distributed Replay
Distributed replay is a fairly complex feature with a large number of configuration options. It does a very good job of simulating the workload against a database server, however it does not measure everything—for example it does not address network throughput: https://docs.microsoft.com/en-us/sql/tools/distributed-replay/sql-server-distributed-replay.
Perform performance tuning on Azure IaaS
Azure Virtual Machines are somewhat like on-premises virtual machines, in that you are not locked into a specific hardware platform, and you can enact changes in your hardware with minimal downtime. What this means is that you can balance performance and cost, and if your initial sizing estimate is off the mark, you can quickly change to a new hardware platform. Most of your performances tuning opportunities lie within storage, however you should try to tune SQL Server first.
Tuning SQL Server on Azure IaaS
Fundamentally, there is no difference to tuning SQL Server on Azure IaaS versus any other environment. The one major difference is that I/O performance tends to be more of a focus. The move to premium storage has reduced this, however you should still take advantage of features like data compression to reduce the I/O workload and improve memory utilization on your machine. You should follow other best practices like not using auto shrink and actively managing your data and log file growth. Another I/O issue you may adjust is TempDB—this you can consider moving tempdb to the D: drive to take advantage of its lower latency. You may also wish to take advantage of SQL Server’s wait statistics to understand what the database engine is waiting on.
More Info SQL Server Wait Statistics
SQL Server tracks everything any operation is waiting on. This can help you tune the system based on what resources are causing the delays: https://blogs.msdn.microsoft.com/sqlserverstorageengine/2017/07/03/what-are-you-waiting-for-introducing-wait-stats-support-in-query-store/.
Another pattern you want to follow in Azure VMs (and Azure SQL Database) is to be more aggressive with indexes than you ordinarily might be in an on-premises environment. If you are on SQL Server 2016 or 2017, you can take advantage of the Query Store feature to identify missing indexes for you.
Using the query store
The Query Store is a feature that was introduced in SQL Server 2016, and captures query compilation information and runtime execution statistics. This gives you a powerful history of performance in your environment, and highlights execution plan changes, query regressions (executions that are suddenly slower than past executions), and high resource consuming queries.
You need to enable the Query Store (see Figure 1-60) for your database(s), which you can do by executing the following T-SQL:
ALTER DATABASE YourdatabaseName SET QUERY_STORE = ON

Figure 1-60 Top Resource Consumer View from Query Store
You can use the following query to pull missing index requests out of the Query Store data in your database.
SELECT   SUM(qrs.count_executions) * AVG(qrs.avg_logical_io_reads) AS
est_logical_reads ,
         SUM(qrs.count_executions) AS sum_executions ,
         AVG(qrs.avg_logical_io_reads) AS avg_avg_logical_io_reads ,
         SUM(qsq.count_compiles) AS sum_compiles ,
         (   SELECT TOP 1 qsqt.query_sql_text
             FROM   sys.query_store_query_text qsqt
             WHERE  qsqt.query_text_id = MAX(qsq.query_text_id)) AS query_text ,
         TRY_CONVERT(XML, (   SELECT   TOP 1 qsp2.query_plan
                              FROM     sys.query_store_plan qsp2
                              WHERE    qsp2.query_id = qsq.query_id
                              ORDER BY qsp2.plan_id DESC )) AS query_plan ,
         qsq.query_id ,
         qsq.query_hash
FROM     sys.query_store_query qsq
         JOIN sys.query_store_plan qsp ON qsq.query_id = qsp.query_id
         CROSS APPLY ( SELECT TRY_CONVERT(XML, qsp.query_plan) AS query_plan_xml )
 AS qpx
         JOIN sys.query_store_runtime_stats qrs ON qsp.plan_id = qrs.plan_id
         JOIN sys.query_store_runtime_stats_interval qsrsi ON qrs.runtime_stats_interval_id = qsrsi.runtime_stats_interval_id
WHERE    qsp.query_plan LIKE N'%<MissingIndexes>%'
         AND qsrsi.start_time >= DATEADD(HH, -24, SYSDATETIME())
GROUP BY qsq.query_id ,
         qsq.query_hash
ORDER BY est_logical_reads DESC;
GO
The Query Store is a powerful new feature that can supply you with important data about your environment and help you tune the performance of your SQL Server quickly.
Support availability sets in Azure
The Azure cloud has a lot of automation and availability options built into it. However, Microsoft has to perform the same sort of maintenance operations like patching hardware and software that you would do in your on-premises environment. You have learned about building availability into your SQL Server environment, and now you learn about adding availability into your Azure environment. Availability Sets protect your Azure workloads from both unplanned outages due to things like hardware maintenance or physical infrastructure problems, and planned outages to software updates.
You do this in Azure by using the Availability Set construct. For example, you would put all the members of your AlwaysOn Availability Group into an Availablity Set (see Figure 1-61). It is important to note that you must create the availability set at the time you create your VMs. This means you can’t add an existing VM to an availability set after the fact.

Figure 1-61 Availablity Set Diagram
The basic concepts of an availability set are update domains and fault domains. Update domains ensure that your VMs are spread across multiple physical hosts to protect against downtime for planned updates. Fault domains share a common power source and network source. Availability sets spread your virtual machines across three fault domains and up to five update domains. Availability sets also work with managed disks to protect your disks as part of your availability set.
Thought experiment
In this thought experiment, apply what you’ve learned in this Chapter. You can find answers to this thought experiment in the next section.
You are a consultant to the Contoso Corporation. Contoso is a mid-sized wholesaler, which currently has a customer facing ordering system where each customer has their own set of tables, and a backend business intelligence system that is 10 TB. Business users search the business intelligence system using full text search for product name sales. Contoso has around 100 customers, with each customer averaging about 4 GB of data.
Contoso’s CIO is trying to shut down their on-premises data center, due to concerns about PCI compliance and two recent power outages that resulted in days of downtime. Contoso is looking for guidance around a migration path to Azure. Contoso is also looking to provide increased availability for the customer facing systems. With this information in mind answer the following questions.
What should be the solution for the business intelligence system?
How should Contoso approach building a new customer facing system?
How should Contoso address the availability concern?
How should Contoso migrate the customer data?
Thought experiment answers
This section contains the solution to the thought experiment. Each answer explains why the answer choice is correct.
Contoso should migrate the business intelligence system to SQL Server running in an Azure VM. The size makes it prohibitive to move to SQL DB, and the full text search options limits the use of SQL DW.
Contoso should split out each customer into their own database, and migrate the platform to Azure SQL Database using elastic pools to optimize cost and management.
Contoso can use active geo-replication in conjunction with the elastic pools in Azure SQL Database
Constoso should build BACPACs for each customer’s data, and migrate into their new database.
Chapter summary
You Azure SQL Database Server name must be globally unique.
Choosing a service tier for your Azure SQL Database is important.
Azure SQL Database offers automatic tuning via adding and removing indexes automatically.
Compatibility level 140 offers advanced performance enhancements to both Azure SQL Database and SQL Server 2017.
Changing service levels for Azure SQL Database may be a time-consuming operation for a large database.
You can create an Azure SQL Server using the portal, PowerShell, the Azure CLI, or the Rest API.
You need to open firewall rules for your application to talk to Azure SQL Database.
Azure SQL Database provides high availability inherently, but you must configure multi-region availability.
Long term backup retention is available and configured with Azure Backup Vaults.
Your Azure SQL Database sysadmin account should be an Azure Active Directory Group.
Elastic pools are a very good fit for many small databases.
Pools have similar sizing characteristics to individual databases, but simplify management.
Elastic jobs allow to run scripts across all your databases.
Elastics jobs can use geo-replication for databases or across multiple databases.
It is important to understand the SQL Server licensing rules when planning your architecture.
Migrating existing applications is easier than building for a new application because you can capture performance data from the existing environment.
Capturing data from performance monitoring is a good way to size your architecture.
Balancing CPU, memory, and storage performance are the keys to good SQL Server performance.
Choosing the size for your Azure VM is a balance of cost and performance.
Azure Compute Units offer a way to compare relative performance of given Azure VM tiers.
The G series of VMs offer premium performance for your heaviest workloads.
Use Storage Spaces in Windows Server to add disk storage and IOPs capacity.
Use Premium Storage exclusively for your production workloads.
Consider using the temporary D drive for high write TempDB workloads.
SQL Server on Azure IaaS should use Instant File Initialization.
Properly size your data files to avoid auto-growth events on your SQL Server on Azure.
Using DACPACs can help you automate the deployment of schema and DDL to your Azure SQL Databases and SQL Server instances.
Migration to Azure can take advantage of built-in features like AlwaysOn Availability Groups, or take advantage of Azure Site Recovery.
Distributed Replay is an excellent way to capture and replay a workload for testing purposes.
The Query Store is an excellent way to easily capture performance information from either your SQL Server instance or your Azure SQL Database.
Use Availability Sets to protect your workloads from Azure outages.