
![]()
Entity Data Modeling Fundamentals
More likely than not, you are just beginning to explore Entity Framework, and you are probably asking the question, “Okay, how do I get started?” If this describes you, this chapter is a great place to start. If, on the other hand, you have built some working models and feel comfortable with a few key modeling concepts, such as entity splitting and inheritance, you can skip this chapter.
In this chapter, we will walk you through the basic examples of modeling with Entity Framework. Modeling is the core feature of Entity Framework and what distinguishes Entity Framework from previous Microsoft data access platforms. Once you have built your model, you can write code against the model rather than against the rows and columns in the relational database.
We start off this chapter with an example of how to create a simple conceptual model, and then let Entity Framework create the underlying database. In the remaining examples, we will show you how to create models from existing tables and relationships in your databases.
2-1. Creating a Simple Model
Problem
You have a brand new project, and you want to create a model.
Solution
Let’s imagine that you want to create an application to hold the names and phone numbers of people that you know. To keep things simple, let’s assume that you need just one entity type: Person.
To create the new model, do the following:
- Right-click your project, and select Add
 New Item.
 - From the templates, select ADO.NET Entity Data Model and click Add. This template is located in Data under Visual C# Items (see Figure 2-1).
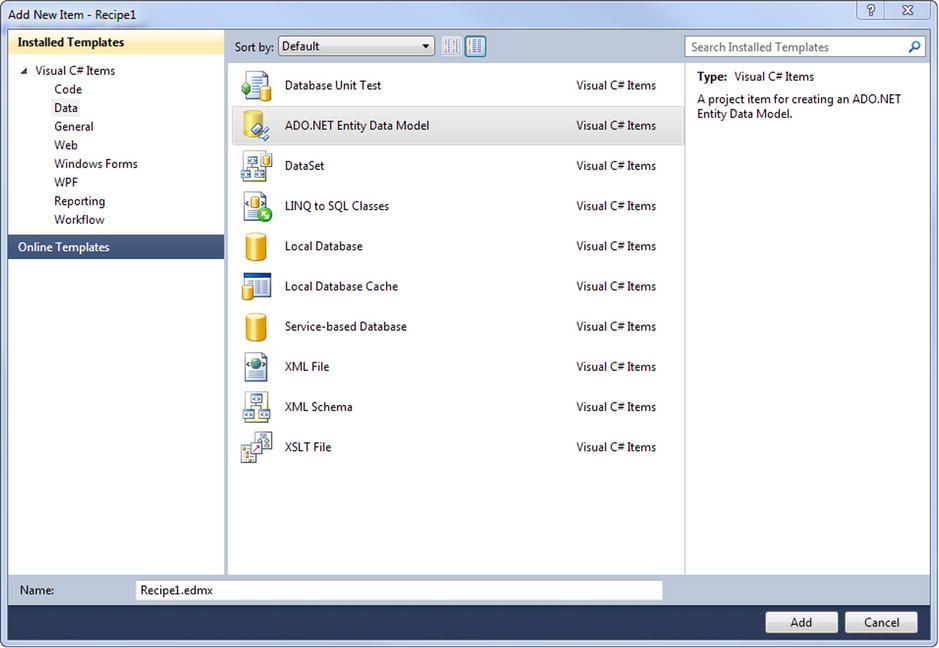
Figure 2-1. Adding a new .emdx file that contains XML describing the conceptual model, storage model, and mapping layer
- In the first step of the wizard, choose Empty Model and click Finish. The wizard will create a new conceptual model with an empty design surface.
- Right-click the design surface, and select Add Entity.
- Type Person in the Entity name field, and select the box to Create a key property. Use Id as the Key Property. Make sure that its Property Type is Int32. Click OK, and a new Person entity will appear on the design surface (see Figure 2-2).
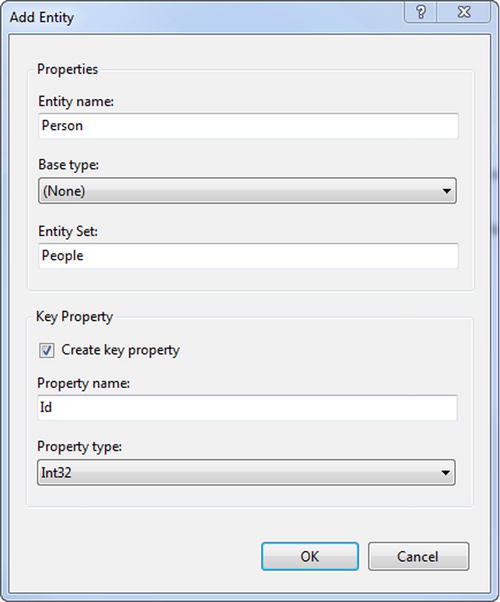
Figure 2-2. Adding a new entity type representing a Person in our conceptual model
- Right-click near the top of the Person entity, and select Add Scalar Property. A new scalar property will be added to the Person entity.
- Rename the scalar property FirstName. Add scalar properties for LastName, MiddleName, and PhoneNumber.
- Right-click the Id property, and select Properties. In the properties view, change the StoreGeneratedPattern property to Identity if it is not already set to Identity. This flags the Id property as a value that will be computed by the store layer (database). The database script we get at the end will flag the Id column as an identity column, and the storage model will know that the database will automatically manage the values in this column.
The completed conceptual model should look like the model in Figure 2-3.
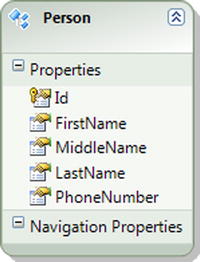
Figure 2-3. Our completed model with an entity type representing a Person
You now have a simple conceptual model. To generate a database for our model, there are a few things we still have to do:
- We need to change a couple of properties of our model to help with housekeeping. Right-click the design surface, and select properties. Change the Database Schema Name to Chapter2, and change the Entity Container Name to EF6RecipesContext. Figure 2-4 illustrates these changes.
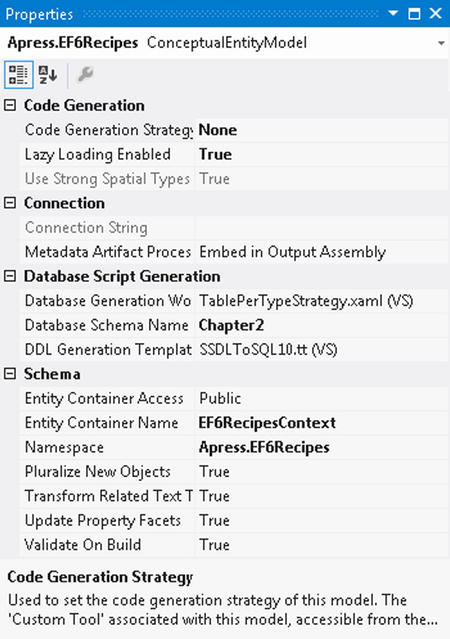
Figure 2-4. Changing the properties of our model
- Right-click the design surface, and select Generate Database Script from Model. Select an existing database connection or create a new one. In Figure 2-5, we’ve opted to create a new connection to our local machine and to the database EF6Recipes.
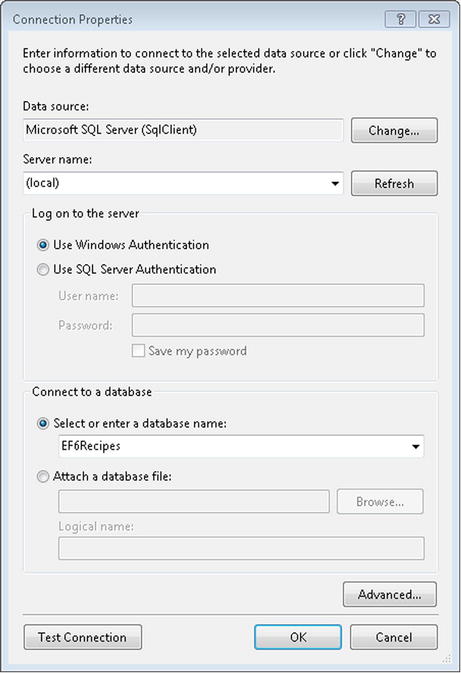
Figure 2-5. Creating a new database connection that will be used by Entity Framework to create a database script that we can use to create a database from our conceptual model
- Click OK to complete the connection properties, and click Next to preview the database script (see Figure 2-6). Once you click Finish, the generated script is added to your project.
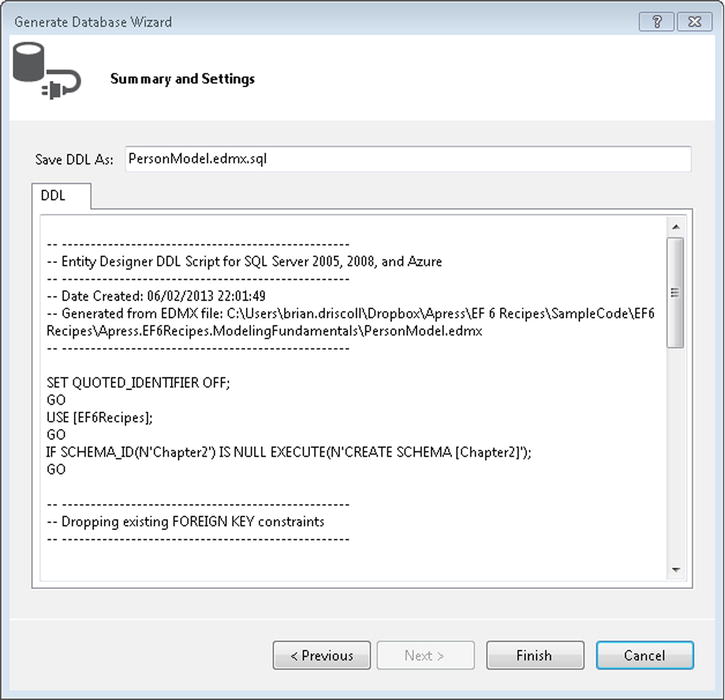
Figure 2-6. Generating the storage model in the .edmx file and creating the database script
- Run the database script in an SSMS query window to create the database and the People table.
How It Works
The Entity Framework Designer is a powerful tool for creating and updating a conceptual model, storage model, and mapping layer. This tool provides support for bidirectional model development. You can either start with a clean design surface and create a model; or start with a database that you already have and import it to create a conceptual model, storage model, and mapping layer. The current version of the Designer supports somewhat limited roundtrip modeling, allowing you to re-create your database from a model and update the model from changes in your database.
The model has a number of properties that affect what goes in the generated storage model and database script. We changed two of these properties. The first was the name of the container. This is the class derived from DbContext. We called this EF6RecipesContext to be consistent with the contexts we use throughout this book.
Additionally, we changed the schema to “Chapter 2.” This represents the schema used to generate the storage model as well as the database script.
The code in Listing 2-1 demonstrates one simple way to create and insert instances of our Person entity type. The code also demonstrates iterating through all the Person entities in our database.
Listing 2-1. Inserting into and Retrieving from Our Model
using (var context = new EF6RecipesContext())
{
    var person = new Person { FirstName = "Robert", MiddleName="Allen",
                                LastName = "Doe", PhoneNumber = "867-5309" };
    context.People.Add(person);
    person = new Person { FirstName = "John", MiddleName="K.",
                            LastName = "Smith", PhoneNumber = "824-3031" };
    context.People.Add(person);
    person = new Person { FirstName = "Billy", MiddleName="Albert",
                            LastName = "Minor", PhoneNumber = "907-2212" };
    context.People.Add(person);
    person = new Person { FirstName = "Kathy", MiddleName="Anne",
                            LastName = "Ryan", PhoneNumber = "722-0038" };
    context.People.Add(person);

    context.SaveChanges();
}

using (var context = new EF6RecipesContext())
{
    foreach (var person in context.People)
    {
        System.Console.WriteLine("{0} {1} {2}, Phone: {3}",
                                  person.FirstName, person.MiddleName,
                                  person.LastName, person.PhoneNumber);
    }
}
The output of the code in Listing 2-1 should look something like the following:
John K. Smith, Phone: 824-3031
Robert Allen Doe, Phone: 867-5309
Kathy Anne Ryan, Phone: 722-0038
Billy Albert Minor, Phone: 907-2212
Best Practice
When we created a new instance of the database context, we did it within a using() statement:
using (var context = new EF6RecipesContext())
{
...
}
If you are not familiar with this pattern, it’s really pretty simple. Normally, when we get a new instance of an object, we use the new operator and assign the result to some variable. When the variable goes out of scope and the object is no longer referenced by anything else, the garbage collector will do its job at some point and reclaim the memory for the object. That works great for most of the objects that we create in our .NET applications because most objects hold on to resources that can wait around for whenever the garbage collector has a chance to reclaim them. The garbage collector is rather nondeterministic. It reclaims resources pretty much on its own schedule, which we can only partially influence.
Instances of DbContext hold on to system resources such as database connections that we want to release as soon as we’re done with them. We don’t really want these database connections to stay open waiting for the garbage collector eventually to reclaim them.
There are a few nice features of using() statements. First, when the code execution leaves the using() {} block, the Dispose() method on the context will be called because DbContext implements the IDisposable interface. For DbContext, the Dispose() method closes any active database connections and properly cleans up any other resources that need to be released.
Second, no matter how the code leaves the using(){} block, the Dispose() method is called. Most importantly, this includes return statements and exceptions that may be thrown within the code block. The using(){} block is kind of a guarantee that critical resources will be reclaimed properly.
The best practice here is always to wrap your code in the using(){} block when creating new instances of DbContext. It’s one more step to help bulletproof your code.
2-2. Creating a Model from an Existing Database
Problem
You have an existing database with tables, perhaps a few views, and some foreign key constraints, and you want to create a model for this database.
Solution
Let’s say that you have database describing poets and their poetry. Your relational database might look something like the diagram in Figure 2-7.

Figure 2-7. A simple database for poets and their poetry
From this database diagram, you can see that a poet can be the author of one or more poems, and each poem can be categorized by its meter, which is the basic pattern of a poem’s verse. It’s not shown in this diagram, but our database also has a view that joins the tables together so that we can more easily enumerate each poet and poem, as well as the poem’s meter.
To import the view, tables, and relationships into a model, do the following:
- Right-click your project, and select Add New Item.
- From the Visual C# Items Data templates, select ADO.NET Entity Data Model.
- Select Generate from database to create the model from our existing tables. Click Next.
- Either choose an existing connection to your database or create a new connection. If you are creating a new connection, you will need to select your database server, your authentication method (Windows or SQL Server), and the database. Once you have selected these, it’s a good idea to click Test Connection to be sure that the connection is ready to go. Once you have tested the connection, click Next.
The next dialog box shows all of the tables, views, and stored procedures in the database. Check the items you want to include in the model. We want to select all of the tables (Meter, Poem, and Poet). We also want to select the view (vwLibrary). For now, leave the two check boxes for pluralizing and including foreign key columns selected. We will discuss them further momentarily. Figure 2-8 shows the things we’ve selected.
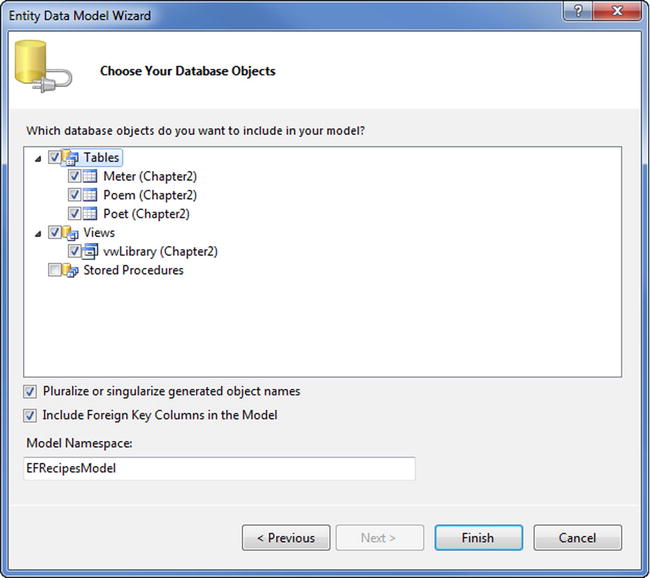
Figure 2-8. Selecting the tables and view to include in our model. Leave the Pluralize or singularize generated object names and Include Foreign Key Columns in the model checked
When you click Finish, the wizard will create a new model with our three tables and the view. The wizard will also read the foreign key constraints from the database and infer a one-to-many relationship between Poet and Poem(s) as well as a one-to-many relationship between Meter and Poem(s).

Figure 2-9. Our completed model
Figure 2-9 shows the new model created for us by including the Poet, Poem, and Meter tables as well as the vwLibrary view.
You now have a model that you can use in your code. Note that the vwLibrary entity is based on the vwLibrary view in our database. In most databases, views are read-only objects: inserts, deletes, and updates are typically not supported at the database layer. This is also the case with Entity Framework. Entity Framework considers views read only. You can get around this by mapping stored procedures for the create, update, and delete actions for view-based entities. We will show you how to do just that in Chapter 6.
How It Works
Let’s look at the model created for us by the importing process. Notice that the entities have scalar properties and navigation properties. The scalar properties map to the columns in the tables of the database, while the navigation properties are derived from the relationships between the tables.
In our database diagram, a poem has a meter and a poet (the author). These correspond to the Meter and Poet navigation properties. If we have an instance of a Poem entity, the Poet navigation property holds an instance of a Poet entity, while the Meter navigation property holds an instance of a Meter entity.
A poet can be the author of any number of poems. The Poems navigation property contains a collection of instances of the Poem entity. This collection can be empty, of course, for those poets that have yet to write any poetry. For the Meter entity, the Poems navigation property is also a collection. For this navigation property, the collection holds instances of Poems that have the given meter. SQL Server does not support relationships defined on views, and our model reflects this with an empty set of navigation properties on the vwLibrary entity.
Notice that the Import Wizard was smart enough to pluralize the navigation properties that contained collections. If you right-click the entities and look at their properties, you will notice that the entity set names for each of the entities are also property pluralized. For example, the entity set name for the Poem entity is Poems. This automatic pluralization happened because we left the Pluralize or singularize generated object names option checked.
The Include Foreign Key Columns in the model option also caused the foreign keys to be included in the model. Although it may seem a little unnecessary to have both foreign keys and navigation properties, we’ll see in many of the following recipes that having direct access to the foreign keys can be useful.
The code in Listing 2-2 demonstrates how to create instances of Poet, Poem, and Meter entities in our model and how to save these entities to our database. The code also shows you how to query the model to retrieve the poets and poems from the database.
Listing 2-2. Inserting into and Querying Our Model
using (var context = new EF6RecipesContext())
{
    var poet = new Poet { FirstName = "John", LastName = "Milton" };
    var poem = new Poem { Title = "Paradise Lost" };
    var meter = new Meter { MeterName = "Iambic Pentameter" };
    poem.Meter = meter;
    poem.Poet = poet;
    context.Poems.Add(poem);
    poem = new Poem { Title = "Paradise Regained" };
    poem.Meter = meter;
    poem.Poet = poet;
    context.Poems.Add(poem);

    poet = new Poet { FirstName = "Lewis", LastName = "Carroll" };
    poem = new Poem { Title = "The Hunting of the Shark" };
    meter = new Meter { MeterName = "Anapestic Tetrameter" };
    poem.Meter = meter;
    poem.Poet = poet;
    context.Poems.Add(poem);

    poet = new Poet { FirstName = "Lord", LastName = "Byron" };
    poem = new Poem { Title = "Don Juan" };
    poem.Meter = meter;
    poem.Poet = poet;
    context.Poems.Add(poem);

    context.SaveChanges();

}

using (var context = new EF6RecipesContext())
{
    var poets = context.Poets;
    foreach (var poet in poets)
    {
        Console.WriteLine("{0} {1}", poet.FirstName, poet.LastName);
        foreach (var poem in poet.Poems)
        {
            Console.WriteLine("	{0} ({1})", poem.Title, poem.Meter.MeterName);
        }
    }
}

// using our vwLibrary view
using (var context = new EF6RecipesContext())
{
    var items = context.vwLibraries;
    foreach (var item in items)
    {
        Console.WriteLine("{0} {1}", item.FirstName, item.LastName);
        Console.WriteLine("	{0} ({1})", item.Title, item.MeterName);
    }
}
In the first block of code in Listing 2-2, we create instances of the Poet, Poem, and Meter entity types for the poet John Milton, his poem “Paradise Lost,” and the meter for the poem, which in this case is Iambic Pentameter. Once we have created the instances of the entity types, we set the poem’s Meter property to the meter instance and the poem’s Poet property to the poet instance. Using the same approach, we build up the other entities relating each poem to its meter and poet. Once we have everything in place, we call SaveChanges()to generate and execute the appropriate SQL statements to insert the rows into the underlying database.
The output from the code in Listing 2-2 is as follows:
Lord Byron
        Don Juan (Anapestic Tetrameter)
Lewis Carroll
        The Hunting of the Shark (Anapestic Tetrameter)
John Milton
        Paradise Regained (Iambic Pentameter)
        Paradise Lost (Iambic Pentameter)
Lewis Carroll
        The Hunting of the Shark (Anapestic Tetrameter)
Lord Byron
        Don Juan (Anapestic Tetrameter)
John Milton
        Paradise Regained (Iambic Pentameter)
John Milton
        Paradise Lost (Iambic Pentameter)
In the code, we start by creating and initializing instances of the poet, poem, and meter for the first of John Milton’s poems. Once we have these in place, we set the poem’s Meter navigation property and the poem’s Poet navigation property to the instances of poem and meter. Now that we have the poem instance completed, we add it using the Add() method. Entity Framework does all of the remaining work of adding the poem to the Poems collection on the poet instance and adding the poem to the Poems collection on the meter instance. The rest of the setup follows the same pattern. To shorten the code, we reuse variables and instances where we can.
Once we have all of the objects created and all the navigation properties initialized, we have completed the object graph. Entity Framework keeps track of the changes we’ve made to build the object graph. These changes are tracked in the database context. Our context variable contains an instance of the database context (it’s of type DbContext), and it is what we used to build the object graph. To send these changes to the database, we call the SaveChanges() method.
To query our model and, of course, verify that we did indeed save everything to the database, we grab a fresh instance of the object context and query it using LINQ to Entities. We could have reused the same instance of the database context, but then we know it has the object graph and any subsequent queries we run against it won’t flow through to the database because the graph is already in memory.
Using LINQ to Entities, we query for all of the poets, and for each poet we print out the poet’s name and the details for each of their poems. The code is pretty simple, but it does use a couple of nested for loops.
The last block of code uses the vwLibrary entity. This entity is based on our vwLibrary view. This view joins the tables together to flatten things out a bit and provide a cleaner perspective. When we query for each poet against the vwLibraries entity set, we can get by with just one for loop. The output is a little different because we repeat the poet’s name for each poem.
There is one last thing to note in this example. We didn’t insert the poets, poems, and meters using the vwLibrary entity because views are always read-only in most database systems. In Entity Framework, we can’t insert (or update, or delete) entities that are based on views. Of course, we’ll show you exactly how to overcome this little challenge in many of the recipes in this book!
2-3. Modeling a Many-to-Many Relationship with No Payload
Problem
You have a couple of tables in an existing database that are related to each other via a link or junction table. The link table contains just the foreign keys used to link the two tables together into a many-to-many relationship. You want to import these tables to model this many-to-many relationship.
Solution
Let’s say that your database tables look something like the database diagram in Figure 2-10.

Figure 2-10. Artists and albums in a many-to-many relationship
To create a model and import these tables and relationships, do the following:
- Add a new model to your project by right-clicking your project and selecting Add New Item. Choose ADO.NET Entity Data Model from the Visual C# Items Data templates.
- Select Generate from database. Click Next.
- Use the wizard to select an existing connection to your database, or create a new connection.
- From the Choose Your Database Object dialog box, select the tables Album, LinkTable, and Artist. Leave the Pluralize and Foreign Key options checked. Click Finish.
The wizard will create the model shown in Figure 2-11.

Figure 2-11. The model with a many-to-many relationship between our tables
The many-to-many relationship between Album and Artist is represented by a line with the * character on both ends. Because an Album can have many Artists, and an Artist can responsible for many Albums, each of these navigation properties is of type EntityCollection.
How It Works
In Figure 2-11, an artist can be related to many albums, whereas an album can be the work of many artists. Notice that the link table from Figure 2-10 is not represented as an entity in our model. Because our link table has no scalar properties (that is, it has no payload), Entity Framework assumes that its sole purpose is to create the association between Album and Artist. If the link table had scalar properties, Entity Framework would have created a very different model, as we will see in the next recipe.
The code in Listing 2-3 demonstrates how to insert new albums and artists into our model and how to query our model for both artists and their albums and albums with their artists.
Listing 2-3. Inserting and Querying Our Artists and Albums Model Through the Many-to-Many Association
using (var context = new EF6RecipesContext())
{
    // add an artist with two albums
    var artist = new Artist { FirstName = "Alan", LastName = "Jackson" };
    var album1 = new Album { AlbumName = "Drive" };
    var album2 = new Album { AlbumName = "Live at Texas Stadium" };
    artist.Albums.Add(album1);
    artist.Albums.Add(album2);
    context.Artists.Add(artist);

    // add an album for two artists
    var artist1 = new Artist { FirstName = "Tobby", LastName = "Keith" };
    var artist2 = new Artist { FirstName = "Merle", LastName = "Haggard" };
    var album = new Album { AlbumName = "Honkytonk University" };
    artist1.Albums.Add(album);
    artist2.Albums.Add(album);
    context.Albums.Add(album);

    context.SaveChanges();
}

using (var context = new EF6RecipesContext())
{
    Console.WriteLine("Artists and their albums...");
    var artists = context.Artists;
    foreach (var artist in artists)
    {
        Console.WriteLine("{0} {1}", artist.FirstName, artist.LastName);
        foreach (var album in artist.Albums)
        {
            Console.WriteLine("	{0}", album.AlbumName);
        }
    }

    Console.WriteLine("
Albums and their artists...");
    var albums = context.Albums;
    foreach (var album in albums)
    {
        Console.WriteLine("{0}", album.AlbumName);
        foreach (var artist in album.Artists)
        {
            Console.WriteLine("	{0} {1}", artist.FirstName, artist.LastName);
        }
    }
}
The output from the code in Listing 2-3 looks like the following:
Artists and their albums...
Alan Jackson
        Drive
        Live at Texas Stadium
Tobby Keith
        Honkytonk University
Merle Haggard
        Honkytonk University

Albums and their artists...
Drive
        Alan Jackson
Live at Texas Stadium
        Alan Jackson
Honkytonk University
        Tobby Keith
        Merle Haggard
After getting an instance of our database context, we create and initialize an instance of an Artist entity type and a couple of instances of the Album entity type. We add the albums to the artist and then add the artist to the Database Context.
Next we create and initialize a couple of instances of the Artist entity type and an instance of the Album entity type. Because the two artists collaborated on the album, we add the album to both artists’ Albums navigation property (which is of type EntityCollection). Adding the album to the Database Context causes the artists to get added as well.
Now that the completed object graph is part of the database context, the only thing left to do is to use SaveChanges() to save the whole thing to the database.
When we query the database in a brand-new Database Context, we grab the artists and display their albums. Then we grab the albums and print the artists that created the albums.
Notice that we never refer to the underlying LinkTable from Figure 2-10. In fact, this table is not even represented in our model as an entity. The LinkTable is represented in the many-to-many association, which we access via the Artists and Albums navigation properties.
2-4. Modeling a Many-to-Many Relationship with a Payload
Problem
You have a many-to-many relationship in which the link table contains some payload data (any additional columns beyond the foreign keys), and you want to create a model that represents the many-to-many relationship as two one-to-many associations.
Solution
Entity Framework does not support associations with properties, so creating a model like the one in the previous recipe won’t work. As we saw in the previous recipe, if the link table in a many-to-many relationship contains just the foreign keys for the relationship, Entity Framework will surface the link table as an association and not as an entity type. If the link table contains additional information, Entity Framework will create a separate entity type to represent the link table. The resulting model will contain two one-to-many associations with an entity type representing the underlying link table.
Suppose we have the tables and relationships shown in Figure 2-12.

Figure 2-12. A many-to-many relationship with payload
An Order can have many Items. An Item can be on many Orders. Additionally, we have a Count property connected to each instance of the Order, Item relationship. This Count property is referred to as a payload.
To create a model and import these tables and relationships into the model, do the following:
- Add a new model to your project by right-clicking your project and selecting Add New Item. Choose ADO.NET Entity Data Model from the Visual C# Data templates.
- Select Generate from database. Click Next.
- Use the wizard to select an existing connection to your database or create a new connection.
- From the Choose Your Database Object dialog box, select the tables Order, OrderItem, and Item. Leave the Pluralize and Foreign Key options checked. Click Finish.
The wizard will create the model in Figure 2-13.
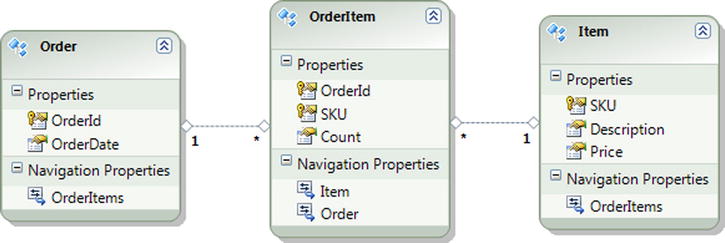
Figure 2-13. Two one-to-many associations from a many-to-many relationship with payload
How It Works
As we saw in the previous recipe, for a many-to-many relationship with no payload, the model is clean and simple to navigate. Because Entity Framework does not support the notion of payloads on associations, it surfaces the link table as an entity with two one-to-many associations to the related entities. In this case, the OrderItem table is represented not as an association, but as an entity type with a one-to-many association to Order and a one-to-many association to Item. In the previous recipe, the payload-free link table did not translate into an entity type in the model. Instead, it became part of the many-to-many association.
The addition of a payload requires an additional hop through the entity representing the link table to retrieve the related items. This is illustrated in code in Listing 2-4.
Listing 2-4. Inserting into and Retrieving from the Model
using (var context = new EF6RecipesContext())
{
    var order = new Order { OrderId = 1,
                            OrderDate = new DateTime(2010, 1, 18) };
    var item = new Item { SKU = 1729, Description = "Backpack",
                          Price = 29.97M };
    var oi = new OrderItem { Order = order, Item = item, Count = 1 };
    item = new Item { SKU = 2929, Description = "Water Filter",
                      Price = 13.97M };
    oi = new OrderItem { Order = order, Item = item, Count = 3 };
    item = new Item { SKU = 1847, Description = "Camp Stove",
                      Price = 43.99M };
    oi = new OrderItem { Order = order, Item = item, Count = 1 };
    context.Orders.Add(order);
    context.SaveChanges();
}

using (var context = new EF6RecipesContext())
{    foreach (var order in context.Orders)
     {
        Console.WriteLine("Order # {0}, ordered on {1}",
                           order.OrderId.ToString(),
                           order.OrderDate.ToShortDateString());
        Console.WriteLine("SKU	Description	Qty	Price");
        Console.WriteLine("---	-----------	---	-----");
        foreach (var oi in order.OrderItems)
        {
            Console.WriteLine("{0}	{1}	{2}	{3}", oi.Item.SKU,
                               oi.Item.Description, oi.Count.ToString(),
                               oi.Item.Price.ToString("C"));
        }
    }
}
The following is the output from the code shown in Listing 2-4.
Order # 1, ordered on 1/18/2010
SKU     Description    Qty     Price
----    -----------    ---     ------
1729    Backpack       1       $29.97
1847    Camp Stove     1       $43.99
2929    Water Filter   3       $13.97
After we create an instance of our database context, we create and initialize an Order entity as well as the items and order items for the order. We connect the order with the items by initializing the OrderItem entities with the instances of the Order entity and the Item entity. We use the Add() method to add the order to the context.
With the object graph complete and the order added to the context, we update the database with the SaveChanges() method.
To retrieve the entities from the database, we create a fresh instance of the context and iterate through the context.Orders collection. For each order (well, we just have one in this example), we print the order detail and we iterate through the entity collection on the OrderItems navigation property. These instances of the OrderItem entity type give us access to the Count scalar property (the payload) directly, and each item on the order via the Item navigation property. Going through the OrderItems entity to get to the items is the “extra” hop that is the cost of having a payload in the link table (OrderItems, in our example) in a many-to-many relationship.
Unfortunately, a project that starts out with several payload-free many-to-many relationships often ends up with several payload-rich many-to-many relationships. Refactoring a model, especially late in the development cycle, to accommodate payloads in the many-to-many relationships can be tedious. Not only are additional entities introduced, but the queries and navigation patterns through the relationships change as well. Some developers argue that every many-to-many relationship should start off with some payload, typically a synthetic key, so that the inevitable addition of more payload has significantly less impact on the project.
So here’s the best practice: If you have a payload-free many-to-many relationship and you think there is some chance that it may change over time to include a payload, start with an extra identity column in the link table. When you import the tables into your model, you will get two one-to-many relationships, which means the code you write and the model you have will be ready for any number of additional payload columns that come along as the project matures. The cost of an additional integer identity column is usually a pretty small price to pay to keep the model more flexible.
2-5. Modeling a Self-Referencing Relationship with a Code-First Approach
Problem
You have a table that references itself, and you want to model this as an entity with a self-referencing association using a Code-First approach.
Solution
Let’s say that you have a self-referencing table that’s like the one shown in the database diagram in Figure 2-14.
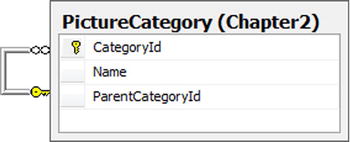
Figure 2-14. A self-referencing table
To create a model and import this table and the self-referencing relationship into the model, do the following:
- Create a new class that inherits from DbContext in your project.
- Use the code in Listing 2-5 to create the PictureCategory POCO entity.
Listing 2-5. Creating the PictureCategory POCO Entity
public class PictureCategory
{
    [Key]
    [DatabaseGenerated(DatabaseGeneratedOption.Identity)]
    public int CategoryId { get; private set; }
    public string Name { get; set; }
    public int? ParentCategoryId { get; private set; }

    [ForeignKey("ParentCategoryId")]
    public PictureCategory ParentCategory { get; set; }

    public List<PictureCategory> Subcategories { get; set; }


    public PictureCategory()
    {
        Subcategories = new List<PictureCategory>();
    }
} - Add a DbSet<PictureCategory> auto property to your DbContext subclass.
- Override the OnModelCreating method in your DbContext class to configure the bidirectional association (ParentCategory and SubCategories), as seen in Listing 2-6.
Listing 2-6. Overriding OnModelCreating in DbContext Subclass
public class EF6RecipesContext : DbContext
{
    public DbSet<PictureCategory> PictureCategories { get; set; }

    public PictureContext() : base("name=EF6CodeFirstRecipesContext")
    {

    }

    protected override void OnModelCreating(DbModelBuilder modelBuilder)
    {
        base.OnModelCreating(modelBuilder);

        modelBuilder.Entity<PictureCategory>()
                    .HasMany(cat => cat.SubCategories)
                    .WithOptional(cat => cat.ParentCategory);
    }
}
How It Works
Database relationships are characterized by degree, multiplicity, and direction. Degree is the number of entity types that participate in the relationship. Unary and binary relationships are the most common. Tertiary and n-place relationships are more theoretical than practical.
Multiplicity is the number of entity types on each end of the relationship. You have seen the multiplicities 0..1 (zero or 1), 1 (one), and * (many).
Finally, the direction is either one-way or bidirectional.
The Entity Data Model supports a particular kind of database relationship called an Association Type. An Association Type relationship has either unary or binary degree, multiplicities 0..1, 1, or *, and a direction that is bidirectional.
In this example, the degree is unary (just the entity type PictureCategory is involved), the multiplicity is 0..1 and *, and the direction is, of course, bidirectional.
As is the case in this example, a self-referencing table often denotes a parent-child relationship, with each parent having many children while each child has just one parent. Because the parent end of the relationship is 0..1 and not 1, it is possible for a child to have no parent. This is just what you want to leverage in representing the root node; that is, the one node that has no parent and is the top of the hierarchy.
Listing 2-7 shows how you can recursively enumerate the picture categories starting with the root node, which, of course, is the only node that has no parent.
Listing 2-7. Inserting into Our Model and Recursively Enumerating All of the Instances of the Self-referencing entity
static void RunExample()
{
    using (var context = new EF6RecipesContext())
    {
        var louvre = new PictureCategory { Name = "Louvre" };
        var child = new PictureCategory { Name = "Egyptian Antiquites" };
        louvre.Subcategories.Add(child);
        child = new PictureCategory { Name = "Sculptures" };
        louvre.Subcategories.Add(child);
        child = new PictureCategory { Name = "Paintings" };
        louvre.Subcategories.Add(child);
        var paris = new PictureCategory { Name = "Paris" };
        paris.Subcategories.Add(louvre);
        var vacation = new PictureCategory { Name = "Summer Vacation" };
        vacation.Subcategories.Add(paris);
        context.PictureCategories.Add(paris);
        context.SaveChanges();
    }

    using (var context = new EF6RecipesContext())
    {
     var roots = context.PictureCategories.Where(c => c.ParentCategory == null);
        roots.ForEach(root => Print(root, 0));
    }
}

static void Print(PictureCategory cat, int level)
{
    StringBuilder sb = new StringBuilder();
    Console.WriteLine("{0}{1}", sb.Append(' ', level).ToString(), cat.Name);
    cat.Subcategories.ForEach(child => Print(child, level + 1));
}
The output of the code in Listing 2-7 shows our root node: Summer Vacation. The first (and only) child is Paris. Paris has Louvre as a child. Finally, at the Louvre, we categorized our pictures by the various collections we visited.
Summer Vacation
 Paris
  Louvre
   Egyptian Antiquities
   Sculptures
   Paintings
Clearly, the code is a little involved. We start by creating and initializing the instances of our entity types. We wire them together in the object graph by adding the PictureCategories to our louvre category. Then we add the louvre category to the paris category. Finally, we add the paris category to our summer vacation category. We build the hierarchy from the bottom up.
Once we do a SaveChanges(), the inserts are all done on the database, and it’s time to query our tables to see whether we’ve actually inserted all of the rows correctly.
For the retrieval part, we start by getting the root entity. This is the one that has no parent. In our case, we created a summer vacation entity, but we didn’t make it the child of any other entity. This makes our summer vacation entity the root of the hierarchy.
Now, with the root, we call another method we wrote: Print(). The Print() method takes a couple of parameters. The first parameter is an instance of a PictureCategory. The second parameter is a level, or depth, we are at in the hierarchy. With the root category, summer vacation, we’re at the top of the hierarchy, so we pass in 0. The method call looks like Print(root, 0).
In the Print() method, we write out the name of the category preceded by a space for each level deep in the hierarchy. One of the Append() methods of the StringBuilder class takes a character and an integer. It creates an instance of StringBuilder with the character appended the number of times specified by the integer parameter. In our call, we send in a space and level, and it returns a string with a space for every level deep that we are in the hierarchy. We use the ToString() method to convert the StringBuilder instance to a string.
Now for the recursive part: We iterate through the children and call the Print() method on each child, making sure to increment the level by one. When we run out of children, we simply return. The result is the output shown previously.
In Recipe 6-5, we show another approach to this problem using a Common Table Expression in a stored procedure on the store side to iterate through the graph and return a single flattened result set.
2-6. Splitting an Entity Among Multiple Tables
Problem
You have two or more tables that share the same primary key, and you want to map a single entity to these two tables.
Solution
Let’s illustrate the problem with the two tables shown in Figure 2-15.
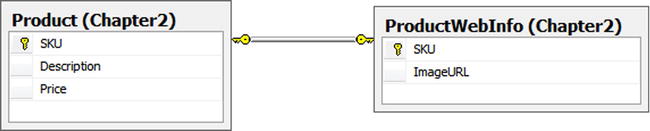
Figure 2-15. Two tables, Product and ProductWebInfo, with common primary keys
To create a model with a single entity representing these two tables, do the following:
- Create a new class in your project that inherits from DbContext.
- Create a Product POCO entity using the code in Listing 2-8.
Listing 2-8. Creating the Product POCO Entity
public class Product
{
    [Key]
    [DatabaseGenerated(DatabaseGeneratedOption.None)]
    public int SKU { get; set; }
    public string Description { get; set; }
    public decimal Price { get; set; }
    public string ImageURL { get; set; }
} - Add an auto-property of type DbSet<Product> to your DbContext subclass.
- Override the OnModelCreating() method of DbContext with the code in Listing 2-9.
Listing 2-9. Overriding OnModelCreating in the DbContext Subclass
public class EF6RecipesContext : DbContext
{
    public DbSet<Product> Products { get; set; }

    public ProductContext() : base("name=EF6CodeFirstRecipesContext")
    {
    }

    protected override void OnModelCreating(DbModelBuilder modelBuilder)
    {
        base.OnModelCreating(modelBuilder);

        modelBuilder.Entity<Product>()
                    .Map(m =>
                             {
                                 m.Properties(p => new {p.SKU, p.Description, p.Price});
                                 m.ToTable("Product", "Chapter2");
                             })
                    .Map(m =>
                             {
                                 m.Properties(p => new {p.SKU, p.ImageURL});
                                 m.ToTable("ProductWebInfo", "Chapter2");
                             });
    }
}
How It Works
It seems all too common in legacy systems to find “extra” information for each row in one table tucked away in another table. Often this happens over time as a database evolves, and no one is willing to break existing code by adding columns to some critical table. The answer is to “graft on” a new table to hold the additional columns.
By merging two or more tables into a single entity or, as it is usually perceived, splitting a single entity across two or more tables, we can treat all of the parts as one logical entity. This process is often referred to as vertical splitting.
The downside of vertical splitting is that retrieving each instance of our entity now requires an additional join for each additional table that makes up the entity type. This extra join is shown in Listing 2-10.
Listing 2-10. Additional Join Required by Vertical Splitting
SELECT
[Extent1].[SKU] AS [SKU],
[Extent2].[Description] AS [Description],
[Extent2].[Price] AS [Price],
[Extent1].[ImageURL] AS [ImageURL]
FROM  [dbo].[ProductWebInfo] AS [Extent1]
INNER JOIN [dbo].[Product] AS [Extent2] ON [Extent1].[SKU] = [Extent2].[SKU]
Nothing special is required to insert into or retrieve from the Product entity. Listing 2-11 demonstrates working with the vertically split Product entity type.
Listing 2-11. Inserting into and Retrieving from Our Model with the Product Entity Type
using (var context = new EF6RecipesContext())
{
    var product = new Product { SKU = 147,
                                Description = "Expandable Hydration Pack",
                                Price = 19.97M, ImageURL = "/pack147.jpg" };
    context.Products.Add(product);
    product = new Product { SKU = 178,
                            Description = "Rugged Ranger Duffel Bag",
                            Price = 39.97M, ImageURL = "/pack178.jpg" };
    context.Products.Add(product);
    product = new Product { SKU = 186,
                            Description = "Range Field Pack",
                            Price = 98.97M, ImageURL = "/noimage.jp" };
    context.Products.Add(product);
    product = new Product { SKU = 202,
                            Description = "Small Deployment Back Pack",
                            Price = 29.97M, ImageURL = "/pack202.jpg" };
    context.Products.Add(product);

    context.SaveChanges();
}

using (var context = new EF6RecipesContext())
{
    foreach (var p in context.Products)
    {
        Console.WriteLine("{0} {1} {2} {3}", p.SKU, p.Description,
                            p.Price.ToString("C"), p.ImageURL);
    }
}
The code in Listing 2-7 produces the following results:
147 Expandable Hydration Pack $19.97 /pack147.jpg
178 Rugged Ranger Duffel Bag $39.97 /pack178.jpg
186 Range Field Pack $98.97 /noimage.jpg
202 Small Deployment Back Pack $29.97 /pack202.jpg
2-7. Splitting a Table Among Multiple Entities
Problem
You have a table with some frequently used fields and a few large, but rarely needed fields. For performance reasons, you want to avoid needlessly loading these expensive fields on every query. You want to split the table across two or more entities.
Solution
Let’s say that you have a table like the one shown in Figure 2-16, which holds information about photographs as well as the bits for both the thumbnail and full-resolution image of the photograph.
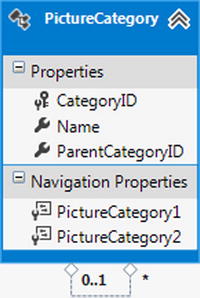
Figure 2-16. A Photograph table with a field holding the binary large object (blob) representing the data for the image
To create an entity type that contains the reasonably low-cost and frequently used columns, as well as an entity type containing the high-cost but rarely used HighResolutionBits column, do the following:
- Create a new class in your project that inherits from DbContext.
- Create a Photograph POCO entity class using the code in Listing 2-12.
Listing 2-12. Creating the Photograph POCO Entity
public class Photograph
{
    [Key]
    [DatabaseGenerated(DatabaseGeneratedOption.Identity)]
    public int PhotoId { get; set; }
    public string Title { get; set; }
    public byte[] ThumbnailBits { get; set; }

    [ForeignKey("PhotoId")]
    public virtual PhotographFullImage PhotographFullImage { get; set; }
} - Create a PhotographFullImage POCO entity class using the code in Listing 2-13.
Listing 2-13. Creating the PhotographFullImage POCO Entity
public class PhotographFullImage
{
    [Key]
    public int PhotoId { get; set; }
    public byte[] HighResolutionBits { get; set; }

    [ForeignKey("PhotoId")]
    public virtual Photograph Photograph { get; set; }
} - Add an auto-property of type DbSet<Photograph> to your DbContext subclass.
- Add another auto-property type of DbSet<PhotographFullImage> to your DbContext subclass.
- Override the OnModelCreating() method of the DbContext class, as shown in Listing 2-14.
Listing 2-14. Overriding the OnModelCreating Method of DbContext
protected override void OnModelCreating(DbModelBuilder modelBuilder)
{
    base.OnModelCreating(modelBuilder);

            modelBuilder.Entity<Photograph>()
                .HasRequired(p => p.PhotographFullImage)
                .WithRequiredPrincipal(p => p.Photograph);

    modelBuilder.Entity<Photograph>().ToTable("Photograph", "Chapter2");
    modelBuilder.Entity<PhotographFullImage>().ToTable("Photograph", "Chapter2");
}
How It Works
Entity Framework does not directly support the notion of lazy loading of individual entity properties. To get the effect of lazy loading expensive properties, we exploit Entity Framework’s support for lazy loading of associated entities. We created a new entity type to hold the expensive full image property and created a one-to-one association between our Photograph entity type and the new PhotographFullImage entity type. We added a referential constraint on the conceptual layer that, much like a database referential constraint, tells Entity Framework that a PhotographFullImage can’t exist without a Photograph.
Due to the referential constraint, there are a couple of things to note about our model. If we have a newly created PhotographFullImage, an instance of Photograph must exist in the object context or the data source prior to calling SaveChanges(). Also, if we delete a photograph, the associated PhotographFullImage is also deleted. This is just like cascading deletes in database referential constraints.
The code in Listing 2-15 demonstrates inserting and retrieving from our model.
Listing 2-15. Inserting into and Lazy Loading Expensive Fields
byte[] thumbBits = new byte[100];
byte[] fullBits = new byte[2000];
using (var context = new EF6RecipesContext())
{
    var photo = new Photograph { Title = "My Dog",
                                 ThumbnailBits = thumbBits };
    var fullImage = new PhotographFullImage { HighResolutionBits = fullBits };
    photo.PhotographFullImage = fullImage;
    context.Photographs.Add(photo);
    context.SaveChanges();
}

using (var context = new EF6RecipesContext())
{
    foreach (var photo in context.Photographs)
    {
        Console.WriteLine("Photo: {0}, ThumbnailSize {1} bytes",
                           photo.Title, photo.ThumbnailBits.Length);

        // explicitly load the "expensive" entity, PhotographFullImagecontext.Entry(photo).Reference(p => p.PhotographFullImage).Load();        Console.WriteLine("Full Image Size: {0} bytes",
                photo.PhotographFullImage.HighResolutionBits.Length);
    }
}
The output from Listing 2-15 is as follows:
Photo: My Dog, Thumbnail Size: 100 bytes
Full Image Size: 2000 bytes
The code in Listing 2-15 creates and initializes instances of the Photograph and PhotographFullImage entities, adds them to the object context, and calls SaveChanges().
On the query side, we retrieve each of the photographs from the database, print some information about the photograph, and then explicitly load the associated PhotographFullImage entity. Notice that we did not change the default context option to turn off lazy loading. This puts the burden on us to load related entities explicitly. This is just what we want. We could have chosen not to load the associated instances of PhotographFullImage, and if we were iterating through hundreds or thousands of photographs, this would have saved us an awful lot of cycles and bandwidth.
2-8. Modeling Table per Type Inheritance
Problem
You have some tables that contain additional information about a common table, and you want to model this using table per type inheritance.
Solution
Suppose that you have two tables that are closely related to a common table, as shown in Figure 2-17. The Business table is on the 1 side of a 1:0..1 relationship with the eCommerce and the Retail tables. The key feature here is that the eCommerce and Retail tables extend information about a business represented in the Business table.
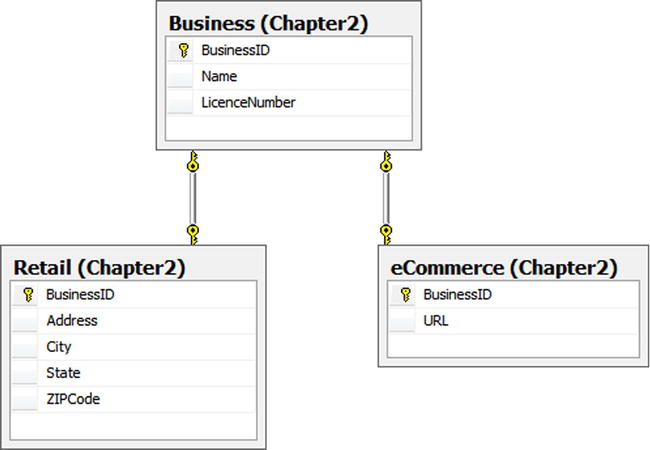
Figure 2-17. Closely related tables ripe for inheritance
The tables Retail and eCommerce are related to the Business table, which holds a few properties that we would naturally associate with any business. To model table per type inheritance such that entities Retail and eCommerce inherit from the Business base entity type, perform the following steps:
- Create a new class in your project that inherits from DbContext.
- Create a Business POCO entity class using the code in Listing 2-16.
Listing 2-16. Creating the Business POCO Entity Class
[Table("Business", Schema = "Chapter2")]
public class Business
{
    [Key]
    [DatabaseGenerated(DatabaseGeneratedOption.Identity)]
    public int BusinessId { get; protected set; }
    public string Name { get; set; }
    public string LicenseNumber { get; set; }
} - Create an eCommerce POCO entity class that inherits from the Business class using the code in Listing 2-17.
Listing 2-17. Creating the eCommerce POCO Entity Class
[Table("eCommerce", Schema = "Chapter2")]
public class eCommerce : Business
{
    public string URL { get; set; }
} - Create a Retail POCO entity class that inherits from the Business class using the code in Listing 2-18.
Listing 2-18. Creating the Retail POCO Entity Class
[Table("Retail", Schema = "Chapter2")]
public class Retail : Business
{
    public string Address { get; set; }
    public string City { get; set; }
    public string State { get; set; }
    public string ZIPCode { get; set; }
} - Add an auto-property of type DbSet<Business> to your DbContext subclass.
How It Works
Both the Retail and the eCommerce tables are on the 0..1 side of a 1:0..1 relationship with the Business table. This means that we could have a business with no additional information or a business with additional Retail or eCommerce information. In object-oriented programming terms, we have a base type, Business, with two derived types, Retail and eCommerce.
Because of the 1:0..1 relationship, we cannot have a row in the Retail or eCommerce tables without a corresponding row in the Business table. In object-oriented terms, an instance of a derived type has the properties of the base type. This concept of a derived type extending the properties of a base type is a key feature of inheritance. In table per type (often abbreviated TPT) inheritance, each of the derived types is represented in separate tables.
Listing 2-19 demonstrates inserting and retrieving from our model.
Listing 2-19. Inserting and Retrieving Entities in TPT Inheritance
using (var context = new EF6RecipesContext())
{
    var business = new Business { Name = "Corner Dry Cleaning",
                                  LicenseNumber = "100x1" };
    context.Businesses.Add(business);
    var retail = new Retail { Name = "Shop and Save", LicenseNumber = "200C",
                              Address = "101 Main", City = "Anytown",
                              State = "TX", ZIPCode = "76106" };
    context.Businesses.Add(retail);
    var web = new eCommerce { Name = "BuyNow.com", LicenseNumber = "300AB",
                              URL = "www.buynow.com" };
    context.Businesses.Add(web);
    context.SaveChanges();
}

using (var context = new EF6RecipesContext())
{
    Console.WriteLine("
--- All Businesses ---");
    foreach (var b in context.Businesses)
    {
        Console.WriteLine("{0} (#{1})", b.Name, b.LicenseNumber);
    }

    Console.WriteLine("
--- Retail Businesses ---");
    foreach (var r in context.Businesses.OfType<Retail>())
    {
        Console.WriteLine("{0} (#{1})", r.Name, r.LicenseNumber);
        Console.WriteLine("{0}", r.Address);
        Console.WriteLine("{0}, {1} {2}", r.City, r.State, r.ZIPCode);
    }

    Console.WriteLine("
--- eCommerce Businesses ---");
    foreach (var e in context.Businesses.OfType<eCommerce>())
    {
        Console.WriteLine("{0} (#{1})", e.Name, e.LicenseNumber);
        Console.WriteLine("Online address is: {0}", e.URL);
    }
}
The code in Listing 2-19 creates and initializes instances of the Business entity type and the two derived types. To add these to the Database Context, we use the Add() method exposed on the Business entity set in the context.
On the query side, to access all of the businesses, we iterate through the Businesses entity set. For the derived types, we use the OfType<>() method specifying the derived type to filter the Business entity set.
The output of Listing 2-19 looks like the following:
--- All Businesses ---
Corner Dry Cleaning (#100X1)
Shop and Save (#200C)
BuyNow.com (#300AB)
--- Retail Businesses ---
Shop and Save (#200C)
101 Main
Anytown, TX 76106

---- eCommerce Businesses ---
BuyNow.com (#300AB)
Online address is: www.buynow.com
Table per type is one of three inheritance models supported by Entity Framework. The other two are Table per Hierarchy (discussed in this chapter) and Table per Concrete Type (see Chapter 15).
Table per type inheritance provides a lot of database flexibility because we can easily add tables as new derived types find their way into our model as an application develops. However, each derived type involves additional joins that can reduce performance. In real-world applications, we have seen significant performance problems with TPT when many derived types are modeled.
Table per hierarchy, as you will see in Recipe 2-10, stores the entire hierarchy in a single table. This eliminates the joins of TPT and thereby provides better performance, but at the cost of some flexibility.
Table per concrete type is supported by the Entity Framework runtime, but not by the designer. Table per Concrete Type has some important applications, as we will see in Chapter 15.
2-9. Using Conditions to Filter an ObjectSet
Problem
You want to create a permanent filter on an entity type so that it maps to a subset of the rows in a table.
Solution
Let’s say that you have a table holding account information, as shown in the database diagram in Figure 2-18. The table has a DeletedOn nullable column that holds the date and time the account was deleted. If the account is still active, the DeletedOn column is null. We want our Account entity to represent only active accounts; that is, an account without a DeletedOn value.

Figure 2-18. Account table with DeletedOn DateTime column
To model this table so that only active accounts are used to populate the Account entity type, do the following:
- Add a new model to your project by right-clicking your project and selecting Add New Item. Choose ADO.NET Entity Data Model from the Visual C# Data templates.
- Select Generate from database. Click Next.
- Use the wizard to select an existing connection to your database, or create a new connection.
- From the Choose Your Database Object dialog box, select the Account table. Leave the Pluralize and Foreign Key options checked. Click Finish.
- Click the Account entity to view the Mapping Details window. If the Mapping Details window is not visible, show it by selecting View Other Windows Entity Data Model Mapping Details. Click Add a Condition, and select the DeletedOn column. In the Operator column, select Is, and in the Value/Property column, select Null. This creates a mapping condition when the DeletedOn column is Is Null (see Figure 2-19).
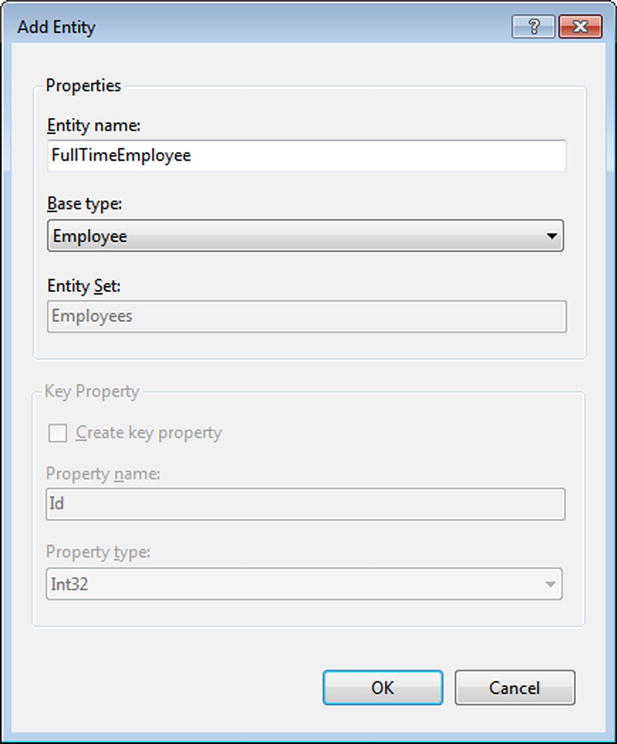
Figure 2-19. Creating the conditional mapping for the Account entity to the Account table
- Right-click the DeletedOn property and select Delete. Because we’re using the DeletedOn column in a conditional mapping, we can’t map it to a property. Its value would always be null anyway in our model.
How It Works
Conditional mappings are often used when you want to apply a permanent filter on an entity. Conditional mappings are also key to implementing Table per Hierarchy Inheritance. You can apply conditions using the following:
<value> Is Null
<value> Is Not Null
<integer> = <value>
<string> = <value>
In this example, we applied an Is Null condition on the Account entity that filters out rows that contain a DeletedOn date/time. The code in Listing 2-20 demonstrates inserting into and retrieving rows from the Account table.
Listing 2-20. Inserting into and Retrieving from the Account
using (var context = new EF6RecipesContext())
{
    context.Database.ExecuteSqlCommand(@"insert into chapter2.account
            (DeletedOn,AccountHolderId) values ('2/10/2009',1728)");

    var account = new Account { AccountHolderId = 2320 };
    context.Accounts.Add(account);
    account = new Account { AccountHolderId = 2502 };
    context.Accounts.Add(account);
    account = new Account { AccountHolderId = 2603 };
    context.Accounts.Add(account);
    context.SaveChanges();
}

using (var context = new EF6RecipesContext())
{
    foreach (var account in context.Accounts)
    {
        Console.WriteLine("Account Id = {0}",
                           account.AccountHolderId.ToString());
    }
}
In Listing 2-20, we use the ExecuteSqlCommand() method on the Database property of the DbContext to insert a row into the database the old-fashioned way. We need to do this because we are inserting a row with a nonnull value for the DeletedOn column. In our model, the Account entity type has no property mapping to this column; in fact, the Account entity type would never be materialized with a row that had a DeletedOn value—and that’s exactly what we want to test.
The rest of the first part of the code creates and initializes three additional instances of the Account entity type. These are saved to the database with the SaveChanges() method.
When we query the database, we should get only the three instances of the Account entity type that we added with the SaveChanges() method. The row that we added using the ExecuteSqlCommand() method should not be visible. The following output confirms it:
Account Id = 2320
Account Id = 2502
Account Id = 2603
2-10. Modeling Table per Hierarchy Inheritance
Problem
You have a table with a type or discriminator column that you use to determine what the data in a row represents in your application. You want to model this with table per hierarchy inheritance.
Solution
Let’s say that your table looks like the one shown in Figure 2-20. This Employee table contains rows for both hourly employees and salaried employees. The EmployeeType column is used to discriminate between the two types of rows. When EmployeeType is 1, the row represents a salaried or full-time employee. When the EmployeeType is 2, the row represents an hourly employee.
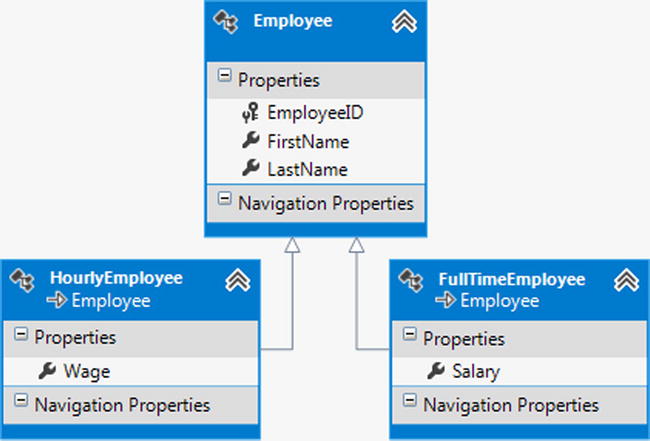
Figure 2-20. An Employee table containing both hourly and full-time employees
To create a model using table per hierarchy inheritance based on the Employee table, do the following:
- Create a new class in your project that inherits from DbContext.
- Create an abstract Employee POCO entity class using the code in Listing 2-21.
Listing 2-21. Creating the Abstract Employee POCO Entity Class
[Table("Employee", Schema="Chapter2")]
public abstract class Employee
{
    [Key]
    [DatabaseGenerated(DatabaseGeneratedOption.Identity)]
    public int EmployeeId { get; protected set; }
    public string FirstName { get; set; }
    public string LastName { get; set; }
} - Create a FullTimeEmployeePOCO entity class that inherits from Employee using the code in Listing 2-22.
Listing 2-22. Creating the FullTimeEmployee POCO Entity Class
public class FullTimeEmployee : Employee
{
    public decimal? Salary { get; set; }
} - Create an HourlyEmployee POCO entity class that inherits from Employee using the code in Listing 2-23.
Listing 2-23. Creating the HourlyEmployee POCO Entity Class
public class HourlyEmployee : Employee
{
    public decimal? Wage { get; set; }
} - Add an auto-property of type DbSet<Employee> to your DbContext subclass.
- Override the OnModelCreating method of DbContext to map your concrete employee type classes to the EmployeeType discriminator column, as shown in Listing 2-24.
Listing 2-24. Overriding the OnModelCreating Method of DbContext
protected override void OnModelCreating(DbModelBuilder modelBuilder)
{
    base.OnModelCreating(modelBuilder);

    modelBuilder.Entity<Employee>()
                .Map<FullTimeEmployee>(m => m.Requires("EmployeeType").HasValue(1))
                .Map<HourlyEmployee>(m => m.Requires("EmployeeType").HasValue(2));
}
![]() Note Nonshared properties (for example, Salary and Wage) must have nullable types.
Note Nonshared properties (for example, Salary and Wage) must have nullable types.
How It Works
In table per hierarchy inheritance, often abbreviated TPH, a single table is used to represent the entire inheritance hierarchy. Unlike table per type inheritance, the TPH rows for the derived types as well as the base type are intermingled in the same table. The rows are distinguished by a discriminator column. In our example, the discriminator column is EmployeeType.
In TPH, mapping conditions, which are set in entity configuration, are used to indicate the values of the discriminator column that cause the table to be mapped to the different derived types. We marked the base type as abstract. By marking it as abstract, we didn’t have to provide a condition for the mapping because an abstract entity can’t be created. We will never have an instance of an Employee entity. We did not implement an EmployeeType property in the Employee entity. A column used in a condition is not, in general, mapped to a property.
The code in Listing 2-25 demonstrates inserting into and retrieving from our model.
Listing 2-25. Inserting into and Retrieving from Our TPH Model
using (var context = new EF6RecipesContext())
{
    var fte = new FullTimeEmployee { FirstName = "Jane", LastName = "Doe",
                                     Salary = 71500M};
    context.Employees.Add(fte);
    fte = new FullTimeEmployee { FirstName = "John", LastName = "Smith",
                                 Salary = 62500M };
    context.Employees.Add(fte);
    var hourly = new HourlyEmployee { FirstName = "Tom", LastName = "Jones",
                                      Wage = 8.75M };
    context.Employees.Add(hourly);
    context.SaveChanges();
}

using (var context = new EF6RecipesContext())
{
    Console.WriteLine("--- All Employees ---");
    foreach (var emp in context.Employees)
    {
        bool fullTime = emp is HourlyEmployee ? false : true;
        Console.WriteLine("{0} {1} ({2})", emp.FirstName, emp.LastName,
                           fullTime ? "Full Time" : "Hourly");
    }

    Console.WriteLine("--- Full Time ---");
    foreach (var fte in context.Employees.OfType<FullTimeEmployee>())
    {
        Console.WriteLine("{0} {1}", fte.FirstName, fte.LastName);
    }

    Console.WriteLine("--- Hourly ---");
    foreach (var hourly in context.Employees.OfType<HourlyEmployee>())
    {
        Console.WriteLine("{0} {1}", hourly.FirstName, hourly.LastName);
    }
}
Following is the output of the code in Listing 2-25:
--- All Employees ---
Jane Doe (Full Time)
John Smith (Full Time)
Tom Jones (Hourly)
--- Full Time ---
Jane Doe
John Smith
--- Hourly ---
Tom Jones
The code in Listing 2-25 creates, initializes, and adds two full-time employees and an hourly employee. On the query side, we retrieve all of the employees and use the is operator to determine what type of employee we have. We indicate the employee type when we print out the employee’s name.
In separate code blocks, we retrieve the full-time employees and the hourly employees using the OfType<>() method.
Best Practice
There is some debate over when to use abstract base entities in TPH inheritance and when to create a condition on the base entity. The difficulty with a concrete base entity is that it can be very cumbersome to query for all of the instances in the hierarchy. The best practice is that if your application never needs instances of the base entity is to make it abstract.
If your application needs instances of the base entity, consider introducing a new derived entity to cover the condition for the concrete base entity. For example, we might create a new derived class, such as UnclassifiedEmployee. Once we have this new derived entity, we can safely make our base entity abstract. This provides us with a simple way to query for condition formally covered by the base entity with a condition.
There are some rules to keep in mind when using TPH. First, the conditions used must be mutually exclusive. That is, you cannot have a row that can conditionally map to two or more types.
Second, the conditions used must account for every row in the table. You cannot have a row in the table that has a discriminator value that does not map the row to exactly one type. This rule can be particularly troubling if you are working with a legacy database in which other applications are creating rows for which you have no appropriate condition mappings. What will happen in these cases? The rows that do not map to your base or derived types will simply not be accessible in your model.
The discriminator column cannot be mapped to an entity property unless it is used in an is not null condition At first, this last rule might seem overly restrictive. You might ask, “How can I insert a row representing a derived type if I can’t set the discriminator value?” The answer is rather elegant. You simply create an instance of the derived type and add it to the context in the same way that you would any other entity instance. Object Services takes care of creating the appropriate insert statements to create a row with the correct discriminator value.
2-11. Modeling Is-a and Has-a Relationships Between Two Entities
Problem
You have two tables that participate in both Is-a and Has-a relationships, and you want to model them as two entities with the corresponding Is-a and Has-a relationships.
Solution
Let’s say that you have two tables that describe scenic parks and their related locations. In your database, you represent these with a Location table and a Park table. For the purposes of your application, a park is simply a type of location. Additionally, a park can have a governing office with a mailing address, which is also represented in the Location table. A park, then, is both a derived type of Location and can have a location that corresponds to the park’s governing office. It is entirely possible that the office is not located on the grounds of the park. Perhaps several parks share an office in a nearby town. Figure 2-21 shows a database diagram with the Park and Location tables.
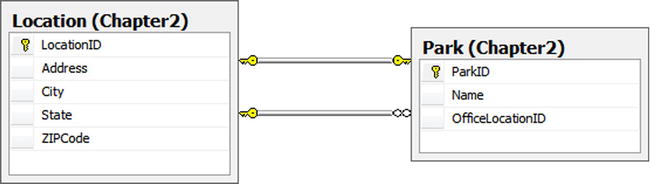
Figure 2-21. Location and Park in both a Has-a and Is-a relationship
Follow these steps to model both of these relationships:
- Add a new model to your project by right-clicking your project and selecting Add New Item. Choose ADO.NET Entity Data Model from the Visual C# Data templates.
- Select Generate from database. Click Next.
- Use the wizard to select an existing connection to your database or create a new connection.
- From the Choose Your Database Object dialog box, select the Location and Park tables. Leave the Pluralize and Foreign Key options checked. Click Finish.
- Delete the one-to-zero or one association created by the Entity Data Model Wizard.
- Right-click the Location entity, and select Add Inheritance. Select the Park entity as the derived entity and the Location entity as the base entity.
- Delete the ParkId property from the Park entity type.
- Click the Park entity to view the Mapping Details window. If the Mapping Details window is not visible, show it by selecting View Other Windows Entity Data Model Mapping Details. Map the ParkId column to the LocationId property.
- Change the name of the Location1 navigation property in the Park entity type to Office. This represents the office location for the park.
The completed model is shown in Figure 2-22.
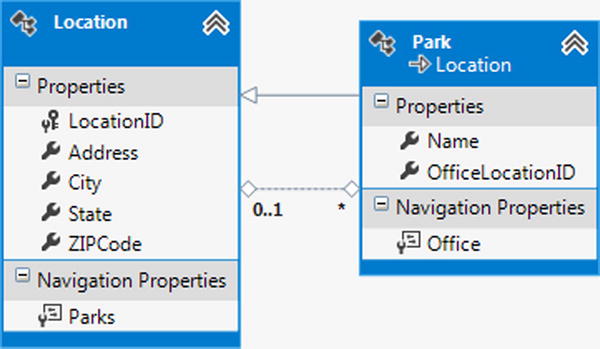
Figure 2-22. The completed model with Park deriving from Location. A Park is-a location. A park has-a location for its office
How It Works
Entities can have more than one association with other entities. In this example, we created an Is-a relationship using table per type inheritance with Location as the base entity type and Park as the derived entity type. We also created a Has-a relationship with a one-to-many association between the Location and Park entity types.
In Listing 2-26, we demonstrate creating a new Park entity that also results in creating a Location because of the Is-a relationship. We attach an office Location to the Park, which results in a second row in the Location table.
Listing 2-26. Creating and Retrieving Park and Location Entities
using (var context = new EF6RecipesContext())
{
    var park = new Park { Name = "11th Street Park",
                          Address = "801 11th Street", City = "Aledo",
                          State = "TX", ZIPCode = "76106" };
    var loc = new Location { Address = "501 Main", City = "Weatherford",
                             State = "TX", ZIPCode = "76201" };
    park.Office = loc;
    context.Locations.Add(park);
    park = new Park { Name = "Overland Park", Address = "101 High Drive",
                      City = "Springtown", State = "TX", ZIPCode = "76081" };
    loc = new Location { Address = "8705 Range Lane", City = "Springtown",
                         State = "TX", ZIPCode = "76081" };
    park.Office = loc;
    context.Locations.Add(park);
    context.SaveChanges();
}

using (var context = new EF6RecipesContext())
{
    context.ContextOptions.LazyLoadingEnabled = true;
    Console.WriteLine("-- All Locations -- ");
    foreach (var l in context.Locations)
    {
        Console.WriteLine("{0}, {1}, {2} {3}", l.Address, l.City,
                            l.State, l.ZIPCode);
    }

    Console.WriteLine("--- Parks ---");
    foreach (var p in context.Locations.OfType<Park>())
    {
        Console.WriteLine("{0} is at {1} in {2}", p.Name, p.Address, p.City);
        Console.WriteLine("	Office: {0}, {1}, {2} {3}", p.Office.Address,
                            p.Office.City, p.Office.State, p.Office.ZIPCode);
    }
}
The output of the code in Listing 2-26 is as follows:
-- All Locations --
501 Main, Weatherford, TX 76201
801 11th Street, Aledo, TX 76106
8705 Range Lane, Springtown, TX 76081
101 High Drive, Springtown, TX 76081
--- Parks ---
11th Street Park is at 801 11th Street in Aledo
        Office: 501 Main, Weatherford, TX 76201
Overland Park is at 101 High Drive in Springtown
        Office: 8705 Range Lane, Springtown, TX 76081
2-12. Creating, Modifying, and Mapping Complex Types
Problem
You want to create a complex type, set it as a property on an entity, and map the property to some columns on a table.
Solution
Let’s say that you have the table shown in Figure 2-23. You want to create a Name complex type for the FirstName and LastName columns. You also want to create an Address complex type for the AddressLine1, AddressLine2, City, State, and ZIPCode columns. You want to use these complex types for properties in your model, as shown in Figure 2-24.
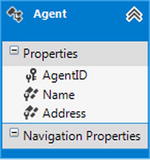
Figure 2-23. The Agent table with the name and address of the agent
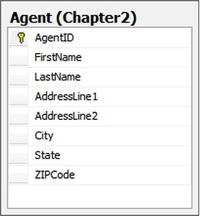
Figure 2-24. The completed model with the name and address components refactored into complex types
Follow these steps to create the model with the Name and Address complex types:
- Add a new model to your project by right-clicking your project and selecting Add New Item. Choose ADO.NET Entity Data Model from the Visual C# Data templates.
- Select Generate from database. Click Next.
- Use the wizard to select an existing connection to your database or create a new connection.
- From the Choose Your Database Object dialog box, select the Agent table. Leave the Pluralize and Foreign Key options checked. Click Finish.
- Select the FirstName and LastName properties, then right-click and select Refactor Into Complex Type.
- In the Model Browser, rename the new complex type from ComplexType1 to Name. This changes the name of the type. On the Agent, rename the ComplexTypeProperty to Name. This changes the name of the property.
- We’ll create the next complex type from scratch so that you can see an alternative approach. Right-click on the design surface, and select Add Complex Type.
- In the Model Browser, rename the new complex type from ComplexType1 to Address.
- Select the AddressLine1, AddressLine2, City, State, and ZIPCode properties in the Agent. Right-click and select Cut. Paste these properties onto the Address complex type in the Model Browser.
- Right-click the Agent, and select Add Complex Property. Rename the property Address.
- Right-click on the new Address property and select Properties. Change its type to Address. This changes the new property’s type to the new Address complex type.
- View the Mapping Details window for the Agent. Map the columns from the Agent table to the properties on the two complex types we’ve created. The mappings are shown in Figure 2-25.
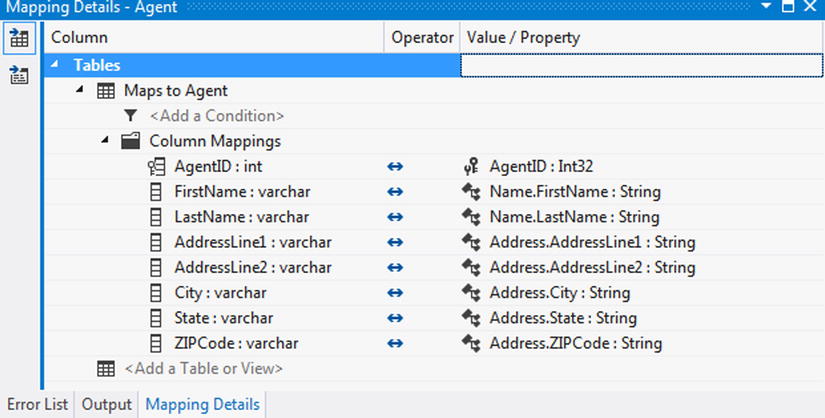
Figure 2-25. Mapping the fields of the complex types to the columns in the Agent table
How It Works
Complex types allow you to group several properties into a single type for a property on an entity. A complex type can contain scalar properties or other complex types, but they cannot have navigation properties or entity collections. A complex type cannot be an entity key. Complex types are not tracked on their own in an object context.
A property whose type is a complex type cannot be null. When you work with entities with complex type properties, you have to be mindful of this rule. Occasionally, when the value of a complex type property is unimportant for a particular operation, you may need to create a dummy value for the property so that it has some nonnull value.
When you modify any field in complex type property, the property is marked as changed by Entity Framework, and an update statement will be generated that will update all of the fields of the complex type property.
In Listing 2-27, we demonstrate this using the model by inserting a few agents and displaying them.
Listing 2-27. Inserting Agents and Selecting from Our Model
using (var context = new EF6RecipesContext())
{
    var name1 = new Name { FirstName = "Robin", LastName = "Rosen" };
    var name2 = new Name { FirstName = "Alex", LastName = "St. James" };
    var address1 = new Address { AddressLine1 = "510 N. Grant",
                                 AddressLine2 = "Apt. 8",
                                 City = "Raytown", State = "MO",
                                 ZIPCode = "64133" };
    var address2 = new Address { AddressLine1 = "222 Baker St.",
                                 AddressLine2 = "Apt.22B",
                                 City = "Raytown", State = "MO",
                                 ZIPCode = "64133" };
    context.Agents.Add(new Agent { Name = name1, Address = address1 });
    context.Agents.Add(new Agent {Name = name2, Address = address2});
    context.SaveChanges();
}

using (var context = new EF6RecipesContext())
{
    Console.WriteLine("Agents");
    foreach (var agent in context.Agents)
    {
        Console.WriteLine("{0} {1}", agent.Name.FirstName, agent.Name.LastName);
        Console.WriteLine("{0}", agent.Address.AddressLine1);
        Console.WriteLine("{0}", agent.Address.AddressLine2);
        Console.WriteLine("{0}, {1} {2}", agent.Address.City,
                           agent.Address.State, agent.Address.ZIPCode);
        Console.WriteLine();
    }
}
The output of the code in Listing 2-27 is as follows:
Agents
Robin Rosen
510 N. Grant
Apt. 8
Raytown, MO 64133

Alex St. James
222 Baker St.
Apt.22B
Raytown, MO 64133