
![]()
Working with Object Services
This chapter contains a rather eclectic collection of recipes that provide practical solutions to common problems in real-world applications. We build our applications to tolerate changes in deployment environments, and we make our applications flexible enough so that few if any configuration details need to be hard-coded.
The first three recipes provide you with the tools to meet these challenges. The remaining recipes cover topics such as Entity Framework’s Pluralization Service, using the edmgen.exe utility, working with identifying relationships, and retrieving objects from an object context.
7-1. Dynamically Building a Connection String
Problem
You want to build the connection string dynamically for your application.
Solution
Many real-world applications start out on a developer’s desktop; move through one or more testing, integration, and staging environments; and finally end up in a production deployment. You want to configure the application’s connection string dynamically depending on the current environment.
To build the connection string dynamically for your application, follow the pattern in Listing 7-1.
Listing 7-1. Dynamically Building a Connection String
public static class ConnectionStringManager
{
    public static string EFConnection = GetConnection();

    private static string GetConnection()
    {
            var sqlBuilder = new SqlConnectionStringBuilder();

            sqlBuilder.DataSource = ConfigurationManager.AppSettings["SqlDataSource"];

            // fill in the rest
            sqlBuilder.InitialCatalog = ConfigurationManager.AppSettings["SqlInitialCatalog"];
            sqlBuilder.IntegratedSecurity = true;
            sqlBuilder.MultipleActiveResultSets = true;

            var eBuilder = new EntityConnectionStringBuilder();
            eBuilder.Provider = "System.Data.SqlClient";
            eBuilder.Metadata =
                  "res://*/Recipe1.csdl|res://*/Recipe1.ssdl|res://*/Recipe1.msl";
            eBuilder.ProviderConnectionString = sqlBuilder.ToString();
            return eBuilder.ToString();    }
}

public partial class EF6RecipesContainer
    {
        public EF6RecipesContainer(string nameOrConnectionString)
            : base(nameOrConnectionString)
        {

        }
    }
How It Works
When you add an ADO.NET Entity Data Model to your project, Entity Framework adds an entry to the <connectionStrings> section in your project’s .config file. At runtime, the constructor for the object context is passed the key for this configuration entry (EF6RecipesContext for many of the recipes in this book). Given this key, the database context uses the connection string found in the .config file.
To create the connection string dynamically based on the environment in which our application is deployed, we created the ConnectionStringManager class (refer to Listing 7-1). In the GetConnection()method, we obtain the environment-specific values for data source and initial catalog from a config file. To use our ConnectionStringManager, we implemented an additional constructor that takes a string parameter representing the connection string or name inside the EF6RecipesContainer partial class.
When we instantiate EF6RecipesContainer, we can pass into it the value of ConnectionStringManager.EFConnection and, as a result, the instance will use the dynamically created connection string to connect to the database server.
7-2. Reading a Model from a Database
Problem
You want to read the CSDL, MSL, and SSDL definitions for your model from a database table.
Solution
Suppose that you have a model like the one shown in Figure 7-1.

Figure 7-1. A model with a Customer entity
Our model has just one entity: Customer. The conceptual layer (CSDL mapping layer (MSL and storage layer (SSDL definitions are typically found in the .edmx file in your project. We want to read these definitions from a database. To read these definitions from a database, do the following:
- Right-click the design surface, and view the Properties. Change the Code Generation Strategy to None. We’ll use POCO for our Customer class. See Chapter 8 for more recipes on using POCO.
- Create the table shown in Figure 7-2. This table will hold the definitions for our project.

Figure 7-2. The Definitions table holds the definitions for our SSDL, CSDL, and MSL. Note that the column data types for the definitions are XML
- Right-click the design surface, and view the Properties. Change the Metadata Artifact Processing to Copy to Output Directory. Rebuild your project. The build process will create three files in the output directory: Recipe2.ssdl, Recipe2.csdl, and Recipe2.msl.
- Insert the contents of these files into the Definitions table in the corresponding columns. Use 1 for the Id column.
- Follow the pattern in Listing 7-2 to read the metadata from the Definitions table, and create a MetadataWorkspacethat your application will use.
Listing 7-2. Reading the Metadata from the Definitions Table
using System;
using System.Collections.Generic;
using System.Linq;
using System.Text;
using System.Data.Metadata.Edm;
using System.Data.SqlClient;
using System.Data.EntityClient;
using System.Xml;
using System.Data.Mapping;
using System.Data.Objects;

namespace Recipe2
{
    class Program
    {
        static void Main(string[] args)
        {
            RunExample();
        }

        static void RunExample()
        {
            using (var context = ContextFactory.CreateContext())
            {
                context.Customers.AddObject(
                      new Customer { Name = "Jill Nickels" });
                context.Customers.AddObject(
                      new Customer { Name = "Robert Cole" });
                context.SaveChanges();
            }

            using (var context = ContextFactory.CreateContext())
            {
                Console.WriteLine("Customers");
                Console.WriteLine("---------");
                foreach (var customer in context.Customers)
                {
                    Console.WriteLine("{0}", customer.Name);
                }
            }
        }
    }

    public class Customer
    {
        public virtual int CustomerId { get; set; }
        public virtual string Name { get; set; }
    }

    public class EFRecipesEntities : ObjectContext
    {
        private ObjectSet<Customer> customers;
        public EFRecipesEntities(EntityConnection cn)
            : base(cn)
        {
        }

        public ObjectSet<Customer> Customers
        {
            get
            {
                return customers ?? (customers = CreateObjectSet<Customer>());
            }
        }
    }

    public static class ContextFactory
    {
        static string connString = @"Data Source=localhost;
           Initial Catalog=EFRecipes;Integrated Security=True;";
        private static MetadataWorkspace workspace = CreateWorkSpace();

        public static EFRecipesEntities CreateContext()
        {
            var conn = new EntityConnection(workspace,
                             new SqlConnection(connString));
            return new EFRecipesEntities(conn);
        }

        private static MetadataWorkspace CreateWorkSpace()
        {
            string sql = @"select csdl,msl,ssdl from Chapter7.Definitions";
            XmlReader csdlReader = null;
            XmlReader mslReader = null;
            XmlReader ssdlReader = null;

            using (var cn = new SqlConnection(connString))
            {
                using (var cmd = new SqlCommand(sql, cn))
                {
                    cn.Open();
                    var reader = cmd.ExecuteReader();
                    if (reader.Read())
                    {
                        csdlReader = reader.GetSqlXml(0).CreateReader();
                        mslReader = reader.GetSqlXml(1).CreateReader();
                        ssdlReader = reader.GetSqlXml(2).CreateReader();
                    }
                }
            }

            var workspace = new MetadataWorkspace();
            var edmCollection = new EdmItemCollection(new XmlReader[]
                                                   { csdlReader });
            var ssdlCollection = new StoreItemCollection(new XmlReader[]
                                                   { ssdlReader });
            var mappingCollection = new StorageMappingItemCollection(
                edmCollection, ssdlCollection, new XmlReader[] { mslReader });

            workspace.RegisterItemCollection(edmCollection);
            workspace.RegisterItemCollection(ssdlCollection);
            workspace.RegisterItemCollection(mappingCollection);
            return workspace;
        }
    }
}
Following is the output of the code in Listing 7-2:
Customers
---------
Jill Nickels
Robert Cole
How It Works
The first part of the code in Listing 7-2 should be very familiar to you by now. We use Entity Framework to create a new context, create a few entities, and call SaveChanges()to persist the entities to the database. To retrieve the entities, we iterate through the collection and display each on the console. The only difference in this part is the call to ContextFactory.CreateContext().Normally, we would just use the new operator to get a new instance of our EFRecipesEntities context.
We’ve created the ContextFactory to create our context from the model metadata stored, not in the .edmx file, but in a table in a database. We do this in the CreateContext() method. The CreateContext() method creates a new EntityConnection based on two things: a workspace that we create with the CreateWorkSpace()method and a SQL connection string. The real work happens in how we create the workspace in the CreateWorkSpace() method.
The CreateWorkSpace() method opens a connection to the database where our metadata is stored. We construct a SQL statement that reads the one row from the Definitions table (refer to Figure 7-2) that holds our definitions for the conceptual layer, storage layer, and mapping layer. We read these definitions with XmlReaders. With these definitions, we create an instance of a MetadataWorkspace. A MetadataWorkspace is an in-memory representation of a model. Typically, this workspace is created by the default plumbing in Entity Framework from your .edmx file. In this recipe, we create this workspace from the definitions in a database. There are other ways to create this workspace including using embedded resources and an implementation with Code First.
The code in Listing 7-2 uses POCOs for our Customer entity. We cover POCO extensively in Chapter 8, but here we use POCO to simplify the code. With POCO, we don’t use the classes generated by Entity Framework. Instead, we use our own classes that have no particular dependence on Entity Framework. In Listing 7-2, we created our own definition of the Customer entity in the Customer class. We also created our own object context: EFRecipesEntities. Our context, of course, does have a dependence on Entity Framework because it derives from ObjectContext.
Problem
You want to know the various options for deploying a model.
Solution
When you add a new ADO.NET Entity Data Model to your project, Entity Framework sets the Build Action property for the .edmx file to Entity Deploy. Additionally, the Metadata Artifact Processing property of the model is set to Embed in Output Assembly. When you build your project, the Entity Deploy action extracts three sections from the .edmx file into three separate files. The CSDL section is extracted into the Model.csdl file. The MSL section is extracted into the Model.msl file. The SSDL section is extracted into the Model.ssdl file. With the Embed in Output Assembly, these three files get embedded into the assembly as resources.
Changing the Metadata Artifact Processing property to Copy to Output Directory causes the three Model.* files to be copied to the same directory as the resulting assembly. The files are not embedded as a resource.
How It Works
The .edmx file contains all three model layers: conceptual, mapping, and storage. The file also contains additional data used by the designer to manage the design surface. At runtime, Entity Framework uses each of the layers separately. The .edmx file is just a convenient container for the design time user experience. The deployment of a model depends on model layers either embedded in the assembly, stored in files, or, as we saw in Recipe 7-2, retrieved from another source and used to complete a MetadataWorkspace.
If your Metadata Artifact Processing property is set to Embed in Output Assembly, you will notice that the connection string in your App.config or web.config file includes a metadata tag, which looks something like the following:
metadata=res://*/Recipe3.csdl|res://*/Recipe3.ssdl|res://*/Recipe3.msl;
This notation indicates a search path for each of the model layers embedded in the assembly. If you change the Metadata Artifact Processing property to Copy to Output Directory, you will see the connection string change to something like this:
metadata=.Recipe3.csdl|.Recipe3.ssdl|.Recipe3.msl;
This notation indicates a file path to each of the model layers.
When embedding the model layers as resources in an assembly, you are not restricted by the connection string syntax to referencing only the executing assembly. Table 7-1 illustrates some of the possible constructions you can use to reference the embedded model layers in other assemblies.
Table 7-1. Connection String Syntax for Loading Model Layers
| Syntax | Meaning |
|---|---|
| res://myassembly/file.ssdl | Loads the SSDL from myassembly |
| res://myassembly/ | Loads the SSDL, CSDL, and MSL from myassembly |
| res://*/file.ssdl | Loads the SSDL from all assemblies in the AppDomain |
| res://*/ | Loads the SSDL, CSDL, and MSL from all assemblies |
7-4. Using the Pluralization Service
Problem
You want to use Entity Framework’s Pluralization Service when you import a table from a database.
Solution
Suppose that you have a database with the tables shown in Figure 7-3.

Figure 7-3. Employees and Tasks tables in our database
Notice that the tables in Figure 7-3 take the plural form. This is common in many databases. Some DBAs believe that all table names should be plural; other DBAs believe just the opposite. Of course, there are a few that don’t seem to follow any particular view and mix things up. Depending on your perspective, you may want to use the singular form of the table names for your model’s entities. Entity Framework provides a Pluralization Service that can automatically generate the singular form of a table name to use as the corresponding entity name.
To use the Pluralization Service when importing your tables, check the Pluralize or singularize generated object names box in the last step of the Entity Data Model Wizard (see Figure 7-4). By default, this box is checked.
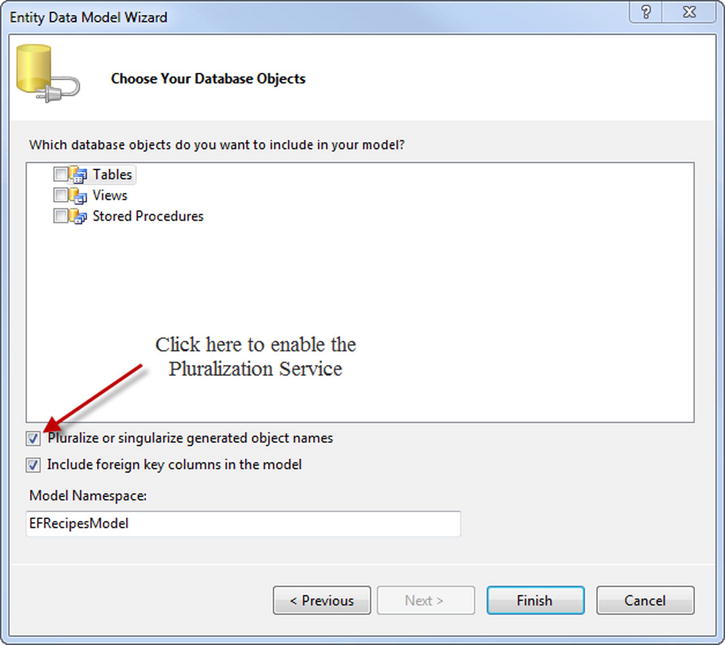
Figure 7-4. Enabling the Pluralization Service
Figure 7-5 shows a model created when we import the table in Figure 7-3 without the Pluralization Service enabled. Notice that entity names are taken directly from the table names and retain the plural form. Figure 7-6 shows the same tables imported with the Pluralization Service enabled. These entities use the singular forms of the table names.

Figure 7-5. The model created from the tables in Figure 7-3 without the Pluralization Service

Figure 7-6. The model created from the tables in Figure 7-3 with the Pluralization Service
How It Works
Most developers prefer the entity names in the model in Figure 7-6. (Look at the names in boldface at the top of each entity.) Not only are the entity names singular, but the Employee navigation property in the Task entity also makes more sense than the Employees navigation property in the Tasks entity in Figure 7-5. In both cases, this navigation property is an EntityReference, not a collection. The plural form in Figure 7-5 seems somewhat confusing.
If our table names were singular to start with, the Pluralization Service would correctly pluralize the collection-based navigation properties and pluralize the underlying entity set names. This takes cares of the other half of the DBA community that uses singular names for tables.
You can set the default on/off state of the Pluralization Service for new entities in your model by changing the Pluralize New Objects property When you add new entities to your model, this setting will change the default on/off state for the Pluralization Service.
You can use the Pluralization Service outside of the context of Entity Framework. This service is available in the System.Data.Entity.Design namespace To add a reference to the System.Data.Entity.Design.dll, you will need to change your project’s Target framework from the default .NET Framework 4 Client Profile to the more expansive .NET Framework 4. This setting is changed in the properties of the project. The code in Listing 7-3 demonstrates using the Pluralization Service to pluralize and singularize the words “Person” and “People.”
Listing 7-3. Using the Pluralization Service
var service = PluralizationService.CreateService(new CultureInfo("en-US"));
string person = "Person";
string people = "People";
Console.WriteLine("The plural of {0} is {1}", person,
                   service.Pluralize(person));
Console.WriteLine("The singular of {0} is {1}", people,
                   service.Singularize(people));
Following is the output of the code in Listing 7-3:
The plural of Person is People
The singular of People is Person
7-5. Retrieving Entities from the Change Tracker
Problem
You want to create an extension method that retrieves entities from the change tracker in order to perform some operation before the data is saved.
Solution
Suppose that you have a model like the one shown in Figure 7-7.
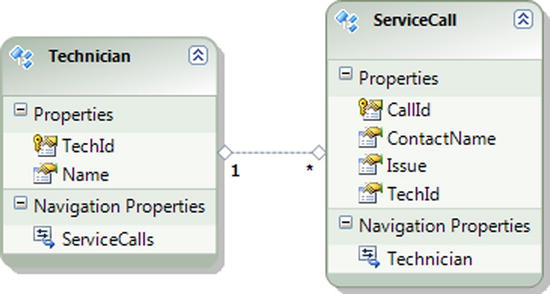
Figure 7-7. Our model with technicians and their service calls
In this model, each technician has service calls that include the contact name and issue for the call. You want to create an extension method that retrieves all entities in the model that are in the Added, Modified, or Unchanged state. To do this, follow the pattern in Listing 7-4.
Listing 7-4. Creating an Extension Method That Retrieves All of the Entities in the Added, Modified, or Unchanged State
class Program
{
    static void Main(string[] args)
    {
        RunExample();
    }

    static void RunExample()
    {
        using (var context = new EF6RecipesContext())
        {
            var tech1 = new Technician { Name = "Julie Kerns" };
            var tech2 = new Technician { Name = "Robert Allison" };
            context.ServiceCalls.Add(new ServiceCall {
                  ContactName = "Robin Rosen",
                  Issue = "Can't get satellite signal.",
                  Technician = tech1 });
            context.ServiceCalls.Add(new ServiceCall {
                  ContactName = "Phillip Marlowe",
                  Issue = "Channel not available",
                  Technician = tech2 });

            // now get the entities we've added
            foreach (var tech in
                     context.ChangeTracker.GetEntities<Technician>())
            {
                Console.WriteLine("Technician: {0}", tech.Name);
                foreach (var call in tech.ServiceCalls)
                {
                    Console.WriteLine("	Service Call: Contact {0} about {1}",
                                       call.ContactName, call.Issue);
                }
            }
        }
    }
}

public static class ChangeTrackerExtensions
{
    public static IEnumerable<T> GetEntities<T>(this DbChangeTracker tracker)
    {
        var entities = tracker
                 .Entries<T>()
                 .Where(entry => entry.State != EntityState.Detached && entry.Entity != null)
                 .Select(entry => entry.Entity)();
        return entities;
    }
}
Following is the output of the code in Listing 7-4:
Technician: Julie Kerns
        Service Call: Contact Robin Rosen about Can't get satellite signal.
Technician: Robert Allison
        Service Call: Contact Phillip Marlowe about Channel not available
How It Works
In Listing 7-4, we implemented the GetEntities<T>() extension method to retrieve all of the entities in the object context that are in the Added, Modified, or Unchanged state. Because this may be a common activity in your application, it makes sense to implement this just once in an extension method. In the implementation of the GetEntities<T>() method, we use LINQ-to-Entities to filter the set of entries returned by the Entries<T>() method. The method returns all entries that are not in the Detached state. From these, we filter out relationships and null entries. From the remaining entries, we select only those of the given type.
There are some important scenarios in which you might want to implement a method like GetEntities<T>(). For example, in the SavingChanges event, you may want to validate entities that are about to be inserted, modified, or deleted.
7-6. Generating a Model from the Command Line
Problem
You want to generate a model from the command line.
Solution
To generate a model for a given database from the command line, use the edmgen.exe program. To access the Visual Studio Command Prompt click Visual Studio 2012 Command Prompt under Microsoft Visual Studio 2012 from the Start menu.
The Microsoft documentation for the edmgen command provides a complete list of the command line options. The edmgen command supports a lot of useful command line options The following command, for example, will generate a model from all of the tables in the given Test database:
edmgen /mode:FullGeneration /project:Test /provider:"System.Data.SqlClient" /c:"server=localhost;integrated security=true;database=Test;"
Other /mode options are available. One that can be particularly useful in a continuous integration build process is /mode:ValidateArtifacts. With this option, one or more of the generated layers are validated. You need to use one or both of the /inssdl or /incsdl options. If you are validating the mapping layer, all three layers must be specified.
You can use one of the /out options to specify the name of the generated file for specific model layers. For example, using /outcsdl:MyProject.csdl will create the conceptual layer definitions in a file named MyProject.csdl. There are similar options for the other layers.
How It Works
The edmgen command provides a convenient way to automate some of the build processes, and it is a useful tool for pregenerating query views and generating separate files for the model layers. One restriction of edmgen is that it does not provide a way to generate a model based on a subset of the tables in a database.
Using the edmgen command to pregenerate views can be tremendously helpful for application performance. Before a query can be executed, Entity Framework must build a set of views that it uses to access and query the database. Without using the edmgen utility, view generation takes place on the first Entity Framework call. If the data model is relatively small this initialization at first call may pose minimal risk; however, if the data model is large or particularly complex, then such a performance hit might not be acceptable. In a case such as the latter it may make sense to pregenerate query views using the edmgen command-line utility.
7-7. Working with Dependent Entities in an Identifying Relationship
Problem
You want to insert, update, and delete a dependent entity in an identifying relationship.
Solution
Suppose that you have a model like the one shown in Figure 7-8. The LineItem’s entity key is a composite key comprised of InvoiceNumber and ItemNumber. InvoiceNumber is also a foreign key to the Invoice entity.

Figure 7-8. Invoice and LineItem in an identifying relationship because of the composite entity key in the LineItem entity
When one of the properties of an entity key is both the primary key and the foreign key, the entity is said to be participating in an identifying relationship. In our model, LineItem’s entity key, its identity, is also a foreign key to the Invoice entity. The LineItem entity is referred to as the dependent entity, while Invoice is the principal entity.
There is a subtle difference in how Entity Framework handles the deletion of dependent entities in an identifying relationship. Because the dependent entity cannot exist without participating in the relationship, simply removing the dependent entity from the principal’s collection will result in Entity Framework marking the dependent entity for deletion. Additionally, deleting the principal entity will also mark the dependent for deletion. This is reminiscent of the cascading deletes common in database systems. Of course, Entity Framework allows you to delete the dependent entity explicitly. The code in Listing 7-5 demonstrates all three of these scenarios.
Listing 7-5. Deleting the Dependent Entity
static void Main(string[] args)
{
    RunExample();
}

static void RunExample()
{
    using (var context = new EF6RecipesContext())
    {

        var invoice1 = new Invoice { BilledTo = "Julie Kerns",
                          InvoiceDate = DateTime.Parse("9/19/2013") };
        var invoice2 = new Invoice { BilledTo = "Jim Stevens",
                          InvoiceDate = DateTime.Parse("9/21/2013") };
        var invoice3 = new Invoice { BilledTo = "Juanita James",
                          InvoiceDate = DateTime.Parse("9/23/2013") };
        context.LineItems.Add(new LineItem { Cost = 99.29M,
                                     Invoice = invoice1 });
        context.LineItems.Add(new LineItem { Cost = 29.95M,
                                     Invoice = invoice1 });
        context.LineItems.Add(new LineItem { Cost = 109.95M,
                                     Invoice = invoice2 });
        context.LineItems.Add(new LineItem { Cost = 49.95M,
                                     Invoice = invoice3 });
        context.SaveChanges();

        // display the line items
        Console.WriteLine("Original set of line items...");
        DisplayLineItems();

        // remove a line item from invoice1's collection
        var item = invoice1.LineItems.ToList().First();
        invoice1.LineItems.Remove(item);
        context.SaveChanges();
        Console.WriteLine("
After removing a line item from an invoice...");
        DisplayLineItems();

        // remove invoice2
        context.Invoices.Remove(invoice2);
        context.SaveChanges();
        Console.WriteLine("
After removing an invoice...");
        DisplayLineItems();

        // remove a single line item
        context.LineItems.Remove(invoice1.LineItems.First());
        context.SaveChanges();
        Console.WriteLine("
After removing a line item...");
        DisplayLineItems();

        // update a single line item
        var item2 = invoice3.LineItems.ToList().First();
        item2.Cost = 39.95M;
        context.SaveChanges();
        Console.WriteLine("
After updating a line item from an invoice...");
        DisplayLineItems();
    }
}

static void DisplayLineItems()
{
    bool found = false;
    using (var context = new EF6RecipesContext())
    {
        foreach (var lineitem in context.LineItems)
        {
            Console.WriteLine("Line item: Cost {0}",
                               lineitem.Cost.ToString("C"));
            found = true;
        }
    }
    if (!found)
        Console.WriteLine("No line items found!");
}
Following is the output of the code in Listing 7-5:
Original set of line items...
Line item: Cost $99.29
Line item: Cost $29.95
Line item: Cost $109.95
Line item: Cost $49.95

After removing a line item from an invoice...
Line item: Cost $29.95
Line item: Cost $109.95
Line item: Cost $49.95

After removing an invoice...
Line item: Cost $29.95
After removing a line item...
Line item: Cost $49.95
After updating a line item...
Line item: Cost $39.95
How It Works
The code in Listing 7-5 deletes line items in three ways. First it deletes a line item from an invoice’s collection. Because a line item is dependent on the invoice for its identity, Entity Framework marks the referenced line item for deletion. Next it deletes an invoice. Entity Framework marks all of the dependent line items for deletion. Finally, the code deletes the last remaining line item directly by calling Remove() on the context’s LineItems entity set.
You can modify all of the properties of a dependent entity except for properties that participate in the identifying relationship. In our model, we can modify the Cost property in a line item, but we can’t change the Invoice navigation property.
When a principal object in an identifying relationship is saved to the database, the key that is generated at the database (for store-generated values) is written to the principal entity and to all of its dependent entities. This ensures that all are synchronized in the database context.
7-8. Inserting Entities Using a Database Context
Problem
You want to insert entities in your model to the database using a database context.
Solution
Suppose that you have a model like the one shown in Figure 7-9.
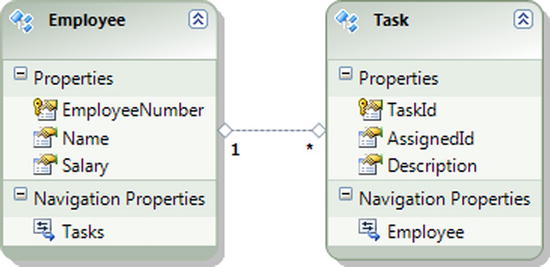
Figure 7-9. A model with employees and their tasks
The model in Figure 7-9 represents employees and their tasks. You want to insert new employees and their tasks into the underlying database. To insert an Employee, create a new instance of Employee and call the Add()method available on the Employees entity set in the context. To add a Task for an employee, create a new instance of Task and add it to the Tasks collection of the employee. You must also call Add() to add either the employee or the task to the database context. To persist the changes to the database, call the SaveChanges() method.
The code in Listing 7-6 demonstrates using Add() to add new objects to the database context and persist them to the database with SaveChanges().
Listing 7-6. Inserting New Entities into the Database
using (var context = new EF6RecipesContext())
{
    var employee1 = new Employee {EmployeeNumber = 629,
                                  Name = "Robin Rosen", Salary = 106000M };
    var employee2 = new Employee {EmployeeNumber = 147,
                                  Name = "Bill Moore", Salary = 62500M };
    var task1 = new Task { Description = "Report 3rd Qtr Accounting" };
    var task2 = new Task { Description = "Forecast 4th Qtr Sales" };
    var task3 = new Task { Description = "Prepare Sales Tax Report" };

    // use Add() on the Employees entity set
    context.Employees.Add(employee1);

    // add two new tasks to employee1's tasks
    employee1.Tasks.Add(task1);
    employee1.Tasks.Add(task2);

    // add a task to the employee and use
    // Add() to add the task to the database context
    employee2.Tasks.Add(task3);
    context.Tasks.Add(task3);

    // persist all of these to the database
    context.SaveChanges();
}

using (var context = new EF6RecipesContext())
{
    foreach (var employee in context.Employees)
    {
        Console.WriteLine("Employee: {0}'s Tasks", employee.Name);
        foreach (var task in employee.Tasks)
        {
            Console.WriteLine("	{0}", task.Description);
        }
    }
}
Following is the output of the code in Listing 7-6:
Employee: Bill Moore's Tasks
        Prepare Sales Tax Report
Employee: Robin Rosen's Tasks
        Report 3rd Qtr Accounting
        Forecast 4th Qtr Sales
How It Works
In Listing 7-6, we used the Add() method available on the Employees and Tasks entity sets to add entities to the database context.
When you add an entity to the database context, Entity Framework creates a temporary entity key for the newly added entity. Entity Framework uses this temporary key to uniquely identify the entity. This temporary key is replaced by a real key after the object is persisted to the database. If saving two entities to the database results in both entities being assigned the same entity key, Entity Framework will throw an exception. This can happen if the keys are assigned the same value by the client or by some store-generating process.
For foreign key associations, you can assign the foreign key property of an entity the value of the entity key of a related entity. Although temporary keys are involved, Entity Framework will fix up the keys and relationships correctly when the entities are saved to the database.
You can also use the Attach() method to add an entity to a database context. This is a two-step process. First call Attach() with the entity. This adds it to the database context, but the change tracker initially marks the entity as Unchanged. Calling SaveChanges() at this point will not save the entity to the database. The second step is to pass the entity into the database context’s Entry() method to obtain a DbEntityEntry instance and set its State property to the new state: EntityState.Added. Calling SaveChanges() at this point will save the new entity to the database.
7-9. Querying and Saving Asynchronously
Problem
You need to maintain the responsiveness of your application while performing queries and persisting changes to the database.
Solution
Suppose that you have Account and Transactions POCO entities, which you’ve written using the Code-First modeling strategy, like the ones shown in Listing 7-7.
Listing 7-7. Account and Transaction POCO Entities
    public class Account
    {
        public int AccountNumber { get; set; }
        public string AccountHolder { get; set; }

        public virtual ICollection<Transaction> Transactions { get; set; }
    }

    public class Transaction
    {
        public int AccountNumber { get; set; }
        public int TransactionNumber { get; set; }
        public DateTime TransactionDate { get; set; }
        public decimal Amount { get; set; }
    }
The Transaction entity is clearly a dependent entity of the Account entity, so we’ll configure that relationship by creating EntityTypeConfiguration subclasses for each entity type, as shown in Listing 7-8.
Listing 7-8. Configuring the Account and Transaction Entity Types
    public class AccountTypeConfiguration : EntityTypeConfiguration<Account>
    {
        public AccountTypeConfiguration()
        {
            HasKey(a => a.AccountNumber);

            Property(a => a.AccountNumber)
                .HasDatabaseGeneratedOption(DatabaseGeneratedOption.Identity);

            HasMany(a => a.Transactions)
                .WithRequired();
        }
    }

    public class TransactionTypeConfiguration : EntityTypeConfiguration<Transaction>
    {
        public TransactionTypeConfiguration()
        {
            HasKey(t => new {t.AccountNumber, t.TransactionNumber});

            Property(t => t.TransactionNumber)
                .HasDatabaseGeneratedOption(DatabaseGeneratedOption.Identity);
        }
    }
Finally, in Listing 7-9, we set up the DbContext subclass and implement an override of the OnModelCreating method in which we add the entity configurations to the model builder’s Configurations collection.
Listing 7-9. Creating the DbContext Subclass
    public class EF6RecipesContext : DbContext
    {
        public DbSet<Account> Accounts { get; set; }
        public DbSet<Transaction> Transactions { get; set; }

        public EF6RecipesContext() : base("name=EF6CodeFirstRecipesContext")
        {

        }

        protected override void OnModelCreating(DbModelBuilder modelBuilder)
        {
            base.OnModelCreating(modelBuilder);

            modelBuilder.Configurations.Add(new AccountTypeConfiguration());
            modelBuilder.Configurations.Add(new TransactionTypeConfiguration());
        }
    }
In order to query and save asynchronously, we will use the ForEachAsync() LINQ-to-Entities method and the SaveChangesAsync() DbContext method respectively. The code in Listing 7-10 demonstrates the usage of each method.
Listing 7-10. Querying and Saving Entities Asynchronously
        static void Main(string[] args)
        {
            RunExample().Wait();
            Console.ReadKey(true);
        }

        static async Task RunExample()
        {
            using (var context = new EF6RecipesContext())
            {
                var account1 = new Account
                    {
                        AccountHolder = "Robert Dewey",
                        Transactions = new HashSet<Transaction>
                            {
                                new Transaction
                                    {
                                        TransactionDate = Convert.ToDateTime("07/05/2013"),
                                        Amount = 104.00M
                                     },
                                new Transaction
                                    {
                                        TransactionDate = Convert.ToDateTime("07/12/2013"),
                                        Amount = 104.00M
                                    },
                                new Transaction
                                    {
                                        TransactionDate = Convert.ToDateTime("07/19/2013"),
                                        Amount = 104.00M
                                    }
                            }
                    };
                var account2 = new Account
                    {
                        AccountHolder = "James Cheatham",
                        Transactions = new List<Transaction>
                            {
                                new Transaction
                                    {
                                        TransactionDate = Convert.ToDateTime("08/01/2013"),
                                        Amount = 900.00M
                                    },
                                new Transaction
                                    {
                                        TransactionDate = Convert.ToDateTime("08/02/2013"),
                                        Amount = -42.00M
                                    }
                            }
                    };
                var account3 = new Account
                    {
                        AccountHolder = "Thurston Howe",
                        Transactions = new List<Transaction>
                            {
                                new Transaction
                                    {
                                        TransactionDate = Convert.ToDateTime("08/05/2013"),
                                        Amount = 100.00M
                                    }
                            }
                     };

                context.Accounts.Add(account1);
                context.Accounts.Add(account2);
                context.Accounts.Add(account3);
                context.SaveChanges();

                // Add monthly service charges for each account.
                foreach (var account in context.Accounts)
                {
                    var transactions = new List<Transaction>
                        {
                            new Transaction
                                {
                                    TransactionDate = Convert.ToDateTime("08/09/2013"),
                                    Amount = -5.00M
                                },
                            new Transaction
                                {
                                    TransactionDate = Convert.ToDateTime("08/09/2013"),
                                    Amount = -2.00M
                                }
                        };

                    Task saveTask = SaveAccountTransactionsAsync(account.AccountNumber, transactions);

                    Console.WriteLine("Account Transactions for the account belonging to {0} (acct# {1})", account.AccountHolder, account.AccountNumber);

                    await saveTask;
                    await ShowAccountTransactionsAsync(account.AccountNumber);
                }


            }
        }

        private static async Task SaveAccountTransactionsAsync(int accountNumber, ICollection<Transaction> transactions)
        {
            using (var context = new EF6RecipesContext())
            {
                var account = new Account { AccountNumber = accountNumber };
                context.Accounts.Attach(account);
                context.Entry(account).Collection(a => a.Transactions).Load();
                foreach (var transaction in transactions.OrderBy(t => t.TransactionDate))
                {
                    account.Transactions.Add(transaction);
                }

                  await context.SaveChangesAsync();
            }
        }

        private static async Task ShowAccountTransactionsAsync(int accountNumber)
        {
            Console.WriteLine("TxNumber	Date	Amount");
            using (var context = new EF6RecipesContext())
            {
                var transactions = context.Transactions.Where(t => t.AccountNumber == accountNumber);
                await transactions.ForEachAsync(t => Console.WriteLine("{0}	{1}	{2}", t.TransactionNumber, t.TransactionDate, t.Amount));
            }
        }
How It Works
Asynchronous constructs were introduced in .NET 4.5 to reduce the complexity normally associated with writing asynchronous code. When we call SaveAccountTransactionsAsync(), we assign it to a Task object, which calls the method and then returns execution control to the caller while the asynchronous portion of the SaveAccountTransactionsAsync() method is executing. The code that calls ShowAccountTransactionsAsync() is structured in much the same way. When the awaited calls in each of these two methods return, execution returns to the line following the caller’s await statement.
It’s important to know that the async model in .NET 4.5 is single-threaded rather than multi-threaded, so the code that follows await SaveAccountTransactionsAsync() is suspended until SaveAccountTransactionsAsync() returns. It’s additionally important to know that any method that calls an async method must itself be marked with the async modifier and have Task or Task<T> as its return type.
The output of the code in Listing 7-10 is shown below.
Account Transactions for the account belonging to Robert Dewey (acct# 1)
TxNumber        Date                    Amount
1               7/5/2013 12:00:00 AM    104.00
2               7/12/2013 12:00:00 AM   104.00
3               7/19/2013 12:00:00 AM   104.00
7               8/9/2013 12:00:00 AM    -5.00
8               8/9/2013 12:00:00 AM    -2.00

Account Transactions for the account belonging to James Cheatham (acct# 2)
TxNumber        Date                    Amount
4               8/1/2013 12:00:00 AM    900.00
5               8/2/2013 12:00:00 AM    -42.00
9               8/9/2013 12:00:00 AM    -5.00
10              8/9/2013 12:00:00 AM    -2.00

Account Transactions for the account belonging to Thurston Howe (acct# 3)
TxNumber        Date                    Amount
6               8/5/2013 12:00:00 AM    100.00
11              8/9/2013 12:00:00 AM    -5.00
12              8/9/2013 12:00:00 AM    -2.00