
![]()
Customizing Entity Framework Objects
The recipes in this chapter explore some of the customizations that can be applied to objects and to the processes in Entity Framework. These recipes cover many of the “behind the scenes” things that you can do to make your code more uniform by pushing concerns about things like business rule enforcement out of the details of your application to a central, application-wide implementation.
We start off this chapter with a recipe that shows you how to have your own code executable anytime SaveChanges() is called within your application. This recipe and a few others are particularly useful if you want to enforce business rules from a single point in your application.
In other recipes, we show you how to track database connections, how to automate responses to collection changes, how to implement cascading deletes, how to assign default values, and how to work with strongly typed XML properties.
The common thread of all of these recipes is extending the objects and processes in Entity Framework to make your code more resilient, uniform, and maintainable.
12-1. Executing Code When SaveChanges( ) Is Called
Solution
Let’s say that you have a model that represents a job applicant. As part of the model, you want the file containing the applicant’s resume to be deleted when the applicant’s record is deleted. You could find every place in your application where you need to delete an applicant’s record, but you want a more consistent and unified approach.
Your model looks like the one shown in Figure 12-1.

Figure 12-1. A model for job applicant
To ensure that the applicant’s resume file is deleted when the applicant is deleted, we override the SavingChanges() method in the DbContext. In our overridden method, we need to scan the DbContext for changes that include deleting instances of the Applicant entity. Next we need to tell Entity Framework to save the changes by calling the real SaveChanges() method. Finally, for each of the deleted Applicants, we need to delete the associated resume file. The code in Listing 12-1 demonstrates this approach.
Listing 12-1. Overriding SaveChanges() to Delete the Resume File When the Applicant Is Deleted
class Program
   {
      static void Main(string[] args)
      {
         RunExample();
      }

      static void RunExample()
      {
         using (var context = new EFRecipesEntities())
         {
            var path1 = "AlexJones.txt";
            File.AppendAllText(path1, "Alex Jones
Resume
...");
            var path2 = "JanisRogers.txt";
            File.AppendAllText(path2, "Janis Rodgers
Resume
...");
            var app1 = new Applicant
            {
               Name = "Alex Jones",
               ResumePath = path1
            };
            var app2 = new Applicant
            {
               Name = "Janis Rogers",
               ResumePath = path2
            };
            context.Applicants.Add(app1);
            context.Applicants.Add(app2);
            context.SaveChanges();

            // delete Alex Jones
             context.Applicants.Remove(app1);
             context.SaveChanges();
         }
      }
   }
   public partial class EFRecipesEntities
   {
      public override int SaveChanges()
      {
         Console.WriteLine("Saving Changes...");
         var applicants = this.ChangeTracker.Entries().Where(e => e.State == System.Data.Entity.EntityState.Deleted).Select(e => e.Entity).OfType<Applicant>().ToList();

         int changes = base.SaveChanges();
         Console.WriteLine("
{0} applicants deleted",
                        applicants.Count().ToString());
         foreach (var app in applicants)
         {
            File.Delete(app.ResumePath);
            Console.WriteLine("
{0}'s resume at {1} deleted",
                           app.Name, app.ResumePath);
         }
         return changes;
      }
   }
Following is the output from the code in Listing 12-1:
Saving Changes...
0 applicants deleted
Saving Changes...

1 applicants deleted

Alex Jones's resume at AlexJones.txt deleted
How It Works
The code in Listing 12-1 starts by inserting two applicants, each with the path to a resume file that we also created. The goal here is to delete the resume file in a structured way when the instance of the Applicant entity is deleted. We do this by overriding the SaveChanges() method.
In our SaveChanges() method, first we gather up all of the instances of Applicant that have been marked for deletion. These are the ones that will be deleted from the database when we call the real SaveChanges() method. We need to get them before we call SaveChanges(), because after we call SaveChanges() these instances will be detached from the context and we will no longer be able to use this query to retrieve them. Once we have the instances that will be deleted, we call SaveChanges() to do the real work of persisting objects to the database. Once the changes have been successfully committed, we can delete the resume files.
Entity Framework does not expose insert, update, and delete events for each entity. However, much of what we would do in these events can be handled, as we have demonstrated here, by overriding the SaveChanges() method.
12-2. Validating Property Changes
Problem
You want to validate a value being assigned to a property.
Solution
Let’s say that you have a model with a User entity. The User entity has properties for the full name and user name for the user. You have a business rule that says that each user must have a UserName greater than five characters long. You want to enforce this business rule with code that sets the IsActive property to false if the UserName is set to a string less than or equal to five characters; otherwise the IsActive flag is set to true. This approach does not work in a Code-First approach. The model is shown in Figure 12-2.

Figure 12-2. The User entity in our model
To enforce our business rule, we need to implement the partial methodsOnUserNameChanging() and OnUserNameChanged().These methods are called during the property change activity and after the property has been changed. The code in Listing 12-2 demonstrates one solution.
Listing 12-2. Monitoring the Changing of the UserName Property
class Program
{
    static void Main(string[] args)
    {
        RunExample();
    }

    static void RunExample()
    {
        using (var context = new EFRecipesEntities())
        {
            var user1 = new User { FullName = "Robert Meyers",
                                   UserName = "RM" };
            var user2 = new User { FullName = "Karen Kelley",
                                   UserName = "KKelley" };
            context.Users.AddObject(user1);
            context.Users.AddObject(user2);
            context.SaveChanges();
            Console.WriteLine("Users saved to database");
        }

        using (var context = new EFRecipesEntities())
        {
            Console.WriteLine();
            Console.WriteLine("Reading users from database");
            foreach (var user in context.Users)
            {
                Console.WriteLine("{0} is {1}, UserName is {2}", user.FullName,
                        user.IsActive ? "Active" : "Inactive", user.UserName);
            }
        }
    }
}

public partial class User
{
    partial void OnUserNameChanging(string value)
    {
        if (value.Length > 5)
            Console.WriteLine("{0}'s UserName changing to {1}, OK!",
                               this.FullName, value);
        else
            Console.WriteLine("{0}'s UserName changing to {1}, Too Short!",
                               this.FullName, value);
    }

    partial void OnUserNameChanged()
    {
        this.IsActive = (this.UserName.Length > 5);
    }
}
Following is the output of the code in Listing 12-2:
Robert Meyers's UserName changing to RM, Too Short!
Karen Kelley's UserName changing to KKelley, OK!
Users saved to database

Reading users from database
Robert Meyers's UserName changing to RM, Too Short!
Robert Meyers is Inactive, UserName is RM
Karen Kelley's UserName changing to KKelley, OK!
Karen Kelley is Active, UserName is KKelley
How It Works
In the solution, we implement the partial methods OnUserNameChanging() and OnUserNameChanged() to monitor the property change activity. The OnUserNameChanging() method is called when the property value is being set. Here we have an opportunity to throw an exception or, as in our example, simply report that the UserName is being set to a value of five characters or fewer.
The OnUserNameChanged() method is called after the property has been changed. Here we simply set the IsActive property based on the length of the final UserName property value.
These partial methods are created by Entity Framework as part of the code generation process. The names of the partial methods are derived from the property names. In our case, each method name included the name of the property. These partial methods are called inside the setter for each property.
You may be wondering a bit about the output of code. Notice that the partial methods are called twice in our example. They are called when the property value is set. They are also called when the User instances are materialized from the database. This second call happens, of course, because the materialization process involves setting the property value from the persisted value in the database.
In addition to these two partial methods, Entity Framework exposes two events for monitoring property changes. These events,PropertyChanging and PropertyChanged, are raised when any property on an Entity is changed. The sender of the event is the instance of the entity, and the PropertyEventArgs parameter contains a PropertyName that holds the name of the property that is changing or that has changed. Because these events are fired for any property change on the entity, they can be useful in some scenarios, particularly if you have an entity with many properties. They are somewhat less useful in practical terms because they don’t readily expose the current and proposed values for the property.
When our UserName property value changes, the sequence is as follows:
- OnUserNameChanging() method is called.
- PropertyChanging event is raised.
- PropertyChanged event is raised.
- OnUserNameChanged() method is called.
The PropertyChanging and PropertyChanged events are not raised when a navigation property value is changed. The state of an entity changes only when a scalar or complex property changes.
12-3. Logging Database Connections
Solution
Entity Framework exposes a StateChange event on the connection for a DbContext. To create a log entry each time a connection is opened or closed, we need to handle this event.
Suppose our model looks like the one shown in Figure 12-3. In Listing 12-3, we create a few instances of a Donation and save them to the database. The code implements the override SaveChanges() method to wire in our handler for the StateChange event.

Figure 12-3. The model with the Donation entity
Listing 12-3. Code to Implement Logging of Open and Close of a Database Connection
class Program
   {
      static void Main(string[] args)
      {
         RunExample();
      }

      static void RunExample()
      {
         using (var context = new EFRecipesEntities())
         {
            context.Donations.Add(new Donation
            {
               DonorName = "Robert Byrd",
               Amount = 350M
            });
            context.Donations.Add(new Donation
            {
               DonorName = "Nancy McVoid",
               Amount = 250M
            });
            context.Donations.Add(new Donation
            {
               DonorName = "Kim Kerns",
               Amount = 750M
            });
            Console.WriteLine("About to SaveChanges()");
            context.SaveChanges();
         }

         using (var context = new EFRecipesEntities())
         {
            var list = context.Donations.Where(o => o.Amount > 300M);
            Console.WriteLine("Donations over $300");
            foreach (var donor in list)
            {
               Console.WriteLine("{0} gave {1}", donor.DonorName,
                              donor.Amount.ToString("C"));
            }
         }
         Console.WriteLine("Press any key to close...");
         Console.ReadLine();
      }
   }

   public partial class EFRecipesEntities
   {
      public override int SaveChanges()
      {
         this.Database.Connection.StateChange += (s, e) =>
         {
            var conn = (DbConnection)s;
            Console.WriteLine("{0}: Database: {1}, State: {2}, was: {3}",
               DateTime.Now.ToShortTimeString(), conn.Database,
               e.CurrentState, e.OriginalState);
         };
         return base.SaveChanges();
      }
   }
Following is the output from the code in Listing 12-3:
About to SaveChanges()
09:56 : Database: EFRecipes, State: Open, was: Closed
09:56: Database: EFRecipes, State: Closed, was: Open
Donations over $300
Robert Byrd gave $350.00
Kim Kerns gave $750.00
How It Works
To wire in the handler for the StateChange event, we implement the override SaveChanges() method.
Our event handler receives two parameters: the sender of the event and a StateChangeEventArgs. This second parameter provides access to the CurrentState of the connection and the OriginalState of the connection. We create a log entry indicating both of these states as well as the time of the event and the associated database.
If you are paying particularly close attention to the order of the log entries, you will notice that, in the second using block, the connection to the database occurs during the execution of the query in the foreach loop, and not when the query is constructed. This demonstrates the important concept that queries are executed only when explicitly required. In our case, this execution occurs during the iteration.
12-4. Recalculating a Property Value When an Entity Collection Changes
Problem
You want to recalculate a property value on the entity when its entity collection changes.
Solution
Both EntityCollection and EntityReference derive from RelatedEnd. RelatedEnd exposes an AssociationChanged event. This event is raised when the association is changed or modified. In particular, this event is raised when an element is added to, or removed from, a collection.
To recalculate a property values, we implement a handler for the AssociationChanged event.
Let’s say that you have a model with a shopping cart and items for the cart. The model is shown in Figure 12-4.

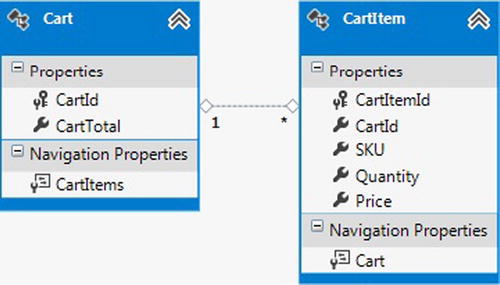
Figure 12-4b. The cart’s items
The code in Listing 12-4 demonstrates using the AssociationChanged event to recalculate the CartTotal property on the Cart entity when items are added to, or removed from, the CartItems collection.
Listing 12-4. Using the AssociationChanged Event to Keep the CartTotal in Sync with the Items in the Cart
class Program
{
    static void Main(string[] args)
    {
        RunExample();
    }

    static void RunExample()
    {
        using (var context = new EFRecipesEntities())
        {
            var item1 = new CartItem { SKU = "AMM-223", Quantity = 3,
                                       Price = 19.95M };
            var item2 = new CartItem { SKU = "CAMP-12", Quantity = 1,
                                       Price = 59.95M };
            var item3 = new CartItem { SKU = "29292", Quantity = 2,
                                       Price = 4.95M };
            var cart = new Cart { CartTotal = 0 };
            cart.CartItems.Add(item1);
            cart.CartItems.Add(item2);
            cart.CartItems.Add(item3);
            context.Carts.AddObject(cart);
            item1.Quantity = 1;
            context.SaveChanges();
        }

        using (var context = new EFRecipesEntities())
        {
            foreach (var cart in context.Carts)
            {
                Console.WriteLine("Cart Total = {0}",
                                   cart.CartTotal.ToString("C"));
                foreach (var item in cart.CartItems)
                {
                    Console.WriteLine("	SKU = {0}, Qty = {1}, Unit Price = {2}",
                                       item.SKU, item.Quantity.ToString(),
                                       item.Price.ToString("C"));
                }
            }
        }
    }
}

public partial class Cart
{
    public Cart()
    {
        this.CartItems.AssociationChanged += (s, e) =>
            {
                if (e.Action == CollectionChangeAction.Add)
                {
                    var item = e.Element as CartItem;
                    item.PropertyChanged += (ps, pe) =>
                        {
                            if (pe.PropertyName == "Quantity")
                            {
                                this.CartTotal =
                                  this.CartItems.Sum(t => t.Price * t.Quantity);
                                Console.WriteLine("Qty changed, total = {0}",
                                  this.CartTotal.ToString("C"));
                            }
                        };
                }
                this.CartTotal = this.CartItems.Sum(t => t.Price * t.Quantity);
                Console.WriteLine("New total = {0}",
                                   this.CartTotal.ToString("C"));
            };
    }
}
Following is the output from the code in Listing 12-4:
New total = $59.85
New total = $119.80
New total = $129.70
Qty changed, total = $89.80
Cart Total = $89.80
New total = $89.80
        SKU = AMM-223, Qty = 1, Unit Price = $19.95
        SKU = CAMP-12, Qty = 1, Unit Price = $59.95
        SKU = 29292, Qty = 2, Unit Price = $4.95
How It Works
To keep the CartTotal property in sync with the items in the CartItems collection, we need to wire in a handler for the AssociationChanged event on the CartItems collection. We do this in the constructor for the Cart entity.
The event handler is a little complicated because we have to consider two cases. In the first case, we’re simply adding or removing an item from the cart. Here we just recalculate the total by iterating through the collection and summing the price for each item multiplied by the quantity of the item. To get this sum, we use the Sum() method and pass in a lambda expression that multiplies the price and quantity.
In the second case, the entity collection remains the same, but one of the items has its quantity changed. This also affects the cart total and requires that we recalculate. For this case, we wire in a handler for the PropertyChanged event whenever we add an item to the cart. This second handler simply recalculates the cart total when the Quantity property changes.
To wire in this second handler, we depend on the Action property exposed in the CollectionChangedEventArgs, which is passed as the second parameter to our first event handler. The actions defined are Add, Remove, and Refresh.
Batch operations such as Load(), Clear(), and Attach() raise the CollectionChangedEvent just once regardless of how many elements are in the collection. This can be good if your collection contains lots of elements and you are interested in, as we are here, the entire collection. It can, of course, be annoying if you need to track collection changes at a more granular level.
12-5. Automatically Deleting Related Entities
Problem
When an entity is deleted, you want to delete the related entities automatically.
Solution
Suppose that you have a table structure that consists of a course, the classes for the course, and the enrollment in each class, as shown in Figure 12-5.

Figure 12-5. The Course, Class, and Enrollment tables in our database
Given these tables, you have created a model like the one shown in Figure 12-6.
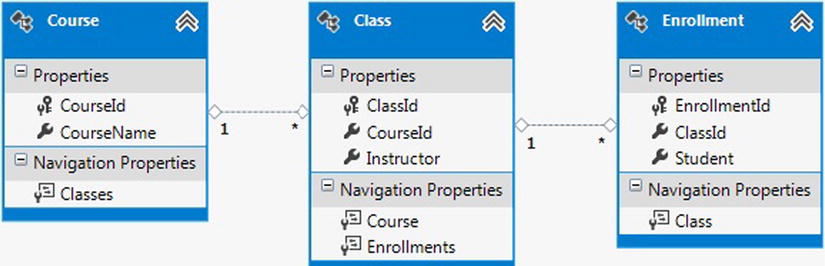
Figure 12-6. A model with the Course, Class, and Enrollment entities and their associations
When a course is deleted from the database, you want all of the classes for the course to be deleted and all of the enrollments for the classes to be deleted as well. To get this to work, we set a cascade delete rule in the database for the relationships. To set this rule, select the relationship in SQL Server Management Studio, view the properties, and select Cascade in the INSERT and UPDATE Specification’s Delete Rule.
When these tables are imported into the model, these cascade delete rules will also be imported. You can see this by selecting the one-to-many association between Course and Class and viewing the properties (see Figure 12-7).

Figure 12-7. The cascade delete rule from the database was imported into the model, and it is shown in the properties for the association
The cascade delete shown in Figure 12-7 is in the conceptual layer. There is a similar rule present in the store layer. Both of these Entity Framework rules and the underlying database cascade delete rule are necessary to keep the object context and the database in sync when objects are deleted.
The code in Listing 12-5 demonstrates the cascade delete.
Listing 12-5. Using the Underlying Cascade Delete Rules to Delete the Related Objects
class Program
    {
        static void Main(string[] args)
        {
            RunExample();
        }

        static void RunExample()
        {
            using (var context = new EFRecipesEntities())
            {
                var course1 = new Course { CourseName = "CS 301" };
                var course2 = new Course { CourseName = "Math 455" };
                var en1 = new Enrollment { Student = "James Folk" };
                var en2 = new Enrollment { Student = "Scott Shores" };
                var en3 = new Enrollment { Student = "Jill Glass" };
                var en4 = new Enrollment { Student = "Robin Rosen" };
                var class1 = new Class { Instructor = "Bill Meyers" };
                var class2 = new Class { Instructor = "Norma Hall" };
                class1.Course = course1;
                class2.Course = course2;
                class1.Enrollments.Add(en1);
                class1.Enrollments.Add(en2);
                class2.Enrollments.Add(en3);
                class2.Enrollments.Add(en4);
                context.Classes.Add(class1);
                context.Classes.Add(class2);
                context.SaveChanges();
                context.Classes.Remove(class1);
                context.SaveChanges();
            }
            using (var context = new EFRecipesEntities())
            {
                foreach (var course in context.Courses)
                {
                    Console.WriteLine("Course: {0}", course.CourseName);
                    foreach (var c in course.Classes)
                    {
                        Console.WriteLine("	Class: {0}, Instructor: {1}",
                                           c.ClassId.ToString(), c.Instructor);
                        foreach (var en in c.Enrollments)
                        {
                            Console.WriteLine("		Student: {0}", en.Student);
                        }
                    }
                }
            }

            Console.WriteLine("Press any key to close...");
            Console.ReadLine();
        }
    }
Following is the output from the code in Listing 12-5:
Course: CS 301
Course: Math 455
        Class: 8, Instructor: Norma Hall
                Student: Jill Glass
                Student: Robin Rosen
How It Works
This recipe has the cascade delete rule both in the database and in the model. In the model, the rule is represented both at the conceptual layer and in the store layer. To keep the object context in sync with the database, we defined the cascade delete in both the database and in the model.
Best Practice
Now you may be asking, “Why do we need this rule in both the model and in the database? Wouldn’t it suffice to have the rule either in the database, or in the model?”
The reason cascade delete exists at the conceptual layer is to keep the objects loaded in the object context in sync with the cascade delete changes made by the database. For example, if we have classes and enrollments for a given course loaded in the object context and we mark the course for deletion, Entity Framework would also mark the course’s classes and their enrollments for deletion. All of this happens before anything is sent to the database. At the model layer, cascade delete means to mark related entities for deletion. Ultimately, Entity Framework will issue redundant deletes for these entities.
Thus if Entity Framework will issue redundant deletes, why not just have the rules in the model and not in the database? Here’s why: For Entity Framework to mark entities for deletion, they must be loaded into the DbContext. Imagine that we have a course in the DbContext, but we haven’t loaded the related classes or the related enrollments. If we delete the course, the related classes and enrollments can’t be marked for deletion because they are not in the DbContext. No commands will be sent to the database to delete these related rows. However, if we have the cascade delete rules in place in the database, the database will take care of deleting the rows.
The best practice here is to have the cascade delete rules both in the model and in the database.
If you have added a cascade delete rule to a model, Entity Framework will not overwrite it if you update the model from the database. Unfortunately, if you don’t have a cascade delete rule in the model and you update the model from the database while the database has a newly created cascade delete rule, Entity Framework will not add a cascade delete rule in the conceptual layer. You will have to add it manually.
12-6. Deleting All Related Entities
Problem
You want to delete all of the related entities in the most generic way possible.
Solution
We want to delete all of the related entities in a generic way; that is, in a way that will work across all entities without specific reference to any particular entity type. To do this, we will create a method that uses the Relationship Manager to get all of the related ends. With these, we can use CreateSourceQuery() to retrieve the entities and delete them.
The code in Listing 12-6 demonstrates this method using the model in Figure 12-8. In this model, we have recipes with related ingredients and steps.

Figure 12-8. A model with ingredients and steps for each recipe
Listing 12-6. Demonstrating the DeleteRelatedEntities<>() Method
class Program
{
    static void Main(string[] args)
    {
        RunExample();
    }

    static void DeleteRelatedEntities<T>(T entity, EFRecipesEntities context)
                where T : EntityObject
    {
        var entities = ((IEntityWithRelationships)entity)
                        .RelationshipManager.GetAllRelatedEnds()
                        .SelectMany(e =>
                          e.CreateSourceQuery().OfType<EntityObject>()).ToList();
        foreach (var child in entities)
        {
            context.DeleteObject(child);
        }
        context.SaveChanges();
    }

    static void RunExample()
    {
        using (var context = new EFRecipesEntities())
        {
            var recipe1 = new Recipe { RecipeName = "Chicken Risotto" };
            var recipe2 = new Recipe { RecipeName = "Baked Chicken" };
            recipe1.Steps.Add(new Step { Description = "Bring Broth to a boil" });
            recipe1.Steps.Add(new Step { Description =
                                           "Slowly add Broth to Rice" });
            recipe1.Ingredients.Add(new Ingredient { Name = "1 Cup White Rice" });
            recipe1.Ingredients.Add(new Ingredient { Name =
                                           "6 Cups Chicken Broth"});
            recipe2.Steps.Add(new Step { Description =
                                           "Bake at 350 for 35 Minutes" });
            recipe2.Ingredients.Add(new Ingredient { Name = "1 lb Chicken" } );
            context.Recipes.AddObject(recipe1);
            context.Recipes.AddObject(recipe2);
            context.SaveChanges();
            Console.WriteLine("All the Related Entities...");
            ShowRecipes();
            DeleteRelatedEntities(recipe2, context);
            Console.WriteLine("
After Related Entities are Deleted...");
            ShowRecipes();
        }
    }

    static void ShowRecipes()
    {
        using (var context = new EFRecipesEntities())
        {
            foreach (var recipe in context.Recipes)
            {
                Console.WriteLine("
*** {0} ***", recipe.RecipeName);
                Console.WriteLine("Ingredients");
                foreach (var ingredient in recipe.Ingredients)
                {
                    Console.WriteLine("	{0}", ingredient.Name);
                }
                Console.WriteLine("Steps");
                foreach (var step in recipe.Steps)
                {
                    Console.WriteLine("	{0}", step.Description);
                }
            }
        }
    }
}
Following is the output of the code in Listing 12-6:
All the Related Entities...

*** Chicken Risotto ***
Ingredients
        1 Cup White Rice
        6 Cups Chicken Broth
Steps
        Bring Broth to a boil
        Slowly add Broth to Rice

*** Baked Chicken ***
Ingredients
        1 lb Chicken
Steps
        Bake at 350 for 35 Minutes

After Related Entities are Deleted...

*** Chicken Risotto ***
Ingredients
        1 Cup White Rice
        6 Cups Chicken Broth
Steps
        Bring Broth to a boil
        Slowly add Broth to Rice

*** Baked Chicken ***
Ingredients
Steps
How It Works
Of course, there is no real performance benefit using the code in Listing 12-6. What is useful about this approach is that it deletes all of the related entities without reference to any particular entity type. We could have loaded the second recipe and simply marked each of the ingredients and steps for deletion, but this code snippet would be specific to these entities in this model. The method in Listing 12-6 will work across all entity types and delete all related entities.
12-7. Assigning Default Values
Problem
You want to assign default values to the properties of an entity before it is saved to the database.
Solution
Let’s say that you have a table similar to the one in Figure 12-9, which holds information about a purchase order. The key, PurchaseOrderId, is a GUID, and there are two columns holding the date and time for the creation and last modification of the object. There is also a comments column that is no longer used and should always be set to “N/A”. Because we no longer use the comments, we don’t have this property available on the entity. You want to initialize the PurchaseOrderId column, the date fields, the Paid column, and the comments column to default values. Our model is shown in Figure 12-10.

Figure 12-9. The PurchaseOrder table with several columns that need default values

Figure 12-10. The model created from the PurchaseOrder table in Figure 12-9
We will illustrate three different ways to set default values. Default values that don’t need to be dynamically calculated can be set as the Default Value for the property in the conceptual model. Select the Paid property and view its Properties. Set the Default Value to false.
For properties that need to be calculated at runtime, we need to override the SaveChanges event. This is illustrated in Listing 12-7. In this event, if the object is in the Added state, we set the PurchaseOrderId to a new GUID and set the CreateDate and ModifiedDate fields.
To illustrate setting the default value outside of the conceptual model, we can modify the store layer to set a default value for the comments column. This approach would be useful if we didn’t want to surface some properties in the model, yet wanted to set their default values. To set the default value through the store layer, right-click the .edmx file and select Open With ![]() XML Editor. Add DefaultValue="N/A" to the <Property> tag for the Comment property in the SSDL section of the .edmx file.
XML Editor. Add DefaultValue="N/A" to the <Property> tag for the Comment property in the SSDL section of the .edmx file.
Listing 12-7. Overriding the SaveChanges Event to Set the Default Values
class Program
    {
        static void Main(string[] args)
        {
            RunExample();
        }

        static void RunExample()
        {
            using (var context = new EFRecipesEntities())
            {
                context.PurchaseOrders.Add(
                                  new PurchaseOrder { Amount = 109.98M });
                context.PurchaseOrders.Add(
                                  new PurchaseOrder { Amount = 20.99M });
                context.PurchaseOrders.Add(
                                  new PurchaseOrder { Amount = 208.89M });
                context.SaveChanges();
            }

            using (var context = new EFRecipesEntities())
            {
                Console.WriteLine("Purchase Orders");
                foreach (var po in context.PurchaseOrders)
                {
                    Console.WriteLine("Purchase Order: {0}",
                                       po.PurchaseOrderId.ToString(""));
                    Console.WriteLine("	Paid: {0}", po.Paid ? "Yes" : "No");
                    Console.WriteLine("	Amount: {0}", po.Amount.ToString("C"));
                    Console.WriteLine("	Created On: {0}",
                                       po.CreateDate.ToShortTimeString());
                    Console.WriteLine("	Modified at: {0}",
                                       po.ModifiedDate.ToShortTimeString());
                }
            }
        }
    }

    public partial class EFRecipesEntities
    {
        public override int SaveChanges()
        {
            var changeSet = this.ChangeTracker.Entries().Where(e => e.Entity is PurchaseOrder);
            if (changeSet != null)
            {
                foreach (var order in changeSet.Where(c => c.State == System.Data.Entity.
                EntityState.Added).Select(a => a.Entity as PurchaseOrder))
                {
                    order.PurchaseOrderId = Guid.NewGuid();
                    order.CreateDate = DateTime.UtcNow;
                    order.ModifiedDate = DateTime.UtcNow;
                }
                foreach (var order in changeSet.Where(c => c.State == System.Data.Entity.
                EntityState.Modified).Select(a => a.Entity as PurchaseOrder))
                {
                    order.ModifiedDate = DateTime.UtcNow;
                }
            }
            return base.SaveChanges();
        }
    }
Following is the output from the code in Listing 12-7:
Purchase Orders
Purchase Order: 1b4df3c6-6f72-4c6b-9ce2-331bad509be5
        Paid: No
        Amount: $208.89
        Created On: 3:15 PM
        Modified at: 3:15 PM
Purchase Order: c042f045-38af-4bfc-93c0-a870ffd36195
        Paid: No
        Amount: $20.99
        Created On: 3:15 PM
        Modified at: 3:15 PM
Purchase Order: 223faf4a-e128-4f5a-8dee-b9b104ed43b7
        Paid: No
        Amount: $109.98
        Created On: 3:15 PM
        Modified at: 3:15 PM
How It Works
We demonstrated three different ways to set default values. For values that are static and for which a property is exposed on the entity for the underlying column, we can use the designer’s Default Value for the property. This is ideally suited for the Paid property. By default, we want to set this to false. New purchase orders are typically unpaid.
For columns that need dynamically calculated values, such as the CreateDate, ModifiedDate, and PurchaseOrderId columns, we override the SaveChanges event that computes these values and sets the column values just before the entity is saved to the database.
Finally, for columns that are not surfaced as properties on the entity and need a static default value, we can use the Default Value attribute in the store layer property definition. In this recipe, we set the comments column default value to “N/A” in the store layer property definition.
There is another option for assigning default values. You could assign them in the constructor for the entity. The constructor is called each time a new instance of the entity is created. This includes each time the instance is materialized from the database. You have to be careful not to overwrite previous values for the properties from the database.
12-8. Retrieving the Original Value of a Property
Problem
You want to retrieve the original value of a property before the entity is saved to the database.
Solution
Let’s say that you have a model (see Figure 12-11) representing an Employee, and part of this entity includes the employee’s salary. You have a business rule that an employee’s salary cannot be increased by more than 10 percent. To enforce this rule, you want to check the new salary against the original salary for increases in excess of 10 percent. You want to do this check just before the entity is saved to the database.

Figure 12-11. An Employee entity with the employee’s salary
To verify that a salary increase does not exceed 10 percent as required by our business rule, we override the SaveChanges event. In the overridden event, we retrieve the current and original values. If the new value is more than 110 percent of the original value, we throw an exception. This exception, of course, causes the saving of the entity to fail. The code in Listing 12-8 provides the details.
Listing 12-8. Overriding the SaveChanges Event to Enforce the Business Rule
class Program
    {
        static void Main(string[] args)
        {
            RunExample();
        }

        static void RunExample()
        {
            using (var context = new EFRecipesEntities())
            {
                var emp1 = new Employee { Name = "Roger Smith", Salary = 108000M };
                var emp2 = new Employee { Name = "Jane Hall", Salary = 81500M };
                context.Employees.Add(emp1);
                context.Employees.Add(emp2);
                context.SaveChanges();
                emp1.Salary = emp1.Salary * 1.5M;
                try
                {
                    context.SaveChanges();
                }
                catch (Exception)
                {
                    Console.WriteLine("Oops, tried to increase a salary too much!");
                }
            }

            using (var context = new EFRecipesEntities())
            {
                Console.WriteLine();
                Console.WriteLine("Employees");
                foreach (var emp in context.Employees)
                {
                    Console.WriteLine("{0} makes {1}/year", emp.Name,
                                       emp.Salary.ToString("C"));
                }
            }
            Console.WriteLine("Press any key to close...");
            Console.ReadLine();
        }
    }

    public partial class EFRecipesEntities
    {
        public override int SaveChanges()
        {
            var entries = this.ChangeTracker.Entries().Where(e => e.Entity is Employee && e.State ==
            System.Data.Entity.EntityState.Modified);
            foreach (var entry in entries)
            {
                var originalSalary = Convert.ToDecimal(
                                entry.OriginalValues["Salary"]);
                var currentSalary = Convert.ToDecimal(
                                entry.CurrentValues["Salary"]);
                if (originalSalary != currentSalary)
                {
                    if (currentSalary > originalSalary * 1.1M)
                        throw new ApplicationException(
                                    "Can't increase salary more than 10%");
                }
            }
            return base.SaveChanges();
        }
    }
Following is the output of the code in Listing 12-8:
Oops, tried to increase a salary too much!

Employees
Roger Smith makes $108,000.00/year
Jane Hall makes $81,500.00/year
How It Works
In the SaveChanges overridden event, we first retrieve all of the object state entries for the Employee entity that are in the modified state. For each of them, we look for a modified “Salary” property with both original and current value, which represents the value after modification. If they differ, we check to see if they differ by more than 10 percent. If they do, then we throw an ApplicationException. Otherwise, we simply call the SaveChanges of the DbContext and let Entity Framework save the changes to the database.
12-9. Retrieving the Original Association for Independent Associations
Problem
You have an independent association. You want to retrieve the original association prior to saving the changes to the database using ObjectContext.
Solution
Suppose that you have a model representing an order and the order’s status (see Figure 12-12). The fulfillment of an order goes through three stages, as represented in the OrderStatus entity. First the order is assembled. Next the order is tested. Finally, the order is shipped. Your application has a business rule that confines all orders to this three-step process. You want to enforce this rule by throwing an exception if an order goes, for example, from assembly to shipped without first being tested. The association between Order and OrderStatus is an independent association.

Figure 12-12. A model with orders and their status
To solve this problem, we wire in a handler for the SavingChanges event. In this handler, we check to verify that the order status changes follow the prescribed sequence. The code in Listing 12-9 provides the details.
Listing 12-9. Enforcing the Sequence of Fulfillment Steps for an Order
class Program
{
    static void Main(string[] args)
    {
        RunExample();
    }

    static void RunExample()
    {
        using (var context = new EFRecipesEntities())
        {
            // static order status
            var assemble = new OrderStatus { OrderStatusId = 1,
                                             Status = "Assemble" };
            var test = new OrderStatus { OrderStatusId = 2,
                                         Status = "Test" };
            var ship = new OrderStatus { OrderStatusId = 3,
                                         Status = "Ship" };
            context.OrderStatus.AddObject(assemble);
            context.OrderStatus.AddObject(test);
            context.OrderStatus.AddObject(ship);

            var order = new Order { Description = "HAL 9000 Supercomputer",
                                    OrderStatus = assemble };
            context.Orders.AddObject(order);
            context.SaveChanges();

            order.OrderStatus = ship;
            try
            {
                context.SaveChanges();
            }
            catch (Exception)
            {
                Console.WriteLine("Oops...better test first.");
            }
            order.OrderStatus = test;
            context.SaveChanges();
            order.OrderStatus = ship;
            context.SaveChanges();
        }

        using (var context = new EFRecipesEntities())
        {
            foreach (var order in context.Orders)
            {
                Console.WriteLine("Order {0} [{1}], status = {2}",
                                    order.OrderId.ToString(),
                                    order.Description,
                                    order.OrderStatus.Status);
            }
        }
    }
}

public partial class EFRecipesEntities
{
    partial void OnContextCreated()
    {
        this.SavingChanges += new EventHandler(EFRecipesEntities_SavingChanges);
    }

    void EFRecipesEntities_SavingChanges(object sender, EventArgs e)
    {
        // all the tracked orders
        var orders = this.ObjectStateManager.GetObjectStateEntries(
                        EntityState.Modified | EntityState.Unchanged)
                        .Where(entry => entry.Entity is Order)
                        .Select(entry => entry.Entity as Order);

        foreach (var order in orders)
        {
            var deletedEntry = this.ObjectStateManager
                     .GetObjectStateEntries(EntityState.Deleted)
                     .Where(entry => entry.IsRelationship &&
                             entry.EntitySet.Name == order
                                .OrderStatusReference
                                .RelationshipSet.Name).First();
            if (deletedEntry != null)
            {
                EntityKey deletedKey = null;
                if ((EntityKey)deletedEntry.OriginalValues[0] == order.EntityKey)
                {
                    deletedKey = deletedEntry.OriginalValues[1] as EntityKey;
                }
                else if ((EntityKey)deletedEntry.OriginalValues[1] ==
                          order.EntityKey)
                {
                    deletedKey = deletedEntry.OriginalValues[0] as EntityKey;
                }
                if (deletedKey != null)
                {
                    var oldStatus = this.GetObjectByKey(deletedKey)
                                        as OrderStatus;

                    // better be going to the next status
                    if (oldStatus.OrderStatusId + 1 !=
                        order.OrderStatus.OrderStatusId)
                        throw new ApplicationException(
                          "Can't transition to that order status!");
                }
            }
        }
    }
}
Following is the output of the code in Listing 12-9:
Oops...better test first.
Order 2 [HAL 9000 Supercomputer], status = Ship
How It Works
We wired in a handler for the SavingChanges event. In this handler, we picked out the previous order status and the new (current) order status and verified that the new status ID is one greater than the previous ID. Of course, the code in Listing 12-9 doesn’t look quite that simple. Here’s how to find both the original order status and the new one.
For independent associations, in the object state manager there is an entry for the order, the order status, and a relationship entry with one end pointing to the order and the other end pointing to the order status. The relationship entry is identified by IsRelationship set to true.
First we get all of the orders tracked in the object context. To do this, we use the object state manager to get all of the entries that are either modified or unchanged. We use a Where clause to filter this down to just entities of type Order.
For each order, we get all object state entries that are deleted. Then we use a Where clause to pick out just the relationship entries (IsRelationship is true) in the OrderStatus relationship set. Because there should be at most one of these for any order, we pick the first. We look for the deleted relationships because when a relationship is changed, the original one is marked deleted and the new one is created. Because we’re interested in the previous relationship, we look for a deleted relationship between the order and the order status.
Once we have the deleted relationship, we need to look at the original values for the entry to find both the order end and the order status end. Be careful not to reference the current values here. Because the relationship is deleted, referencing the current values will cause an exception. As we don’t know which end of the relationship is the order and which end is the order status, we test both.
With the original order status entity in hand, we simply check whether the original OrderStatusId is one less than the new OrderStatusId. We created the OrderStatus objects so that their IDs would increment by one just to make the code a little easier.
12-10. Retrieving XML
Solution
Let’s say that you have an XML column in a table in your database. When you import this table into a model, Entity Framework interprets the data type as a string rather than XML (see Figure 12-13). The current version of Entity Framework does not expose XML data types from the database. You want to work with this property as if it were an XML data type.
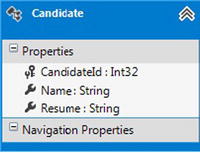
Figure 12-13. A model with a Candidate entity. The Resume property is of type string in the model but of type XML in the database
The Resume property of the Candidate entity is of type string in the model, but it is an XML type in the database. To manipulate the property as if it were of type XML, we’ll make the property private and expose a CandidateResume property as XML.
Select the Resume property and view its properties. Change the setter and getter to private. Next, we need to expose a new property that will surface the resume as XML. The code in Listing 12-10 provides the details.
With the CandidateResume property, we can manipulate the Resume natively by using the XML API. In Listing 12-10, we create a strongly-typed resume using XElement class and assign it to the CandidateResume property, which assigns the original string Resume property inside the setter. After saving the Candidate entity to the database, we later update the Resume element inside the CandidateResume and update the changes made to the database.
Listing 12-10. Using the CandidateResume Property to Expose the Resume as XML
class Program
    {
        static void Main(string[] args)
        {
            RunExample();
        }

        static void RunExample()
        {
            using (var context = new EFRecipesEntities())
            {
                var resume = new XElement("Person",
                    new XElement("Name", "Robin St.James"),
                    new XElement("Phone", "817 867-5201"),
                    new XElement("FirstOffice", "Dog Catcher"),
                    new XElement("SecondOffice", "Mayor"),
                    new XElement("ThirdOffice", "State Senator"));
                var can = new Candidate
                {
                    Name = "Robin St.James",
                    CandidateResume = resume
                };
                context.Candidates.Add(can);
                context.SaveChanges();
                can.CandidateResume.SetElementValue("Phone", "817 555-5555");
                context.SaveChanges();
            }

            using (var context = new EFRecipesEntities())
            {
                foreach (var can in context.Candidates)
                {
                    Console.WriteLine("{0}", can.Name);
                    Console.WriteLine("Phone: {0}",
                            can.CandidateResume.Element("Phone").Value);
                    Console.WriteLine("First Political Office: {0}",
                            can.CandidateResume.Element("FirstOffice").Value);
                    Console.WriteLine("Second Political Office: {0}",
                            can.CandidateResume.Element("SecondOffice").Value);
                    Console.WriteLine("Third Political Office: {0}",
                            can.CandidateResume.Element("ThirdOffice").Value);
                }
            }
            Console.WriteLine("Press any key to close...");
            Console.ReadLine();
        }
    }

    public partial class Candidate
    {
        private XElement candidateResume = null;

        public XElement CandidateResume
        {
            get
            {
                if (candidateResume == null)
                {
                    candidateResume = XElement.Parse(this.Resume);
                    candidateResume.Changed += (s, e) =>
                    {
                        this.Resume = candidateResume.ToString();
                    };
                }
                return candidateResume;
            }
            set
            {
                candidateResume = value;
                candidateResume.Changed += (s, e) =>
                {
                    this.Resume = candidateResume.ToString();
                };
                this.Resume = value.ToString();
            }
        }
    }
Following is the output of the code in Listing 12-10:
Robin St.James
Phone: 817 555-5555
First Political Office: Dog Catcher
Second Political Office: Mayor
Third Political Office: State Senator
How It Works
The current release of Entity Framework does not support the XML data type. Given the importance of XML, it is likely that some future version will provide full support. In this recipe, we created a new property, CandidateResume, which exposes the candidate’s resume as XML.
The code in Listing 12-10 demonstrates using the CandidateResume property in place of the Resume property. For both the getter and setter, we wired in a handler for the Changed event on the XML. This handler keeps the Resume property in sync with the CandidateResume property. Entity Framework will look at the Resume property when it comes time to persist an instance of the Candidate entity. Only changes to the Resume property will be saved. We need to reflect changes in the CandidateResume property to the Resume property for the database to stay in sync (via Entity Framework).
12-11. Applying Server-Generated Values to Properties
Problem
You have several columns in a table whose values are generated by the database. You want to have Entity Framework set the corresponding entity properties after inserts and updates.
Solution
Suppose that you have a table like the one in Figure 12-14.

Figure 12-14. The ParkingTicket table with the TicketId, CreateDate, PaidDate, and TimeStamp columns generated by the database
Also, let’s say that you have created a trigger, like the one in Listing 12-11, so that the PaidDate column is populated when the Paid column is set to true. You’ve also set the TicketId to be an Identity column and CreateDate to default to the current date. With the trigger in Listing 12-11 and the automatically generated values, only the Amount and Paid columns are required for an insert.
Listing 12-11. A Trigger That Sets the PaidDate Column When the Paid Bit is Set to true.
CREATE TRIGGER UpdateParkingTicket
ON ParkingTicket
FOR UPDATE
AS
UPDATE ParkingTicket
  SET PaidDate = GETDATE()
  FROM ParkingTicket
   JOIN Inserted i ON
                        ParkingTicket.TicketId = i.TicketId
  WHERE i.Paid = 1
After an insert or an update, you want Entity Framework to populate the entity with the values generated by the database. To create the model that supports this, do the following:
- Right-click the project, and select Add
 New Item. Add a new ADO.NET Entity Data Model. Import the ParkingTicket table. The resulting model should look like the one shown in Figure 12-15.

Figure 12-15. The model with the ParkingTicket entity
- Right-click on each of the scalar properties in the ParkingTicket entity. View the properties of each. Notice that the StoreGeneratedPattern property is set to Identity for the TicketId. For TimeStamp, the StoreGeneratedPattern property is set to Computed. The StoreGeneratedPattern property for CreateDate and PaidDate is not set. Change both the values to Computed.
Listing 12-12. Code to Check if the Database-Generated Values Are Populated Back to the Properties on Inserts and Updates
class Program
    {
        static void Main(string[] args)
        {
            RunExample();
        }

        static void RunExample()
        {
            using (var context = new EFRecipesEntities())
            {
                context.ParkingTickets.Add(new ParkingTicket { Amount = 132.0M, Paid = false });
                context.ParkingTickets.Add(new ParkingTicket { Amount = 255.0M, Paid = false });
                context.SaveChanges();
            }

            using (var context = new EFRecipesEntities())
            {
                foreach (var ticket in context.ParkingTickets)
                {
                    Console.WriteLine("Ticket: {0}", ticket.TicketId);
                    Console.WriteLine("Date: {0}", ticket.CreateDate.ToShortDateString());
                    Console.WriteLine("Amount: {0}", ticket.Amount.ToString("C"));
                    Console.WriteLine("Paid: {0}",
                                ticket.PaidDate.HasValue ?
                                ticket.PaidDate.Value.ToShortDateString() : "Not Paid");
                    Console.WriteLine();
                    ticket.Paid = true; // just paid ticket!
                }

                // save all those Paid flags
                context.SaveChanges();
                foreach (var ticket in context.ParkingTickets)
                {
                    Console.WriteLine("Ticket: {0}", ticket.TicketId);
                    Console.WriteLine("Date: {0}", ticket.CreateDate.ToShortDateString());
                    Console.WriteLine("Amount: {0}", ticket.Amount.ToString("C"));
                    Console.WriteLine("Paid: {0}",
                                ticket.PaidDate.HasValue ?
                                ticket.PaidDate.Value.ToShortDateString() : "Not Paid");
                    Console.WriteLine();
                }
            }
            Console.WriteLine("Press any key to close...");
            Console.ReadLine();
        }
    }
Following is the output of the code in Listing 12-12:
Ticket: 5
Date: 7/3/2013
Amount: $132.00
Paid: Not Paid

Ticket: 6
Date: 7/3/2013
Amount: $255.00
Paid: Not Paid

Ticket: 5
Date: 7/3/2013
Amount: $132.00
Paid: 3/24/2010

Ticket: 6
Date: 7/3/2013
Amount: $255.00
Paid: 3/24/2010
How It Works
When you set a property’s StoreGeneratedPattern to Identity or Computed, Entity Framework knows that the database will generate the value. Entity Framework will retrieve these columns from the database with a subsequent select statement.
When the StoreGeneratePattern is set to Identity, Entity Framework retrieves the database-generated value just once at the time of insert. When the StoreGeneratedPattern is set to Computed, Entity Framework will refresh the value on each insert and update. In this example, the PaidDate column was set by the trigger (because we set Paid to true) on update and Entity Framework acquired this value after the update.
12-12. Validating Entities on Saving Changes
Solution
Suppose that you have a model like the one shown in Figure 12-16.

Figure 12-16. A model for customers and their orders
There are certain business rules around customers and their orders. You want to make sure that these rules are checked before an order is saved to the database. Let’s say that you have the following rules:
- The order date on an order must be after the current date.
- The ship date on an order must be after the order date.
- An order cannot be shipped unless it is in an “Approved” status.
- If an order amount is over $5,000, there is no shipping charge.
- An order that has shipped cannot be deleted.
To check if changes to an entity violates any of these rules, we’ll define an IValidatable interface that has just one method: Validate(). Any of our entity types can implement this interface. For this example, we’ll show the implementation for the SalesOrder entity. We’ll handle the SavingChanges event and call Validate() on all entities that implement IValidator. This will allow us to intercept and validate entities before they are saved to the database. The code in Listing 12-13 provides the details.
Listing 12-13. Validating SaleOrder Entities in the SavingeChanges Event
class Program
{
    static void Main(string[] args)
    {
        RunExample();
    }

    static void RunExample()
    {
        // bad order date
        using (var context = new EFRecipesEntities())
        {
            var customer = new Customer { Name = "Phil Marlowe" };
            var order = new SalesOrder { OrderDate = DateTime.Parse("3/12/18"),
                                         Amount = 19.95M, Status = "Approved",
                                         ShippingCharge = 3.95M,
                                         Customer = customer };
            context.Customers.AddObject(customer);
            try
            {
                context.SaveChanges();
            }
            catch (Exception ex)
            {
                Console.WriteLine(ex.Message);
            }
        }

        // order shipped before it was ordered
        using (var context = new EFRecipesEntities())
        {
            var customer = new Customer { Name = "Phil Marlowe" };
            var order = new SalesOrder { OrderDate = DateTime.Parse("3/12/10"),
                                         Amount = 19.95M, Status = "Approved",
                                         ShippingCharge = 3.95M,
                                         Customer = customer };
            context.Customers.AddObject(customer);
            context.SaveChanges();
            try
            {
                order.Shipped = true;
                order.ShippedDate = DateTime.Parse("3/10/10");
                context.SaveChanges();
            }
            catch (Exception ex)
            {
                Console.WriteLine(ex.Message);
            }
        }

        // order shipped, but not approved
        using (var context = new EFRecipesEntities())
        {
            var customer = new Customer { Name = "Phil Marlowe" };
            var order = new SalesOrder { OrderDate = DateTime.Parse("3/12/10"),
                                         Amount = 19.95M, Status = "Pending",
                                         ShippingCharge = 3.95M,
                                         Customer = customer };
            context.Customers.AddObject(customer);
            context.SaveChanges();
            try
            {
                order.Shipped = true;
                order.ShippedDate = DateTime.Parse("3/13/10");
                context.SaveChanges();
            }
            catch (Exception ex)
            {
                Console.WriteLine(ex.Message);
            }
        }

        // order over $5,000 and shipping not free
        using (var context = new EFRecipesEntities())
        {
            var customer = new Customer { Name = "Phil Marlowe" };
            var order = new SalesOrder { OrderDate = DateTime.Parse("3/12/10"),
                                         Amount = 6200M, Status = "Approved",
                                         ShippingCharge = 59.95M,
                                         Customer = customer };
            context.Customers.AddObject(customer);
            context.SaveChanges();
            try
            {
                order.Shipped = true;
                order.ShippedDate = DateTime.Parse("3/13/10");
                context.SaveChanges();
            }
            catch (Exception ex)
            {
                Console.WriteLine(ex.Message);
            }
        }

        // order deleted after it was shipped
        using (var context = new EFRecipesEntities())
        {
            var customer = new Customer { Name = "Phil Marlowe" };
            var order = new SalesOrder { OrderDate = DateTime.Parse("3/12/10"),
                                         Amount = 19.95M, Status = "Approved",
                                         ShippingCharge = 3.95M,
                                         Customer = customer };
            context.Customers.AddObject(customer);
            context.SaveChanges();
            order.Shipped = true;
            order.ShippedDate = DateTime.Parse("3/13/10");
            context.SaveChanges();
            try
            {
                context.DeleteObject(order);
                context.SaveChanges();
            }
            catch (Exception ex)
            {
                Console.WriteLine(ex.Message);
            }
        }
    }
}

public partial class EFRecipesEntities
{
    partial void OnContextCreated()
    {
        this.SavingChanges +=new EventHandler(EFRecipesEntities_SavingChanges);
    }

    private void EFRecipesEntities_SavingChanges(object sender, EventArgs e)
    {
        var entries = this.ObjectStateManager
                       .GetObjectStateEntries(EntityState.Added |
                                              EntityState.Modified |
                                              EntityState.Deleted)
                       .Where(entry => entry.Entity is IValidator)
                       .Select(entry => entry).ToList();
        foreach (var entry in entries)
        {
            var entity = entry.Entity as IValidator;
            entity.Validate(entry);
        }
    }
}

public interface IValidator
{
    void Validate(ObjectStateEntry entry);
}

public partial class SalesOrder : IValidator
{
    public void Validate(ObjectStateEntry entry)
    {
        if (entry.State == EntityState.Added)
        {
            if (this.OrderDate > DateTime.Now)
                throw new ApplicationException(
                  "OrderDate cannot be after the current date");
        }
        else if (entry.State == EntityState.Modified)
        {
            if (this.ShippedDate < this.OrderDate)
            {
                throw new ApplicationException(
                  "ShippedDate cannot be before OrderDate");
            }
            if (this.Shipped.Value && this.Status != "Approved")
            {
                throw new ApplicationException(
                  "Order cannot be shipped unless it is Approved");
            }
            if (this.Amount > 5000M && this.ShippingCharge != 0)
            {
                throw new ApplicationException(
                  "Orders over $5000 ship for free");
            }
        }
        else if (entry.State == EntityState.Deleted)
        {
            if (this.Shipped.Value)
                throw new ApplicationException(
                  "Shipped orders cannot be deleted");
        }
    }
}
Following is the output of the code in Listing 12-13:
OrderDate cannot be after the current date
ShippedDate cannot be before OrderDate
Order cannot be shipped unless it is Approved
Orders over $5000 ship for free
Shipped orders cannot be deleted
How It Works
When you call SaveChanges(), Entity Framework raises the SavingChanges event before it saves the object changes to the database. We implemented the partial method OnContextCreated() so that we can wire in a handler for this event. When SavingChanges is raised, we handle the event by calling the Validate() method on every entity that implements the IValidator interface. We’ve shown an implementation of this interface that supports our business rules. If you have business rules for other entity types in your model, you could implement the IValidator interface for them.
Best Practice
Business rules in many applications almost always change over time. Industry or government regulation changes, continuous process improvement programs, evolving fraud prevention, and many other factors influence the introduction of new business rules as well as changes to existing rules. It’s a best practice to organize your code base so that the concerns around business rule validation and enforcement are more easily maintained. Often, this means keeping all of this code in a separate assembly or in a separate folder in the project. Defining and implementing interfaces, such as the IValidator interface in this recipe, help to ensure that business rules validation is uniformly applied.