
![]()
Beyond the Basics with Modeling and Inheritance
By now you have a solid understanding of basic modeling techniques in Entity Framework. In this chapter, you will find recipes that will help you address many common, and often complex, modeling problems. The recipes in this chapter specifically address problems that you are likely to face in modeling existing, real-world databases.
We start this chapter by working with many-to-many relationships. This type of relationship is very common in many modeling scenarios in both existing databases and new projects. Next we’ll look at self-referencing relationships and explore various strategies for retrieving nested object graphs. We round out this chapter with several recipes involving more advanced modeling of inheritance and entity conditions.
6-1. Retrieving the Link Table in a Many-to-Many Association
Problem
You want to retrieve the keys in the link table that connect two entities in a many-to-many association.
Solution
Let’s say that you have a model with a many-to-many association between Event and Organizer entities, as is shown in Figure 6-1.
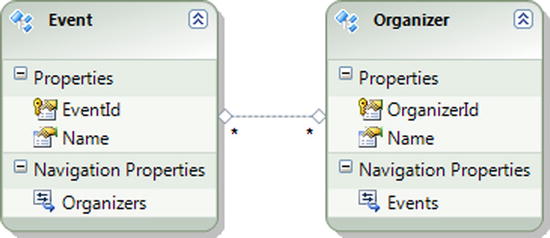
Figure 6-1. Many-to-many association between Event and Organizer entities
As we illustrated in several recipes in Chapter 2, a many-to-many relationship is represented in a database using an intermediate table called a link table. The link table holds the foreign keys on each side of the relationship (see Figure 6-2). When a link table with no additional columns and the related tables are imported into Entity Framework, the Entity Data Model Wizard creates a many-to-many association between the related tables. The link table is not represented as an entity; however, it is used internally for the many-to-many association.

Figure 6-2. A database diagram showing the EventOrganizer link table holding the foreign keys to the related Event and Organizer tables
To retrieve the entity keys EventId and OrganizerId, we can use either a nested from clause or the SelectMany()method. Listing 6-1 shows both approaches.
Listing 6-1. Retrieving a Link Table Using Both a Nested from Clause and the SelectMany() Method
using (var context = new EF6RecipesContext())
{
    var org = new Organizer { Name = "Community Charity" };
    var evt = new Event { Name = "Fundraiser" };
    org.Events.Add(evt);
    context.Organizers.Add(org);
    org = new Organizer { Name = "Boy Scouts" };
    evt = new Event { Name = "Eagle Scout Dinner" };
    org.Events.Add(evt);
    context.Organizers.Add(org);
    context.SaveChanges();
}

using (var context = new EF6RecipesContext())
{
    var evsorg1 = from ev in context.Events
                 from organizer in ev.Organizers
                 select new { ev.EventId, organizer.OrganizerId };
    Console.WriteLine("Using nested from clauses...");
    foreach (var pair in evsorg1)
    {
        Console.WriteLine("EventId {0}, OrganizerId {1}",
                           pair.EventId,
                           pair.OrganizerId);
    }

    var evsorg2 = context.Events
                         .SelectMany(e => e.Organizers,
                            (ev, org) => new { ev.EventId, org.OrganizerId });
    Console.WriteLine("
Using SelectMany()");
    foreach (var pair in evsorg2)
    {
        Console.WriteLine("EventId {0}, OrganizerId {1}",
                           pair.EventId, pair.OrganizerId);
    }
}
The output of the code in Listing 6-1 should be similar to the following:
Using nested from clauses...
EventId 31, OrganizerId 87
EventId 32, OrganizerId 88

Using SelectMany()
EventId 31, OrganizerId 87
EventId 32, OrganizerId 88
How It Works
A link table is a common way of representing a many-to-many relationship between two tables in a database. Because it serves no purpose other than defining the relationship between two tables, Entity Framework represents a link table as a many-to-many association, not as a separate entity.
The many-to-many association between Event and Organizer allows easy navigation from an Event entity to the associated organizers and from an Organizer entity to all of the associated events. However, you may want to retrieve just the keys in the link table. You may want to do this because the keys are themselves meaningful or you want to use these keys for operations on these or other entities. The problem here is that the link table is not represented as an entity, so querying it directly is not an option. In Listing 6-1, we show a couple of ways to get just the underlying keys without materializing the entities on each side of the association.
The first approach in Listing 6-1 uses nested from clauses to retrieve the organizers for each event. Using the Organizers’ navigation property on the instances of the Event entity leverages the underlying link table to enumerate all of the organizers for each of the events. We reshape the results to the pairs of corresponding keys for the entities. Finally, we iterate through the results, printing the pair of keys to the console.
In the second approach, we use the SelectMany() method to project the organizers for each event into the pairs of keys for the events and organizers. As with the nested from clauses, this approach uses the underlying link table through the Organizers’ navigation property. We iterate through the results in the same way as with the first approach.
6-2. Exposing a Link Table as an Entity
Problem
You want to expose a link table as an entity instead of a many-to-many association.
Solution
Let’s say that your database has a many-to-many relationship between workers and tasks, and it looks something like the one in the database diagram shown in Figure 6-3.

Figure 6-3. A many-to-many relationship between workers and tasks
The WorkerTask link table contains nothing more than the foreign keys supporting the many-to-many relationship.
To convert the association to an entity representing the WorkerTask link table, follow these steps.
- Create a WorkerTask POCO entity class, as shown in Listing 6-2.
- Replace the Tasks property of the Worker POCO entity with a WorkerTasks property of type ICollection<WorkerTask>.
- Replace the Workers property of the Task POCO entity with a WorkerTasks property of type ICollection<WorkerTask>.
- Add an auto-property of type DbSet<WorkerTask> to your DbContext subclass.
The final model should look like the one shown in Listing 6-2.
Listing 6-2. The Final Data Model Including WorkerTask
[Table("Worker", Schema="Chapter6")]
public class Worker
{
    [Key]
    [DatabaseGenerated(DatabaseGeneratedOption.Identity)]
    public int WorkerId { get; set; }
    public string Name { get; set; }

    [ForeignKey("WorkerId")]
    public virtual ICollection<WorkerTask> WorkerTasks { get; set; }
}

[Table("Task", Schema = "Chapter6")]
public class Task
{
    [Key]
    [DatabaseGenerated(DatabaseGeneratedOption.Identity)]
    public int TaskId { get; set; }
    public string Title { get; set; }

    [ForeignKey("TaskId")]
    public virtual ICollection<WorkerTask> WorkerTasks { get; set; }
}

[Table("WorkerTask", Schema = "Chapter6")]
public class WorkerTask
{
    [Key]
    [Column(Order = 1)]
    public int WorkerId { get; set; }

    [Key]
    [Column(Order = 2)]
    public int TaskId { get; set; }

    [ForeignKey("WorkerId")]
    public virtual Worker Worker { get; set; }

    [ForeignKey("TaskId")]
    public virtual Task Task { get; set; }
}
How It Works
During the application development lifecycle, developers often find the need to add payload to the many-to-many associations that started life payload-free. In this recipe, we show how to surface the many-to-many association as a separate entity so that additional scalar properties (for example, payload) can be added.
Many developers choose to assume that all many-to-many relationships will ultimately hold a payload, and they create a synthetic key for the link table rather than the traditional composite key formed by combining the foreign keys.
The downside of our new model is that we do not have a simple way to navigate the many-to-many association. We have two one-to-many associations that require an additional hop through the linking entity. The code in Listing 6-3 demonstrates this additional bit of work on both the insert side and the query side.
Listing 6-3. Inserting into and Retrieving Task and Worker Entities
using (var context = new EF6RecipesContext())
{
    var worker = new Worker { Name = "Jim" };
    var task = new Task { Title = "Fold Envelopes" };
    var workertask = new WorkerTask { Task = task, Worker = worker };
    context.WorkerTasks.Add(workertask);
    task = new Task { Title = "Mail Letters" };
    workertask = new WorkerTask { Task = task, Worker = worker };
    context.WorkerTasks.Add(workertask);
    worker = new Worker { Name = "Sara" };
    task = new Task { Title = "Buy Envelopes" };
    workertask = new WorkerTask { Task = task, Worker = worker };
    context.WorkerTasks.Add(workertask);
    context.SaveChanges();
}

using (var context = new EF6RecipesContext())
{
    Console.WriteLine("Workers and Their Tasks");
    Console.WriteLine("=======================");
    foreach (var worker in context.Workers)
    {
        Console.WriteLine("
{0}'s tasks:", worker.Name);
        foreach (var wt in worker.WorkerTasks)
        {
            Console.WriteLine("	{0}", wt.Task.Title);
        }
    }
}
The code in Listing 6-3 produces the following output:
Workers and Their Tasks
=======================

Jim's tasks:
        Fold Envelopes
        Mail Letters

Sara's tasks:
        Buy Envelopes
6-3. Modeling a Many-to-Many, Self-Referencing Relationship
Problem
You have a table with a many-to-many relationship with itself, and you want to model this table and relationship.
Solution
Let’s say that you have a table that has relationship to itself using a link table, as shown in Figure 6-4.
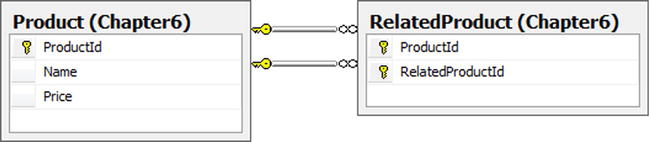
Figure 6-4. A table with a many-to-many relationship to itself
To create a model, do the following:
- Create a new class in your project that inherits from DbContext.
- Add a Product POCO entity class to your project using the code in Listing 6-4.
Listing 6-4. Creating the Product POCO Entity Class
[Table("Product", Schema = "Chapter6")]
public class Product
{
    public Product()
    {
        RelatedProducts = new HashSet<Product>();
        OtherRelatedProducts = new HashSet<Product>();
    }

    [Key]
    [DatabaseGenerated(DatabaseGeneratedOption.Identity)]
    public int ProductId { get; set; }
    public string Name { get; set; }
    public decimal Price { get; set; }

    // Products related to this product
    public virtual ICollection<Product> RelatedProducts { get; set; }

    // Products to which this product is related
    public virtual ICollection<Product> OtherRelatedProducts { get; set; }
} - Add an auto-property of type DbSet<Product> to your DbContext subclass.
- Override the OnModelCreating method of DbContext in your subclass to create the many-to-many self-referencing relationship mapping, as shown in Listing 6-5.
Listing 6-5. Overriding OnModelCreating in the DbContext Subclass to Create the Many-to-Many Self-Referencing Mapping
protected override void OnModelCreating(DbModelBuilder modelBuilder)
{
    base.OnModelCreating(modelBuilder);

    modelBuilder.Entity<Product>()
                .HasMany(p => p.RelatedProducts)
                .WithMany(p => p.OtherRelatedProducts)
                .Map(m =>
                         {
                             m.MapLeftKey("ProductId");
                             m.MapRightKey("RelatedProductId");
                             m.ToTable("RelatedProduct", "Chapter6");
                         });
}
How It Works
As you can see, the Entity Framework supports a many-to-many self-referencing association with little effort. We created two navigation properties in our Product class, RelatedProducts and OtherRelatedProducts, and mapped those properties to the underlying database schema in our DbContext subclass.
The code in Listing 6-6 inserts a few related products and retrieves the related products. To retrieve all of the related products for a given product, we need to traverse both the RelatedProducts navigation property and the OtherRelatedProducts navigation property.
Tent is related to Ground Cover through the RelatedProducts navigation property because we added Ground Cover to Tent’s RelatedProducts collection. Pole is related to Tent through Tent’s OtherRelatedProducts collection because we added Tent to Pole’s RelatedProducts collection. The associations go both ways. In one direction, it’s a related product. In the other direction, it’s an OtherRelatedProduct.
Listing 6-6. Retrieving the Related Products
using (var context = new EF6RecipesContext())
{
    var product1 = new Product { Name = "Pole", Price = 12.97M };
    var product2 = new Product { Name = "Tent", Price = 199.95M };
    var product3 = new Product { Name = "Ground Cover", Price = 29.95M };
    product2.RelatedProducts.Add(product3);
    product1.RelatedProducts.Add(product2);
    context.Products.Add(product1);
    context.SaveChanges();
}
using (var context = new EF6RecipesContext())
{
    var product2 = context.Products.First(p => p.Name == "Tent");
    Console.WriteLine("Product: {0} ... {1}", product2.Name,
                       product2.Price.ToString("C"));
    Console.WriteLine("Related Products");
    foreach (var prod in product2.RelatedProducts)
    {
        Console.WriteLine("	{0} ... {1}", prod.Name, prod.Price.ToString("C"));
    }
    foreach (var prod in product2.OtherRelatedProducts)
    {
        Console.WriteLine("	{0} ... {1}", prod.Name, prod.Price.ToString("C"));
    }
}
The output of Listing 6-6 is as follows:
Product: Tent ... $199.95
Related Products
        Ground Cover ... $29.95
        Pole ... $12.97
The code in Listing 6-6 retrieves only the first level of related products. A transitive relationship is one that spans multiple levels, like a hierarchy. If we assume that the “related products” relationship is transitive, we might want to form the transitive closure. The transitive closure would be all of the related products regardless of how many hops away they may be. In an eCommerce application, product specialists could create the first level of related products. Additional levels could be derived by computing the transitive closure. The end result would allow the application to show the familiar “…you may also be interested in …” message that we often see during the checkout process.
In Listing 6-7, we use a recursive method to form the transitive closure. In traversing both the RelatedProducts and OtherRelatedProducts associations, we need to be careful not to get stuck in a cycle. If product A is related to B, and product B is related to product A, our application would get trapped in the recursion. To detect cycles, we use a Dictionary<> to help prune off paths that we have already traversed.
Listing 6-7. Forming the Transitive Closure of the “Related Products” Relationship
static void RunExample2()
{
    using (var context = new EF6RecipesContext())
    {
        var product1 = new Product { Name = "Pole", Price = 12.97M };
        var product2 = new Product { Name = "Tent", Price = 199.95M };
        var product3 = new Product { Name = "Ground Cover", Price = 29.95M };
        product2.RelatedProducts.Add(product3);
        product1.RelatedProducts.Add(product2);
        context.Products.Add(product1);
        context.SaveChanges();
    }

    using (var context = new EF6RecipesContext())
    {
        var product1 = context.Products.First(p => p.Name == "Pole");
        Dictionary<int, Product> t = new Dictionary<int, Product>();
        GetRelated(context, product1, t);
        Console.WriteLine("Products related to {0}", product1.Name);
        foreach (var key in t.Keys)
        {
            Console.WriteLine("	{0}", t[key].Name);
        }
    }
}

static void GetRelated(DbContext context, Product p, Dictionary<int, Product> t)
        {
            context.Entry(p).Collection(ep => ep.RelatedProducts).Load();
            foreach (var relatedProduct in p.RelatedProducts)
            {
                if (!t.ContainsKey(relatedProduct.ProductId))
                {
                    t.Add(relatedProduct.ProductId, relatedProduct);
                    GetRelated(context, relatedProduct, t);
                }
            }
            context.Entry(p).Collection(ep => ep.OtherRelatedProducts).Load();
            foreach (var otherRelated in p.OtherRelatedProducts)
            {
                if (!t.ContainsKey(otherRelated.ProductId))
                {
                    t.Add(otherRelated.ProductId, otherRelated);
                    GetRelated(context, otherRelated, t);
                }
            }
}
In Listing 6-7, we use the Load() method (see the recipes in Chapter 5) to ensure that the collections of related products are loaded. Unfortunately, this means that we will end up with many additional round trips to the database. We might be tempted to load all of the rows from the Product table up front and hope that relationship span would fix up the associations. However, relationship span will not fix up entity collections, only entity references. Because our associations are many-to-many (entity collections), we cannot rely on relationship span to help out and we have to resort to using the Load() method.
Following is the output of the code in Listing 6-7. From the first block of code that inserts the relationships, we can see that a Pole is related to a Tent, and a Tent is related to Ground Cover. The transitive closure for the products related to a Pole includes a Tent, Ground Cover, and Pole. Pole is included because it is on the other side of the relationship with Tent, which is a related product.
Products related to Pole
        Tent
        Ground Cover
        Pole
6-4. Modeling a Self-Referencing Relationship Using Table per Hierarchy Inheritance
Problem
You have a table that references itself. The table represents several different but related kinds of objects in your database. You want to model this table using Table per Hierarchy inheritance.
Solution
Suppose that you have a table like the one shown in Figure 6-5, which describes some things about people. People often have a hero, perhaps the individual who inspired them the most. We can represent a person’s hero with a reference to another row in the Person table.
Each person has some role in life. Some people are firefighters. Some people are teachers. Some people are retired. Of course, there could be many other roles. Information about people can be specific to their roles. A firefighter is stationed at a firehouse. A teacher teaches at a school. A retired person often has a hobby.
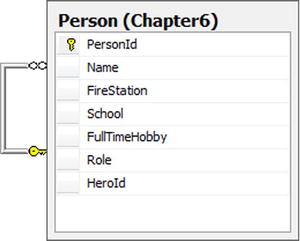
Figure 6-5. Person table containing people with different roles
For our example, the possible roles are firefighter (f), teacher (t), or retired (r). A single character in the role column indicates the role for a person.
To create a model, do the following:
- Create a new class in your project that inherits from DbContext
- Add an abstract Person POCO entity class using the code found in Listing 6-8.
Listing 6-8. Creating the Abstract Person POCO Entity Class
[Table("Person", Schema = "Chapter6")]
public abstract class Person
{
    [Key]
    [DatabaseGenerated(DatabaseGeneratedOption.Identity)]
    public int PersonId { get; protected set; }
    public string Name { get; set; }

    public virtual Person Hero { get; set; }
    public virtual ICollection<Person> Fans { get; set; }
} - Add an auto-property of type DbSet<Person> to your DbContext subclass.
- Add concrete POCO entity classes for Firefighter, Teacher, and Retired entities using the code found in Listing 6-9.
Listing 6-9. Creating Concrete POCO Entities for Firefighter, Teacher, and Retired
public class Firefighter : Person
{
    public string FireStation { get; set; }
}

public class Teacher : Person
{
    public string School { get; set; }
}

public class Retired : Person
{
    public string FullTimeHobby { get; set; }
} - Override the OnModelCreating method of DbContext in your subclass to configure the HeroId foreign key as well as the type hierarchy, as shown in Listing 6-10.
Listing 6-10. Overriding OnModelCreating in the DbContext Subclass
protected override void OnModelCreating(DbModelBuilder modelBuilder)
{
    base.OnModelCreating(modelBuilder);

    modelBuilder.Entity<Person>()
                .HasMany(p => p.Fans)
                .WithOptional(p => p.Hero)
                .Map(m => m.MapKey("HeroId"));

    modelBuilder.Entity<Person>()
                .Map<Firefighter>(m => m.Requires("Role").HasValue("f"))
                .Map<Teacher>(m => m.Requires("Role").HasValue("t"))
                .Map<Retired>(m => m.Requires("Role").HasValue("r"));
}
How It Works
The code in Listing 6-11 demonstrates inserting and retrieving Person entities from our model. We create a single instance of each of the derived types and wire in a few hero relationships. We have a teacher who is the hero of a firefighter and a retired person who is the hero of the teacher. When we set the firefighter as the hero of the retired person, we introduce just enough of a cycle so that Entity Framework generates a runtime error (a DbUpdateException) because it cannot determine the appropriate order for inserting the rows into the table. In the code, we get around this problem by calling the SaveChanges() method before wiring in any of the hero relationships. Once the rows are committed to the database, and the store-generated keys are brought back into the object graph, we are free to update the graph with the relationships. Of course, these changes must be saved with a final call to SaveChanges().
Listing 6-11. Inserting into and Retrieving from Our Model
using (var context = new EF6RecipesContext())
{
    var teacher = new Teacher { Name = "Susan Smith",
                                School = "Custer Baker Middle School" };
    var firefighter = new Firefighter { Name = "Joel Clark",
                                FireStation = "Midtown" };
    var retired = new Retired { Name = "Joan Collins",
                                FullTimeHobby = "Scapbooking" };
    context.People.Add(teacher);
    context.People.Add(firefighter);
    context.People.Add(retired);
    context.SaveChanges();
    firefighter.Hero = teacher;
    teacher.Hero = retired;
    retired.Hero = firefighter;
    context.SaveChanges();
}

using (var context = new EF6RecipesContext())
{
    foreach(var person in context.People)
    {
        if (person.Hero != null)
            Console.WriteLine("
{0}, Hero is: {1}", person.Name,
                                person.Hero.Name);
        else
            Console.WriteLine("{0}", person.Name);
        if (person is Firefighter)
            Console.WriteLine("Firefighter at station {0}",
                               ((Firefighter)person).FireStation);
        else if (person is Teacher)
            Console.WriteLine("Teacher at {0}", ((Teacher)person).School);
        else if (person is Retired)
            Console.WriteLine("Retired, hobby is {0}",
                               ((Retired)person).FullTimeHobby);
        Console.WriteLine("Fans:");
        foreach (var fan in person.Fans)
        {
            Console.WriteLine("	{0}", fan.Name);
        }
    }
}
The output from the code in Listing 6-11 is as follows:
Susan Smith, Hero is: Joan Collins
Teacher at Custer Baker Middle School
Fans:
        Joel Clark

Joel Clark, Hero is: Susan Smith
Firefighter at station Midtown
Fans:
        Joan Collins

Joan Collins, Hero is: Joel Clark
Retired, hobby is Scapbooking
Fans:
        Susan Smith
6-5. Modeling a Self-Referencing Relationship and Retrieving a Complete Hierarchy
Problem
You are using a self-referencing table to store hierarchical data. Given a record, you want to retrieve all associated records that are part of that hierarchy at any level deep.
Solution
Suppose that you have a Category table like the one in the database diagram shown in Figure 6-6.

Figure 6-6. Self-referencing Category table
To create our model, do the following:
- Create a new class in your project that inherits from DbContext.
- Add a Category POCO entity class using the code in Listing 6-12.
Listing 6-12. Creating the Category POCO Entity Class
[Table("Category", Schema = "Chapter6")]
public class Category
{
    [Key]
    [DatabaseGenerated(DatabaseGeneratedOption.Identity)]
    public int CategoryId { get; set; }
    public string Name { get; set; }

    public virtual Category ParentCategory { get; set; }
    public virtual ICollection<Category> SubCategories { get; set; }
} - Add an auto-property of type DbSet<Category> to the DbContext subclass.
- Override the OnModelCreating method of DbContext in your subclass, as shown in Listing 6-13. In the override, we will create the ParentCategory and SubCategories associations and configure the foreign key constraint.
Listing 6-13. Overriding OnModelCreating in the DbContext Subclass
protected override void OnModelCreating(DbModelBuilder modelBuilder)
{
    base.OnModelCreating(modelBuilder);

    modelBuilder.Entity<Category>()
                .HasOptional(c => c.ParentCategory)
                .WithMany(c => c.SubCategories)
                .Map(m => m.MapKey("ParentCategoryId"));
}
In our model, the Category entity has a Subcategories navigation property that we can use to get the collection of all of the immediate subcategories of the Category. However, to access them, we need to load them explicitly using either the Load()or the Include() methods. The Load() method requires an additional round trip to the database, while the Include() method provides only a predefined, limited depth.
We want to bring the entire hierarchy into the object graph as efficiently as possible. To do this, we use a Common Table Expression in a stored procedure.
To add the stored procedure to our model, do the following:
- Create a stored procedure called GetSubCategories that makes use of a Common Table Expression to return all of the subcategories for a CategoryId recursively. The stored procedure is shown in Listing 6-14.
Listing 6-14. The GetSubCategories() Stored Procedure That Returns Subcategories for a Given CategoryId
create proc chapter6.GetSubCategories
(@categoryid int)
as
begin
with cats as
                (
                select c1.*
                from chapter6.Category c1
                where CategoryId = @categoryid
                union all
                select c2.*
                from cats join  chapter6.Category c2 on cats.CategoryId = c2.ParentCategoryId
                )
                select * from cats where CategoryId != @categoryid
end - Add a method that takes an integer parameter and returns an ICollection<Category> to your DbContext subclass, as shown in Listing 6-15. Entity Framework 6 Code First does not yet support function imports in the way that the EF designer does, so in the method body we'll call our stored procedure with the SqlQuery method that's defined in the Database property of DbContext.
Listing 6-15. Implementing the GetSubCategories Method in Our DbContext Subclass
public ICollection<Category> GetSubCategories(int categoryId)
{
    return this.Database.SqlQuery<Category>("exec Chapter6.GetSubCategories @catId",
                      new SqlParameter("@catId", categoryId)).ToList();
}
We can use the GetSubCategories method that we've defined in our DbContext subclass to materialize our entire graph of categories and subcategories. The code in Listing 6-16 demonstrates the use of the GetSubCategories() method.
Listing 6-16. Retrieving the Entire Hierarchy Using the GetSubCategories() Method
using (var context = new EF6RecipesContext())
{
    var book = new Category { Name = "Books" };
    var fiction = new Category { Name = "Fiction", ParentCategory = book };
    var nonfiction = new Category { Name = "Non-Fiction", ParentCategory = book };
    var novel = new Category { Name = "Novel", ParentCategory = fiction };
    var history = new Category { Name = "History", ParentCategory = nonfiction };
    context.Categories.Add(novel);
    context.Categories.Add(history);
    context.SaveChanges();
}

using (var context = new EF6RecipesContext())
{
    var root = context.Categories.Where(o => o.Name == "Books").First();
    Console.WriteLine("Parent category is {0}, subcategories are:", root.Name);
    foreach (var sub in context.GetSubCategories(root.CategoryId))
    {
        Console.WriteLine("	{0}", sub.Name);
    }
}
The output from the code in Listing 6-16 is as follows:
Parent category is Books, subcategories are:
        Fiction
        Non-Fiction
        History
        Novel
How It Works
Entity Framework supports self-referencing associations, as we have seen in Recipe 6.2 and Recipe 6.3. In these recipes, we directly loaded the entity references and collections using the Load() method. We cautioned, however, that each Load() results in a round trip to the database to retrieve an entity or entity collection. For larger object graphs, this database traffic may consume too many resources.
In this recipe, we demonstrated a slightly different approach. Rather than explicitly using Load() to materialize each entity or entity collection, we pushed the work off to the storage layer by using a stored procedure to enumerate recursively all of the subcategories and return the collection. We used a Common Table Expression in our stored procedure to implement the recursive query. In our example, we chose to enumerate all of the subcategories. You could, of course, modify the stored procedure to enumerate elements of the hierarchy selectively.
To use our stored procedure, we added a method to our DbContext subclass that calls the stored procedure through DbContext.Database.SqlQuery<T>() and called the method within our code. We use the SqlQuery<T>() method rather than the ExecuteSqlCommand() method because our stored procedure returns a result set.
6-6. Mapping Null Conditions in Derived Entities
Problem
You have a column in a table that allows null. You want to create a model using Table per Hierarchy inheritance with one derived type representing instances in which the column has a value and another derived type representing instances in which the column is null.
Solution
Let’s say that you have a table describing experimental medical drugs. The table contains a column indicating when the drug was accepted for production. Until the drug is accepted for production, it is considered experimental. Once accepted, it is considered a medicine. We’ll start with the Drug table in the database diagram in Figure 6-7.
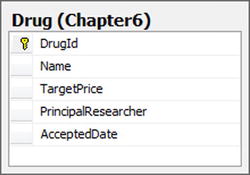
Figure 6-7. Drug table with the nullable discriminator column, AcceptedDate
To create a model using the Drug table, do the following:
- Create a class in your project that inherits from DbContext.
- Create Drug, Medicine, and Experimental POCO entity classes, as shown in Listing 6-17.
Listing 6-17. Creating the Drug, Medicine, and Experimental POCO Entity Classes
[Table("Drug", Schema = "Chapter6")]
public abstract class Drug
{
    [Key]
    [DatabaseGenerated(DatabaseGeneratedOption.Identity)]
    public int DrugId { get; set; }
    public string Name { get; set; }
}

public class Experimental : Drug
{
    public string PrincipalResearcher { get; set; }

    public void PromoteToMedicine(DateTime acceptedDate, decimal targetPrice,
                          string marketingName)
    {
        var drug = new Medicine { DrugId = this.DrugId };
        using (var context = new DrugContext())
        {
            context.Drugs.Attach(drug);
            drug.AcceptedDate = acceptedDate;
            drug.TargetPrice = targetPrice;
            drug.Name = marketingName;
            context.SaveChanges();
        }
    }

}

public class Medicine : Drug
{
    public decimal? TargetPrice { get; set; }
    public DateTime AcceptedDate { get; set; }
} - Add an auto-property of type DbSet<Drug> to your DbContext subclass.
- Override the OnModelCreating method of DbContext to configure the TPH mapping for Medicine and Experimental types, as shown in Listing 6-18.
Listing 6-18. Overriding OnModelCreating to Configure TPH Mapping
protected override void OnModelCreating(DbModelBuilder modelBuilder)
{
    base.OnModelCreating(modelBuilder);
    modelBuilder.Entity<Experimental>()
                .Map(m => m.Requires("AcceptedDate").HasValue((DateTime?)null));
    modelBuilder.Entity<Medicine>()
                .Map(m => m.Requires(d => d.AcceptedDate).HasValue());
}
How It Works
In this example, we made use of the null and is not null conditions to map a Drug without an AcceptedDate to an Experimental drug and a Drug with an AcceptedDate to a Medicine. As in many inheritance examples, we marked the base entity, Drug, as abstract because in our model we would never have an uncategorized drug.
It is interesting to note that, in the Medicine entity, we mapped the AcceptedDate discriminator column to a scalar property. In most scenarios, mapping the discriminator column to scalar property is prohibited. However, in this example, our use of the null and is not null conditions, as well as marking the AcceptedDate as not nullable, sufficiently constrains the values for property to allow the mapping.
In Listing 6-19, we insert a couple of Experimental drugs and query the results. We take the opportunity provided by the exposed AcceptedDate property to demonstrate one way to change an object from one derived type to another. In our case, we create a couple of Experimental drugs and then promote one of them to a Medicine.
Listing 6-19. Inserting and Retrieving Instances of Our Derived Types
class Program
{
    ...
    static void RunExample()
    {
        using (var context = new EF6RecipesContext())
        {
            var exDrug1 = new Experimental { Name = "Nanoxol",
                         PrincipalResearcher = "Dr. Susan James" };
            var exDrug2 = new Experimental { Name = "Percosol",
                         PrincipalResearcher = "Dr. Bill Minor" };
            context.Drugs.Add(exDrug1);
            context.Drugs.Add(exDrug2);
            context.SaveChanges();

            // Nanoxol just got approved!
            exDrug1.PromoteToMedicine(DateTime.Now, 19.99M, "Treatall");
            context.Entry(exDrug1).State = EntityState.Detached // better not use this instance any longer
        }

        using (var context = new EF6RecipesContext())
        {
            Console.WriteLine("Experimental Drugs");
            foreach (var d in context.Drugs.OfType<Experimental>())
            {
                Console.WriteLine("	{0} ({1})", d.Name, d.PrincipalResearcher);
            }

            Console.WriteLine("Medicines");
            foreach (var d in context.Drugs.OfType<Medicine>())
            {
                Console.WriteLine("	{0} Retails for {1}", d.Name,
                          d.TargetPrice.Value.ToString("C"));
            }
        }
    }
}
Following is the output of the code in Listing 6-19:
Experimental Drugs
        Percosol (Dr. Bill Minor)
Medicines
        Treatall Retails for $19.99
We change an Experimental drug to a Medicine using the PromoteToMedicine()method. In the implementation of this method, we create a new Medicine instance, attach it to a new DbContext, and initialize it with the appropriate new values. Once the new instance is attached and initialized, we use the SaveChanges()method on the DbContext to save the new instance to the database. Because the instance has the same key (DrugId) as the Experimental drug, Entity Framework generates an update statement rather than an insert statement.
We implemented the PromoteToMedicine() method inside the POCO class Experimental. This allows us seamlessly to add the method to the class, and it provides for a much cleaner implementation. That being said, in the interest of creating persistence-ignorant POCO entities that can be used in multiple DbContexts, it might make more sense to implement a slightly altered version of this method in a helper class instead.
6-7. Modeling Table per Type Inheritance Using a Nonprimary Key Column
Problem
You have one or more tables in an existing schema that have a one-to-one relationship to a common table using keys that are not primary keys in the tables. You want to model this using Table per Type inheritance.
Solution
Let’s say that your database contains the tables shown in the database diagram in Figure 6-8.
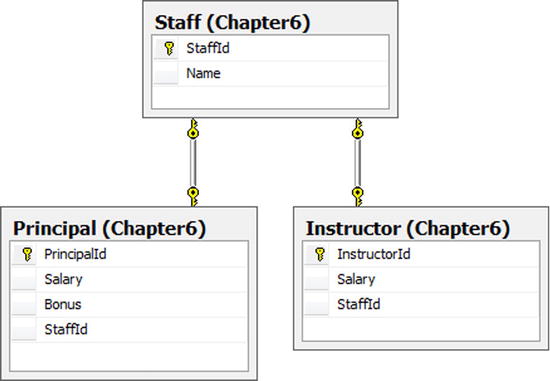
Figure 6-8. A database diagram containing Staff, Principal, and Instructor tables
In Figure 6-8, we have a Staff table containing the name of the staff member and two related tables containing information about Principals and Instructors. The important thing to notice here is that the Principal and Instructor tables have primary keys that are not the foreign keys for the Staff table. This type of relationship structure is not directly supported in Table per Type inheritance. For Table per Type, the related tables’ primary keys must also be the foreign key for the primary (base) table. Also notice that the relationship is one-to-one. This is because we have constrained the StaffId columns in the Principal and Instructor tables to be unique by creating a unique index on this column in both tables.
To model the tables and relationships in Figure 6-8 using Table per Type inheritance, do the following:
- Add a new ADO.NET Entity Data Model to your project, and import the Staff, Principal, and Instructor tables.
- Delete the associations between the Principal and the Staff entities and between the Instructor and the Staff entities.
- Right-click the Staff entity, and choose Add
 Inheritance. Select Staff as the base entity and Principal as the derived entity. Repeat this step by selecting Staff as the base entity and Instructor as the derived entity.
 - Delete the StaffId property from the Instructor and Principal entities.
- Right-click the Staff entity, and choose Properties. Set the Abstract attribute to True. This marks the Staff entity as abstract.
- Because the StaffId is not the primary key in either the Principal or the Instructor tables, we cannot use the default table mapping to map the Principal, Instructor, or Staff entities. Select each entity, view the Mapping Details window, and delete the table mapping. Repeat this for each entity.
- Create the stored procedures in Listing 6-20. We will map these procedures to the Insert, Update, and Delete actions for the Principal and Instructor entities.
Listing 6-20. Stored Procedures for the Insert, Update, and Delete Actions for the Instructor and Principal Entities
create procedure [chapter6].[InsertInstructor]
(@Name varchar(50), @Salary decimal)
as
begin
                declare @staffid int
                insert into Chapter6.Staff(Name) values (@Name)
                set @staffid = SCOPE_IDENTITY()
                insert into Chapter6.Instructor(Salary,StaffId) values (@Salary,@staffid)
                select @staffid as StaffId,SCOPE_IDENTITY() as InstructorId
end
go

create procedure [chapter6].[UpdateInstructor]
(@Name varchar(50), @Salary decimal, @StaffId int, @InstructorId int)
as
begin
                update Chapter6.Staff set Name = @Name where StaffId = @StaffId
                update Chapter6.Instructor set Salary = @Salary where InstructorId = @InstructorId
end
go

create procedure [chapter6].[DeleteInstructor]
(@StaffId int)
as
begin
                delete Chapter6.Staff where StaffId = @StaffId
                delete Chapter6.Instructor where StaffId = @StaffId
end
go

create procedure [Chapter6].[InsertPrincipal]
(@Name varchar(50),@Salary decimal,@Bonus decimal)
as
begin
                declare @staffid int
                insert into Chapter6.Staff(Name) values (@Name)
                set @staffid = SCOPE_IDENTITY()
                insert into Chapter6.Principal(Salary,Bonus,StaffId) values (@Salary,@Bonus,@staffid)
                select @staffid as StaffId, SCOPE_IDENTITY() as PrincipalId
end
go

create procedure [Chapter6].[UpdatePrincipal]
(@Name varchar(50),@Salary decimal, @Bonus decimal, @StaffId int, @PrincipalId int)
as
begin
                update Chapter6.Staff set Name = @Name where StaffId = @StaffId
                update Chapter6.Principal set Salary = @Salary, Bonus = @Bonus where PrincipalId = @PrincipalId
end
go

create procedure [Chapter6].[DeletePrincipal]
(@StaffId int)
as
begin
                delete Chapter6.Staff where StaffId = @StaffId
                delete Chapter6.Principal where StaffId = @StaffId
end - Right-click the design surface, and select Update Model from Database. Add the stored procedures that you created in step 7.
- Select the Principal entity, and view the Mapping Details window. Click the Map Entity to Functions button. This is the bottom button on the left side of the Mapping Details window. Map the Insert, Update, and Delete actions to the stored procedures. Make sure that you map the result columns StaffId and PrincipalId from the Insert action (see Figure 6-9).
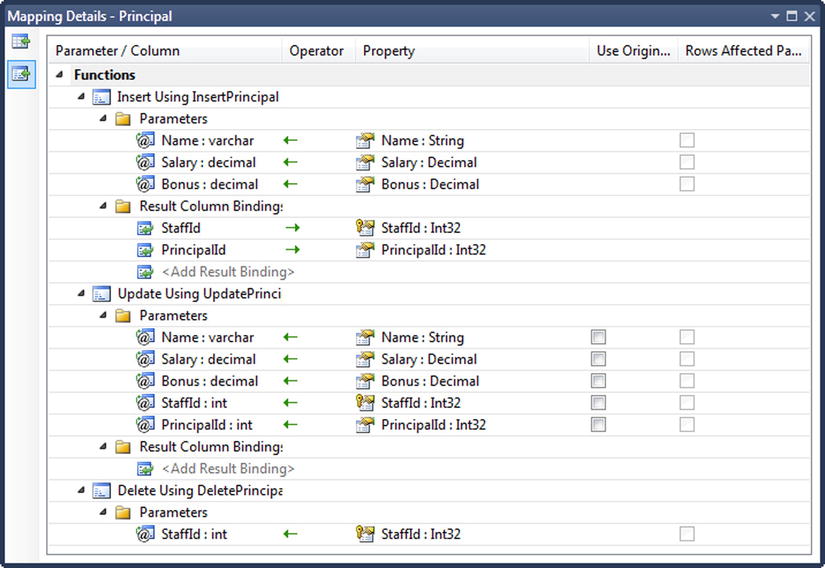
Figure 6-9. Insert, Update, and Delete actions mapped for the Principal entity
- Repeat step 9 for the Instructor entity. Be sure to map the result columns StaffId and InstructorId from the Insert action.
Right-click the .edmx file in the Solution Explorer, and select Open With ![]() XML Editor. This will close the designer and open the .edmx file in the XML editor. Scroll down to <EntityContainerMapping> tag in the mapping layer. Insert the QueryView in Listing 6-21 into the <EntitySetMapping> tag.
XML Editor. This will close the designer and open the .edmx file in the XML editor. Scroll down to <EntityContainerMapping> tag in the mapping layer. Insert the QueryView in Listing 6-21 into the <EntitySetMapping> tag.
Listing 6-21. QueryView for the Instructor and Principal Entities
<EntitySetMapping Name="Staffs">
    <QueryView>
        select value
        case
        when (i.StaffId is not null) then
        EFRecipesModel.Instructor(s.StaffId,s.Name,i.InstructorId,i.Salary)
        when (p.StaffId is not null) then
        EFRecipesModel.Principal(s.StaffId,s.Name,p.PrincipalId,p.Salary,p.Bonus)
        END
        from EFRecipesModelStoreContainer.Staff as s
        left join EFRecipesModelStoreContainer.Instructor as i
        on s.StaffId = i.StaffId
        left join EFRecipesModelStoreContainer.Principal as p
        on s.StaffId = p.StaffId
    </QueryView>
</EntitySetMapping>
How It Works
With Table per Type inheritance, Entity Framework requires that the foreign key for the base entity’s table be the primary keys in the derived entity’s table. In our example, each of the tables for the derived entities has separate primary keys.
To create a Table per Type inheritance model, we started at the conceptual level by deriving the Principal and Instructor entities from the Staff entity. Next we deleted the mappings that were created when we imported the table. We then used a QueryView expression to create the new mappings. Using QueryView pushed the responsibility for the Insert, Update, and Delete actions onto our code. To handle these actions, we used traditional stored procedures in the database.
We used QueryView to supply the mappings from our underlying tables to the scalar properties exposed by our derived entities. The key part of the QueryView is the case statement. There are two cases: either we have a Principal or we have an Instructor. We have an Instructor if the Instructor’s StaffId is not null, or we have a Principal if the Principal’s StaffId is not null. The remaining parts of the expression bring in the rows from the derived tables.
The code in Listing 6-22 inserts a couple of Principals and one Instructor into our database.
Listing 6-22. Inserting into and Retrieving from Our Model
using (var context = new EF6RecipesContext())
{
    var principal = new Principal { Name = "Robbie Smith",
                                    Bonus = 3500M, Salary = 48000M };
    var instructor = new Instructor { Name = "Joan Carlson",
                                    Salary = 39000M };
    context.Staffs.Add(principal);
    context.Staffs.Add(instructor);
    context.SaveChanges();
}

using (var context = new EF6RecipesContext())
{
    Console.WriteLine("Principals");
    Console.WriteLine("==========");
    foreach (var p in context.Staffs.OfType<Principal>())
    {
        Console.WriteLine("	{0}, Salary: {1}, Bonus: {2}",
                           p.Name, p.Salary.ToString("C"),
                           p.Bonus.ToString("C"));
    }
    Console.WriteLine("Instructors");
    Console.WriteLine("===========");
    foreach (var i in context.Staffs.OfType<Instructor>())
    {
        Console.WriteLine("	{0}, Salary: {1}", i.Name, i.Salary.ToString("C"));
    }
}
The following is the output of the code in Listing 6-22:
Principals
==========
        Robbie Smith, Salary: $48,000.00, Bonus: $3,500.00
Instructors
===========
        Joan Carlson, Salary: $39,000.00
6-8. Modeling Nested Table per Hierarchy Inheritance
Problem
You want to model a table using more than one level of Table per Hierarchy inheritance.
Solution
Suppose that we have an Employee table that contains various types of employees such as Hourly and Salaried Employee, as shown in Figure 6-10.
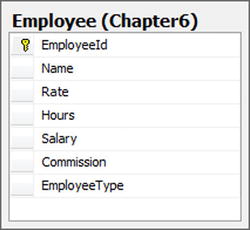
Figure 6-10. The Employee table containing various types of employees
The Employee table contains hourly employees, salaried employees, and commissioned employees, which is a subtype of salaried employees. To model this table with derived types for the hourly and salaried employees and a commissioned employee type derived from the salaried employee, do the following:
- Create a new class in your project that inherits from DbContext.
- Create POCO entity classes for Employee, HourlyEmployee, SalariedEmployee, and CommissionedEmployee, as shown in Listing 6-23.
Listing 6-23. Creating the Employee, HourlyEmployee, SalariedEmployee, and CommissionedEmployee POCO Entities
public abstract class Employee
{

    public int EmployeeId { get; set; }
    public string Name { get; set; }
}

public class SalariedEmployee : Employee
{
    public decimal? Salary { get; set; }
}

public class CommissionedEmployee : SalariedEmployee
{
    public decimal? Commission { get; set; }
}

public class HourlyEmployee : Employee
{
    public decimal? Rate { get; set; }
    public decimal? Hours { get; set; }
} - Add an auto-property of type DbSet<Employee> to your DbContext subclass.
- Override the OnModelCreating method of DbContext to configure the TPH discriminator values for each derived type, as shown in Listing 6-24.
Listing 6-24. Overriding OnModelCreating in Our DbContext Subclass to Configure TPH Discriminator Values
protected override void OnModelCreating(DbModelBuilder modelBuilder)
{
    base.OnModelCreating(modelBuilder);

    modelBuilder.Entity<Employee>()
                .HasKey(e => e.EmployeeId)
                .Property(e => e.EmployeeId)                .HasDatabaseGeneratedOption(DatabaseGeneratedOption.Identity);

    modelBuilder.Entity<Employee>()
         .Map<HourlyEmployee>(m => m.Requires("EmployeeType").HasValue("hourly"))
         .Map<SalariedEmployee>(m => m.Requires("EmployeeType").HasValue("salaried"))
         .Map<CommissionedEmployee>(m => m.Requires("EmployeeType").HasValue("commissioned"))
         .ToTable("Employee", "Chapter6");
}
How It Works
Table per Hierarchy inheritance is a flexible modeling technique. The depth and breadth of the inheritance tree can be reasonably large and is easily implemented. This approach is efficient because no additional tables and their required joins are involved.
Implementing TPH with a Code-First approach is straightforward because object-oriented inheritance is hierarchical in nature.
Listing 6-25 demonstrates inserting into and retrieving from our model.
Listing 6-25. Inserting and Retrieving Derived Entities from Employee
using (var context = new EF6RecipesContext())
{
    var hourly = new HourlyEmployee { Name = "Will Smith", Hours = 39,
                                      Rate = 7.75M };
    var salaried = new SalariedEmployee { Name = "JoAnn Woodland",
                                      Salary = 65400M };
    var commissioned = new CommissionedEmployee { Name = "Joel Clark",
                                      Salary = 32500M, Commission = 20M };
    context.Employees.Add(hourly);
    context.Employees.Add(salaried);
    context.Employees.Add(commissioned);
    context.SaveChanges();
}

using (var context = new EF6RecipesContext())
{
    Console.WriteLine("All Employees");
    Console.WriteLine("=============");
    foreach (var emp in context.Employees)
    {
        if (emp is HourlyEmployee)
            Console.WriteLine("{0} Hours = {1}, Rate = {2}/hour",
                               emp.Name,
                               ((HourlyEmployee)emp).Hours.Value.ToString(),
                               ((HourlyEmployee)emp).Rate.Value.ToString("C"));
        else if (emp is CommissionedEmployee)
            Console.WriteLine("{0} Salary = {1}, Commission = {2}%",
                        emp.Name,
                        ((CommissionedEmployee)emp).Salary.Value.ToString("C"),
                        ((CommissionedEmployee)emp).Commission.ToString());
        else if (emp is SalariedEmployee)
            Console.WriteLine("{0} Salary = {1}", emp.Name,
                        ((SalariedEmployee)emp).Salary.Value.ToString("C"));
    }
}
The output of the code in Listing 6-25 is as follows:
All Employees
=============
Will Smith Hours = 39.00, Rate = $7.75/hour
JoAnn Woodland Salary = $65,400.00
Joel Clark Salary = $32,500.00, Commission = 20.00%
6-9. Applying Conditions in Table per Type Inheritance
Problem
You want to apply conditions while using Table per Type inheritance.
Solution
Let’s say that you have the two tables depicted in Figure 6-11. The Toy table describes toys a company produces. Most toys manufactured by the company are for sale. Some toys are made just to donate to worthy charities. During the manufacturing process, a toy may be damaged. Damaged toys are refurbished, and an inspector determines the resulting quality of the refurbished toy.
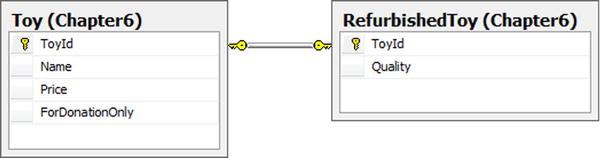
Figure 6-11. Toy and RefurbishedToy tables with a one-to-one relationship
The application that generates reports for the company has no need to access toys manufactured for donations. To create a model that filters out toys manufactured for donation while representing the Toy and RefurbishedToy tables using Table per Type inheritance, do the following:
- Add a new ADO.NET Entity Data Model to your project, and import the Order and Lookup tables.
- Delete the association between Toy and RefurbishedToy.
- Right-click the Toy entity, and select Add Inheritance. Select Toy as the base entity and RefurbishedToy as the derived entity.
- Delete the ToyId property in the RefurbishedToy entity.
- Select the RefurbishedToy entity. In the Mapping Details window, map the ToyId column to the ToyId property. This value will come from the Toy base entity.
- Delete the ForDonationOnly scalar property from the Toy entity.
- Select the Toy entity, and view the Mapping Details window. Use Add a Table or View to map this entity to the Toy table. Add a condition When ForDonationOnly = 0.
The resulting model is shown in Figure 6-12.
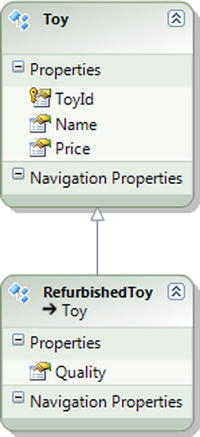
Figure 6-12. The completed model with the Toy entity and derived RefurbishedToy entity
How It Works
We limited the RefurbishedToy instances to nondonation toys by applying a condition on the base entity. This approach is useful in cases such as when we need to apply a permanent filter to an inheritance structure while using separate tables to implement some of the derived types.
The code in Listing 6-26 demonstrates inserting into and retrieving from our model.
Listing 6-26. Inserting into and Retrieving from Our Model
using (var context = new EF6RecipesContext())
{
    Context.Database.ExecuteSqlCommand(@"insert into chapter6.toy
             (Name,ForDonationOnly) values ('RagDoll',1)");
    var toy = new Toy { Name = "Fuzzy Bear", Price = 9.97M };
    var refurb = new RefurbishedToy { Name = "Derby Car", Price = 19.99M,
                                      Quality = "Ok to sell" };
    context.Toys.Add(toy);
    context.Toys.Add(refurb);
    context.SaveChanges();
}

using (var context = new EF6RecipesContext())
{
    Console.WriteLine("All Toys");
    Console.WriteLine("========");
    foreach (var toy in context.Toys)
    {
        Console.WriteLine("{0}", toy.Name);
    }
    Console.WriteLine("
Refurbished Toys");
    foreach (var toy in context.Toys.OfType<RefurbishedToy>())
    {
        Console.WriteLine("{0}, Price = {1}, Quality = {2}", toy.Name,
                           toy.Price, ((RefurbishedToy)toy).Quality);
    }
}
The following is the output from Listing 6-26:
All Toys
========
Fuzzy Bear
Derby Car

Refurbished Toys
Derby Car, Price = 19.99, Quality = Ok to sell
6-10. Creating a Filter on Multiple Criteria
Problem
You want to filter rows for an entity based on multiple criteria.
Solution
Let’s assume that we have a table that holds web orders, as shown in Figure 6-13.
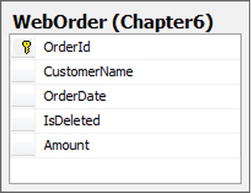
Figure 6-13. The WebOrder table containing information about a web order
Suppose that we have a business requirement, which defines instances of WebOrder as orders placed after the first day of 2012 or orders placed between 2010 and 2012 that are not deleted or orders placed before 2010 that have an order amount greater than $200. This kind of filter cannot be created using the rather limited conditions available in the Mapping Details window in the designer. One way to implement this complex filter is to use QueryView. To model this entity and implement a filter that satisfies the business requirement using QueryView, do the following:
- Add a new ADO.NET Entity Data Model to your project, and import the WebOrder table.
Create the stored procedures in Listing 6-27. In the next two steps, we’ll map these to the insert, update, and delete actions for the WebOrder entity.
Listing 6-27. Procedures Defined in the Database for the Insert, Update, and Delete Actions on the WebOrder Entity
create procedure [Chapter6].[InsertOrder]
(@CustomerName varchar(50),@OrderDate date,@IsDeleted bit,@Amount decimal)
as
begin
                insert into chapter6.WebOrder (CustomerName, OrderDate, IsDeleted, Amount)
                values (@CustomerName, @OrderDate, @IsDeleted, @Amount)
                select SCOPE_IDENTITY() as OrderId
end
go

create procedure [Chapter6].[UpdateOrder]
(@CustomerName varchar(50),@OrderDate date,@IsDeleted bit,
 @Amount decimal, @OrderId int)
as
begin
                update chapter6.WebOrder set CustomerName = @CustomerName,
         OrderDate = @OrderDate,IsDeleted = @IsDeleted,Amount = @Amount
                where OrderId = @OrderId
end
go

create procedure [Chapter6].[DeleteOrder]
(@OrderId int)
as
begin
                delete from Chapter6.WebOrder where OrderId = @OrderId
end - Right-click the design surface, and select Update Model from Database. In the Update Wizard, select the InsertOrder, UpdateOrder, and DeleteOrder stored procedures.
- Select the WebOrder entity, and select the Map Entities to Functions button in the Mapping Details window. This button is the second of two buttons on the left side of the window. Map the InsertOrder procedure to the Insert action, the UpdateOrder procedure to the Update action, and the DeleteOrder procedure to the Delete action. The property/parameter mappings should automatically line up. However, the return value from the InsertOrder procedure must be mapped to the OrderId property. This is used by Entity Framework to get the value of the identity column OrderId after an insert. Figure 6-14 shows the correct mappings.
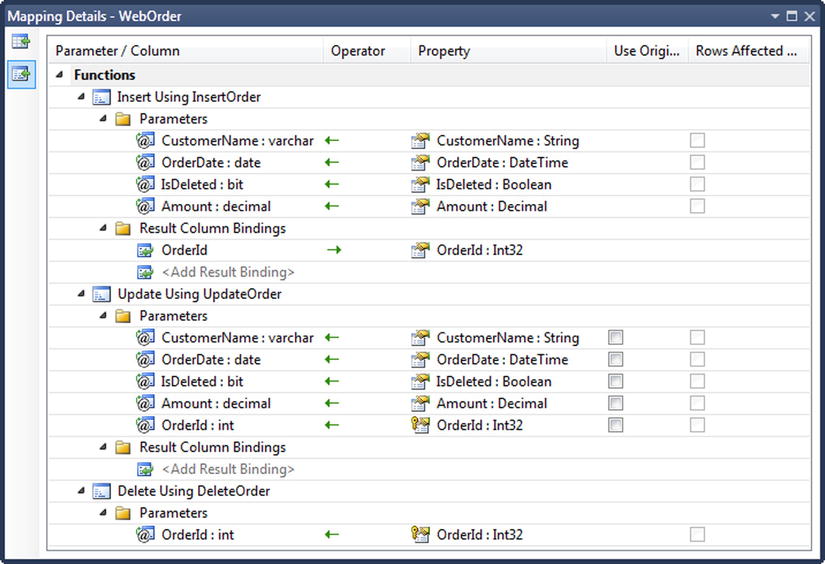
Figure 6-14. Details for the stored procedure/action mappings
- Select the table mapping (top button) in the Mapping Details window. Delete the mapping to the WebOrder table. We’ll map this using QueryView.
Right-click the .edmx file in the Solution Explorer window, and select Open With
XML Editor. In the C-S mapping layer, inside the <EntitySetMapping> tag, enter the code shown in Listing 6-28 This is the QueryView that will map our WebOrder entity.Be careful! Changes made to the C-S mapping layer will be lost if you do another Update Model from Database.
Listing 6-28. Entity Set Mapping Using QueryView for the WebOrder Table
<EntitySetMapping Name="WebOrders">
<QueryView>
select value
EFRecipesModel.WebOrder(o.OrderId,
o.CustomerName,o.OrderDate,o.IsDeleted,o.Amount)
from EFRecipesModelStoreContainer.WebOrder as o
where (o.OrderDate > datetime'2007-01-01 00:00') ||
(o.OrderDate between cast('2005-01-01' as Edm.DateTime) and
cast('2007-01-01' as Edm.DateTime) and !o.IsDeleted) ||
(o.Amount > 800 and o.OrderDate <
cast('2005-01-01' as Edm.DateTime))
</QueryView>
</EntitySetMapping>
How It Works
QueryView is a read-only mapping that can be used instead of the default mapping offered by Entity Framework. When QueryView is inside of the <EntitySetMapping> tag of the mapping layer, it maps entities defined on the store model to entities defined on the conceptual model. When QueryView is inside of the <AssociationSetMapping> tag, it maps associations defined on the store model to associations defined on the conceptual model. One common use of QueryView inside of an <AssociationSetMapping> tag is to implement inheritance based on conditions that are not supported by the default condition mapping.
QueryView is expressed in Entity SQL. QueryView can query only entities defined on the store model. Additionally, eSQL in QueryView does not support group by and group aggregates.
When entities are mapped using QueryView, Entity Framework is unaware of the precise implementation of the mapping. Because Entity Framework does not know the underlying columns and tables used to create instances of the entities, it cannot generate the appropriate store-level actions to insert, update, or delete the entities. Entity Framework does track changes to these entities once they are materialized, but it does not know how to modify them in the underlying data store.
The burden of implementing the insert, update, and delete actions falls onto the developer. These actions can be implemented directly in the .edmx file or they can be implemented as stored procedures in the underlying database. To tie the procedures to the actions, you need to create a <ModificationFunctionMapping> section. We did this in step 4 using the designer rather than directly editing the .edmx file.
If an entity mapped using QueryView has associations with other entities, those associations, along with the related entities, also need to be mapped using QueryView. Of course, this can become rather tedious. QueryView is a powerful tool, but it can rapidly become burdensome.
Some of the common use cases for using QueryView are as follows.
- To define filters that are not directly supported, such as greater than, less than, and so on
- To map inheritance that is based on conditions other than is null, not null, or equal to
- To map computed columns or return a subset of columns from a table, or to change a restriction or data type of a column, such as making it nullable, or to surface a string column as integer
- To map Table per Type Inheritance based on different primary and foreign keys
- To map the same column in the storage model to multiple types in the conceptual model
- To map multiple types to the same table
Inside the QueryView in Listing 6-28, we have an Entity SQL statement that contains three parts. The first part is the select clause which instantiates an instance of the WebOrder entity with a constructor. The constructor takes the property values in precisely the same order as they are defined on the conceptual model in Listing 6-29.
Listing 6-29. The Definition of the WebOrder Entity in the Conceptual Model
<EntityType Name="WebOrder">
  <Key>
    <PropertyRef Name="OrderId" />
  </Key>
  <Property Name="OrderId" Type="Int32" Nullable="false"
            annotation:StoreGeneratedPattern="Identity" />
  <Property Name="CustomerName" Type="String" Nullable="false"
            MaxLength="50" Unicode="false" FixedLength="false" />
  <Property Name="OrderDate" Type="DateTime" Nullable="false" />
  <Property Name="IsDeleted" Type="Boolean" Nullable="false" />
  <Property Name="Amount" Type="Decimal" Nullable="false"
            Precision="18" Scale="2" />
</EntityType>
Notice that, in the Entity SQL in Listing 6-29 we fully qualified the conceptual namespace EFRecipesModel when creating an instance of the WebOrder entity. However, in the from clause we also fully qualified the store container, EFRecipesModelStoreContainer.
The final section of the Entity SQL expression includes the where clause that, of course, is the whole reason for using a QueryView in this example. Although the where clause can be arbitrarily complex, it is subject to the restrictions for Entity SQL in QueryView as noted above.
The code in Listing 6-30 demonstrates inserting and retrieving WebOrdersin our model.
Listing 6-30. Inserting and Retrieving WebOrder Entities
using (var context = new EF6RecipesContext())
{
    var order = new WebOrder {CustomerName = "Jim Allen",
                              OrderDate = DateTime.Parse("5/3/2012"),
                              IsDeleted = false, Amount = 200};
    context.WebOrders.Add(order);
    order = new WebOrder { CustomerName = "John Stevens",
                           OrderDate = DateTime.Parse("1/1/2011"),
                           IsDeleted = false, Amount = 400 };
    context.WebOrders.Add(order);
    order = new WebOrder { CustomerName = "Russel Smith",
                           OrderDate = DateTime.Parse("1/3/2011"),
                           IsDeleted = true, Amount = 500 };
    context.WebOrders.Add(order);
    order = new WebOrder { CustomerName = "Mike Hammer",
                           OrderDate = DateTime.Parse("6/3/2013"),
                           IsDeleted = true, Amount = 1800 };
    context.WebOrders.Add(order);
    order = new WebOrder { CustomerName = "Steve Jones",
                           OrderDate = DateTime.Parse("1/1/2008"),
                           IsDeleted = true, Amount = 600 };
    context.WebOrders.Add(order);
    context.SaveChanges();
}

using (var context = new EF6RecipesContext())
{
    Console.WriteLine("Orders");
    Console.WriteLine("======");
    foreach (var order in context.WebOrders)
    {
        Console.WriteLine("
Customer: {0}", order.CustomerName);
        Console.WriteLine("OrderDate: {0}", order.OrderDate.ToShortDateString());
        Console.WriteLine("Is Deleted: {0}", order.IsDeleted.ToString());
        Console.WriteLine("Amount: {0}", order.Amount.ToString("C"));
    }
}
The output of the code in Listing 6-30 follows. Notice that only customers that meet the criteria that we defined in the Entity SQL expression inside the QueryView are displayed.
Orders...

Customer: John Stevens
Order Date: 1/1/2011
Is Deleted: False
Amount: $400.00

Customer: Jim Allen
Order Date: 5/3/2012
Is Deleted: False
Amount: $200.00

Customer: Mike Hammer
Order Date: 6/3/2013
Is Deleted: True
Amount: $1,800.00
6-11. Using Complex Conditions with Table per Hierarchy Inheritance
Problem
You want to model a table using Table per Hierarchy inheritance by applying conditions more complex than those supported directly by Entity Framework.
Solution
Suppose that we have a Member table, as depicted in Figure 6-15. The Member table describes members in our club. In our model, we want to represent adult members, senior members, and teen members as derived types using Table per Type inheritance.

Figure 6-15. The Member table describing members in our club
Entity Framework supports Table per Hierarchy inheritance based on the conditions =, is null, and is not null. Simple expressions such as <, between, and > are not supported. In our case, a member whose age is less than 20 is a teen (the minimum age in our club is 13). A member between the ages of 20 and 55 is an adult. And, as you might expect, a member over the age of 55 is a senior. To create a model for the member table and the three derived types, do the following:
- Add a new ADO.NET Entity Data Model to your project, and import the Member table.
- Right-click the Member entity, and select Properties. Set the Abstract attribute to true. This marks the Member entity as abstract.
- Create the stored procedures in Listing 6-31. We will use them to handle the Insert, Update, and Delete actions on the entities we’ll derive from the Member entity.
Listing 6-31. Stored Procedures for the Insert, Update, and Delete Actions
create procedure [chapter6].[InsertMember]
(@Name varchar(50), @Phone varchar(50), @Age int)
as
begin
                insert into Chapter6.Member (Name, Phone, Age)
                values (@Name,@Phone,@Age)
                select SCOPE_IDENTITY() as MemberId
end
go

create procedure [chapter6].[UpdateMember]
(@Name varchar(50), @Phone varchar(50), @Age int, @MemberId int)
as
begin
                update Chapter6.Member set Name=@Name, Phone=@Phone, Age=@Age
                where MemberId = @MemberId
end
go

create procedure [chapter6].[DeleteMember]
(@MemberId int)
as
begin
                delete from Chapter6.Member where MemberId = @MemberId
end - Right-click the design surface, and select Update Model from Database. Select the stored procedures that you created in step 3.
- Right-click the design surface, and select Add Entity. Name the new entity Teen, and set the base type to Member. Repeat this step, creating the derived entities Adult and Senior.
- Select the Member entity, and view the Mapping Details window. Click Maps to Member, and select <Delete>. This deletes the mappings to the Member table.
- Select the Teen entity, and view the Mapping Details window. Click the Map Entity to Functions button. This is the bottom button on the left of the Mapping Details window. Map the stored procedures to the corresponding Insert, Update, and Delete actions. The parameter/property mappings should automatically populate. Make sure that you set the Result Column Bindings to map the return value to the MemberId property for the Insert action. This identity column is generated on the database side (see Figure 6-16).

Figure 6-16. Mapping the Insert, Update, and Delete actions for the Teen entity
- Repeat step 7 for the Adult and Senior entities.
Right-click the .edmx file in the Solution Explorer window, and select Open With
XML Editor. This will open the .edmx file in the XML editor. - In the C-S mapping section, inside the <EntityContainerMapping> tag, enter the QueryView code shown in Listing 6-32.
Listing 6-32. QueryView for Mapping the Member Table to the Derived Types Teen, Adult, and Senior
<EntitySetMapping Name="Members">
<QueryView>
select value
case
when m.Age < 20 then
EFRecipesModel.Teen(m.MemberId,m.Name,m.Phone,m.Age)
when m.Age between 20 and 55 then
EFRecipesModel.Adult(m.MemberId,m.Name,m.Phone,m.Age)
when m.Age > 55 then
EFRecipesModel.Senior(m.MemberId,m.Name,m.Phone,m.Age)
end
from EFRecipesModelStoreContainer.Member as m
</QueryView>
</EntitySetMapping>The resulting model should look like the one in Figure 6-17.
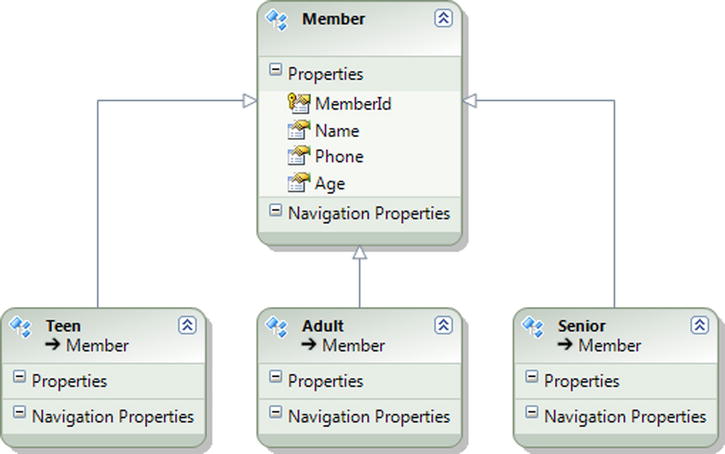
Figure 6-17. The resulting model with Member and the three derived types: Senior, Adult, and Teen
How It Works
Entity Framework supports only a limited set of conditions when modeling Table per Hierarchy inheritance. In this recipe, we extended the conditions using QueryView to define our own mappings between the underlying Member table and the derived types: Senior, Adult, and Teen. This is shown in Listing 6-32.
Unfortunately, QueryView comes at a price. Because we have defined the mappings ourselves, we also take on the responsibility for implementing the Insert, Update, and Delete actions for the derived types. This is not too difficult in our case.
In Listing 6-31, we defined the procedures to handle the Insert, Delete, and Update actions. We need to create only one set because these actions target the underlying Member table. In this recipe, we implemented them as stored procedures in the underlying database. We could have implemented in the .edmx file.
Using the designer, we mapped the procedures to the Insert, Update, and Delete actions for each of the derived types. This completes the extra work we need to do when we use QueryView.
The code in Listing 6-33 demonstrates inserting into and retrieving from our model. Here we insert one instance of each of our derived types. On the retrieval side, we print the members together with their phone number, unless the member is a Teen.
Listing 6-33. Inserting into and Retrieving from Our Model
using (var context = new EF6RecipesContext())
{
    var teen = new Teen { Name = "Steven Keller", Age = 17,
                          Phone = "817 867-5309" };
    var adult = new Adult { Name = "Margret Jones", Age = 53,
                            Phone = "913 294-6059" };
    var senior = new Senior { Name = "Roland Park", Age = 71,
                              Phone = "816 353-4458" };
    context.Members.Add(teen);
    context.Members.Add(adult);
    context.Members.Add(senior);
    context.SaveChanges();
}

using (var context = new EF6RecipesContext())
{
    Console.WriteLine("Club Members");
    Console.WriteLine("============");
    foreach(var member in context.Members)
    {
        bool printPhone = true;
        string str = string.Empty;
        if (member is Teen)
        {
            str = " a Teen";
            printPhone = false;
        }
        else if (member is Adult)
            str = "an Adult";
        else if (member is Senior)
            str = "a Senior";
        Console.WriteLine("{0} is {1} member, phone: {2}",member.Name,
                           str, printPhone ? member.Phone : "unavailable");
    }
}
The following is the output from the code in Listing 6-33:
Members of our club
===================
Steven Keller is a Teen member, phone: unavailable
Margret Jones is an Adult member, phone: 913 294-6059
Roland Park is a Senior member, phone: 816 353-4458
It is important to note here that no design time, or even runtime checking, is done to verify the ages for the derived types. It is entirely possible to create an instance of the Teen type and set the age property to 74—clearly not a teen. On the retrieval side, however, this row will be materialized as a Senior member—a situation likely to offend our Teen member.
We can introduce validation before changes are committed to the data store. To do this, register for the SavingChanges event when the context is created. We wire this event to our code that performs the validation. This code is shown in Listing 6-34.
Listing 6-34. Handling Validation in the SavingChanges Event
public partial class EF6RecipesContext
{
    partial void OnContextCreated()
    {
        this.SavingChanges += new EventHandler(Validate);
    }

    public void Validate(object sender, EventArgs e)
    {
        var entities = this.ObjectStateManager
                            .GetObjectStateEntries(EntityState.Added |
                                                    EntityState.Modified)
                            .Select(et => et.Entity as Member);
        foreach (var member in entities) {
            if (member is Teen && member.Age > 19) {
                throw new ApplicationException("Entity validation failed");
            }
            else if (member is Adult && (member.Age < 20 || member.Age >= 55)) {
                throw new ApplicationException("Entity validation failed");
            }
            else if (member is Senior && member.Age < 55) {
                throw new ApplicationException("Entity validation failed");
            }
        }
    }
}
In Listing 6-34, when SaveChanges() is called, our Validate() method checks each entity that has either been added or modified. For each of these, we verify that the age property is appropriate for the type of the entity. When we find a validation error, we simply throw an exception.
We have several recipes in Chapter 12 that focus on handling events and validating objects before they are committed to the database.
6-12. Modeling Table per Concrete Type Inheritance
Problem
You have two or more tables with similar schema and data, and you want to model these tables as types derived from a common entity using Table per Concrete Type inheritance.
Solution
Let’s assume that we have the tables shown in Figure 6-18.
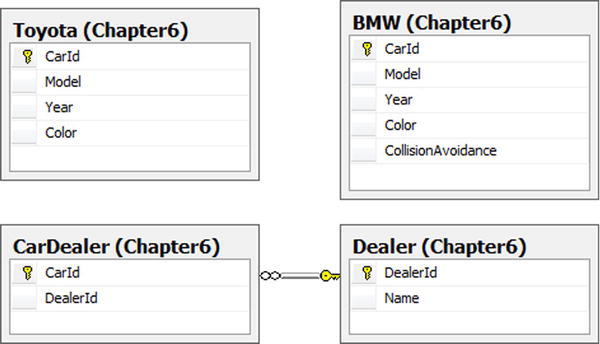
Figure 6-18. Tables Toyota and BMW with similar structure that will become derived types of the Car entity
In Figure 6-18, the tables Toyota and BMW have similar schema and represent similar data. The BMW table has an additional column with a bit value indicating whether the instance has the collision-avoidance feature. We want to create a model with a base entity holding the common properties of the Toyota and BMW tables. Additionally, we want to represent the one-to-many relationship between the car dealer and cars held in inventory. Figure 6-22 shows the final model.
To create the model, do the following:
- Add a new ADO.NET Entity Data Model to your project, and import the Toyota, BMW, CarDealer, and Dealer tables.
- Right-click the design surface, and select Add Entity. Name the new entity Car, and unselect the Create key property check box.
- Right-click the Car entity, and view its properties. Set the Abstract property to true.
- Move the common properties of the Toyota and BMW entities to the Car entity. You can use Cut/Paste to move these properties. Make sure that only the CollisionAvoidance property remains with the BMW entity and the Toyota entity has no properties. Both of these entities will inherit these common properties from the Car entity.
- Right-click the Car entity, and select Add Inheritance. Set the base entity as Car and the derived entity as BMW.
- Repeat step 5, but this time set the Toyota as the derived entity.
- Right-click the CarDealer entity and select Delete. When prompted to delete the CarDealer table from the store model, select No.
- Right-click the design surface, and select Add Association. Name the association CarDealer. Select Dealer on the left with a multiplicity of one. Select Car on the right with a multiplicity of many. Name the navigation property on the Car side Dealer. Name the navigation property on the Dealer side Cars. Be sure to uncheck the Add foreign key properties.
- Select the association, and view the Mapping Details window. Select CarDealer in the Add a Table or View drop-down menu. Make sure that the DealerId property maps to the DealerId column, and the CarId property maps to the CarId column.
Right-click the .edmx file, and select Open With ![]() XML Editor. Edit the mapping section with the changes shown in Listing 6-35 for the BMW and Toyota entities.
XML Editor. Edit the mapping section with the changes shown in Listing 6-35 for the BMW and Toyota entities.
Listing 6-35. Mapping the BMW and Toyota Tables
<EntitySetMapping Name="Cars">
  <EntityTypeMapping TypeName="IsTypeOf(EFRecipesModel.BMW)">
    <MappingFragment StoreEntitySet="BMW">
      <ScalarProperty Name="CollisionAvoidance"
                ColumnName="CollisionAvoidance" />
      <ScalarProperty Name="CarId" ColumnName="CarId"/>
      <ScalarProperty Name="Model" ColumnName="Model"/>
      <ScalarProperty Name="Year" ColumnName="Year"/>
      <ScalarProperty Name="Color" ColumnName="Color"/>
    </MappingFragment>
  </EntityTypeMapping>
  <EntityTypeMapping TypeName="IsTypeOf(EFRecipesModel.Toyota)">
    <MappingFragment StoreEntitySet="Toyota">
      <ScalarProperty Name="CarId" ColumnName="CarId"/>
      <ScalarProperty Name="Model" ColumnName="Model"/>
      <ScalarProperty Name="Year" ColumnName="Year"/>
      <ScalarProperty Name="Color" ColumnName="Color"/>
    </MappingFragment>
  </EntityTypeMapping>
</EntitySetMapping>
The resulting model is shown in Figure 6-19.
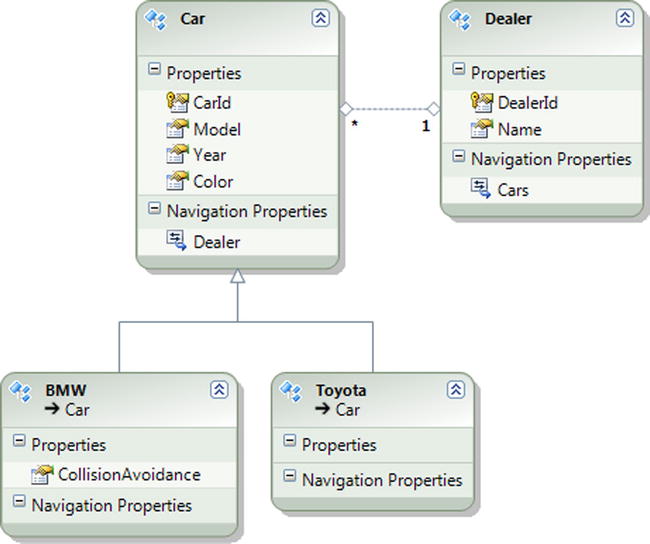
Figure 6-19. The completed model with the derived entities BMW and Toyota represented in the database as separate tables
How It Works
Table per Concrete Type is an interesting inheritance model in that it allows each derived entity to map to separate physical tables. From a practical perspective, the tables need to share at least some part of a common schema. This common schema is mapped in the base entity while the additional schema parts are mapped in the derived entities. For Table per Concrete Type inheritance to work properly, the entity key must be unique across the tables.
The base entity is marked abstract, and it is not mapped to any table. In Table per Concrete Type, only the derived entities are mapped to tables.
In our example, we marked the Car entity as abstract and we did not map it to any table. In the mapping shown in Listing 6-35, notice that we mapped only the derived entities BMW and Toyota. We moved all of the common properties (CarId, Model, Year, and Color) to the base entity. The derived entities contained only the properties unique to the entity. For instance, the BMW entity has the additional CollisionAvoidance property.
Because the entities Toyota and BMW derived from the Car entity, they became part of the same Cars entity set. This means that the CarId entity key must be unique within the entity set that now contains all of the derived entities. Because the entities are mapped to different tables, it is possible that we can have collisions in the keys. To avoid this, we set the CarId column in each table as an identity column. For the BMW table, we set the initial seed to 1 with an increment of 2. This will create odd values for the CarId key. For the Toyota table, we set the initial seed to 2 with an increment of 2. This will create event values for the CarId key.
When modeling relationships in Table per Concrete Type inheritance, it is better to define them at the derived type rather than at the base type. This is because the Entity Framework runtime would not know which physical table represents the other end of the association. In our example, of course, we provided a separate table (CarDealer) that contains the relationship. This allowed us to model the relationship at the base entity by mapping the association to the CarDealer table.
There are many practical applications of Table per Concrete Type inheritance Perhaps the most common is in working with archival data. Imagine that you have a several years worth of orders for your eCommerce site. At the end of each year, you archive the orders for the previous 12 months in an archive table and start the New Year with an empty table. With Table per Concrete Type inheritance, you can model the current and archived orders using the approach demonstrated here.
Table per Concrete Type inheritance has a particularly important performance advantage over other inheritance models When querying a derived type, the generated query targets the specific underlying table without the additional joins of Table per Type inheritance or the filtering of Table per Hierarchy. For large datasets or models with several derived types, this performance advantage can be significant.
The disadvantages of Table per Concrete Type inheritance include the overhead of potentially duplicate data across tables and the complexity of insuring unique keys across the tables. In an archival scenario, data is not duplicated but simply spread across multiple tables. In other scenarios, data (properties) may be duplicated across the tables.
The code in Listing 6-36 demonstrates inserting into and retrieving from our model.
Listing 6-36. Inserting into and Querying Our Model
using (var context = new EF6RecipesContext())
{
    var d1 = new Dealer { Name = "All Cities Toyota" };
    var d2 = new Dealer { Name = "Southtown Toyota" };
    var d3 = new Dealer { Name = "Luxury Auto World" };
    var c1 = new Toyota { Model = "Camry", Color = "Green",
                          Year = "2014", Dealer = d1 };
    var c2 = new BMW { Model = "310i", Color = "Blue",
                       CollisionAvoidance = true,
                       Year = "2014", Dealer = d3 };
    var c3 = new Toyota { Model = "Tundra", Color = "Blue",
                       Year = "2014", Dealer = d2 };
    context.Dealers.Add(d1);
    context.Dealers.Add(d2);
    context.Dealers.Add(d3);
    context.SaveChanges();
}

using (var context = new EF6RecipesContext())
{
    Console.WriteLine("Dealers and Their Cars");
    Console.WriteLine("======================");
    foreach (var dealer in context.Dealers)
    {
        Console.WriteLine("
Dealer: {0}", dealer.Name);
        foreach(var car in dealer.Cars)
        {
            string make = string.Empty;
            if (car is Toyota)
                make = "Toyota";
            else if (car is BMW)
                make = "BMW";
            Console.WriteLine("	{0} {1} {2} {3}", car.Year,
                               car.Color, make, car.Model);
        }
    }
}
The output of the code in Listing 6-36 is as follows:
Dealers and Their Cars
======================

Dealer: Luxury Auto World
        2014 Blue BMW 310i

Dealer: Southtown Toyota
        2014 Blue Toyota Tundra

Dealer: All Cities Toyota
        2014 Green Toyota Camry
6-13. Applying Conditions on a Base Entity
Problem
You want to derive a new entity from a base entity that currently exists in a model and continue to allow the base entity to be instantiated.
Solution
Let’s assume that you have a model like the one shown in Figure 6-20.
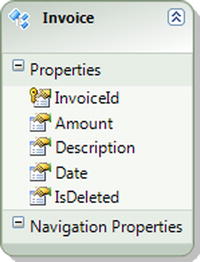
Figure 6-20. Our model with the Invoice entity
This model contains a single Invoice entity. We want to derive a new entity that represents deleted invoices. This will allow us to separate more cleanly business logic that operates on active invoices differently than on deleted invoices. To add the derived entity, do the following:
- View the Mapping Details window for the Invoice entity. Add a condition on the IsDeleted column to map the entity when the column is 0, as shown in Figure 6-21.
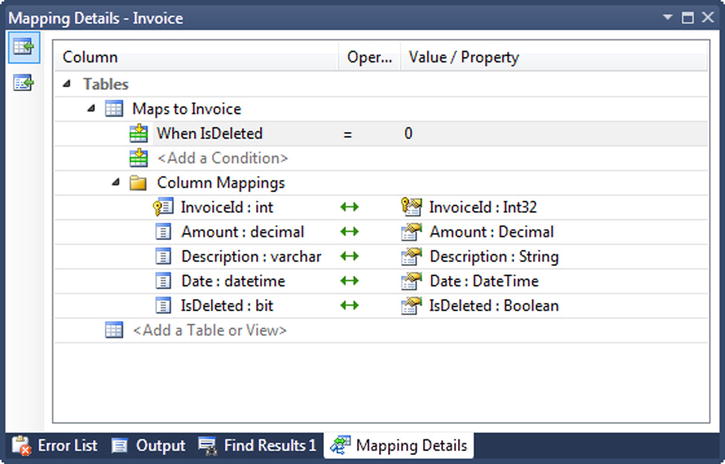
Figure 6-21. Mapping the Invoice entity when the IsDeleted column is 0
- Now that the IsDeleted column is used in a condition, we need to remove it from the scalar properties for the entity. Right-click the IsDeleted property in the entity and select Delete.
- Right-click the design surface, and select Add Entity. Name the new entity DeletedInvoice, and select Invoice as the base type.
- View the Mapping Details window for the DeletedInvoice entity. Map the entity to the Invoice table. Add a condition on the IsDeleted column to map the entity when the column is 1, as shown in Figure 6-22.
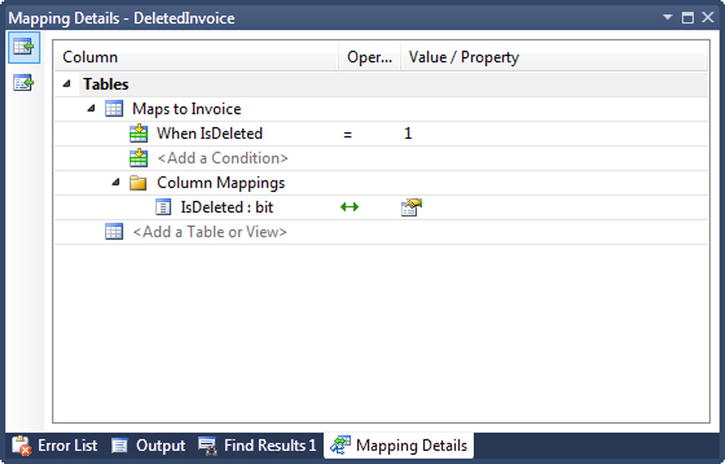
Figure 6-22. Mapping the DeletedInvoice entity to the Invoice table when the IsDeleted column is 1
The final model with the Invoice entity and the derived DeletedInvoice entity is shown in Figure 6-23.
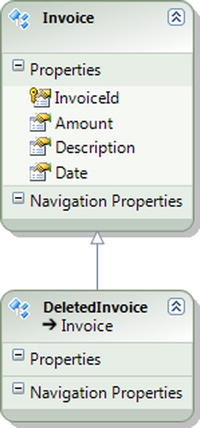
Figure 6-23. Our completed model with the Invoice entity and the DeletedInvoice entity
How It Works
There are two different ways to model our invoices and deleted invoices. The approach we’ve shown here is only recommended if you have an existing model and code base, and you would like to add the DeletedInvoice derived type with as little impact as possible to the existing code. For a new model, it would be better to derive an ActiveInvoice type and a DeletedInvoice type from the Invoice base type. In this approach, you would mark the base type as abstract.
Using the approach we’ve shown here, you could can determine, as we do in the code in Listing 6-37, if the entity is a DeletedInvoice, either by casting or by using the OfType<>() method. However, you can’t select for the Invoice entity alone. This is the critical drawback to the approach we’ve shown here.
The approach you should use for new code is to derive two new entities: ActiveInvoice and DeleteInvoice. With these two sibling types, you can use either casting or the OfType<>() method to operate on either type uniformly.
Listing 6-37. Using the as Operator to Determine If We Have an Invoice or DeletedInvoice
using (var context = new EF6RecipesContext())
{
    context.Invoices.Add(new Invoice { Amount = 19.95M,
                                    Description = "Oil Change",
                                    Date = DateTime.Parse("4/11/13") });
    context.Invoices.Add(new Invoice { Amount = 129.95M,
                                    Description = "Wheel Alignment",
                                    Date = DateTime.Parse("4/01/13") });
    context.Invoices.Add(new DeletedInvoice { Amount = 39.95M,
                                    Description = "Engine Diagnosis",
                                    Date = DateTime.Parse("4/01/13") });
    context.SaveChanges();
}

using (var context = new EF6RecipesContext())
{
    foreach (var invoice in context.Invoices)
    {
        var isDeleted = invoice as DeletedInvoice;
        Console.WriteLine("{0} Invoice",
                          isDeleted == null ? "Active" : "Deleted");
        Console.WriteLine("Description: {0}", invoice.Description);
        Console.WriteLine("Amount: {0}", invoice.Amount.ToString("C"));
        Console.WriteLine("Date: {0}", invoice.Date.ToShortDateString());
        Console.WriteLine();
    }
}
The following is the output of the code in Listing 6-37:
Active Invoice
Description: Oil Change
Amount: $19.95
Date: 4/11/2013

Active Invoice
Description: Wheel Alignment
Amount: $129.95
Date: 4/1/2013

Deleted Invoice
Description: Engine Diagnosis
Amount: $39.95
Date: 4/1/2013
6-14. Creating Independent and Foreign Key Associations
Problem
You want to use Model First to create both independent and foreign key associations.
Solution
Foreign keys and independent associations help us maintain referential integrity within the database schema and provide navigation paths to related entities. In order to create foreign keys and independent associations using Model First, do the following:
- Add a new ADO.NET Entity Data Model to your project. Select Empty Model when prompted to choose the model contents. Click Finish. This will create an empty design surface.
- Right-click the design surface, and select Add Entity. Name the new entity User and click OK.
- Right-click the new entity, and add a scalar property for the UserName.
- Right-click the design surface, and select Add Entity. Name the new entity PasswordHistory and click OK.
- Right-click the new entity, and add a scalar property for the LastLogin. Right-click the LastLogin property, and change its type to DateTime.
- Right-click the User entity, and select Add Association. To create a foreign key association, check the Add foreign key properties to the PasswordHistory entity check box. To create an independent association, uncheck this box.
- Right-click the design surface, and select Generate Model from Database. Select a database connection, and complete the remainder of the wizard. This will generate the storage and mapping layers of the model and produce a script to generate the database for the model.
If you choose to create a foreign key association, the model should look like the one shown in Figure 6-24. If you choose to create an independent association, the model should look like the one shown in Figure 6-25.
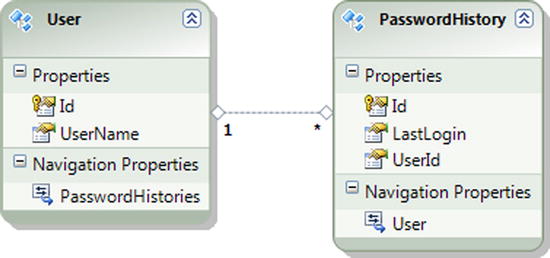
Figure 6-24. A foreign key association between User and PasswordHistory
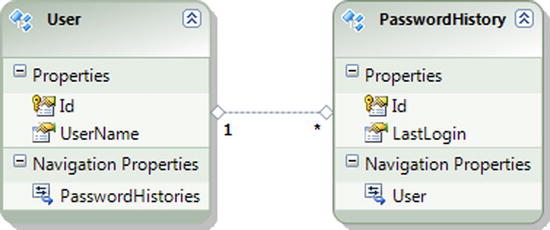
Figure 6-25. An independent association between User and PasswordHistory
How It Works
With a foreign key association, the foreign key is exposed as a property in the dependent entity. Exposing the foreign key allows many aspects of the association to be managed with the same code that manages the other property values. This is particularly helpful in disconnected scenarios, as we will see in Chapter 9. Foreign key associations are the default in Entity Framework.
For independent associations, the foreign keys are not exposed as properties. This makes the modeling at the conceptual layer somewhat cleaner because there is no noise introduced concerning the details of the association implementation. In the early versions of Entity Framework, only independent associations were supported.
6-15. Changing an Independent Association into a Foreign Key Association
Problem
You have a model that uses an independent association, and you want to change it to a foreign key association.
Solution
Let’s say that you have a model like the one shown in Figure 6-26.
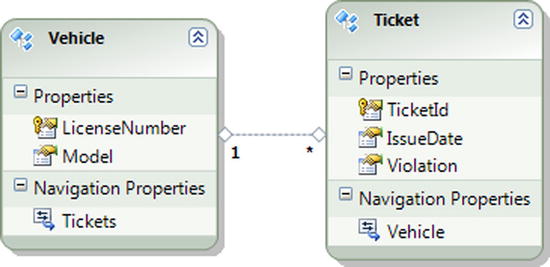
Figure 6-26. A model for vehicles and tickets using an independent association
To change the association from an independent association to a foreign key association, do the following:
- Right-click the Ticket entity, and select Add Scalar Property. Rename the property LicenseNumber.
- View the Mapping Details window for the association. Remove the mapping to the Ticket table by selecting <Delete> from the Maps to Ticket control.
- Right-click the association, and view the properties. Click in the button in the Referential Constraint control. In the dialog box, select the Vehicle entity in the Principal drop-down control. The Principal Key and the Dependent Property should both be set to LicenseNumber, as shown in Figure 6-27.
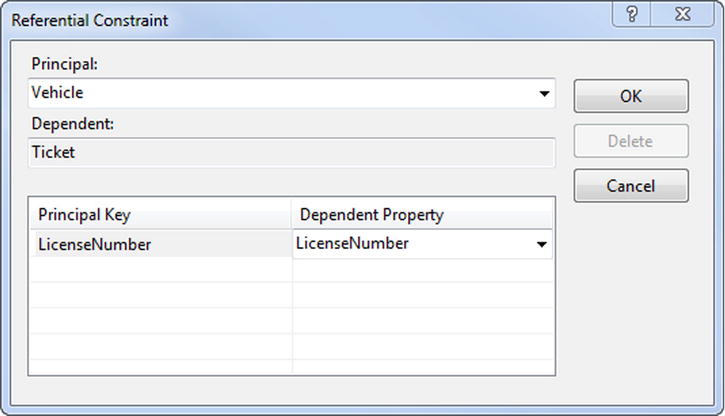
Figure 6-27. Creating the referential constraint for the foreign key association
- View the Mapping Details window for the Ticket entity. Map the LicenseNumber column to the LicenseNumber property, as shown in Figure 6-28.
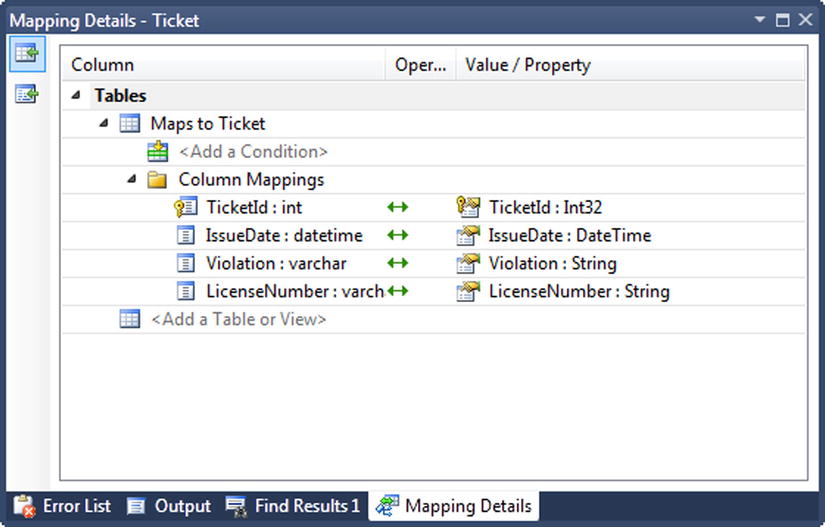
Figure 6-28. Mapping the LicenseNumber column to the LicenseNumber property for the Ticket entity
The final model is shown in Figure 6-29.
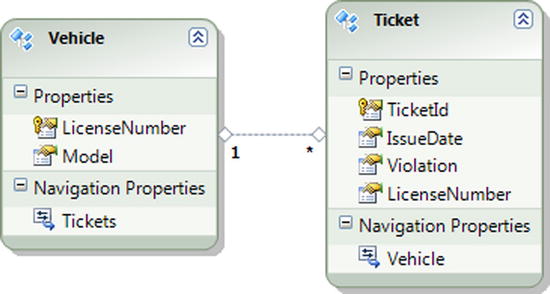
Figure 6-29. The model with the independent association changed to a foreign key association
How It Works
When you change an independent association into a foreign key association, most of your existing code will continue to work. You will find it easier now to associate two entities by simply setting the exposed foreign key to the appropriate value. To change a relationship with an independent association, you need to create a new instance of EntityKey and set the entity’s xxxReference.EntityKey to this new instance. With a foreign key association, you simply set the exposed foreign key property to the key value.
Foreign key associations are not currently supported for many-to-many associations because these associations must be mapped to the underlying link table. A future version of Entity Framework may support foreign key associations, along with payloads, for many-to-many associations.