Remote Connectivity
As a security expert, consider this all-too-real scenario: a passenger sits in the airport, working on his computer, waiting for the plane to start boarding. While sitting there, surfing on the wireless airport network, he notices that almost every laptop in sight is a Mac. On a hunch, he opens Bonjour Browser to discover that many of these laptops have various remote management tools (the Apple Remote Desktop client or Screen Sharing, based on VNC), SSH or Telnet enabled. He also notices that many of these computers are not password-protected, and are therefore easily controllable by anyone with the gall to tap into the computer. Within 10 minutes, nearly all the laptop lids are closed with their owners suspiciously looking around, attempting to determine which passenger was entertaining them with the “joke of the day” on their display.
On a serious note, this is possibly the best-case scenario for these unsuspecting Mac owners in the airport. With Screen Sharing, Apple Remote Desktop (ARD), SSH, and many of the other remote access options improperly secured on these machines, it would be possible to cause much more damage than simply sending a humorous message to their desktops. Deleting files, capturing passwords, reconfiguring operating system preferences, and issuing damaging commands from a shell are all possible. It would also be very easy to simply submit a program that would run in the background and provide access to anyone attempting to control it, using what is called a root kit. (Root kits are explained in further detail in Chapter 8.)
More often than not, communication over public networks is not properly secured. When sitting in an airport, coffee shop, hotel, or any other publicly available network, it is important not only to password-protect the means of communicating, but also to encrypt the traffic you are sending over the network. Sending information in an unprotected manner across a public network can be painfully embarrassing, not to mention expensive. This chapter will focus on securely configuring and using the most common remote management applications (both built-in and third party) in the Mac community.
Remote Management Applications
Apple has created a number of remote management programs that are included with Mac OS X. In this section we will cover the two that are available graphically: Apple Remote Desktop and Screen Sharing. We will also cover Back to My Mac, which uses Screen Sharing to establish connectivity between two systems via the MobileMe service.
Apple Remote Desktop
Apple Remote Desktop (ARD) allows administrators to remotely control and administer OS X systems, either from within your company’s network or from outside of it. ARD can be used to send shell commands to workstations, transfer files to client systems, and install software remotely on computers. ARD also allows for very extensive reporting of user history, application usage, and software versions.
Screen Sharing
Mac OS X 10.5 introduced a feature called Screen Sharing. Screen Sharing allows you to control a remote system and send and receive clipboard contents, simply by clicking on an icon in the sidebar of a Finder window. Screen Sharing is also built into Messages, allowing for very easy remote management from an Instant Messaging session. Screen Sharing provides only very limited capability compared to ARD, but it can be very useful for remote support or emergency server management.
Note Although opening the Screen Sharing application is most easily done from the sidebar of a Finder window, you can also open the application from the /System/Library/CoreServices/Applications folder. This means that you do not have to see a client, but can connect over an IP address; this is handy for connecting to remote locations where the computers will not appear in your sidebar for OS X.
Both Screen Sharing and Remote Desktop use the Virtual Network Computing (VNC) protocol to observe and control remote systems. The VNC system (and Screen Sharing) by itself does not provide for the same level of control as ARD. For example, you cannot send Unix commands over VNC or set up tiered access to VNC. ARD is easy to set up, and its customizable security features make the operating environment much more secure than VNC alone. Apple has expanded beyond the capabilities of VNC in its development of ARD, and has added a lot of new features while maintaining backward compatibility with clients such as Chicken of the VNC, UltraVNC, and RealVNC. If you do not have the ARD client installed, then you can still use VNC to access another computer remotely using Screen Sharing, but although this is equally as secure (it uses Kerberos to protect passwords by default), Screen Sharing has less configurable options than the Remote Desktop component of Apple Remote Desktop.
Because VNC is a multiplatform remote connectivity protocol that allows you to remotely view and control Mac, Windows, or Linux systems, the Mac can be managed by any platform and likewise manage any platform, provided the client has a VNC server running. Other operating systems can connect using a standard VNC client, allowing you to quickly tap into another computer, no matter what kind of machine you’re connecting from. This is obviously a dangerous aspect of VNC, as an attacker can compromise your system by remotely accessing it if the VNC client is not secured properly. If you do not want to allow other systems to connect to yours, then we recommend disabling this feature entirely (it is not enabled by default). If you would, however, like to allow other systems to be able to connect to yours, there is a way to set this up securely. Let’s walk through setting up screen sharing in a secure manner.
Enabling Screen Sharing
To enable Screen Sharing, open the Sharing preference pane. Then click either the Screen Sharing or Remote Management check box (see Figure 15-1). Checking Screen Sharing will allow for only remote control and observation. We’ll discuss remote management shortly. Once you have started the Screen Sharing service you will be able to click on the “Allow access for” section, and set it to “Only these users.”

Figure 15-1. Setting up Screen Sharing
One of the most critical aspects of securing Screen Sharing is limiting which users are allowed to connect to your system remotely. The “Allow access for” section is where you would configure which users (from the Accounts pane in System Preferences) have access to share any of these services by clicking the plus (+) button. Select the user from the list in the dialog box (see Figure 15-2) that you would like to grant access to this preference, and then click the Select button.

Figure 15-2. Selecting users
Once you have added the users to whom you would like to grant VNC client access, click the Computer Settings button in the Sharing preference pane, and verify that the “Anyone may request permission to control screen” is unchecked (see Figure 15-3). Leaving this option enabled means you will be prompted when clients attempt to gain access. In many cases, it is preferable to be prompted because it allows users to be informed when a remote connection is being made.

Figure 15-3. Screen sharing computer settings
If you know that users without ARD (such as Windows workstations or those using Chicken of the VNC) will need to control the machine with a different VNC client, click the “VNC viewers may control screen with password” box. Otherwise, leave it unchecked, because allowing any VNC access increases the susceptibility of a system.
To control your computer, VNC clients on the local network can connect to it via IP address or Bonjour. As a Bonjour-enabled service, Screen Sharing is also available via Wide-Area Bonjour, courtesy of .Mac.
Implementing Back to My Mac
If you have a current iCloud account, the Back to My Mac feature of iCloud allows you to connect to any computer that has your .Mac username and password entered in the iCloud pane of System Preferences. This eliminates the need to forward ports on your router, because it accesses the remote system using the iCloud system preference. The OS X built-in Screen Sharing feature is used to allow both Back to My Mac and VNC to connect to your computer. You can stop or start Back to My Mac using the Back to My Mac option in the iCloud preference pane (see Figure 15-4).

Figure 15-4. Back to My Mac in the iCloud preference pane
Configuring Remote Management
Screen Sharing is great for home use, but ARD is far superior for larger environments with more requirements. If you only need remote control, then Screen Sharing will typically suffice. If you have large numbers of systems to manage, or you need the ability to remotely install software or send Unix commands, then Remote Management is likely going to be of more use to you. In the Sharing preference pane, the management features are referred to as Remote Management, and can be controlled granularly on a per-task basis. The Remote Desktop application, used to control Macs using ARD, is licensed separately. If you enable Remote Management, Screen Sharing will automatically be disabled. Remote Management includes the VNC access managed by Screen Sharing.
Enabling Remote Management
To enable Remote Management, click the Remote Management service in the Sharing preference pane (see Figure 15-5). From here, you should set the “Allow access for” option to “Only these users” and add the users who will have access privileges as you did for Screen Sharing in the previous section.

Figure 15-5. Setting up Remote Management
In the Sharing preference pane, you can also select what level of access other users have to your system. The Remote Management panel also lets you select what level of access a user should be given by clicking the Options button. Check the boxes (see Figure 15-6) for the appropriate level of access you want to grant. Remember that for every user, only the minimum required level of access should be given. For example, if you want the ARD to be used to build reports on a machine only, then you would click the Generate reports box and nothing else.

Figure 15-6. Remote Management options
Here are descriptions of the settings that can be enabled:
- Observe: Remote users can see the activity on their computer, but cannot take control of a session.
- Control: Remote users can see the activity on their computer and can take control of the mouse and keyboard. Keep in mind that, if they can take control of an administrative user, they have the capability to elevate their own privileges.
- Show When Being Observed: Users being observed will see an icon in the toolbar indicating that their computer is being controlled.
- Generate Reports: Remote users can view software, hardware, and other information about your system.
- Open and Quit Applications: ARD can be used to open and quit applications without using the remote control function.
- Change Settings: Application and System Preferences Settings can be changed without using menu options from within the Remote Desktop application.
- Send Text Messages: The ARD text message feature can be used to send instant messages to the remote user.
- Restart and Shut Down: ARD can be used to shut down the system and reboot it without controlling the screen.
- Copy items: ARD can be used to copy data to the computer.
Once you have granted access to those users and configured management access for those who absolutely must have remote access management capabilities, click the Computer Settings button, and check the “Show remote management status in menu bar box” (see Figure 15-7). This allows the user to see the Remote Desktop icon in the upper right-hand corner of the screen. The Menu Bar icon will notify a user if they’re being observed or their computer is being controlled, and will also allow the user to interact with an administrator via the “Message to administrator” option. Some environments, however, prefer that their users not know when someone is watching what they’re doing. If this is the case, don’t check the box.

Figure 15-7. Remote Management computer settings
Note You can also enable VNC clients to access the system in this screen, but keep in mind that VNC viewers will have a lower encryption protocol than ARD users. Once you are satisfied with your settings, click the OK button to return to the Sharing preference pane.
Using Secure Shell
Telnet was once the primary method for remotely connecting to client systems with command line over remote shells. However, Telnet connections are unencrypted, and therefore insecure forms of transmitting information. As use of the Internet became more widespread, the security implications of having login credentials and user data transmitted in cleartext became unacceptable, and SSH was created. SSH is a better version of this technology, giving an administrator a remote shell (or Terminal access) to send commands to a user computer over a secure connection. These commands can be used to transfer files, connect to other systems, and run any Terminal commands. SSH should be used in those environments where opening a variety of ports to allow remote ARD connectivity is undesirable and where GUI level access is not needed to remotely manage the computer.
Enabling SSH
To enable incoming SSH access to your system, click the Sharing preference pane, and click Remote Login service (see Figure 15-8). From here, click “Only these users,” and click the plus (+) button to add users who will be allowed to remotely access the computer using SSH. Checking the box turns the Remote Login indicator light green. You can now use SSH to access the system remotely.

Figure 15-8. Using the Remote Login feature to enable SSH access
Further Securing SSH
SSH is a secure protocol, but you can make SSH even more secure with the command line by using public/private key pairs, which make it unnecessary for your password to go over the wire at all. Your private keys should be secured with a passphrase, to keep your private key safe if your system is compromised. You can store your passphrase in your keychain, but this can prove to be just as dangerous as having no passphrase at all if your system is compromised. Therefore make sure that a passphrase is set and required for every access of your keys.
Connecting to an SSH host will request authentication from the client. If you have a key set, your SSH client will generate a temporary key based on your private key. It will then send this key to the server, and the server will compare it to the public keys that it has. If your public key can unlock the temporary key, you are authenticated and allowed access. If the keys fail, then SSH drops back to password-based authentication and will prompt for a password.
Let’s see how this works:
Note For the purposes of this example, we assume you haven’t generated an SSH key yet.
First you need to make a key pair. To do this, you will use DSA as the key type to ensure that you will be connecting via the more secure SSH2 protocol:
ssh-keygen -t dsa
You will be prompted for a filename; press Return to accept the default. You will then be prompted for a key passphrase. If you want it to prompt for a passphrase, enter it now; otherwise, for unchallenged logins, hit Return to set it to blank.
Now you will have your new public-private key set in ~/.ssh. The private key is named id_dsa, and the public is id_dsa.pub. For the server to use the key, you must copy your public key to it. If keys have not been used for authentication up to this point, you can simply copy the key to the remote host and rename it:
scp ~/.ssh/id_dsa.pub user@host:~/.ssh/authorized_keys
This will create or replace your authorized keys file on the server.
If you have authorized keys already, you should add to the file like so:
cat ~/.ssh/id_dsa.pub | ssh user@host ’cat - >> ~/.ssh/authorized_keys’
Now try logging into the SSH server as you would normally:
ssh host.domain.com -l username
If you specified a passphrase, you will be asked for it; otherwise, it will automatically grant you access.
Tip If you are using single sign-on with a Mac OS X Server, then authentication will be handled by Kerberos instead and won’t need to implement key-based login.
When using keypairs without passphrases, it is imperative that the private key not fall into the wrong hands. If a compromised passphrase is suspected, the key should be removed from the authorized_keys file of any computer on which it has been installed, and a new keypair should be generated immediately.
Using a VPN
A virtual private network (VPN) is a private communications tunnel, established within a public network, between two points, one inside a home or corporate network and one outside of it. Safe communication through this tunnel is possible through encrypted network traffic.
Connecting to Your Office VPN
Many organizations have VPN’s in place for uses to remotely connect to the office. When you use the VPN to connect to your office, then you are using a public network (in other words, the Internet) to establish a private network (a VPN tunnel). Once you have a private network, then you will more than likely be able to access many of the resources just as you would if you were in the office, albeit a little slower because you are not actually working from the LAN. Let’s run through a basic VPN client setup to connect to your office’s LAN.
If you are going to set up a VPN client, then you first need to obtain configuration settings from your network administrator. First, you need to know what VPN protocol your network is using. The two main types of VPNs are PPTP and L2TP over IPSec. Once you know the type of VPN you are connecting to, then you will need to know the address of the VPN server. This is often an IP address or a DNS name.
To start, open the Network preference pane, and click the plus sign to open the Select the Interface screen. At the Select the Interface screen, choose VPN as the interface, and then choose appropriate VPN type (PPTP or L2TP) for your environment. Once you have entered this information, click the Create button (see Figure 15-9).

Figure 15-9. Adding a VPN connection
Setting Up L2TP
If you are given a choice of PPTP or L2TP, then you should use L2TP, because it is more secure. If you will be connecting to an L2TP-based VPN, then you will have a few more configurable options available to you, and you’ll need to know more information about the technical nature of network you are connecting to. In addition to some form of user authentication, L2TP also requires machine-based authentication, such as a shared secret, a term that can be used to refer to a password. The authentication can also be an SSL certificate (see Figure 15-10), which can be imported or manually added using the Keychain Utility.

Figure 15-10. L2TP user and machine authentication types
Setting Up PPTP
If you are connecting to a PPTP-based VPN, then you will also need to know the username and password to connect with this connection. Once you have this information, you will be able to configure the VPN.
Once you have a connection created and you have obtained the correct address, account, and password, then you can complete the setup. To do so, open the Network preference pane, and click the PPTP connection you created earlier. Then enter the username in the Account Name field (see Figure 15-11) and the address of the VPN server in the Server Address field.

Figure 15-11. Configuring a VPN connection in System Preferences
If you have an authentication method other than the simple password authentication required to establish a connection, click the Advanced button. At the User Authentication screen (see Figure 15-12), select your authentication type and click OK. Once you are finished configuring all the required settings, click Apply in the Network preference pane, and test your connection by clicking the Connect button.
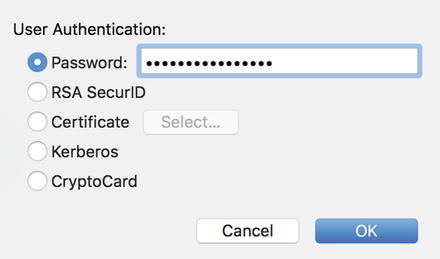
Figure 15-12. PPTP user authentication types
Tip To make connecting easier, select the Show VPN Status check box in Connection Settings. This will put an icon in the menu bar that allows you to quickly connect to any of the VPN connections you have setup.
Connecting to a Cisco VPN
OS X also comes with the ability to connect to a Cisco-based VPN without any third party software. This is made possible by the new Cisco feature in the VPN type option available in the Network System Preferences pane. To configure the Cisco IPSec VPN Client, first open the Network System Preference pane. Then click on the plus icon below the list of network services. Here, you will choose the Cisco IPSec option, as you can see in Figure 15-13, and assign the new service a name using the Name: field.

Figure 15-13. Setting up the Cisco VPN client
You will then see a screen with the settings to connect to the IPSec VPN client, as you shown in Figure 15-14. Here, provide the name or IP address of the server that you will be connecting to in the Server Address field. You will also need to provide a username and password to connect to the VPN.

Figure 15-14. Configuring the Cisco VPN client settings
If you need to provide a shared secret then click on the Authentication Settings button and provide it in the Shared Secret field. Or, if your environment uses an SSL certificate, click on the radio button for Certificate and then click on the Select button. You can then select the certificate. See Figure 15-15.

Figure 15-15. Configuring the Cisco VPN Authentication Settings
Finally, many environments will use or require a group name. If your environment requires a group name, enter it into the Group Name field and click on OK. You will then be able to test your new Cisco IPSec VPN client by clicking on the Connect button. If you are able to establish a connection then the setup process is complete!
Configuring Routing
You can also use a static route to point to a client machine’s network. You will then be able to pass traffic to other hosts on the client’s network through the encrypted PPP tunnel securely. If the network you are trying to access is 10.0.0.0/24, you would use the following command to create a route for traffic directed at specific IP addresses:
sudo /sbin/route add -net 10.0.0.0/24 10.0.0.55
Depending on the client machine’s routing setup, you might be able to have the server machine pass all Internet traffic through the client machine. This is a good way to help secure traffic if you’re using a wireless access point in a public place. You can bring up the VPN connection and then change your default route with the following command:
sudo /sbin/route add -net 0.0.0.0 10.0.0.55
This will route all of your Internet traffic through the VPN link, securing your wireless traffic. Remember, it might likely take a hit in performance, slowing things down a bit, as your traffic will be encrypted, passed through the tunnel, decrypted, passed out of the client machine, and then passed out onto the Internet. Performance slowdowns are an expected result.
Disconnecting
The process to disconnect is fairly simple. On the server, use ps ax | grep pppd to search for the PPP daemon’s process ID. Then use the sudo kill <Process ID>command to stop the daemon. The server machine’s PPP daemon will bring down the link. This allows the client machine’s PPP daemon to quit. Upon quitting, the client machine will log the VPN user out of the connection. At this point, the PPP connection will have stopped, both daemons will have quit, and your SSH connection should be disconnected.
Summary
Remote access is invaluable to administrators, whether you’re managing a small office or a large corporate network. If you take care to configure VPN tunnels and remote management properly, you can securely connect to your LAN and administer your systems without making those same tools an avenue for attacks.