Security Quick-Start
Ready to start securing your Mac? Let’s get right into it. Keep in mind that this chapter is meant to be a quick-and-dirty start to securing your Mac, for the “I don’t have time to dive into the nitty-gritty, I need to get my Mac secured right away” readers. This chapter will give you just the basics to get your Mac secure quickly, and although it will leave you with a fairly secure system, it’s not as comprehensive as the subsequent chapters, where we’ll fine-tune your Mac’s settings. For a more thorough understanding of OS X security and the tools you can use to secure your Mac, we urge you to continue reading beyond the basics. Beginning in Chapter 2, you’ll be introduced to all the other intricacies surrounding securing the Mac OS, diving deeper into the larger concepts of what is covered here in this quick-start.
Securing the Mac OS X Defaults
Because it is built on a Unix architecture, OS X is a fairly secure and stable operating system right out of the box. Unix, at its core, is designed for high-end server architecture, web servers, and the like. Therefore, it was designed with security needs in mind. However, it is a commonly held misconception that the Mac cannot be made any more secure in the graphical user interface (GUI) of the operating system and can only be further secured through the Unix command line. On the contrary, there are a number of security settings to configure right in the System Preferences Security section. And there are many ways we can and should make Mac OS X more secure without dabbling with the command line.
In fact, right out of the box, there are many security holes within the Mac OS, and they were left intentionally. Why? In the world of operating systems, there is a balancing act between an operating system’s ease of use and how secure it is. If you’ve tinkered with various operating systems, you’ve seen that the most cumbersome of the lot tend to be those that require more verification windows to make sure you really want to do what you’re trying to do. This can prove rather frustrating when performing even the most basic of tasks. When the engineers at Apple redesigned their OS from the ground up, they considered security very heavily, but they also considered usability. In many cases, they decided to err more on the side of user-friendly interaction than obtrusive “allow” and “deny” windows, establishing a reputation as one of the most user-friendly computer systems available. Many security features are disabled by default. This provides an easy-to-use machine while still allowing the user to implement more advanced security measures at their discretion, but it can also leave the machine open to exploits through these security holes.
Many of the features of OS X are already fairly secure without changing anything, with little or no trade-off to functionality. In fact, certain features should not be changed unless changing them is absolutely required; for example, you should not enable the root account unless you need to run a process that requires it, as is the case with programs such as Carbon Copy Cloner. Root is a very powerful feature, and enabling it is a huge security risk if other security measures are not implemented to offset the activation, such as disabling root after using it. Many security breaches occur because users forget to put security settings back the way they were.
Now that we’ve got that out of the way, let’s start discussing some of the places where we can improve the Mac’s security right away.
Customizing System Preferences
Probably the best (and most obvious) place to start is in your computer’s System Preferences pane, located in the dock or under the Apple menu. Believe it or not, seemingly innocuous settings can be used to exploit some of the Mac’s core features. By optimizing System Preferences, we can provide a higher level of protection than is provided right out of the box. And we can cover the most important security options all in the first chapter!
Let’s start with the Accounts pane.
One of the most important concepts to understand in OS X security is that a Mac running OS X is running a multiuser operating system. Every machine has at least one user account and one local administrative account (sometimes referred to as the root account), which, if enabled, has the ability to take ownership of all the files on the system as well as to kill any processes on the computer without giving anyone a chance to save their work (via the kill command). As with any multiuser operating system, multiple accounts on the machine create multiple points of entry for potential breaches in security. Therefore, it is important to make sure each point of entry is properly secured.
The first way to do that is actually quite simple: by using strong passwords. Let’s say that again one more time for emphasis: use strong passwords. Your system is only as secure as your passwords are strong. All too often, a computer is compromised because its password is simply password, or the user’s first name, or the name of the company. In OS X, Apple created the Password Assistant to counteract this alarming trend by assisting the user with some fairly advanced password techniques (more on that shortly).
If you haven’t set your password yet, let’s do that right now. To set a password, open the Users & Groups preference pane and click your account name. (Make sure the padlock at the bottom of the pane is unlocked. If it isn’t, you’ll need an administrator account and password to unlock it.) To the right, you’ll see a Change Password button (see Figure 1-1). The name is typically your full name or the full name you may have entered when the account was created. The short name is a shortened version of the name (the first letter of the first word and the full second word by default).
Note We’ll discuss users and groups in detail in Chapter 3, but we will touch on a few of the important points in this section: disabling login items, setting account types, and basic user security.

Figure 1-1. The Accounts preference pane
To change the password, click the Change Password button on the Accounts preference pane. A smaller window will appear, requesting that you enter the old password once and the new password twice (see Figure 1-2).

Figure 1-2. Changing a password
Clicking the key icon in the Change Password window opens the Password Assistant (see Figure 1-3). The Password Assistant is a random password generator that can be used to help create a more secure password. It’s a great utility if you need suggestions for more complex passwords.

Figure 1-3. Password Assistant
If your password is still password or your name or the name of your company, it’s time to change it. Right now. We’ll wait.
Tip When setting passwords, it’s a good practice to make them as complex as possible by including numbers, letters, or special characters, such as !, @, #, or $ (and not just using those characters to substitute similar letters). The more complex the character selection, the more secure the password can be. This is where the Password Assistant really comes in handy.
The final note about passwords is that Apple has been slowly merging the experience of using an iCloud password and that of using an OS X password. In OS X 10.11, when you click Reset Password and create new accounts, you’ll have the choice to use an iCloud password as your user password, allowing you to, for example, reset these online. As you can see in Figure 1-4, the process of configuring an iCloud password is pretty straightforward; just click the Use iCloud Password button. However, for an enterprise organization, the jury is still out on whether using iCloud passwords is a good idea.

Figure 1-4. iCloud user passwords
Login Options
You can further refine the security options in the Users & Groups preference pane by customizing the default settings of its Login Options button. To change the settings, click the Login Options button, which is located below the various accounts. (Again, you may need to click the padlock icon and access this screen as an administrator.) The first option to change on the resulting screen (Figure 1-5) is “Automatic login.” If it’s currently set to On, we’d recommend setting it to Off. This gives you some control over who can access the computer when it’s first turned on.

Figure 1-5. Login options
The Login Options screen is where you’d enable the root user (which we recommend you only do when you’re performing tasks that absolutely require the root account to be enabled). To enable the root user, click the Join or Edit button (according to the state the system is in) next to Network Account Server. Click the Open Directory Utility button (make sure to click the lock in the Directory Utility window) and then click Edit in the top menu and choose Enable Root User or, if the root account is enabled, click Disable Root User to turn it back off.
Next, the “Display login window as” option (Figure 1-5) enables you to display either a list of users or a blank field for the username and password at login. Quite often, users use their photo and real name when configuring their user account, which can be a security concern if an attacker were able to grab control of the machine (they’d know what they look like and what their real name is). We highly recommend that you enable root and configure the option to require a full name and password be typed in to log in.
If the computer is in a workgroup setting and more than one user needs to access it, we also recommend turning off the “Show the Restart, Sleep, and Shut Down Buttons” option, which is enabled by default. When you disable this option, these buttons will be hidden at the login window if the computer were to be logged off due to inactivity or by another user. Some systems provide services for other users, and disabling that option helps to ensure that users have access to those services.
If you are using a stand-alone computer or if you do not use a directory service (we’ll cover Open Directory further in Chapter 16), uncheck the “Allow network users to log in at login window” box.
The Show Password Hints option can be helpful if you need a hint to remind yourself of your password. But use caution here: this is a prime example of a security hole that can be easily exploited. While the hint box can help you to remember your password, it can also give someone trying to guess your password valuable insight into what the password may be. Put some thought into it and use an obscure connection to the password, something only you would know.
For example, “My dog’s name,” may seem harmless enough, but an acquaintance familiar with you and your pets would find it extremely easy to guess your password. Something like “bone sleuth with numbers” might jog your memory and be obvious to you, but not so obvious to others. Or use something that looks like a password and jogs your memory. Again, there is no substitute for the use of strong passwords. And whatever you do, do not enter the actual password into the password hint field (trust us, it happens all the time). One-word answers are guaranteed to be the first words that will be attempted when guessing your password.
Note You should also change your password routinely. But given the choice between a somewhat secure password and never rotating your password, we recommend a somewhat secure password. Not everyone can do both, but when you can, you should.
The administrative user should be logged in only when administrative tasks (changing passwords, configuring network settings, and so on) are necessary; not for everyday work. This is a key component of Unix system administration and a good way to keep users from accidentally harming the system. Limit the administrative access to the machine only to the users who absolutely need it (this includes your own account if you use the machine regularly). To remove administrative access for a user, click the account in the Accounts pane and click the user for whom you’d like to change access. Uncheck the box “Allow user to administer this computer.” (See Figure 1-6.)

Figure 1-6. User settings
Fast User Switching is a convenient way to allow a user to log in to multiple accounts concurrently. It poses a security risk, however, because it is possible to access or alter processes (and files not in the user’s home directory) run by other users. Fast User Switching should be used only for specific reasons, such as testing different versions of software. As a security precaution, it should not be left running unattended.
Another way to safeguard against abuse is to limit administrative access to those who absolutely need it. Better yet, if Fast User Switching is a feature you are not likely to use, disable it by unchecking the “Show fast user switching” menu option (shown in Figure 1-5 earlier).
Security & Privacy Preferences
Another place to change the default settings to make the machine more secure is in the Security preference panel (see Figure 1-7). Here, you will find options for enabling many of the miscellaneous security features that Apple has developed, as well as disabling some less secure features. This panel has become the default place to look for security features that don’t fit into any specific section of System Preferences.

Figure 1-7. Security preference pane, General tab
Under the General tab is the option “Require a password [time interval] after sleep or screen saver begins.” This will require that a password be used to wake the computer after it has gone to sleep or after the screen saver has been activated. This feature is absolutely critical and is not enabled by default. You can also specify a time when the password can be required after the machine has woken up. We cannot overstress the importance of enabling this option and specifying that the machine require a password immediately. Assigning a key or hot corner (moving the cursor to a corner of the screen to activate the display) to put a system to sleep allows you to put your machine to sleep when you are finished using it. Later in this chapter we will review setting up automatic sleep, the hot corner, and screen saver options.
The option “Show a message when the screen is locked” will show users a message when the screen is locked. This message can be set to inform users of your organization’s security policy or instruct people who find a lost computer how to return it to your organization.
You also have the ability to configure a feature the marketing gurus at Apple have called Gatekeeper. This is shown in Figure 1-7 with the option “Allow apps downloaded from.” Gatekeeper controls what kinds of apps are allowed to open on a computer. The options are
- Mac App Store: Only allow the computer to install Apps downloaded from the Mac App Store.
- Mac App Store and identified developers: Only allow signed apps and those downloaded from the Mac App Store (which are therefore signed).
- Anywhere: Allows users to open any apps no matter where the app was downloaded from (apps downloaded from the Internet will still warn the user when they are opened).
If you use a lot of third-party software, you might decide to use the “Mac App Store and identified developers” option. Running off only apps that come from the app store might be challenging, but as each of these is vetted by Apple, it’s certain worth trying to do so.
Let’s face it: we’re human, and with the number of passwords we have to remember every day, we can very easily forget them. But what happens when you forget your computer’s password and you are the only one with an account on the machine? There is a system that websites use when users forget their passwords. It’s called a self-service password reset and can be used to reset a password on its own (usually by answering a secret question on a web prompt and then receiving a new temporary password via e-mail). For a machine with many users, this would certainly be a handy feature to have, and it would significantly reduce the volume of calls to the help desk. Fortunately, Apple has supplied Mac owners with this feature via the password reset utility included in the OS X Recovery Mode. By booting a computer to Recovery Mode (holding down the R key at boot), you can reset the password. A very handy feature indeed.
But what if your computer fell into the wrong hands, and you wanted to limit someone’s ability to access your data if they were able to reset the password? Many of us travel with laptops that, if stolen and their passwords reset, would give users access to data they shouldn’t be able to access. If a teacher’s computer were rebooted by a student, they’d have access to tests, children would have access to their parent’s website viewing habits, employees would have access to confidential data about other employees, and so on—all if they were able to get physical access to our computers while we were away. The ability to reset a password easily introduces you to a feature of the OS X security preferences that protects data, even if the password is reset using Recovery Mode: FileVault. This option removes the ability to access data on a computer, even if the password is reset, by encrypting the contents of the boot volume.
Note The FileVault feature is only as strong as the password protecting the account.
To use FileVault, you need to set it up in the Security preference pane. Open System Preferences, and click Security. Then click the FileVault tab to see a screen similar to Figure 1-8 and choose Turn On FileVault.

Figure 1-8. Setting up FileVault
You will then be prompted to restart your computer before enabling FileVault. Click Restart to reboot the computer and complete starting the FileVault encryption process. Once restarted, you will be prompted to restart the computer again and the encryption process will start.
Note If you suspect that others will enable FileVault to encrypt their computers, such as students, children, or employees, then setting up an institutional recovery key before they can enable FileVault will help ensure that you will always be able to log into any FileVault disk images that are created by other users on the system.
At the login screen, you will be able to log in as the user who enabled FileVault. Once logged in, allow other users to authenticate to the computer using the Enable Users button in the FileVault pane of the Security System Preference, as you can see in Figure 1-9.

Figure 1-9. Setting up FileVault
If you want to change FileVault settings later, you can do so by returning to the Security preference pane and clicking the FileVault tab again. Your options include disabling FileVault completely (which can be helpful in troubleshooting).
Note There will be a little impact to the user experience on the computer when FileVault is first setup. The computer will run a little slow while the hard drive is being encrypted. Additionally, because of the restarts, you may find the computer will not be usable for a good 10 to 20 minutes after FileVault is enabled.
Firewall
The OS X firewall is a software-based application firewall built into the operating system designed to block unwanted network traffic. It is disabled by default, and unless you know that enabling it causes incompatibility issues with other operating systems or file systems, you should enable it. Doing so is a simple process: simply open System Preferences and click Security & Privacy and then the Firewall tab. From here, click the Turn On Firewall button, shown in Figure 1-10.

Figure 1-10. Enabling the firewall in the Security preference pane
Once it is enabled, click the Firewall Options button for more granular settings, which are covered in further detail in Chapter 11.
You can use the App Store to keep your system updated quickly and easily with the latest Apple updates and security patches. You will be prompted with a notification when updates are available. You can also manually check by opening the App Store and then clicking Updates in the row of icons along the top of the screen.
As you can see in Figure 1-11, you can click the Update All button to install any updates for the operating system and all apps installed, or use the Update button for a given patch to run only that one.
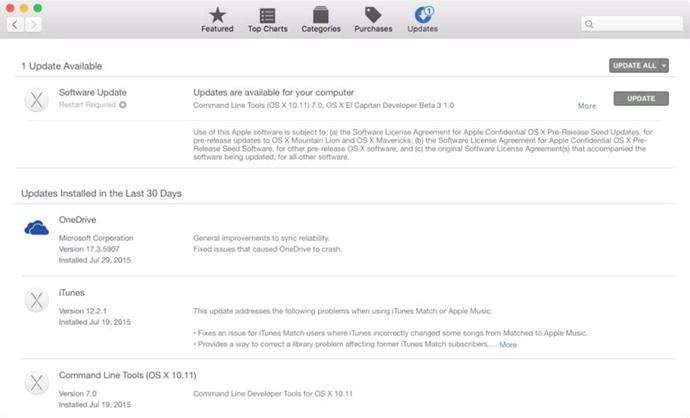
Figure 1-11. The Software Update preference pane
Before running any software updates on mission-critical systems, you should test them in a lab environment. Typically, security updates will not cause issues with other applications, but it is still wise to test them in a lab environment before installing them on mission-critical machines.
For many, using the Mac App Store will be adequate to keep your computer updated. However, if you have multiple systems on your network that need updating, you can quickly bottleneck your Internet pipe if multiple users are downloading updates all at the same time. You will most likely want to deploy a solution to help you conserve your bandwidth by managing these updates. The Software Update Server feature or the Caching Service in OS X Server are great solutions for controlling Apple software updates. However, this is not going to be the right solution for everyone because it requires an OS X Server to use.
Note There are ways to run the Software Update Server feature without having it run on a Mac, if you don’t mind deploying Open Source software in your environment.
Security updates should always be taken seriously and be run when possible. One unique aspect of the Apple security updates is that they are always deployed independently from other updates. Security updates rarely force a restart of the computer, and they almost invariably provide a comprehensive description explaining what they fix and why they were written, with links to descriptions of the vulnerabilities they fix.
Bluetooth is a globally unlicensed short-range radio frequency for wireless networks, also known as IEEE 802.15.1. It is a wireless technology that provides a way to connect and exchange information between devices such as mobile phones (such as the iPhone), laptops, PCs, printers, headphones, speakers, and digital cameras. The Apple Bluetooth keyboard and mouse are popular Bluetooth devices in Apple environments.
Bluetooth works by pairing two devices. While two devices are paired, they are able to freely exchange data. To pair a device with an Apple computer, you will need your computer to be discoverable, or awaiting a pairing. You are also required to accept the pairing in most cases. However, there are a variety of attacks that can force a pairing if your system is set to be discoverable without using a password. Once a connection is established, files can be shared over Bluetooth, creating a security vulnerability; to prevent it, you need to disable Bluetooth.
Bluetooth is enabled and discoverable by default. If you don’t have a need for Bluetooth on your system, you should disable it. To do this, open System Preferences and select the Bluetooth preference pane. Once you have this pane open, click the Off button to disable Bluetooth on your system (see Figure 1-12).

Figure 1-12. The Bluetooth preference pane
The left side of the pane shows the various devices that have been paired with your Mac. Here, you will be able to configure each device with its appropriate settings.
The Advanced button allows you to change some settings associated with Bluetooth (see Figure 1-13):
- Open Bluetooth Setup Assistant at startup if no keyboard is detected: Prompts a user if a keyboard is not detected at boot. Irrelevant on a laptop but a good idea on a desktop.
- Open Bluetooth Setup Assistant at startup if no mouse or trackpad is detected: Prompts a user if a mouse is not detected at boot. Irrelevant on a laptop but a good idea on a desktop.
- Allow Bluetooth devices to wake this computer: Allows a Bluetooth device to wake the computer from sleep. If you require a password to unlock the computer, this causes little security risk.

Figure 1-13. Advanced Bluetooth settings
The Printers & Scanners preference pane in System Preferences offers a few options for configuring access to shared printers and faxes. Only printers that multiple users need access to should be shared. Allowing a user to print to a printer that they shouldn’t be using can cause confidentiality issues if the documents they are printing land in the wrong hands. To disable printers not in use, uncheck “Share this printer on the network” for each printer (see Figure 1-14).

Figure 1-14. Printer sharing
By default, all users will have access to shared printers. Click the Sharing Preferences button to bring up the Sharing System Preference pane, where you can change the Everyone setting to a smaller subset of users or even a single user. For example, in Figure 1-15, we set the Everyone group to No Access (Everyone cannot be removed from the list). Single users will have the ability to print.

Figure 1-15. The Sharing System Preference pane
We have already shared printers. But what about everything else? If you are not sharing a resource on your computer, use this Sharing System Preference pane to disable any sharing services that aren’t necessary. To do this, open the Sharing preference pane, and review the items on the Services window on the left that are being used to share resources (see Figure 1-16). If you are sharing files, use the Shared Folders window to show you which folders you’re sharing out on your computer and which users are able to access them under the list of Users. It’s a nice feature for us security folks who would like to see at a glance which folders are being shared.

Figure 1-16. Sharing preferences
Tip Disable all services that are not needed by the user for whom you are configuring access. These services are more comprehensively discussed in Chapter 13, Chapter 14, Chapter 15, and Chapter 16 for OS X Server Services.
When you delete a file from a hard drive, the file is marked for deletion but is often kept by the file system until the system needs to free up space for new files. Reformatting a hard drive should provide additional assurance that data is erased. To ensure that data isn’t accessed by malicious users, always erase a disk before disposing of it or repurposing the drive.
To erase a disk, open Disk Utility, and click the drive in the left column. Next, click the Erase button (see Figure 1-17).

Figure 1-17. The Erase feature of Disk Utility
Note Make sure there is no data that is needed on the disk you’re securely erasing. Once you have erased data securely, the cost of retrieving the data will be great, if it’s even possible.
Using Secure Empty Trash
The Secure Empty Trash feature works much the same way as the Secure Erase feature. This is more secure than simply emptying the trash in that it also overwrites the location on the hard drive where the data in the trash was stored with random data. This will cause the data to be much harder to recover if it were to fall into the wrong hands. To empty the trash securely, in Finder click Secure Empty Trash (see Figure 1-18).

Figure 1-18. The Secure Empty Trash menu item
Then click the OK button to make the files unrecoverable. It is worth noting that there are a variety of popular applications to help undelete files. As Figure 1-19 warns, once you click OK to securely erase your trash, you will not be able to recover the files at a later date, even with these data recovery applications.

Figure 1-19. The Secure Empty Trash confirmation prompt
Using Encrypted Disk Images
Encrypted disk images offer you a place to keep files in an encrypted form. Let’s say that for speed or compatibility reasons you don’t want to keep your entire home folder encrypted, as you would by using FileVault, but you do want to keep certain folders encrypted. You can use encrypted disk images, which are much like ZIP files that compress a bunch of files into one file. Anyone attempting to access the data within them will need a password to do so.
To create an encrypted disk image, open Disk Utility and click the File menu, selecting Blank Image in the Image section of the menu. The resulting screen (see Figure 1-20) will have a wide variety of options. The Volume Size and Encryption settings are the most important to consider when creating the disk image. The volume size determines the size limit of the disk image. The encryption type can be 128-bit or (for more security) 256-bit; 256-bit images are harder to crack, but they are slower to create and to open when created. They will also take up more disk space than 128-bit. It’s important to consider whether 256-bit encryption is worth the performance hit and disk space increase you will experience from using it.
Tip If you are unsure what the size of your disk image should be and are not worried about limiting its size, choose Sparse Disk Image from the Image Format options, and the image will automatically grow as it requires more space (such as when you add files to it).

Figure 1-20. Encrypted Disk Image options
When you choose an encryption type, you will be asked for a password. Next you will click the Save button, and OS X will create a file using the encryption parameters you have selected. Once you have created an encrypted disk image, you will need the password anytime you need to access the image.
Securing Your Keychains
OS X uses encrypted keychains to keep track of commonly used passwords and certificates that are accessed regularly. You can also securely store notes in Keychains. Keychains are meant to make your life easier by automating the manual re-entry of this information every time you need to access it. One keychain password can be used to unlock a number of passwords, allowing your computer to keep track of credentials; this both saves you time and spares you from keeping track of them yourself. Another benefit is that it allows a single service to maintain a centralized database of passwords, rather than having each application ask for passwords.
The result is a substantially secure way of caching passwords for future use. But it’s really only as secure as the complexity of the password used to access it. When setting the keychain password, make sure to use one that is both difficult to crack and unique from all the other passwords on the machine. To change the keychain password, open Keychain Access in the Utilities folder. Click the login open padlock on the upper right (see Figure 1-21) and then click Edit at the top of the screen. Select the option for Change Password for Keychain “login” and change the password. You can also lock keychain access in the Change Settings for Keychain “login” option.

Figure 1-21. Keychain Access options
There are always multiple keychains on OS X computers. They include the system keychain and the user keychains, which appear as Login for each user (by default). With multiple users on a machine, there are inevitably multiple user keychains as well. Each user has a default keychain stored in their home folder. These can be managed using Keychain Access (at /Applications/Utilities/Keychain Access), which can help further secure multiple keychains. To access Keychain Access, from your Finder choose Go and then click Utilities. Locate the Keychain Access folder within the Utilities folder, open it and then locate the top left panel, labeled Keychains. The Keychains panel displays all the keychains on the system known to the user. From here you can lock and unlock keychains by clicking them and clicking the lock icon at the top of the screen (see Figure 1-21). This will require a password every time an application or service attempts to access the keychain.
You can create new keychains by clicking Open Keychain Access and clicking the + sign on the next screen. This essentially creates an encrypted file containing other information that needs to be secured, such as cached passwords to web sites. This is similar to an encrypted disk image. The password assigned to each keychain will decrypt the keychain file, thereby unlocking the keychain. Each keychain can and should have a different password.
Finally, each time a keychain item is created, you will be prompted for a password to allow the computer to access the stored repository and write a new object into it.
Best Practices
Here is a quick “cheat sheet” of important practices you should employ in keeping your Mac secure, followed by the chapter numbers that explore these security practices further:
- Install antivirus software (see Chapter 8).
- Always install Apple’s security updates (as discussed in this chapter).
- Open files only from known sources (see Chapter 9).
- Use a standard account for everyday work (see Chapter 3).
- Disable automatic login, and assign a password for every user (as discussed in this chapter).
- Lock your screen when you step away, and require a password to unlock it (as discussed in this chapter).
- Give your keychain its own password, and lock it when it is not in use (as discussed in this chapter).
- Use a firewall (see Chapter 11).
- Encrypt important files (see Chapter 9).
- Protect your wireless network with WPA, and use VPNs when using public wireless (see Chapter 12).
- Protect sensitive e-mail from prying eyes using encryption (see Chapter 7).
- Practice private surfing (see Chapter 7).
- Encrypt your chat sessions (see Chapter 7).