File Services
Configuring file-sharing security can be one of the more challenging aspects of working with shared computer data in a networked environment. The challenge is twofold—how do you keep files accessible to those who need them while simultaneously keeping them inaccessible to those who don’t? Sharing files over a network is also an inherently dangerous activity. Other computers’ users can access files on your system without physically gaining access to your computer; thus, if it is configured incorrectly, the wrong data can easily get into the wrong hands, which can prove to be catastrophic. However, in most environments, it is crucial that multiple computers have access to data on a single computer. How do we manage this file-sharing conundrum?
In Chapter 3 we discussed how to apply security settings to users and groups. In this chapter, we will discuss these security settings as they apply to sharing files. We’ll explore the security differences in file sharing between Macs on a peer-to-peer network and a central file-sharing networked system, and we’ll look at how to strengthen these file-sharing policies in a networked Mac environment using the native tools within OS X (Apple Filing Protocol when file sharing with other Macs, and Samba to connect a Windows-based machine to a Mac).
The Risks in File Sharing
Giving others access to files on your computer can be risky on many levels. First, you risk someone obtaining access to the system who shouldn’t. For example, when a file is remotely deleted from your system, the file does not go to the trash, you do not get alerted about the deletion, and anyone who knows the right password typically can delete files. If the wrong folders on a system are shared, you can also give someone the ability to delete critical files, whether intentionally or not. For all of these reasons, and with the risks of confidential data being accessed over file-sharing protocols, you need to properly lock down the security of any file sharing on your systems.
In Chapter 3, we discussed creating a limited Sharing Only account. This feature was added into Mac OS X Leopard for this very reason, and when creating accounts solely to give access to files, we recommend using this account type over any other.
Peer-to-Peer vs. Client-Server Environments
Before we discuss how to configure file-sharing permissions correctly, it’s important to summarize the differences between peer-to-peer and client-server file-sharing environments. See Chapter 4 for an extensive discussion of the two network types.
It is common in a networked Mac environment to have a handful of computers, each with file sharing enabled, with users trading files back and forth between each other without a central repository for the files. This type of environment is known as peer-to-peer networking (P2P). Security in a P2P environment is generally straightforward and tends to be rather loose. Anyone with access to the computer usually has access to files on that machine.
Note Peer-to-peer in this context is not the same as it is when using an application to access files hosted anonymously on the Internet. In this context, peer-to-peer is strictly meant to indicate sharing files over network connections in small environments.
As environments mature and grow larger, the distributed file sharing of P2P will give way to centralized file servers in what is typically described as a client-server, or two-tier, environment. Client-server environments offer a single and centralized location for users to access files that are needed by multiple users. In a client-server environment, backup and security begin to play a much more critical role, because files are now accessible by multiple users who have access to that repository. File permissions become critical to maintaining security. The permissions and backup strategies are easier to deal with in client-server environments for two reasons: first, because client-server environments have dedicated servers to handle many of the tasks that clients will handle in P2P environments; and second, because in a client-server environment, most data is stored on a server.
There are some inherent challenges to migrating from a P2P to a server-based file-sharing environment. Some users might have a hard time moving away from their old method of sharing files. The proper permission controls are often not set up correctly on the centralized data, if they are set up at all. Client machines might continue to share files after the transition simply because they weren’t configured not to share them. This can lead to security issues that can be disastrous if not managed appropriately.
File Security Fundamentals
Before we dive into how to secure file services properly, let’s discuss some fundamentals of file security in OS X. This will include the LKDC, POSIX and ACLs (covered more fully in Chapter 4).
LKDC
Because Apple is concerned about protecting peer-to-peer environments just as much as client-server environments, it has equipped every copy of OS X with a Kerberos Local Key Distribution Center (LKDC). The LKDC, based on a Kerberos authentication scheme (Kerberos is discussed in Chapter 16), secures AFP, CIFS (Samba), and VNC services (covered in Chapter 15). The LKDC implementation helps to secure communications, because it requires the nodes communicating with one another to prove their identity prior to communicating. Once a system has initiated communication, keys are used instead of passwords when authenticating users and services. This keeps passwords from being sent over the network, helping to keep them secure.
By forcing the same identity requirements that are common in client-server environments, the LKDC protects against eavesdropping and replaying sessions (where traffic is captured and replayed to get around security mechanisms). And the LKDC is implemented by default in every Mac, meaning there is nothing to do to set it up! The LKDC is dedicated to providing and protecting authentication. But how does the system determine what you are authorized to access? It starts with POSIX.
Using POSIX Permissions
Chapter 4 discussed POSIX permissions in OS X at length; this section summarizes the topic in the context of file permissions. OS X is an SUS-compliant operating system. POSIX is a standardized feature set developed to make operating systems compatible with Unix-based operating systems. POSIX permission levels are divided into three categories: read (users can access the file), write (users can write data to it), and execute (users can run the file, such as an application). When viewing these permissions from the terminal command ls, read is indicated by an r, write is indicated by a w, and execute is indicated by an x.
Note For more information on changing permissions from the command line, see Chapter 4.
When you look at the permission designations for files, you’ll see they are displayed in the order of owner, group, and (if needed) everyone. The owner is the user that owns a file, can set permissions on the file, and is listed in the text following the permissions of the file. The group of a file is listed next. The “everyone” designation is given to every user accessing a file who is not listed in either the owner or the group designation and is also known as a guest user of that file.
Note When looking at file permissions, you might find that an admin or wheel group is listed in a file’s permissions. These are part of the built-in users and groups that a system defaults to upon installation of the operating system. Chapter 4 discusses admin groups in more depth.
The output of the permissions for a file will use the following syntax:
(permissions) (owner) (group) (everyone) (file size) (last modified)
The ls command followed by the –al option can show you the permissions, as indicated in the following example:
cedge:/Users cedge$ ls -al
total 16
drwxrwxrwx    8 root      admin      272 Aug 24 22:07 .
drwxrwxr-t   35 root      admin     1292 Agu 13 20:27 ..
-rwxrwxrwx    1 cedge     admin     6148 Aug 23 13:55 .DS_Store
-rwxrwxrwx    1 root      wheel        0 Aug  1  2015 .localized
drwxrwxrwx   16 318admin  318admin   544 Aug 26  2015 318admin
drwxrwxrwt   10 root      wheel      340 Aug 23 13:14 Shared
drwxrwxrwx   38 cedge     cedge     1292 Aug 13 15:40 cedge
drwxrwxrwx   12 postgres  postgres   408 Aug 24 22:22 postgres
Note The d in front of the permissions in the previous example indicates that the item is a directory rather than a file.
Getting More out of Permissions with Access Control Lists
Traditionally, OS X has been limited to the standard POSIX permission model of read, write, and execute. This system has served Unix-based operating systems well for many years now; however, it is starting to show its age. The main concern is that it isn’t very flexible, and several special modes, such as the sticky bit (a setting that indicates that only the owner can delete a file from the respective folder), have been added over time.
For more complicated permission structures, access control lists (ACLs) provide you with the most granular control available over permissions for files and folders. An ACL is a list of permissions attached to files and folders. These replace POSIX permissions in the traditional sense of OS X security. ACLs give the Mac a set of permissions equal to that found in Microsoft Windows. ACL information is stored in the extended attributes of the Mac OS Extended file system (HFS+).
It’s easiest to understand ACLs if we break down how they work and are applied. There are two key system properties that allow ACLs to function:
- The generated unique identifier (GUID) is a value that is used many times in OS X because it can be guaranteed to be unique across computer systems. Your user account has both a traditional Unix-style UID and a new GUID.
- An access control entry (ACE) is the individual rule that determines what access is given to any particular user or group.
Note An ACL is a list of ACEs that can be attached to a directory or file, providing permissions similar to those used in Microsoft Windows.
The following are the possible permissions that can be applied to files and folders with the new ACL model. This is a huge jump from the read-write-execute model we are used to on OS X. Here are the permissions:
- Change Permissions
- Change Owner
- Read Attributes
- Read Extended Attributes
- List Folder Contents
- Traverse Folder
- Read Permissions
- Write Attributes
- Create Files
- Create Folder
- Delete
- Delete Subfolders and Files
Note When defining ACLs, you should typically do so at a group level. Reserve user-level ACEs for special cases such as deny rules for problematic users. For more on defining the users and groups that make up ACEs, see Chapter 4.
Sharing Protocols: Which One Is for You?
Computers can connect in various ways to talk to one another. The way in which computers communicate is known as a protocol. When configuring global settings for a file-sharing environment, you must consider that computers connecting to each other will more than likely use different protocols to communicate. For example, one protocol, Apple Filing Protocol (AFP), will typically be used when connecting two Macs, and an entirely different protocol, Samba (SMB), will be used to connect a Windows-based machine to a Mac. However, one fact remains constant among these protocols: permissions must be set when accessing resources from one computer to another.
Apple Filing Protocol
AFP is a presentation-layer network protocol that is the primary protocol for providing file services for Mac computers. AFP is rarely used outside the Mac platform, so little security attention has been paid to it as a protocol from security researchers. However, you should take certain steps to ensure the security of the files and data that use AFP to communicate.
To configure AFP sharing, you must first enable AFP on the computer. To enable AFP in OS X, open your System Preferences, and click the Sharing preference pane (see Figure 13-1). Select the File Sharing check box. The File Sharing indicator button will turn green.

Figure 13-1. Enabling file sharing
Note Configuring AFP is different and much more feature-rich in OS X Server than in the OS X client. For more information on this portion of the AFP configuration, please see Chapter 16.
Now that you’ve enabled file sharing, you will want to limit access to files and folders. To do so, review the shared folders in the Shared Folders list. Here you can stop sharing any folders that should not be shared by clicking the minus (–) sign in order to “unshare” them. Once you have verified that everything in the list should be there, you can now create new shared folders. To do so, click the plus (+) sign, which will open a window that allows you to browse your folders (see Figure 13-2). In this window, find the folder you want to share, and click the Add button.

Figure 13-2. Browsing to a folder
Once you have shared a folder, you can move on to setting sharing permissions. To do so, first review the list of users and groups (for more information on configuring users and groups, see Chapter 3) in the Users list. Click any of the users and groups that should not have access to the data in the Shared Folders list, and click the minus (–) sign while those users or groups are highlighted to deny access. After you have removed users who should not have access to the folder, click the plus (+) sign to add users who should have access. At this point, you will see a window with all of your users. Any users who already have access to the directory will be disabled. Find the users you want to grant access to, select them, and click the Select button to add them to the Users list.
Setting Sharing Options
Click Options to select which protocols you will use. On this screen, simply select the check box for each protocol to enable it, as you can see in Figure 13-3. For the purposes of this discussion, we have selected SMB. Here you can also configure which users will have access to the SMB service.

Figure 13-3. Defining an SMB/Windows user
Samba
You should only enable SMB, or any of the services discussed here, if you actually need them. When adding users to this list, you will be asked to enter a password (see Figure 13-4). The reason for this is that the respective user’s password file must be modified to allow for an older style of password, which is used by the Samba Windows file-sharing engine.

Figure 13-4. Providing the password for a Windows user
It’s important to note that you are decreasing the overall security of your system by using the SMB service. Apple does not enable the storage of these weak passwords by default, because dictionary attacking these older LAN Manager (LM MD4) passwords has been fairly simple. Any attacker who has gained root access to your system could view this weak password “hash” in your password file and potentially recover your login password. It might seem counterintuitive to worry about security concerns for someone with root access, but remember that even the root account cannot view a user’s encrypted keychain file without knowing that user’s password. Therefore, in this instance, if an attacker has gained complete control of the system, they could be able to decrypt files that are based on the user’s login password, such as keychains or file-vaulted home folders.
Note If you use the same password for all services, then compromising this password could lead to compromising the password for all of your services that use it.
Once you are satisfied that your files and folders have an appropriate level of permissions assigned to them, it’s time to turn to other protocols that computers will be using to access resources on your Mac. First on the list is the Samba protocol.
Once you have enabled a Windows user, you will be able to connect to the system using SMB. To test this from a Mac, click the Go menu from the Finder, and select the “Connect to a Server” option. In the Connect to Server window (as shown in Figure 13-5), type smb:// followed by the IP address of the computer to which you are connecting. When you click Connect, you will be asked to enter the password and will be given a list of share points that have access through SMB. Make sure the user you are logged in as has access only to the locations that you want the user to be able to access.

Figure 13-5. Connecting to an SMB share point
Using Apple AirPort to Share Files
The File Sharing feature of OS X provides the most granular approach to a workgroup-oriented file-sharing scenario that you can get without upgrading to OS X Server. There will be instances, however, when users may want to configure the File Sharing feature to run off an AirPort base station. Modern Apple AirPorts have the capacity to share files using a portable hard drive connected over USB to the AirPort device. To share files using the Apple AirPort, plug an external hard drive into the AirPort, open the AirPort Utility in the /Applications/Utilities folder, authenticate, click the AirPort to configure, and then click the Edit button for that device.
Click Disks to see a window similar to that shown in Figure 13-6. This window will list the disks and volumes attached to your AirPort along with their names and capacities. It will also list the users attached to the AirPort if you configured Secure Shared Disks with the “With accounts” option.
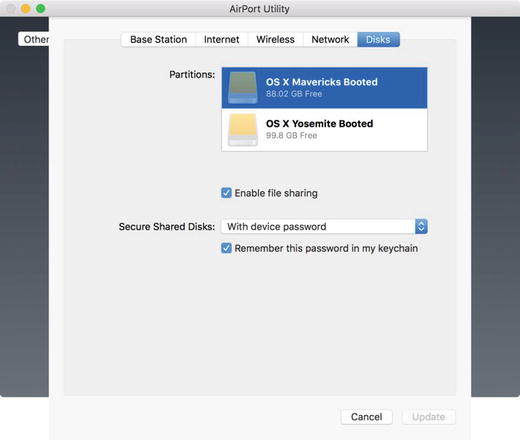
Figure 13-6. AirPort disk sharing overview
Select the Disks tab, and click the Enable File Sharing box to enable file sharing. You can now configure the type of permissions to be used for the disks you need to share. The most secure setting to use for the Secure Shared Disks option is With Accounts, which allows you to create accounts for use with the disks attached to the AirPort, as seen in Figure 13-7.

Figure 13-7. Configuring file sharing on the AirPort
Note It is common to refer to a wireless access point, such as an Apple AirPort’s shared disk, or a hard drive connected to a network, as network-attached storage (NAS).
Once you have set your base station to use accounts for shared storage, create the accounts that can access the shared volumes. To do so, click the plus sign. At the account creation screen, provide a username and password to access the shared disk. Then choose the level of access the account should have. Here, you can choose Read and Write (as we did in Figure 13-8), which is able to do anything on the disks, Read Only, which can only view contents, and Not Allowed, which is an account that is able to see the shared repository of data, but not access any of the volumes. Each account will have the same set of permissions for all disks.

Figure 13-8. Create accounts on the AirPort
Caution There is little protection for these accounts; the user names and passwords do not benefit from policies, the users and passwords are not shared between various systems, and there is no adaptive firewall as with OS X or OS X Server to protect the device whatsoever.
Third-Party Problem Solver: DAVE
From time to time, file and application incompatibilities will arise that cannot be solved by enabling the Samba protocol. Or you’ll need to use SMB signing to communicate with Windows servers. In these and other cases, the default capabilities of Samba in OS X are often not enough. In these situations, we recommend turning to third-party applications to solve this problem. DAVE is one of these problem solvers. DAVE, distributed by Thursby Software (www.thursby.com), enables file and printer sharing compatibility between Windows and Mac operating systems.
Note Before installing DAVE, disable Samba on the Sharing preference pane in System Preferences. DAVE cannot be installed if Samba is currently enabled.
SMB authentication primarily occurs over LANMAN, NTLMv1, and NTLMv2. LANMAN used a weak (by modern standards) authentication protocol known as LM Hash. NTLMv1 was a great step forward and represented the introduction of a challenge-response protocol. With NTLMv1, the server authenticates the client by sending a random number, known as the challenge. The client uses the challenge and a password, or ticket, known by both the client and the server. The client identity then is configured using the result of combining the two. The server verifies that the client has calculated the correct result and verifies the identity of the client. NTLMv2 is also a challenge-response protocol, but with more steps involved to enhance the security of the challenge-response process.
Of these, NTLMv2 is by far the most secure; however, it has been replaced in many situations by Kerberos. If Kerberos is available, then the DAVE client will always use it. This level of granularity is more than is found in OS X otherwise. Add in the ability to name and set up workgroups and other traditional Samba options, and you can easily see why Dave has a place in environments that use OS X to provide files to Windows clients.
Permission Models
In larger environments, system administrators have been grappling with various methods to handle file permissions for a good while now. Over the years, the Mac administrative community has developed a few methodologies as standard practices for managing permissions. In this section, we’ll touch on these permissions methodologies, or models, to give you a better understanding about the ways that file-sharing permissions policies can be implemented on Mac networks.
Discretionary access control (DAC) allows data owners to administer file permissions themselves. In a DAC model, administrators often spend less time assigning permissions (which often means spending more time restoring accidentally deleted files). Discretionary access control systems permit users to entirely determine the access granted to their resources, which means they can (through accident or malice) give access to unauthorized users. The owner of any resource has access to control the privileges to that resource. There are often no security checks ensuring that malicious code is not distributed or that the owner of a file or folder is well trained enough to be assigning permissions in the first place. This is the default model and, unfortunately, the most common model for controlling permissions. However, in addition to time spent on restoring deleted files, DAC is also limited in that security breaches can be caused when users who do not understand the appropriate access levels for files within their organization assign permissions that cause security breaches.
Mandatory access control (MAC) is a model that can augment or even replace DAC for file permissions. MAC’s most important feature involves denying users full control over the access to resources that they create. The system security policy (as set by the administrator) entirely determines the access rights granted, and a user cannot grant less restrictive access to their resources than the administrator specifies.
MAC has the goal of defining an architecture that requires the evaluation of all security-related information and making decisions based on what is done with data and the various data types in use in your organization. MAC is a strict hierarchical model usually associated with governments. All objects are given security labels known as sensitivity labels, and are classified accordingly. All users are then given specific security clearances as to what they are allowed to access. A common term when working with MAC is lattice, which describes the upper and lower bounds of a user’s access permission. In other words, a user’s access differs at different levels.
Role-based access control (RBAC) involves limiting access to files based on the responsibilities of a user. When using a role-based security model for access controls, each role in an organization is created for various job functions. The permissions to perform certain operations are assigned to specific roles. Users are then assigned particular roles, and through those role assignments they acquire the permissions to perform particular system functions. Role-based access requires that an organization review the various positions and build access levels for resources based on those roles.
As an organization looks to scale, it should define roles based on potential future hires. As organizations grow, they are more likely to build out new organizational charts that contain current and future positions within the organization. This often represents a good building block for developing roles, which become users or groups in the directory structure. Security groups can then be used within any document management system or enterprise resource planning (ERP) solution that an organization might decide to deploy. This is the most common permissions model being used today because it accommodates growth within an organization while being careful to limit permissions definitively.
Summary
Throughout this chapter we have discussed securing your file shares. While many of the security mechanisms that have been put in place by Apple will help, such as the LKDC and various encryption protocols, they will not be effective if your password is not secure. They can also be easily circumvented if you do not have good password policies, such as requiring a password to be changed at certain intervals (see Chapter 16 for more on password policies). Therefore, the most important aspect of securing your files over file shares is to practice good password security.
In Chapter 14, we will turn our attention to perhaps the most popular way to access data today, web servers.