Securing a Wireless Network
At the Black Hat conference in August 2006, David Maynor and Jon “Johnny Cache” Ellch shocked the Mac community by demonstrating to the world something that hackers had known for a long time: the Mac could be hacked, easily. Maynor and Ellch, two security professionals with long-time careers in the security industry, were able to release what is known as a proof-of-concept attack by exploiting the wireless Atheros drivers built into the Mac operating system. Using a script called setup.sh, which turned a Mac computer (with its wireless card turned on) into an access point, an attacker could gain control of an unsuspecting Mac user’s laptop. Another hacker script, called bad_seed, could then be run from the host computer to exploit the vulnerability in the target computer’s wireless driver; this would give an attacker access to a Terminal session on the target computer running root (which is a “superuser” that is allowed full control of the computer). The exploit was not released, but it did provide proof that the Mac community was a long way away from an operating system immune to wireless attacks. While the Mac may be more resistant to attack, no system has every been truly immune.
I don’t believe in spreading Fear, Uncertainty and Doubt (or FUD) to sell security products. Instead, I’ve tried to be a pragmatist through this book, looking at easy and safe ways to secure your Mac without degrading the user experience. The concept used in the wireless exploit was not specific to Apple computers, but pointed instead to general flaws in wireless networking protocols as a whole.
In this chapter, we’ll cover securing Apple AirPort-based wireless networks. We’ll begin with an introduction to wireless networking in general and then move into securing an Apple AirPort base station. Later in the chapter, to help show the importance of wireless security, we will showcase some common wireless hacking tools. We’ll illustrate just how easy it is to listen in on wireless traffic, emphasizing why security measures are so important.
Wireless Network Essentials
From a basic security perspective, wireless networks can be rather challenging. Many amateur wireless setups are left unsecured and transmitting information in clear text, thereby exposing user credentials, e-mails, and other data submitted over the network to anybody in the vicinity, and causing unnecessary security risks to sensitive information. It is all too easy to plug in an open wireless device on a wired network, causing a breach in the network that can then be exploited by someone listening in from an outside location such as a parking lot or nearby coffee shop. These and other potential security threats make it important to practice good security when configuring wireless networks.
To properly secure a wireless network, it is key to first have a fundamental understanding of what a wireless network is. A wireless network is different from an Ethernet network or another type of local area network (LAN), although the topologies often follow many of the same standards covered in Chapter 10. In fact, a wireless network is often referred to as a wireless LAN (wLAN).
Logging in to a wireless network is like connecting to a hub with all the other users of that network. But rather than traveling across copper wires to interconnect devices like LAN networks, wireless networks use channelized, low-powered radio waves running on the same frequencies as microwave ovens and cordless telephones. The 2.4GHz and 5GHz bands are pretty crowded these days, with Bluetooth technology (2.4GHz to 2.485GHz) only complicating matters. This can often place a large amount of conflicting signal traffic on these channels, causing data to get lost or fragmented in transit.
The speed and reliability of a wireless network depends on the hardware and proximity of the devices. Ranges between wireless devices are typically limited to a few hundred feet, depending on signal strength and the efficiency of the equipment. The greater the signal strength the longer the distance the signal can be detected, which increases the chance that packets can be intercepted.
Note A key element to focus on when studying wireless security is what happens with data that is not properly delivered between wireless devices.
Wireless networks that encompass a large area will be composed of multiple wireless devices, because of the short-range capacity of wireless connectivity and the tendency to saturate a single device with multiple users. Wireless access points (WAPs) are the devices used to distribute the wireless signal across this network. They accomplish this using a radio, the device within the WAP that talks to the client computer’s wireless card, creating a wireless signal. WAPs will often connect directly into a wired network, exchanging data with the wired network via an Ethernet connection. This connection is known as a backhaul.
Wireless networks use the IEEE 802.11 protocol, which differs from other wireless protocols in how it processes the wireless signal and the frequency used for connectivity.
There are a number of flavors of 802.11 used in wireless networking as it applies to Macs. While the formal definition for each protocol is by frequency (or wavelength) and signal design, they are commonly referred to as having different speeds, referred to in megabits per second. The most common flavors are 802.11b running at 11 megabits per second, 802.11g running at 54 megabits per second, 802.11n running at 108 megabits per second, and 802.11a, which uses the 5GHz band for internodal communications. Lastly, 802.11ac runs at various speeds up to 1.3 gigabits per second.
Note 802.1x is a highly secure wireless protocol typically found in larger network infrastructures. If your network can leverage this technology, check out our section on integrating 802.1x into your environment in Chapter 10.
Introducing the Apple AirPort
Over the years, Apple has released a variety of products in its family of WAPs, typically referred to as Apple AirPorts. Today, we’re back to two devices, the Apple AirPort Extreme and the Apple AirPort Express, described in detail at http://www.apple.com/airport-extreme/http://www.apple.com/shop/product/ME918LL/A/airport-extreme?afid=p238|sKLFkj8Sn-dc_mtid_1870765e38482_pcrid_91262096527_%26cid%3Daos-us-kwg-btb and http://www.apple.com/airport-express/http://www.apple.com/shop/product/MC414LL/A/airport-express?fnode=58 respectively.
The AirPort supports a variety of encryption protocols that can be used to secure the wireless network. Encryption protocols that are specific to wireless networking include the following:
- WPA2: Also known as 802.11i, WPA2 uses the AES block cipher to make cracking keys difficult. Unless you have a RADIUS server, WPA2 is the best form of encryption to use on an AirPort with Apple clients.
- WPA2 Enterprise: Similar to WPA2 in supported encryption standards, WPA2 Enterprise also adds support for usernames, which can be obtained using a RADIUS server, such as FreeRadius and Microsoft Windows Active Directory servers.
- WEP: This is the weakest of the security features supported by Apple AirPort. Windows computers need to use the hex equivalent to log into the network. This can be found using the Equivalent Network Password option in the Edit menu of the AirPort Utility. You should not be using WEP unless you have devices so old that this is the only encryption protocol they can support.
The Apple AirPort devices were designed to be easy to use. In many environments, the Apple AirPort will work right out of the box. However convenient this may be, the default settings are widely known, so an AirPort left with the default settings running represents a considerable security risk for any network.
Tip AirPorts do not always need an Ethernet cable connection to become part of the network. If there are other AirPorts on the network, it is possible to use the wireless network of an existing AirPort network as the network connection that the AirPort will use. This is what is known as a wireless distribution system (WDS) cloud. A WDS network can allow you to extend a wireless network for great distances, and create a wireless network that goes far beyond the 300-foot limitation documented by Apple.
AirPort Utility
The Apple AirPort is configured using an app called AirPort Utility, which is on every Mac in /Applications/Utilities. The AirPort Utility has built-in controls for disk sharing and a user-friendly, wizard-like approach to configuring AirPorts of all types, including older AirPorts.
Configuring the Current AirPorts
When you start the AirPort Utility, you’re immediately able to browse all the AirPorts on the network at once in a view that shows how the devices are interconnected with one another (Figure 12-1). This list includes all AirPorts that are visible over the Ethernet interface, as well as AirPorts on the wireless network.

Figure 12-1. Airport Utility
Click on any AirPort to see basic information about that device, including the MAC addresses of connected clients and addresses configured on the device. Click Edit. (Figure 12-2) to log into the device.

Figure 12-2. Device Basic Settings
When you log into the AirPort, you are initially placed into the Base Station tab. Here you will configure a password to manage the AirPort. This is one of the most important security tasks you have: select a strong password. There are no password lockouts if an incorrect password is entered too many times, or alerts of such a thing happening. Therefore, you should use as strong a password as possible. Additionally, as you can see in Figure 12-3, you configure Back to My Mac options for the AirPort here as well. This allows you to log into the AirPort from any computer that is configured to use Back to My Mac, using the same account that you’re using for the AirPort. This type of option can be helpful if you need to configure an AirPort remotely from somewhere else, such as the office while your kids are trying to access NetFlix from home. Otherwise this should not really be used as the account provides a second potential vector for unauthorized users to inappropriately access the device.
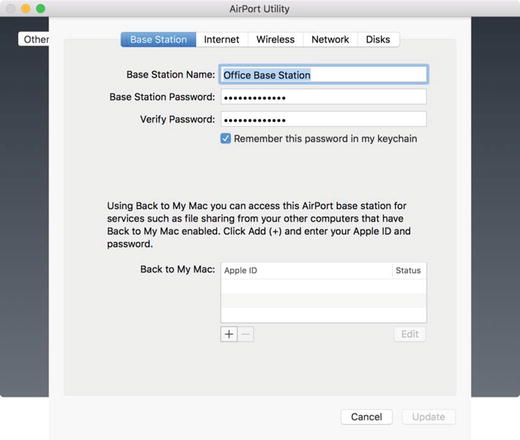
Figure 12-3. Base Station configuration
Click on the Internet tab. Here you’ll configure static or dynamic IP addresses if you’re also using the AirPort as a router. In this case, we’re using the AirPort as a router behind another firewall. This allows us to segment traffic between various networks. For example, when using this network you won’t be able to see any of the devices on my home network. There is also a Guest Network option, but I have a number of networks at my house for various tasks, so I use this guest network for writing books (like this one) and provide the Guest Network option for allowing friends to access my network.
The options available here include the following (shown in Figure 12-4):
- Connect Using: Typically, this will be Static (where you manually assign settings) or Dynamic, where the Internet Service Provider assigns settings to you.
- IPv4 Address: The IP address of the router. This can be dynamic, if your Internet Service Provider provides you with one, or Static, if you assign one manually. (Your ISP will usually provide you with the static IP address to use if this is the case.) Because this is looking upstream at another router on this network, I was able to arbitrarily assign it an IP address within the block I use for the upstream network.
- Subnet Mask: Usually supplied by your Internet Service Provider, the Subnet Mask limits the size of the network.
- Router Address: This is the gateway that your router will use to connect to the Internet.
- DNS Servers: The DNS servers the AirPort will use to resolve any hostnames that the AirPort needs to resolve.
- IPv6 DNS Servers: These are used if you are able to use IPv6 for your network. Typically they will deploy onto the device automatically. Therefore, unless your Internet Service Provider tells you otherwise, you won’t need to configure IPv6 DNS Servers.
- Domain Name: A default domain name provided to clients that obtain IP addresses dynamically (if there are any) from the AirPort.
- IPv6 WAN Address: This is used if you’re able to use IPv6 for your network. Typically the WAN Address will deploy onto the device automatically through your Internet Service Provider. Therefore, unless your Internet Service Provider tells you otherwise, you won’t need to configure IPv6 DNS Servers.

Figure 12-4. Internet Configuration
There is little security in the settings you choose here other than the 192.168.* private addressing scheme. These settings are mostly just to make the device work with the rest of the network infrastructure. We’re still not supplying a network to end users, just configuring this device to join our main network. Click on the Internet Options button to configure more IPv6 settings, but we will not cover Ipv6 in this chapter as it has little to do with the security of your AirPort network.
Next, click on the Wireless tab. This is where we configure the protocols referenced earlier in this chapter. Assuming the AirPort is providing a wireless network to other devices on your network, the Network Mode setting is usually set to Create a wireless network, as configured in Figure 12-5. Here, you can also disable the wireless antenna by selecting the Off option, or configure WDS by choosing to Extend a wireless network.

Figure 12-5. Wireless Configuration
The wireless password is important. This is where you install a strong password that is difficult to crack. The longer and the more special characters it contains, the harder a password is to crack. But that also makes it more difficult to remember and means the wireless password might get written down, reducing the security of your environment. Using the “Remember this password in my keychain” option will save the wireless password to the computer where you’re configuring the AirPort so you don’t need to enter it again, once you save your settings by clicking that handy Update button to save your settings.
The Enable Guest Network option allows you to configure a guest network. Devices in this network will not be able to see the devices in your main network. Here you have similar security options, but when set up properly none of these settings are nearly as important as on the main wireless network, as this is a smaller and more limited network.
Click on Wireless Options. Here, you can enable or disable the 5GHz networking on the AirPort and change the channels used to provide wireless signal. Changing channels is usually done to cut down on interference in your network caused by other WAPs on your own or neighboring networks. However, it’s important to keep in mind that the more robust the security of the connection to your access point from other devices, the less of your data that can be intercepted. As you can see in Figure 12-6, you can also choose to hide your network. This means that the network name (SSID) only shows up in computers requesting to join a wireless network if the network name is manually typed in. This is known as SSID suppression on many other brands of devices. I like the option, but it can create support issues in larger environments if you’re always having to send someone to enter a network name for users. Also, it does not really hide the network. Several common network utilities will ignore the “hidden” feature in the radio signal and show the network to the utility and its operator.

Figure 12-6. Wireless Options
Once you’re happy with the settings for your wireless network, click on Save or Update. Keep in mind that if you are making an update to the configuration of a live network then clicking on Update will shut down and restart the network. If you have a critical connection open then you may have to wait for a better time to enable the update. After making the change to this setting, click on the Network tab. In the
Router Mode field, you will choose to use Off (Bridge Mode), which disables the router functionality of the device (so it uses an upstream router to provide clients with IP addresses and a gateway to the Internet), or you will choose to use DHCP and NAT. Assuming you are using DHCP and NAT, you will have a few items to configure (Figure 12-7):
- DHCP Reservations: Every computer on a network has a unique MAC address as well as a unique IP address. Here you can assign a static IP address from your new network to a computer with a given MAC address.
- Port Settings: Also known as port forwarding. This option allows you to configure which TCP ports are forwarded to which LAN IP addresses when they come into the network, using the static or dynamic IP address assigned earlier in this chapter when we configured the Network settings on the device.
- Enable Access Controls: Here, configure what times each client computer can route through this device to access to the Internet.

Figure 12-7. Network Options
Limiting the DHCP Scope
If the AirPort is acting as a routing device and there are multiple computers for which the AirPort is directing traffic, then you should use the built- in DHCP feature on the AirPort. The DHCP feature will configure the AirPort to hand out IP addresses to client computers and devices on the network. A good way to secure the network is to limit the number of IP addresses assigned to networked computers. Limiting the number of assignable IP addresses to the exact number of computers on the network is a good way to ensure that only certain computers are able to use the address. Not allowing an unlimited number of computers to join the network limits the threat of unknown systems compromising your environment (although not as much as limiting access based on MAC address would as we will discuss later on).
To configure DHCP, click Network Options from the Network tab in AirPort Utility (see Figure 12-8). Next, click the DHCP Range field, and select the IP address scheme to use. When choosing an IP scheme, make sure there are no other IP schemes already in place on the network that might conflict. Once an IP scheme is selected, enter the first IP address the router should use in the DHCP scope in the DHCP Beginning Address field. Then enter the last IP address in the scope in the DHCP Ending Address field. For example, if five computers need to have IPs distributed to them, then you’d use 10.0.1.2 as the first address and 10.0.1.6 as the last address. Click the Save button to commit the changes to the AirPort (and Update from back on the Network screen).

Figure 12-8. DHCP settings
Securing Computer-to-Computer Networks
A computer-to-computer network is similar to other wireless networks except it does not have a central base station. In previous versions of OS X, computer-to-computer networks were known as ad hoc networks.
The security features available on computer-to-computer networks are limited. WEP is disabled by default, and WPA is not available. When creating a secure computer-to-computer network it is imperative to implement a secure, encrypted connection. To create a secure computer-to-computer network connection, click the wireless icon at the top of your screen (see Figure 12-9), and choose the Create Network option.

Figure 12-9. Creating computer-to-computer networks
At the Create a computer-to-computer network screen, enter the name you’d like to give the network and the channel the network will use (12-10).

Figure 12-10. Enable the computer-to-computer network
Other computers will now be able to connect to your network. This is mostly useful for sharing files back and forth with one another.
Wireless Topologies
A wireless network’s placement within a network can greatly impact the security level of the network. Many wireless networks, for ease of use, will want to have NAT disabled, allowing Bonjour connections into devices on the wired network. For larger networks where security is paramount, network administrators should strongly consider putting an Apple AirPort in a demilitarized zone (DMZ). A DMZ sits outside the corporate firewall and can have a completely different set of rules for how network traffic is managed.
The default configuration of an Apple AirPort has NAT enabled. This removes the ability of the wireless clients to communicate over broadcast networks with upstream networks. However, clients can still communicate by IP address with upstream networks. Therefore, this is not actually a DMZ but instead a subnetwork of your main network. Communications are still possible and less controllable.
The preferred location of AirPorts and wireless access points is in a DMZ. It is important to note that placing the wireless access point in a network above rather than below (in terms of the network architecture) will render your NAT wireless clients unable to communicate directly with your corporate network. They will need to establish a VPN tunnel to talk to the network. With this setup, traffic can be most effectively encrypted.
This network topology is often employed in larger companies, and in the future we expect more and more wireless protocols to be developed around it.
Wireless Hacking Tools
Several tools can be used when looking to enumerate or break into wireless networks. Many of these have graphical user interfaces (GUIs) that allow less-savvy users to perform very complicated tasks, such as mapping out WEP keys for physical areas and discovering wireless networks with relative ease, even if they don’t have any background in hacking. We’ll spend some time covering these tools so you’ll know what to look out for when securing your wireless network.
KisMAC
KisMAC is the OS X version of Kismet, a wireless network utility for Linux and FreeBSD. KisMAC development was managed by a developer in Germany, but political considerations in 2007 forced the project to move to Switzerland. The project changed hands again and eventually ended up in the United States at http://kismac-ng.org. It has since been forked to IGRsoft and renamed to KisMac (or KisMac2), and it can be found at http://downloads.igrsoft.com/beta/KisMac2.zip. KisMAC is a free network scanning utility based on Kismet. KisMac is used to detect wireless networks and crack their passwords. Once downloaded, simply open the app and click the Scan button. As you can see in Figure 12-11, KisMac initially lists all of the wireless networks that are visible by KisMAC scanners. KisMAC will show the signal strength and type of encryption for each of the networks, making it very easy to find AirPorts that are close to you as well as isolating networks with weak signal strengths.

Figure 12-11. KisMAC base stations
When scanning, KisMAC can show details about a given network. Simply click on one of the networks and click on Details to see everything KisMAC has been able to ascertain thus far, as you can see in Figure 12-12.

Figure 12-12. KisMAC graphs
Other programs such as Mac Stumbler and iStumbler can give the same information, but the more advanced password cracking and wireless scanning features found in KisMAC make it a more compelling application for the hacker to use.
Cracking wireless networks with KisMAC is possible only if a second wireless network interface is installed on the machine. The second network interface runs in a passive monitoring mode, while the first active network interface sends out probe requests and waits for answers. Be aware that this is no longer the bleeding edge of hacking technology, but it is still very effective in testing out the “hackability” of your network.
Packet reinjection is a WEP cracking technique used to crack wireless networks. With this attack, KisMAC will try to send captured packets of data in order to cause another computer to respond. If the computer responds, KisMAC will send these packets repeatedly. If KisMAC detects any answers, then it will go into injection mode. Injection mode generates a lot of traffic, causing more easily captured pieces of data to be generated. Wireless networks with WEP can be broken within an hour, and sometimes only ten minutes or less.
Many wireless access points offer a key generation process using an easy-to-remember passphrase. Unfortunately, many wireless manufacturers implemented a very dangerous algorithm, called the Newsham 21-bit attack, for the generation of 40-bit WEP keys. This algorithm generates keys with an effective strength of only 21 bits. KisMAC is able to brute-force, or attempt all possible combinations until the correct password combination is found (see Figure 12-13), finding these keys quickly. Wireless access points from Linksys, D-Link, Belkin, and Netgear are confirmed to be vulnerable to the Newsham 21-bit attack.

Figure 12-13. Cracking into base stations
Most network interfaces that are available are PCMCIA cards, which is an interface that MacBook and MacBook Pro users cannot use because of the lack of a PCMCIA interface on the machines. Still, there are a couple usually listed in the KisMAC preferences that you can acquire if you’d like to use your computer for performing these tasks.
Detecting Rogue Access Points
If a rogue access point is suspected on the network, it is possible to use KisMAC to quickly locate the WAP. If you have a GPS unit, the Map menu provides users with the ability to set their current position on a map and then follow the wireless signal to the rogue access point’s source using signal strength readings.
To set up a map, you will need to import an image and switch to the Map tab. You should now see a map. Click the Set Waypoint 1 entry in the Map menu and click a position in the map for which you know the geographical position. KisMAC will now ask you for this position. If you have a GPS device attached to your computer, your current position is set as the default coordinates.
Now use the Set Waypoint 1 entry to set up a second waypoint. After you have set up these two points, KisMAC can use the image as a map (see Figure 12-14). Networks are automatically displayed. You can also show your current position by clicking the Current Position entry in the Map menu.

Figure 12-14. Setting up a map for KisMAC
iStumbler and Mac Stumbler
iStumbler is a good discovery tool for OS X that is available under a BSD-style open source license and allows users to find AirPort networks, Bluetooth devices, and Bonjour services. You can download iStumbler from www.iStumbler.net. After downloading, open the application and it will automatically scan the wireless networks that are accessible to the computer running it. The default graph (see Figure 12-15) will show the wireless network name, the type of security employed on the wireless network, the signal, the vendor of the WAPs, the wireless channel, and the Mac address of the wireless base stations.

Figure 12-15. iStumbler
It will also compute a graph that displays a history of the wireless network’s signal strength. You can view this in a stand-alone window by selecting Monitor from the AirPort menu. The monitors can be used to help in troubleshooting wireless signal issues by finding overlapping SSIDs, finding rogue access points, and helping determine which channel to use in a physical location that is highly saturated with wireless access point channels and signals.
Another nice feature of iStumbler is the ability to view details about wireless networks using the AirPort Inspector. The Inspector includes details such as the noise level and the average signal level of the network. The advanced information that can be obtained using Inspector is accessible in the Edit menu and enabled by default, but it also mirrors much of what is found by holding down the Option key and clicking on your Wi-Fi menu bar item (Figure 12-16). iStumbler provides you with a lot more information than we can cover in this chapter. Suffice it to say that this level of detail can be handy if you are troubleshooting an issue on the phone with a vendor or looking to hack into your wireless network to test the security of your environment.

Figure 12-16. Hold down the option key and click on your Wi-Fi menu bar item
Ettercap
Ettercap is a tool used to execute “man-in-the-middle” (MITM) attacks on a LAN. Features include sniffing network traffic, network analysis, and content filtering. It can also be used to intercept packets, to perform ARP spoofing, and to perform character injection. It will perform password collection for a variety of protocols including Telnet, FTP, POP, SSH, ICQ, SMB, MySQL, HTTP, IMAP, and Yahoo Messenger. Ettercap can perform OS fingerprinting, kill network connections, and check for other poisoners. It can also do all of this on wired networks.
You can download Ettercap from https://ettercap.github.io/ettercap/.
Network Utility
Built into OS X is the Network Utility, which still provides some useful information about the Mac it is running on as well as the network that Mac is attached to, whether that be an Ethernet network or a wireless network. This utility has been moved to /System/Library/CoreServices/Applications/
NetSpot Pro
NetSpot Pro (and the non-Pro version for home users) is a WiFi planning, surveying and mapping utility that allows detection of many characteristics of WAPs in an area. The SSIDs and characteristics can be saved in a file, and can be mapped to an area. These maps can be exported to a KML file for storage and later comparison and analysis over time to see how a WiFi environment changes. The app has good tech support and a user forum. It can be found here, http://www.netspotapp.com. Discovery setting in NetSpot Pro displays several useful characteristics when scanning a physical space or area for WiFi signals that are in the space (Figure 12-17).

Figure 12-17. Discovery setting in NetSpot
The Survey setting in NetSpot Pro allows adding WAP locations and characteristics to a map or outline of a physical space or area for documentation or later analysis (Figure 12-18).

Figure 12-18. Survey setting in NetSpot
Cracking WEP Keys
To drive home why it is so important to practice good security with your wireless environment, let’s look at cracking a few types of wireless security protocols. Let’s start with a WEP key. There are three steps we will need to go through in order to crack a WEP key. First, we need to locate the AirPort using a tool such as KisMAC.
Second, we need to generate a minimum of 400,000 WEP initialization vectors (random bits of data used to decrypt wireless traffic). We will capture the traffic using Aireplay to generate the required initialization vectors. Aireplay is available at http://www.aircrack-ng.org. Once captured, Airodump will be used to save the captured initialization vectors into a file and they can be processed from there. Because of the nature of the project, we recommend checking out the online documentation for further information on using the product.
802.1x
Encryption should always be implemented on wireless networks. It enables a challenge-and-response request for authentication credentials, and is one of the best safeguards against allowing users to crack your WEP keys. There are a number of different flavors of 802.1x, protocols involved in getting systems working, and methods for dealing with certificate distribution. We recommend sitting with the team that manages your wireless environment and building a profile that can be used to enroll your client systems properly if you’ll be using some form of 802.1x.
The easiest way to do this is using either Apple’s Profile Manager, or Apple Configurator (Figure 12-19). Both of these products can generate a profile that can be installed manually and tested. You can also use practically any third party Mobile Device Management (MDM) solution to deploy a profile.

Figure 12-19. Manually build profiles for 802.1x configurations
Once a profile is installed, use the 802.1x tab of the Wi-Fi interface you’re configuring for connectivity in order to manually connect and test your configuration. 802.1x can be either very easy or very frustrating. By working with your network administrators, you can have them review logs and help you get each setting configured appropriately.
General Safeguards Against Cracking Wireless Networks
Encryption should always be implemented on wireless networks. It is one of the best safeguards against allowing users to crack your WEP keys.
Determining the strength of encryption is always a trade-off between security and speed. The more encrypted, the slower the network will be because of increased time for the mathematics to do encryption and decryption at both ends. But increased levels of encryption also mean increased time to crack passwords, which makes your network a tougher problem for potential password crackers. Most wardrivers will not bother with heavily encrypted networks, moving on to less well-protected environments. Keep in mind that the encryption strength is not only determined by the number of bits that the encryption is using but also by the complexity of the passphrase being used if only because more complex passwords are harder to crack when using a dictionary attack. Corporate environments concerned about wireless security will use WPA2 Enterprise and 802.1x, which goes beyond simple WEP keys by employing a RADIUS server on the network. (RADIUS is Remote Authentication and Dial In User Service. It has been around for a long time but is still widely used and is very useful for network security.) This allows the administrator to use a server that can lock accounts if someone is attempting to break into them using password policies and other account management security measures described in Chapter 16.
Having good signal strength helps keep packets from becoming orphaned. Because orphaned packets make cracking wireless networks easier, maintaining good signal strength is another good way to keep wireless networks protected.
Summary
Securing your network is a must in today’s security environment. Because of the damage or loss that can happen on a local area network and the sheer number of people now able to effect such damage, it is now critical to act locally as well with regard to network security. This starts with the wireless network, if only because of the exposure to potentially nefarious operators who may be outside the physical and logical perimeter of your space.
In this chapter we looked at some of the techniques used to both secure and break into a wireless network. Password protection, MAC address filtration, and NAT firewalls are good security techniques. They should not be the only security measures used for securing wireless networks, but they are good first steps toward securing wireless networks. While breaking into any networks should be reserved to labs and securing your own networks, our main goal in looking at these practices was to portray how easily some of these security mechanisms are to bypass and the damage that can be done once they have been circumvented. When practicing your skills in wireless cracking be sure to act only on your own network or on a network for which you have explicit permission to act on. Many regions have laws that forbid password cracking or attempts to penetrate WiFi networks, with real penalties for doing so.
Now that we are finished looking at wireless networks, in Chapter 13 we will look at one of the most critical of services on the inside of your network, file sharing.