
Chapter 3
Android Database Support
WHAT’S IN THIS CHAPTER?
- Learning about SQL support in Android
- Understanding SQL from Java: The SQLiteDatabase class
- Creating a database: The SQLiteOpenHelper class
- Understanding loaders, cursors, and adapters
WROX.COM CODE DOWNLOADS FOR THIS CHAPTER
Please note that all the code examples in this chapter are available at https://github.com/wileyenterpriseandroid/Examples.git and as a part of the book’s code download at www.wrox.com on the Download Code tab.
The previous chapter introduced SQLite and demonstrated its use from a command line on the Android platform. This chapter extends the demonstration to show the use of SQLite from an application.
In order to use local, structured data from an application, it is necessary to do several things:
- Embed SQL commands in application code and execute them at run time.
- Create, initialize, and update databases as needed.
- Select a database lifecycle management strategy appropriate for an application.
- Parse the data obtained from queries for use in an application.
SQL IN JAVA: THE SQLITEDATABASE CLASS
Chapter 2 demonstrated the use of SQLite from the command line. In order to be useful as part of an application, however, it must be possible to embed SQL in the Java code that composes an application. The Android library provides the SQLiteDatabase class for this purpose.
Running SQL queries against a SQLite database, from Java code, requires an instance of the SQLiteDatabase class. You’ll see in the next section how to get such an instance. This section shows the basics of how to use the instance, once you have it. Here, you will see how the instance methods provide basic, low-level access to a database.
Basic SQL Embedding
The simplest and most representative of the SQLiteDatabase methods is execSQL. It takes as an argument a single string containing arbitrary SQL and executes that string as a query against the attached database. This is, in general, how SQL code is embedded in an application: The SQL is expressed as a Java string and then passed to a synchronous method for execution. When the method returns, the SQL has been executed. Nearly all of the SQL statements demonstrated in the previous chapter can be executed in this way. Here, for example, is Java code that executes a single SQL statement that creates a database table:
db.execSQL("create table pets(name text, age integer)");If executed successfully, this Java code will create the new table named pets with two columns in the attached database.
There are some limitations to keep in mind when using the Android SQL APIs. The first of these limitations — and this particular limitation isn’t specific to the execSQL method — is that the SQLite “dot” commands introduced in the previous chapter (for example, .help, .schema, .table, and .exit) are not SQL. They are artifacts of the sqlite3 command-line interpreter and cannot be used from application code.
Another limitation that applies across the entire Android SQLite API — one that might be particularly surprising in the context of the execSQL method — is that multiple SQL statements cannot be batched in a single method call. The string passed to execSQL as an argument should contain exactly one SQL statement. If it contains more than one statement (probably separated by semicolons), all of the statements after the first semicolon are silently ignored.
A final and perhaps obvious limitation, specific to executing SQL statements from the execSQL method, is that the method has no means of returning a value. Even if it were possible to run a SQL query using execSQL, it would be pointless to do so because there is no way to get programmatic access to the query results. In fact, when a statement executed by the execSQL method does return data, the method throws a SQLiteException with an error message indicating that a query statement should be run using a different method.
The most generic method that returns a result is the rawQuery method. It can be used to execute SQL that returns a result and to recover that result programmatically. As an example, consider an application that requires the ability to determine, at run time, the structure of a table in an open database: It needs something roughly equivalent to the .schema <tablename> command implemented by the sqlite3 CLI. An implementation of this requirement might use rawQuery and SQLite’s pragma table_info command, like this:
Cursor c = db.rawQuery("pragma table_info(" + tableName + ")", null);This query is a bit far-fetched, perhaps, because applications are unlikely ever to connect to a database whose structure is not well known. The point, however, is that rawQuery is an analog to execSQL: It provides a way to execute arbitrary SQL that returns data. That data is returned — as it is from most SQLite API methods — as a cursor. Cursors are discussed in detail later in this chapter.
In general, execSQL and rawQuery are both blunt instruments. Rather than being general tools for programmatic execution of SQL, they should, instead, be used as last resorts to access infrequently used SQL that is not addressed elsewhere in the Android SQLite API. The execSQL method’s chief use, as will become clear in a moment, is building a new database. Most developers will probably never use rawQuery.
Before moving away from these low-level methods, you should examine one more generic API pattern. Both execSQL and rawQuery take a third argument (it is optional for execSQL), called bindArgs. As an example of why bindArgs is valuable, consider this naive code — incorrect for many reasons, but intended to clean old records for a given individual from the database:
db.execSQL("delete from people where name='" + person
    + "' and added_date < "
    + String.valueOf(System.currentTimeMillis() - HISTORY));
Now consider what happens if the variable person contains the value fred';. Remember that the execSQL method simply ignores any text that appears after a semicolon. When executed, this code will delete all of the records for fred instead of just a few historical records. This is a very simple example of the problem that is at the root of the by now very familiar SQL-injection database attack.
This kind of error can be avoided by using bindArgs. The SQLite API provides a way of replacing parameter characters (? and ?NNN) in a SQL expression with the values specified as bindArgs. This binding is subject to syntactical checks and is thus much less vulnerable to the kind of security issue demonstrated in this section. For more information on using SQL parameters in SQLite, see http://www.sqlite.org/lang_expr.html#varparam.
Syntactic SQL
Instead of embedding SQL in application code as unchecked, untyped strings, the Android SQLite API hoists the semantics of SQL into API methods. As you might expect, most of these methods fall into one of four families: insert, update, delete, and query. There are, in addition, a couple of convenience methods and several management methods.
Delete
The smallest of the families is the delete-related methods. In fact, it contains exactly one method: delete. It is instructive to review the arguments to the delete method because they establish another pattern used throughout the API.
Before reviewing the method arguments, though, you should note that the two methods on the SQLiteDatabase object, create and delete, are not opposites! The create method creates a new database. Its opposite is deleteDatabase. Most developers will never use either. The delete method executes a SQL delete statement that, conditionally, deletes rows from a specific table in the database. Its opposite is insert.
In general, again, statements in the SQL language have a syntax that defines clauses. This structure is frequently highlighted when SQL statements are pretty-printed, as were some of the examples in the previous chapter. Here is an example of a pretty-printed delete statement:
DELETE
    FROM pets
    WHERE age > 10 AND age < 20
The pattern within the Android SQLiteDatabase API is that the first part of this statement, in this case, the DELETE, is supplied by the method itself — the delete method produces a DELETE statement, the insert method produces an INSERT statement, and so on.
The subclauses for the statement are, each, separate arguments to the method. They are specified without the keyword that introduces them in SQL. For instance, the previous pretty-printed example could be embedded in Java as:
db.delete("pets", "age > 10 AND age < 20", null);Aside from preventing minor misspellings (deleet for delete or something), this code isn’t really a dramatic improvement over execSQL. It is simply a convenience method that is transformed, quite literally, into the execSQL version. The third argument, however, is the bindArgs feature, and makes the delete statement significantly safer. Given a table:
CREATE TABLE pets(name text, age integer)
INSERT INTO pets VALUES("linus", 14)
INSERT INTO pets VALUES("fellini", 15)
INSERT INTO pets VALUES("totoro", 8)
The following method call will successfully delete two rows from the database, leaving only the row for "totoro":
db.delete("pets", "age = ? OR name = ?", new String[] {"15", "linus"});Although it does not support the named arguments described in the SQLite documentation, the Android API does support numbered arguments. This method call has exactly the same effect as the previous one:
db.delete("pets", "age = ?2 OR name = ?1", new String[] {"linus", "15"});Update
The family of methods that implement database updates is also very small. It includes two methods, update and updateWithOnConflict. They introduce a new syntactic constraint in the form of a new type, ContentValues. ContentValues provides a binding from a column name to its value. For instance, the SQL statement:
UPDATE pets
    SET age = 99
    WHERE name = "linus" OR name = "fellini"
would be coded using the Android SQLite API as follows:
ContentValues newAges = new ContentValues();
newAges.put("age", Integer.valueOf(99));
db.update(
    "pets",
    newAges,
    "name = ? OR name = ?",
    new String[] {"linus", "fellini"});
Again, the interface extensions appropriately enforce structure. The SQL statement that the library actually prepares for execution looks like this:
UPDATE pets SET age = ? WHERE name = ? OR name = ?
bindArgs: 99, "linus", "fellini"
The other update method, updateWithOnConflict, supports the SQLite ON CONFLICT clause (see http://www.sqlite.org/lang_conflict.html), which controls behavior when statement execution would violate a UNIQUE or NOT NULL constraint. This can happen, for instance, when an update statement attempts to set the primary key for some row to a value that is already the primary key for some other row. Although the choice of a conflict resolution algorithm can affect the method’s return value (or the exceptions it throws), it is primarily something that is passed to the SQLite engine and not explicitly handled by the Android SQLite library. In particular, calling updateWithOnConflict, specifying CONFLICT_IGNORE, does not guarantee that no SQLiteException will be thrown. The SQLiteException is an unchecked exception and can be thrown by nearly any method in the Android SQLite API. The documentation for the SQLiteDatabase class mentions it only haphazardly: There are many situations in which it could be thrown that are not described there.
Insert
The insert family of methods is nearly identical to the update family: Its methods take as arguments the name of the database they must update and a ContentValues object mapping column names to values. There are a few small differences, however. Perhaps oddly, the insert methods, alone among the statement execution methods, catch and discard any SQLiteException thrown by underlying code. They return an error value of −1 to indicate failure. To get behavior that is analogous to the behaviors of the delete and update methods, use insertOrThrow. Here is an example of an insert:
ContentValues newPet = new ContentValues();
newPet.put("name", "luna");
newPet.put("age", 99);
db.insert("pets", null, newPet);
The replace method is also a member of the insert family. It is a convenience method that is translated to a call to insert using the OR REPLACE ON CONFLICT algorithm for resolving constraint violations. The replace method will insert a new row, if the insertion does not cause a conflict. If the insertion would cause a conflict, existing rows are replaced by new values. The behavior of this method can be surprising. Consider the following dataset:
CREATE TABLE test(id integer primary key, key text unique, val text unique)
INSERT INTO test VALUES(1, "foo", "foo")
INSERT INTO test VALUES(2, "bar", "bar")
Running the following code:
ContentValues newTest = new ContentValues();
newTest.put("key", "bar");
newTest.put("val", "foo");
db.replace("test", null, newTest);
results in the following:
sqlite> select * from test;
3|foo|bar
Although this particular sample code, simple as it is, does not generate any exceptions, clearly the deletion of two rows and the disappearance of the two associated primary keys could cause all sorts of foreign key constraints to be violated. Caveat emptor.
Query
The query family of methods is, by virtue of being most complex, the largest. Including the rawQuery methods that you met earlier in the chapter and the methods on the SQLiteQueryBuilder class, there are a total of 13 query methods.
To begin, Listing 3-1 shows an example of a SQL query, with all of its clauses.
LISTING 3-1: A complete query
SELECT table1.name, sum(table2.price)
    FROM table1, table2
    WHERE table1.supplier = table2.id AND table1.type = "spigot"
    GROUP BY table1.name
    HAVING sum(table2.price) < 50
    ORDER BY table1.name ASC
    LIMIT 100
Each of the clauses is represented by its own argument in the query methods:
- table — The FROM clause: a table to query
- columns — A list of columns to be included in the result: the projection
- selection, selectionArgs — The WHERE clause and its arguments
- groupBy — The GROUP BY clause
- having — The HAVING clause
- orderBy — The ORDER BY clause
An empty or non-existent clause can be represented by a Java null value. Analogous to the insert and update statements, the WHERE clause in the query method is specified using two method arguments: selection and selectionArgs. The string passed as the selection can contain parameter tokens (such as ? or ?NNN), which are replaced by the corresponding values from the selectionArgs array. Here is a very simple query on the pets database:
Cursor c = db.query(
    "pets",
    new String[] { "name", "age" },
    "age > ?",
    new String[] { "50" },
    null, // group by
    null, // having
    "name ASC");
There are four additional arguments, available on overloaded variations of the query method. They are listed here in roughly decreasing order of normal use:
- limit — Maximum number of rows to be returned in the query
- distinct — A standard SQL keyword that causes the query to return only one instance of each row meeting the selection criteria, even if there are several such rows in the queried table
- CancellationSignal — An object that can cancel the query to which it is passed
- cursorFactory — Allows the use of custom implementations of the cursor
Even the full version of the SQLiteDatabase query method, however, with all 11 of its arguments, cannot accommodate a UNION query. To do that, it is necessary to use the SQLiteQueryBuilder.
The query builder is not an elegant tool. In the end, it basically concatenates clause strings together to build a query string. It also has several bells and whistles that can be a bit confusing. Although it is one of the few tools available for constructing generic complex queries, its API suggests that it was designed not as a general-purpose query tool but rather as a means of handling queries for a content provider (discussed in detail in Chapter 4). It does facilitate the task of constructing JOIN and UNION queries.
Consider the following database:
CREATE TABLE vals(id integer PRIMARY KEY, val text)
CREATE TABLE keys(key text, fk integer references ref(id))
INSERT INTO vals VALUES(1, 'bar')
INSERT INTO vals VALUES(2, 'baz')
INSERT INTO vals VALUES(3, 'zqx3')
INSERT INTO vals VALUES(4, 'quux')
INSERT INTO keys VALUES('one', 1)
INSERT INTO keys VALUES('one', 4)
INSERT INTO keys VALUES('two', 2)
INSERT INTO keys VALUES('two', 3)
This code uses the SQLiteQueryBuilder to construct and execute a query on a join of its two tables:
SQLiteQueryBuilder qb = new SQLiteQueryBuilder();
qb.setTables("keys k INNER JOIN vals v ON k.fk = v.id");
Cursor c = qb.query(db,
    new String[] {"k.key AS kk", "v.val AS vv"},
    "kk = ?",
    new String[] { "two" },
    null,
    null,
    "vv DESC",
    null);
The actual query run by this bit of code looks like this:
SELECT k.key AS kk, v.val AS vv
    FROM keys k INNER JOIN vals v ON k.fk = v.id
    WHERE (kk = ?)
    ORDER BY vv DESC
And its output is as follows:
two|zqx3
two|baz
Note, first of all, that this query supports the, by now familiar, separation of selection clause from the arguments to the clause. Once again, expression parameters, represented by ?NNN (a question mark followed by between 0 and 3 digits), are replaced by their corresponding values from the selectionArgs array. This substitution is performed by SQLite and is fairly resistant to misuse. The query builder actually performs one other safety check on the WHERE clause, verifying that it is syntactically correct both as given and when wrapped in parentheses (that is, both expr and (expr)). The idea is that it is extremely difficult (if not completely impossible) to construct a devious selection clause that produces a correct SQL expression both ways.
Next, note that the query builder allows the construction of complex queries. Because it is basically just concatenating strings together, it is largely agnostic as to what is in those strings. The previous query, for instance, could also be written as follows:
SQLiteQueryBuilder qb = new SQLiteQueryBuilder();
qb.setTables("keys k, vals v");
Cursor c = qb.query(db,
    new String[] {"k.key as kk", "v.val as vv"},
    "k.fk = v.id AND kk = ?",
    new String[] { "two" },
    null,
    null,
    "vv DESC",
    null);
In which case, the actual query looks like this:
SELECT k.key as kk, v.val as vv
    FROM keys k, vals v
    WHERE (k.fk = v.id AND kk = ?)
    ORDER BY vv DESC
The features demonstrated thus far make the query builder sufficient to create nearly any query needed in application code. As mentioned, there is also a facility to produce a UNION query that is not explored here. The query builder provides some measure of safety both against syntactic errors and against the injection of malicious code by a client in the SQL it constructs.
Other Tools
In addition to the four main statement families, the SQLiteDatabase object supports several other methods. A significant number of these methods are used to manage transactions.
Code that must manage its own transactions will do so using something like the following template:
db.beginTransaction();
try {
    // sql...
    db.setTransactionSuccessful();
}
finally {
    db.endTransaction();
}
In other words, any transaction that is not explicitly marked as successful is rolled back. The SQLiteDatabase object supports all of the SQLite transaction types (documented here: http://www.sqlite.org/lang_transaction.html).
There is one other method that deserves some special attention: setForeignKeyConstraintsEnabled. As noted in the previous chapter, the Android build of SQLite disables foreign key constraints by default. As of API level 16, Jelly Bean, the setForeignKeyConstraintsEnabled method allows an application to enable the constraints programmatically. The new method replaces the previous means of achieving the same effect, which worked as far back as API level 7, Eclair, executing the pragma PRAGMA foreign_keys=true.
Most of the other methods on the SQLiteDatabase object manage, create, or delete the file that contains the database. The Android library has a much more convenient tool for that purpose, called SQLiteOpenHelper.
Creating a Database: The SQLiteOpenHelper Class
In a typical web service, creating a database is likely to be a distinct, infrequent, and substantial task. Designing, tuning, maintaining, and updating a database on an engine hosting several can be very specialized work. An organization might even employ an entire, separate segment of its engineering staff, database administrators, to do such work. Regardless of who does the work, creating the database is certainly part of the installation of the application and not part of its execution.
In a mobile application, things are different. When a user installs a new application, that application is going to have to bootstrap itself into existence. The application bundle is all there is. If a database is necessary, the application is going to have to create it. The SQLiteOpenHelper class is Android’s hedge against this edge case.
SQLiteOpenHelper is a template class — it is abstract. To use it, you must create a subclass. There will be one such subclass for each database managed by your application.
The subclass typically has a constructor that takes only a single argument, the context. The constructor for SQLiteOpenHelper, itself, however, takes at least four arguments. In order to make this work, the subclass defines several constants — including the name of the file to contain the database and its current version — and passes them to the super constructor. For instance, an application that is currently using version 6 of a database stored in the file keyval.db, might look something like this:
public class KeyValHelper extends SQLiteOpenHelper {
    public static final String DB_FILE = "keyval.db";
    public static final int VERSION = 6;
    // ...

    public KeyValHelper(Context context) {
        super(context, DB_FILE, null, VERSION);
    }
    // ...
}
When application code requests a new instance of this database from the helper, the helper first checks to see if the database file exists. If there is no such file, it creates it, using the name passed as the second argument to the constructor (a name that, by convention, ends with the suffix .db). Next, it calls onCreate, one of its three template methods. The subclass implementation of this method is responsible for completely creating the necessary schema in the newly created database file. The code shown in Listing 3-2, for example, creates and initializes the key/value database used in the examples in the previous section of the chapter.
LISTING 3-2: The SQLOpenHelper onCreate method
@Override
public void onCreate(SQLiteDatabase db) {
    ContentValues vals = new ContentValues();
    db.execSQL("CREATE TABLE " + TAB_VALS
        + "(" + COL_ID + " integer PRIMARY KEY,"
        + KeyValContract.Columns.VAL +  " text)");
    vals.put(COL_ID, 1);
    vals.put(KeyValContract.Columns.VAL, "bar");
    db.insert(TAB_VALS, null, vals);
    vals.clear();
    vals.put(COL_ID, 2);
    vals.put(KeyValContract.Columns.VAL, "baz");
    db.insert(TAB_VALS, null, vals);
    vals.clear();
    vals.put(COL_ID, 3);
    vals.put(KeyValContract.Columns.VAL, "zqx3");
    db.insert(TAB_VALS, null,  vals);
    vals.clear();
    vals.put(COL_ID, 4);
    vals.put(KeyValContract.Columns.VAL, "quux");
    db.insert(TAB_VALS, null, vals);
    vals.clear();

    db.execSQL("CREATE TABLE " + TAB_KEYS + "("
        + KeyValContract.Columns.KEY + " text, "
        + COL_FK + " integer references ref(" + COL_ID + "))");
    vals.put(KeyValContract.Columns.KEY, "one");
    vals.put(COL_FK, 1);
    db.insert(TAB_KEYS, null, vals);
    vals.clear();
    vals.put(KeyValContract.Columns.KEY, "one");
    vals.put(COL_FK, 4);
    db.insert(TAB_KEYS, null, vals);
    vals.clear();
    vals.put(KeyValContract.Columns.KEY, "two");
    vals.put(COL_FK, 2);
    db.insert(TAB_KEYS, null, vals);
    vals.clear();
    vals.put(KeyValContract.Columns.KEY, "two");
    vals.put(COL_FK, 3);
    db.insert(TAB_KEYS, null, vals);
}
An application should always use the database’s helper object to obtain an instance of a database. By doing so, it guarantees that the instance it holds is complete, initialized, and ready for use.
void insertKey(String key, int fk) {
    ContentValues r = new ContentValues();
    r.put(KeyValContract.Columns.KEY, key);
    r.put(COL_FK, Integer.valueOf(fk));
    getWriteableDatabase().insert(TAB_KEYS, null, r);
}

void insertVal(String val, int id) {
    ContentValues r = new ContentValues();
    r.put(COL_ID, Integer.valueOf(id));
    r.put(KeyValContract.Columns.VAL, val);
    getWriteableDatabase().insert(TAB_VALS, null, r);
}@Override
public void onCreate(SQLiteDatabase db) {
db.execSQL("CREATE TABLE " + TAB_VALS + "("
+ COL_ID + " integer PRIMARY KEY,"
+ KeyValContract.Columns.VAL + " text)");
// DON'T DO THIS!!!
insertVal("bar", 1);
// ...
}public void addVal(int id, String val) {
addVal(dbHelper.getWriteableDatabase(), id, val);
}
void insertVal(SQLiteDatabase db, String val, int id) {
ContentValues r = new ContentValues();
r.put(COL_ID, Integer.valueOf(id));
r.put(KeyValContract.Columns.VAL, val);
db.insert(TAB_VALS, null, r);
}The fourth argument to the helper’s constructor is the database version. It is an integer and must be greater than 0. When the helper creates the new database, in addition to using the onCreate method to initialize it, it also stores the version number in database metadata. In addition to checking for existence, when opening a database, the helper also compares the version number passed in this open attempt against the one that is stored in the metadata. If the version numbers are the same, the open succeeds without further processing. On the other hand, if the version requested by the application (the argument to the constructor) is greater or less than the version number stored in the metadata, the helper invokes the method onUpgrade or onDowngrade, respectively. These methods are responsible for converting the existing database to the schema requested by the application.
Obviously, the application user does not expect a version change to cost them their stored data. The onUpgrade and onDowngrade methods must be coded very carefully to assure that they do not corrupt or lose data. The helper object wraps the call to either method in a transaction so that any exception thrown during the transformation will cause it to be rolled back entirely. At least the data won’t be completely lost.
As mentioned, although foreign key constraints are disabled by default, there are programmatic means for enabling them. The helper object supports two methods that are well suited to making the necessary calls. If the design of an application includes the enforcement of foreign key constraints, your choice of which method is used to implement those constraints might hinge on how the application performs up and downgrades.
- The onConfigure method is called as soon as the connection to the database has been set up and before onCreate, onUpgrade, or onDowngrade. A call to setForeignKeyConstraintsEnabled here will enforce the constraints, all the time, for the entire database.
- The onOpen method is called only after onCreate, onUpgrade, and onDowngrade, leaving those methods free to play fast and loose while they rebuild the schema. The occasion in which an application must rename or recreate a table or two during an upgrade might be one of the few times that it is truly a relief that foreign key constraints are not enforced. Enabling foreign key constraints in the onOpen method causes them to be enforced only after the database has been initialized.
As must be apparent by this point, attempting to open a database can take a relatively long time. If the act of getting a database instance requires either creating the schema from scratch or copying over a substantial amount of data, the operation might take several seconds. This is far too long for an operation that runs synchronously, as part of the UI.
The SQLiteOpenHelper class guarantees that its constructor runs very quickly. It is quite safe to create the helper itself, directly, for instance, in response to the push of a button or a selection in the Action Bar. On the other hand, when it comes time to request the actual database instance, using getReadableDatabase or getWriteableDatabase, that action must be performed asynchronously and not on the UI thread.
Managing a Database
Before leaving the discussion of the database, you should consider one other topic, lifecycle management. An open database is about 1KB of memory. On a device with memory restrictions, that’s enough to be of interest. There are two basic strategies for managing a database from an application:
- Get it and keep it
- Get it when you need it
The first, get it and keep it, is the simpler of the two strategies and is a very reasonable choice unless there is a case for recovering memory within the application process. If there are substantial periods of time during which an application does not need access to the database — an application with multiple activities, only one of which uses the database, for instance — then holding the database means that the memory it occupies cannot be repurposed.
Don’t confuse garbage collection of in-process memory, though, with the Android system’s management of process lifecycle! If an application’s process is terminated — perhaps because it has been in the background for too long or because too many new applications have been started in front of it — the database, any connections, and everything else that is part of the application memory space are gone. As long as you’ve left the database in a consistent state — no uncommitted transactions and no open file connections to large objects (BLOBs) — tweaking soon-to-be-deallocated memory is a waste of effort.
Although it is simpler, the get-it-and-keep-it strategy still requires attention. If code simply forgets about the db instance, without explicitly closing it, the garbage collector will collect the instance. That will generate an error message similar to this:
09-02 15:27:10.286: E/SQLiteDatabase(16433): close() was never explicitly called on database '/data/data/net.callmeike.android.sqlitetest/databases/test.db'
09-02 15:27:10.286: E/SQLiteDatabase(16433): android.database.sqlite.DatabaseObjectNotClosedException: Application did not close the cursor or database object that was opened here
09-02 15:27:10.286: E/SQLiteDatabase(16433):     at android.database.sqlite.SQLiteDatabase.<init>(SQLiteDatabase.java:1943)
09-02 15:27:10.286: E/SQLiteDatabase(16433):     at android.database.sqlite.SQLiteDatabase.openDatabase(SQLiteDatabase.java:1007)
...
09-02 15:27:10.286: E/System(16433): Uncaught exception thrown by finalizer
09-02 15:27:10.297: E/System(16433): java.lang.IllegalStateException: Don't have database lock!
Holding a reference to the database only in an instance variable of an activity will cause this error. When the activity is no longer visible, it is subject to garbage collection. If it holds the only reference to the database, the database will be finalized at the same time without having been closed.
In order to get and keep a database, it is necessary to hold a strong reference to it. To do this, keep the reference in either in a static class variable or an application instance variable. The latter policy — holding the database reference in an application object — is an excellent way to share a database instance across multiple activities. Listing 3-3 is an example of an Application subclass that does this.
LISTING 3-3: Holding a database reference in an Application object
public class KeyValApplication extends Application {
     private KeyValHelper dbHelper;
     private Thread uiThread;

       @Override
       public void onCreate() {
           super.onCreate();

         // ...

         uiThread = Thread.currentThread();
         dbHelper = new KeyValHelper(this);
     }

     public SQLiteDatabase getDb() {
         if (Thread.currentThread().equals(uiThread)) {
             throw new RuntimeException("Database opened on main thread");
         }
         return dbHelper.getWriteableDatabase();
     }
 }
Note the check in the first few lines of the getDb method that verifies the constraint described earlier in this chapter: The database must not actually be opened on the UI thread.
This code also makes use of another feature of Android’s SQLite system. The database helper holds a reference to the database instance that it creates. In terms of memory management, holding a reference to a database helper is equivalent to holding a reference to the database that it opened. Further, closing the database instance (calling its close method) simply annoys the helper. The helper’s strategy is to create and cache a single database instance and return a reference to that cached instance, in response to each request. If it notices that the instance has been explicitly closed, it must release the cached reference and open a new connection. That is hardly optimal.
You might wonder at the implementation of the getDb method, recalling that there are actually two methods on SQLiteOpenHelper for obtaining a database: getReadableDatabase and getWriteableDatabase. It might be a surprise to discover that getReadableDatabase usually returns a writeable database.
An application can get a reference to a read-only database only by explicitly requesting one (using getReadableDatabase) when for some reason the Android system cannot open a connection to a writeable database. That might happen, for instance, if the file system were full. Normally, however, both methods return a reference to the same, single, cached database object.
Further, there is an interesting corollary to this that explains the implementation of the getDb method in Listing 3-3. Consider that an application has, somehow, obtained a reference to a database that is actually read-only. Suppose, now, that the condition that made it impossible to acquire a writeable database clears and that, after the condition clears, the application makes a call to getWriteableDatabase. Under these circumstances, the helper will open a new, writeable database connection, and may close the read-only connection. If the application has cached references to the read-only database, further attempts to use them will result in errors. Given these semantics, best practice is to request and use only writeable database instances, unless there is a clear and very time-constrained reason to do otherwise. The implementation of getDb in Listing 3-3 does exactly this.
An application for which the second strategy, get it when you need it, is necessary must be aware of all of the objects that might hold references to the database object that it wants to release. Closing the database without releasing all of the references to it accomplishes nothing, of course, because unless the last reference is gone, the database object cannot be garbage collected and its memory re-used. As described previously, the SQLiteOpenHelper retains a reference to its database. Both of the classes SQLiteQuery and SQLiteCursor also retain back pointers to their owner database. It is essential to remember this, even when the query and cursor are managed by a loader, a service introduced in the next section.
CURSORS, LOADERS, AND ADAPTERS
Veterans of Java J2EE development typically find that Android has a familiar feel about it. Applications that don’t have clear beginnings and endings and objects that have managed lifecycles are things they know and may even have come to appreciate, if not exactly to love. That familiarity comes to a harsh end, though, at the interface between the DB and UI tiers.
In the Android world, the DB tier is embodied in the ContentProvider class, the topic of the next chapter. In the UI, Android’s analog for a servlet is the activity. J2EE developers — especially those who have worked for many years with Java EE version 3.0 or later and for whom Spring and Hibernate are old friends — will be expecting some kind of object-relational model as the next step. Think again. In Android, the interface between the UI and DB tiers is CRUD and cursors. The tolerant will call it “REST-like.”
Cursors
Cursors are the objects returned from database-query methods, query and rawQuery. An Android cursor is an in-memory representation of a SQL relation. It is rectangular, with rows and columns. It also has a pointer to a current row, which is often, confusingly, called the cursor. There is only a single current row pointer per cursor, and its value is between −1 and the value returned by the getCount method (that is, just before the first row, 0, to just after the last row, count – 1). The row pointer is a mutable part of the cursor state and is accessible for both read and write from all objects with references to the cursor.
Upon return, the new cursor has a row pointer that points just before the first row. Therefore, a common idiom for reading all of the data from a cursor looks like this:
while (c.moveToNext()) {
    // get data from a single row
}
Because the method moveToNext returns false if it is pointing at the last row of data in the cursor, this code will loop through all of the rows in the cursor and then terminate. Because the cursor method getCount returns the number of rows in the cursor, this same loop could be written, perhaps less expressively, as follows:
for (int i = 0; i < c.getCount(); i++) {
    c.moveToPosition(i);
    // get data from a single row
}
There are several other methods available for managing the row pointer. The methods getPosition, isFirst, isLast, isBeforeFirst, and isAfterLast all can be used to find the current location of the row pointer. The methods moveToPrevious, moveToFirst, moveToLast, moveToPosition and move all set the location of the row pointer. The last two, moveToPosition and move, set the new position absolutely and with reference to the current position, respectively.
Once the row pointer is set to the row currently of interest, data are extracted from particular columns using their column indices. The columns in a cursor will, in most cases, be exactly those from the projection specified in the call to the query method — in most cases, in the order in which they were specified in the query. Nonetheless, the best practice for minimizing the possibility of hard-to-find protocol errors is to use symbolic column names. Reasonably safe code might look something like this:
private void getValues(SQLiteDatabase db) {
    Cursor c = db.query(
            KeyValContract.TABLE_KEYVAL,
            new String[] {
                    KeyValContract.Columns.ID,
                    KeyValContract.Columns.KEY },
                    null, null, null, null, null);
    int idIdx = c.getColumnIndex(KeyValContract.Columns.ID);
    int keyIdx = c.getColumnIndex(KeyValContract.Columns.KEY);
    while (c.moveToNext()) {
        Integer id = getInt(c, idIdx);
        String key = c.getString(keyIdx);
        // ... process the extracted value
    }
}

private Integer getInt(Cursor c, int idx) {
    if (c.isNull(idx)) { return null; }
    long n = c.getLong(idx);
    if ((Integer.MAX_VALUE < n) || (Integer.MIN_VALUE > n)) {
        throw new RuntimeException("Not an integer: " + n);
    }
    return Integer.valueOf((int) n);
}
Note the getInt method, which checks to make sure that the value of the numeric column is neither null nor out of range. The official documentation for the cursor object notwithstanding, the data-extraction methods that return primitive types (getDouble, getInt, and so on) do not throw exceptions when the value in a source column is null. Instead they return a zero value. The SQLiteCursor object is implemented using a CursorWindow, and an accurate description of its behavior can be found in the description of that object (http://developer.android.com/reference/android/database/CursorWindow.html). In order to distinguish between missing and actual zero-valued data, the null check is necessary.
In fact, the SQLiteCursor data-extraction methods cannot be trusted to throw exceptions on data conversion errors, either. Although the various methods that extract the data are typed — getString returns a string, getDouble a double, and so on — extracting data from the column is not type-checked. Any value can be retrieved as a string, for instance. An attempt to retrieve an integer value from a column that contains a value greater than Integer.MAX_VALUE will simply cause the actual value to be truncated.
The cursor method getType might be of some help in verifying that the data in a column is of the expected type: It separates values into four categories — null, integer, float, and string. Because it does not distinguish between the integer value 99 and the long value 9999999999, but does distinguish between 99 and its perfectly convertible string representation “99”, other means of type-checking, especially for foreign data, are likely to be necessary.
There is one other important family of methods on the cursor, those concerned with notification and content observers. They are discussed in Chapter 4 in context of content providers and content resolvers.
Adapters and View Binders
The most common means of viewing cursor-based data in the UI is through a list view. The Android ListView and its associated convenience classes, ListActivity and ListFragment, abstract the process of displaying homogenous data from the particular data being displayed. In order to do this they depend on adapters and view binders.
An adapter maps columns in a cursor to views in a cell of a list view layout. Figure 3-1 illustrates its role.
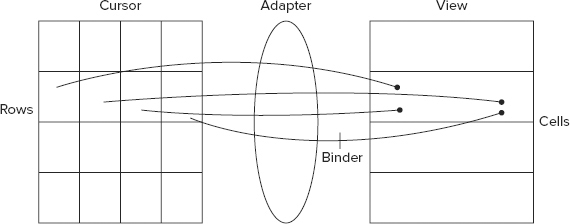
The Android-supplied SimpleCursorAdapter is quite flexible and very easy to use. It is probably sufficient for most applications. To use it, simply create the adapter and pass it to the list view by using the setAdapter method. The list view will use the adapter both to identify the values that should be visible in a particular list view cell and also to identify the row in the attached cursor that corresponds to clicks and edits in the view.
The SimpleCursorAdapter constructor takes five arguments:
- context — Usually the activity from which this list is visible.
- layout — The ID of standard XML layout for a single cell in the list view. This is the target for the cursor data.
- cursor — The source cursor from which data is obtained. Each row in this cursor corresponds to a cell in the list view and each column to a subview in the cell’s layout.
- from — An ordered list of column names.
- to — An ordered list of IDs for corresponding subviews of the list cell layout. The contents of column from[0] will be placed in view to[0], from[1] in to[1], and so on.
For example, the code in Listing 3-4 will generate the screen shown in Figure 3-2, assuming that keyvalCursor is the result of querying the database used as an example elsewhere in this chapter.

LISTING 3-4: A simple list view
RES/LAYOUT/KEYVAL_ROW.XML
<?xml version="1.0" encoding="utf-8"?>
<RelativeLayout
    xmlns:android="http://schemas.android.com/apk/res/android"
    android:layout_width="fill_parent"
    android:layout_height="wrap_content" >

    <TextView
        android:id="@+id/listview_key"
        android:layout_width="wrap_content"
        android:layout_height="wrap_content"
        android:layout_alignParentTop="true"
        android:layout_alignParentLeft="true"
        android:textSize="18sp">
    </TextView>

    <TextView
        android:id="@+id/listview_id"
        android:layout_width="wrap_content"
        android:layout_height="wrap_content"
        android:layout_alignParentTop="true"
        android:layout_alignParentRight="true"
        android:textStyle="bold" >
    </TextView>

    <TextView
        android:id="@+id/listview_val"
        android:layout_width="fill_parent"
        android:layout_height="wrap_content"
        android:layout_below="@id/listview_key"
        android:layout_alignParentLeft="true"
        android:paddingLeft="12dp">
    </TextView>
</RelativeLayout>
KEYVALACTIVITY.JAVA
private static final int LOADER_ID = 6;
private static final String[] FROM = new String[] {
    KeyValContract.Columns.ID,
    KeyValContract.Columns.KEY,
    KeyValContract.Columns.VAL
};

private static final int[] TO = new int[] {
    R.id.listview_id,
    R.id.listview_key,
    R.id.listview_val
};

// ...

@Override
protected void onCreate(Bundle savedInstanceState) {
    super.onCreate(savedInstanceState);
    setListAdapter(
        new SimpleCursorAdapter(this, R.layout.row, null, FROM, TO, 0));
    // ...
}
If an adapter is the wiring between the source cursor and the target view, a view binder is a transformation along a wire. By default, an adapter tries to do something sensible with the data it maps. If the target view is a text view, it is easy (recall that the value of any column can be retrieved as a string). Adapters make reasonable choices, as well, if the target is an image view and the source can be interpreted as the resource ID of an image. If the data represents a time since the epoch and needs to be translated into a real date, or a 32-bit ARGB hue representation to be displayed as a color, a custom view binder is the tool for the job.
A quick note about the implementation of a view binder is in order. Remember that the view binder’s setViewValue method will be called for every sub-view of every cell in the target list. If the list view is to be fast, smooth, and responsive, it is essential that the view binder do its work very quickly. This is one of the few places that extreme optimization is appropriate.
In order for an adapter to work correctly, the cursor to which it is a view must have an integer primary key named '_id'. The adapter uses the canonically named column to map view rows to cursor rows. If it cannot find the column, it will throw an exception like this:
09-03 14:27:50.285: E/AndroidRuntime(2289): FATAL EXCEPTION: main
09-03 14:27:50.285: E/AndroidRuntime(2289): java.lang.IllegalArgumentException: column '_id' does not exist
09-03 14:27:50.285: E/AndroidRuntime(2289):     at android.database.AbstractCursor.getColumnIndexOrThrow(AbstractCursor.java:267)
09-03 14:27:50.285: E/AndroidRuntime(2289):     at android.database.CursorWrapper.getColumnIndexOrThrow(CursorWrapper.java:78)
This does not imply that all tables viewed through list views must have a column named '_id'. There are several alternatives.
If the relation to be viewed has an integer primary key column, my_pk, for instance, that column can be aliased in the query, using a SQL column alias: SELECT my_pk AS _id FROM ....
If the viewed relation does not have an integer primary key, a little SQLite skill may solve the problem. It turns out that rows in SQLite data tables have an implicit column, rowid. The rowid is integer-valued and unique to a row. In most circumstances — anything except many-to-many joins — adding rowid to the projection and renaming it in the query, SELECT rowid AS _id, . . ., makes it possible to view the resulting cursor through a list view.
Loaders
As mentioned earlier, database operations cannot be performed on the UI thread. A slow query, a contended transaction, or a database update might require an amount of time that would cause an intolerable stall in the UI. Recall that the code in Listing 3-3 explicitly checks to see whether a database instance is being requested from the UI thread. It throws an exception if so. The standard Android tool for avoiding such problems, by moving queries off the UI thread is the loader.
Loaders appeared in Honeycomb to replace the managed query interface. They are an abstraction of a process that loads data in the background. The subclass of interest here is the CursorLoader, which, given some parameters that specify a database and a query to be made against that database, runs the query on a daemon thread and then publishes the result. Loaders are used in activities or fragments by passing them to the loader manager.
Implementing and using a loader can seem like a study in indirection. What the code actually needs is a cursor to the data. It can’t simply ask for the cursor, though, because it might take a significant amount of time to get it and that would excessively delay the UI thread. Instead, it asks the loader manager to initialize a new load process. Again, instead of simply describing the process of getting the cursor to the loader manager, when it requests initialization, the code must pass a reference to an observer. Figure 3-3 diagrams the process.

At some point, the loader manager calls the observer. It is the observer’s responsibility to create and return the correct loader. The loader is the object that implements the process of obtaining the cursor. The loader manager runs the loader and, when it completes, again calls the observer, this time with the cursor that the loader returned.
This surprising amount of complexity is necessary, in short, because there is no telling when an activity is suddenly going to become unimportant. Users looking at their contacts might suddenly recall the phone number of the person they intended to call and navigate directly to the phone app. If the loader continues running when that happens, it is wasting battery. Solving this problem of incongruous lifecycles is not impossible but it can be tricky and difficult. Representing the entire load process as an object and letting the loader manager manage its execution is a big win.
Here’s a simple example of the use of a loader:
public class KeyValActivity extends ListActivity
    implements LoaderManager.LoaderCallbacks<Cursor>
{
    private static final int LOADER_ID = 6;
// ...
@Override
    public Loader<Cursor> onCreateLoader(int arg0, Bundle arg1) {
        return new CursorLoader(
                this,
                KeyValContract.URI,
                null, null, null, null);
    }
@Override
    public void onLoadFinished(Loader<Cursor> loader, Cursor c) {
        ((SimpleCursorAdapter) getListAdapter()).swapCursor(c);
    }
@Override
    public void onLoaderReset(Loader<Cursor> arg0) {
        ((SimpleCursorAdapter) getListAdapter()).swapCursor(null);
    }
@Override
    protected void onCreate(Bundle savedInstanceState) {
        // ...
        getLoaderManager().initLoader(LOADER_ID, null, this);
    }
}
The onCreate method in the ListViewActivity gets the loader manager and asks it to initialize a new load process. The important thing to note here is the unique identifier, LOADER_ID. The Android system guarantees that there will never be more than one loader with that identifier. This is essential, because if onCreate (or any other lifecycle method) is called again while the loader still exists (remember that their lifecycles are not the same), it would be possible to have multiple loaders in different phases of execution completing the same load process. The unique, per-process identifier eliminates this possibility.
The third argument to initLoader is a reference to the observer that will actually create the loader. In this example, the activity itself will serve as the observer. This is a reasonable consolidation because it is the activity’s lifecycle that needs to be synchronized with that of the loader. The second argument to initLoader is a bundle that can be used to supply arguments to the loader, on its creation.
In order to be an observer to the LoaderManager, the ListViewActivity must implement LoaderManager.LoaderCallbacks<Cursor> (Cursor, because the loader will return a cursor). Implementing that interface requires that it implement the three new methods — onCreateLoader, onLoaderFinished, and onLoaderReset.
The first of these methods, onCreateLoader, simply creates the new loader and returns it. The loader that is created in this example is a CursorLoader that requests data from a content provider. The specifics of this request are the subject of the next chapter. For the moment, presume that its interface is very similar to the interface for the database query method: It takes similar arguments and returns a cursor on completion.
The loader manager executes the returned loader asynchronously. When it eventually completes, it returns its cursor. The loader manager then calls the second of the observer’s methods, onLoaderFinished, with that cursor. The implementation of the callback quite simply replaces the cursor visible from the list view. If, for some reason — perhaps a phone call or a navigation event — the activity no longer needs to populate the view, the manager calls onLoaderReset. onLoaderReset replaces the cursor with null. Since the loader manager executes the loaders, it can manage the cursors that they return. When onLoaderReset is run the replaced cursor is also closed as necessary.
SUMMARY
In this chapter, you have explored the essentials of using SQL from code. The chapter introduced:
- The low-level methods required to execute SQL commands
- The tools necessary to create and manage the lifecycle of a database
- The cursor object that manages query results
- Asynchronous queries, the tools to manage them, and display them in an activity
You now have the tools to manage persistent data on an Android device. Information that must survive even power-cycling can be stored into a SQLite database and recovered quickly and correctly using Android built-in tools like cursors, loaders, adapters, and view binders. Sharing that data across an enterprise, though, requires additional tools. The next chapter introduces the content provider, the architectural component used to share data.