TEA MUG
Drawing drinks and beverages can be fun too—everything from paper to-go cups at the coffee shop to your mug of tea at home.
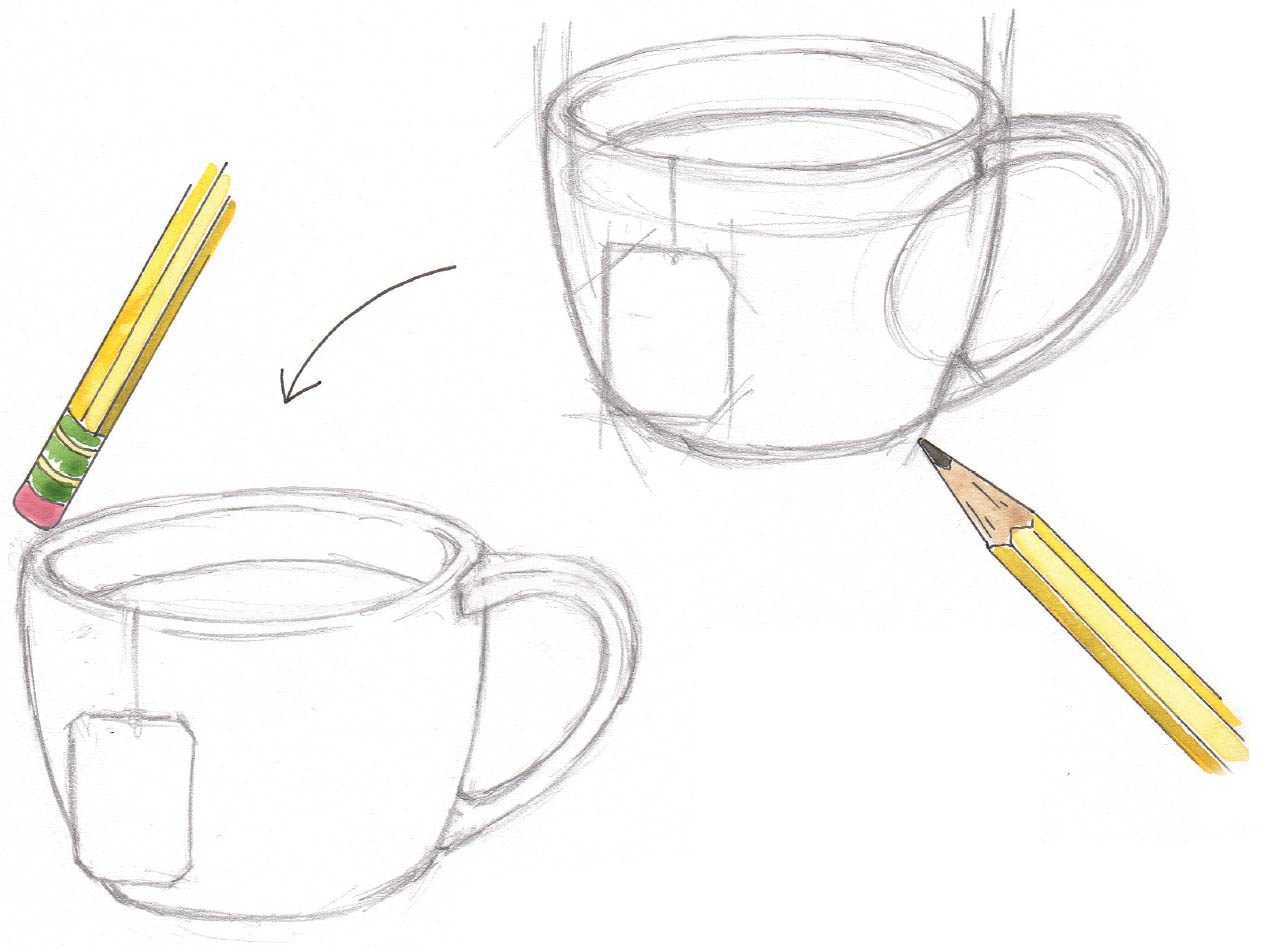
Start by drawing lightly and loosely from the outside in. Get the shape of the cup first, before worrying about the liquid. Keep an eye on the thickness of the sides of the mug.
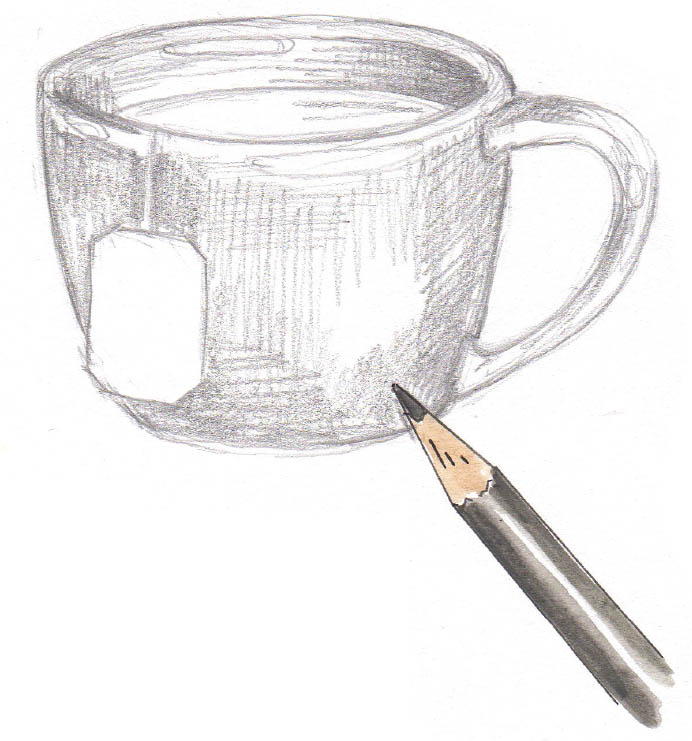
When the shapes are complete, round off lines, and erase extra pencil marks you no longer need.
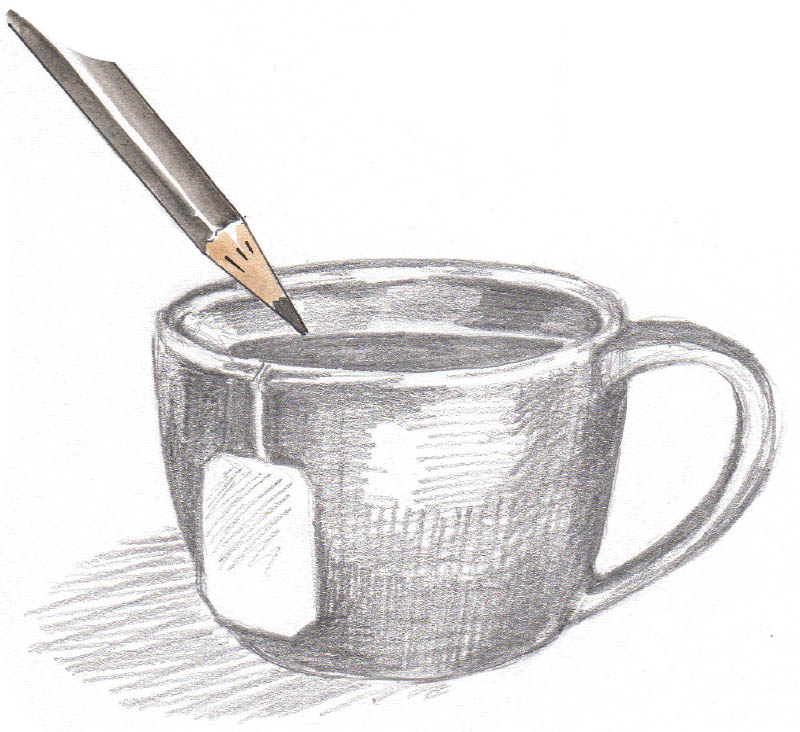
Add shading with crosshatching, leaving the white of the paper for highlights. Remember, the closer the hatch marks are to each other, the darker the shading. If needed. Use a darker HB pencil to add more contrast in the dark areas.
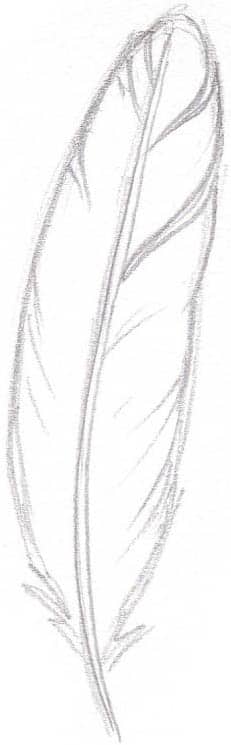
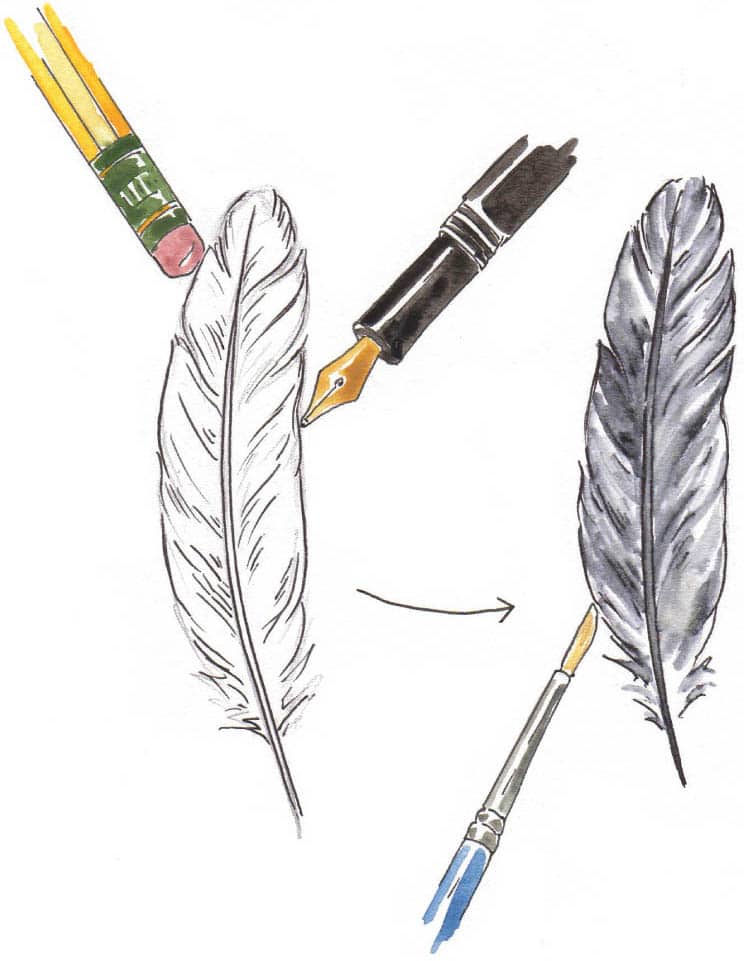
Feathers are particularly fun to draw—and they come in so many shapes and sizes! Start with a light outline. Some feathers are wider on one side than the other, rather than symmetrical, so be sure to really study the feather you’re drawing. Lightly sketch any breaks along the sides of the feather, curving them down toward the feather’s center. With a water-soluble pen or fountain pen, make loose marks on the sides of the feather, along the center, and all over the inside. With a brush and water or water brush, loosen up the pen marks. Keep any highlights free of ink and wash for contrast. When the feather is dry, use pen to add top marks and details. You can also use pen to make the darkest shadows even darker so they “pop” more off the page. Curve the lines with the feather to add more realistic texture. When it’s complete and dry, erase any remaining pencil marks.FEATHER

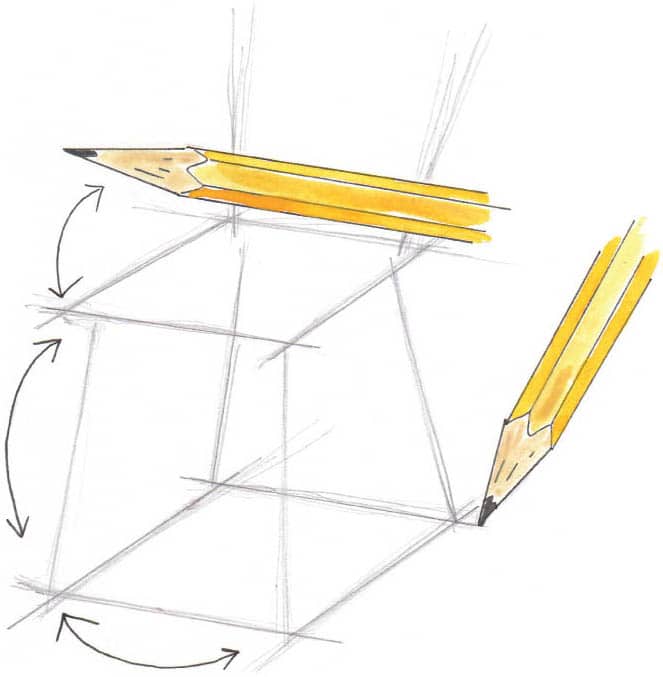
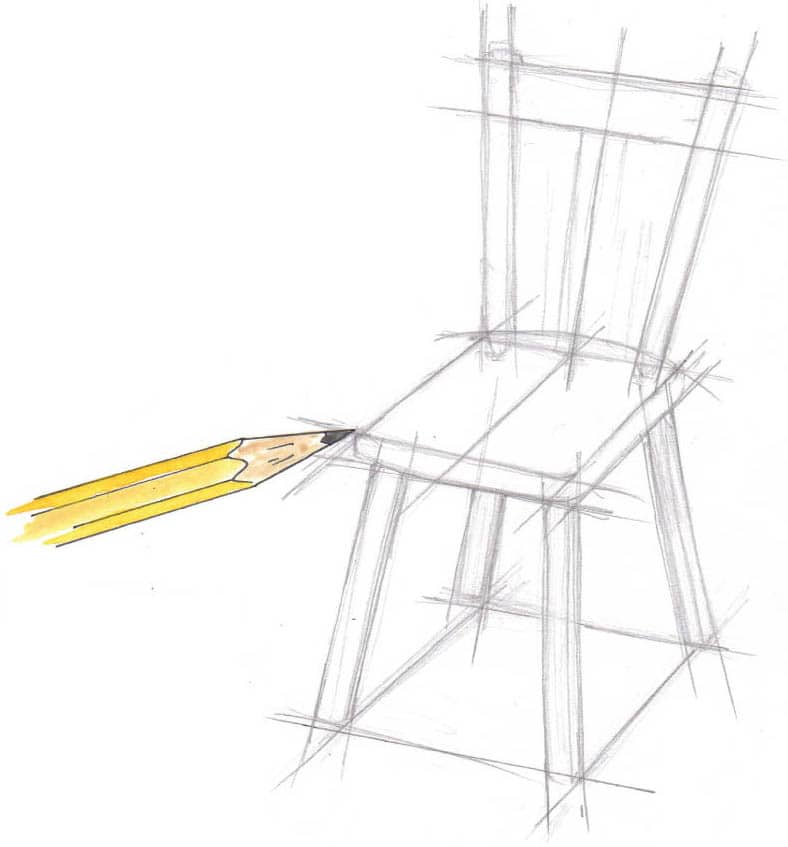
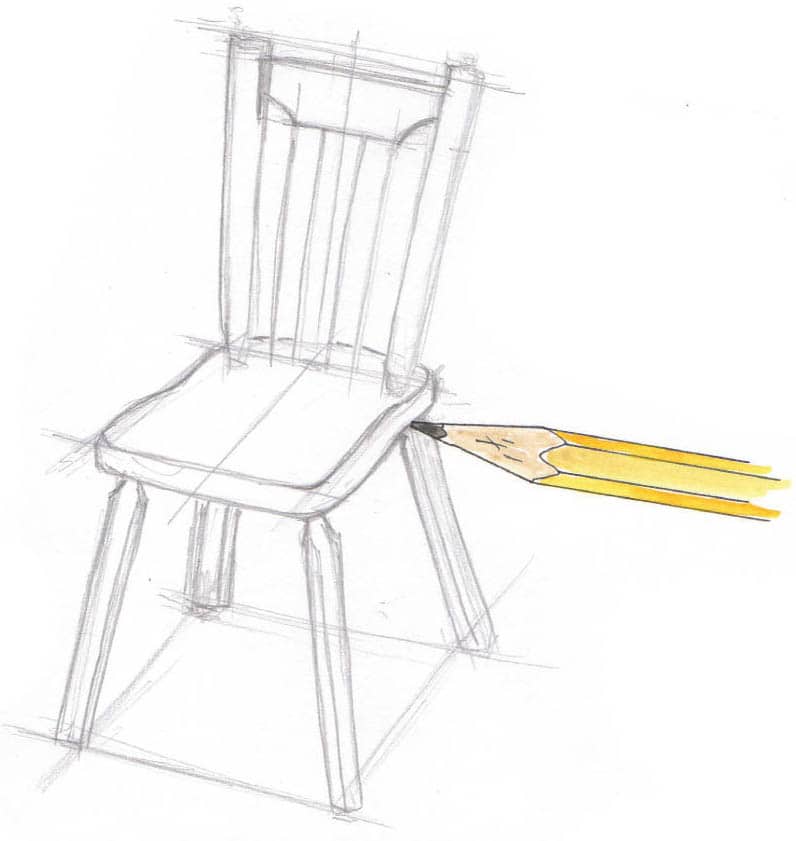
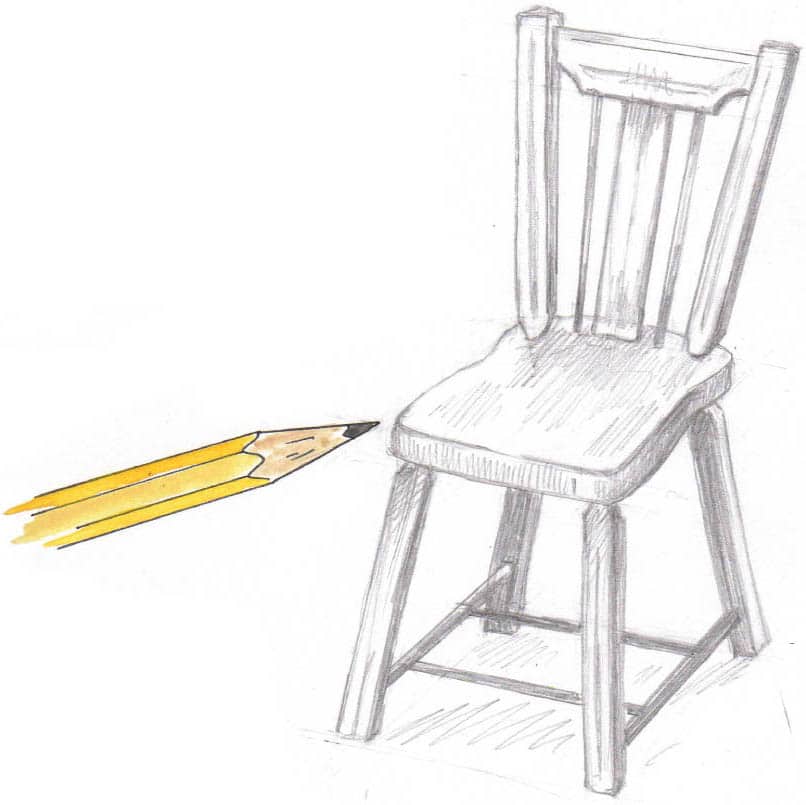
Drawing furniture can be a little tricky because it involves so many straight lines and angles. A ruler is helpful not only to keep the lines straight, but to ensure that each leg, arm, side, or angle is the right size. Even a folded piece of paper or a business card can provide a stiff, straight edge to trace along. There are two parallelograms on this chair—the seat and the angle created by the ends of the legs. Use a pencil to help mark the edges of the front and back of the seat, as well as the more horizontal lines for the legs. The spacing between the feet/legs often mirrors the shape of the seat. Draw vertical lines to connect the seat to the ground, and lightly draw in the back of the chair. Once the length of the legs and back are right, it’s time to make the chair appear more three-dimensional. This includes the sides of the seat, legs, and back of the chair. Add curves or details in the legs and seat back. Erase any of the pencil marks left from the parallelograms.CHAIR
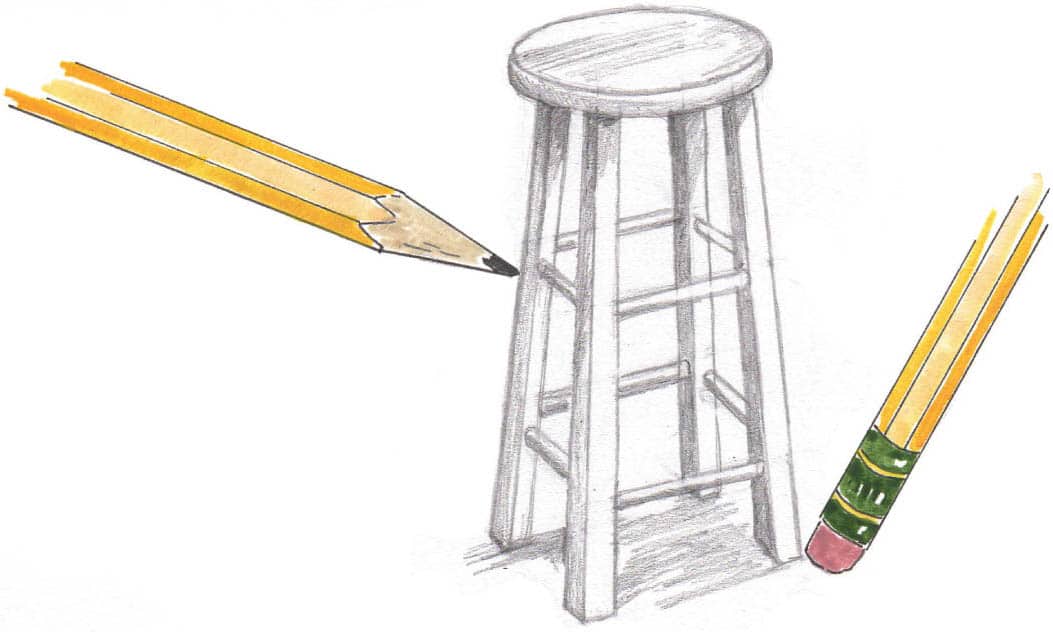
To draw stools or taller pieces of furniture, follow the same steps. Note that a stool typically has more horizontal crossbars or footrests. Start by drawing an ellipse, or oval, for the top of the stool. Lightly sketch the legs, paying attention to the angles. The parallelogram formed by the ends of the legs should match the shape that the crossbars form on the legs. Start making the stool more three-dimensional. In the diagram to the right of the stool, the dots indicate where the bottom of the legs fall. Add shading. The inside of the legs is darker because they catch less light. Use hatch marks to create woodgrain-like texture.STOOL


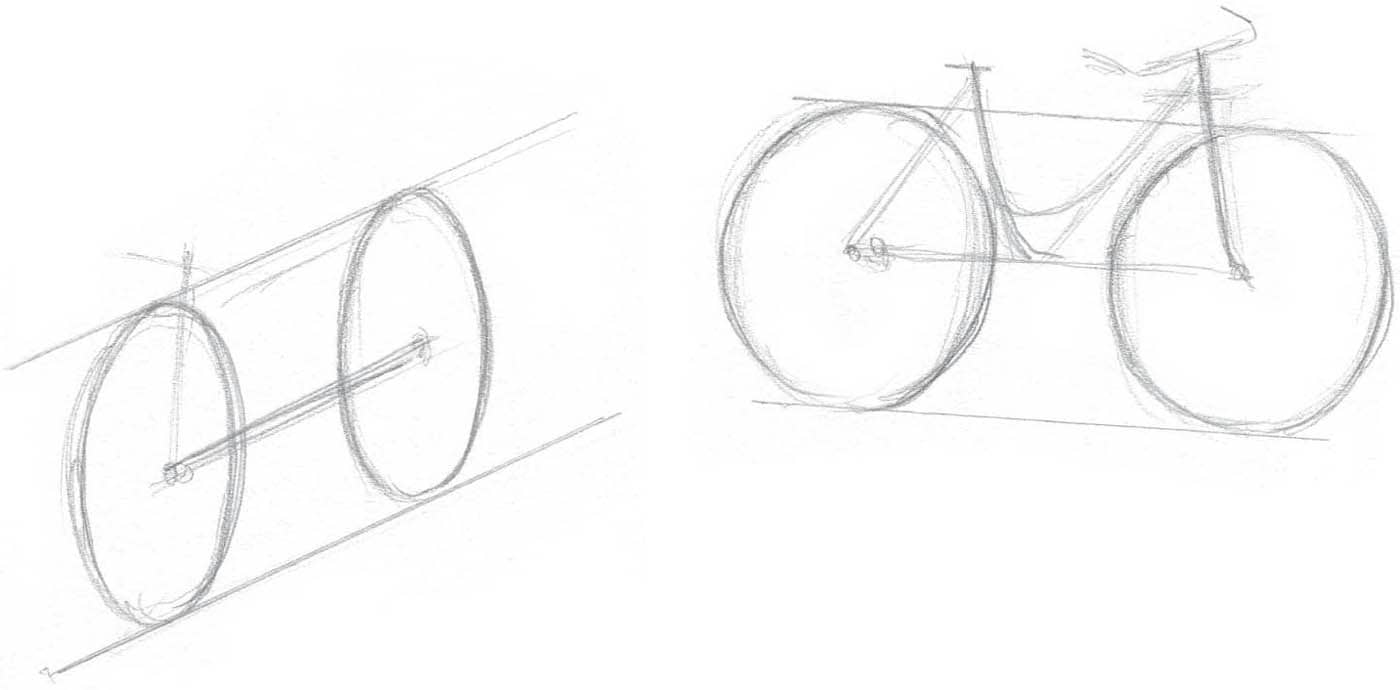
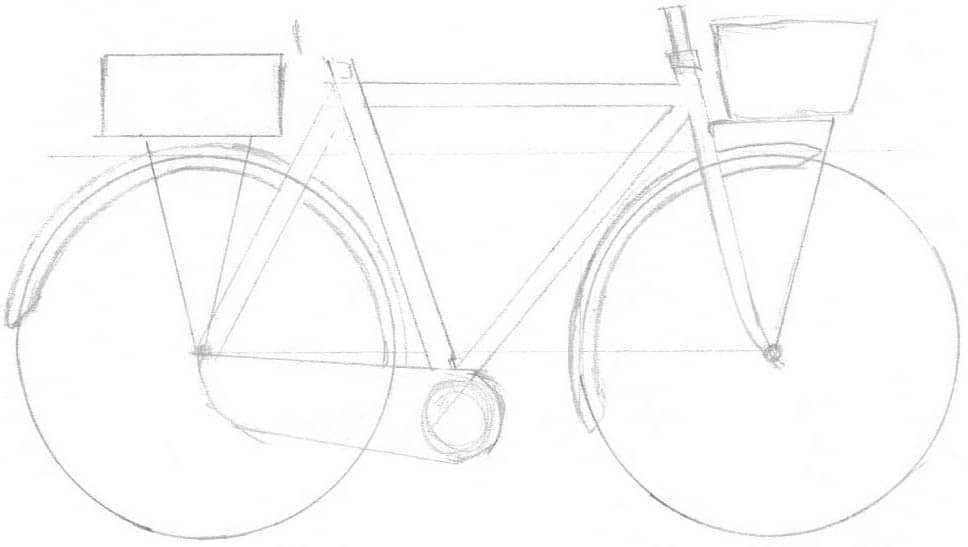
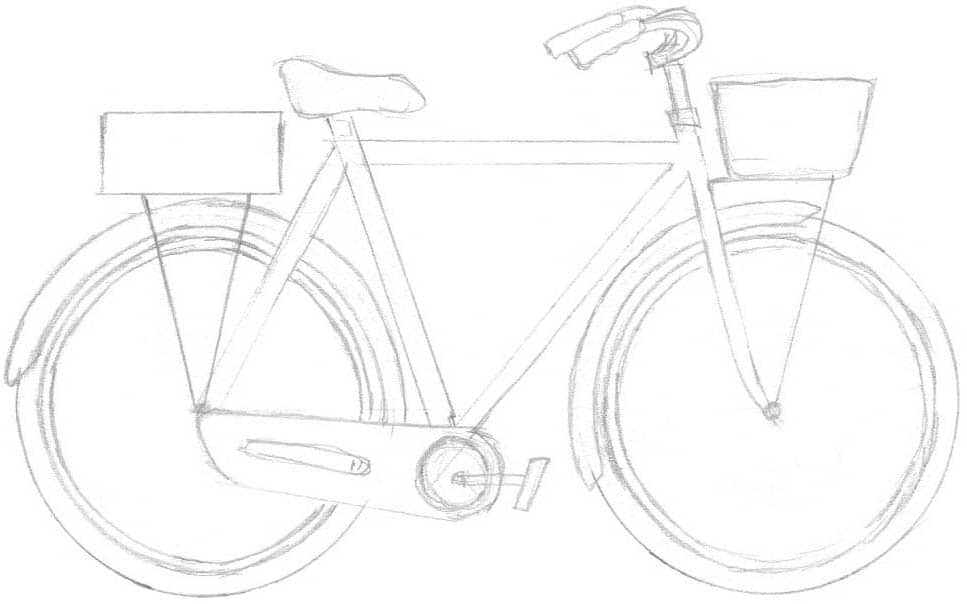
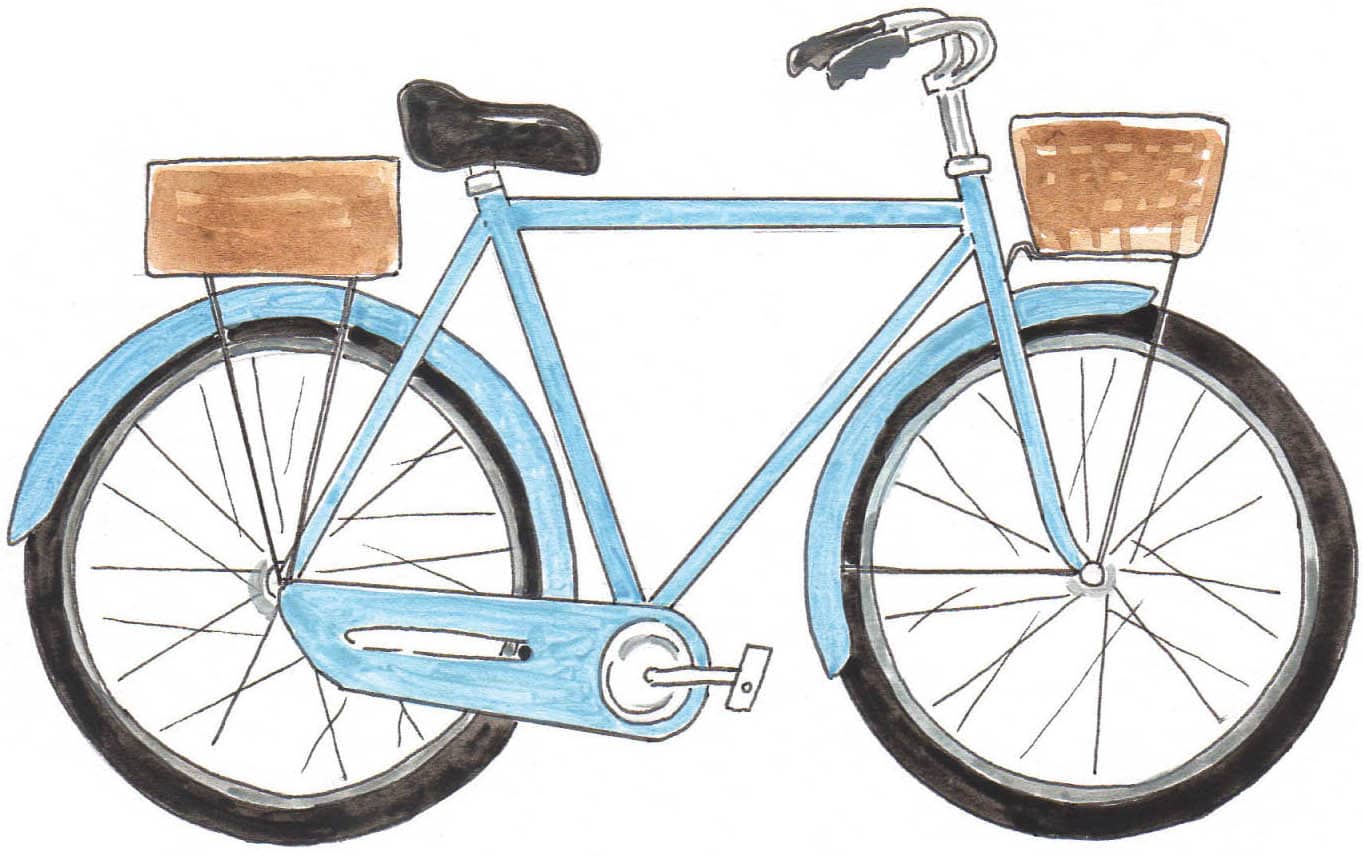
When drawing bicycles, it’s important to get the size and angle of the wheels correct. While the angle may change, the size of the two wheels is almost always the same. Draw a line for the top of the wheels, using a straight edge or ruler if needed. Draw the rear wheel so the top just touches the line. Draw a line that just touches the bottom of the wheel. Then draw the second wheel between the two lines. Draw a line connecting the centers of both wheels. Just above that, draw a horizontal bar for the bike’s top tube. Add lines to frame out the rest of the bike’s tubing, and sketch in the chain or chain cover. Lightly sketch the front and rear wheel covers or fenders, which follow the curves of the wheels. Draw straight lines up to the baskets above the fenders. Lightly sketch the seat and handlebars, as well as the pedal or crank arm, hub on the wheels, and any spokes. Outline the bike with a fine-point, waterproof pen. When the ink is dry, erase any visible pencil marks or smudges before you add color. Use a small brush with a fine point to add watercolor paint.BICYCLE

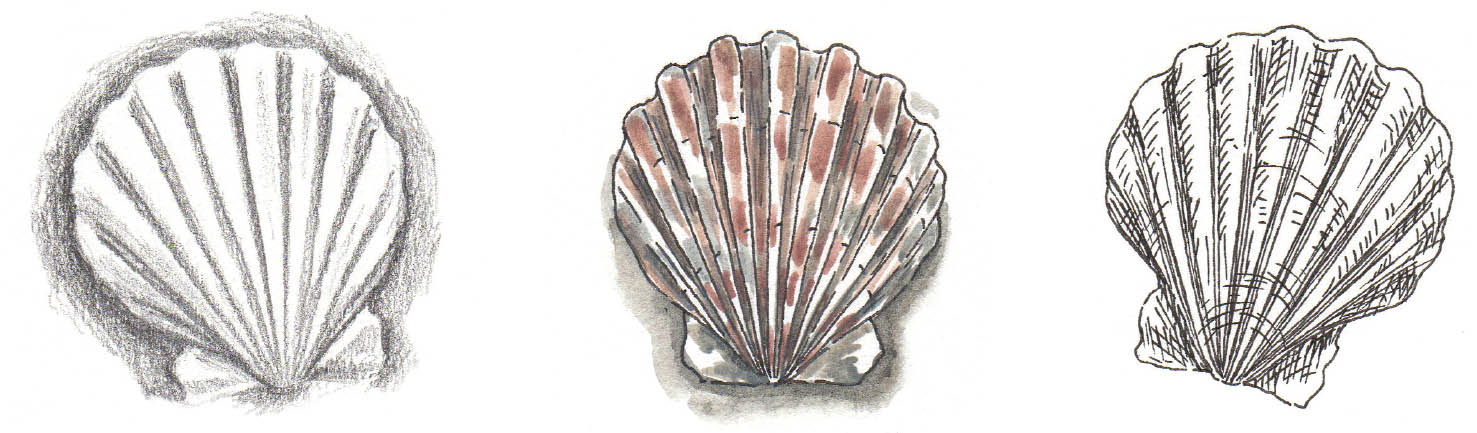
Seashells make great subject matter, because the shapes are simple. Start with a lightly drawn oval, and add a triangle to the base. Connect the shapes with rounded lines. Then erase any sketch marks or extra lines. Draw fan lines from the bottom point to the curved edge of the shell. Where the lines touch the edge of the shell, draw scalloped edges or curves. Now add shading with a fountain pen. With a water brush or a regular brush dipped in water, loosen up the ink and spread it like an ink wash. Once dry, erase any pencil marks. Seashells are particularly fun because you can color or draw them in all sorts of media—everything from regular pencil and watercolors to pen and colored pencils!SEASHELL


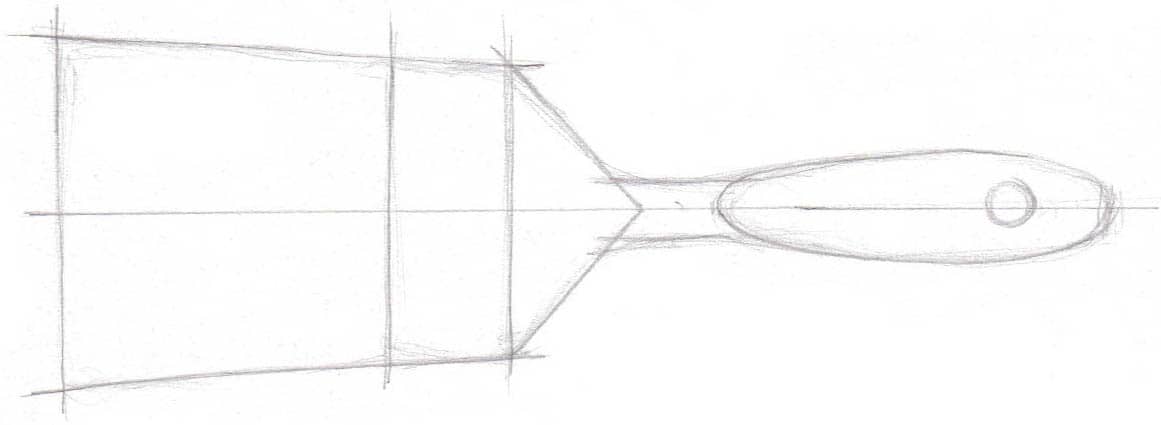
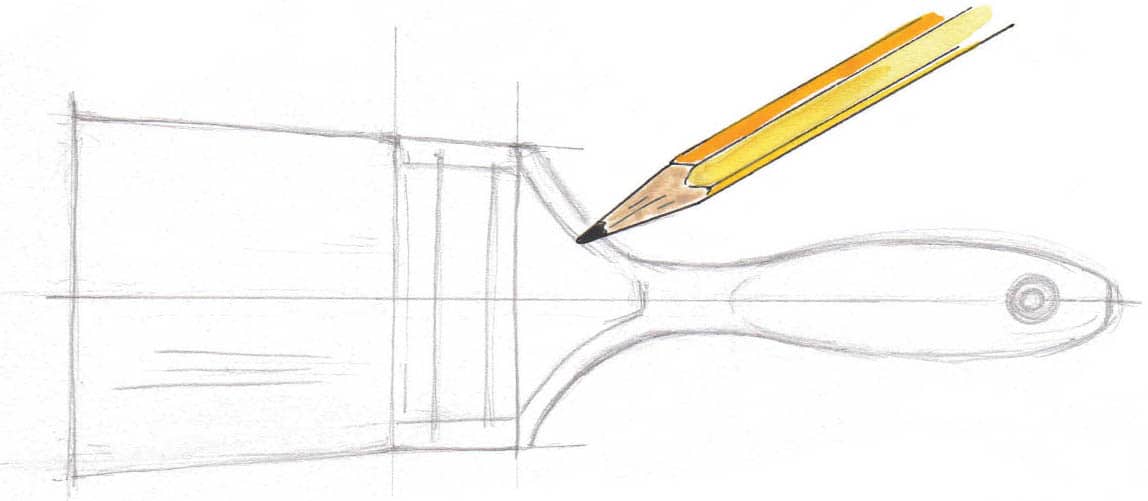
This paintbrush may seem complex, but it’s just a handful of simple shapes! The bristles may look like a rectangle at first glance, but the top and bottom sides slightly bow out from the center. Connect the shapes of the handle with a curved line. Start adding details to the brush: bristles, shapes in the wood, and details in the metal. With a ballpoint pen, build up the darker parts of the brush. Keep any highlights free of marks. In the wooden handle, the pen marks create woodgrain texture. You can use similar marks to create individual brush hairs in the bristles. Then erase any pencil marks. Keep adding more and more layers of hatch marks throughout—especially in the bristles. Curve the pen marks with the sides of the handle to make it more three-dimensional.BRUSH


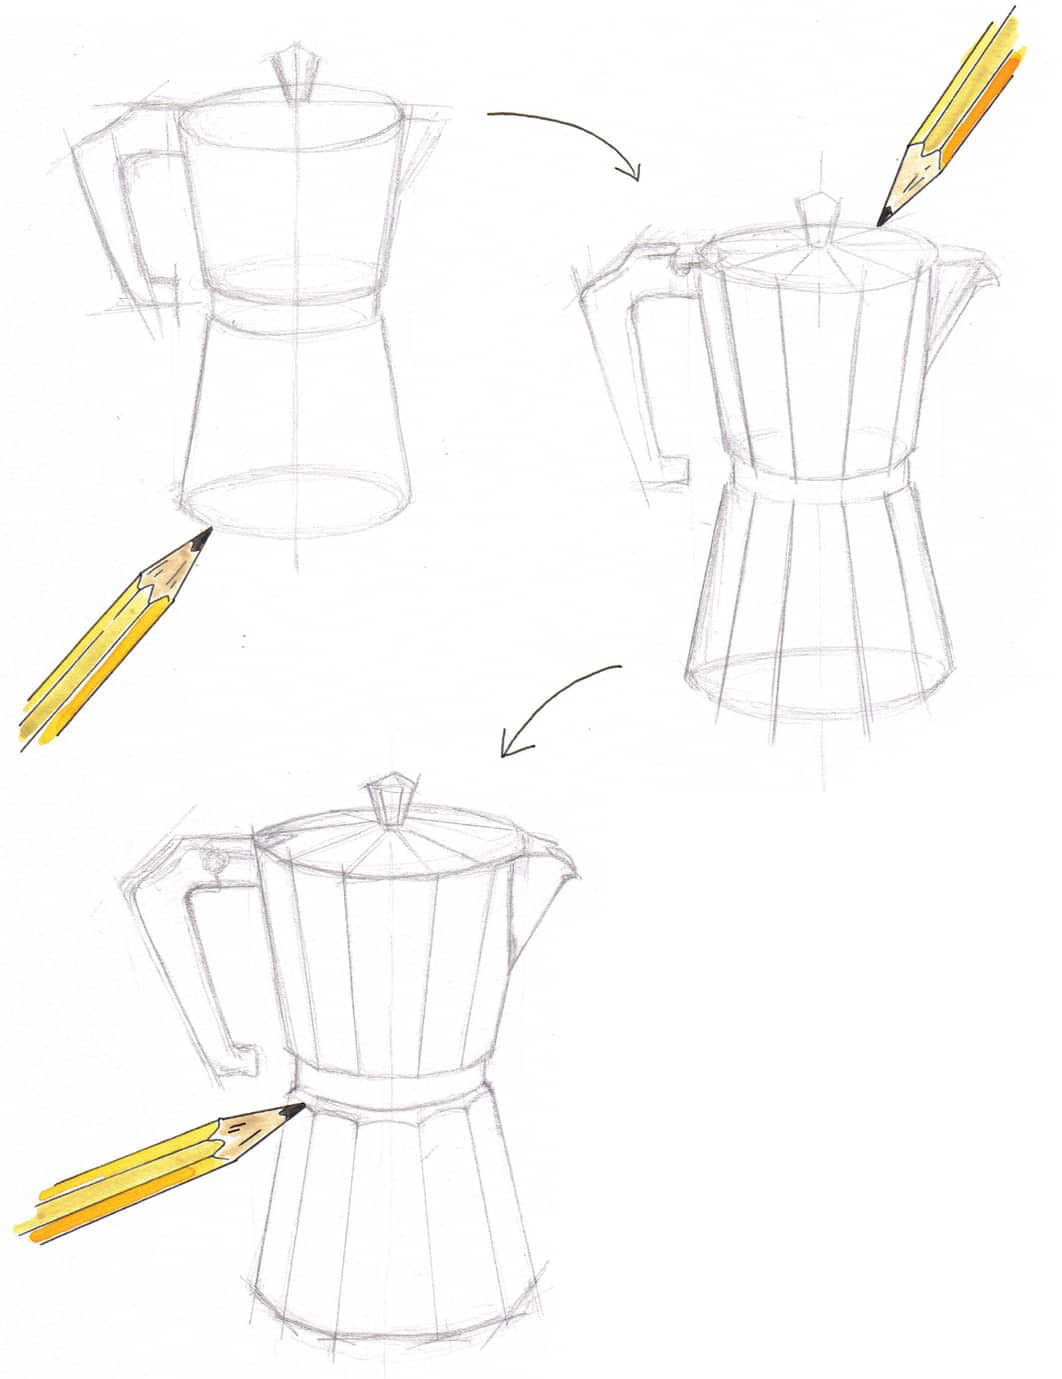
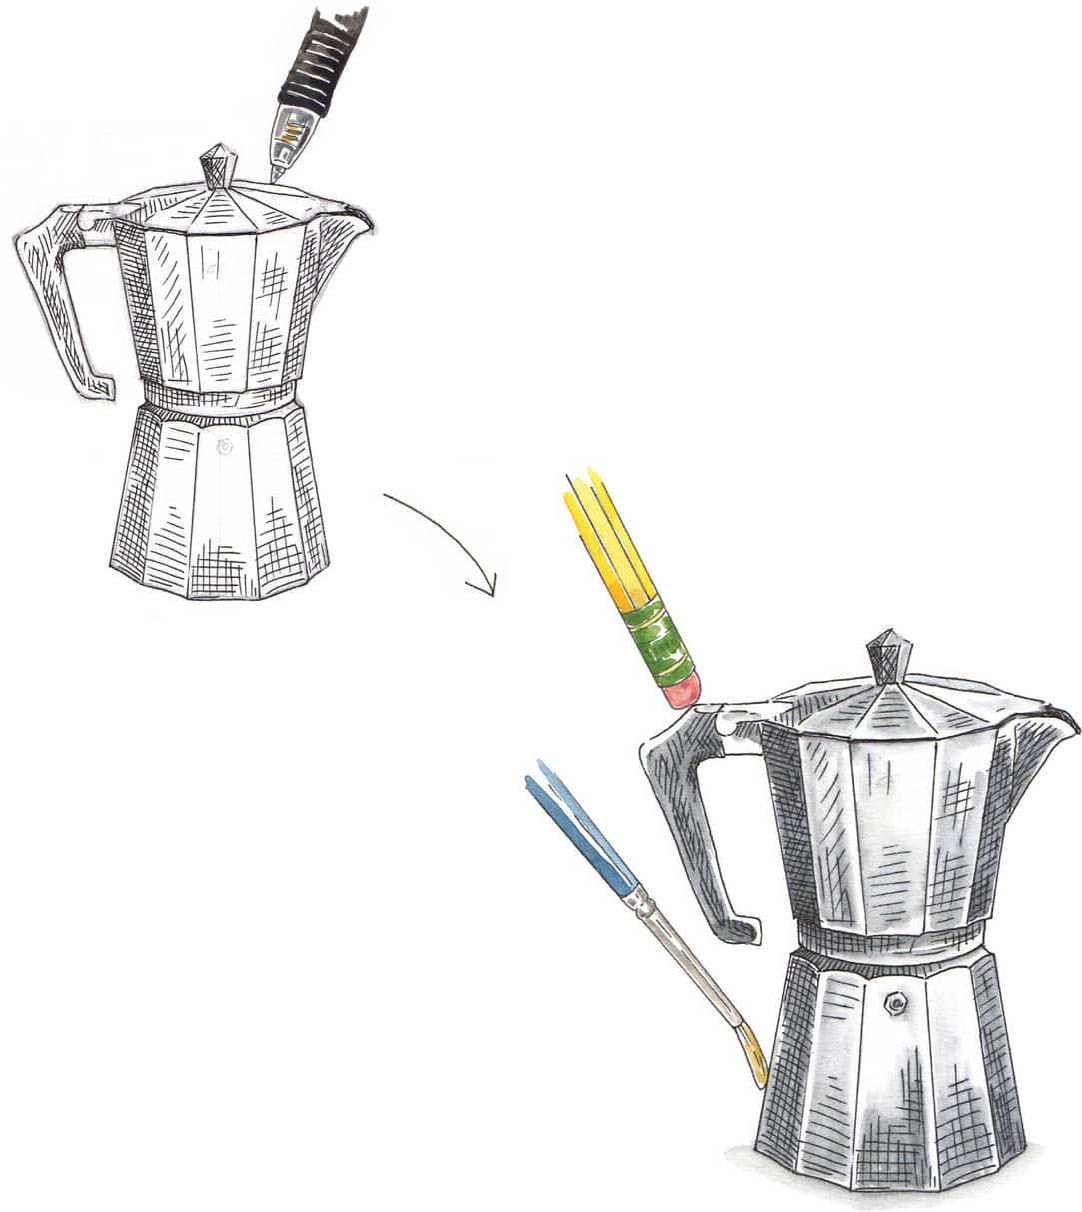
These Italian-style coffee percolators provide an extra challenge because they have so many facets. When drawing very angular objects like this, don’t hesitate to use a ruler or folded piece of paper to achieve straight edges. Start with a long, vertical line for the center of the pot. The top and bottom halves of the coffeepot are trapezoid shapes that almost mirror each other. From this angle, the top and bottom of the pot are long ovals. Even if you can’t actually see the whole curve of the base, draw the whole oval to make the side and curve more accurate. Break down the handle into shapes as well. Next add guiding lines inside. Each faceted side is a long trapezoid. Note how the shapes become narrower as the sides turn away. The lines in the center will line up. Start adding the details inside the pot: the scalloped curves along the top edge of the base, the spout, and the handle. With a pen, use crosshatch and hatch marks to build up the shadows and depict the pot’s shape. The horizontal lines should follow the angle of that side. With a brush and water, loosen up the ink and spread it in even layers. Leave the highlights clear of ink. When the wash is dry, add more pen marks on top and more water, if needed, to build up the shadows. Be sure to loosen up the ink on the bottom edge to show the shadow under the coffeepot.COFFEEPOT
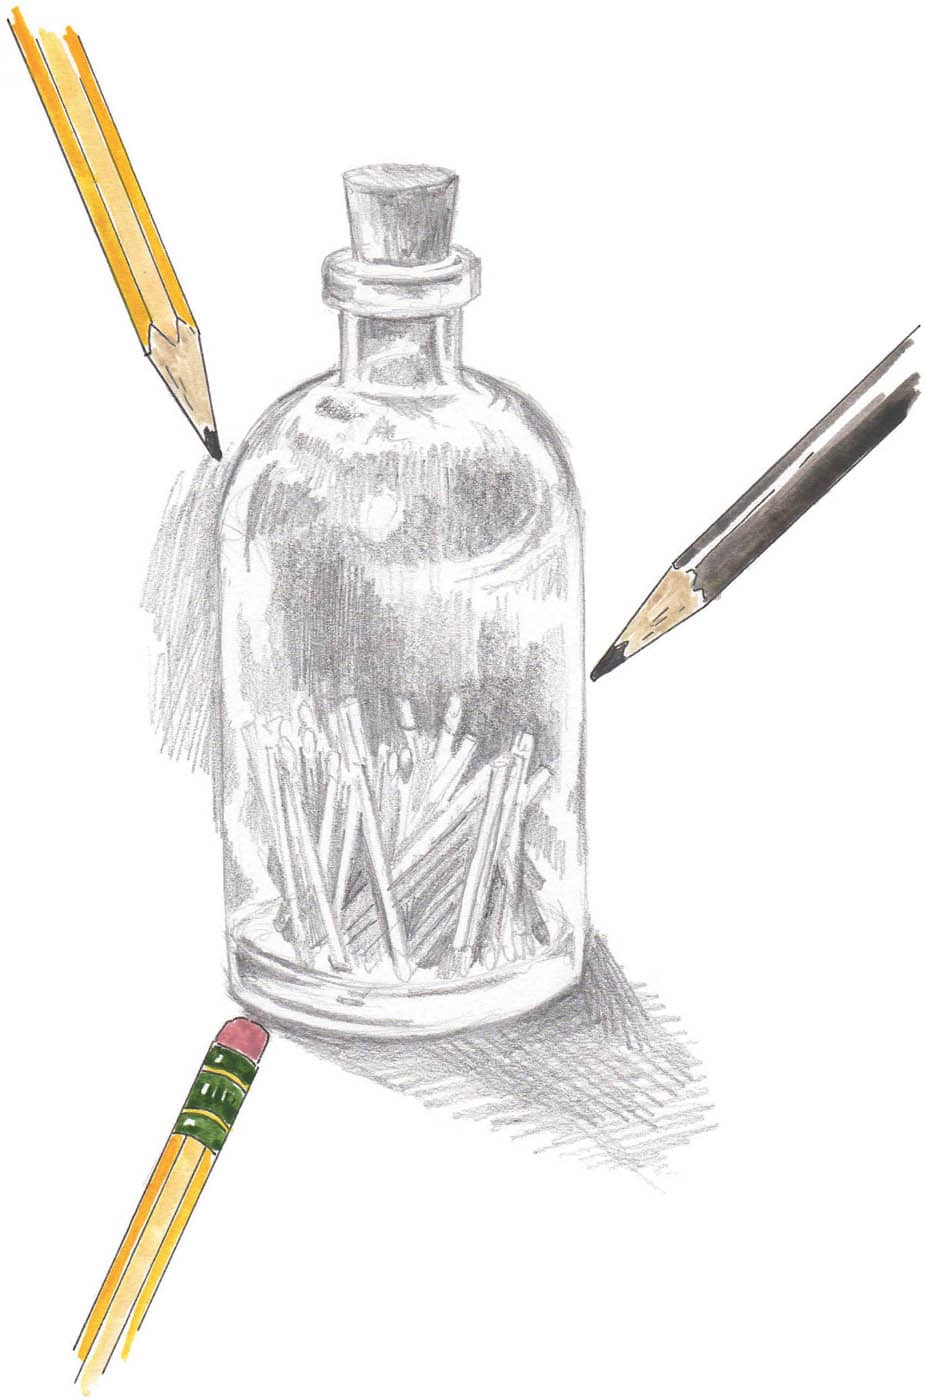
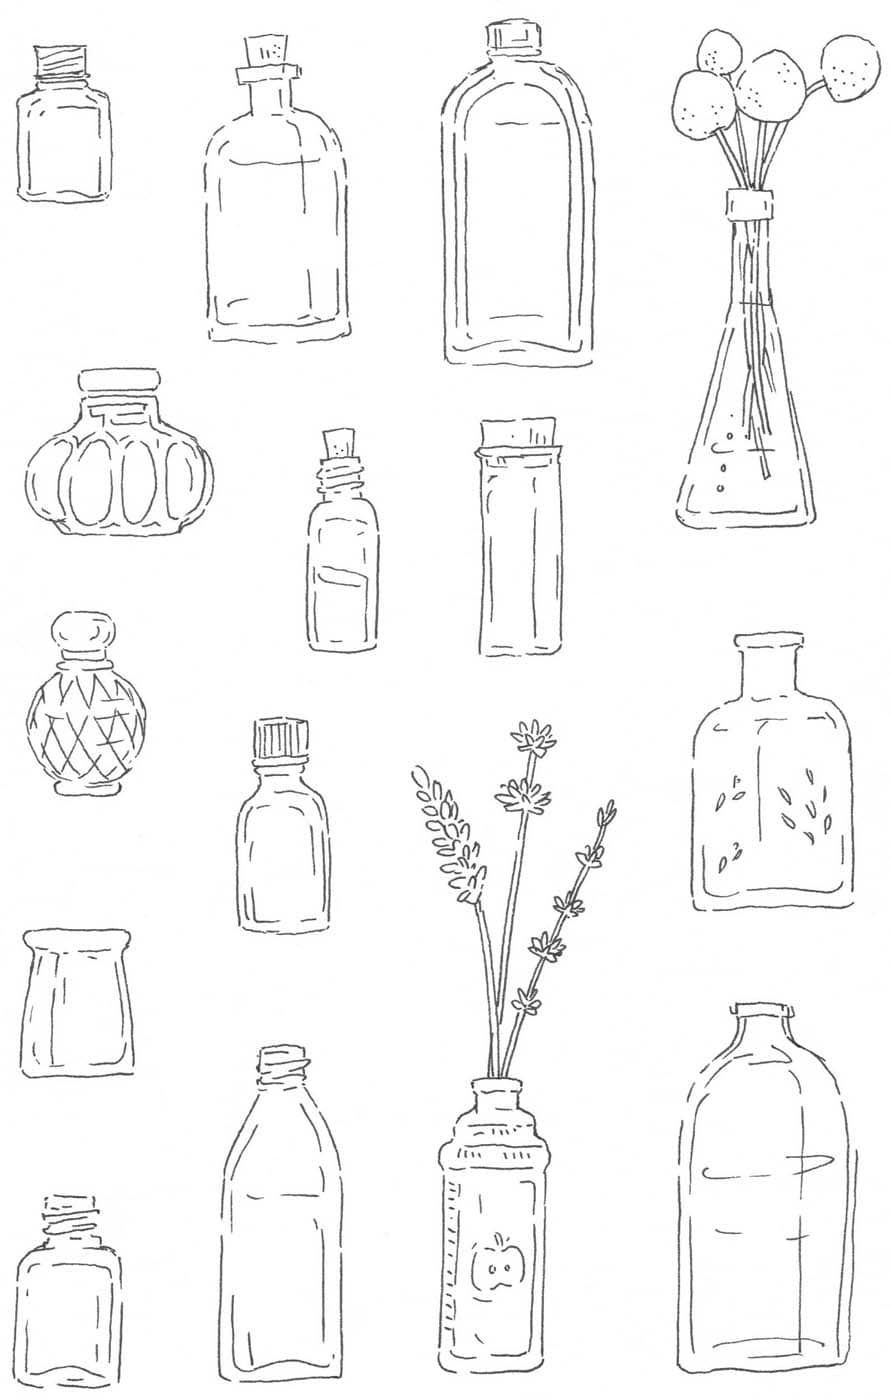
Everyday objects can be drawn in so many ways. Combining materials and techniques gives your work and sketchbook fun variation. Creating simpler drawings, or leaving your drawings at the line-work stage, has many benefits. Line-work drawings are usually faster, giving you the ability to convey lots of information in just a few marks. Practicing these kinds of sketches can be helpful when you have less time to sketch or fully develop a drawing. On the following page is a collection of bottles and jars. Just one on its own can be a nice study for a more in-depth piece, like the one shown here.GLASS BOTTLES
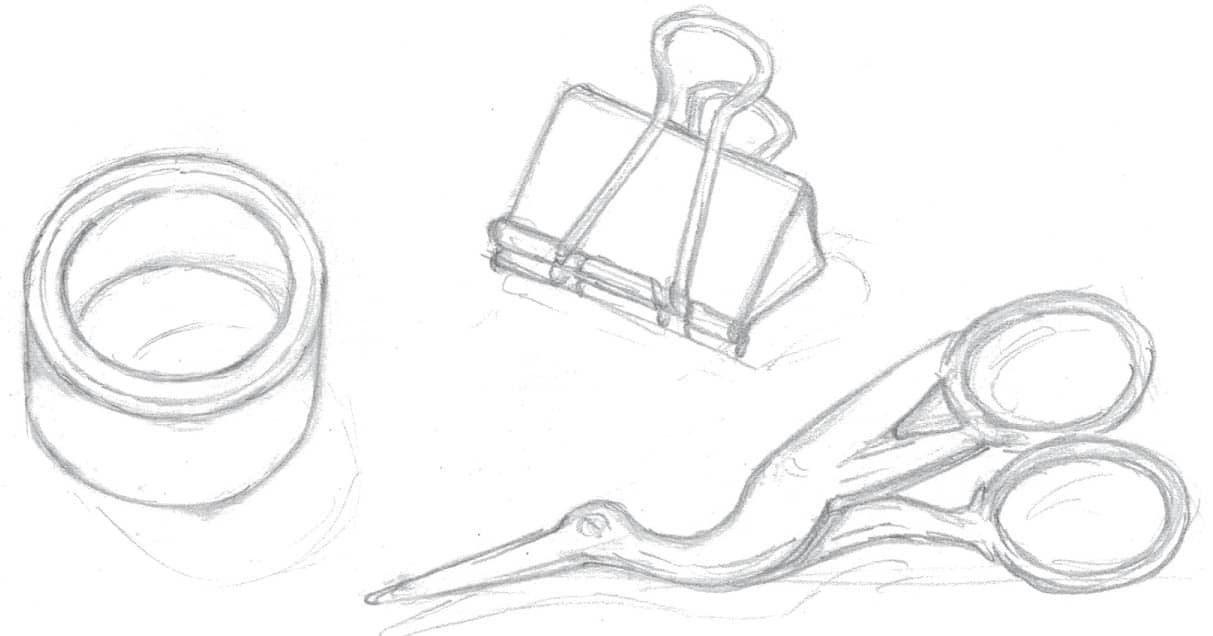
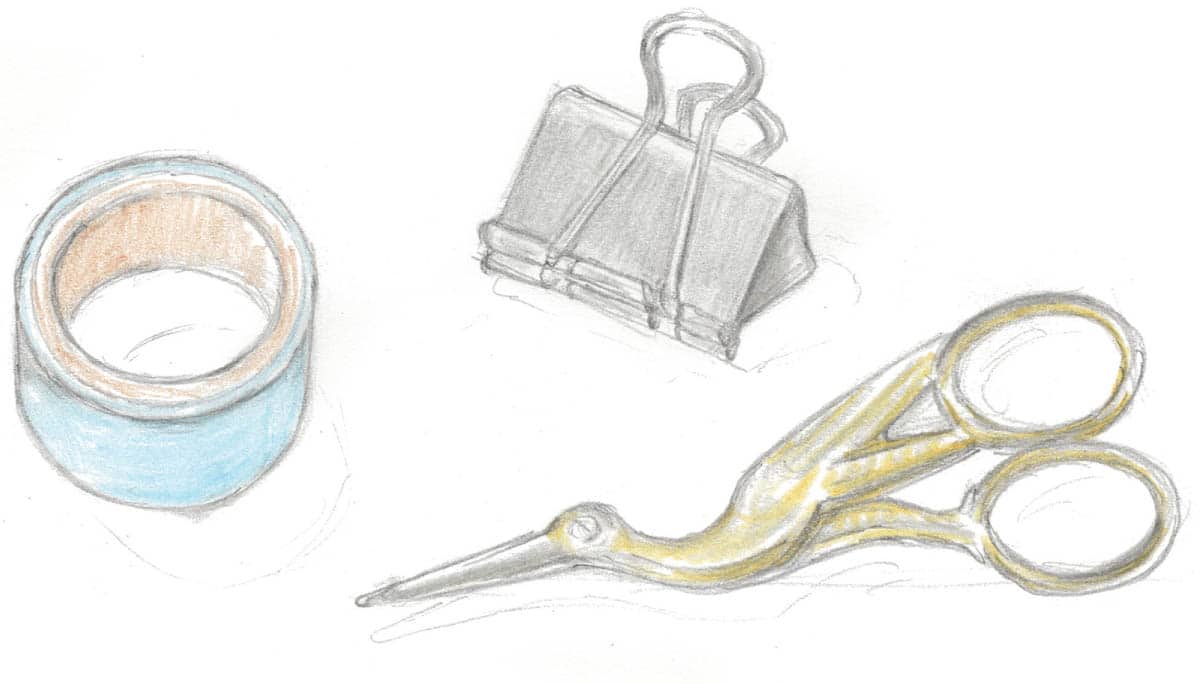
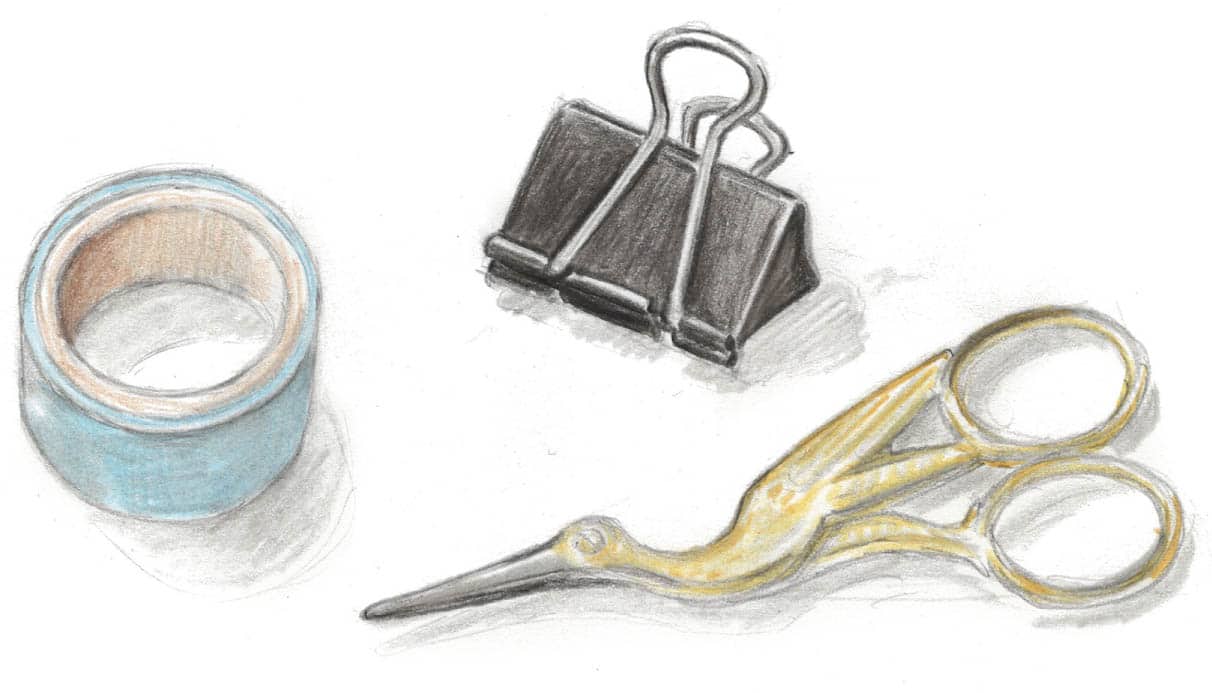
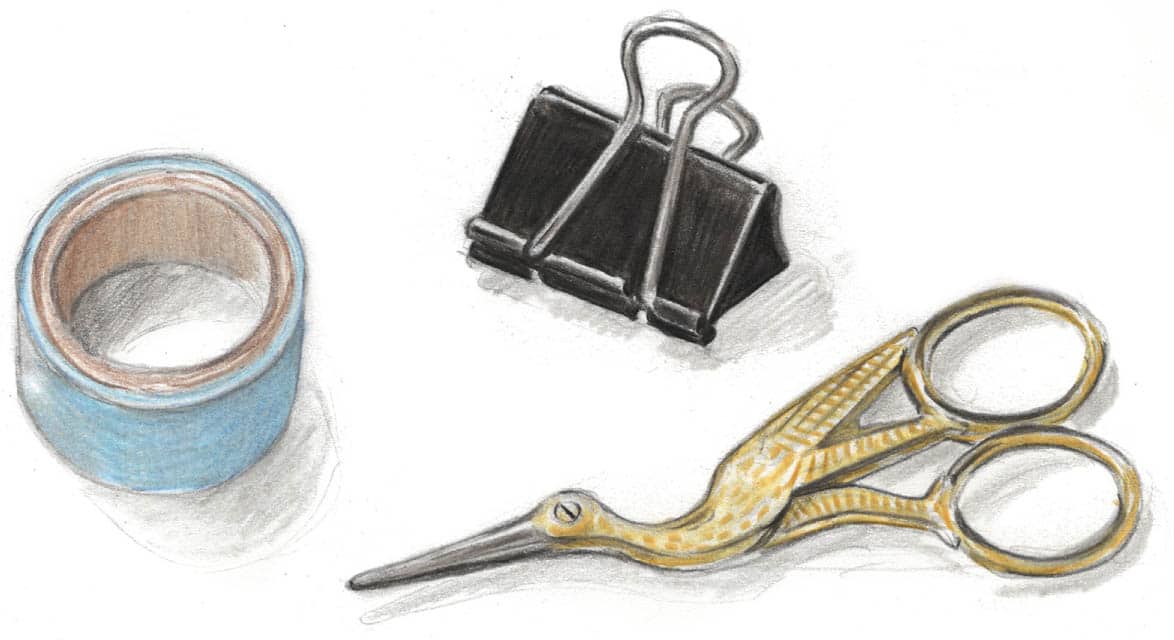
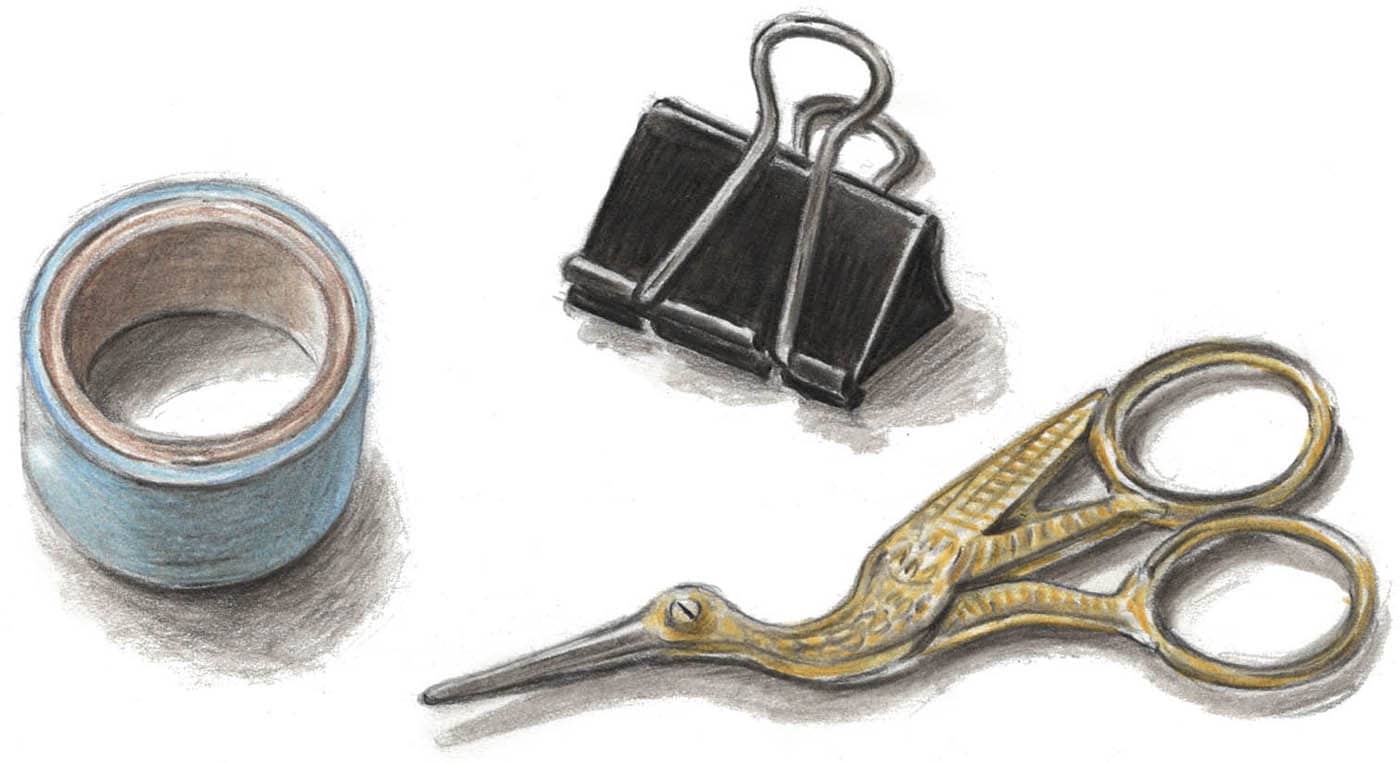
Your office and desk contents can also be a surprisingly good source of drawing inspiration. Small objects like tape rolls, clips, scissors, and bulletin boards are all great options! Try grouping a few objects instead of drawing something, like a single clip, floating on a page by itself. Gather your items and lightly sketch them in pencil, breaking them down into their basic shapes before adding more details and erasing extra guide marks. Also make light notes of the shadows cast by the objects. Lightly sketch in the base layers, using the lightest color you can find on each object. With dark gray, start shading in the middle shadows on the objects; then grab darker shades of each of the first colors and blend those in too. Start burnishing darker shadows and layers. At this point, you can also start building up the details and the shadows cast by the objects. Finally, use dark grays and black, if needed, to get those shadows and details to “pop.” Make sure your pencils are finely sharpened for the tiny shadows that curve along the edges of your objects. Adding those small, fine-lined shadows right next to the highlights makes them appear more crisp and realistic.OFFICE SUPPLIES
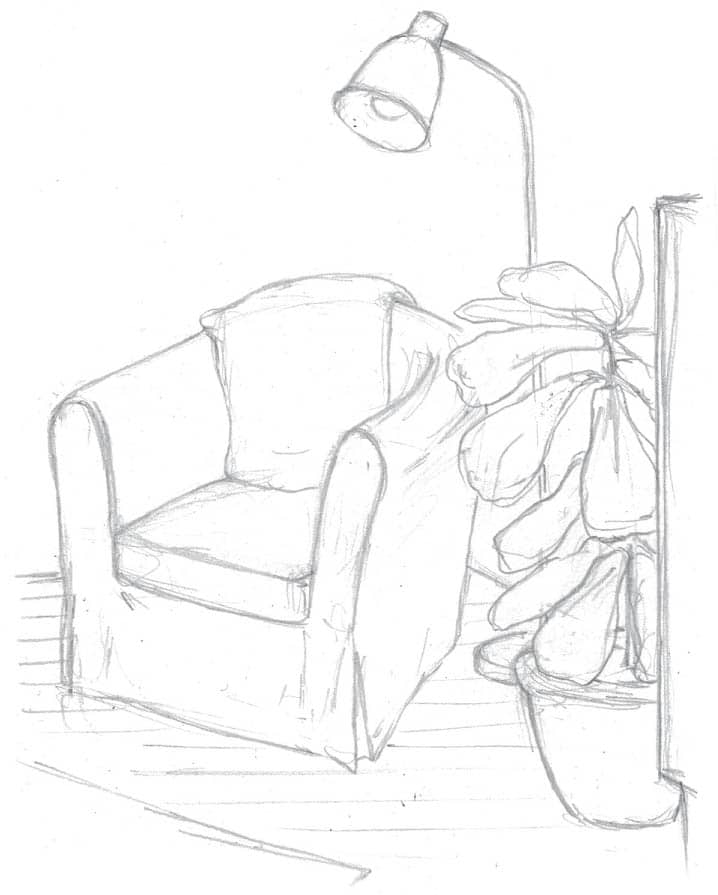
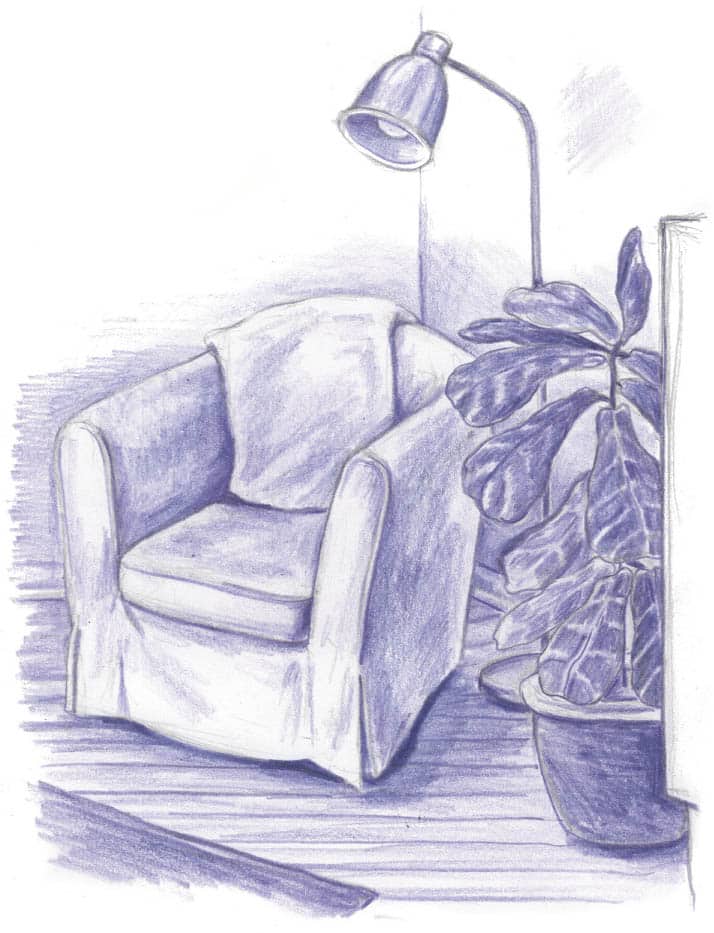
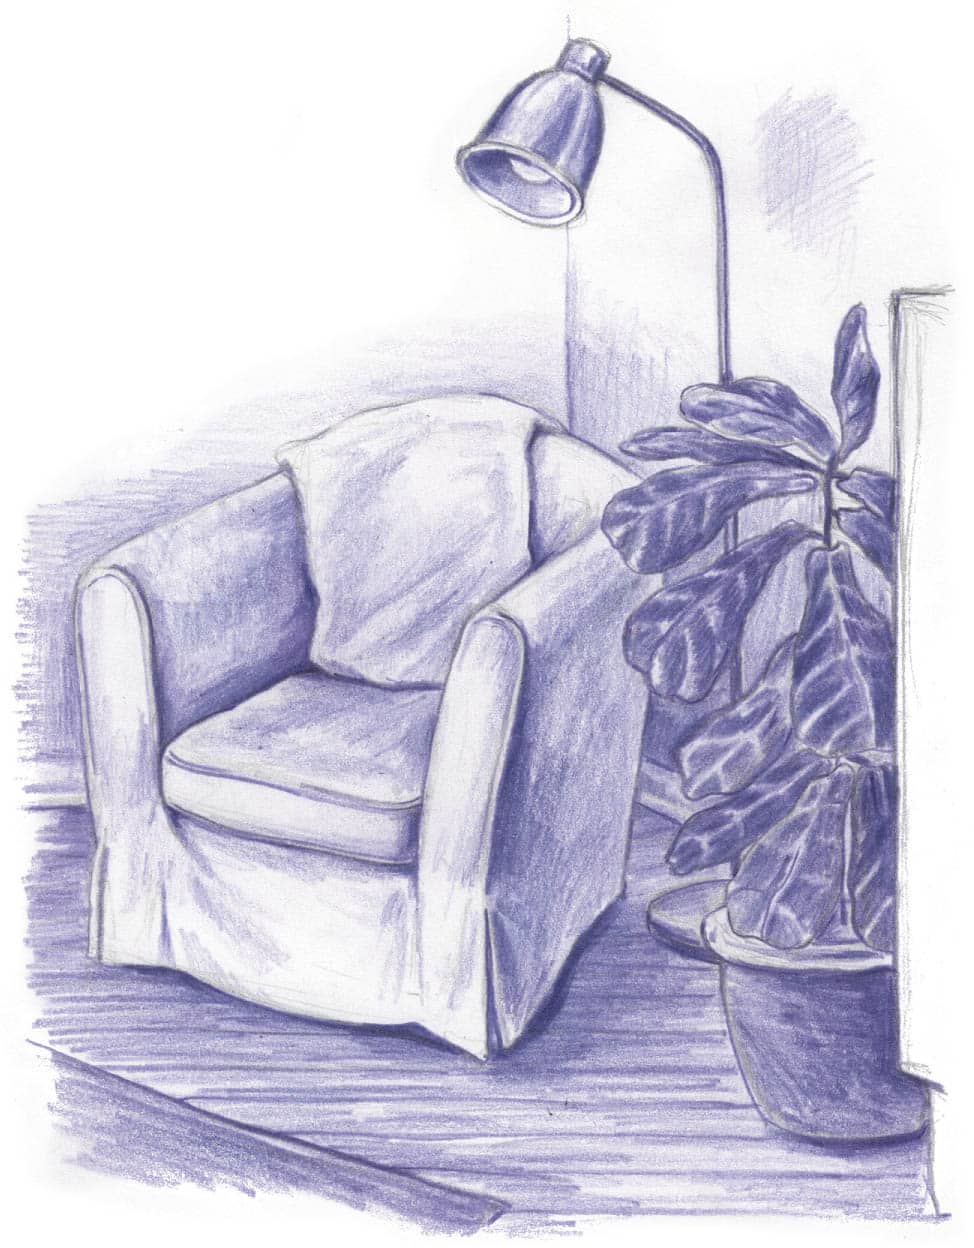
Looking for small scenes around your home or focusing on single pieces of furniture can be great practice—and it’s a good option if your time is limited or the weather is poor. While more complicated scenes and arrangements of furniture can be intimidating, one way to simplify and make it more approachable is to limit your color palette. Working in only a few colors—or even just one—creates a value study of lights and darks, which can be easier than trying to color match and shade complex objects. As always, break everything down into shapes and loosely sketch your scene. It can be helpful to compare the objects and observe where they overlap one another. For instance, the tallest leaf on the fiddle leaf fig plant is about as tall as the dresser. Erase any stray marks and add more details to your drawing, like the floorboards, the curves of the leaves, and the folds in the blanket over the chair. With your color of choice, start shading the middle shadows, leaving any highlights or lighter areas blank. Preserve more white space than you think you need so you can gradually shade those spots in as you darken the shadows. Continue to build up the middle shadows around your scene, including behind the furniture and as texture in the wood flooring. Start developing the darkest shadows and the details. If you’re having trouble isolating where the darkest shadows are, squint your eyes while looking at your scene. This will blur the details and allow you to focus just on the values so you can see the darkest areas. Sharpen your pencil to add fine details and the darkest shadows. Gently outline any objects that need to be differentiated from the background or objects behind them. For instance, the left chair arm is similar in value to the wall behind it; a little line along the arm helps differentiate the two.INDOOR SCENE