
Stay Healthy with the Apple Watch
The Apple Watch is as much a fitness companion as it is a timepiece or communication device. Sensors measure movement and track your heart rate, while the GPS chip provides location and acceleration data. Included apps, such as ECG and Blood Oxygen (on some models) use this data to help you be more active and health-focused.
While the Activity app is a reminder to stay active, the Workout app is the personal trainer pushing you to the next goal. Workout tracks your performance during several common exercises such as walking, running, swimming, cycling, and wheelchair workouts.
Your health includes more than just how you move your body. On the Series 8 and Ultra models, temperature sensors track your body temperature at night, which can be used by women to Track Your Cycle.
New in watchOS 9 is also the Medications app that helps you Stay on Top of Your Medications. The Mindfulness app reminds you to take deep-breathing breaks and regularly pause for reflection as a way to Be More Mindful.
Activity Tracking
Open the Activity ![]() app (from the Home screen or the Activity complication on some watch faces) to view your daily activity progress (Figure 59).
app (from the Home screen or the Activity complication on some watch faces) to view your daily activity progress (Figure 59).

Three rings represent the day’s activity. Rings close as you meet goals:
Calories: The red Move ring on the outside tracks calories burned during activity (computed based on your age, weight, sex, and activity amount).
Activity: A full circle of the green Exercise ring in the middle indicates 30 minutes of activity involving a consistently elevated heart rate and motion “at or above a brisk walk,” according to Apple. The algorithms are based on your general health information (age, height, weight, etc.) and change over time as you track more data. If you think the watch isn’t accurately tracking your activity, Calibrate the Sensors.
Standing: The blue inner Stand ring keeps count of how often you’ve stood up from a sitting position and moved around; the goal is to be in motion for at least one minute an hour out of 12 hours in a day. However, “stand” is somewhat misleading: the watch is really encouraging you to move, not just stand up. Moving your watch arm for about 30 seconds will often count toward the Stand goal.
In the app, scroll down for details, such as a breakdown of when you burned calories, were active, and stood during the day (Figure 60). Keep scrolling to view the day’s total steps, if that’s one way to check in on your daily progress.

There are two ways to adjust the activity targets:
Scroll to the bottom of the Activity screen and tap the Change Goals button. Use the crown or tap the + or – button to set a new calorie goal, and then tap Next. Do the same for the Exercise Goal and Stand Goal. Tap OK.
Wait until the watch provides its Monday weekly progress report, which suggests a new goal and gives you the option to adjust it.
The Fitness app on the iPhone provides the same breakdowns as the app on the watch, and it allows you to go back and compare previous days. Tap the rings to view today’s progress, and then tap the calendar ![]() button at the top of the screen to view a calendar of activity rings (Figure 61).
button at the top of the screen to view a calendar of activity rings (Figure 61).

On the main Summary screen, the app also includes awards you pick up for doing a great job of being active. A list of trends displays a quick analysis of your data, with suggestions for which areas you need to improve; tap the Show More button for more detailed information about each health indicator. Tapping any trend item reveals more granular, day-by-day data and suggestions for improvement.
And when you want to really drill down on performance, tap any workout to view details, including the duration, distance, average heart rate, a map of the route, and more (depending on the type of workout) (Figure 62).

Monitor Your Heart Health
The heart rate monitor in the watch is primarily used to keep track of your exercise and activity, but it can also provide data in other situations. Since the release of the Apple Watch, numerous people have identified underlying health problems based on the information, in some cases preventing serious illness.
Measure Your Heart Rate
Open the Heart Rate app or tap its complication on a watch face. After a few seconds of measuring, your current rate appears (Figure 63). It will continue to update as long as the app is active. Scroll down to view your resting heart rate, walking average, and averages from recent workouts you’ve completed. Tap Current to view a graph of the readings from throughout the day.

The watch also checks your heart rate at regular intervals throughout the day. If the rate is elevated after you appear to have been inactive for 10 minutes, or if it’s very low for 10 minutes, you’ll receive a notification. In the Heart settings in the Watch app on the iPhone, you can set the High Heart Rate and Low Heart Rate targets if the defaults (120 BPM and 40 BPM, respectively) don’t match your normal heart rate range.
Track Heart Rate Data
The watch uses its heart-rate sensor to help determine when you’re being active, but where can you see the data? Go here:
Open the Health app on the iPhone, and tap Browse at the bottom of the screen.
Tap Heart.
Tap Heart Rate under Today to see what’s been recorded so far. On this screen you can also view hourly, weekly, monthly, and yearly results.
Take an ECG Reading
The Apple Watch Series 4 and later models, but not the SE, include the capability to measure your heart’s electrical output. This electrocardiogram (ECG) can help identify atrial fibrillation (AFib), or irregular heart rhythm.
To take an ECG reading, do the following:
Open the ECG
 app on the watch.
Rest your arms on a table or against your body, and hold your finger on the Digital Crown for 30 seconds (Figure 64).

Figure 64: As the ECG app measures electrical impulses, it gives you helpful messages if needed. In this case, I was reprimanded for trying to capture the screenshot. When the test is completed, the watch reports Sinus Rhythm (which is normal), Atrial Fibrillation, a low or high heart rate, or an inconclusive result. Scroll down and optionally tap the Add Symptoms button and choose any that you’re experiencing; those will be included with the report that gets saved to the Health app on the iPhone.
If you do have atrial fibrillation (AFib), the watch can track when your heart is beating at an irregular rhythm over time. It looks at seven days of readings to provide a percentage estimate of AFib events each week. In the Health app on the phone, go to Browse > Heart > AFib History to set it up. If the percentage increases, see your doctor for followup.
Measure Your Blood Oxygen Level
The Blood Oxygen app measures the oxygen saturation in your blood using additional sensors on the back of the Series 6, Series 7, Series 8, and Ultra models. The array shines red and green LEDs and infrared light onto your wrist to determine the color of your blood under the surface by measuring the light reflected back. With that data, algorithms calculate how light (oxygen rich) or dark (less oxygen) the blood color is.
To perform a manual reading, do the following:
Open the Blood Oxygen
 app.
app.Tap the Start button and remain still for 15 seconds while the reading completes (Figure 65). The result is shown immediately.

Don’t be surprised if you see “Unsuccessful Measurement” after or during a test. It’s sensitive to the watch band being too loose, too tight, at an angle, in motion… you get the idea. Make sure the watch is “snug and comfortable” on your wrist, and that it’s not too high or low from your wrist. Find a position where you won’t move your arm, such as resting it flat on a table, because motion can offset the results.
The watch also checks your blood oxygen levels in the background, such as when you’re asleep or it’s not sensing movement. To view those results, open the Health app on your iPhone, tap the Browse button, and choose Vitals > Blood Oxygen. If the light is waking you or a partner up, open the Watch app on the iPhone, tap Blood Oxygen, and turn off Allow Background Measurements > In Sleep Focus (the same goes for when the watch is in Theater mode).
Work the Workout
The best way to close that Exercise ring is to sweat it out. The Workout app includes dozens of workout types to measure your activity. To enable wheelchair workouts, go to the Watch app on the iPhone, tap Health > Health Details, and set Wheelchair to Yes. The watch then substitutes pushes for steps in the Activity and Workout apps.
Start a Workout
When it’s time to start exercising, do the following:
Open the Workout
 app on your watch, or use Siri and say, “Open the Workout app.” On the Apple Watch Ultra, you can configure the Action button to launch the Workout app; see The Action Button.
Scroll to a type of workout, such as Outdoor Walk (Figure 66) (see the sidebar Indoor vs. Outdoor Workouts). If you don’t see the one you want, scroll to the end of the list and tap Add Workout, then choose from the full list (fencing, anyone?). It then appears in your list of recent workouts for next time. You can also Create a Custom Workout.

Figure 66: Pick your pain (or pleasure). Your most recent workout appears at the top. If you’re ready to get moving, tap the workout’s name to start the workout.
To first set or change the type of goal, tap the options
 button on the workout you want and choose from one of the following options to start the workout: Open (no goal), Time, Distance, Calories, or Time (Figure 67). Tap the one you want to start the workout.
Figure 67: Pick a goal. After a 3-second countdown, the app begins recording time, heart rate, pace, and distance.
While you exercise, the Workout app remains active by default (overriding the watch’s Activate on Wrist Raise setting) when you view the screen (Figure 68). Are you close to your goal? Turn the Digital Crown or swipe up to display your activity rings. You can customize what shows here; see Customize the Workout Display.

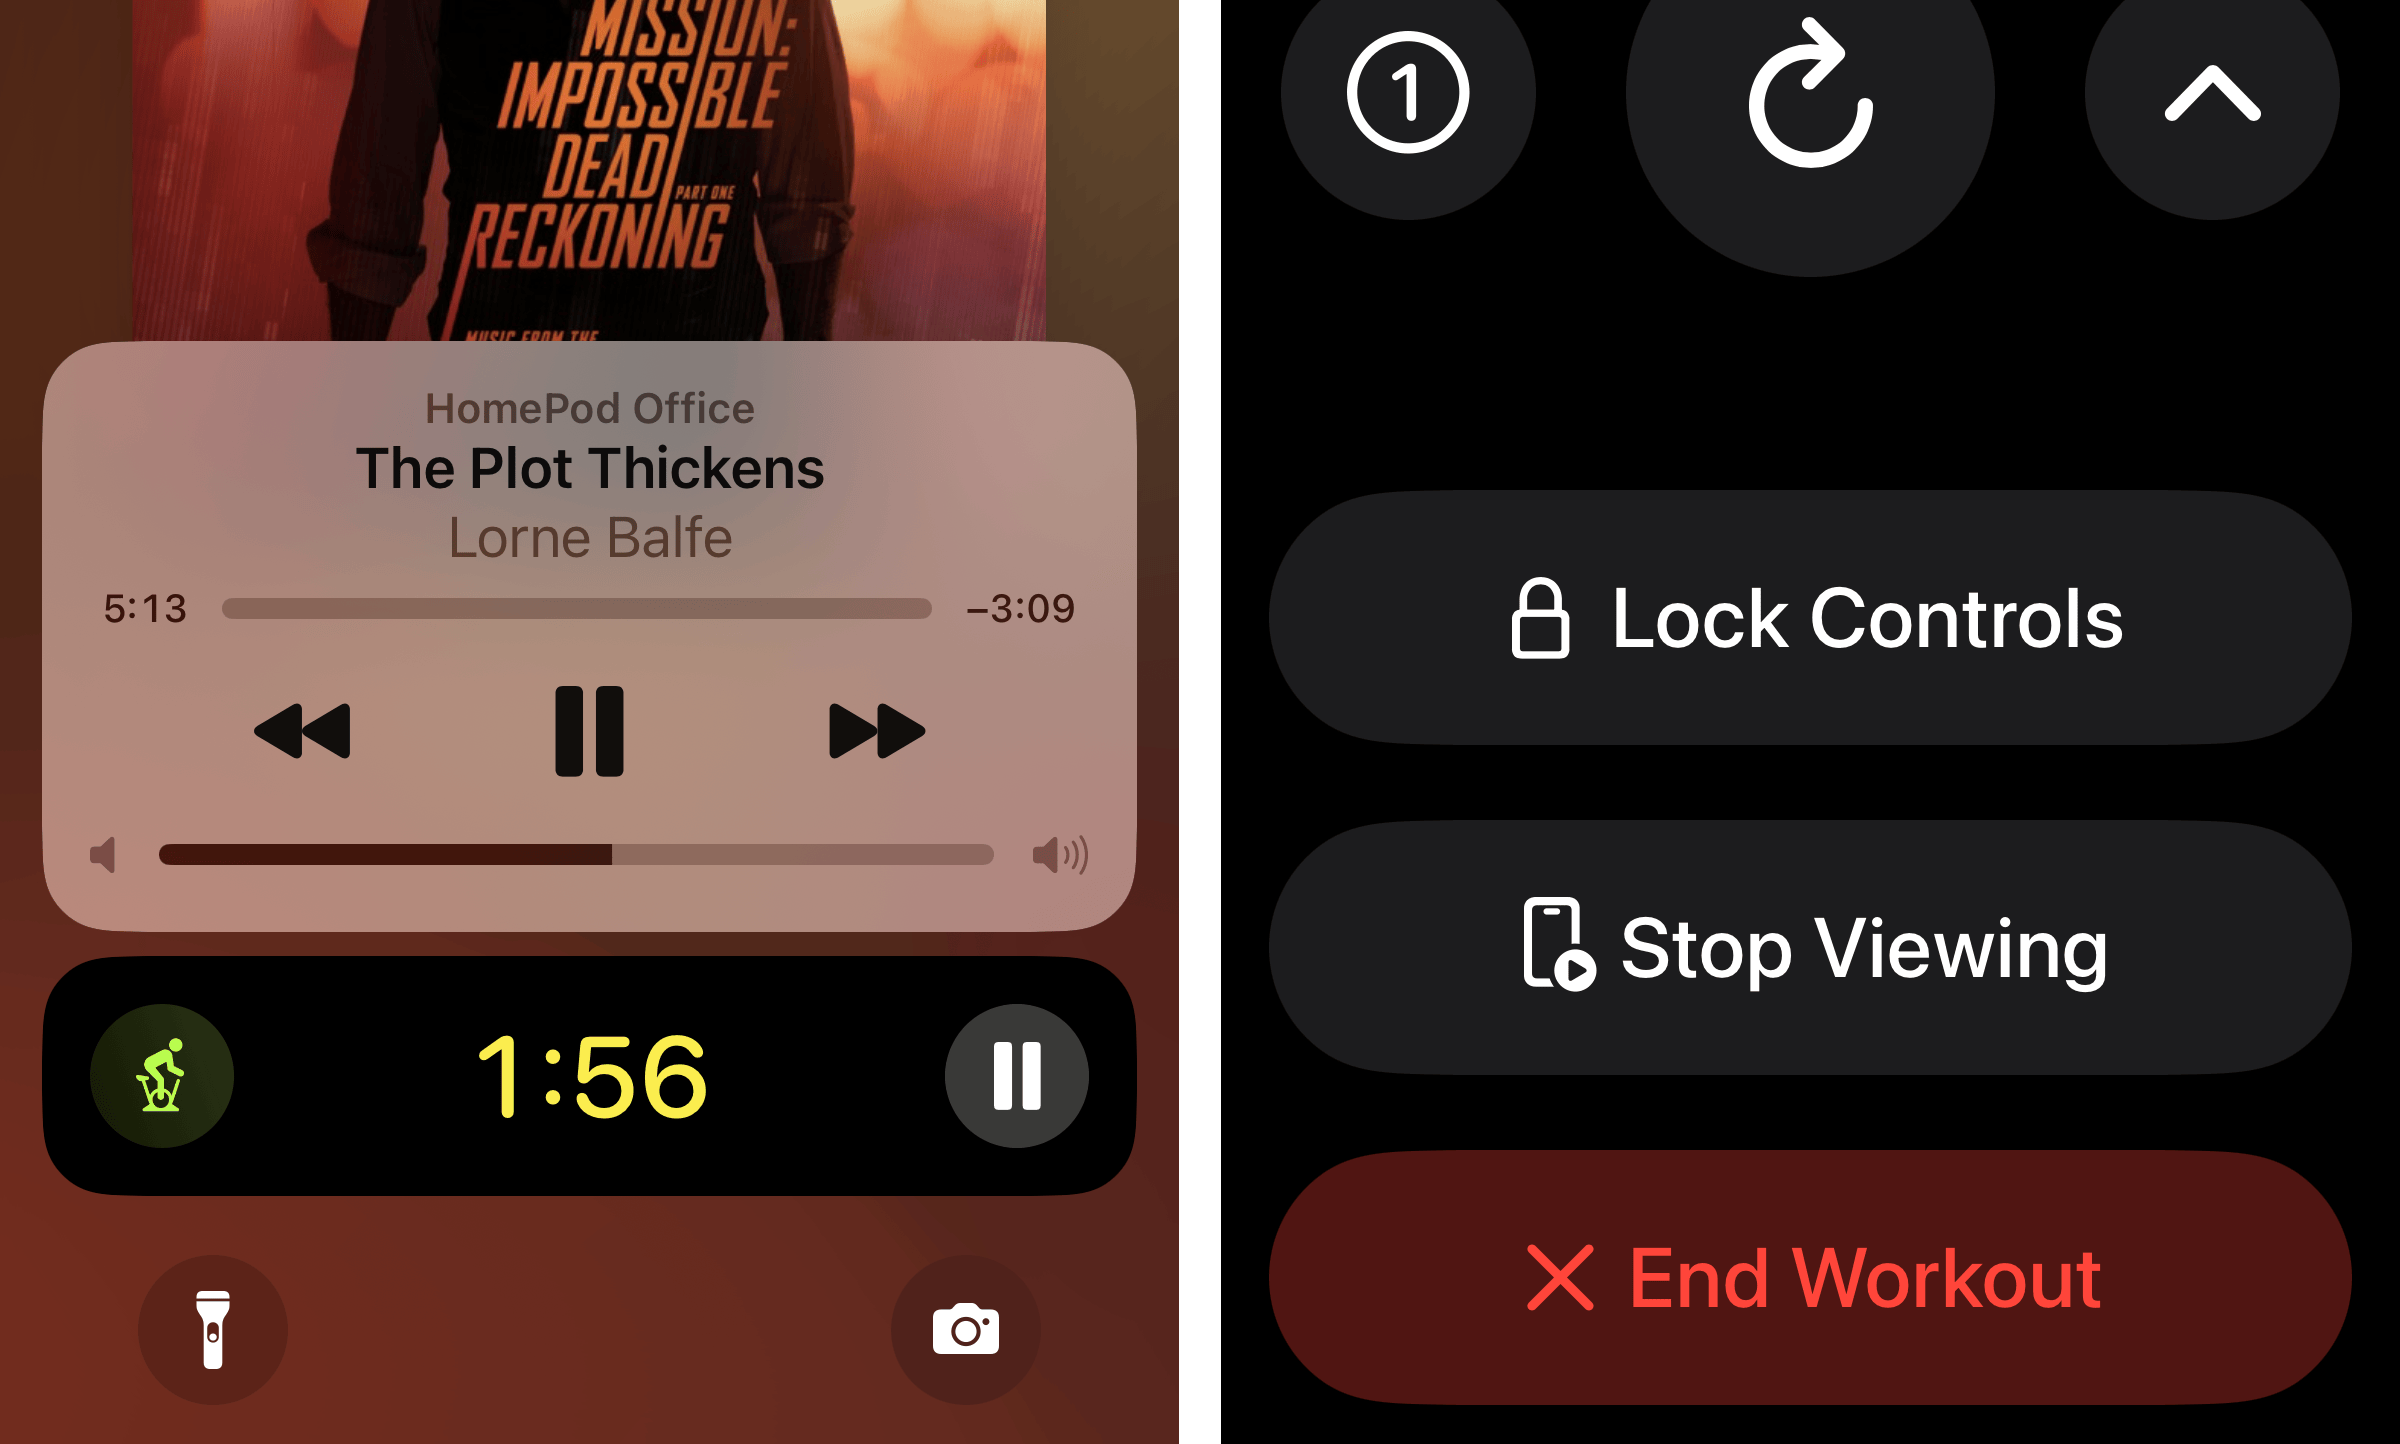
Figure 68: Keep tabs on stats during the workout. Scroll down to view more information, such as the activity rings (right). To pause a workout, press the side button and the Digital Crown at the same time; on the Apple Watch Ultra, press the Action button and the side button at the same time. Or swipe right and tap the Pause button
 (though swiping doesn’t work during swimming workouts). To make the Workout app pause automatically when you stop during a run, open the Watch app on the iPhone, go to Workout > Auto-Pause and turn on Auto Pause.
As you’re working out, tap the screen twice to mark a segment. Some segments are automatically noted, such as when you reach each mile or kilometer during a walk or run.
If you’re doing more than one workout in the same session, such as a run followed by an outdoor cycle session, swipe right and tap the New button. Choose the other type of workout and start it.
At the end of your workout, swipe right and tap End (Figure 69). (On this screen you can also pause/unpause the workout or lock the watch if accidental taps while exercising are interfering.) If you started another workout in the middle of the original one, tapping End finishes all active workouts.

Figure 69: Finish or pause the workout. Before you collapse in a heap, scroll down to review the workout summary. For multiple workouts, tap each one for the data. Most important, tap the Done button to save the results to the Fitness app on the iPhone. You can see them at the bottom of any day’s activity details.
Unfortunately, it’s not possible to export your workout data or route map in a format like GPXso that it can be viewed, analyzed, and shared in other workout systems, such as Strava or MapMyRun.
Automatic Workout Detection
In watchOS 5 and later, the watch can sense when you’ve begun some workouts, even if you didn’t start tracking it in the Workout app. Go to Settings ![]() > Workout and turn on Start Workout Reminder. Based on your movements, the watch will ask if you’ve started a run or walk (indoor or outdoor), an elliptical workout, rowing, cycling, or swimming (in a pool or open water).
> Workout and turn on Start Workout Reminder. Based on your movements, the watch will ask if you’ve started a run or walk (indoor or outdoor), an elliptical workout, rowing, cycling, or swimming (in a pool or open water).
Long on my list of desired features, the watch can also guess when you’ve completed a workout. Turn on End Workout Reminder in the same settings screen, and you’ll be asked if you’re finished based on the change in your activity. (Before this feature, I would frequently walk to a coffee shop, sit down, start working, and only after 30 minutes or so would I realize the watch thought I was still exercising, throwing off my average heart rate and workout timing data.)
For runners or outdoor cyclists, a third option is available: Auto Pause temporarily suspends a workout when you stop moving, and starts it up again once you get underway.
Create a Custom Workout
The list of available workouts is impressive, but not everyone exercises the same. You can create a custom workout based on one of the existing ones.
For example, if you want to add a cooldown period at the end of an outdoor walk, here’s how you’d do it:
Open the Workout
app on your watch.Scroll to the workout, in this case Outdoor Walk, and tap the options
button.Scroll down to the bottom of the options and tap the Create Workout button.
Tap the Custom option.
Set intervals on the next screen (Figure 70). In our example, tap the Add button and set a Work step that is defined by distance, time, or left open; that defines the main workout, and is required. To add the cooldown period for our example, tap Cooldown, which by default is set to Skip.

Figure 70: Add intervals to the custom workout. Choose a goal type, such as Time. You could also choose to be alerted at a specific point; for example, if your heart rate hits 126 beats per minute.
Scroll down and tap Time to set how much elapsed time has passed before the cooldown session begins.
Tap the Custom Title field and name the new workout.
Tap Create Workout. It appears in the options for the workout (alongside Open, Time, Distance, and Calories) and is colored purple.
Now, during that workout, the display includes a new “CD” timer. When you reach that cooldown point of your exercise, double-tap the screen to jump to the next interval, which in this case is Cooldown. The CD timer counts down and alerts you when the interval is finished.
Water Workouts
The Apple Watch (Series 2 and later) is water-resistant to 50 meters, making it safe to wear while swimming or bathing. The Apple Watch Ultra is resistant to 100 meters, which is good for diving or other activities in which the watch might be subjected to high water pressure. New in watchOS 9, kickboards are now automatically detected.
The Ultra includes the Depth app to track how deep you’re underwater when diving. You can launch the app on its own or set the Ultra to automatically launch it when the watch is submerged below 1 meter. Go to Settings ![]() > General > Auto-Launch and under When Submerged, enable the Auto-Launch App.
> General > Auto-Launch and under When Submerged, enable the Auto-Launch App.
Starting a swim workout or the Depth app automatically enables Water Lock; press and hold the Digital Crown after your workout to turn it off and eject any water from the case.
Connect to an Exercise Machine
Some manufacturers have started to incorporate Apple’s GymKit developer frameworks to make it easy to connect an Apple Watch to treadmills, stationary bikes, and other exercise equipment. The readings from the machine are stored directly in your workout.
On the watch, go to Settings ![]() > Workout and enable Detect Gym Equipment (or do the same in the Watch app on the iPhone). Holding the watch near compatible machines connects and starts the workout. If this option is off, you can still hold the watch near the machine and open the Workout app to start a workout.
> Workout and enable Detect Gym Equipment (or do the same in the Watch app on the iPhone). Holding the watch near compatible machines connects and starts the workout. If this option is off, you can still hold the watch near the machine and open the Workout app to start a workout.
Customize the Workout Display
The active Workout screen depicts several metrics, such as time elapsed, calories burned, and heart rate, as well as groups of other information such as heart rate zones and elevation. Turning the Digital Crown displays different groups to help you focus as you exercise. You can choose which data appear by editing a workout’s views:
Open the Workout
app on your watch.Scroll to a workout and tap the options
button.Tap the edit
 button for a workout tile (such as Open).
Tap Workout Views.
Tap Edit Views.
To edit the contents of the Metrics or Metrics 2 groups, tap the edit
 button (Figure 71).
Tap an item, such as Average Pace, and choose an alternative, which can be another metric of the same type (such as showing Current Pace) or a different one, such as Elevation.
Tap the back
 button to return to the previous screen and then tap Done.
Figure 71: Choose which metrics appear during a workout. To choose which groups appear, scroll through the selections and tap the Include button for the ones you want to use (Figure 72).

Figure 72: Tap the Include switch to add workout groups to the display. If you want the groups to show up in a different order, tap the Reorder button at the bottom of the list, then drag the group names to position them. Tap Done.
Tap < to return to the workout’s main screen.
Work Out with Apple Fitness+
Of all the activities available in the Workout app on my watch, the most used by far is Outdoor Walk. It’s better than nothing, but I often find it difficult to work up the motivation for more strenuous exercise, especially if it involves going to a gym, bundling up in poor weather for a run or bike ride, or…let’s be honest, getting out of the house at all. Apple’s Fitness+ service is here to get us off our behinds without having to go too far from our couches.
Fitness+ (which is an optional paid service) features guided workout videos that range from relaxing yoga to high intensity interval training (HIIT) sessions. When you start a workout, your watch connects to an iPhone, iPad, or Apple TV to track and display your biometric data and progress.
To run a Fitness+ workout, do the following:
On your compatible device, such as an iPhone, open the Fitness app and tap the Fitness+ icon.
Choose a workout. They’re organized by type (such as Cycling, Treadmill, Core, and so on) and include workouts of varying durations.
Tap the Let’s Go (or Let’s Begin) button. (The button varies depending on the workout.)
To start the workout, tap the Play
 button on your watch or on the device.
As you follow the workout, the metrics from your watch and your activity rings appear onscreen (Figure 73).

Figure 73: A cycling workout in progress. (Image: Apple) When the workout ends, tap Done.
Even with an enthusiastic professional guiding the (pre-recorded) workout, exercise can be lonely. Using Apple’s SharePlay technology, you can share a workout (or meditation) with friends and family. Here’s how to rope—I mean, invite—someone else into working out with you:
On your iPhone, iPad, or Mac, connect with the other person (or people) in a FaceTime call.
Switch to the Fitness app; the FaceTime video of the other person remains onscreen.
Choose the Fitness+ workout you both will do.
Tap Let’s Begin (or Let’s Go, or whichever action verb that particular workout uses).
On the other person’s device, they will see a Join Shareplay banner; ask them to tap Open.
Press the Play
button to start the workout for you both.When the workout ends, tap Done.
Exit the Fitness app and end the FaceTime call when you’re finished.
Review Your Workout
A side effect of doing a workout, other than the health benefits, is the amount of data the watch collects while you’re exercising. Aside from giving you a personal boost, the information can help you tailor future workouts.
Open the Fitness app on the iPhone and tap a recent workout to view more details about it. You’ll see the same information the watch provides when you end a workout, such as time and distance, as well as a list of splits, a map, and a chart of heart rate activity. Tap Show More on any of these to view more granular data (Figure 74).

Unfortunately, the only way to share this data is as a small image that looks like it’s designed for social media.
Use the Stopwatch App
The directions for using the Stopwatch ![]() app vary slightly based on which view is active; these assume Analog view; the other views have prominent labeled buttons:
app vary slightly based on which view is active; these assume Analog view; the other views have prominent labeled buttons:
Start: Tap the green Start
 button, which becomes a red Stop button after the stopwatch has begun.
Lap: Tap the white Lap
 button to track a second lap time; tap it again for additional splits.
Stop: Tap the red Stop
 button.
View: Any time during the timing session before you clear the times, you can use other views: tap < and then choose the Analog, Digital, Graph, or Hybrid readout. In the Analog view, turn the Digital Crown to see more detail at once; turn again to return to the single analog stopwatch view.
Clear/Reset: Once you’ve stopped recording, to clear the results, press the Lap
button again (or tap Reset in the other views).
Calibrate the Sensors
One neat feature of the Apple Watch is that it can learn more about how you walk and run. Knowing your average stride helps it estimate calorie burn better, and enables it to track workout distance and pace even when you’re indoors (or using an early watch model without a GPS chip outdoors). The key is the watch’s accelerometer, which can detect steps.
Accelerometer calibration happens the first time you run the Workout app, but also as you continue to exercise. Following the directions in an Apple support document, you can calibrate the watch by walking or running for 20 minutes in a flat area outside where the GPS in your watch or iPhone will have a clear signal. For better results, repeat the 20-minute walk or run at different (consistent) speeds.
Share Activity
watchOS makes it possible to share activity stats with any friend who also has an Apple watch. This includes mutual notifications of goals met, workouts completed, and achievements earned.
To share your stats:
Add friends: In the Fitness app on the iPhone, tap Sharing at the bottom, then tap the friends
 icon in the upper-right corner. Next, tap the plus
  icon and enter a friend’s email address (or, for someone in your Contacts list already, their name). Tap Send. Once your friend accepts the invitation, you can see each other’s activity.
On the watch, open the Activity
 app and swipe leftward to view the Sharing screen. Scroll to the bottom and tap Invite a Friend, locate a contact, and tap their name. The invite is sent immediately.
See friends’ activity: In the Activity app on your watch, swipe leftward to see the Sharing screen (Figure 75). Turn the Digital Crown to see other friends. Tap a friend to see their activity.

Figure 75: The Activity app’s Sharing screen lets you view your friends’ activity stats. Sort your friends list: In the Activity app on your watch, swipe leftward to see the Sharing screen. Tap Sort By to sort your list of friends by various criteria, such as name or progress in meeting various daily goals.
Adjust sharing: In the Activity app on the watch, swipe leftward to see the Sharing screen and then tap a friend. To mute notifications from that friend, tap Mute Notifications. To hide your activity from that friend, tap Hide My Activity. To remove that friend, tap Remove Friend.
Compete with friends: Sometimes a little friendly competition can inspire you to be more active. On the Sharing screen of the Activity app on the watch, tap a friend’s name and then tap Compete. Tap Invite to challenge them to a seven-day competition to see who can rack up the most points. Each percentage you add to your activity rings equals one point, with a maximum of 600 points possible per day.
Monitor Your Hearing
The Noise ![]() app uses the watch’s microphone to detect loud noises and warns you if you’re in an unsafe acoustic environment. It runs on Series 4 and later models running watchOS 6 and above. To activate the feature on the watch, go to Settings
app uses the watch’s microphone to detect loud noises and warns you if you’re in an unsafe acoustic environment. It runs on Series 4 and later models running watchOS 6 and above. To activate the feature on the watch, go to Settings ![]() > Noise > Environmental Sound Measurements and turn Measure Sounds On.
> Noise > Environmental Sound Measurements and turn Measure Sounds On.
You can view the noise levels in the Noise app on the watch or using the Noise complication on a watch face (Figure 76).

The watch alerts you when noise levels exceed 90 decibels (dB). Go to Settings ![]() > Noise > Noise Notifications and change the threshold for when a notification appears, or turn the alerts off.
> Noise > Noise Notifications and change the threshold for when a notification appears, or turn the alerts off.
Another way to help protect your hearing is to ensure your ears don’t get blasted by sudden loud sounds when listening to headphones. Go Settings ![]() > Sounds & Haptics > Headphone Safety > Reduce Loud Sounds and turn the option on.
> Sounds & Haptics > Headphone Safety > Reduce Loud Sounds and turn the option on.
When you do, a volume level appears (Figure 77). Adjust the threshold for loud sounds; the description text below the level notes the decibel ceiling and approximates a similar noise level, such “heavy city traffic” at 85 decibels.

Stay on Top of Your Medications
Taking medications on a regular basis reinforces the habit of taking them, which is naturally good for your health. The new Medications ![]() app reminds you to take the meds and keeps a log you can refer to.
app reminds you to take the meds and keeps a log you can refer to.
To start, add your medications:
Open the Health app on the iPhone, tap Browse, and go to the Medications category.
Under Your Medications, tap the Add Medication button.
In the Search field, type the name of your medicine. Or, tap the Camera button and position a medication label in front of the camera.
If there’s a match, select it (Figure 78). Or do a text search.

Figure 78: The Health app scans for text matching medications in its database. On the next screen, choose a frequency (such as Every Day) and a time of day to take the medicine. Tap Next.
Choose a shape to match the pill (helpful for making sure you’re taking the correct one). Other icons, such as inhalers, are also available. Tap Next.
Optionally choose colors for the pill shape and the icon’s background, and tap Next.
Add optional details such as a display name and any notes, then tap Done.
When you’ve entered two or more medications, the Health app flags any potential conflicts, found in the Drug Interactions panel.
When the time arrives, the watch displays a notification reminding you to take your medications (Figure 79). Tap Log All as Taken once you do, or Log All as Skipped if you missed them. Or, tap Remind Me in 10 Minutes to postpone the reminder. You can also open the Medications ![]() app and mark them as taken or skipped.
app and mark them as taken or skipped.

Track Your Cycle
Tracking a woman’s monthly menstrual cycle has several benefits, from anticipating the beginning and end days of her period to calculating fertile days when trying to become pregnant. It can also help to record events that don’t follow her schedule, such as spotting between periods, that could warrant a call to a physician.
The Cycle Tracking app on the watch, along with the Health app on the iPhone, makes it easy to track these variables:
In the Health app on the iPhone, tap the Cycle Tracking health category and answer the initial questions to record your most recent period.
When your next period begins, open the Cycle Tracking app on the watch and tap the oval for today’s date to record it (Figure 80). Below the daily tracker, you can optionally record the flow level and any associated symptoms, such as cramping or sleep changes.

As you enter more data, the app can do a better job of predicting when your period will start or when you’re in a fertility window. In the Health App on the iPhone, go to Cycle Tracking > Options to enable Period Predictions and Fertility Predictions (if applicable), and optionally turn on notifications that will give you a heads up and prompt you to log events and symptoms.
You’ll see five symbols on the tracking chart:
A light blue oval
 marks the predicted six-day fertile window.
A light purple oval
 marks the retrospectively-estimated ovulation day.
A circle with red stripes
 marks when the next period is predicted to occur.
A solid red circle
 marks period days you’ve logged.
A purple dot
 marks days when you’ve logged other data, such as symptoms or sexual activity.
The Apple Watch Series 8 and Ultra models include temperature sensors that can help predict ovulation windows. You need to wear the watch at night with Sleep focus mode enabled and the Track Sleep with Apple Watch feature active. The data is used retrospectively, which means it correlates an average increase of body temperature after ovulation in order to predict when the next ovulation will occur. Apple says it takes at least two cycles of gathering nightly wrist temperature data to get more accurate results.
Be More Mindful
Apple is concerned not only with your physical health, but your mental well being, too. The Mindfulness app brings together stress-reducing techniques: breathing, morning and evening reflections, and guided meditation sessions as part of Apple’s Fitness+ service. (If you are not subscribed to Fitness+, you’ll see only Reflect and Breathe as options.) The app displays a reminder at the start and end of your day; when it appears, tap Open Mindfulness (or tap Mute for Today) (Figure 82). You can also start a session manually by opening the Mindfulness ![]() app.
app.

In the app, choose one of the options: Reflect, Breathe, or Fitness+ Audio Meditations if you have a Fitness+ subscription.
Reflect
A Reflect prompt gives you something specific to focus on, such as isolating your thoughts or letting go of any in-the-moment urges, followed by a lava lamp inspired animation plays for the duration of the reflection period (Figure 83).

The duration is set for 1 minute, but you can change that: in the Mindfulness main screen, tap the ![]() button next to Reflect, tap Duration, and choose a time up to 5 minutes.
button next to Reflect, tap Duration, and choose a time up to 5 minutes.
To end the reflection early, swipe right and tap End.
Breathe
As a breathing exercise, the app tells you to be still and prompts you when to inhale and exhale (Figure 84) (both on screen and with a series of haptic taps).

The duration is set for 1 minute, but as with the Reflect app, you can change it: in the Mindfulness main screen, tap the Details ![]() button next to Breathe, tap Duration, and choose a time up to 5 minutes.
button next to Breathe, tap Duration, and choose a time up to 5 minutes.
To change the number of breaths per minute, open the Watch app on the iPhone and tap Mindfulness > Breath Rate. Or, on the watch, go to Settings ![]() > Mindfulness > Breath Rate.
> Mindfulness > Breath Rate.
Fitness+ Audio Meditations
If you subscribe to Apple’s Fitness+ service and want to start a meditation, do the following:
In the Mindfulness
 app, tap Fitness+ Audio Meditations.
Tap one of the guided meditations, which vary in duration.
If you’ve not already connected a Bluetooth audio destination, such as a pair of AirPods, choose one in the screen that follows. Then tap Cancel and tap the Fitness+ Audio Meditations button again to start the meditation.
Like other Fitness+ exercises, Meditate tracks the time elapsed and your pulse rate (Figure 85).

Figure 85: Listen to a guided meditation session led by one of the Fitness+ trainers. Swipe right to display controls to end or pause the meditation. When finished, tap Done at the bottom of the summary screen.
New meditations are added to the watch’s storage when the watch is connected to power and close to your iPhone. If you don’t want them occupying the storage, go to Settings ![]() > Mindfulness and turn off Add New Meditations to Watch.
> Mindfulness and turn off Add New Meditations to Watch.
On the other hand, if you do want to store favorite meditations, you can add them to a Mindfulness library by doing the following:
In the Mindfulness
app, tap Fitness+ Audio Meditations.Scroll to locate a meditation you want to save, and then tap the I button.
Schedule Mindfulness Reminders
By default, Mindfulness reminders are scheduled for Start of Day and End of Day. Those times seem to be based on when the watch (via its sensors) detect that you’re up and around in the morning, and when you’re close to bedtime at night; if you use the Sleep app, the Mindfulness reminder appears during the wind-down time.
You can also add your own repeating reminders, such as when you need to cool down after finishing work for the day. Here’s how:
On the watch, go to Settings
 > Mindfulness and tap Add Reminder.
Tap the Change Time button, which displays the current time.
Set the time for the reminder and tap the
 button.
Tap the Repeat button and choose which days of the week to display the reminder. Tap the Back
 button to return to the previous screen.
Tap Add to create the reminder.
Sleep Better
Research tells us that when we get more sleep, we feel and perform better while we’re awake. Science also tells us that a good way to improve our sleep is to establish a sleep schedule and stick to it. Maybe if research and science would stop talking, we could get some shuteye!
The Sleep app on the Apple Watch works together with your iPhone to coax you into slumber and record data about when and how well you’re sleeping during the night. If “going to sleep” for you too often means being awake in the middle of the night, give the Sleep options a try.
When you wear your watch at night, the sensors detect information such as how and when you move and your resting heart rate. (The Series 6, 7, and 8 models, plus the Ultra, can also Measure Your Blood Oxygen Level as you sleep.) The Sleep mode also puts your watch into a low power state to conserve battery power through the night.
The first time you run the Sleep app on the watch, you’re guided through the basic settings: determining sleep goals, setting a sleep schedule, and establishing wind down routines to prepare yourself for a good night’s rest. You can also set these options in the Health app on the iPhone: go to Browse > Sleep.
Sleep and Wake Manually
Open Control Center and tap the Focus ![]() button, and then tap the Sleep mode
button, and then tap the Sleep mode ![]() button. The watch, iPhone, and other devices running iOS 15 or later, or computers running macOS Monterey or later, switch into Sleep mode.
button. The watch, iPhone, and other devices running iOS 15 or later, or computers running macOS Monterey or later, switch into Sleep mode.
If you need to access your watch while it’s in Sleep mode, tap the screen to activate it, and then press and hold the Digital Crown until the screen unlocks. The watch is still in Sleep mode, so when you’re finished it reverts back to the low power display and locks the screen.
If you wake up before your regular schedule completes, tap the Sleep mode ![]() button in Control Center to stop the mode. If you forget, the watch notices you’re no longer nearly motionless in bed and asks if you want to turn off your alarm (Figure 86).
button in Control Center to stop the mode. If you forget, the watch notices you’re no longer nearly motionless in bed and asks if you want to turn off your alarm (Figure 86).

Set Sleep Goals and Options
I’m definitely a sleep-less-during-the-week-and-compensate-on-the-weekends type of person. I don’t want to wake up early on Saturdays unless I absolutely need to. If you’re like me, create a separate sleep schedule:
On the watch, open the Sleep
 app.
app.Tap Full Schedule.
Scroll down and tap Add Schedule.
Tap the button under Active On, which reads the current unscheduled days (such as “Weekends” if Saturday and Sunday are open). Tap the days you want to include in this schedule and then return to the previous screen.
Tap the Wake Up field and set the time you’d like to start your day (Figure 87). Tap the check
button.
Figure 87: Choose the days (left) and the wake up time (right) when you create a new sleep schedule. To be roused with an alarm, turn the Alarm switch on. Optionally tap Sounds & Haptics and choose a song or chime to coax you into wakefulness. (Kudos to the musicians at Apple, because the sounds are wonderfully well done.) You’ll hear the sound and feel corresponding taps on your wrist; if Silent mode is on, you’ll feel only the taps, which build in intensity.
The Bedtime target is based on the goal you set for number of hours per night, but you can tap it and set a different time that applies to just this schedule.
Tap Add to apply the schedule.
Two options apply to all schedules, and they can be found at the bottom of the Full Schedule screen:
Sleep Goal. Tap this button and enter the number of hours you’d like to get. The app uses this to calculate recommended bedtimes and to also keep track of how often you’re meeting the goal.
Wind Down. Tap this button and set a duration, such as 15 or 30 minutes. At that point, you’ll be notified that it’s time to start thinking about snoozing (Figure 88). It also activates the Sleep focus mode.

Change Only the Next Sleep Goal
Some nights don’t go to plan, and you’re up later than the Sleep app is scheduled for. If you’re using your iPhone or watch during that time, it can be a hassle to unlock the sleep screens each time. In that case, change only the next goal, without affecting your normal schedule, by doing the following:
Open the Sleep
app and tap the schedule listed under Next.Make adjustments to the Bedtime and Wake Up times.
Check that the Alarm setting is on or off depending on your intention; if it’s a particularly late night, for example, I’ll turn it off so I can sleep in, but it will still be set to ring the following day.
Tap the back
button to return to the main Sleep options.
View Sleep Data
In the Sleep app on the watch, scroll down to view an abbreviated look at the last two weeks’ sleep data. For more data, open the Health app on the iPhone and go to Summary > Sleep (or Browse > Sleep if you don’t see it in the Summary screen) (Figure 89).

The data collected under watchOS 9 indicates when you’re spending time in REM, core, and deep sleep stages. In the Health app, view charts representing the last day, week, month, and six month periods.
The Health app can also track your average breathing rate while you’re asleep, as well as your wrist temperature on Series 8 and Ultra models. In the Sleep summary, look for the Respiratory Rate: Sleep report, and the Average Wrist Temperature data under the Comparisons tab. If you’re seeing erratic readings, you may want to consult a physician or sleep specialist.
Thoroughly Wash Your Hands
The need to effectively wash our hands has always been there, but the COVID-19 pandemic elevated the importance of hand washing in all our lives. Experts recommend washing—yes, with water and soap—for 20 seconds each time to kill viruses and bacteria.
What has this got to do with the Apple Watch? The movements of your hands and arms while washing are distinctive, just the type of thing a nearby accelerometer can pick up. On the watch, go to Settings ![]() > Handwashing and turn on Handwashing Timer. When the watch detects the rapid hand movements and the sounds of running water and lathered soap associated with handwashing, it pops up a bubbly 20-second timer (Figure 90).
> Handwashing and turn on Handwashing Timer. When the watch detects the rapid hand movements and the sounds of running water and lathered soap associated with handwashing, it pops up a bubbly 20-second timer (Figure 90).

I’ve found that the countdown can be off by a second or two, but otherwise serves as a good reminder to not rush through a cleaning.
It’s easy to remember to wash your hands after using the bathroom or before you begin cooking, but sometimes more difficult after you get home from running errands. In the Watch app on the iPhone, go to Settings > Handwashing and turn on Handwashing Reminders; if the handwashing timer hasn’t been triggered within a few minutes of returning home (the address you’ve listed for your contact information), a friendly reminder notification appears.
The Handwashing feature isn’t just a friendly nudge, though. If you’re curious, or just eager to peruse the data, open the Health app on the iPhone and go to Browse > Other Data > Handwashing to see how often over the last day, week, month, or year the watch recorded a cleaning, and the duration of each (Figure 91).
