Use a Macro Utility
Earlier in this book, I discussed AppleScript and Automator, two tools that can control numerous other apps and tie multiple actions together into easy-t0-run shortcuts. Both of those technologies are powerful, free, and included with macOS. But AppleScript’s learning curve precludes casual use, while it’s limited by the capabilities various apps choose to expose. Automator is far easier for a beginner to use, but it, too, has a fairly constrained palette of capabilities—and not all the tasks you might wish to automate fit its “workflow” mold. Meanwhile, apps like Excel and Nisus Writer Pro have fantastic automation capabilities built in, but they’re largely confined to activities within those apps.
So we come to a category of automation tools that—at the risk of overstating my case—transcends these limitations. If you just want to get the job done—not necessarily in the most programmatically elegant way but in a fast, reliable, and flexible way—you want a macro utility. It’s the sort of tool I reach for most often for general-purpose automation tasks.
Like other kinds of tools covered in this book, the idea of a macro utility is straightforward. You pick an action, or a series of actions, from a list; these form the macro’s task. Then you pick one or more events to trigger that action—a keyboard shortcut, a button click, a change in network settings, or whatnot. That’s it: you have a macro.
What’s interesting about the utilities discussed in this chapter is that the lists of potential actions they offer as building blocks for macros are long and diverse. Some of these actions, similar to AppleScript verbs and Automator actions, directly control a particular app (iTunes, Safari, the Finder) or send instructions to macOS (shut down, change display brightness, switch users). Others manipulate behind-the-scenes resources (clipboards, variables, strings) or manage the flow of steps (if/then/else conditionals, loops, subroutines). Still others “play” the visible interface, simulating button presses, menu commands, keystrokes, and mouse movements.
Put all this together and you have a toolkit that—with a bit of cleverness and patient testing—can automate almost any repetitive Mac task that doesn’t require creativity or human intuition. Here are just a handful of examples, all of which can be done with a single click or keystroke:
- Remap keys on your keyboard to perform different functions
- Show the screen of a shared Mac
- Force a “stuck” Trash to empty
- Add keyboard shortcuts to menu commands in apps that don’t support the Mac’s built-in shortcuts
- Create an ad hoc Wi-Fi network
- Open an entire set of apps and documents
- Resize and reposition all your windows so they don’t overlap
- Modify text or formatting according to predefined patterns
- Email the URL of the Web page you’re currently viewing to someone else
- Rotate, flip, resize, or crop all the images in a folder
Having sung the praises of macro utilities generally, I must level with you. For all practical purposes, we’re talking about one utility: Keyboard Maestro. Sure, I’ll mention a few other apps (in Use Another Macro Utility and Switch Contexts with ControlPlane). But in the case of ControlPlane, it aims to solve a conceptually different problem and, to be candid, the others aren’t even in the same league. If you want a great macro utility—and trust me, you do—Keyboard Maestro is where it’s at.
Control Your Mac with Keyboard Maestro
I’ve already given you a taste of what Keyboard Maestro can do, so let me show you what it looks like, walk you through creating a couple of macros, and explore some of its options and little-known features.
Create a Macro
When you open the Keyboard Maestro (Figure 46), you’ll see a three-pane Editor interface. On the left is a list of groups, which you can use to organize your macros however you like; this includes the All Macros smart group. In the middle is the list of all the macros in the current group. And on the right is the contents of the currently selected macro (or a blank shell of a macro, if you’ve just created it). To create an empty macro, click the plus ![]() button at the bottom of the Macros list.
button at the bottom of the Macros list.

Within the macro pane (Figure 47), you see two areas: the trigger(s) (top) and the action(s) (bottom). You can configure these two items in any order. A trigger is what you do to make the macro run—a keystroke, a menu command, or a system event, say. (More about triggers in a moment.) The action(s) are what happen when the trigger occurs.

Let’s walk through a few macros to see how it’s all done.
Macro #1: Open Login Items
For the sake of illustration, we’ll start by making a macro with a single, simple trigger and a sequence of three actions. When you run this macro, it displays System Preferences > Users & Groups > Login Items. (Ordinarily, you’d have to open System Preferences, click Users & Groups, and then, unless Login Items had been selected the previous time you viewed that pane, click Login Items. So, we’re replacing three clicks with one keyboard shortcut.)
Follow these steps:
- If you haven’t already done so, launch Keyboard Maestro, select a group (doesn’t matter which one), and click the plus
 button at the bottom of the Macros list to create a new, blank macro.
 - Give your macro a name—replace Untitled Macro at the top with
Open Login Items. - Click New Trigger to display a pop-up menu from which you can choose any of 20 trigger types. Choose Hot Key Trigger (the first item) from this menu to use a keyboard shortcut as the trigger.
- You’ll notice that the Type field under the text “This hot key” is already selected. So press the keyboard shortcut you want to use to trigger this macro. It can be anything you like, but I suggest choosing something obscure that isn’t already being used for something else, like Command-Option-Control-L.
- Click New Action to display a new pane (which covers the two leftmost columns of the window) with a list of all possible actions, grouped by category (Figure 48).

Figure 48: Keyboard Maestro’s actions are grouped by category. - The first action is to open the User & Groups pane of System Preferences.
To do this, click Open in the Categories list and then drag Open a System Preference Pane to the “No Action” label on the right (or just double-click the action). If Users & Groups isn’t already shown next to “Open preference pane,” choose it from the pop-up menu.
- When you launch System Preferences, it may take a second or two to open, and we want to wait until it’s running to switch to the Login Items view.
So, drag the Pause Until action (from the Control Flow category) underneath the Open Users & Groups Preference Pane action. Click New Condition and choose Front Window Condition from the pop-up menu. Then, from the Front Application pop-up menu, choose System Preferences (if it’s not already there, click More at the bottom to expand the list). Leave the last pop-up menu set to Exists.
- Now we need to switch to the Login Items view (in case that’s not what the window is currently set to).
Click Interface Control in the Categories list, and add the Press a Button action to the end of your action list. Replace the text OK with
Login Items. At this point, the macro should look like Figure 49.
Figure 49: The final Open Login Items macro, in edit mode. - Click the Edit button at the bottom to deselect it. Once you’re no longer in edit mode, the macro should look like Figure 50.

We’re ready to rock! Press Command-Option-Control-L (or whichever combination you chose). System Preferences should open to the Users & Groups pane, with the Login Items view visible.
Macro #2: Convert Formats
Your favorite word processor can probably import and export files in various text formats. But macOS also includes a command-line utility called textutil that can (among other talents) convert files to or from any of nine different formats. Want to go from Word (.doc or .docx) to HTML (or vice versa)? You can do that with a Keyboard Maestro macro that employs a shell script, and never launch Word at all.
Follow these steps:
- As in Macro #1: Open Login Items, create a new macro. Name it
Convert Format. - Click New Trigger to display a pop-up menu of trigger types. Choose Status Menu Trigger (just for variety).
- Add your first action—Prompt for User Input (in the Variables category—which will prompt you, the user, to choose a destination file format.
- Fill in
Convert Formatfor the Title, and in the Prompt field, typeChoose the format you want to convert the selected file(s) to. Must be one of: txt, html, rtf, rtfd, doc, docx, wordml, odt, webarchive. - Click the plus
 button under Variables and Default Values to add a new variable. Enter
 Toin the first field (the variable’s name) andhtmlin the second field (its default value). - Next, tell the macro that it should operate on whichever file(s) you happen to have selected in the Finder: add the For Each action (in the Control Flow category) to the end of your action list. Replace the text Variable in the For Each field with
filePath. Click the plus button next to New Collection, and choose Finder’s Selection Collection from the pop-up menu. - Finally, it’s time to add the shell script. But it’s not an independent action; rather, it’s part of the For Each action—that is, the shell script will run on each item you selected in the Finder. Add an Execute a Shell Script (from the Execute category) into the No Action area (surrounded by a dotted line) at the bottom of the For Each action. In the field that appears there, type this:
textutil -convert $KMVAR_To "$KMVAR_filePath"At this point, your macro should look like Figure 51.

Figure 51: The final Convert Format macro, in edit mode. - Optional but recommended: click the Edit button at the bottom to deselect it.
Now you can run the macro, but first you’ll need at least one document somewhere in one of the supported formats (from Step 6 above). I suggest copying one or more such files to your Desktop to make them easier to work with.
One last thing before we run the macro: if Keyboard Maestro’s status ![]() or
or ![]() menu isn’t visible in your Mac’s menu bar, switch back to Keyboard Maestro, go to Keyboard Maestro > Preferences > General and make sure Display Status Menu is set to either Alphabetically, By Group, or Hierarchically (i.e., not Never).
menu isn’t visible in your Mac’s menu bar, switch back to Keyboard Maestro, go to Keyboard Maestro > Preferences > General and make sure Display Status Menu is set to either Alphabetically, By Group, or Hierarchically (i.e., not Never).
Now select the file(s) you want to convert. Then, choose Convert Format from the Keyboard Maestro status ![]() or
or ![]() menu. You should see the dialog (which you created!) (Figure 52).
menu. You should see the dialog (which you created!) (Figure 52).

Leave the To field set to its default, and click OK. A new file should appear with the same name and location as the old file (which will still be there) but with the .html extension—and it’ll be in HTML format! (Feel free to run the macro as often as you like, with different To settings and different files selected to see how it works.)
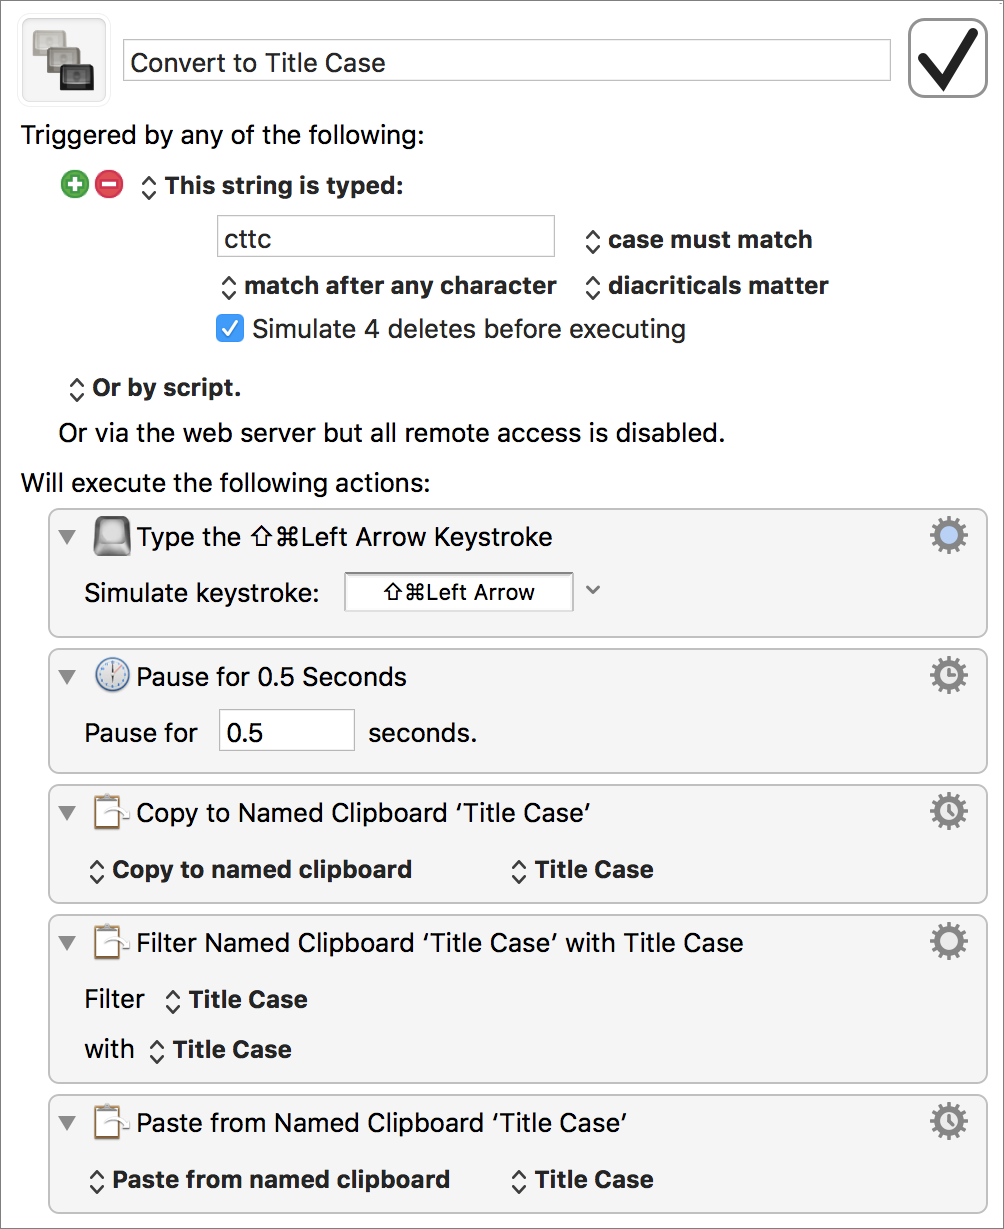
Macro #3: Convert to Title Case
Here’s a goofy little macro that few people would be likely to use in exactly its current form, but it illustrates a few useful Keyboard Maestro features, and you can certainly adapt it to your own needs. When it runs, it selects all the text on the current line up to and including the insertion point and converts that text to title case (like the heading just above this paragraph). But the trigger is just typing a few characters.
Follow these steps (refer to Macro #1: Open Login Items for details):
- Create a new macro and name it
Convert to Title Case. - Click New Trigger to display a pop-up menu of trigger types. Choose Typed String Trigger. Then type
cttcin the This String is Typed field, with the surrounding pop-up menus set to “case must match,” “match after any character,” and “diacriticals matter.” Also select the “Simulate 4 deletes before executing” checkbox. - The first action simulates the keystrokes needed to select text from the insertion point back to the beginning of the line. To do this, add the Type a Keystroke action (from the Interface Control category). Then click in the Simulate Keystroke field and type Command-Shift-Left arrow.
- Next, we want the macro to pause for half a second, to allow that action time to complete. To do this, add a Pause action (from the Control Flow category). Fill 0.5 in the blank.
- Now we want to copy the selected text to a special clipboard (so that the main clipboard isn’t overwritten). To do this, add a Copy to Named Clipboard action (from the Clipboard category). From the second pop-up menu, choose New. Type the name
Title Case, and close the window. Title Case should then automatically be selected in that pop-up menu. - We’ll use one of Keyboard Maestro’s predefined text filters to change the contents of our Title Case clipboard. Add a Filter Clipboard action (from the Clipboard category) to the macro. Choose Title Case from the Filter pop-up menu, and then choose Title Case again from the “with” pop-up menu.
- Finally, we paste the revised clipboard, overwriting what we selected earlier. Add the action Paste from Named Clipboard (from the Clipboard category) and choose Title Case from the second pop-up menu.
Your macro should now look like Figure 53. (I’ll skip the step of turning off edit mode and showing you what that version looks like, although you can do that if you like.)
To run this macro, make sure your insertion point is at the end of a line. Then type cttc (without any modifiers). The macro runs, and your trigger characters disappear.
Macro #4: Paste Previous Clipboard
I told you Keyboard Maestro includes a clipboard history. One of my favorite ways to use this is to press a keystroke that pastes whatever was on my clipboard just before the current thing. So, if I copy and paste something, copy a second thing, but then want to paste the first thing again, this is what I use.
Follow these steps, again using earlier instructions as a guide:
- Create a new macro and name it
Paste Previous Clipboard. - Assign the macro a hot key trigger of Command-Control-V (or whatever you like).
- Add two actions: Set Clipboard to Past Clipboard (from the Clipboard category), with System Clipboard chosen from the Set menu and 1 entered as the number of the clipboard; and Type a Keystroke (from the Text category), with Command-V entered as the keystroke. The result should look like Figure 54.

With this macro enabled, simply press Command-Control-V to paste the previous contents of the clipboard.
Record a Macro
If you read Automate Microsoft Office, you may recall that in Office apps, you can record a macro. In other words, Office will watch you while you perform activities, and then make them into a macro. You can play this macro back later, no coding required. Keyboard Maestro offers a similar feature. It won’t always produce results as reliable as those you get creating your own macro from scratch—and not every kind of macro can be recorded—but it’s a simple way to ease into macro construction or get unstuck if you’re stuck.
To record a macro:
- Create a new macro, just as in the earlier examples, and give it a name and trigger.
- Instead of filling in actions, click the Record button at the very bottom of the window. A little 5-second countdown timer appears on screen (Figure 55).

Figure 55: This floating window appears when you record a macro. The countdown timer (left) gives way to the icon on right when it reaches zero. - Once the timer has counted down to zero and the icon says Recording, do stuff. Whatever you like. Switch apps, type some text, apply formatting, choose menu commands, click buttons, anything. You know, stuff.
- Click the floating Recording icon to stop recording and examine your new macro in Keyboard Maestro.
- Optional but recommended: click Edit to leave edit mode.
Now try running your macro. If the macro doesn’t work as expected—which is likely—go back and click Edit to return to edit mode and see if you can modify some of the actions to do what you want them to do. You may also need to add Pause or Pause Until actions to force the macro to wait for your Mac to catch up with it at certain points.
Learn about Keyboard Maestro Actions
I’ve shown you a handful of actions in the course of walking you through the sample macros. There are many, many more of them. You can learn about actions by looking at the Keyboard Maestro documentation, or by trying them out. Here are just a few actions and categories that I find particularly interesting:
- Activate Clipboard History Switcher (Switchers category): I mentioned in Use a Macro or Launcher Utility that Keyboard Maestro is also an excellent clipboard utility, with its own clipboard history. This action displays a floating window with that history.
- Filter Clipboard (Clipboard category): Speaking of clipboards, this action can make a wide variety of changes to the contents of your clipboard. Use it to remove styles, change case, perform a calculation, count words, and more.
- Google Chrome Control category, Safari Control category: Thanks to the actions in these categories, you can automate nearly anything in Google Chrome or Safari. Open a Web page, fill in and submit a form, click buttons, create new tabs, execute JavaScripts, and perform other activities.
- Execute category: If your macro needs capabilities that Keyboard Maestro’s built-in actions don’t provide, you can use the actions in this category to run a shell script (as we did in Macro #2: Convert Formats), an AppleScript, JavaScript, Swift script, or Automator workflow as part of your macro. (You can also apply a BBEdit text factory—look in the Clipboard category.)
-
Find Image on Screen (Image category): This blew my mind when I first saw it. Keyboard Maestro can identify an area on your screen matching an image (perhaps a cropped screenshot) that you supply, and having found that portion of your screen, it can highlight it, move the mouse to it, or take other actions.
Alternatively, a macro can choose to do something or not based on whether an arbitrary portion of your screen matches an image. As just one example of why this is interesting, a blind reader wrote to tell me he uses this feature, in conjunction with AppleScript, to speak the status of an icon on his screen (enabled or disabled) that he’d have no other way to determine because it’s unavailable to VoiceOver. I think that’s amazing. To learn more about using this action, read How to Assign a Hotkey to Almost Anything by Patrick Welker.
- Variables category: We used two variables in Macro #2: Convert Formats—one of which passed the contents of a field in a dialog to a shell script and the other of which contained the path of each file being operated on. There are countless other ways to use variables, but what I find most valuable is that they’re able to take information created or discovered by one action and reuse it in another action that comes later in the macro.
Learn about Keyboard Maestro Triggers
Just as Keyboard Maestro has lots of nifty actions, it has a crazy array of triggers. We’ve seen keyboard shortcuts and commands on the Keyboard Maestro status menu, but there are 29 other options too. I’m not going to enumerate all of them here—you can read all about them in the Keyboard Maestro documentation—but I want to call out a few that I think are especially noteworthy:
- Typed String Trigger: Unlike a keyboard shortcut, which uses a combination of keys pressed at once (typically with modifiers such as Command, Control, Option, and/or Shift), a typed string trigger is a sequence of keys you type without a modifier. In Automate Text Expansion, we saw how software can turn a typed abbreviation into a longer chunk of text. This is the same idea, except that typing an abbreviation runs a macro (and optionally deletes the characters you just typed). For example, I could type an abbreviation that fills in some predefined text, selects the entire current paragraph, and copies it to the clipboard—all in one operation.
- Time Trigger: Have your macro run on a timer! This trigger lets you select the time and day(s) of the week you want it to run.
- MIDI Trigger: If you have a piano-style MIDI keyboard (or any other MIDI instrument) connected to your Mac, you can trigger a Keyboard Maestro macro when you play a particular note. (Incidentally, there are also MIDI actions to send note on, note off, and control change messages.)
-
Macro Palette Trigger: This floating palette normally takes the form of a small icon (which you can position anywhere on your screen). Mouse over it and it displays a list of macros that you can trigger with a single click (Figure 56).

Figure 56: The macro palette is normally unobtrusive (left), but when you mouse over it, it expands to show macros you can activate with a click. - Wireless Network Trigger: You can trigger a macro by connecting to, or disconnecting from, a certain Wi-Fi network.
- Focused Window Trigger: When the window that currently has focus (that is, the frontmost window) changes, or when its title or frame change, a macro can run automatically.
- URL Trigger: You can click a specially formatted URL in another app to trigger a macro.
Use Another Macro Utility
Even though Keyboard Maestro is an excellent macro utility for macOS, it’s not the only one. Because I know people will ask, I do want to say a few words about other Mac macro utilities:
-
Alfred: Alfred, which I discussed in Use a Third-party Launcher, has a feature called workflows that’s available only if you purchase the optional Powerpack. Workflows connect a trigger (such as pressing Alfred’s hot key and typing an abbreviation) and/or one or more inputs (such as keyword or filters) with one or more actions (such as opening a file or URL, or running a shell script or AppleScript) and optional outputs (such as a notification or putting something on the clipboard). So an Alfred workflow is certainly a variety of macro, but it’s more limited in its triggers, actions, and logic than what you’ll get in Keyboard Maestro, while being (in my opinion) harder to understand than an Automator workflow.
That’s not to say Alfred workflows aren’t extremely useful—they are. With a few keystrokes in Alfred, you can create a new note or search in Evernote, perform a search on multiple Web sites at once, or open a selected image in a browser instead of Preview. But they require a particular way of thinking about tasks that doesn’t match the way my brain works, so I find it difficult to recommend them.
-
QuicKeys: Back in the day (that is, before 2010 or so), QuicKeys was the biggest, baddest, most powerful macro tool for Macs. I absolutely loved it—I found it both easier to use and more flexible than the Keyboard Maestro of that era, and was hard pressed to come up with any automation task it couldn’t perform. Unfortunately, the company that owns it, Startly Technologies, encountered a series of misfortunes—not the least of which was the unexpected death of the lead QuicKeys developer. As a result, QuicKeys has been in a state of suspended animation.
The software hasn’t been updated since December 17, 2009. For reference, those were the days of 10.6 Snow Leopard; 10.7 Lion came out in July 2011. Although QuicKeys is still for sale and still sort of, mostly works with Sierra (see extra steps required here), it doesn’t take advantage of any recently added macOS technologies, and has nontrivial bugs. Since it was never updated for Lion, Mountain Lion, Mavericks, Yosemite, El Capitan, or Sierra, I have to assume the current version (4.0.7) is the last one we’ll ever see. It may work (sort of, mostly) for a long time or it may break with the next version of macOS, but despite its power, I can’t feel good about relying on an app that’s so neglected. If development begins again, I’ll be more than happy to update this section of the book!
-
yKey: Although not in the same league as Keyboard Maestro, yKey (formerly called iKey) is a fine little macro utility. It has a reasonably thorough list of triggers and actions, and can dispatch many repetitive tasks with ease. (And, it has Take Control cred: Adam Engst wrote Take Control of iKey 2, which is slightly outdated, but still useful.)
yKey doesn’t include logic, as such. For example, it can wait for certain app or window states before moving on with the next step in a macro, but it can’t make if/then/else decisions, process variables, perform loops, search for text patterns, or evaluate complex conditions as Keyboard Maestro can. And its interface is odd—it strikes me as being backward from the way most macro utilities approach triggers and actions.
Switch Contexts with ControlPlane
As fond as I am of Keyboard Maestro, there are a few things it can’t do that I need from time to time. For example, I want a certain app to launch whenever I connect my MacBook Pro to AC power, and to quit whenever I unplug it. I want my windows to rearrange in a particular way when I connect a second display to my iMac. And I want to switch my Mac’s audio input whenever I plug in external speakers. It turns out these sorts of tasks are precisely the domain of an app called ControlPlane.
ControlPlane is based on the notion of user-defined contexts, which you can think of as settings or situations your Mac might find itself in. For example, a context could be a location (home, work, or a coffee shop), the presence of a particular connected peripheral, or a mood that might strike you. You begin by creating whatever contexts are useful or meaningful to you.
Then, for each context, you create one or more rules that tell ControlPlane how likely it is that a given context exists. For example, if I have a context “coffee shop,” I might create a rule that says if my current Wi-Fi network is called “Google Starbucks,” my confidence that I’m in a coffee shop is 100 percent. Depending on the context, a single clue may give it away, or you may need a combination of factors, such as which devices are currently connected and what your Mac’s IP address is.
Once the conditions are in place that convince ControlPlane you’re in a given context, it performs any actions you’ve assigned to that context. (It can also perform actions when you leave a context.) So, if my context is “AC power,” with the fact that my Mac is plugged in supplying the sole piece of needed evidence, my action to open a particular app is performed automatically. When I disconnect from power, another action automatically quits that app.
I’ll be the first to admit that this is a rather unintuitive arrangement. And yet, once you get the hang of it, it can become quite powerful, giving you the option to perform tasks based on passive triggers, or combinations of triggers, that are entirely outside the domain of something like Keyboard Maestro.