Automate the Finder
The Finder is a special app that runs all the time and lets you navigate all the files, folders, and apps on your Mac. You use the Finder to organize, tag, and locate files; connect to other devices on your network; mount and unmount servers and external drives; and perform numerous other activities that involve files, folders, and volumes.
The Finder is also the main place people go to open apps that don’t appear in the Dock. When you want to launch an application, you might open a Finder window, click Applications in the sidebar, scroll to the app you want, and double-click it. Similarly, if you want to open a document in its default app, you might dig through any number of nested folders in the Finder and then double-click that document.
Since you use the Finder so much, it offers prime opportunities for automation. For example, it’s possible to launch apps and open documents without clicking and scrolling through any windows. In a second or less, while keeping both hands on the keyboard, you can open an app or document without even knowing where it’s located.
In this chapter, I discuss how to get started automating the Finder using Spotlight, and then I move on to more powerful third-party utilities that let you do even more.
Use Spotlight as a Launcher
Spotlight, the Mac’s built-in file indexing and search feature, has always been an excellent way to launch apps (and open files) too. You can activate Spotlight with a click on the Spotlight ![]() menu or a keyboard shortcut, type a few letters of the app you’re searching for, and press Return to launch it as soon as it’s highlighted.
menu or a keyboard shortcut, type a few letters of the app you’re searching for, and press Return to launch it as soon as it’s highlighted.
In recent versions of macOS, Spotlight has become a better launcher, as well as an all-purpose tool for searching the Web, performing calculations, and controlling other aspects of your Mac’s operation. In fact, Apple not-too-subtly changed Spotlight’s appearance and behavior to more closely resemble third-party launchers such as Alfred and LaunchBar, discussed just ahead (see Use a Third-party Launcher).
Spotlight isn’t perfect, by any means, but once you get the hang of it, it’s a pretty good way to find stuff.
To use Spotlight as a launcher:
- Press Command-Space or click the magnifying glass
 icon in your menu bar to display the Spotlight window.
 - Begin typing an app’s name (Figure 12). If the app’s name is made up of multiple words, you can type the first letter of each (such as
kafor Keychain Access); you can also type InterCapped letters, as inbcfor BusyCal. Wait while Spotlight searches. As it finds matching items, it lists apps at the top.
Figure 12: The Spotlight window as it appears for me after typing m. - If the app you want to launch is highlighted as the top hit, press Return to launch it. If it’s not the top hit, you can either continue typing to narrow down the search or press the Down Arrow key until the app you want is highlighted. Then press Return.
The app opens. This works regardless of where the app is located on your Mac.
You can use the same technique to open documents, iTunes tracks, Contacts records, Safari history items, and so on. You can also use it to look up words in the dictionary and to perform Web searches.
Many of these search results—including Wikipedia entries, maps, dictionary definitions, and contact records—appear in the built-in Spotlight preview pane to the right, so there’s no need to open a separate app (and, in fact, you can skip pressing Return). Spotlight can also do mathematical calculations and currency conversions. For example, type (17*3)/12 or $120 in euros, and the result will appear in both the search window and the preview pane.
Furthermore, Spotlight is adaptive—whichever app you selected last after typing a given letter or letters will appear first on the list the next time you type the same thing. However, all non-app matches will be farther down on the list, likely requiring multiple arrow presses to get to them. (You can customize the order of the categories in System Preferences > Spotlight > Search Results.) Also, be aware that the list won’t show every possible match, so you may have to click Show All in Finder (at the bottom of the list) to open a new window with complete search results.
Even if you restrict yourself to opening apps from the keyboard with this method, Spotlight tends to be kind of slow. And because its results change over a period of several seconds, it often takes that long to be sure that the thing you want will still be highlighted when you press Return. So you can’t blindly type in a few characters and trust that the right thing will open.
But with a bit of extra software, all these problems can magically disappear—and you can gain significant new capabilities.
Use a Third-party Launcher
If your goal is simply to use your keyboard to launch apps, open an occasional document, and perhaps do a few calculations, Spotlight might be adequate. But wouldn’t it be even better if you could use that same Command-Space shortcut (or another one of your choosing) as a system-wide trigger to perform dozens of other common actions, too? If so, you’re the type of person who can use a third-party launcher.
Here are the sorts of things a third-party launcher can do that the Spotlight menu can’t:
- Learn your preferences as you use it, so that your most frequently used items automatically bubble to the top of the list (and therefore require fewer keystrokes)—even if those items aren’t apps
- Display matching items instantly
- Browse your iTunes library for music by song, artist, composer, album, genre, or playlist—and control iTunes playback
- Perform actions other than opening items—for example, sending the items via Mail or Messages, compressing files in the Finder, moving them to another location, or adding tags
- Add calendar events using only the keyboard
- Look up login items from the password utility 1Password
Mac users have four excellent choices in launchers: Alfred, Butler, LaunchBar, and QuickSilver. Each of these utilities approaches the task a bit differently from the rest, offering its own unique features and user interface. And each of them has a ton of vocal supporters who insist that their favorite launcher is far superior to all the others. I have my own preference, but I acknowledge that all four have merits, and I won’t think (much) less of you if you choose a different one.
The typical way you use a launcher is much like the way you use the Spotlight menu from the keyboard. Press Control-Space (or whichever hot key you’ve selected) to open a window or other widget, and then begin typing.
In most cases, after a bit of training, the launcher matches whatever it was you were looking for with only one or two characters. Then, press Return to open that thing. For example, to open Mail, I press Command-Space, m, and Return. Of course, that’s just the sequence for the basic task of opening an app or file; you might type different characters, or use a different hot key or string of commands, to perform additional actions.
Here’s a brief rundown of the four major Mac launcher utilities.
LaunchBar
I’ve used LaunchBar since 2002, and even though I’ve tried all the other launchers (more than once), I always come back to LaunchBar because it just feels right to me. It works the way I think (or vice versa). And, you can save 20 percent on LaunchBar with the coupon at the end of this book.
You activate LaunchBar with a hot key—it’s Command-Space by default (which I prefer, so I changed Spotlight to be Control-Space). Start typing (the name of an app, file, contact, or whatever) and, when the right item is selected (Figure 13), press Return to open it.

M in this case) to see matching apps and other items.You don’t have to type the first letters of the name exactly; for example, I type nw for Nisus Writer Pro and cp for CrashPlan. If you type an abbreviation and then select something other than LaunchBar’s top pick, it remembers that, and as you use it, it molds its suggestions to your actual usage.
LaunchBar has many other talents, too. If you press the hot key and then start typing numbers, LaunchBar assumes you want to perform a calculation, and lets you do so without any other preliminaries (just as Spotlight does). You can also use a feature called Instant Send to do interesting things with selected files or folders—for example, email them, open them with a non-default app, or run an AppleScript on them. I use LaunchBar for looking up contact phone numbers, tracks in iTunes, and 1Password login items, among many other things. LaunchBar can also remember items previously copied or cut to your Clipboard and recall them later.
Alfred
When you press Alfred’s hot key (Option-Space by default), a large floating window appears. Start typing the name of an app, file, or other content, and Alfred displays matches immediately. You can also type keywords to perform commands such as restarting your Mac or hiding the current app. Alfred has hundreds of features and nearly every aspect of the app is highly customizable.
Although Alfred itself is free, some of its most interesting features require a purchase of the optional Powerpack, which—among other things—adds automatic text expansion, iTunes controls, access to Contacts, email searching, 1Password integration, a clipboard history, and workflows (which combine Alfred features with system commands and scripts to form macro-like tools; see Use Another Macro Utility).
Butler
Butler pops up a floating window when you press its hot key (Control-Space by default), and as you start typing, the results initially look much like those in the Spotlight menu. However, unlike Spotlight, Butler can learn your favorite apps, files, and other items as you use it. You can also trigger Butler with a menu, hot corner, or user-defined abbreviation. Butler offers the usual range of launcher actions: opening files and apps, searching the Web, running AppleScripts, controlling iTunes, and so on. It also includes a clipboard history (see Use a Macro or Launcher Utility).
Unfortunately, although Butler has lots of capabilities, I find its user interface nearly inscrutable, and its included documentation isn’t much help. Perhaps it was just designed for someone who approaches software differently than I do, but it seemed to require too much thought and effort to decode its features, problems I didn’t experience with any other launcher I tried.
Quicksilver
Quicksilver is a free (donations accepted), slick, and highly modular launcher. It includes just a few built-in features, but you can add any of dozens of free plug-ins to enhance the app with additional capabilities. Some of these plug-ins provide controls for specific apps (Apple Mail, Evernote, Google Chrome, iTunes, Safari, and others) while others add lower-level features (such as image and text manipulation, access to the windows and menus of open apps, calculations, a clipboard history, and text manipulation).
You bring up the Quicksilver display by pressing a hot key (Control-Space by default), and then start typing to find items to launch. You can also assign hot keys to many other actions, such as iTunes controls. With the right plug-ins, you can also trigger actions with mouse actions, trackpad gestures, or system events (such as an application quitting or a file being compressed).
Organize Files with Hazel
You’re probably familiar with the way email rules work (whether or not you use them yourself; see Automate Email). When a message comes in, your email program checks to see if the conditions in your first rule match. If so, it performs the actions associated with that rule (such as filing the message in a mailbox, deleting it, or replying to it); if not, it moves on to the next rule.
A clever utility called Hazel does the same thing, except for files in the Finder rather than for email messages. You can save 20 percent on Hazel with the coupon at the end of this book. (And, you should find Hazel’s built-in help especially helpful—I wrote it!)
In the Hazel pane of System Preferences, you select a folder and then set up one or more rules for it (Figure 14).
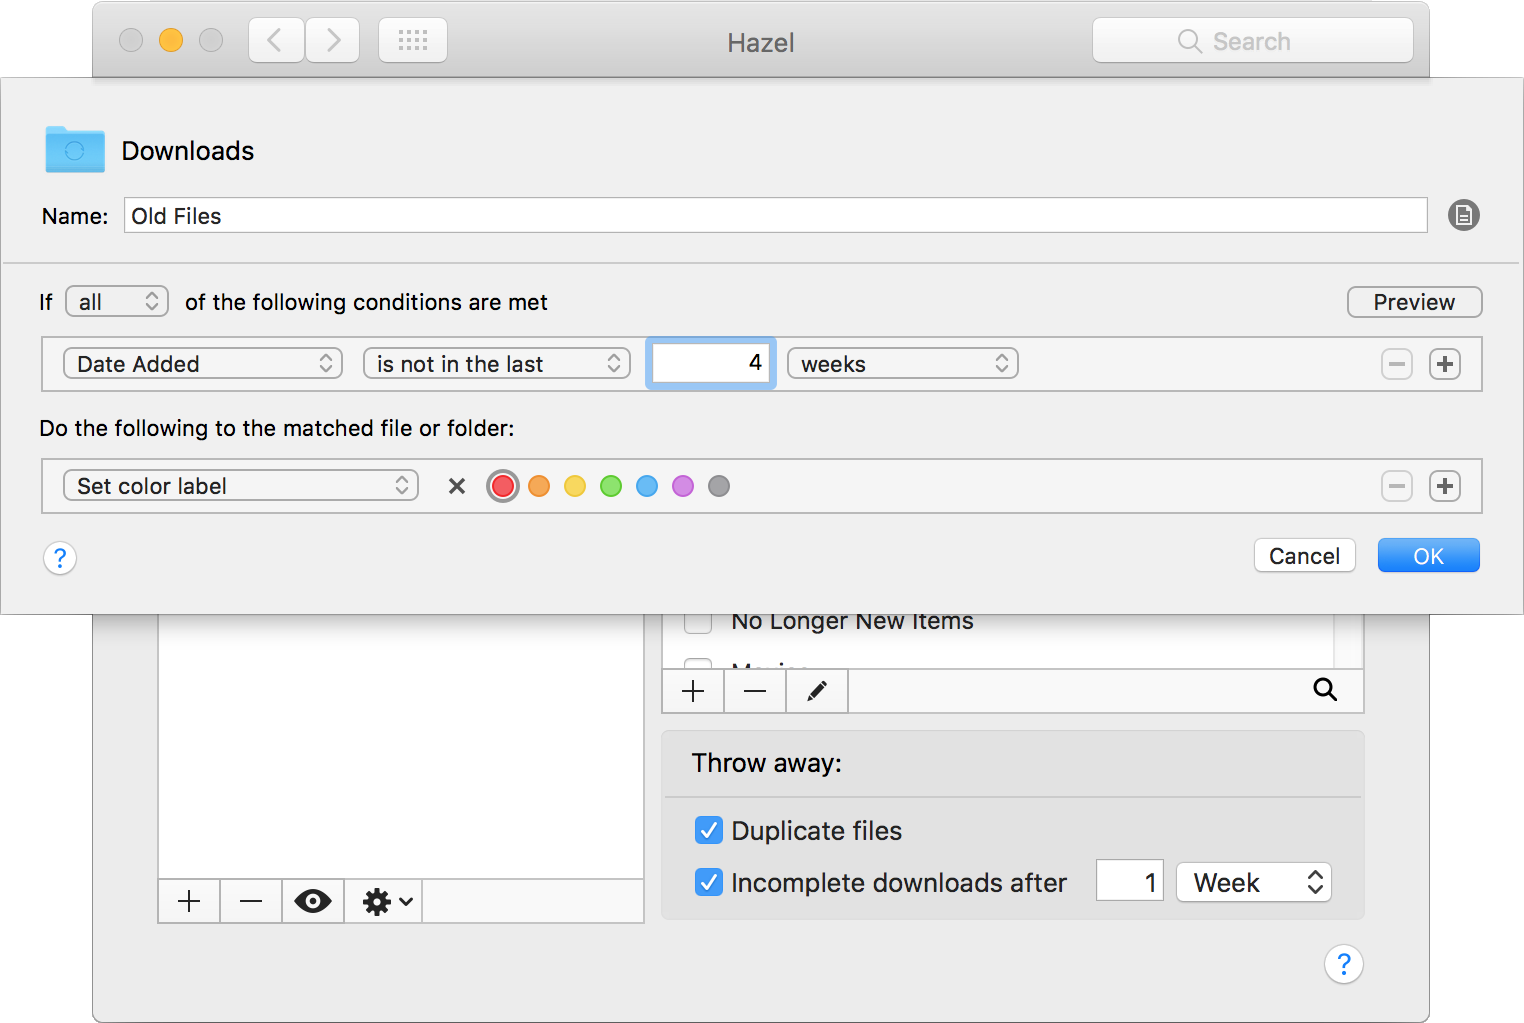
Rules can look for conditions such as how recently a file was created or modified, its name, its size, tags, and other attributes. When it finds a match, Hazel can perform one or more actions such as applying a tag, moving or copying the file into another folder, deleting the file, compressing or decompressing it, importing it into iTunes or Photos (for music and photos, respectively), displaying a notification, or running an AppleScript or shell script.
Hazel rules have an effect similar to AppleScript Folder actions. (If you’re not familiar with them, flip ahead to Use AppleScript Folder Actions.) But Hazel rules require no coding, so they’re far simpler to use.
Hazel can also keep your Trash from overflowing with old and/or large files, help you completely remove all traces of apps you delete, and remove duplicate files.
I’ll admit that the first time I heard about Hazel, I was afraid that it would move things around without my knowledge, with the result being that I’d lose (or at least lose track of) things rather than have a tidier Mac. I mean, I put files in particular places for a reason, and I didn’t want some smart-alecky app making up its own mind about where things should go. But in fact, Hazel does only what you expressly ask it to do. And if it makes you more comfortable, it can alert you when it moves or deletes something so that there are never any surprises.
Here are some examples of what Hazel can do for you:
- Keep your Downloads folder clean. If you haven’t manually removed a downloaded file after a week or so, Hazel can archive or delete it based on rules you’ve set up.
- Add music files that appear in your Dropbox folder to iTunes. It can delete the (now redundant) originals, too.
- Keep your Desktop clutter-free by moving files into project-specific folders if they’ve been on your Desktop for a few weeks without being opened.
- Alert you when a shared folder changes (say, for a project you’re working on with someone else).
- Add photos from Dropbox to your favorite photo-management app.
It’s easy to get carried away with a tool like this, but I prefer to think of it as a way to automate a few specific file-management tasks that would otherwise require my time and attention.