
12
Producing Music and Speech
In the previous chapter, we learned how to work with NeoPixel rings and strips. We also explored how to program the MAX7219-based 7-segment 8-digit display board. We worked with an external MicroPython library for the MAX7219 project and now we are comfortable working with external libraries. We created interesting projects with these cool external displays.
This chapter will explore a new dimension of the Micro:bit by discussing various methods of generating music and speech using Micro:bit. As discussed in the introductory chapters, the Micro:bit V2 has an inbuilt speaker. The programming module comes with inbuilt functions to generate tones and melodies. These can be easily heard using the inbuilt speakers. If we want to hear them louder, we can also connect to any external speaker. In this chapter, we will cover the step-by-step process of dealing with various methods of producing music and speech.
We will explore the following list of topics together:
- Connecting a speaker
- Melodies
- Custom melodies
- Tempo and pitch
- Working with a microphone
- Working with speech
Let us get started with music and speech with MicroPython and Micro:bit.
Technical requirements
Apart from the usual setup, the demonstrations in this chapter need the following components (which are not required for Micro:bit V2 users):
- Piezo buzzer
- Headphones/earphones with a 3.5 mm jack
Connecting a speaker
Speakers are electromagnetic components used for generating sounds. The internal circuit diagram of a speaker is shown in Figure 12.1. A speaker uses a thin magnetic membrane that can be excited by the electromagnetic field generated by the electric signals created by sound. As shown in the following figure, the North and South poles of the magnet will attract different parts of the membrane and generate different sounds. The faster or slower this membrane vibrates, the higher or lower the frequency of the output sound will be:
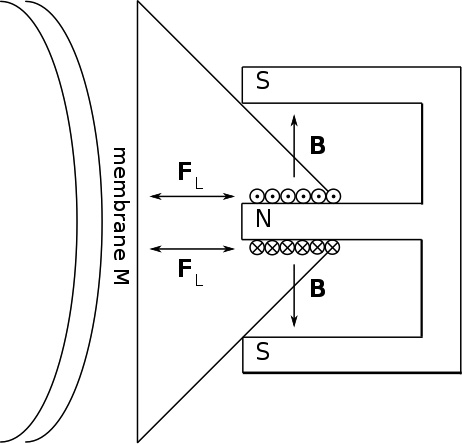
Figure 12.1 – Internal circuit diagram of a speaker (courtesy: https://upload.wikimedia.org/wikipedia/commons/4/45/Simplified_loudspeaker_diagram_with_forces.svg)
The Micro:bit V2 has an inbuilt speaker, which is located on the backside of the board. Figure 12.2 shows the location of the inbuilt speaker on the Micro:bit:

Figure 12.2 – Location of the in-built speaker on the Micro:bit V2 (courtesy: https://microbit-micropython.readthedocs.io/en/v2-docs/_images/speaker.png)
In the Micro:bit V1, the inbuilt speaker is not available. Therefore, we can only rely on external speakers or headphones to hear sounds generated by the Micro:bit. We can also connect a speaker or headphones to the Micro:bit V2. The process of connecting the speaker to Micro:bit is the same, irrespective of the version. A speaker has two terminals – that is, positive and negative. The negative terminal should be connected to the ground pin of the Micro:bit, and the positive pin can be connected to either of the round pins (0, 1, or 2). A headphone with a 3.5mm jack also has the same two terminals on the jack. Figure 12.3 shows the connection between a headphone jack and the Micro:bit:
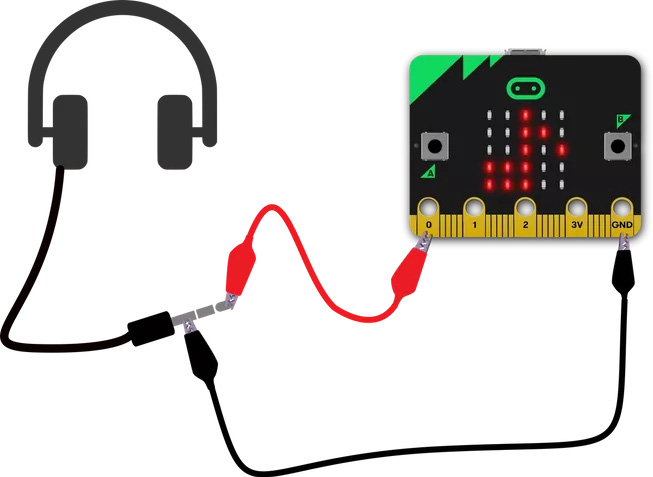
Figure 12.3 – Connecting a headphone/speaker to the Micro:bit
In this section, we discussed how to connect an external speaker or microphone to a Micro:bit. These are required for the Micro:bit V1 since the Micro:bit V2 already has an inbuilt buzzer. However, even for V2, a user may connect an external speaker or headphones for better sound output.
Melodies
Music is made of melodies. The Micro:bit library is designed with a rich collection of pre-loaded melodies. We can play a simple melody on the Micro:bit using the music module. The module contains 21 melodies. Some of the most popular ones are as follows:
music.DADADADUM
music.PRELUDE
music.RINGTONE
music.BIRTHDAY
music.WEDDING
music.BADDY
music.POWER_UP
music.POWER_DOWN
We can access the complete list using the dir(music) command. Connect your Micro:bit to your PC and run the following simple MicroPython code to play any of these melodies:
import music
music.play(music.BLUES)
We can play multiple melodies by pressing different buttons on the Micro:bit. In the following code, we are playing two different melodies by pressing buttons A and B on the Micro:bit. The following code will play the FUNK melody when button A is pressed and the DADADADUM melody when button B is pressed:
import music
from microbit import *
while True:
    if button_a.is_pressed():
        display.show("1")
        music.play(music.FUNK)
    elif button_b.is_pressed():
        display.show("2")
        music.play(music.DADADADUM)
    else:
        display.show("O")
Let us explore one more program, where we will store the melodies as a playlist and play any melody in the playlist by pressing buttons A and B. We have defined a function, play_music. It is accessed by pressing the B button. This function will play different melodies based on the value of the index, i. The value of the index variable, i, is increased by pressing A. If the index value becomes 10, then it is reset to 0 because we have decided to play only 10 different melodies. The user can decide on the number of melodies:
import music
from microbit import *
i = 0
def play_music(i):
    print(i)
    if i == 0:
        music.play(music.DADADADUM)
    elif i == 1:
        music.play(music.ENTERTAINER)
    elif i == 2:
        music.play(music.PRELUDE)
    elif i == 3:
        music.play(music.ODE)
    elif i == 4:
        music.play(music.NYAN)
    elif i == 5:
        music.play(music.RINGTONE)
    elif i == 6:
        music.play(music.FUNK)
    elif i == 7:
        music.play(music.BLUES)
    elif i == 8:
        music.play(music.BIRTHDAY)
    elif i == 9:
        music.play(music.WEDDING)
while True:
    if button_a.is_pressed():
        i = i+1
        sleep(1000)
    elif button_b.is_pressed():
        play_music(i)
    else:
        display.show(i)
    if i== 10:
        i = 0
In this program, we have defined a function called play_music(). The argument to this function is an integer, i. In this function, we used the if-elif-else statement to declare 10 different conditional statements. For 10 different values of i, 10 different melodies are defined in this program. Therefore, depending on the argument’s value to the function, the receptive melody will be played. Then, we check buttons A and B on the Micro:bit. If button A is pressed, then we increase the value of i, and the next melody is played, while if button B is pressed, the previous melody is played.
In this section, we used the Micro:bit to play a simple melody.
Custom melodies
With that, we have a good command of the music module of MicroPython. The melodies that are used in this module are made from various musical notes. A musical note is a symbol that donates musical sounds. A note can also represent a pitch class. Any music melody is made with a correct combination of musical notes. In English music, the notes are A, B, C, D, E, F, and G (the correct order is C, D, E, F, G, A, and B). You can learn more about the chromatic scale at https://en.wikipedia.org/wiki/Chromatic_scale and musical notes at https://en.wikipedia.org/wiki/Musical_note.
The next important aspect of melodies is the octave. The octave is the span between two of the same notes but with double the frequency. It indicates how high or low the note should be played. Octaves are in the range of 0 to 8. The higher the value of the octave, the longer the duration of the note. For example, if the octave is set to 6, then it will last two times longer than octave 3.
In MicroPython, the function to represent notes is as follows:
NOTE[octave][:duration]
Here, NOTE represents the name of the note (A to G), octave is a number (0 to 8), and duration is the amount of time for which it is played. For example, D5:4 will play the note D in the fifth octave for a duration of 4.
Let us understand the notes and their duration with the help of Table 12.1:
|
Note Type |
Whole Note |
Half Note |
Quarter Note |
Eighth Note |
Sixteenth Note |
|
Symbol |
|
|
|
|
|
|
Name |
Semibreve |
Minim |
Crotchet |
Quaver |
Semiquaver |
|
Duration (in MicroPython) |
16 |
8 |
4 |
2 |
1 |


Table 12.1 – Notes and their durations for MicroPython
Now, let us compose our first melody. As we mentioned previously, the sequence of notes in English music is C, D, E, F, G, A, and B. We will play the same sequence three times at octave number 4. The code is as follows:
from microbit import *
import music
for x in range(3):
    music.play(["C4", "D4", "E4", "F4", "G4", "A4", "B4"])
When you run this code, you will hear the sequence of tones making a melody three times. This is a good way for us to start composing melodies.
Now, let us compose one of the most commonly played melodies – that is, Happy Birthday. Refer to https://www.letsplaykidsmusic.com/happy-birthday-easy-piano-music/ to get the notes.
Now, we will store these note values in a list named tune, and then play the list values:
import music
tune = ["G4", "G4", "A3", "G4", "C1", "B2", "G4", "G4", "A3", "G4", "D2", "C1"]
music.play(tune)
The preceding code will play the first 12 notes of the Happy Birthday melody. We have only mentioned the note names and octave number in this sequence. We have not mentioned the durations. To perfectly play the melody, we must also mention the correct durations.
Now, let us compose a melody by mentioning the durations as well. We need the help of a music teacher to know the duration for every note to play a melody with perfection. Frère Jacques is one of the most popular French rhymes. Let us compose it using the same function:
from microbit import *
import music
for x in range(3):
    music.play(["C4:4", "D4", "E4", "C4", "E4:4", "F4", "G4:8"])
In this program, we have used seven different notes. One interesting aspect of this code is that we have not mentioned the duration for every note. MicroPython remembers the last defined duration and will allocate the same to the next notes. The first note is defined as C4:4. This means that the Micro:bit will play note C at octave 4 for a duration of 4. Now, if we want to play the next notes at the same octave and duration, then we can just mention the name of the note; writing the octave and duration is optional.
The following code will generate the same melody as the previous code. In this code, we have only defined the first note with full specifications. The next notes until F have not been defined with octave values and durations. We have mentioned the new value of G4 with a duration of 8:
from microbit import *
import music
for x in range(3):
    music.play(["C4:4", "D", "E", "C", "E", "F", "G4:8"])
In this section, we discussed how to create custom melodies by knowing the concepts of notes. If you have the technical knowledge to generate music through different notes, then you can apply that to generate electronic music using the Micro:bit.
Tempo and pitch
The next two features of music are tempo and pitch. Tempo is defined as the number of beats to be played per minute. Therefore, a piece of high-tempo music will play more beats per minute (bpm) and will sound fast. Similarly, if we keep the tempo value low, then we can hear the same melody as a piece of slow-paced music. In Micro:bit’s MicroPython implementation, we have the music.set_tempo(bpm=tempo) function to set the tempo of the melody.
For example, the following code will play the melody at 100 bpm:
music.set_tempo(bpm=100)
Pitch is defined as the frequency of the tone. Frequency is the number of cycles in 1 second. We can’t be confused about understanding tempo and pitch. Let us consider a note, A4, with a pitch of 440 Hz. This means that the speaker’s membrane will vibrate 440 times every second to play this tone in octave 4. If we place the tone with A5, then the frequency or the pitch will double – that is, 880 Hz. Now, we can play this tone as a part of the melody at different tempo values.
Let us write a simple program to play a tone at different tempo levels. We will define a variable called tempo with a value of 90. Then, we will use the music.set_tempo function to set the tempo value equal to the variable value. Then, we will play the note C4 for a duration of 4 with a rest of 1 tick. We have used conditional statements with buttons A and B. We can increase the tempo with button A and decrease it with B. We can hear the same tone with a higher or lower tempo by pressing these two buttons:
from microbit import *
import music
tempo = 90
while True:
    music.set_tempo(bpm=tempo)
    music.play(['C4:4', 'r:1'])
    if button_a.was_pressed():
        tempo = tempo + 5
    if button_b.was_pressed():
        tempo = tempo -5
Now, let us explore another simple program where we can change the melody’s tempo by using a potentiometer. The connections for the circuits are shown in Figure 12.4. We connect the extreme ends of the potentiometer to the ground and power supply (VCC) (3V, in this case). The central pin of the potentiometer is the output pin, which is connected to analog pin P0 of the Micro:bit:
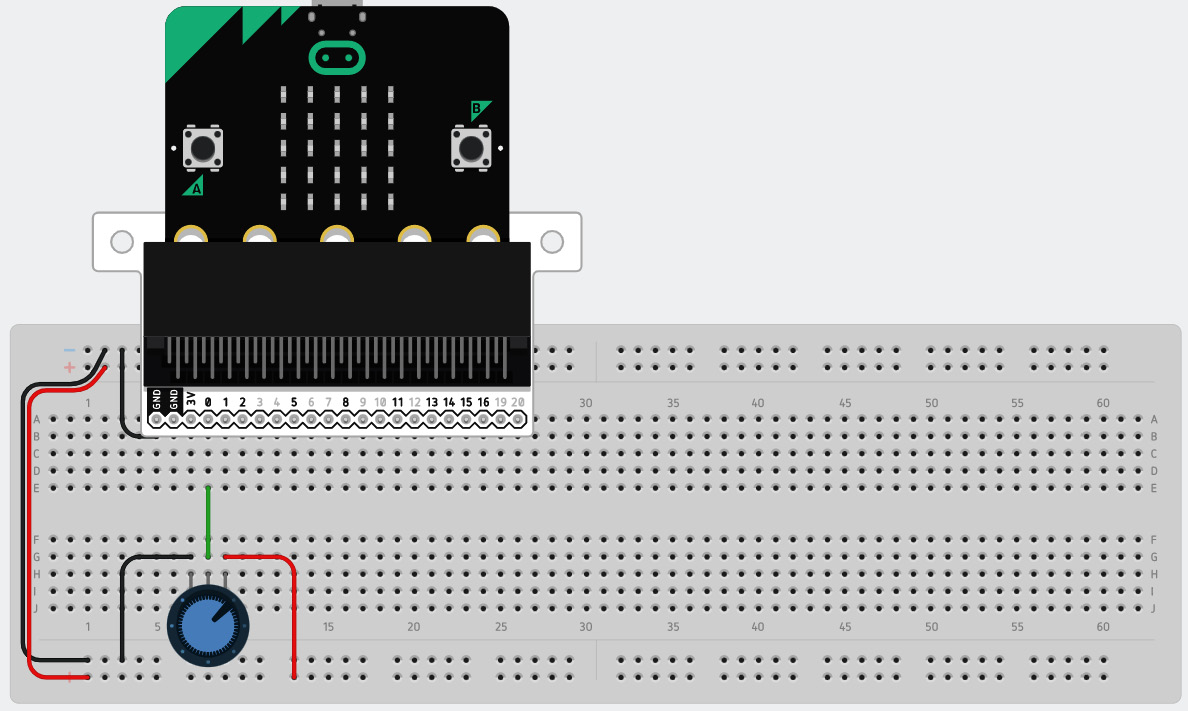
Figure 12.4 – The connections of a potentiometer to control the tempo of a melody
The program for the circuit is given here:
from microbit import *
import music
pot_val = 0
while True:
    pot_val = (pins.analog_read_pin(AnalogPin.P0)/ 5)
    music.set_tempo(bpm=pot_val)
    music.play(['C4:4', 'r:1'])
Here, we defined a variable, pot_val, and set its value to 0. Then, we read the value of analog pin P0. The values read at this pin will be in the range of 0 to 1,023. The music tempo is generally in the range of 0 to 200 bpm. So, we have divided the analog pin value by 5 to map the read values from 0 to 200. Then, we set the tempo level to the value of pot_val and played the melody at this tempo level.
In this section, we learned about the tempo and pitch of the melodies. A piece of music can be played faster or slower, depending on the tempo values set for the same. This section helped us program the different tempo values to generate different melodies using MicroPython.
Working with a microphone
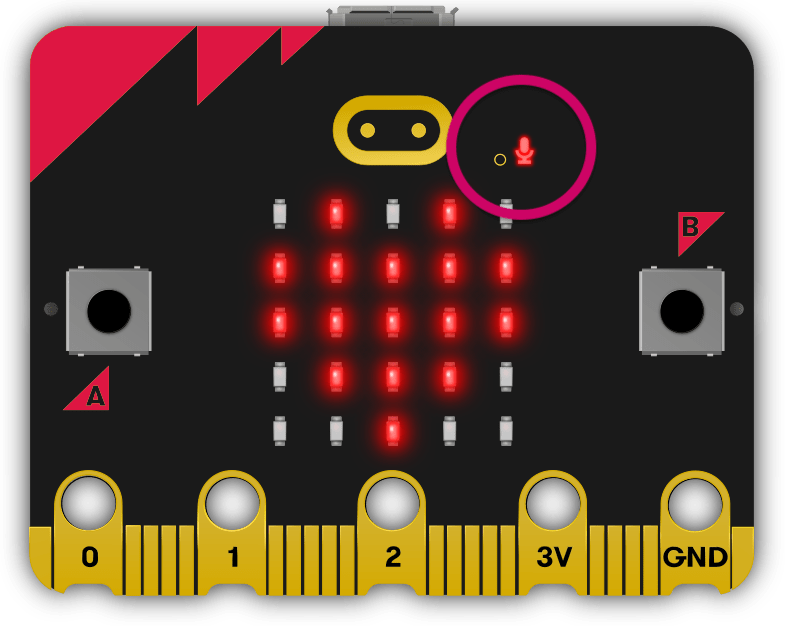
So far, we have generated different sound outputs using the Micro:bit. The Micro:bit is also equipped with a microphone. This microphone can be used to detect sound from the environment. This section will teach us how to handle speech using a Micro:bit. The microphone is present on the front of the Micro:bit V2. Figure 12.5 shows its location:

Figure 12.5 – Location of the microphone on the Micro:bit V2 (courtesy: https://microbit-micropython.readthedocs.io/en/v2-docs/_images/microphone.png)
The microphone that’s built inside the Micro:bit has a sensitivity of -38dB ±3dB @ 94dB SPL. It has an SNR of 63dB. The microphone can detect frequencies from 100 Hz to 80 kHz. The complete datasheet for this microphone is available at https://www.knowles.com/docs/default-source/model-downloads/spu0410lr5h-qb-revh32421a731dff6ddbb37cff0000940c19.pdf?Status=Master&sfvrsn=cebd77b1_4.
In MicroPython, the microphone can respond to a predefined set of sound events. These events are based on the sound signal’s wavelength and amplitude. All these events can be accessed with the SoundEvent class. We can use the microbit.SoundEvent function to access different events under this class. There are two main classes:
- microbit.SoundEvent.QUIET: This is used to detect the absence of sound or the transition from loud sounds to lower sounds or quietness.
- microbit.SoundEvent.LOUD: This function represents the presence of a loud sound around the microphone. It can also detect any short-duration sounds, such as claps.
Now, let us make a very simple system using the microphone. If we clap, the Micro:bit will detect it as a loud sound and display O on the LED matrix. If there is no sound detection, then X will be displayed:
from microbit import *
while True:
    if microphone.current_event() == SoundEvent.LOUD:
        display.show("O")
        sleep(1000)
    if microphone.current_event() == SoundEvent.QUIET:
       display.show("X")
Now, let us modify the program slightly and make a fancy disco light. The brightness of the LEDs can also be set using numbers from 0 to 255. In this program, we will detect the sound level using the microphone.sound_level() function. Then, we will display X on the LED matrix with varying intensities. For this purpose, we will declare an array named imageX, which will display X on the 5x5 LED matrix of the Micro:bit. We will multiply the matrix with the detected sound level; by doing so, the LEDs will glow with the computed intensities:
from microbit import *
imageX = Image("10001:"
              "01010:"
              "00100:"
              "01010:"
              "10001")
while True:
    display.show(imageX* microphone.sound_level())
Now, we will use another feature of the sound level that’s been detected by the microphone. Assume that you are at your annual function and students are being called on stage and given awards. Some popular students receive applause for a longer duration, while others receive shorter ones. Using this system, we will count the duration of loud applause. The first decision is to set the loudness level to a certain value. As we mentioned previously, the microphone will detect sound levels from 0 to 255, so in this program, we have set the level to 200, which means only loud applause will be considered. Whenever a sound with a loudness of more than 200 is detected, then the set_counter variable will start recording the time from the running_time() function. This time will be recorded in milliseconds. Once the loudness has been reduced, we convert the time from milliseconds into seconds by dividing it by 1,000:
from microbit import *
microphone.set_threshold(SoundEvent.LOUD, 200)
set_timer = 0
while True:
    if microphone.was_event(SoundEvent.LOUD):
        set_timer = running_time()
        display.show(Image.HEART)
    if microphone.was_event(SoundEvent.QUIET):
        if set_timer > 0:
            time = running_time() - set_timer
            set_timer = 0
            display.clear()
            sleep(200)
            display.scroll(time / 1000)
In this section, we learned about the functionality of the in-built microphone of the Micro:bit. Then, we learned how to detect any sound using the microphone and the respective library and functions to detect the same. We also learned about the level of detected sounds and implemented interesting codes using those concepts. This section also taught us the related MicroPython concepts.
Working with speech
Earlier in this chapter, we generated music melodies using the Micro:bit. The Micro:bit can also be used to generate speech. This means we can generate words, sentences, and even poems using the Micro:bit. We will use a speech library to generate speech using the Micro:bit. Let us try generating a simple speech message using the speech library:
import speech
from microbit import *
speech.say("Hey!")
sleep(500)
speech.say("How are you friend")
sleep(1000)
This program will generate the speech Hey! How are you friend? We can hear the sound from the internal speaker or any external speaker connected to the Micro:bit.
The speech that’s generated by the preceding program does so using the Text-to-Speech (TTS) default settings. The TTS conversion in the Micro:bit is done with Software Automated Mouth (SAM), which was originally released in 1982 for the Commodore 64. More details about SAM are available at https://simulationcorner.net/index.php?page=sam. This program can take up to 255 characters of textual input and generate a sound of around 2.5 seconds in one command.
The complete say function in the speech library can be accessed like so:
speech.say(words, *, pitch=64, speed=72, mouth=128, throat=128)
Here, words are the text input that the user provides. The preceding line of code mentions the default values of pitch, speed, mouth, and throat. If we want to change these values for better speech production, we must take care of the following parameters:
- The pitch parameter of the generated sound can be between 20 to 90 for practical speech generation. Anything below 20 is impractical to generate, and anything above 90 is a very low pitch. Therefore, we should keep it between 20 to 90. The best range is suggested to be 50 to 70, and 64 is the default pitch value.
- The speed parameter of the generated speech can be between 0 and 255. Any value below 20 is impractical, and anything above 100 is very slow. A speed of 70 to 75 is considered for normal conversation. We can reduce the value for faster speech production. The default value is 72.
- The mouth parameter of the generated speech represents how much the speaker is opening their mouth to generate the speech. A lower value represents the speaker speaking without moving their lips considerably. This number can be set between 0 and 255. The default value is kept in the center at 128.
- The throat parameter shows the stress on the speaker’s throat while speaking. A lower value means the speaker is relaxed, while a higher number represents the speaker putting more effort into generating the speech. This number can be set between 0 and 255. The default value is kept in the center at 128.
The following code will generate the same sound, Hello friend, with five different settings:
import speech
from microbit import *
speech.say("Hello friend", pitch=60, speed=72, mouth=160, throat=120)
speech.say("Hello friend", pitch=70, speed=92, mouth=190, throat=120)
speech.say("Hello friend", pitch=80, speed=98, mouth=110, throat=100)
speech.say("Hello friend", pitch=90, speed=64, mouth=120, throat=100)
speech.say("Hello friend", pitch=98, speed=98, mouth=190, throat=190)
In all these programs, we can see that the speech generated by the Micro:bit is inaccurate and not as close to human speech. We can use the pronounce() function from the speech library to generate a speech signal that’s close to human speech. This function uses English phonemes to generate speech. A phoneme is the smallest unit of sound in speech. It can distinguish one word from another in a particular language. Every word is made up of multiple phonemes. For example, the word hat has three phonemes: h, a, and t. The English phonemes are coded with characters in the speech library. These codes are as follows:
SIMPLE VOWELS                          VOICED CONSONANTS
IY           f(ee)t                    R        (r)ed
IH           p(i)n                     L        a(ll)ow
EH           b(e)g                     W        a(w)ay
AE           S(a)m                     W        (wh)ale
AA           p(o)t                     Y        (y)ou
AH           b(u)dget                  M        Sa(m)
AO           t(al)k                    N        ma(n)
OH           c(o)ne                    NX       so(ng)
UH           b(oo)k                    B        (b)ad
UX           l(oo)t                    D        (d)og
ER           b(ir)d                    G        a(g)ain
AX           gall(o)n                  J        (j)u(dg)e
IX           dig(i)t                   Z        (z)oo
                                       ZH       plea(s)ure
DIPHTHONGS                             V        se(v)en
EY           m(a)de                    DH       (th)en
AY           h(igh)
OY           b(oy)
AW           h(ow)                     UNVOICED CONSONANTS
OW           sl(ow)                    S         (S)am
UW           cr(ew)                    SH        fi(sh)
                                       F         (f)ish
                                       TH        (th)in
SPECIAL PHONEMES                       P         (p)oke
UL           sett(le) (=AXL)           T         (t)alk
UM           astron(om)y (=AXM)        K         (c)ake
UN           functi(on) (=AXN)         CH        spee(ch)
Q            kitt-en (glottal stop)    /H        a(h)ead
Now, if we want to pronounce any word, we should combine the phonemes of that word and enter that as an argument to the pronounce() function.
Now, assume that we want to pronounce hello using phonemes. This word can be made using the combination of phonemes H-EH-L-OH, and our argument will be HEHLOH:
import speech
from microbit import *
speech.pronounce("/HEHLOH")
This articulation of hello is better than the previous one. Similarly, we can generate the phoneme codes for all the words by following the rules of phonetics and generating speech using the Micro:bit. You can refer to the text-to-phoneme table given at https://github.com/s-macke/SAM/wiki/Text-to-phoneme-translation-table for more details.
Now, when we speak, sometimes, we elongate the pronunciation of a particular phoneme. For example, while calling someone standing close to us, we will say Hey for a short duration. Whereas if the person is far from us, we stretch our speech and say Hey for a longer duration. We can increase the duration of any phoneme by adding a multiplication factor to it. For example, H-EH3 will generate the sound of EH for a three-times longer duration. The following code will generate the word hello in four different ways:
import speech
from microbit import *
speech.pronounce("/HEHLOH")
speech.pronounce("/HEH3LOH")
speech.pronounce("/HEH3LOH4")
speech.pronounce("/HEHLOH7")
In this section, we learned how to use the speech module of MicroPython and apply it to the Micro:bit. Then, we discussed the features of the speech library. We also discussed two different ways to produce speech using the Micro:bit. In the first approach, we used the say function with different settings. In the second approach, we worked with the concept of phonemes to generate the speech.
Summary
In this chapter, we explored a unique aspect of the Micro:bit: we learned how to use its inbuilt speaker to generate different sounds. We also talked about the connections of an external speaker and how they can be connected to the Micro:bit. Then, we learned how to generate a single musical tone with different octaves and durations. These tones can be combined to generate customized melodies. We also explored the music library of MicroPython to play some predefined melodies. In the second half of this chapter, we learned how to use a microphone and take sound inputs to perform interesting operations on the Micro:bit. Finally, we discussed how to generate human-like speech using the speech library.
In the next chapter, we will discuss networking and radio communication using the Micro:bit. We will explore in detail how two or more Micro:bit devices can communicate using the built-in radio. We will also create a few simple games using the radio communication capability of Micro:bit devices.