
2
Setting Up the Micro:bit and Using Code Editors
In the previous chapter, we got acquainted with the BBC Micro:bit board and its specifications. We also learned how to power it up. The chapter was heavy on the side of concepts and not the hands-on part.
In this chapter, we will get started with the environment setup for MicroPython with the Micro:bit. We will write and execute our first MicroPython program, and we will explore the entire ecosystem of MicroPython programming platforms and Integrated Development Environments (IDEs) with Micro:bit. We will also learn how to upgrade the firmware of Micro:bit. The following is the list of topics we will explore and demonstrate:
- BBC Micro:bit versus Raspberry Pi
- The Python programming language
- Introduction to MicroPython
- MicroPython code editors
- Using offline IDEs for MicroPython
- Manually upgrading the firmware
- Restoring the out-of-the-box experience program
Upon completing this chapter, we will be very comfortable with setting up BBC Micro:bit for MicroPython and running the basic code examples written in MicroPython. Let’s get started.
Technical requirements
For this chapter, we will need a computer with an internet connection and a Micro:bit with a micro USB cable for connectivity.
BBC Micro:bit versus Raspberry Pi
Most of us have at least heard of, if not worked with, Raspberry Pi. Raspberry Pi is a family of single-board computers and microcontrollers developed by the Raspberry Pi Foundation (https://www.raspberrypi.com/). It was founded and headed by Eben Upton. The most recent single-board computer in the Raspberry Pi family, at the time of writing of this book (July 2022), is Raspberry PI 4 Model B and the latest microcontroller board is Raspberry Pi Pico W.
Raspberry PI 4 Model B is a full-fledged computer capable of running operating systems (OSes) such as Windows IoT, various Linux flavors, and FreeBSD. Raspberry Pi Pico W is a low-cost microcontroller board that can be programmed with similar tools that we use to program BBC Micro:bit. Since BBC Micro:bit is not a full-fledged computer like Raspberry Pi 4B, it makes very little sense to compare it with Raspberry Pi 4B and other single-board computers. However, the comparison between BBC Micro:bit V2 and Raspberry Pi Pico W seems to be a fair one. The following table compares a few of the features of both of them side by side:
|
BBC Micro:bit V2 |
Raspberry Pi Pico W | |
|
SoC |
Nordic nRF52833 – 64 MHz 32-bit ARM Cortex-M4 microcontroller |
RP2040 Arm Cortex M0+ Dual Core at 133 MHz |
|
Flash Memory |
512 KB |
2 MB |
|
Static RAM |
128 KB |
264 KB |
|
GPIO |
26 |
40 |
|
Connectivity |
Bluetooth and radio |
Infineon CYW43439 2.4 GHz Wi-Fi with an onboard antenna connected via SPI |
|
Power |
micro USB, GPIO pins, and JST battery connector |
micro USB and GPIO pins |
Table 2.1 – Comparison between BBC Micro:bit V2 and Raspberry Pi Pico W
The main reason we see the comparison between BBC Micro:bit and Raspberry Pi Pico W is that both boards are capable of running MicroPython.
Similarly, you can compare various models of the Arduino family of microcontrollers with Micro:bit. Take it as an exercise. Start by comparing Micro:bit with the Arduino Uno R3, then explore the specifications and programming frameworks of other models of the members of the Arduino family.
In the next section, we will explore the concepts related to the Python programming language.
The Python programming language
It is important to know the background of the programming language we plan to use for our code demonstrations. Python (https://www.python.org/) is a general-purpose programming language, and it is free and open source. Python is also an object-oriented, high-level, and interpreted programming language. Figure 2.1 is the logo of the Python (https://www.python.org/community/logos/) programming language:

Figure 2.1 – Python logo (courtesy: the Python Software Foundation)
Python is a dynamically-typed and garbage-collected programming language. Apart from object-oriented programming, it supports other programming paradigms such as functional, structured, and procedural programming. Python also comes with batteries included; this means it comes with a very large standard library.
The Centrum Wiskunde & Informatica (abbreviated as CWI, and in English, known as the National Research Institute for Mathematics and Computer Science) in the Netherlands was the birthplace of Python. Guido van Rossum is the creator of the Python programming language. It started as his personal hobby project in December 1989. He was the benevolent dictator for life for Python until 2018. He has worked for Google and Dropbox, and currently, he is a Distinguished Engineer at Microsoft. The following is a photograph of Guido van Rossum:

Figure 2.2 – Guido van Rossum (courtesy: https://commons.wikimedia.org/wiki/File:Guido_van_Rossum_%286984267183%29_%28cropped%29.jpg)
Python is a successor of the ABC programming language, which was also conceived at the CWI. A steering committee currently guides Python development (as of now, Guido is not a part of it anymore).
The Python community follows Python Enhancement Proposals (PEPs) for the development and governance of the standards. We can find the index of PEPs at https://peps.python.org. The term PEP itself is defined in detail at https://peps.python.org/pep-0001/. Moreover, the philosophy of the Python programming language can be visited at PEP20 (https://peps.python.org/pep-0020).
Python implementations and distributions
We will extensively use Python syntax throughout the book to demonstrate various functionalities of Micro:bit. So, it is imperative to know what a Python implementation is. Before we begin to understand the meaning of the term implementation, let’s talk a bit about UNIX and C. UNIX is a family of OSes; it is more like a standard, and there are many OSes, such as macOS, that are UNIX-certified. Also, there are many other OSes, such as FreeBSD and various Linux distributions, that emulate some of the functionality of UNIX OS. Similarly, C is a standard for programming languages. There are many compilers, such as GCC, LLVM, and VC++, that support compiling a C program. All we wish to say is that UNIX and C are more like standards, and they are implemented in many systems.
Similarly, Python is now becoming more of a standard. Python programs are interpreted by the Python interpreter. The reference implementation of this interpreter is available at www.python.org and it is known as CPython. Many other projects have created their own Python interpreters and they are known as Python implementations. We can find (non-exhaustive) lists of such implementations at https://www.python.org/download/alternatives/ and https://wiki.python.org/moin/PythonImplementations.
Now, let’s understand what a Python distribution is. An implementation of Python bundled with a package manager and a few libraries is known as a Python distribution. For example, a standard distribution of Python (available for download at www.python.org) has the reference interpreter CPython, the package manager (pip – pip installs Python, a recursive acronym – a technical pun), and an IDE (in this case, Integrated Learning and Development Environment – abbreviated as IDLE). There are many other distributions of Python developed by other organizations. A non-exhaustive list can be found at https://wiki.python.org/moin/PythonDistributions.
For this book and the demonstrations, we are more interested in the MicroPython implementation of Python.
Introduction to MicroPython
As its name indicates, MicroPython (https://micropython.org/) is an implementation of Python meant for microcontrollers. It is written in C and is largely compatible with Python 3. MicroPython is made up of a Python compiler that converts a program into bytecode and a runtime interpreter that runs the bytecode on the targeted microcontroller board. It also comes with a Read-Eval-Print-Loop (REPL) prompt for the immediate execution of Python statements. MicroPython comes with a large implementation of the core libraries included in CPython. Figure 2.3 is MicroPython’s latest logo:

Figure 2.3 – MicroPython’s logo
MicroPython was created by the Australian programmer and theoretical physicist Damien George. It was financially supported by a Kickstarter crowdfunding campaign. It was originally meant for a specialized microcontroller board, Pyboard. Its scope has now expanded, and it supports tons of microcontroller boards, including both revisions of BBC Micro:bit. MicroPython has a small footprint for devices with 256 k of flash memory and 16 k of RAM. Micro:bit comes with built-in support for MicroPython, and we can directly run MicroPython programs on Micro:bit.
MicroPython code editors
There are several online and offline code editors for writing and uploading MicroPython code for microcontrollers. Let’s explore a few of the most popular editors.
Online code editors
One of the best ways to start coding without installing anything is to use the online code editor at https://python.microbit.org/. Currently, there are two versions of this available, and we will explore both versions. The URL points to https://python.microbit.org/v/3. This is the current version of the online code editor, and in the future, it will be accessible at https://python.microbit.org/v/3. Let’s explore it first. When we visit https://python.microbit.org/, the very first thing we see is the following interface:

Figure 2.4 – The online code editor interface
The web page is divided into many sections. We can see that an example code snippet is already present in the middle section. Do not worry about the code as we will learn about it all in detail throughout the book. The objective of this section is to familiarize ourselves with the online code editor. In case you are not comfortable with the font size, you can change it by clicking on the settings option (the gear symbol) in the bottom-left corner.
The code is error-free and works perfectly (we have already tried and tested it). In the top-right corner, there is a simulator of Micro:bit (V2, to be very specific), which allows us to test programs. If we click the run button (triangle enclosed in a circle) as shown in the following screenshot (Figure 2.5), then it runs the program in the simulator and shows the output:

Figure 2.5 – The Micro:bit simulator
We can see that the two buttons at the bottom are disabled. They will be enabled once we click the run button. After we click the run button, it shows the execution of the code, as shown in Figure 2.6:

Figure 2.6 – The Micro:bit simulator running a program
We can see the output of the code on the built-in display of the simulator. We can also see that the buttons that were disabled earlier are enabled now. The first button is to stop the execution of the program, the second button is to reload the program, and the third button is to enable/disable the sound output.
At the bottom, there is a purple-colored button that reads Send to Micro:bit. When we click this button, it opens the following interface (Figure 2.7) to connect to a Micro:bit:
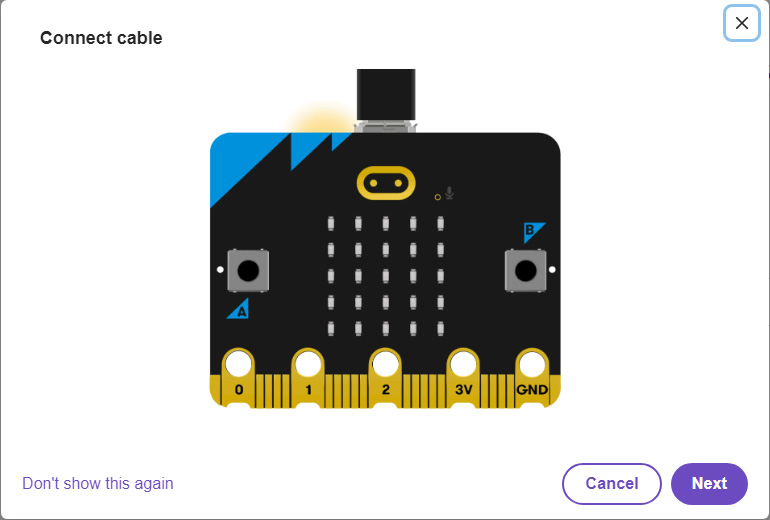
Figure 2.7 – Tutorial to connect Micro:bit to a computer
Connect your Micro:bit device to the computer using the cable as instructed on the window. Once you connect, the OS detects a new drive and opens the Micro:bit as a storage device, as shown in Figure 2.8:
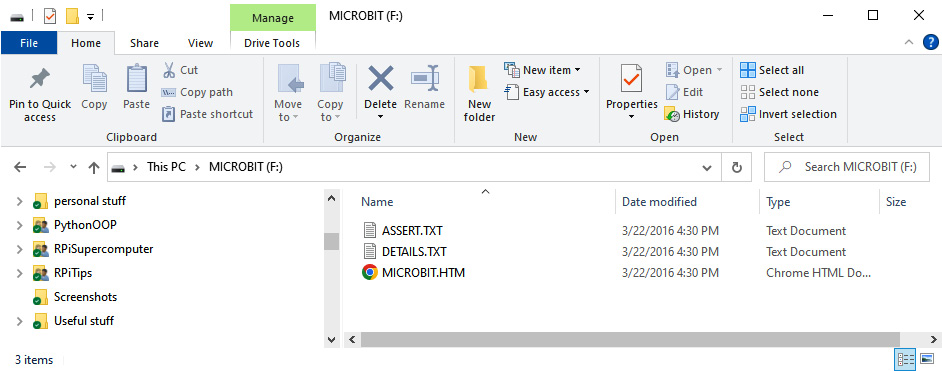
Figure 2.8 – Micro:bit as a storage device
One of the files on the Micro:bit drive is DETAILS.TXT. This file has valuable information about the board, such as the unique ID of the board and the firmware running on the board. The firmware enables the USB connection and helps the computer show Micro:bit as a storage drive. The contents of our Micro:bit V2 are as follows:
# DAPLink Firmware - see https://mbed.com/daplink
Unique ID: 9904360259304e45004890130000006a000000009796990b
HIC ID: 9796990b
Auto Reset: 1
Automation allowed: 0
Overflow detection: 0
Incompatible image detection: 1
Page erasing: 0
Daplink Mode: Interface
Interface Version: 0255
Bootloader Version: 0255
Git SHA: 1436bdcc67029fdfc0ff03b73e12045bb6a9f272
Local Mods: 0
USB Interfaces: MSD, CDC, HID, WebUSB
Bootloader CRC: 0x828c6069
Interface CRC: 0x5b5cc0f5
Remount count: 0
URL: https://microbit.org/device/?id=9904&v=0255
The contents will obviously be different for each board. For a detailed explanation of the contents, you may wish to visit https://support.microbit.org/support/solutions/articles/19000129907-details-txt.
The other file is MICROBIT.HTM, and it points to the page at https://microbit.org/get-started/user-guide/overview/.
As of now, we do not need to work with this window, so you can close it. If you look at the list of the drives in your OS, then you will find a drive labeled MICROBIT. In the window shown in Figure 2.9, click on the Next button and it will open the next page of the tutorial:

Figure 2.9 – Second screen of the tutorial window
When we click on the Next button, it opens a pop-up box, as shown in Figure 2.10:

Figure 2.10 – Connection pop up window
The pop-up box in the preceding figure shows all of the BBC Micro:bit devices connected to the computer. Select the device and click on the Connect button. Once it connects, the bottom menu will show additional options. If you click on the Show Serial option and then press CTRL + C, it shows the REPL window, as shown in Figure 2.11:

Figure 2.11 – The REPL window
We can use this REPL window to run small snippets of MicroPython code. When we click on the Send to Micro:bit button now, since it is connected to a Micro:bit device, it flashes the program to the Micro:bit device and the program starts executing on the device. We can see the text and the heart image scrolling and flashing on the 5 x 5 LED display matrix of the Micro:bit.
We can save the file in HEX format and as a Python program to the local disk by clicking on the Save button and three vertical dots beside that, respectively. We can also open a HEX or a Python code file using the Open button. Flashing the code to the Micro:bit device’s flash memory using the Send to Micro:bit button is known as Direct Flashing.
Note
If you wish to know about the HEX file format, please explore the following URLs: https://tech.microbit.org/software/hex-format/ and https://microbit-micropython.readthedocs.io/en/v2-docs/devguide/hexformat.html.
There is one other way of flashing the code to the Micro:bit. As explained earlier, we can save the code in HEX format and as a Python script to our local computer’s disk. We can directly copy the HEX file (but not the Python program) to the drive labeled MICROBIT. First, download your program as a HEX file to your local computer. Now, copy the HEX file we downloaded to the MICROBIT drive. It will take some time for the file to copy (not too long, though, just a few seconds), and then the MICROBIT drive window will disappear immediately. This is because the drive is automatically disconnected and unmounted. However, the drive will automatically be connected and mounted in a couple of seconds, and the drive window will also appear automatically. If you check the drive’s contents now, you won’t find the HEX file. Do not panic! This is expected behavior. The program is loaded onto the Micro:bit’s flash memory. We can see the text and the heart image scrolling and flashing on the 5x5 LED display matrix of the Micro:bit.
Using REPL
We can use REPL in MicroPython in the current live editor at https://python.microbit.org/. The future versions will also likely have a REPL prompt for MicroPython. REPL is similar to the command-line interface of any OS. We can use it to run single-line statements and small code blocks written in MicroPython. Type in print("Hello, World") and hit the Enter key on the keyboard to execute it. It will show the following result:
>>> print("Hello, World!")
Hello, World!
>>>
This way, we can run single-line statements and see the results immediately. Let’s try another example. Run the following statements:
>>> from microbit import *
>>> display.scroll("BBC micro:bit V2")
Once both statements are executed, we can see the quoted text scrolling on the display of the Micro:bit. Don’t worry much about the syntax right now. We will learn about everything in detail in the upcoming chapters. For now, you may wish to scroll the text of your choice by making changes to the quoted text and running it in the REPL prompt.
Note
The older version of this editor can be found at https://python.microbit.org/v/2.
In this section, we saw how we can use the online Python editor of Micro:bit to write and directly flash code to our Micro:bit devices.
Using offline IDEs for MicroPython
Python programs can also be written and executed with the help of specialized software known as IDEs. The reference implementation of Python (CPython) comes with an IDE known as IDLE. The following is a screenshot of IDLE in action (Figure 2.12) on a Windows computer:
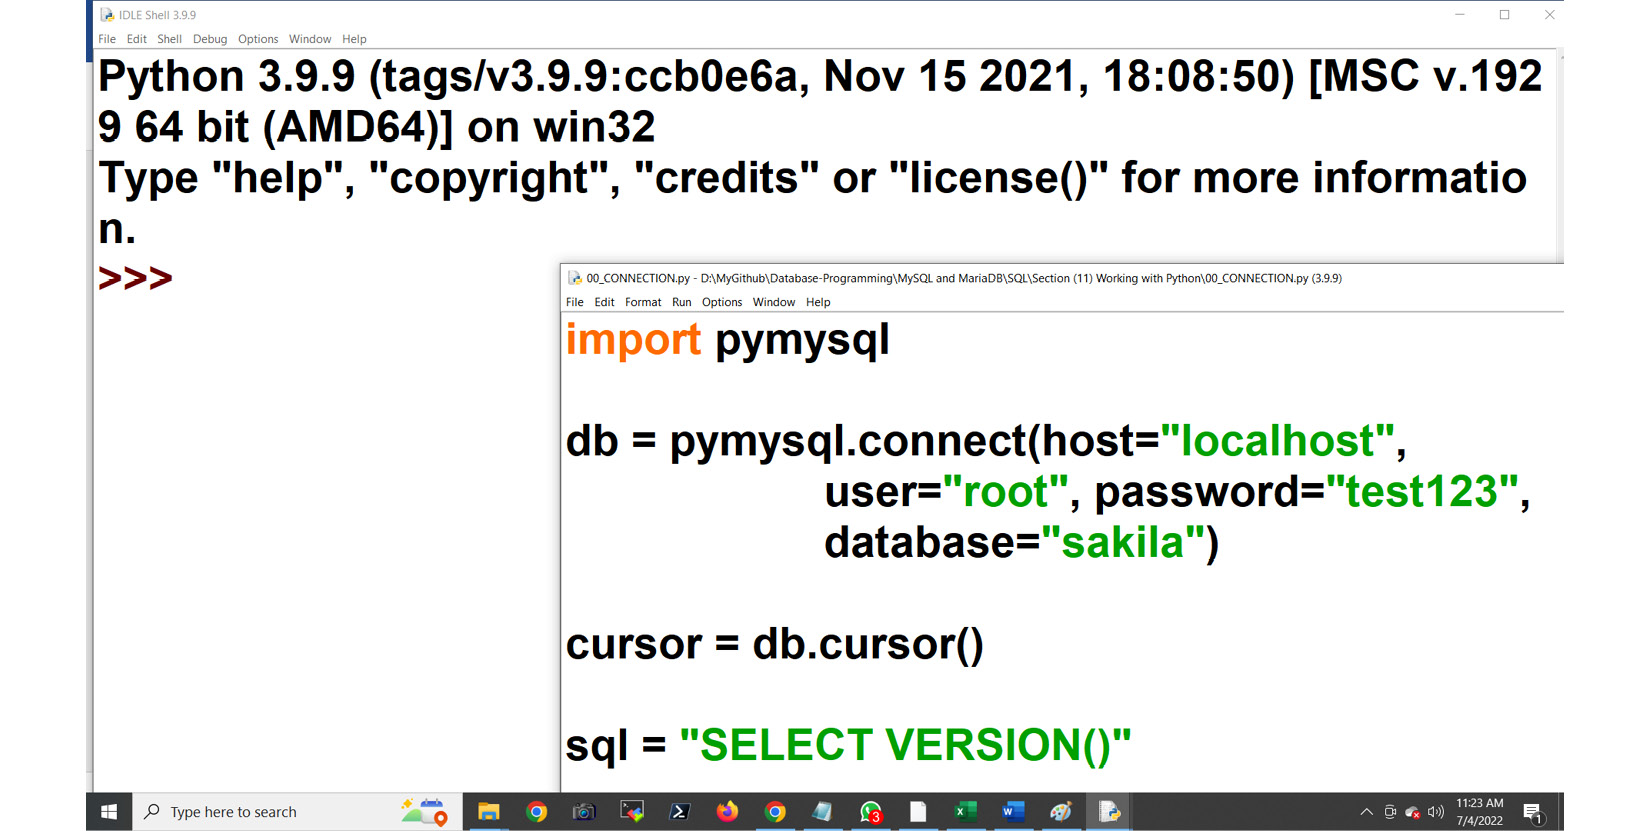
Figure 2.12 – IDLE in action
There is no doubt that IDLE has a great interface. However, it works with CPython and not with MicroPython. We have already seen how we can work with web editors for MicroPython. In this section, we will explore a few desktop IDEs for MicroPython.
The Thonny Python IDE
Let’s go over how to install and use the Thonny Python IDE. We can visit https://thonny.org/ for the installation files. In the top-right corner of the page, we have options for Windows, macOS, and commands for installation on distributions of Linux. Thonny comes bundled with a Python interpreter of its own. It may not conform to the latest CPython release from Python Foundation and could be older. As of the writing of this book, the latest CPython release is 3.10.5, and the latest stable version of Thonny comes with Python 3.7.9.
Thonny comes pre-installed with the Raspberry Pi OS if you choose to use a desktop environment. You can install it on any distribution of Linux with the following command:
bash <(wget -O - https://thonny.org/installer-for-linux)
If you have already installed an implementation of Python 3 with pip3 and wish to only install Thonny, then run the following command at the command prompt of your OS:
pip3 install thonny
We prefer this method. We downloaded and installed the latest Python 3 setup from www.python.org and then ran the preceding command on Windows PowerShell.
For Debian and its derivatives, the following command will install Thonny:
sudo apt install thonny
For Fedora and its derivatives, the following command will install Thonny:
sudo dnf install thonny
Let’s see how we can work with Thonny. You can launch it from the desktop shortcut or the command prompt of your OS using the following command:
thonny
Once launched, it shows the following window:

Figure 2.13 – The Thonny IDE window
We can see the menu, code editor, assistant, and shell. The shell window provides REPL functionality. In the bottom-right corner, you can find the Python interpreter associated with the current instance of Thonny. It is a clickable option and will invoke the following options when clicked:

Figure 2.14 – Interpreter options
Click on the last option (Configure interpreter…) and it will open the following window:
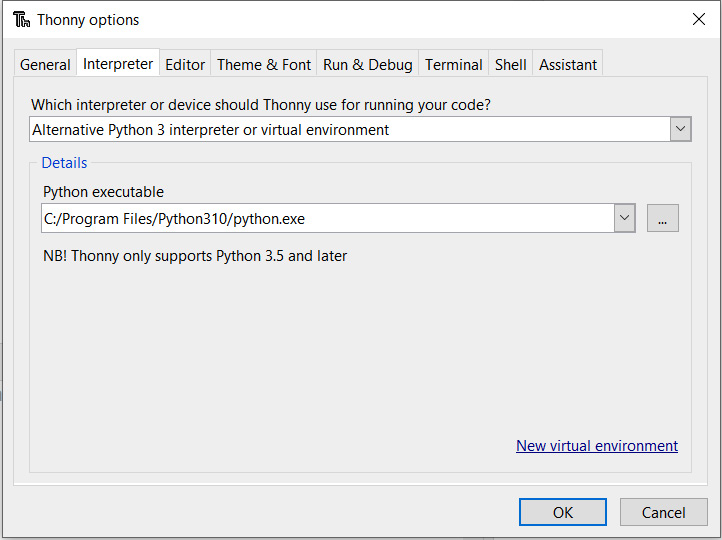
Figure 2.15 – Configuring the interpreter...
We can also open this window from the main menu from the Tools option, as shown in Figure 2.16:

Figure 2.16 – Tools | Options
The second tab of the window will open the interpreter options (refer to Figure 2.15). Here, we can choose to associate the Thonny IDE with a particular interpreter. If we choose Alternative Python 3 interpreter or virtual environment from the first dropdown, as shown in Figure 2.15, then we can mention the path of the Python 3 interpreter executable in the text area (we can also browse and choose it). This way, we can use any implementation of Python with Thonny. We are more interested in using Thonny with MicroPython using BBC Micro:bit. First, connect your Micro:bit to your computer and then choose the MicroPython (BBC Micro:bit) option from the first dropdown (Figure 2.17):

Figure 2.17 – Configuring for MicroPython with Micro:bit
In the second dropdown, we have to choose the port. Look for an option that has USB Serial or UART in the text and choose that option:
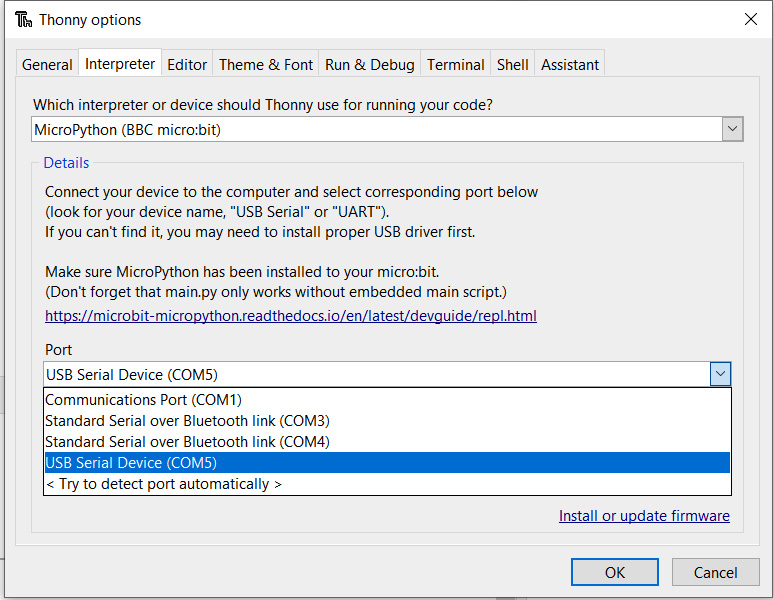
Figure 2.18 – Choosing the correct port
We can install the firmware using this tool. Click on Install or update firmware in the bottom-right corner of the window. It opens a new window, as shown in Figure 2.19:

Figure 2.19 – The Install MicroPython firmware for BBC Micro:bit window
Click on the Install button and it will install/upgrade the device’s firmware. Click on the OK button and the shell will restart and show the following header indicating the detection of Micro:bit board:

Figure 2.20 – Thonny configured for Micro:bit
You may wish to try the following two lines again:
>>> from microbit import *
>>> display.scroll("BBC micro:bit V2")
Also, copy and paste the same code in the editor window and save that as prog00.py to a location on your computer. We prefer saving the code in the directories organized chapter-wise. You can download all these examples from the GitHub repository for this book project. When you try to save any new code file for the very first time, it shows the following window:

Figure 2.21 – Options to save
Choose the This computer option and save it to a local location. This is the copy on the local computer. Now, save again and this time, choose the second option (Micro:bit). This will open a new window, as shown in Figure 2.22:

Figure 2.22 – Saving on BBC Micro:bit
Enter main.py in the text area corresponding to the File name label and click on the OK button. The code has been flashed to the connected Micro:bit. However, it won’t run immediately. We have to reboot the Micro:bit. You can either disconnect and reconnect it again (hard reboot) or click the REPL shell and press CTRL + D on the keyboard simultaneously (soft reboot). We prefer the latter. If we want a MicroPython program to run when Micro:bit is rebooted, we should save the file as main.py. If we modify the program, we should save the local copy and overwrite the main.py file on the BBC Micro:bit.
The Mu editor
Let’s see how to install and configure the Mu editor. Please visit the page at https://codewith.mu/en/download and download it for your platform. You can also install it with pip3 using the following command:
pip3 install mu-editor
Once installed, launch the Mu editor using the shortcut or typing in the following command in the command prompt:
mu
It will launch the following interface:
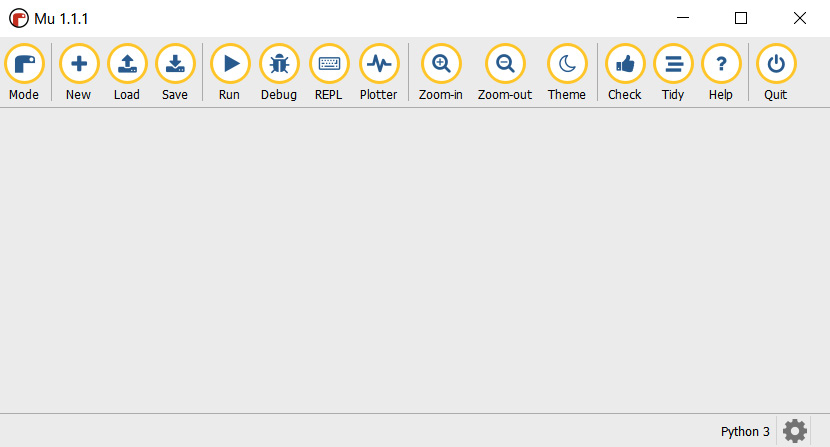
Figure 2.23 – The Mu editor
The Mu editor is currently configured for Python 3. We can check it in the bottom right of the preceding screen. If we click the very first icon (the one that reads Mode), it opens the following dialog box (Figure 2.24) where we can choose the interpreter:
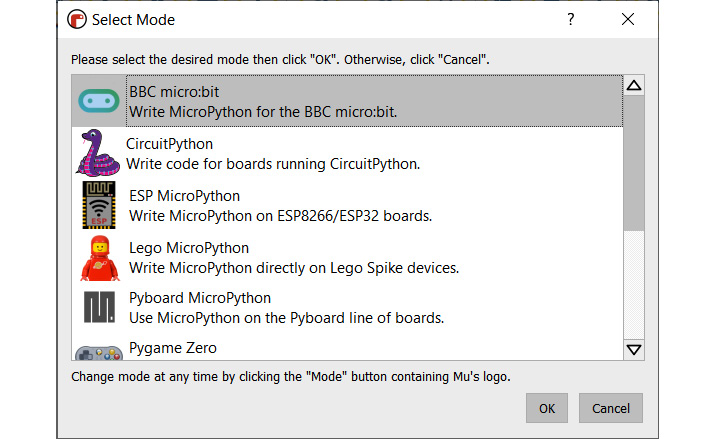
Figure 2.24 – Choosing the interpreter
Choose the option that reads BBC Micro:bit, and click the OK button. We are ready to roll. We can see the interpreter’s name on the bottom right. Also, we can see that a couple of options in the main menu have changed. Load the code file that we saved earlier to the local disk of our computer and click the Flash option. It will directly flash the code to the Micro:bit and run it (unlike Thonny, there is no need to save it manually in the Micro:bit and soft/hard reboot). There is also an option for REPL. As an exercise, explore that. This is how we can use the Mu editor to code with MicroPython for Micro:bit.
Working with other editors and smartphone apps
Another popular IDE is uPyCraft. You can explore it at its GitHub page at https://github.com/DFRobot/uPyCraft.
We can check the information about other editors and apps at https://support.microbit.org/support/solutions/19000102309.
The following page has information about the Android app:
https://support.microbit.org/support/solutions/articles/19000065804-using-the-micro-bit-on-android
The following pages have information about the iOS app:
- https://support.microbit.org/support/solutions/articles/19000117215-micro-bit-ios-app-connect-and-send-programs
- https://support.microbit.org/support/solutions/articles/19000117216-monitor-control-in-the-ios-app
Next, we will learn how to manually upgrade the firmware of a Micro:bit board to keep it up to date.
Manually upgrading the firmware
A firmware is a program between the hardware and the software; it provides the control of the device-specific hardware. A well-known example is Binary Input Output System (BIOS).
In the Micro:bit drive, the DETAILS.TXT file has the firmware number in the following line:
Interface Version: 0255
Earlier, we updated the Micro:bit firmware before using the Thonny editor. Now, we will learn how to do it manually. First, we have to identify the version of Micro:bit. A detailed article teaches us how to identify the version of Micro:bit and you can find it at https://support.microbit.org/support/solutions/articles/19000119162-how-to-identify-the-version-number-of-your-micro-bit-. The following diagram (Figure 2.25) shows the difference between V1 and V2 markings:

Figure 2.25 – V1 versus V2 markings (courtesy: Micro:bit Educational Foundation/microbit.org)
All of the V1 boards use the same firmware.
There are two versions for V2. One version is for the boards numbered V2.0, and another version is for the boards numbered V2.20 or V2.21. The following figure shows the difference between both versions of V2:

Figure 2.26 – V2.0 versus V2.2x (courtesy: Micro:bit Educational Foundation/microbit.org)
We can download the HEX file for the V1 firmware from https://tech.microbit.org/docs/software/assets/DAPLink-factory-release/0249_kl26z_microbit_0x8000.hex.
We can download the HEX file for the V2.0 firmware from https://tech.microbit.org/docs/software/assets/DAPLink-factory-release/0255_kl27z_microbit_0x8000.hex.
We can download the HEX file for the V2.20 and V2.21 firmware from https://tech.microbit.org/docs/software/assets/DAPLink-factory-release/0257_nrf52820_microbit_if_crc_c782a5ba90_gcc.hex.
We can find all these URLs at https://microbit.org/get-started/user-guide/firmware/.
Download the HEX file for your version of Micro:bit. Then, keep the push button near the micro USB port pressed and connect the Micro:bit to the computer:
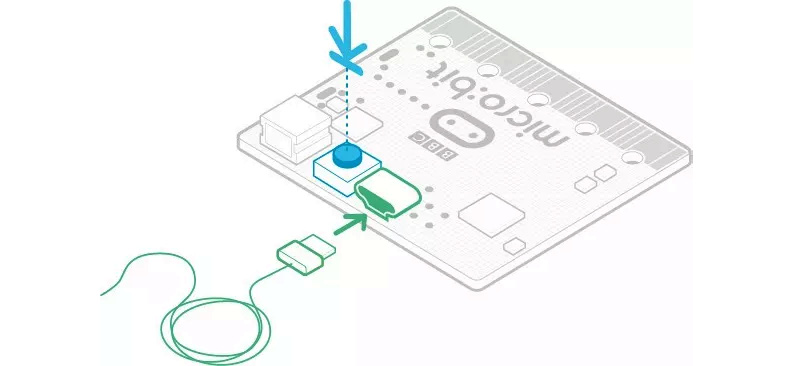
Figure 2.27 – Connecting to upgrade the firmware (courtesy: Micro:bit Educational Foundation/microbit.org)
Rather than mounting normally as a MICROBIT drive, it will mount as a MAINTENANCE drive (Figure 2.28) as follows:

Figure 2.28 – Maintenance drive
Copy the downloaded HEX file to this MAINTENANCE drive and it will upgrade the firmware. The Micro:bit will disconnect and reconnect automatically.
Restoring the out-of-the-box experience program
We have overwritten the factory out-of-the-box experience program by writing our own programs to the Micro:bit. If we wish to reload the out-of-the-box experience program, we can find its HEX file at https://microbit.org/get-started/user-guide/out-of-box-experience/.
Summary
In this chapter, we compared Micro:bit with Raspberry Pi Pico W. We learned the history of the Python programming language and MicroPython. We explored various IDEs for MicroPython and ran our first MicroPython program with Micro:bit. We also learned how to upgrade the firmware and restore the out-of-the-box experience. MicroPython is one of the best programming platforms for beginners to work with Micro:bit and similar microcontroller boards, such as Raspberry Pi Pico W. All the demonstrations in the coming chapters of this book will use MicroPython.
In the next chapter, we will explore the basics of Python programming with MicroPython and Micro:bit in depth. The chapter will be heavy with hands-on Python programming. Readers who have never programmed with Python before will learn a lot, and experienced Python readers will also be able to refresh their understanding of the Python programming basics.
Further readings
We can explore the information about the IDEs used for MicroPython at their project home pages:
- https://codewith.mu/
- https://thonny.org/
- https://www.jetbrains.com/pycharm/
- https://dfrobot.gitbooks.io/upycraft/content/
- https://python.microbit.org
We also recommend that all readers read the Python language official documentation at https://docs.python.org/3/.