
14
Automating at Scale with Automation Mesh
Automation mesh is a concept that was released with Ansible Automation Platform 2.1. Its goal was to improve scalability and reliability. This concept allows you to split the workload among nodes between control and execution and to set nodes in a disparate network. Much of this is high-level, so this chapter aims to explain the different types of nodes and their use, and then cover examples to demystify this new feature.
In this chapter, we’re going to cover the following main topics:
- Overview of Automation mesh
- Using instance groups with Automation mesh
- Examples of various use cases and how to use Automation mesh
Technical requirements
This chapter will go over Automation mesh nodes. All code referenced in this chapter is available at https://github.com/PacktPublishing/Demystifying-Ansible-Automation-Platform/tree/main/ch14. While much of this chapter will cover examples of various deployments, if you wish to follow along, it is suggested that you have several virtual or physical machines ready to be used for deployment. In addition, either an OpenShift or a CodeReady Containers environment will be of use. Please review Chapter 2, Installing Ansible Automation Platform, for more details on how to install AAP. While this chapter won’t involve installing AAP on OpenShift, it will discuss how to extend a machine installation to take advantage of OpenShift.
Overview of Automation mesh
A new feature called Automation mesh was introduced starting with Ansible Automation Platform 2.1. This allows for the separation of the control plane and the execution parts of the controller. It also allows for execution nodes to be on-premises, in the cloud, or even on the edge.
Increasing the capacity of the Automation controller is done by adding execution nodes or adding CPU and memory to existing nodes. Adding nodes is currently done by adding entries to the inventory and rerunning the installer. On the roadmap of future features is the ability to do this without a full reinstall. The next section will go into detail about the nodes that can be used on AAP.
The distinct types of nodes
There are seven types of nodes in an AAP deployment:
- Control node: This node contains the web GUI and API and controls all jobs.
- Execution node: This node only executes jobs.
- Hybrid node: This node combines a control and execution node.
- Hop node: Also known as a jump host, this node does not execute jobs but routes traffic to other nodes. It requires minimal ports open for use.
- Database node: This node hosts the PostgreSQL database.
- Automation hub node: This node hosts the pulp files and the GUI and API.
- Automation catalog node: The node hosts the pulp files and the GUI and API.
Each of these can be used in a full installation of AAP, but not all of them are part of Automation mesh.
The following ports need to be opened for services on their respective nodes:

Table 14.1 – Ansible Automation Platform ports required
Hop nodes are specifically designed to require minimal ports open for use. The hop nodes are used to manage or access devices in another security zone. They only require a single port for the receptor to be open for communication.
To better illustrate how the different nodes interact with each other and which ports are in use when communicating, please refer to the following diagram:

Figure 14.1 – Ansible Automation service connections
In addition, it is important to note that execution nodes need the 80 or 443 port open to pull execution environments from a registry. This is the recommended method of distributing images to execution nodes.
Execution nodes are grouped into what’s known as instance groups. Instance groups are logical groups of execution nodes that can be used to specify where job templates or hosts in an inventory can be run. It is important to note that while job templates and inventories can have specified instance groups, they cannot specify an individual node to run on. Each instance group can contain either one or multiple nodes for jobs to execute on.
While many groups can be created, if there are no geographic or network restrictions on the instances, it is best to put them together in the same instance group. Adding additional instance groups works well when there are network and geographic limitations.
For example, if you have an instance group that has instances inside AWS regions for accessing hosts on AWS, having additional instance groups in an enterprise data center may make sense. This would facilitate mitigating different firewall and security concerns that would apply to those connections. However, if the central Automation controller default group can access the inventory hosts that the execution nodes would reach directly, without a large amount of latency, it would be better to utilize the default group. The Automation controller is very good at balancing jobs and workloads between inventories, so the groups and mesh should be utilized specifically to address geographic and network limitations.
There are many reasons to create instance groups to separate where jobs are executed on specific hosts, and they vary use case by use case, but in the end, use your best judgment on how to utilize these features.
The next section will cover a solution to the issue of the execution nodes needing to access container images. The best solution is to allow access to Automation hub, but if that is not feasible, this is a suitable solution.
Distributing execution environments in a restricted network
If there are restrictive firewalls in place, you have two options: having a container registry in the same network as the execution nodes for them to pull from, or pushing images to the remote execution nodes. This can be done by adding them to their execution node internal images. This can be done by following these steps:
- Use the podman save image_name command to save the image to a local file.
- Copy that local file to the execution node in some manner. This could be skopeo, scp, saving that file in a project that runs a job, or another manner.
- On the execution node, become user awx and use podman load image_name to load the image to the local registry.
- Make sure that the image registry is localhost by using the podman tag image_name:latest localhost/image_name:latest command.
- Edit /etc/tower/conf.d/execution_environments.py so that it includes the new image. This should be a new entry in a json list in the following format:
{'name': 'Custom EE name', 'image': ' localhost/image_name:latest '},
- Apply the changes that you made in the file using the awx-manage register_default_execution_environments command.
- Repeat this on all the execution nodes that will use this image.
- In the Automation controller, set that execution environment to Never pull container before running.
This method was partially developed using methods discussed in a Red Hat Knowledge Base article about placing images in a disconnected environment. Please refer to the Place the execution environment container images section of this article in case this method changes: https://access.redhat.com/solutions/6635021.
This covers the basics of nodes and ports and other considerations to take into account when designing a deployment. The next section will cover grouping execution nodes for use.
Using instance groups with Automation mesh
In addition to instance groups, there are also container groups. These behave like instance groups but are connections to an OpenShift pod that is used to run jobs.
In Automation mesh, each instance is linked together in the mesh using a receptor, allowing multiple paths back to the control nodes. This can be seen in the following diagram:

Figure 14.2 – Ansible Automation instance group connections
Instance groups are a vital part of Automation mesh. It is how job templates target which nodes to run jobs on. The next section will cover the different ways to create instance groups.
Creating instance groups
Instance group creation is important as it allows you to bundle instances together for reference. The next few sections will go into the various ways of creating instance groups.
Creating instance groups using the installer
Instance groups can be made when running the installer by putting the node in an Ansible group that begins with instance_group_. An example of this can be found in ch02/inventory_vars/variables.yml:
  instance_group_edge:
    - exec
This would put the exec instance in the edge instance group. This should be the default method of creating instance groups, but they can be reassigned and changed using other methods. The next section will cover creating instance groups in the GUI.
Creating instance groups in the GUI
Instance groups can also be created using the GUI using existing instances. This can be done by following these steps:
- On the Automation controller, navigate to Instance Groups | Add | Add instance group.
- Set the following fields:
- Name: The name of the instance group.
- Policy instance minimum: The minimum number of instances to automatically add to this group when new instances come online. This defaults to 0.
- Policy instance percentage: The minimum percentage of instances to automatically add to this group when new instances come online. This defaults to 0.
Both of these policy settings can be useful for scaling, but since the installer needs to be run to add new instances, it is best to declare which instance belongs to which group ahead of time.
- Click Add. Navigate to the Instances tab and click Associate:

Figure 14.3 – Instance group association
- Select the checkboxes of the instances you wish to add to this instance group. Then, click Save.
The other option in the GUI is to create groups as container groups. Let’s take a look.
Creating container groups using the GUI
Container groups are created in the same way that instance groups are. However, they have different fields:
- Name: The name of the container group.
- Credential: The credential to authenticate with OpenShift. This can only be an OpenShift or Kubernetes API Bearer Token type of credential.
- Pod spec override: This is a Boolean value that’s true if you’re using a custom pod specification.
- Custom pod spec: This is a custom Kubernetes or OpenShift pod specification. More details about OpenShift pods can be found at https://docs.openshift.com/online/pro/architecture/core_concepts/pods_and_services.html.
The podspec_default file can be found in ch14/podspec_default.yml. The important field to change is the image field. It should be the execution environment image that is to be used in this container group. The default value is registry.redhat.io/ansible-automation-platform-22/ee-supported-rhel8:latest. The other fields should be kept as-is unless there is a reason to change them in the OpenShift environment.
These options for instance and container groups can also be created using modules and roles. The next section covers the options for creating instance groups with playbooks.
Instance group settings for modules and roles
The following settings fields are used in both modules and roles to create instance groups:
- name: The name of the instance group.
- new_name: The new name to rename the named instance group.
- credential: The credential to authenticate with OpenShift. This can only be an OpenShift or Kubernetes API Bearer Token type of credential. It is used for container groups.
- is_container_group: This is a Boolean value that’s true if this is a container group.
- policy_instance_percentage: Minimum number of instances to automatically add to this group when new instances come online.
- policy_instance_minimum: Static minimum percentage of instances to automatically add to this group when new instances come online.
- policy_instance_list: List of exact-match instances that will be assigned to this group.
- pod_spec_override: A custom Kubernetes or OpenShift pod specification.
- instances: List of instances to add to the instance group.
- state: The desired state of the resource, either present or absent.
These fields are mainly used to update the pod spec execution environment or change what nodes are in each instance group. The next section will cover using modules to update instance groups.
Instance group creation using modules
Modules can be used to update the pod spec when it changes or to make quick changes to instances that have been assigned to different instance groups if needed. The following is an excerpt from the playbook using the instance_group module:
ch14/set_instance_group_using_module.yml
    - name: Add instances to instance group.
      ansible.controller.instance_group:
        name: edge
        instances:
          - exec
The better option is to define instance groups in code using roles, which is covered in the next section.
Instance group creation using roles
Roles allow you to define instance groups in code. A role takes a list using the controller_instance_groups top-level variable. The following is an excerpt from the playbook using the instance_groups role:
ch14/set_instance_group_with_roles.yml
    controller_instance_groups:
      - name: edge
        instances:
          - exec
      - name: cloud
The role is then invoked using the redhat_cop.controller_configuration.instance_groups role.
After using the installation to set instance groups, you can use Configuration as Code (CaC) to create instance groups. Instance groups should largely be static, and set in the installer inventory. However, the CaC use of the role can be used to prevent drift, though this should largely be unnecessary. The next section will cover a few examples of using Automation mesh.
Examples of various use cases and how to use Automation mesh
Automation mesh can be used in a variety of ways, but the two key reasons to use it are to remain geographic or due to network restrictions. The following are some examples:
- Security reasons such as a firewalled DMZ
- Separation of private data centers from the public cloud
- Unstable connections that may not survive the duration of a job run
- Remote locations with high latency from the central deployment
Now, let’s look at a scenario that uses Automation mesh effectively with these key reasons in mind.
Global Automation mesh example
The following example tries to highlight a setup that covers all the preceding examples. For illustration purposes, each instance group has two nodes. Each group also has at least two servers for redundancy purposes. To start, let’s see what how this deployment looks like:

Figure 14.4 – Global Automation mesh example
Using two nodes in each group is only for illustration purposes. In each of the groups, there would be more execution nodes. The central AAP controller group would have three to four servers.
In actual enterprise deployments, each of the execution groups should have two or more nodes. The control nodes at the base of this installation handle the management overhead. This includes project updates, inventory synchronization, management of where jobs are run, the user interface, and the API for this entire deployment.
Please refer to Chapter 2, Installing Ansible Automation Platform, about the sizing of the different region’s nodes as it is important to monitor each of the nodes to tell when they need more resources, whether the nodes could be scaled down, or whether any scheduled jobs should be spread out to take advantage of off-peak hours.
Now, let’s look at the deployment in more detail.
Details of the deployment
This deployment has a central AAP controller group setup with control nodes, and these are directly connected to two data centers on the East and West Coast, respectively. This controller is connected to the company’s DMZ. This restricts access to the controller nodes and the data center connections while allowing communications in and out of the receptor ports for the cloud nodes.
The next step is to connect to a pair of hop nodes inside the cloud. This will reduce direct access to the execution nodes and serve as a hub for all the central communication to happen. From there, the cloud execution groups in the US East and EU connect back to the East hop nodes. This is important as connections from the US East have latency times to the EU servers that average around 100 ms. Having high latency between the execution nodes and the targeted hosts makes it so that jobs take longer to execute. Having execution nodes close to the hosts they are targeting eliminates latency and speeds up job execution times. The next section deals with how the mesh peers nodes with each other.
How the mesh peers nodes
The mesh peers nodes in the form of a web. This can be seen in the following diagram:
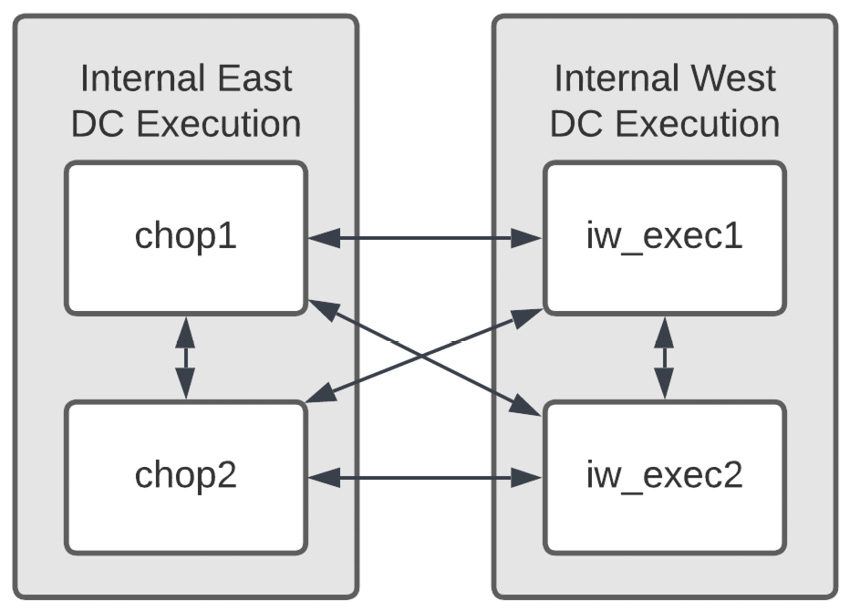
Figure 14.5 – Peered node connections
This illustrates the redundancy built into the mesh and that the nodes are peered to each other and connected. Peers define node-to-node connections and are set at either the host variable level or the group variable level. In this example, the Internal West group is peered to the Internal East group.
Now that we understand how the receptor mesh connects and the details surrounding their deployment, let’s learn how to create the inventory to create this deployment.
Inventory creation for the global Automation mesh example
The inventory to create this mesh is fairly straightforward, but there are a lot of parts as it contains seven groups. The peers for each group must be set, as well as the node types. This section will refer to an INI inventory example file in this chapter’s GitHub repository in the ch14/global_mesh file, though a duplicate of this file in YAML format in the redhat_cop.aap_utilities installer is available at ch14/global_mesh_var.yml. They both convey the same information, just in different forms.
The automationcontroller group is important as it is the central hub of this deployment. The group variables set the node type that is set to be controlled as they do not directly interact with the hosts. In addition, the directly connected nodes are peered to this group so that a mesh is formed between these six nodes:
[automationcontroller]
control1
control2
[automationcontroller:vars]
peers=instance_group_directconnected
node_type=control
The execution_nodes group is all-encompassing. It contains all 12 of the execution and hop nodes. Here, set the node type to execution:
[execution_nodes]               [execution_nodes:vars]
iw_exec1                        node_type=execution
...
The directconnected instance group does not get used in practice, but it does contain the four execution nodes from the East and West data centers:
[instance_group_directconnected]
iw_exec1
iw_exec2
ie_exec1
ie_exec2
Then, two groups have been set: instance_group_iw_exec and instance_group_iw_exec. Each contains its respective nodes. This is set so they can be assigned jobs:
[instance_group_iw_exec]         [instance_group_ie_exec]
iw_exec1                         ie_exec1
iw_exec2                         ie_exec2
The next two set the hop group’s dmz_hop and use_hop nodes; dmz_hop is peered to the automation_controller group directly, and use_hop is peered back to dmz_hop. Both groups are set to the hop node type:
[dmz_hop]                        [use_hop]
dmz1                             chop1
dmz2                             chop2
[dmz_hop:vars]                   [use_hop:vars]
peers=automationcontroller       peers=dmz_hop
node_type=hop                    node_type=hop
The final two sets of groups are the instance_group_uwe_exec and instance_group_euc_exec groups, which are created so that they can be referenced for jobs. Their peer is set to use_hop:
[instance_group_uwe_exec]
uwe_exec1
uwe_exec2
[instance_group_uwe_exec:vars]
peers=use_hop
[instance_group_euc_exec]
euc_exec1
euc_exec2
[instance_group_euc_exec:vars]
peers=use_hop
These groups and variables describe the deployment shown in Figure 14.4. This is not going to fit every situation, but pieces of it should be able to be used to fit anyone’s deployment that needs to spread execution nodes out to disparate environments.
Summary
This chapter covered how to scale automation using Automation mesh, the details of Automation mesh and how using different types of nodes is important for scaling and growing your automation capabilities.
The next chapter will cover the Automation services catalog, which allows you to abstract jobs, forms, and approvals to a business user-friendly interface.