
4
Core Architectural Concepts: Identity and Access Management
In this chapter, you will continue exploring the general architectural concepts a Salesforce CTA should be familiar with. Identity and Access Management (IAM) is one of the most challenging topics that an architect needs to deal with. During a normal project, you might find yourself working with multiple IAM experts from different technological backgrounds. You need to be able to speak the same language as they do, understand their vision, and challenge their architectural design (if needed). As a Salesforce CTA, you are expected to step away from the standard platform knowledge to provide expert guidance in other related matters. Along with integration, IAM is another good example.
In this chapter, you are going to cover the following topics:
- Understanding the general concepts of IAM
- Becoming familiar with the common IAM standards
- Understanding the key authentication flows
Understanding the General Concepts of IAM
The IAM architecture is the activity of defining the processes, tools, monitoring mechanisms, and governance required to grant the enterprise’s internal and external users' access to the right digital assets in a well-governed and secure manner. The IAM architecture needs to ensure that users are granted the right level of access privileges based on internal and external requirements, such as enterprise policies or regulatory compliance.
The users included in an IAM architecture could be externals (and in this case, the term customer identity and access management (CIAM) is used) or internals (where the term IAM is used instead).
The IAM strategy aims at creating a unified digital identity for the enterprise’s customers and employees, along with a set of tools and processes to manage this identity and the access rights associated with it.
The IAM architecture is critical in today’s connected enterprise applications. The rapid growth in the value of data and the proliferation of different approaches by enterprises to make the most out of it, including API monetization, requires exposing the company’s internal resources to the public. It is certain that doing that without the right security planning and strategy is a recipe for disaster, especially considering the sharp rise in ransomware, phishing, whaling, and social engineering attacks. Besides, it is common nowadays to expect a particular transaction to span across multiple systems.
Integrated distributed systems are in use almost everywhere. In some use cases, there is a need to hook some systems together via scalable and secure integration interfaces. In other use cases, there is a need to facilitate a mechanism to swirl the user’s chair between these multiple systems in the easiest possible way, particularly without requiring the user to log in again to other applications. Moreover, social networks are a part of the daily lives of most, if not all, of today’s internet users. Hence, having a mechanism to integrate with them is becoming a standard expectation in today’s customer experience (CX) world.
You also came across some common regulatory compliances, such as the General Data Protection Regulation (GDPR), where the responsibility of safeguarding the user’s personal data is considered part of the enterprise’s responsibilities. Other regulations, such as those introduced by the New York State Department of Financial Services (NYDFS), require a comprehensive mechanism to ensure capturing and monitoring of the activities of logged-in users in an audit log. A solid IAM architecture is a key element in ensuring compliance with such regulations.
The four key components of an IAM solution are as follows:
- Identity repository: This is a place or a system that keeps the personal details of each user. This can take different shapes and forms.
- Management toolbox: This helps in managing, editing, adding, or deleting the data in the identity repository.
- Monitoring platform: To provide continuous monitoring of user activities and store this in a secure audit log.
- Policy enforcer: To regulate and enforce the user’s access privilege.
Some modern IAM tools offer all these capabilities in a single platform. However, you are likely to need additional configurations in other connected systems to facilitate the expected functionalities.
There is a variety of tools used to authenticate users today (which is a mandatory step in regulating and enforcing access privileges and policies), such as user credentials, tokens, digital certificates, fingerprint readers, iris readers, face recognition, smart cards, and hardware tokens. In the past few years, there has been an increase in utilizing multi-factor authentication (MFA), which relies on a combination of information you know (such as user credentials) with something you should exclusively have access to (such as your email inbox or your mobile phone) or something you are (such as your fingerprints).
In the coming sections, you will go through a set of IAM concepts and principles that you need to become familiar with. This will help you and your IAM team members, as well as other IAM architects, establish a common language.
Becoming Familiar with IAM Terms and Definitions
The following terms and definitions are commonly used to define and describe the various elements of an IAM architecture. Some of them are more straightforward than others. The terms and definitions you will cover are as follows:
- Identity
- Authentication
- Authorization
- Identity provider (IDP)
- Service provider (SP)
- Single sign-on (SSO)
- Multi-factor authentication (MFA)
- User provisioning and de-provisioning
- Role-based access (RBA)
- Biometric authentication
- Identity as a Service (IDaaS)
- Risk-based authentication (RBA)
- Lightweight Directory Access Protocol (LDAP)
- Service user versus context user authentication
Identity
This is used to recognize a particular individual or thing. Usually, you normally use names to identify yourself. However, you might come across more than one person with the same name, especially when you deal with a huge number of individuals. In systems, a unique alphanumeric identifier is usually utilized to recognize someone, such as a national ID, social security number, or even an employee ID. Other systems utilize a unique identifier in a specific format, such as the email address format.
Salesforce is a good example of such a system. Once the identity of a particular user is recognized, all operations would run under its context. Salesforce can apply various security policies and run the appropriate monitoring activities based on the given identity. To recognize a particular identity and start using it, you need to ensure that the person claiming it is authentic. This is where authentication comes into the picture.
Authentication
This is a term given to the process or series of processes used to identify a particular individual or thing uniquely, securely, and confidently. This step is used often in today’s applications, where the user is expected to prove their identity using one or more techniques, and once that is done, the application would operate based on the recognized identity (sometimes referred to as the logged-in user or authenticated user).
Authentication normally takes place by requesting one or more of the following inputs from the individual/thing: something that is known only to that individual (such as a password or unique key); something that the individual/thing has (such as a physical ID card, dongle, or an embedded chip); or something related to the physical structure of the identified object (such as a fingerprint or iris scan). Once the individual/thing is authenticated, there will be a need to determine what they are allowed to access within the current system. This is where authorization comes into the picture.
Authorization
This process takes place after authenticating a particular user to grant the right privileges to see, do, and have things within a particular system. In software applications, it is common to have a super user (also known as an administrator) who defines the allowed policies and permissions within a particular system. The administrator would likely also be responsible for defining/creating other users.
Enterprises should aim to apply the principle of least privilege while designing their authorization strategy. This requires that users, applications, and devices are granted the minimal sufficient privileges required to operate normally and deliver their desired functionality. You should keep that in mind while designing your overall security architecture and particularly avoid granting service users (also known as integration users) more privileges than necessary.
Identity Store
This is a common name given to databases or systems with directory structures that are used to hold information about the users (or, in general, identities, which are also known as principals) that a particular system is using. Information held in identity stores may include personal details, such as names, phone numbers, and email addresses, in addition to any other information required to authenticate a user, such as the unique user identifier or passwords (remember, passwords should never be stored in plain text or even in an encrypted form that can be decrypted. Passwords are normally stored as hash values that are impossible to reverse/decrypt as you learned previously in Chapter 3, Core Architectural Concepts: Integration and Cryptography), and any other data that uniquely describes the user.
The identity store can also contain the user’s group memberships, which define the privileges granted to a particular user. The identity store can simply be a database or something more advanced, such as Microsoft Active Directory (AD).
Identity Provider
The IDP (or IdP) is a trusted system that manages the identities of known users/principals. It includes capabilities such as creating, updating, and maintaining different identity information. Moreover, it provides authentication services that can be used by other applications. The main difference between modern IDPs and identity stores is that the former could provide identity maintenance and authentication services either by using their own capabilities or relying on connected identity stores. In other words, the IDPs do not necessarily need to maintain the values used for authentication (such as passwords) as they can connect to an identity store to provide the authentication services. The IDPs in this case provide a standardization and orchestration layer of the whole process.
Similarly, the IDP does not need to maintain the personal information of identities as these could be maintained in an identity store. The IDP in this case provides a set of services on top to display, change, and synchronize the data between the applications using the IDP services and the related identity stores. But this does not mean that the IDPs do not have the capability to hold such information natively. Modern IDPs provide the option of either hosting such information or using the services of a connected identity store. Ping Identity, Okta, and other providers are examples of IDPs. Even Salesforce offers limited IDP capabilities.
Service Provider
The applications that provide specific services for internal or external users are generally referred to as SPs. However, in the context of IAM, SPs are typically applications that rely on other IDPs to provide IAM capabilities (including user management and authentication). SPs typically have their own user repositories (such as databases) and user access control management consoles (where particular permissions are assigned to specific users).
In the use case where an SP is relying on an IDP to handle authentication, identity management, and potentially authorization (commonly known as SSO), there is a need for a special setup where the identity privileges maintained in the IDP would be translated into specific local SP user privileges. In simpler cases, this setup will be limited to the authentication service and a small set of identity management activities.
There are many examples of SPs. Salesforce itself can be considered an SP. Depending on its role in a particular SSO setup, Salesforce can play the role of IDP, SP, or both. Other SP examples include applications such as Workday, SAP, and many others.
Single Sign-on
The term SSO is used to describe the process where a user is allowed to authenticate once to access multiple applications. A common form of SSO is where a user authenticates to one application using any of the previously mentioned authentication mechanisms (such as credentials) and then attempts to access resources that belong to another application, which is linked with the same SSO mechanism. The user would not need to authenticate again in this case. This can occur either on the user interface (UI) level or the business logic level (typically via APIs). SSO eliminates the need to re-authenticate, which could be a tedious process. Therefore, it is considered a technique to improve user productivity. Moreover, it provides a centralized mechanism to monitor user authentication activities and therefore increases security and compliance.
The SSO setup utilizes an IDP to provide centralized user authentication and policy enforcement capability. For example, it is very common nowadays to see enterprises implement SSO to ensure that all their systems are following the same login policies (such as password complexity requirements, login restrictions, and additional verification mechanisms). These policies and regulations would be enforced by an IDP, which acts as the central unit for the SSO setup. All applications that utilize this IDP would be considered SPs.
As a Salesforce Architect, you need to understand that most, if not all, of the enterprise applications that you might deal with would normally have their own user repositories/databases and have built most of their functionalities based on the assumption that there is a logged-in user (also known as a context user) identified from that local repository. For example, think of applications such as Workday, SAP, Oracle NetSuite, Microsoft Dynamics, and Salesforce. They all expect the user to log in and be identified as a context user or application user against their local data stores.
Therefore, in an SSO setup, users will typically be replicated multiple times across the systems. The IDP will control the full list of users, including their authentication mechanisms (such as their hashed passwords), while each of the SPs would maintain a list of users allowed to work with that application and would rely on the IDP to authenticate those users, so they might not hold any authentication data locally. There will be a need for a unique identifier for each user to map local users to the IDP’s users. This is what is referred to usually as a federated identifier. The federated identifier can take multiple shapes and forms, such as an email address, social security number, or simply a unique enterprise ID.
The following diagram is an example illustrating the global and local data stores in an SSO setup:
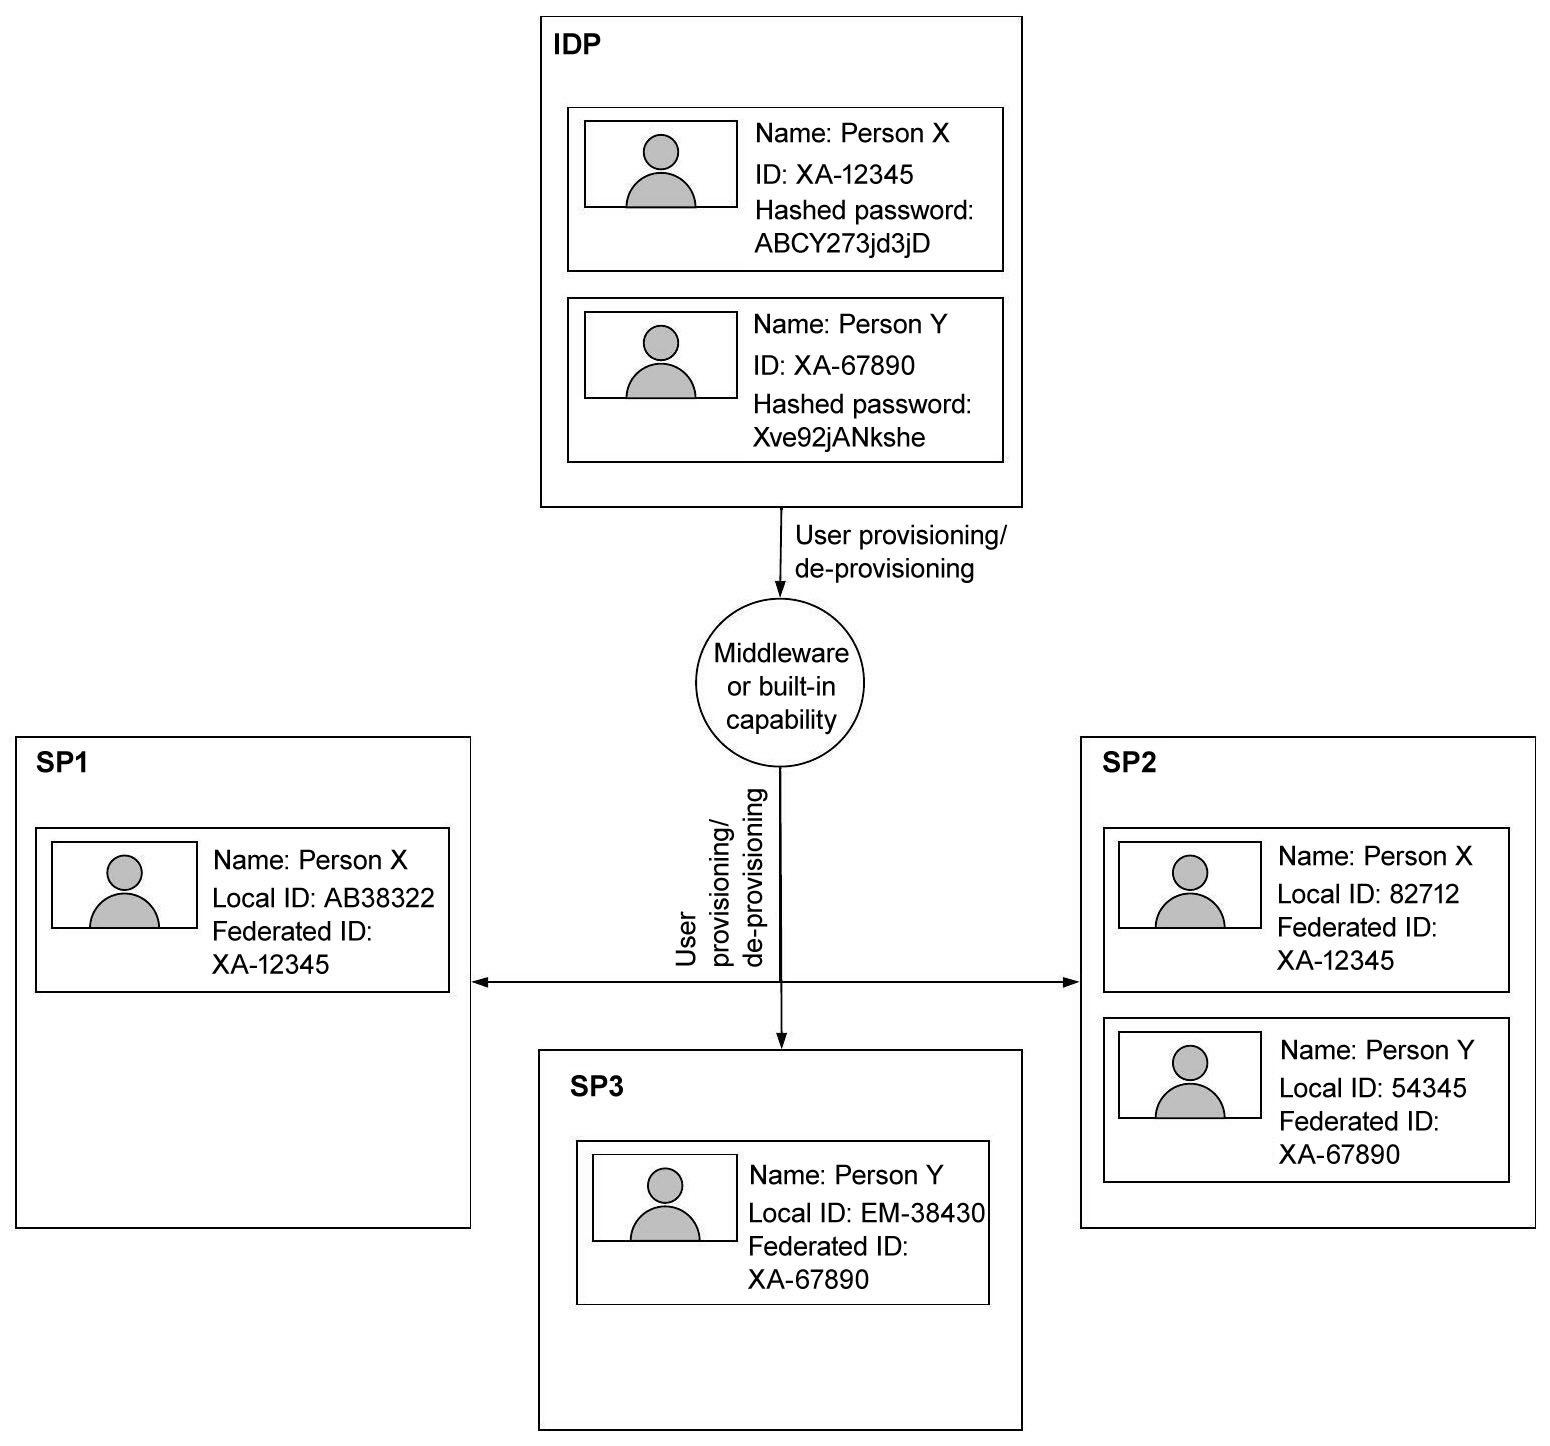
Figure 4.1 – Example of global and local data stores in an SSO setup
Multi-Factor Authentication
MFA is used to describe the security mechanism where a successful authentication process would require the user to pass more than one identity validation process using different methods. For example, the user might be requested to provide something they know (such as a password), something they have (such as a one-time token received on a mobile phone), and something they physically possess (such as a fingerprint). In MFA, the user is normally requested to pass three (or more) different security layers. A more relaxed security mechanism is normally referred to as two-factor authentication (2FA), which requires passing just two identity validation processes. A common example (that Salesforce professionals are familiar with) is requesting the user’s credentials at the first step. Upon successfully passing the validation, the user is then redirected to another page with a single input field, and a one-time token is sent to the specified user’s email address. The user would be requested to enter that one-time password (OTP) token into the input field.
Again, this authentication process relies on something the user knows (the password) and something they have (access to their own email inbox). MFA and 2FA ensure that the attacker cannot gain access to the desired resource(s) by simply guessing or stealing a user’s password (or any other single authentication mechanism, such as an ID card). Many enterprises are making this approach mandatory nowadays. Worth mentioning that Salesforce is automatically enabling MFA for direct logins to production orgs in phases, starting with the Spring ‘23 release and concluding with Spring ‘24.
Having an SSO setup makes this process easy and streamlined. The tasks of defining the 2FA/MFA policies, executing them, and providing a comprehensive log of their use is something the IDP would be handling in full. This means that the SPs do not need to worry about implementing any of this. They can simply rely on the IDP to handle all of that and then authenticate the user who passes the IDP checks based on the trust relationship they have. You will learn more about these trust relationships later in the Understanding the Key Authentication Flows section.
This means that the enterprise can be more agile and flexible in changing and developing its security policies. For example, an enterprise might decide to add a new layer of authentication on top of what it has today. With the right setup, they would need to introduce this only once to the IDP that manages the entire SSO processes for the enterprise.
User Provisioning and De-provisioning
Provisioning is the process of creating a user in an identity repository. That includes global and local identity repositories. Normally, there will also be a set of roles assigned to the user in each repository such as the permission to read some database tables. De-provisioning is exactly the opposite process and involves deactivating or deleting an identity from global and local identity stores, including any roles associated with it, terminating any open sessions, and revoking existing tokens.
Streamlining the provisioning and de-provisioning processes is important for enterprises as employees likely join and leave often. It is also key to ensuring that you can turn off all user access to all relevant systems from a single location. This adds a multitude of benefits in terms of optimization, efficiency, security, and compliance.
Role-based Access
Most enterprise-size applications come with a tool or a module to manage the user’s privileges to access specific functionalities, database objects, records, or fields. The same principle can be applied to all the resources available on a network. The tool would normally be called role-based access control (RBAC) in this case and is used to assign specific roles to users. These roles control what the users can see and do across the entire network. Depending on the RBAC tool itself, roles might also be referred to as group memberships.
Upon identifying the user via authentication, the authorization server determines the roles applicable to the logged-in user. Sometimes, both activities can be done by the same system. Enterprises would ideally aspire to have a centralized tool where they can manage all available roles and their assignments. In an SSO setup, this normally takes place in two steps:
- Define and manage a set of global roles: The global roles would be defined and assigned to the appropriate users in the centralized RBAC system. These roles could be based on users’ responsibilities, job descriptions, or functionality on a particular system, such as system admin – North America, or Salesforce system admin – North America. More than one role can be associated with the same user; for example, when the same user needs to access more than one system with a different privilege level on each.
- Define and manage local application roles: For each SP application, there will be a need to define a set of roles/profiles/permissions that can be assigned to the application users. These local roles are mapped to global roles. However, this is not necessarily a one-to-one mapping; for example, the Salesforce system admin – North America global role could be translated into a Salesforce profile called Salesforce system admin in North America’s Salesforce org, plus a set of permission sets, feature licenses, and third-party licenses that ensure that the specified user can carry out all the functionalities expected of them.
The role translation process is something that can take place in multiple ways. A common way is to assign that task to a user provisioning tool. Some modern IDPs have this built-in capability. For example, some IDPs, such as Ping Identity, can provision and de-provision users in Salesforce using standard Salesforce APIs or using the system for cross-domain identity management (SCIM) standard (which also relies on API calls). Another common approach is utilizing an integration middleware to handle this task.
The following diagram is an example illustrating the global and translated local roles in an SSO setup:

Figure 4.2 – Example of global and translated local roles in an SSO setup
Biometric Authentication
Biometric authentication is the process of uniquely identifying a person using biological attributes, such as a fingerprint, retina scan, voice, facial recognition, and more. There are even studies for identifying people by the way they walk. Recently, biometric authentication gained a lot of traction in the market due to the quick technological advances in this field. At the beginning of the millennium, topics such as face recognition were nothing more than science fiction. Today, it is a compulsory element in many smartphones. You can now do your online shopping using your smartphone and then pay online using the details of a credit card stored safely in your phone’s e-wallet, which is secured using your fingerprint or your facial features. The success of such technologies and the convenience they offer suggest that there will be many more such use cases coming in the near future.
Many enterprises have adopted some sort of biometric authentication as a 2FA or MFA mechanism, where the user logs in to a portal using one authentication mechanism (for example, a password). Once that is done, a push message will be sent to a mobile application that the user should have on their mobile. The user would then open the application, which utilizes the mobile device’s biometric authentication capability to authenticate the user again.
Once the authentication is done successfully, a message will be sent back to the server, which then proceeds with the next steps defined in its authentication process (such as completing the authentication process, creating a session cookie in the user’s browser, running some pre-defined validations, and then redirecting the user to a landing page).
The following diagram illustrates the use of biometric authentication as a second factor of authentication:

Figure 4.3 – Using biometric authentication as a second factor of authentication
Identity as a Service
This is a solution that provides identity services in a SaaS fashion. IDaaS applications normally offer an online portal with some tools and control panels to configure and style it in the desired way. Some of these solutions offer different levels of IAM capabilities, such as user provisioning and de-provisioning. Some providers also offer their solutions in a form that can be hosted on-premises.
Examples of these providers include Okta, Microsoft Azure identity management, Ping Identity, and, to some extent, Salesforce. Like all the other products that are mentioned throughout this book, you need to memorize some of these names to suggest the right solution during the CTA review board.
Risk-based authentication
This technique uses different tools and algorithms to calculate a risk score for the user trying to access a secure resource or attempting to authenticate. Based on the calculated risk score, the user might be asked to provide a second factor of authentication (or more). The algorithms to calculate the risk score of a particular user could depend on many factors, such as an IP address range, the specific time of the day, the existence of cookies from a particular domain in the user’s browser, the last time that a particular user has logged in successfully, and many other more advanced algorithms besides that could rely on anything from complex logic to machine learning and artificial intelligence. RBA provides a convincing way to ensure a high level of security without unnecessarily cluttering the user experience. Several IDPs provide various levels of RBAs as part of their solution.
Lightweight Directory Access Protocol
This is a protocol that is designed to provide a standardized mechanism to interact with data stored in a hierarchical directory structure. LDAP can store and retrieve data from these structures efficiently, which was one of the reasons it became so popular. Microsoft AD is an example of a tool that stores enterprise data (usually, policies, roles, and permissions) in a hierarchical structure. These types of tools are normally referred to as directory service databases.
LDAP is a protocol that can communicate and interact efficiently with directory service databases such as Microsoft AD. In the CTA review board scenarios as well as in real life, you might come across use cases where LDAP is used to communicate with other directory service databases, such as Apache Directory, OpenLDAP, JXplorer, or others. You need to understand which tools and IDPs are built to work with AD specifically, such as Microsoft Active Directory Federation Services (ADFS), or LDAP in general (such as the IDaaS products mentioned earlier in the Identity as a Service section).
Service user versus Context user authentication
In some use cases (particularly when accessing APIs), authentication can typically follow one of two approaches. The first uses a named principal (also known as a service user) where only a single integration user is authenticated and used to access the API, while the second follows a per-user policy, which means that the authentication takes place at least once per user trying to access the API.
Operations executed in the target systems would operate under the context of the integration user in the first case, which means you have less opportunity to provide a finely grained access privilege for each connected user. In contrast, in the second case, operations in the target system would operate under the context of the logged-in user (also known as the context user), which allows you to define different permissions, roles, and profiles for each connected user. The following diagram illustrates the two different approaches:

Figure 4.4 – Difference between service user and context user authentication
Now that you have covered the common IAM terms and concepts and learned how they work together, you’ll find out more about three of the most common IAM standards.
Becoming Familiar with the Common IAM Standards
IAM is a complex domain, and to ensure that its desired functionalities are delivered in a secure, consistent, and compliant way, several standards and protocols have been developed throughout time. As an architect, you need to become very familiar with these standards, understand how they operate and how they differ from one another, and exactly when to propose using any of them. Moreover, some of these standards have known and well-defined processes that describe precisely how to use the given standard to authenticate a user for a given use case. These processes are referred to as authentication flows.
To understand the authentication and authorization concept and how standards are used therein, consider a simple example. For instance, you are traveling from the UK to the US. When you attempt to cross the US border control, they would want to verify your identity. And assume that there is also a need to check some other information related to what you are allowed to do, such as driving a car in the US while using a UK driving license. In this case, the US border control would need to communicate with the UK and make a request to verify your identity. Once that is verified, they will ask what you are authorized to do.
The identification/authentication process can take many forms. For example, you could be identified using your passport, and the passport authenticity itself could be verified using the special security measurements/electronic chip embedded within it. Your passport can be scanned, and a real-time call could be made to a specific online endpoint to retrieve a list of things that you are allowed to do, such as driving a normal-sized car in the US for a given period of time.
In this example, the UK is acting as the IDP, while the US border control is the SP. Your passport represents some sort of authentication token, which is protected by a security measure. In the digital world, this could be a digital signature. The way the data is exchanged and the formats used represents a standard/protocol used for the given task, and the sequence of the authentication and authorization process steps represents the authentication/authorization flow.
When designing an IAM strategy for a client, it makes sense to rely on one of the industry standards rather than attempting to reinvent the wheel. In addition to saving time and effort, this will ensure that your authentication mechanisms are secure, scalable, and compliant. Deviating from the standards could lead to huge security gaps and would almost certainly result in a failure in the IAM domain during the CTA review board.
Understanding Common IAM Standards
In this section, you will get to know some of the most common IAM standards, then move on to further understand the type of tokens involved in these standards, and finally go through a set of authentication flows that you should become very familiar with. Here is a list of common IAM standards:
- Security Assertion Markup Language (SAML)
- Open Authorization (OAuth)
- OpenID Connect (OIDC)
- Kerberos
Security Assertion Markup Language
The SAML standard was created in 2001. It is currently in version 2.0, which was released in 2005. SAML is considered a standard for both authentication and authorization, and it is based on XML. In SAML, the SP can ask an IDP to authenticate and authorize a user/principal using a SAML assertion request. The IDP would respond with a SAML assertion response, which is referred to as the SP-initiated flow. SAML has another commonly used authentication flow called the IDP-initiated flow, where the principal can start from a particular web page that contains links to various systems (SPs). Each link contains an IDP-generated SAML assertion. Once that link is clicked, the assertion is sent to the target SP, and the SP verifies the SAML assertion based on a trust relationship established between the SP and the IDP. The principal is then granted access to the SP.
SAML assertions are signed using XML signature wrapping, which is an advanced form of digital signature. Verifying a digital signature (as previously discussed in Chapter 3, Core Architectural Concepts: Integration and Cryptography) requires access to the public key, which is normally presented as a digital certificate. Trust is established between the IDP and SP using the digital certificate.
In the setup phase, the architect/developer/configurator would normally upload a certificate shared by the IDP to the SP. The SP will then use this certificate to verify SAML assertions received in the future from the IDP. There are other steps involved in setting up the connection between the SP and the IDP using SAML, which could slightly differ depending on the technology used. Salesforce supports both SAML V1.1 and V2.0.
In your solution, you should aim at using the latest supported version. Later in this chapter, you will get to know two SAML-related flows, that is, the SAML IDP-initiated flow and the SAML SP-initiated flow. SAML is best suited for SSO; however, it is not very suitable for mobile phones or JavaScript and is not very popular with APIs.
Open Authorization
OAuth is an open standard that was created to solve a particular problem. It is normally referred to as access delegation or secure delegated access, which is simply allowing an application (normally referred to as the client) to access resources or perform activities on a server (normally referred to as the resource server) on behalf of a user. The standard facilitates this process without the need for the user to share their credentials with the client. This is done by utilizing tokens issued by an IDP, upon the user’s approval. These tokens contain a description of what the client is authorized to access and do on the resource server. This standard’s current version is 2.0, and that is the minimum version you should aim to use.
OAuth is normally considered an authorization standard, although there have been some debates around considering it an authentication standard based on the assumption that the authorization process can be considered a pseudo-authentication. To understand this topic and understand what is meant by access delegation, look at this example.
Assume you are leaving for a short trip, and you want your friend Suzanne to take care of your house while you are away. You want Suzanne to be able to access your house, garage, and two out of the four rooms in your house. Before you leave, you hand over to Suzanne a keychain that contains keys to the main house door, the two rooms, and the garage. Suzanne can now access the house and specified rooms using the keys without you being around.
In this example, Suzanne is the client, you are the user, the house and rooms are the resource server, and the keychain is the token that authorizes Suzanne to access specific resources only. The keychain and the keys have been created by a locksmith who, in this case, resembles an IDP. This locksmith has created the keys based on your own permission/approval. For someone watching Suzanne accessing the house, it may seem that she is the house owner. This is an assumption since she has the keys. In this case, the authorization that the keychain holder has can be used to pseudo-authenticate the person and assume they are the house owner. Now, look at another example from the digital world that you must have experienced.
You are on a website to review books. You have just finished reading a book and written a review. After submitting the review, the website shows you a Share on Facebook button with a message asking you whether you are interested in posting your review on Facebook. You like the idea, so you hit the button. This is your first-ever time doing this. The website will attempt to get permission/authorization to post on Facebook on your behalf. So, it redirects you to Facebook; if you are not already logged in, Facebook will show you the standard login page.
After you authenticate, Facebook will show you a page with a message informing you that the website is requesting permission to post on your behalf (this will be the only thing the website is allowed to do on your behalf, and it is called a scope). The page will also contain approve and reject buttons. Once you hit the approve button, a token will be issued by Facebook to the website, granting the website the limited privilege to post on your behalf. The website will use this token to authenticate to Facebook and post your review on your Facebook wall, and for your Facebook friends, this will look like an activity done directly by you. Note that you shared your credentials with Facebook only; you have never shared them with the website or any other entity.
Typically, there will be another token issued to the website that allows it to get a fresh new token next time without the need for this whole set of activities. The next time you post a review on the website and hit the same button, the website will use the tokens granted to it in the previous step to authenticate again to Facebook and post on your behalf. Depending on the settings of these tokens, this can continue to happen until you revoke these tokens.
In the previous example, this is equivalent to claiming back the keychain from Suzanne or completely changing all the locks. Later in this chapter, you will get to know some OAuth 2.0 and OIDC (which is based on OAuth 2.0) flows, such as web server, user-agent, refresh token, JSON web token (JWT) bearer, device, asset token, and username-password.
OpenID Connect
OpenID is based on OAuth 2.0, but it is designed to provide a federated authentication mechanism that is similar to SAML. It adds a set of different functionalities on top of OAuth 2.0, but the one you should be particularly aware of is an additional token generated called the ID token. The ID token contains information about the authenticated user, such as first name, email, federated identity, and the requesting client, in addition to custom attributes that could be added by the IDP. This token can help confirm the identity of the individual for whom this token has been issued.
The ID token itself is digitally signed, and therefore it is easy to validate and confirm whether its contents have been tampered with. As the IDP’s digital signature secures the ID token, and because it contains key information about the user it is generated for (including the federated identifier), it can be used to authenticate this user by other systems (SPs) who trust the IDP. The trust relationship is established using a digital certificate.
OIDC is widely used today; most social networks, such as Facebook, Twitter, Google, and others, support it. The term social sign-on refers to the authentication process where social networks are used as IDPs to log in to other websites. Social sign-on mostly utilizes OIDC. Also, many enterprises use OIDC as their SSO standard.
Kerberos
Kerberos as an authentication protocol is used over networks (such as a local enterprise network) to provide SSO capabilities. It uses tickets, which are similar in principle to tokens. Kerberos is named after the Greek mythological three-headed dog, Cerberus, who guards the entrance to the underworld. Kerberos is used in several systems, most remarkably, Microsoft Windows. integrated windows authentication (IWA) is a Microsoft product that utilizes Kerberos (it can also work with other protocols such as NT lan manager (NTLM)) to allow Windows users to use AD for SSO.
For instance, imagine that you are an employee of a company that utilizes an AD to manage all its employees’ identities. You arrive at the office in the morning, open your Windows-based laptop, and authenticate to join the domain using your AD credentials (which creates a Kerberos ticket). And now you want to access your company’s instance of Salesforce (which has a unique MyDomain URL). But you want to do that without the need to authenticate again.
Kerberos, IWA, and a tool such as Salesforce Identity Connect, Microsoft ADFS, or Ping Identity (which would facilitate the authentication flow between Salesforce and AD) would all combine to deliver this functionality. The details of setting up Kerberos or IWA are beyond the scope of this book. For the sake of brevity, this book will not detail the Kerberos protocol itself, but you will discover how it is utilized during an SSO flow in Chapter 13, Present and Defend: First Mock.
The standards (SAML, OAuth, OIDC, and Kerberos) utilize and generate tokens as part of their design. Tokens have a crucial role in IAM. They are involved in many different operations and come in different formats and purposes. You will now go through the most common types of tokens that you might come across as a Salesforce Architect.
Getting to Know the Different Types of Tokens
As a Salesforce Architect, you are expected to lead the activities of designing and implementing IAM strategies for your Salesforce implementation. Tokens are an essential element of the IAM standards, and you need to know more than just their names.
Note
The tokens listed here are by no means a complete list of all possible tokens; the list is too long and probably requires a dedicated book.
This is a selected set that Salesforce Architects designing solutions for B2B and B2C are likely to come across.
Access Token
Access token is a term used by OAuth 2.0 and OIDC. The access token is the most significant token that your applications are after. This is the token that will allow an application (also referred to as a client) to authenticate to a resource server and request resources (such as retrieving specific data) on behalf of the user. The access token can be used to authenticate against web services as well, typically by passing the token itself in the header. The access token can be formatted in multiple forms depending on the system issuing it. For example, Salesforce-issued access tokens take the shape of a normal session ID, which will look similar to the following example:
00DR00000008oBT!AQwAQCPqzc_HBE59c80QmEJD4rQKRRc1GRLvYZEqc80QmEJD4
The value of this token cannot be decoded. It is a unique hash and is not supposed to be decrypted or decoded. By itself, it does not contain any information. However, it can be used to access resources on a resource server because a copy of the same token will be cached by the server, usually in a key/value pair dictionary, along with its expiry date. Access tokens have relatively short longevity (such as 30 minutes, 60 minutes, and 120 minutes). The system administrator determines the specific amount of time until session timeout.
Another example is Azure-issued access tokens, which are formatted as JWTs. JWTs contain some standard and custom attributes/payloads (also known as claims).
Note
You can use an online tool such as https://packt.link/cPtWd to see a live example of a JWT and its decoded value.
You will come across other JWT-formatted tokens later in this chapter.
Refresh Token
This is another term used by OAuth 2.0 and OIDC. Refresh tokens are issued for clients in specific use cases (depending on the client type and the authentication flow used). The refresh token normally has greater longevity than the access token. Sometimes, they can be set to never expire (until they get revoked).
The refresh token should be stored in a secure location by the client application and used to get a new access token periodically or whenever needed. You can see refresh tokens in action right now using one of the applications on your smartphone.
Perhaps you have noticed that some apps require you to sign in once, the first time you start the application. You never need to enter your credentials again the next time you open the app, even if you open it after a few days or weeks. This is because the application has been configured to utilize a refresh token. When you authenticated for the first time, the application received both an access token and a refresh token. The access token has a shorter time to live (TTL) than the refresh token; it will usually be valid for a few hours. The application will continue to use it as long as it is still valid.
For instance, you opened the application after two weeks. The application will use the cached access token to communicate with the resource server, but will immediately get a response back, indicating that the token has expired. The application will respond by utilizing the refresh token to get a new access token. Once that is done (and you will see that flow later in this chapter), the application will use the newly retrieved access token to communicate with the resource server. All of this is done in a completely transparent way for the user.
ID Token
This is a token that is exclusive to OIDC. As mentioned before in the OpenID Connect section, the ID token provides a mechanism for the client application to verify the identity of the user for whom this token has been issued. The ID token contains information such as the time of issue and the time of expiry. In addition to data regarding the authenticated user, such as the user’s unique identifier (also known as the federated identifier). Depending on the IDP setup, the federated identifier could be a value such as an employee ID, email address, or a different sort of unique identifier.
The ID token also contains information about the client application for which the token was issued. Most importantly, the token will also contain the IDP’s digital signature, which can be used to verify the token’s contents. The ID token format is based on JWT, which is a data structure based on JSON. Applications can request an ID token using the same OAuth 2.0 flows if the right parameters are passed. For example, in the web server flow, the client application could get an ID token if it included the OpenID scope as part of the passed scope arguments. You will see further details about this later in this chapter.
JWT
JWT is a standard to format data that can be used to assert the identity of a party to other parties as well as asserting a set of information (referred to as claims) that is included in the token itself. ID tokens use the JWT format. JWTs can either be signed (similar to the example given before while describing the ID token), in which case they’re referred to as JSON web signature (JWS) tokens, or encrypted, in which case they’re called JSON web encryption (JWE) tokens.
Commonly, when a JWT is referred to, it is implicitly assumed that it is a signed JWT (effectively, a JWS). If a JWT is neither signed nor encrypted, it is explicitly clarified by calling it an unsecured JWT. The body of a JWT is encoded. It normally looks like the following example (the three dots at the end represent a trimming of the text for the sake of simplicity):
eyJhbGciOiJIUzI1NiIsInR5cCI6IkpXVCJ9.eyJzdWIiOiIxMjM0NTY3ODkwIiwibmFtZSI6IkpvaG4gRG9lIiwiaWF0IjoxNTE2MjM5 MDIyfQ.SflKxwRJSMeKKF2QT4fwpMeJf36PO…
Once you decode a JWT using a tool such as https://packt.link/cPtWd, you’ll notice that the JWT consists of three main parts—a header, a payload, and a signature (remember, when the term JWT is used by itself, this usually implicitly indicates that this JWT is actually a JWS). The header and the payload sections could look like the following example:
{
  "alg": "HS256",
  "typ": "JWT",
  "kid": "228",
}
{
  "iss": "www.packtpub.com",
  "sub": "11050225117732",
  "email": "[email protected]",
  "email_verified": true,
  "aud": "825249835659",
  "iat": 1401908271,
  "exp": 1401912171
}
The attributes such as iss, aud, iat, and exp are referred to as claims. These are standard claims; they are part of the standard JWTs. An IDP might add custom claims and include additional information in them. Here is an explanation of the meanings of some of these claims:
- iss (issuer): This claim is used to hold an identifier about the principal that issued the token.
- aud (audience): This claim is used to hold an identifier for the recipients the token is issued for, such as the client application.
- iat (issued at): This is the time the token was issued at.
- exp (expiration time): This is the time after which the token should not be accepted.
- alg (algorithm): This is the algorithm used for encryption or the digital signature.
- kid (key ID): This is an optional header claim. It is not necessarily included by all OpenID providers. When Salesforce is configured as an OpenID provider, its ID tokens (in JWT format) will contain this optional header claim.
This claim contains an identifier for the key that was used to sign the token. Salesforce (and some other OpenID token providers) use multiple private keys to sign JWTs, and therefore they need to provide a key ID (kid) to help the recipients identify which public key can be used to verify the signature.
The applications that receive a signed JWT from Salesforce would extract the value of the kid header claim and then use it to look up the correct public key from the list published regularly by Salesforce to verify the token’s signature. All this happens transparently, and the user would not be bothered unless the signature is invalid. In such a case, an exception will be thrown.
Note
If you go to the page at this public URL, https://packt.link/qBw4j, you will see multiple keys listed by Salesforce. Each is identified using a unique key ID.
One thing to keep in mind is that Salesforce, similar to other OpenID providers, can regularly change the keys used to sign their tokens. The client application should never attempt to hardcode kid, but instead should attempt to resolve it dynamically, as you learned earlier in this section.
Session Token
Also known as the session ID, session token is a common term used in reference to web applications. A session token is a unique string (normally, a hash value) that identifies a particular session for the currently logged-in user. Session IDs are heavily used on websites, and they are normally stored within a cookie. The session ID can normally be mapped to a key-value dictionary in the application server, which contains information about the logged-in user and what they are authorized to do. If an attacker manages to get hold of a session ID/session token, they would normally be able to impersonate the victim at the target application server.
Therefore, users are always advised to log out after they finish working with a particular secure website to destroy their sessions. This is also the reason why session IDs are normally configured to have a short lifetime, particularly with financial services applications (such as online banking) where the session can expire after a very short period (such as five minutes) of idle time.
The token’s TTL can be fixed (which means the token will expire after the given time, regardless of whether the user is active) or can be extended based on user activity. This means the token will expire only after a specific given period of idle time (where the user is simply not interacting with the server); in this case, it is normally called a sliding token.
Authorization Code
This is a special type of token. It is used in one of the OAuth 2.0/OpenID flows (the web server flow). It has a very short TTL, and it is created by the authorization server and returned (via the browser) to the client application. The client application would then send the authorization code back to the authorization server (directly, not via the browser) to exchange it for an access token (and optionally, a refresh token).
Since the authorization code is returned via the browser (which happens very quickly), the authorization code is visible to the end user and can be observed using some tools (such as Google Chrome DevTools). This is particularly why its TTL is so short, as this reduces the risk of being stolen by an attacker (who can use it to get an access token).
SAML Assertion
Similar to JWTs, SAML assertions can be used to authenticate a user to a particular resource server/SP. It contains information such as the user identity, issue time, and expiry time. It can also be secured using multiple mechanisms, including XML signature wrapping. Applications can utilize SAML assertions to authenticate to APIs as well.
Salesforce Security Token
When you attempt to access Salesforce APIs and authenticate using a basic authentication mechanism (username/password), you need to append the security token to the password provided. The token itself is a case-sensitive alphanumeric key. You should try to avoid basic authentication as much as possible and utilize one of the standards mentioned before, such as OIDC.
Now that you are familiar with all types of tokens, look at the different authentication flows and observe the generation of each type of these tokens throughout the process.
Understanding the Key Authentication Flows
For each of the following flows, you will go through the flow’s sequence diagram, cover the high-level details of each step, and provide potential use cases and key considerations. To draw and read a sequence diagram properly, you need to make yourself familiar with the standard symbols used.
The following diagram lists the most common UML sequence diagram symbols:
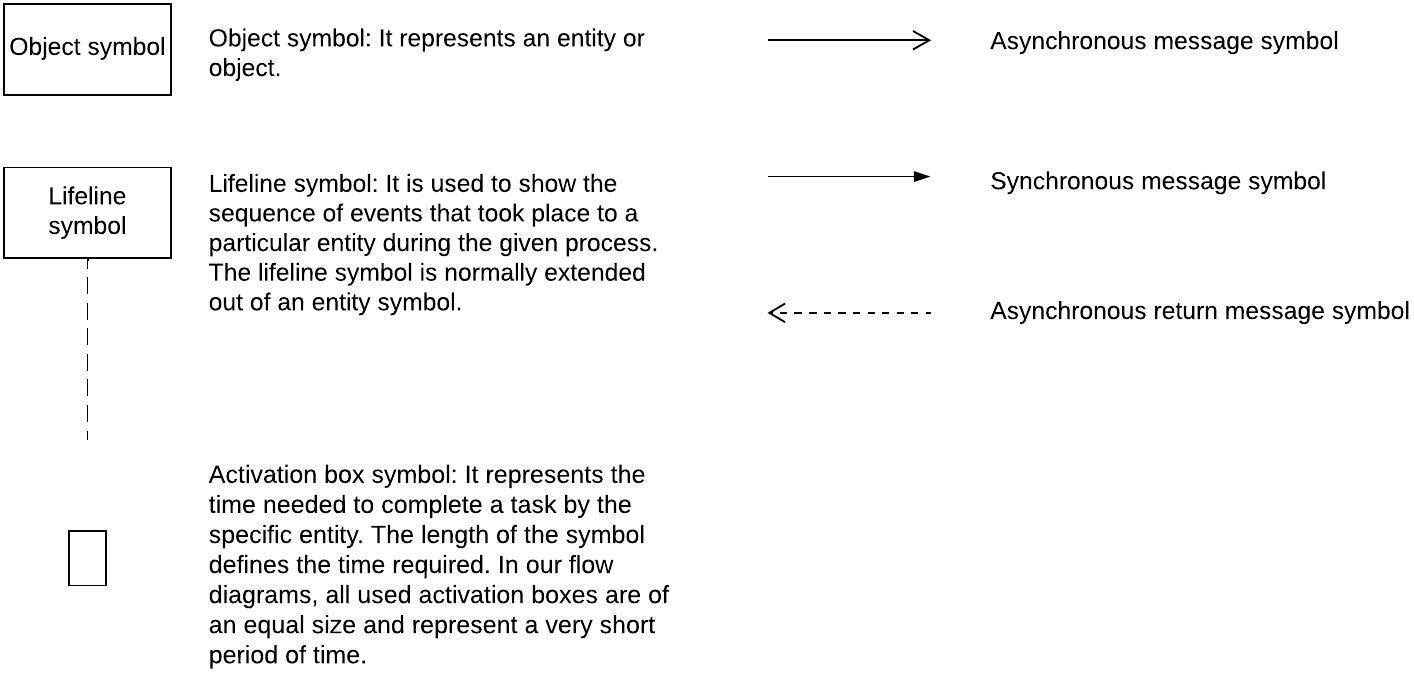
Figure 4.5 – Common sequence diagram symbols
These flows are not specific to Salesforce; they are open standards and used across different technologies. You need to become familiar with all of them. During the CTA review board, you will likely need to explain one of these flows. The best way to explain a flow is to draw its sequence diagram and walk the audience through it. The best suggestion will be to practice drawing these diagrams over and over until you fully memorize them. Also, practice explaining them to an audience. This will all help during the review board presentation and in your daily activities in general.
Ready? Buckle up, here you go.
Becoming Familiar with the SAML 2.0 Flows
SAML 2.0 has three main flows, that is, the IDP-initiated, SP-initiated, and SAML bearer assertion flows. The SAML bearer assertion flow is very similar to the OAuth 2.0 JWT flow, which will not be explicitly covered but will be discussed later in this chapter in the JWT Bearer Flow section.
SAML IDP-Initiated Flow
The following diagram represents a SAML IDP-initiated flow. This flow is usually used by enterprises that provide a central location/page for their employees to access all applications (SPs) linked to the same enterprise IDP:

Figure 4.6 – SAML IDP-initiated flow
This is how the process flows:
- The user visits the IDP login page or the IDP home page.
- The home or login pages will check whether the user is authenticated by checking whether there is a stored cookie for the IDP domain with a valid session token. Assume that this is the first login by the user for the given day and that there is no valid session token found. The user should see the login page at this stage.
- The user enters their username and password (or authenticates in the process defined by the IDP). If the IDP is configured to use 2FA or MFA, then the other factors will be requested before the user is authenticated. Once the user is authenticated, they are redirected to the IDP’s home page.
- The user lands on the IDP’s home page/landing page. The page contains links for all available applications (SPs) that are using the IDP for SSO. The user clicks on one of those links.
- The IDP generates a SAML assertion, signed with the IDP’s private key/certificate. The assertion is sent via the browser to the SP.
- The assertion is sent to the SP.
- The SP receives the assertion and validates it using the IDP’s public key/certificate. The user is authenticated, and a session token for the specific SP domain is created and saved in a browser cookie. The user is redirected to the SP home page. The next time the user attempts to access the SP, the SP will detect the cookie with the session token. And if it is still valid, the user will be allowed to access the desired page. Otherwise, a new authentication flow will start over. The only difference is that this time it will start from the SP rather than the IDP. This is what is referred to as SP-initiated flow.
SAML SP-Initiated Flow
The following diagram represents a SAML SP-initiated flow. This flow is used when a user attempts to access a deep link of a particular SP. The deep link could be a URL saved in bookmarks, a link in an email, a URL from the browser history, a URL that the user knows by heart, or even the URL of the SP’s home page. The idea is that the user is trying to access one of the SP’s resources. The SP needs to authenticate the user before it allows access to that resource. This is a very common flow:

Figure 4.7 – SAML SP-initiated flow
This is how the process flows:
- The user visits the SP using a deep link or simply by trying to access the SP’s home page.
- The SP checks for an existing and valid session token stored in a cookie associated with the SP’s domain. Assume that this token has not been found because this is the first time the user attempts to access this application/SP today.
- The user is redirected to the IDP via the browser with a SAML assertion request. The idea here is to get the IDP to authenticate the user and then return the user back to the SP’s page/URL that the user was attempting to access (for example, the URL in a deep link such as http://www.packtpub.com/books/SF_ExamplePage.html). The target URL is passed in a parameter called RelayState. In this example, the value of this parameter would be /books/SF_ExamplePage.html. This parameter will eventually be passed back to the SP following user authentication, which will help redirect the user to the right URL.
- The user is redirected to the IDP login page (with the RelayState value).
- The IDP checks for an existing and valid session token stored in a cookie associated with the IDP’s domain. Assume that this token has not been found because this is the first time the user has logged in to the IDP today.
- The user enters the username and password (or authenticates in whatever way is defined by the IDP). If the IDP is configured to use 2FA or MFA, then the other factors will be requested before the user is authenticated.
- Once the user is authenticated, a SAML assertion will be created, signed with the IDP private key/certificate, and returned to the SP via the browser, along with the RelayState value.
- A SAML assertion is sent to the SP via the browser, along with the RelayState value.
- The SP receives the assertion and validates it using the IDP’s public key/certificate. The user is authenticated, and a session token for the specific SP domain is created and saved in a browser cookie. The user is then redirected to the SP page specified in the RelayState value. The user lands on the URL they were trying to access in Step 1.
This is how it looks the next time the user attempts to access another page from the same SP, assuming the SP session cookie is still valid:
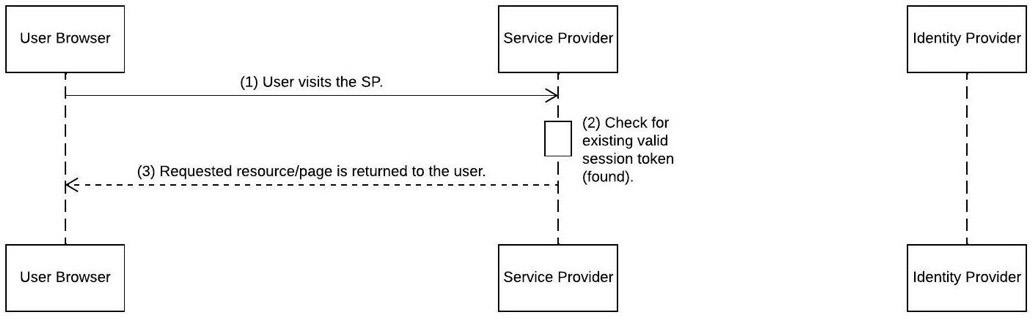
Figure 4.8 – Continuing the SAML SP-initiated flow following user authentication with a valid SP session
This is how the process flows:
- The user visits the SP using a deep link or simply by trying to access the SP’s home page.
- The SP checks for an existing and valid session token stored in a cookie associated with the SP’s domain. Assume that the token from the previous authentication is still valid.
- The user is granted access to the desired resource. Now look at the scenario where the user attempts to access a page from the SP following the expiry of the SP’s session token, but prior to the expiry of the IDP’s session token. This could happen if the expiry time of the IDP token is set to a higher duration than the session token of the SP:

Figure 4.9 – Continuing the SAML SP-initiated flow with an expired SP session and a valid IDP session
This is how the process flows:
- The user visits the SP using a deep link or simply by trying to access the SP’s home page.
- The SP checks for an existing and valid session token stored in a cookie associated with the SP’s domain. Assume that the token from the previous authentication has expired.
- The user is redirected to the IDP via the browser with a SAML assertion request. The value of RelayState is also populated and passed.
- The user is redirected to the IDP login page (with the RelayState value).
- The IDP checks for an existing and valid session token stored in a cookie associated with the IDP’s domain. Assume that the IDP found an active/valid session token.
- A SAML assertion is created, signed with the IDP private key/certificate, and returned to the SP via the browser, along with the RelayState value.
- A SAML assertion is sent to the SP via the browser, along with the RelayState value.
- The SP receives the assertion and validates it using the IDP’s public key/certificate. The user is authenticated, and a session token for the specific SP domain is created and saved in a browser cookie. The user is then redirected to the SP page specified in the RelayState value.
These are the most common SAML 2.0 flows. Now, you will explore and learn about the OAuth 2.0/OIDC flows.
OAuth 2.0/OIDC Flows
Remember that OIDC is based on OAuth 2.0, so most of the following flows are applicable to both. Here are some of the terms used in these flows:
- Client app: An application that is trying to access resources on a resource server on behalf of the user. For example, a website such as www.mywebsite.com could be trying to access resources from a Salesforce instance such as MySFinstance.my.Salesforce.com. Salesforce Workbench https://packt.link/o0xKc is another good example of a website that is accessing resources from another (a Salesforce org in this case).
- Authorization server: This is the server that will grant the right authorization to the logged-in user. For the sake of simplicity, assume that this server is also handling the process of identifying the user attempting to log in (effectively authenticating the user and acting like an IDP) and that it has access to the identity store where the identification mechanisms for the users are kept (such as user credentials). login.Salesforce.com is an example of such a server.
- Resource server: This is the server with the resource that the client application is trying to access on behalf of the user. For example, this could be a Salesforce instance such as MySFinstance.my.Salesforce.com, from where the user is simply trying to access a particular page or a web service.
- Client ID/consumer ID: This is a unique alphanumeric ID for a given client app. The authorization server generates this value for a specific client app upon registering the app with the authorization server. The app registration is typically done as part of the setup process, but it can happen dynamically in some cases.
- Client secret/consumer secret: This is a unique alphanumeric value representing a highly confidential value that the client app should never expose to the user or external entities apart from the trusted authorization server. Similar to the client ID, the authorization server also generates this value for a specific client app upon registering the app with the authorization server.
There are other terms that you will come across that will be covered later in this chapter. Next, you will get introduced to the following authentication flows:
- Web server flow
- Refresh Token flow
- User-agent flow
- JWT bearer flow
- Device flow
- Asset token flow
- Username-password flow
All set? Now, you can proceed to the flows.
Web Server Flow
This flow is also known as the authorization code flow or auth-code flow. This scenario is typically used when a website/web application is trying to access resources from a resource server on behalf of the user. Websites/web apps are hosted on servers, and to use this flow, the website/web app should be able to safely store the highly confidential client secret value. That value should never be exposed to end users, never returned to the browser, never exchanged over non-secure channels, and never exposed to any entity but the authorization server. If the website/web app (which is the client app in this case) is unable to meet this requirement, you need to consider a different flow.
This flow facilitates server-to-server communications but requires user interaction, at least during the first authentication. The flow can grant the client app an access token, optionally an ID token (if the OpenID scope is specified during the process), and a refresh token (if the refresh_token or offline_access scope is specified during the process). A refresh token allows the client app to communicate with the authorization server to request a new access token when the current access token expires.
Refresh tokens can be configured to never expire. This means that a web server flow can be used to establish a never-expiring (until revoked) authenticated connection between the client app and the resource server. This flow can also be used to authenticate middleware to a target application (for example, authenticating MuleSoft to Salesforce, or vice versa). Remember that there will still be a need for human interaction at the setup phase where the first authentication occurs.
Take a look at the sequence diagram:

Figure 4.10 – OAuth 2.0/OIDC web server flow
This is how the process flows:
- The user visits the client application (website/web app). For the sake of simplicity, assume that the website itself has already identified and authenticated the user locally (using its own authentication mechanism). However, the website is also trying to access some of the user’s data stored on the resource server on behalf of the user. For example, the website could be trying to retrieve the user’s full profile.
- The website checks for an existing and valid access token or refresh token for the current user and the target resource server. These tokens would typically be stored on the server hosting the website, either in memory, or in a more persistent data store such as a database, or both, identified by the user who owns them and the target system they are meant to be used with. The tokens should be stored safely on the server where an attacker or other users (even a system administrator) do not have access (for example, they could be encrypted while stored in the database and protected while in memory).
Assume that the application did not find any tokens for the current user, which are meant for the target resource server, most likely because this is the first time that this user tries to retrieve data from the resource server.
- The client app starts the authorization process by sending an authorization request. This process is sometimes called the OAuth dance. The client app does an HTTP redirect via the browser to the target authorization endpoint, such as https://packt.link/2FEvu, and passes a set of parameters.
The key parameters passed are client_id, which is the unique alphanumeric ID for the client app, and redirect_uri, which is the URI that the user will be redirected to following successful authentication. This URI must also be registered with the authorization server (this is also done during the setup process). The response_type parameter defines the OAuth 2.0 grant type; this pretty much defines the type of authentication flow used. For the web server flow, the value of this parameter must be code.
There are several optional parameters that you can use to configure the behavior of the flow. One of them is scope. This parameter contains a list of the permissions the application requests to be authorized to use upon successful authentication. The authorization server normally defines the possible values of this parameter.
However, there are some common scopes, such as full (allows access to all data accessible by the logged-in user), OpenID (requesting this scope while using either the user-agent flow or the web server flow enables the app to receive a signed ID token), and refresh_token (enables the app to receive a refresh token under specific conditions). For example, the full URI of the redirect could look like https://packt.link/d2KaB.
- The authorization request is sent to the authorization server.
- The authorization server checks for an existing and valid session token stored in a cookie associated with the server’s domain. Assume that this token has not been found because this is the first time the user has logged in to the authorization server today.
- The user is presented with a login screen served by the authorization server. The user enters their username and password (or authenticates in whatever way defined by the authorization server). If the server is configured to use 2FA or MFA, the other factors will be requested before the user is authenticated. Once that is complete, the user will be presented with a screen asking for approval to allow the client app to access specific scopes on the resource server. The screen will look like the following screenshot:

Figure 4.11 – Example of an OAuth 2.0/OIDC authorization approval screen
- The user is authenticated, and an authorization code is generated and returned to the client app via the user browser (redirect). The authorization code will be returned to the given redirect_uri. For this example, the returned auth code could look like this: https://packt.link/5i3bi.
- The authorization code is sent to the client app via the browser. Please note that due to the redirect via the browser, the authorization code might be exposed to attackers. However, it has a very short TTL, and there are other protection mechanisms that prevent attackers from making use of it, such as the need for a client secret value (which is supposed to be known only to the client app).
- The client app receives the authorization code. It uses it to get an access token from the authorization server. This is achieved by posting the authorization code and other values to a specific server endpoint.
The other parameters passed include grant_type (this value must be authorization_code for the given flow), redirect_uri (the value of this parameter is used for validation only at this stage and should match the value used in Step 3), code (this parameter contains the value of the authorization code), client_id (this contains the ID of the client app), and client_secret (this is a crucial parameter, and it should contain the highly sensitive client secret value known only to the client app).
Suppose the attacker has access to the client secret. In that case, they can use the authorization code to get the access token (some other protection mechanisms are usually included, but the attacker will find them easier to dodge). Therefore, the client secret must be stored in a safe location of the server hosting the client app.
- The authorization server receives the post request and issues an access token. Optionally, depending on the values passed in the scope parameter, the server can also generate a refresh token and an ID token (OIDC). These tokens are returned to the caller (typically, in JSON format).
- The client app receives the tokens. Optionally, if the client app receives an ID token, the app should validate that token (by validating its signature using the public key of the authorization server). The client app uses the access token to request the desired resource from the resource server.
- The resource server responds by sending the requested resource.
Now assume that the user refreshed the page. The client app would attempt to retrieve the user’s profile details again from the resource server. However, this time, you already have the tokens. The flow would look like this:
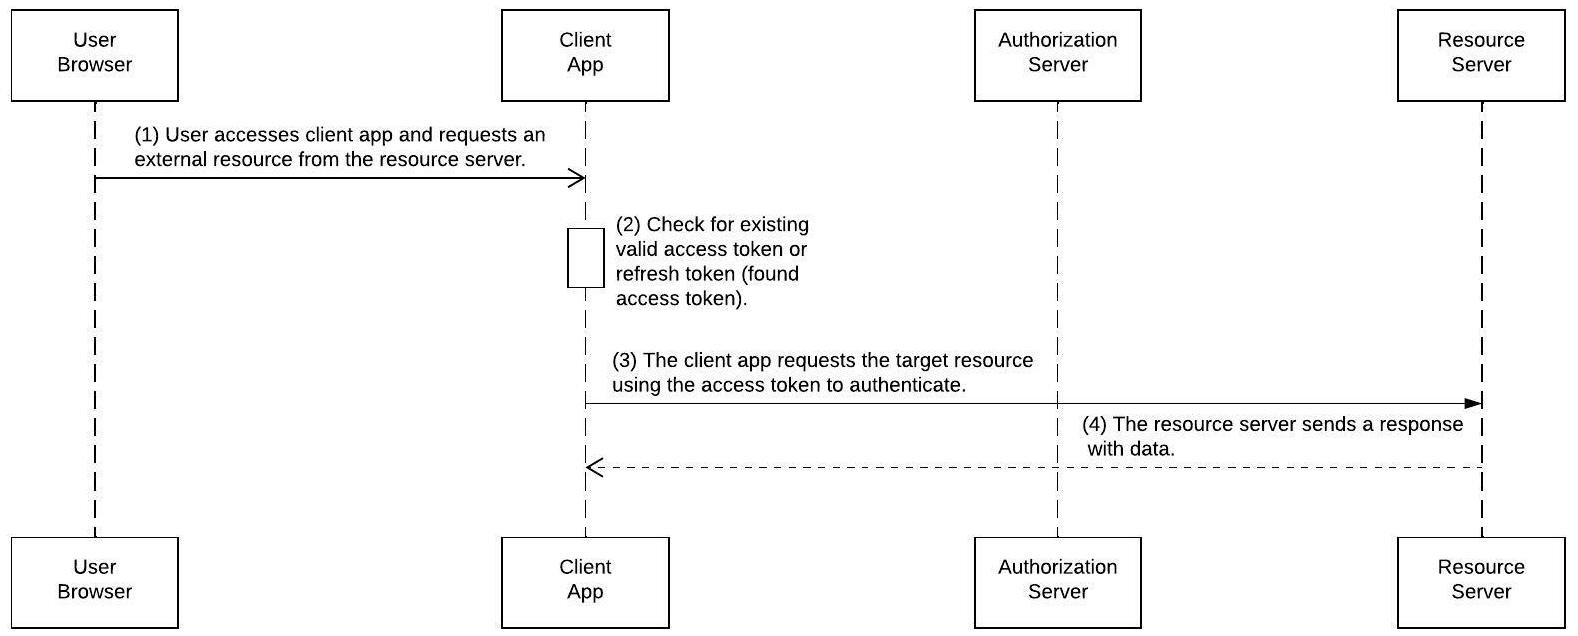
Figure 4.12 – OAuth 2.0/OIDC web server flow, following initial authorization
Please note that the previous diagram assumes that the access token is still valid. If not, the client app will use the refresh token to get a new token in a process known as the Refresh Token flow.
Refresh Token Flow
This approach is used to get a new access token using a refresh token. Take a look at the sequence diagram:

Figure 4.13 – OAuth 2.0/OIDC Refresh Token flow
This is how the process flows:
- The user visits the client application (website/web app). The website tries to access some of the user’s data stored on the resource server on behalf of the user, such as the user’s full profile.
- The website checks for an existing and valid access token or refresh token for the current user and for the target resource server. Assume that the application found both. However, the application is unaware that the access token has expired. Some access tokens contain information within them indicating their expiry date, while some do not. Assuming that the application has no way to find out that the access token has expired, it will try to use it to get the desired resource.
- The client app uses the access token to request the desired resource from the resource server.
- The resource server returns a response indicating that the token has expired. The resource server would typically have storage (in memory or in a database) to keep all active access tokens and refresh tokens. Expired or revoked tokens will get purged from that storage. In this case, the resource server looked for the expired access token in its storage and did not find it (or found it, but with a flag indicating that it expired, depending on the setup of the resource server itself).
- The client app uses the refresh token to get a new access token by posting the following parameters to the authorization server endpoint: grant_type=refresh_token. The value for this flow must be refresh_token; client_id, the client app’s unique ID; client_secret, containing the client app’s secret value; and refresh_token, containing the refresh token itself.
- The authorization server receives the post request, issues an access token, and returns it to the client app.
- The client app receives the access token and uses it to request the desired resource from the resource server.
- The resource server responds by sending the requested resource.
User-agent Flow
Also known as the implicit flow, this flow is considered less secure than the web server flow and is mainly used for client apps that are unable to provide secure storage for the client secret value. JavaScript single-page applications (SPAs) and mobile applications are good examples. Take a look at the sequence diagram:
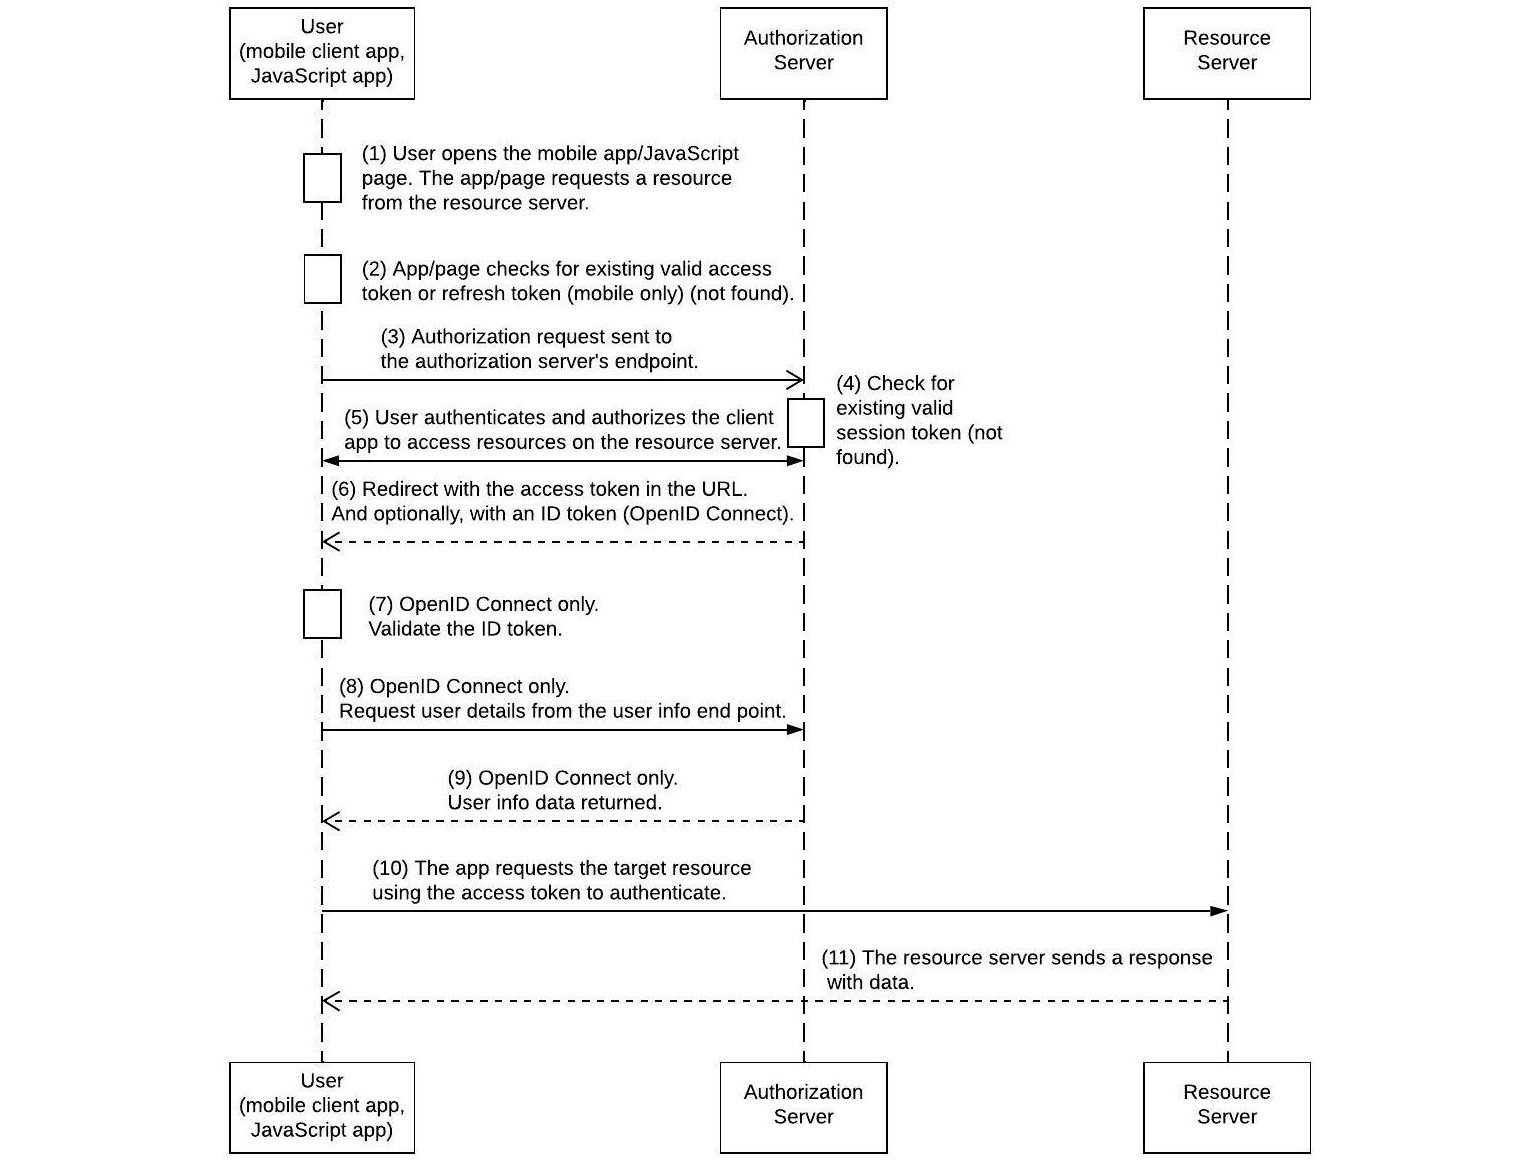
Figure 4.14 – OAuth 2.0/OIDC user-agent flow
This is how the process flows:
- The user starts the mobile application (or visits the JavaScript-based SPA). Assume that this is the first time the user opens this application and assumes that the mobile application is designed to work with data coming from one source, which is the resource server.
- The application checks for a valid access token or a refresh token. Considering that this is the first time the user launches the app, no tokens will be found. The mobile app starts the OAuth 2.0/OIDC user-agent flow. The passed parameters are very similar to those passed in the web server flow, except that the response_type parameter’s value should be the token this time. By way of example, the full URI of the redirect could look like this: https://packt.link/k7Tsv.
One other thing to notice here, besides the response_type value, is the fact that native mobile applications can register and use custom protocols such as myapp:// and then define a callback such as myapp://callback. Due to the nature of the user-agent flow, and the fact that it is less secure than the web server flow, it normally does not return a refresh token.
An exceptional case is when the client app uses a custom protocol in the redirect_uri value. In the preceding example, the flow can return an access token, a refresh token, and an ID token assuming the right scopes are used.
- The authorization request is sent to the authorization server.
- The authorization server checks for an existing and valid session token stored in a cookie associated with the server’s domain. Assume that this token has not been found because this is the first time the user has logged in to the authorization server today.
- The user is presented with a login screen served by the authorization server. The user enters their username and password (or authenticates in whatever way defined by the authorization server). If the server is configured to use 2FA or MFA, the other factors will be requested before the user is authenticated. Once that is complete, the user will be presented with a screen asking for approval to allow the client app to access specific scopes on the resource server. This will be a screen similar to Figure 4.11.
- The user has authentication and an access token generated. A refresh token and an ID token will also be generated if the right scopes are used (assume so, which is a likely case for mobile applications, mainly because they normally want to provide a better user experience by not requiring the user to authenticate again the next time the application is opened). The endpoint would parse the response and extract the three tokens from it.
- This is an optional (but strongly recommended) step in case an ID token is received. The client app validates the ID token by verifying its digital signature.
- This is an optional step. The client app can use the information in the ID token to request the full profile details of the logged-in user.
- This is an optional step related to Step 8. Full profile details are returned.
- The client app uses the access token to request the desired resource from the resource server.
- The resource server responds by sending the requested resource.
You should be able to explain and justify the flow you are planning to use in your solution. The web server flow is preferred over the user-agent due to its better security measures. However, when the client app cannot store the consumer secret value safely and securely (such as in mobile applications or JavaScript-based applications), the user-agent flow provides an acceptable level of security for most enterprises.
JWT Bearer Flow
You came across JWTs before in this chapter (in the JWT section) and learned about their structure and the fact that they have a signature section that contains the author’s digital signature. The signature can be validated by any entity with access to the public key of the JWT’s author. This flow is typically used when you authorize a client app to access data on a resource server without user interaction (to log in).
The digital signature in the JWT itself will be used to authenticate the client app. Considering that there is no user interaction expected in this flow, the client app must either be approved/authorized by a user at an earlier stage (likely using some other flow such as the web server; the user should authorize the client application using a screen similar to Figure 4.9), or be authorized by an admin (the setup for that depends on the authorization server). For example, if Salesforce is the authorization server, there is a setting called Admin approved users are pre-authorized that can be enabled on the connected app functionality.
Now, take a look at this flow’s sequence diagram:

Figure 4.15 – JWT bearer flow
This is how the process flows:
- The client app checks for a valid access token. This could be because the client app is configured to retrieve some data from the resource server periodically (for example, every day), and it needs to have a valid access token to do that. Assume that it did not find one. It is also fair to assume that there is no refresh token available. If a refresh token is available, it makes sense to use it to get a new access token (the Refresh Token flow) rather than going through the JWT bearer flow.
- The client app generates a JWT and signs using its private key/certificate. Generating a JWT is relatively easy and quick, and there are many ready-made libraries that can be used for almost all programming languages.
- The authorization server receives the JWT and validates its signature using the public key/certificate of the client app. There might be a need to share the public key with the authorization server during the setup stage.
Once the signature is validated, the authorization server can extract the user identifier from the JWT (this is typically stored in a variable called sub). The authorization server uses the user identifier to locate the user in its identity store. If a match is found, and if the client app has been authorized for the scopes already, the authorization server generates an access token for the given client app to access the resource server on behalf of the identified user.
- The access token is returned to the client app.
- The client app uses the access token to request the desired resource from the resource server.
- The resource server responds by sending the requested resource.
Device Flow
To understand this flow, there is a need to clarify what is meant by device here. This mainly refers to electronic devices that can connect to the internet, but that have limited input or display capability.
Smart TVs and appliances are great examples. Many smart TVs come today with built-in operating systems, such as Google Android, and require the user to be authenticated before they can work properly. In addition, they also need to be authorized to access specific resource servers to perform specific operations. For example, a smart TV might need to access your Google profile to display the recommended shows for you based on your profile permissions and known behavior. This flow has been designed to be as simple as possible to use, considering the limitations of the devices.
Now, take a look at the sequence diagram:

Figure 4.16 – OAuth 2.0 device flow
This is how the process flows:
- The user turns on the device (for example, turns on the smart TV).
- The device checks for a valid access token or a refresh token. Assume that both are not available because this is the first time the user uses this device.
- The device posts an authorization code request to the authorization server endpoint.
- The authorization server verifies the request and issues a human-readable user code/authorization code, normally with a verification URL and a device code. These values are normally displayed on the device’s screen. You would normally see a message on your smart TV screen with the user code, device code, and the URL that the user should use to verify the device (sometimes this is presented as a QR code to make it easier to open the URL using a mobile phone).
- The user is then expected to use a different device (such as a laptop or mobile phone) to open the URL (as it is usually easier considering the limited ability to use a keyboard on a smart TV). The URL would lead the user to a page where they can input the device code and the user code. Once this step is done, the device will be recognized by the authorization server. On some occasions, the user will also be requested to log in using a social network provider (such as Google) and authorize the application. This will look very similar to the web server flow; the user will have to authorize the device to access specific scopes on the resource server.
- The collected data will be used to authenticate and authorize the device. The browser then posts this information to the authorization server.
- The access token and, optionally, the refresh token will be generated.
- During this period, the device will periodically pull the authorization server for the tokens. Once they are available, they are sent to the device.
- Access and refresh tokens are sent to the device and stored securely.
- The device uses the access token to request the desired resource from the resource server.
- The resource server responds by sending the requested resource.
Asset Token Flow
This flow is mainly created for IoT devices. This could be a bit confusing as smart TVs and appliances could also be considered IoT devices. However, this flow serves a different purpose. It is an open standard meant to verify and secure communication with connected devices, particularly those that do not have any sort of screens to use. In other words, the device would not be able to display a human-readable code to use.
This is common nowadays for many IoT devices such as smart sensors and smart house devices. The user for such devices normally needs to register them before they can be used. Once a device is registered with an IoT management platform, it can be managed and controlled remotely. In addition, its data will start flowing securely to the IoT aggregation platform. The asset token (based on JWT) will be used to uniquely identify and authenticate the specific device (also known as an IoT asset). Take a look at the sequence diagram:

Figure 4.17 – OAuth 2.0 Asset token flow
This is how the process flows:
- The logged-in user attempts to register a new device. Using a specific portal (which is referred to as the client app), the user enters the device ID and clicks a link to start the authentication and registration process.
- The client app generates a JWT, signs it using the app’s private key/certificate, and uses it to request an access token from the authorization server.
- The authorization server receives the token, validates it, and issues an access token (Steps 2 and 3 are meant to request an access token from the authorization server and can be accomplished using either the JWT or web server flow).
- The access token is returned to the client app.
- The client app invokes a specific API from the device to request device information. The device is assumed to be online and connected to the internet.
- The device responds by sending device information, such as the device ID, serial number, and others.
- The client app receives the full device information. It can now request an asset token using the access token and, optionally, an actor token. The actor token can be used to pass information (metadata) about the asset/device itself to the authorization server, which could include custom attributes known by the client app (for example, the account ID that this particular asset should be linked with). The actor token itself is in JWT format and can be signed to allow the authorization server to validate it when received. Both the access token and the actor token are posted to the authorization server to exchange them for an asset token.
- The authorization server receives the tokens, validates them, and issues an asset token (in JWT format) signed using its private key/certificate. The asset token can include the standard and custom attributes that describe the asset itself, originally passed in the actor token.
- The asset token is returned to the device. The device can use it from there onward to authenticate to the resource server (the IoT aggregation platform) and send its data.
Username-Password Flow
This flow utilizes the user credentials (username/password) to retrieve an access token. This flow does not return a refresh token and is meant to be used for specific use cases, mainly when the client app has been developed by the same authority as the authorization server. A high trust level can be assumed in this regard.
For example, you can imagine a website called mywebsite.com trying to access resources from its own subdomain, api.mywebsite.com. However, you are encouraged to consider an alternative flow if possible.
Take a look at its sequence diagram:

Figure 4.18 – Username-password flow
This is how the process flows:
- The user authenticates to the client app using credentials, assuming this is the first time the user has attempted to access the client app today and no session token is available.
- The client app uses the received credentials to request an access token from the authorization server. The app will pass the following parameters: grant_type (the value for this flow should be password); client_id (the client app’s unique ID); client_secret (the client secret of the app), username (the username captured from the user); and password (the password captured from the user). It is worth mentioning that when using this flow to authenticate to a Salesforce API, you need to concatenate the Salesforce security token to the password.
- The authorization server validates the credentials and issues an access token.
- The access token is returned to the client app.
- The client app uses the access token to request the desired resource from the resource server.
- The resource server responds by sending the requested resource.
That concludes the key authentication flows that need to be covered in this chapter. This is by no means a complete list. However, this will get you up to speed with the most common standards and flows you may encounter in your day-to-day work.
Summary
The chapter started by covering some general concepts regarding IAM. You learned the importance of crafting a well-designed IAM strategy and how that could significantly impact the end user experience as well as overall system security and compliance. You then became familiar with some key IAM terms and definitions, including identity, authentication, authorization, identity store, and others. You then moved on to discover some of the most common IAM standards, including SAML, OAuth 2.0, OIDC, and Kerberos, along with the different types of tokens they generate or use, such as access tokens, refresh tokens, session tokens, and ID tokens.
That all set the scene to dive deeper into some of the common and standard authentication flows. You read an in-depth review of nine different flows, including SAML IDP-initiated, SAML SP-initiated, OAuth web server, OAuth JWT, and others.
That concludes this part of the book, where you discussed several common architectural concepts, including data, integration, security and cryptography, and IAM. In the next part, you will dive into more Salesforce-specific knowledge areas and go through some hands-on exercises that will help you to prepare for the CTA review board.
Chapter Review Flashcards
Before you proceed to the next chapter, it is recommended that you go through the flashcards from this chapter first. These flashcards condense all the chapter concepts into smaller and easily manageable chunks that will help you with quick review and retention. By engaging with these flashcards, you will strengthen your understanding of key topics, identify areas that require further study, and build your confidence before moving on to new concepts.
The following image shows an example of the flashcards interface.

Figure 4.19 – CTA flashcards interface
To access the end-of-chapter flashcards from this chapter, follow these steps:
- Open your web browser and go to https://packt.link/ctach4. You will see the following screen:

Figure 4.20 – Flashcards interface login
You can also scan the following QR code to access the website:

Figure 4.21 – QR code to access Chapter 4 flashcards
- Log in to your account using your credentials. If you haven’t activated your account yet, refer to Instructions for Unlocking the Online Content in the Preface for detailed instructions.
After a successful login, you will see the following screen:

Figure 4.22 – Chapter summary and end-of-chapter flashcards
- Click Start on a flashcards stack to begin your review.