Chapter 7: ShardingSphere-JDBC Installation and Start-Up
If you have read Chapter 5, Exploring ShardingSphere Adaptors, or you are somewhat familiar with JDBCs, you may know that they are fairly straightforward and simple to include in your system.
Using ShardingSphere-JDBC won't require you to prepare any additional deployment or services, as you will only need to input the dependencies and configurations into the project. This chapter helps you do just that.
Thanks to this chapter, you will be able to set up and get started with using ShardingSphere-JDBC. Moreover, we have prepared a few bonuses that will provide you with the necessary items to be able to prepare your own custom sharding strategies, configuration, and more.
In this chapter, we are going to cover the following topics:
- Setup and configuration
- Configurations
By the end of the chapter, you'll be ready to start leveraging ShardingSphere-JDBC to take your system to the next level. In the first section, we will start by introducing you to the requirements and the configuration method.
Technical requirements
For ShardingSphere-JDBC, you can use Maven to retrieve the dependencies.
Setup and configuration
To get started, we will go through a two-step procedure. The first part will help you ensure that you have correctly prepared all the requirements, while the second part will give you an overview of the configuration method.
Introducing the preliminary requirements
At the very beginning, if you are looking to use ShardingSphere-JDBC, first add a ShardingSphere-JDBC dependency. Take the following Maven dependency as an example:
<dependencies>
<dependency>
<groupId>org.apache.shardingsphere</groupId>
<artifactId>shardingsphere-jdbc-core</artifactId>
<version>5.0.0</version>
</dependency>
</dependencies>
Then, create a ShardingSphere-JDBC configuration file. If you choose a Java configuration, skip this step. Take the config-sharding.yaml YAML configuration as an example. First, we need to define mode and dataSources:
mode:
type: Standalone
repository:
type: File
overwrite: true
dataSources:
ds_0:
dataSourceClassName: com.zaxxer.hikari.HikariDataSource
driverClassName: com.mysql.jdbc.Driver
jdbcUrl: jdbc:mysql://localhost:3306/demo_ds_0?serverTimezone=UTC&useSSL=false&useUnicode=true&character Encoding=UTF-8
username: root
password:
ds_1:
dataSourceClassName: com.zaxxer.hikari.HikariDataSource
driverClassName: com.mysql.jdbc.Driver
jdbcUrl: jdbc:mysql://localhost:3306/demo_ds_1?serverTimezone=UTC&useSSL=false&useUnicode=true&characterEncoding=UTF-8
username: root
password:
Then, we define rules and props, as follows:
rules:
- !SHARDING
tables:
t_order:
actualDataNodes: ds_${0..1}.t_orderkeyGenerateStrategy:
column: order_id
keyGeneratorName: snowflake
defaultDatabaseStrategy:
standard:
shardingColumn: user_id
shardingAlgorithmName: database_inline
shardingAlgorithms:
database_inline:
type: INLINE
props:
algorithm-expression: ds_${user_id % 2}keyGenerators:
snowflake:
type: SNOWFLAKE
props:
worker-id: 123
props:
sql-show: false
Now, you've successfully configured the preliminary setup.
Introducing the configuration method
As we mentioned in the introduction, you will find that configuring ShardingSphere-JDBC is very easy. ShardingSphere-JDBC supports the following four configuration methods:
- Java API: The Java API lays the foundation for all of ShardingSphere-JDBC's configurations because all other methods are actually internally converted into the Java API method through code. This method is perfect in scenarios that require dynamic configuration.
- YAML: YAML files can greatly simplify configurations. To use ShardingSphere-JDBC, the most common method is writing a configuration into its configuration file.
- Spring Boot Starter: ShardingSphere's Spring Boot Starter makes it easy for developers to get started with ShardingSphere-JDBC in the Spring Boot project.
- Spring namespace: By leveraging namespaces and dependencies provided by ShardingSphere, developers such as yourself can quickly use ShardingSphere-JDBC in Spring projects.
Let's now move on to learn how to configure specific features to be used with ShardingSphere-JDBC. The next section will get you started with data sharding and will be followed by other sections, introducing notable features such as read/write splitting, data encryption, a shadow database, and cluster mode.
Sharding configurations
In this section, the sharding configurations are provided to help you quickly understand sharding capabilities. ShardingSphere-JDBC provides four configuration methods, and you can choose one of them to quickly access a system.
Java configuration items
This part will show some configuration items related to sharding.
In this section's following tables, we will see some specific configuration items for sharding rule configuration.
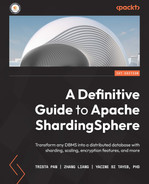
The main class is ShardingRuleConfiguration:
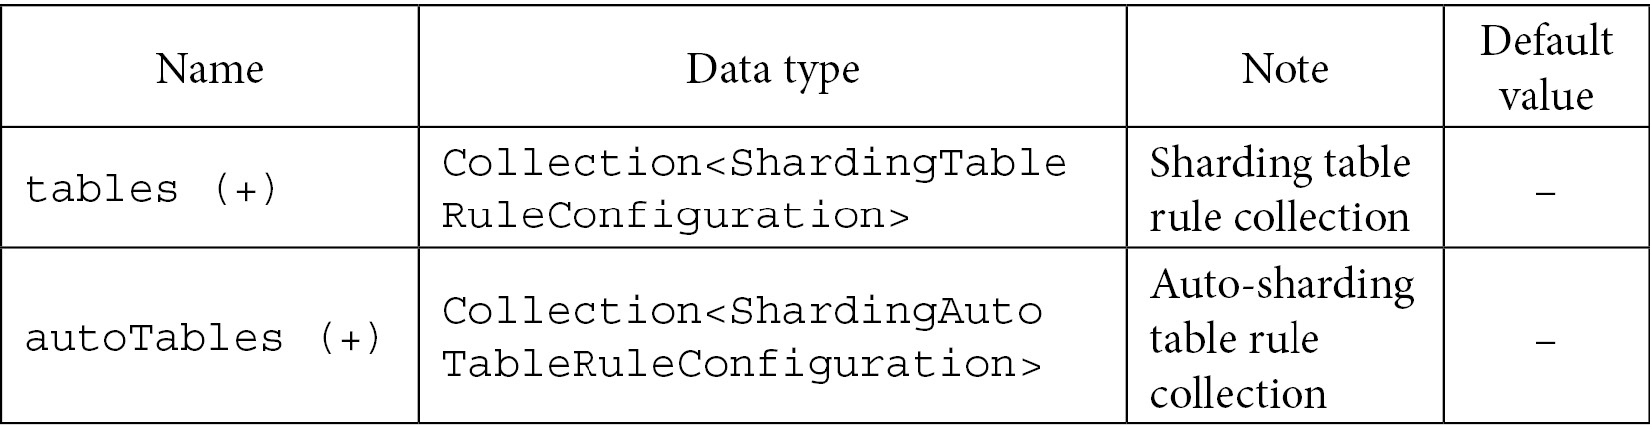
Table 7.1
The following table gives you the binding table configuration:

Table 7.2
This is about broadcast table configuration:

Table 7.3
This is about strategy configuration:

Table 7.4
This is about sharding columns and algorithms:

Table 7.5
This is about key generators:

Table 7.6
The following tables show you the specific configuration fields for the table-level sharding rules.
The main class is ShardingTableRuleConfiguration, and the following table shows the sharding table configuration:

Table 7.7
This is the actual data node configuration:
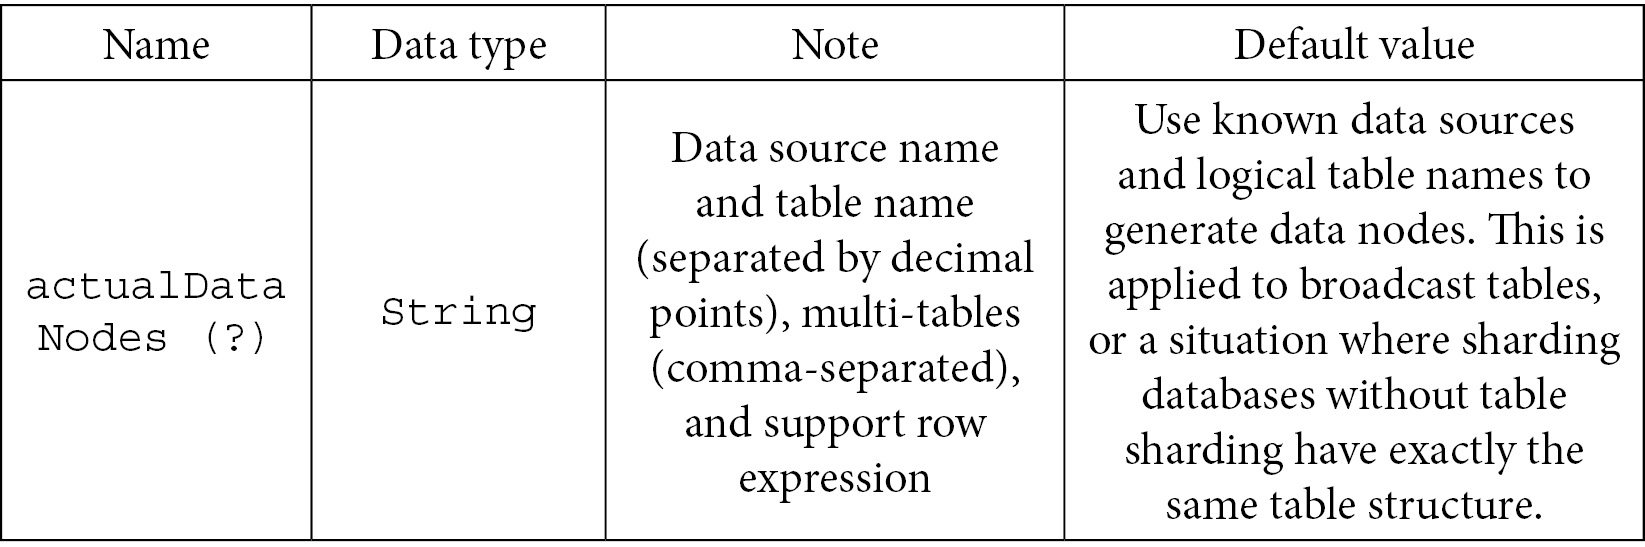
Table 7.8
In the following table, you will find the sharding strategy configuration:

Table 7.9
The following table shows the specific configuration items of the auto-sharding tables.
The main class is ShardingAutoTableRuleConfiguration:
Table 7.10
This is the strategy configuration:

Table 7.11
The following table presents you with the standard sharding strategy configuration items.
The main class is StandardShardingStrategyConfiguration:

Table 7.12
This table is about standard complex sharding strategy configuration items.
The main class is ComplexShardingStrategyConfiguration:

Table 7.13
This table shows hint sharding strategy configuration items.
The main class is HintShardingStrategyConfiguration:

Table 7.14
If you configure a none sharding strategy, then there is nothing else that you would need to configure.
The main class is NoneShardingStrategyConfiguration.
The following table shows the distributed key generation strategy configuration items.
The main class is KeyGenerateStrategyConfiguration:

Table 7.15
Now that we have looked at the various Java configuration items, let's look at a few examples. This example shows you how to create a sharding rule using the Java API:
public DataSource getDataSource() throws SQLException {return ShardingSphereDataSourceFactory.createDataSource(createModeConfiguration(), createDataSourceMap(), Collections.singleton(createShardingRuleConfiguration()), new Properties());
}
The following example shows how to create a sharding rule configuration:
private ShardingRuleConfiguration createShardingRuleConfiguration() {ShardingRuleConfiguration result = new ShardingRuleConfiguration();
result.getTables().add(getOrderTableRuleConfiguration())
result.getKeyGenerators().put("snowflake", new ShardingSphereAlgorithmConfiguration("SNOWFLAKE", getProperties()));return result;
}
This one shows how to create a mode configuration:
private static ModeConfiguration createModeConfiguration() { return new ModeConfiguration("Standalone", new StandalonePersistRepositoryConfiguration("File", new Properties()), true);}
Lastly, the following example shows how to create a table rule configuration:
private static ShardingTableRuleConfiguration getOrderTableRuleConfiguration() { ShardingTableRuleConfiguration result = new ShardingTableRuleConfiguration("t_order"); result.setKeyGenerateStrategy(new KeyGenerateStrategyConfiguration("order_id", "snowflake"));return result;
}
YAML configuration items
This part will show sharding configuration items in YAML that you can configure.
The following list shows tables that you can configure:
- tables: This is the data sharding rule configuration logical table name. The following items can be configured as follows:
- logic-table-name: Logical table name.
- actualDataNodes: Data source names and table names (please refer to inline syntax rules).
- databaseStrategy: Database sharding strategy. Without other configurations, use the default database sharding strategy.
- tableStrategy: Table sharding strategy.
- keyGenerateStrategy: Distributed key generation strategy.
- autoTables: Auto-sharding table rule configuration. Here, you can configure the following items:
- logic-table-name: Logical table name.
- actualDataNodes: Data source name.
- shardingStrategy: Database sharding strategy. Without other configurations, use the default database sharding strategy.
- bindingTables: Binding table rule collection. For this, we have the following:
- logic-table-name: Logical table name collection
- broadcastTables: Broadcast table rule collection. We have the following:
- table-name: Logical table name collection
This list introduces Strategy that you can configure:
- defaultDatabaseStrategy: Default database sharding strategy:
- strategyType: Strategy type – standard, complex, hint, or none
- shardingColumn: Sharding column name
- shardingAlgorithmName: Sharding algorithm name
Remember that defaultDatabaseStrategy is the same as databaseStrategy.
- defaultTableStrategy: Default table sharding strategy
- defaultKeyGenerateStrategy: Default distributed key generation strategy:
- column: Key generation column. Without new configurations, the key generator is not enabled by default.
- keyGeneratorName: Distributed key generation algorithm name.
Remember that defaultKeyGenerateStrategy is the same as keyGenerateStrategy.
Then, we have a default sharding column, sharding algorithms, and key generators that you can configure:
- defaultShardingColumn: Default sharding column name
- shardingAlgorithms: Sharding algorithm configuration
- sharding-algorithm-name: Sharding algorithm name
- type: Sharding algorithm type
- props: Sharding algorithm property configuration
- keyGenerators: Distributed key generation algorithm configuration:
- key-generate-algorithm-name: Distributed key generation algorithm name
- type: Distributed key generation algorithm type
- props: Distributed key generation algorithm property configuration
Now, let's look at a demo of YAML about a sharding table rule:
tables:
t_order:
actualDataNodes: ds_${0..1}.t_orderkeyGenerateStrategy:
column: order_id
keyGeneratorName: snowflake
Let's take a look at an example about strategy:
defaultDatabaseStrategy:
standard:
shardingColumn: user_id
shardingAlgorithmName: database-inline
And lastly, here is an example with the algorithms:
shardingAlgorithms:
database-inline:
type: INLINE
props:
algorithm-expression: ds_${user_id % 2}Spring Boot configuration items
This part shows the items that you can configure in springboot:
- The first table and configuration we introduce are about actual data nodes:
spring.shardingsphere.rules.sharding.tables.<table-name>.actual-data-nodes
This has a data source name and a table name (separated by decimal points). Multiple table names are separated by commas; inline expressions are supported. By default, the system uses known data sources and logical table names to generate data nodes; it is applied to broadcast tables or situations where sharding databases without table sharding have exactly the same table structure.
- This is the sharding column name:
- Sharding column name: spring.shardingsphere.rules.sharding.tables.<table-name>.database-strategy.standard.sharding-column
- Sharding column name (comma-separated): spring.shardingsphere.rules.sharding.tables.<table-name>.database-strategy.complex.sharding-columns
- This is the algorithm name:
- Sharding algorithm name: spring.shardingsphere.rules.sharding.tables.<table-name>.database-strategy.standard.sharding-algorithm-name:
- Sharding algorithm name: spring.shardingsphere.rules.sharding.tables.<table-name>.database-strategy.complex.sharding-algorithm-name:
- Sharding algorithm name: spring.shardingsphere.rules.sharding.tables.<table-name>.database-strategy.hint.sharding-algorithm-name
- This is about strategy:
- Table sharding strategy – the same as the database sharding strategy: spring.shardingsphere.rules.sharding.tables.<table-name>.table-strategy.xxx
- This is about key generation:
- Distributed key generation column name: spring.shardingsphere.rules.sharding.tables.<table-name>.key-generate-strategy.column
- Distributed key generation algorithm name: spring.shardingsphere.rules.sharding.tables.<table-name>.key-generate-strategy.key-generator-name
- This is about bind tables:
- Binding table rules collection: spring.shardingsphere.rules.sharding.binding-tables[x]:
- This is about broadcast:
- Broadcast table rules collection: spring.shardingsphere.rules.sharding.broadcast-tables[x]
- This is about algorithms:
Let's look at the following code snippet example, which provides a demo of sharding in Spring Boot:
spring.shardingsphere.rules.sharding.tables.t_order.actual-data-nodes=ds-$->{0..1}.t_order_$->{0..1}spring.shardingsphere.rules.sharding.tables.t_order.table-strategy.standard.sharding-column=order_id
spring.shardingsphere.rules.sharding.tables.t_order.table-strategy.standard.sharding-algorithm-name=t-order-inline
SpringNameSpace configuration items
This part shows the configuration items that you can configure in SpringNameSpace.
Each table shows the configuration items for different rules, as follows:
- Sharding rules:
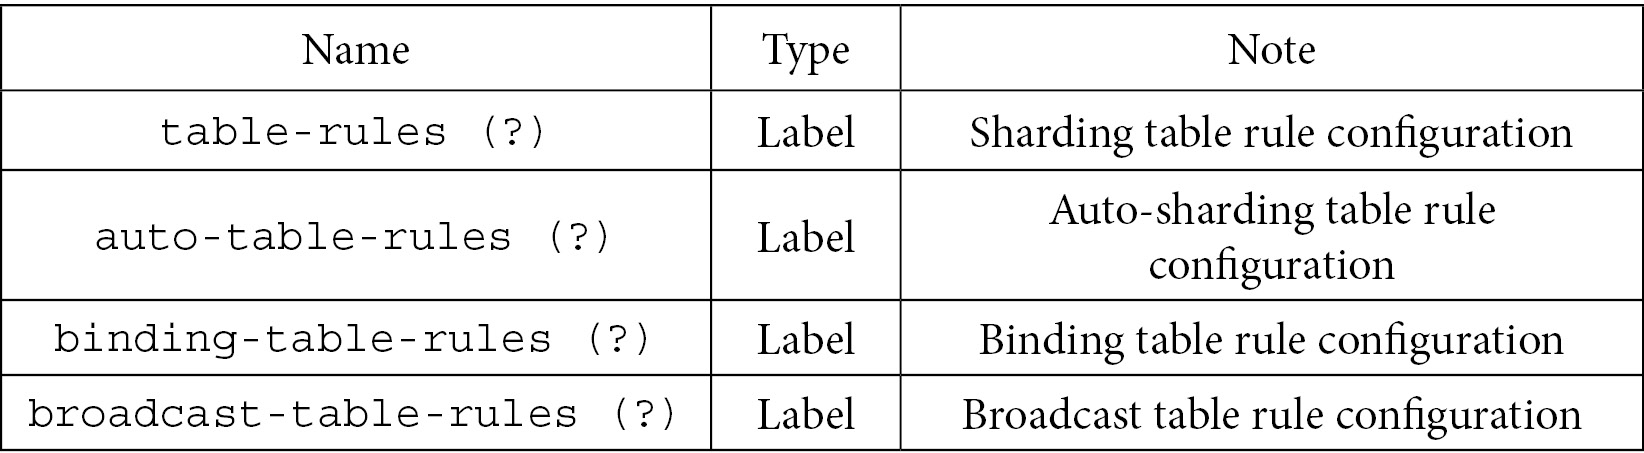
Table 7.16
- Table rules:
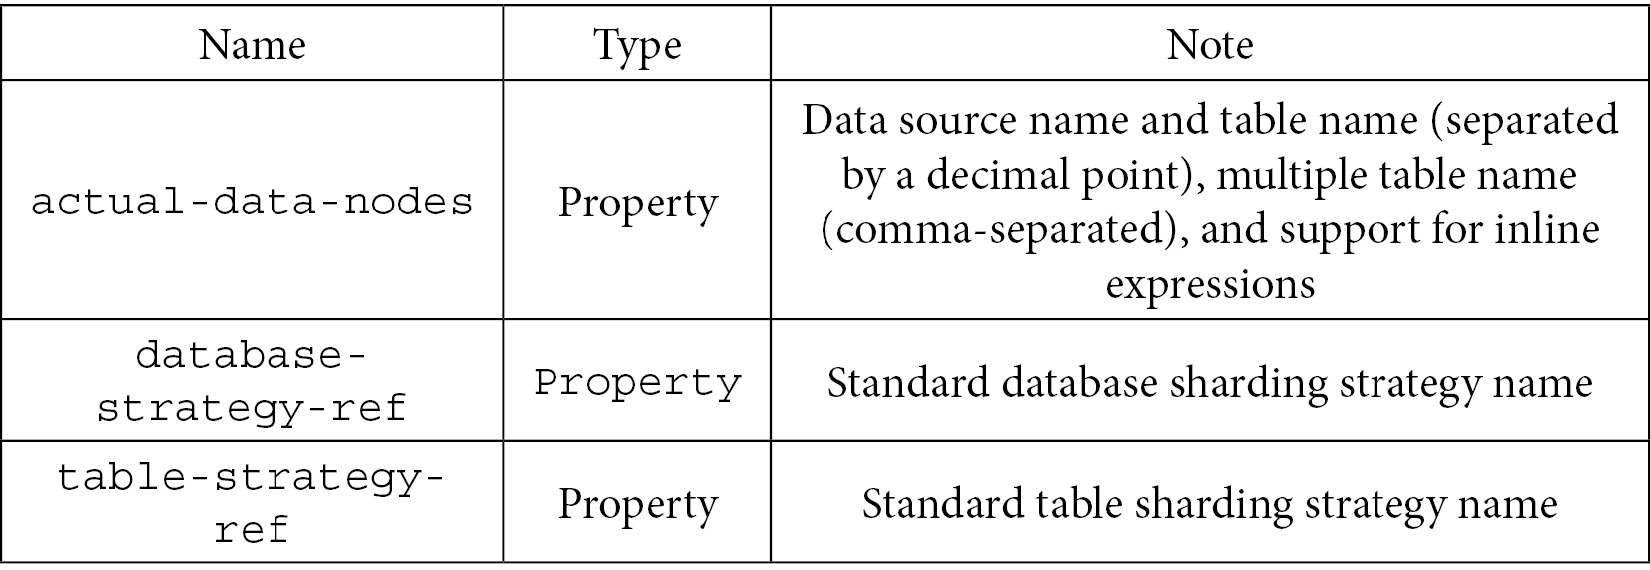
Table 7.17

Table 7.18
- Broadcast table rules:

Table 7.19

Table 7.20
- Complex strategy:

Table 7.21

Table 7.22
- None strategy:

Table 7.23

Table 7.24
- Sharding algorithm:

Table 7.25

Table 7.26
Now, let's look at an example of a demo of SpringNameSpace about sharding rules:
<sharding:rule id="shardingRule">
<sharding:table-rules>
<sharding:table-rule logic-table="t_order" actual-data-nodes="demo_ds_${0..1}.t_order_${0..1}" database-strategy-ref="databaseStrategy" table-strategy-ref="orderTableStrategy" key-generate-strategy-ref="orderKeyGenerator" /></sharding:table-rules>
</sharding:rule>
Understanding read/write splitting configuration
In this section, the read/write splitting configuration is explained to help you quickly understand its related functions. ShardingSphere-JDBC provides you with four configuration methods, and you can freely choose one of them.
Java configuration items
The tables in this section will show you the configuration items related to read/write splitting that you can configure.
- The main class is ReadwriteSplittingRuleConfiguration:

Table 7.27
In the following table, you will see the primary-secondary data source configuration for the read/write splitting feature, with their respective names, data types, and a description for each:
- The main class is ReadwriteSplittingDataSourceRuleConfiguration:
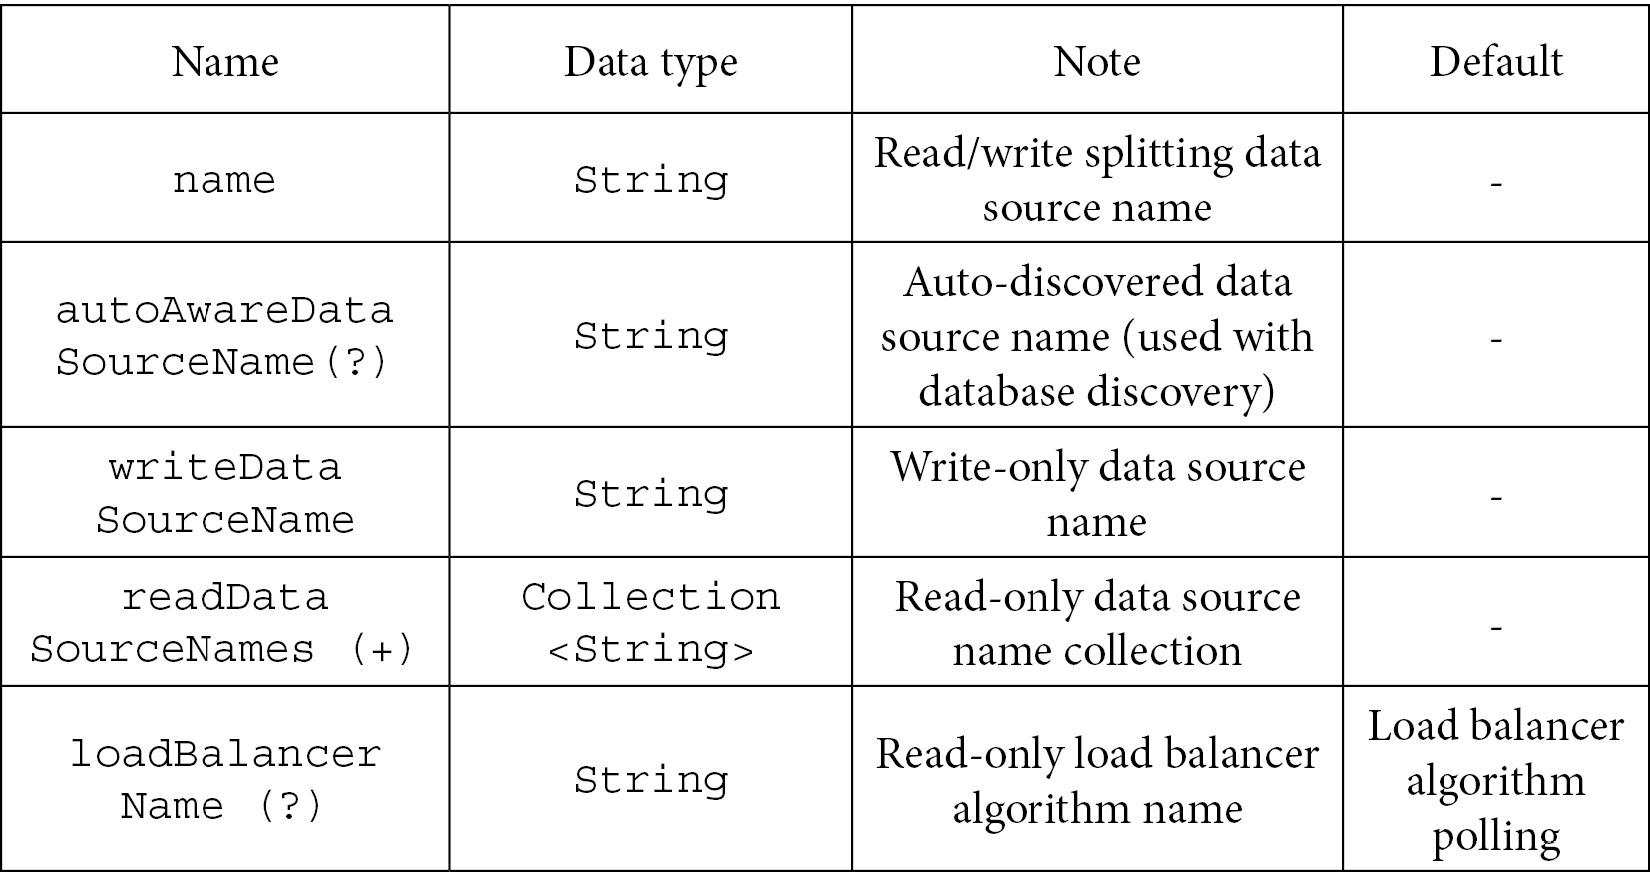
Table 7.28
The following code block provides you with a demonstration that you can refer to for configuring read/write splitting in Java:
ReadwriteSplittingDataSourceRuleConfiguration dataSourceConfig = newReadwriteSplittingDataSourceRuleConfiguration(
"demo_read_query_ds", "", "demo_write_ds", Arrays.asList("demo_read_ds_0", "demo_read_ds_1"), "demo_weight_lb");Properties algoritProperties = new Properties();
algoritProperties.put("demo_read_ds_0", "2"); algoritProperties.put("demo_read_ds_1", "1"); ShardingSphereAlgorithmConfiguration algorithmConfiguration = newShardingSphereAlgorithmConfiguration("WEIGHT", algoritProperties);YAML configuration items
In the list in this section, we will show you the read/write splitting items that you can configure in YAML:
- This shows you how to configure the read/write split rule:
- dataSources: Data source of read/write splitting
- loadBalancers: Load balance algorithm configuration
- This is about data source configuration:
- data-source-name: Logic data source name of read/write splitting
- autoAwareDataSourceName: Auto-aware data source name (use with database discovery)
- writeDataSourceName: Write data source name
- readDataSourceNames: Read data source names and multiple data source names separated with commas
- loadBalancerName: Load balance algorithm name
- This is about load balancing:
- load-balancer-name: Load balance algorithm name
- type: Load balance algorithm type
- props: Load balance algorithm properties
This code block provides you with a demo of read/write splitting configuration in YAML:
dataSources:
pr_ds:
writeDataSourceName: write_ds
readDataSourceNames: [read_ds_0, read_ds_1]
loadBalancerName: weight_lb
loadBalancers:
weight_lb:
type: WEIGHT
props:
read_ds_0: 2
read_ds_1: 1
Spring Boot configuration items
In the tables in this section, we will show you the items that you can configure in Spring Boot:
- This table shows the data source:
- Auto-discovered data source name (used with database discovery): spring.shardingsphere.rules.readwrite-splitting.data-sources.<readwrite-splitting-data-source-name>.auto-aware-data-source-name
- Write-only data source name: spring.shardingsphere.rules.readwrite-splitting.data-sources.<readwrite-splitting-data-source-name>.write-data-source-name
- Read-only data source names (comma-separated): spring.shardingsphere.rules.readwrite-splitting.data-sources.<readwrite-splitting-data-source-name>.read-data-source-names
- This is about loadbalancer:
- Load balancer algorithm name: spring.shardingsphere.rules.readwrite-splitting.data-sources.<readwrite-splitting-data-source-name>.load-balancer-name
- Load balancer algorithm type: spring.shardingsphere.rules.readwrite-splitting.load-balancers.<load-balance-algorithm-name>.type
- Load balancer algorithm property configuration: spring.shardingsphere.rules.readwrite-splitting.load-balancers.<load-balance-algorithm-name>.props.xxx
This code block provides you with a demo of read/write splitting configuration in Spring Boot:
Spring.shardingsphere.rules.readwrite-splitting.load-balancers.round_robin.type=ROUND_ROBIN
spring.shardingsphere.rules.readwrite-splitting.data-sources.pr_ds.write-data-source-name=write-ds
spring.shardingsphere.rules.readwrite-splitting.data-sources.pr_ds.read-data-source-names=read-ds-0,read-ds-1
spring.shardingsphere.rules.readwrite-splitting.data-sources.pr_ds.load-balancer-name=round_robin
<readwrite-splitting:load-balance-algorithm id="randomStrategy" type="RANDOM" />
<readwrite-splitting:rule id="readWriteSplittingRule">
<readwrite-splitting:data-source-rule id="demo_ds" write-data-source-name="demo_write_ds"read-data-source-names="demo_read_ds_0, demo_read_ds_1" load-balance-algorithm-ref="randomStrategy" />
</readwrite-splitting:rule>
SpringNameSpace configuration items
In this section, we will show you the items that you can configure in SpringNameSpace:
- This is about the read/write splitting rule – <readwrite-splitting:rule />:

Table 7.29
- This is about the data source rule – <readwrite-splitting:data-source-rule />:
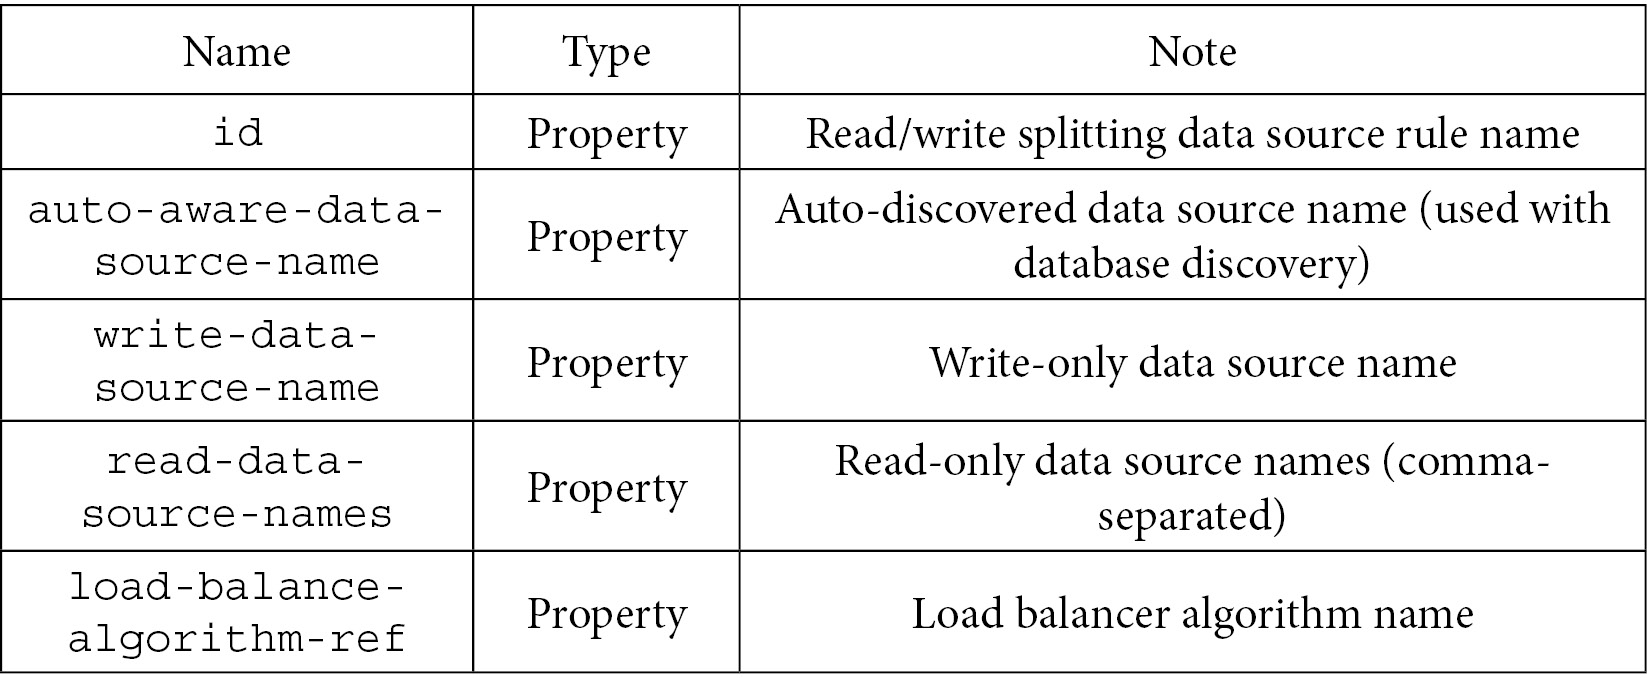
Table 7.30

Table 7.31
A SpringNameSpace example
This part provides a demo of the read/write splitting rule in SpringNameSpace:
<readwrite-splitting:load-balance-algorithm id="randomStrategy" type="RANDOM" />
<readwrite-splitting:rule id="readWriteSplittingRule">
<readwrite-splitting:data-source-rule id="demo_ds" write-data-source-name="demo_write_ds"read-data-source-names="demo_read_ds_0, demo_read_ds_1" load-balance-algorithm-ref="randomStrategy" />
</readwrite-splitting:rule>
Understanding data encryption configuration
In this section, the data encryption configuration is provided to help you quickly understand the related functions. ShardingSphere-JDBC provides four configuration methods, and you can choose the appropriate one to access the system.
Java configuration items
This section gives you the configuration items related to encrypt rules that you can configure:
- The main class is EncryptRuleConfiguration:
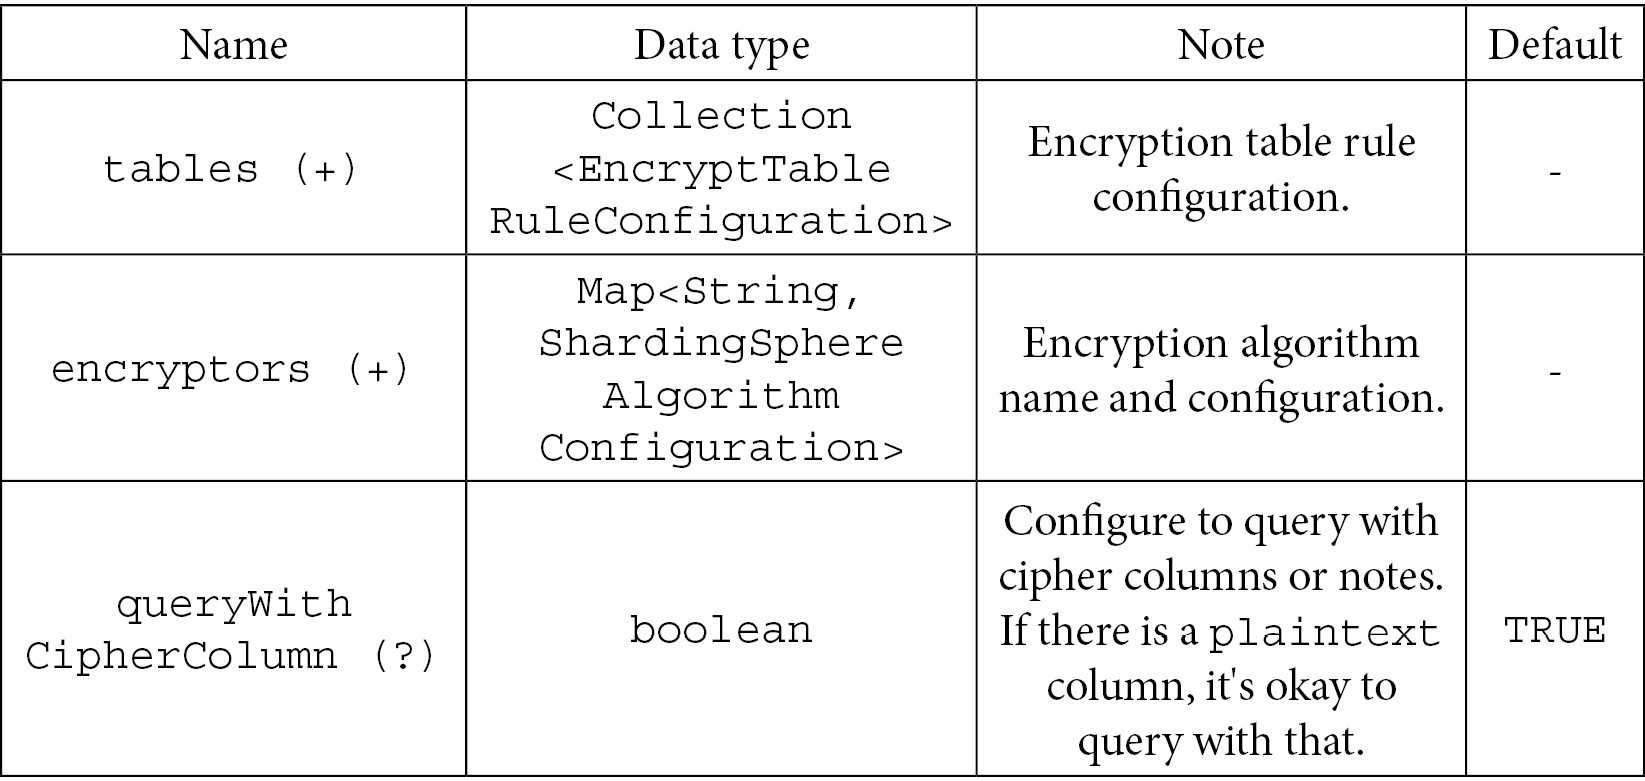
Table 7.32
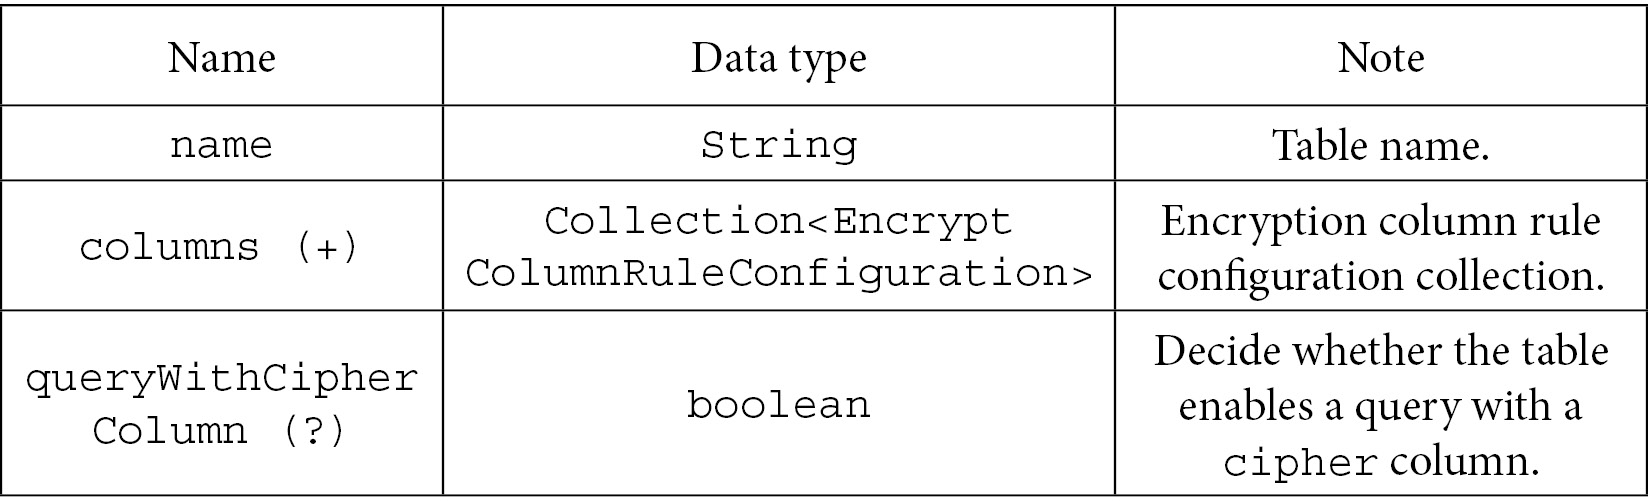
Table 7.33

Table 7.34
- The config column – this table presents you with items to configure the encryption columns' names:

Table 7.35
- The encrypt name – the following table provides you with the configuration for the encryption algorithm:

Table 7.36
- This is about encryption algorithm configuration. The following table introduces you to the encryption algorithm configuration items, having ShardingSphereAlgorithmConfiguration as the main class:

Table 7.37
This code snippet provides a demo of encrypt rules in Java:
EncryptColumnRuleConfiguration columnConfigAes = new EncryptColumnRuleConfiguration("user_name", "user_name", "", "user_name_plain", "name_encryptor"); EncryptTableRuleConfiguration encryptTableRuleConfig = new EncryptTableRuleConfiguration("t_user", Arrays.asList(columnConfigAes, columnConfigTest), null); encryptAlgorithmConfigs.put("name_encryptor", new ShardingSphereAlgorithmConfiguration("AES", props));YAML configuration items
This part shows the configuration items that you can configure:
- The following list shows the encrypt rule items:
- tables: Encryption table configuration.
- encryptors: Encryption algorithm configuration.
- queryWithCipherColumn: Enable a query with a cipher column or not. If there is a plaintext column, it's okay to query with that.
- The following list shows the table configuration items:
- table-name: Encryption table name
- columns: Encryption column configuration
- Next, you will find the columns' configuration items:
- column-name: Encrypted column name
- cipherColumn: Cipher column name
- assistedQueryColumn: Query assistant column name
- plainColumn: Plaintext column name
- The following list introduces you to the encryption name configuration items, as well as the encryptors' configuration items:
- encryptorName: Encryption algorithm name
- encrypt-algorithm-name: Encryption algorithm name
- type: Encryption algorithm type
- props: Encryption algorithm property configuration – query assistant column names
This code block provides you with a demo of the encrypt rule in YAML:
t_user:
columns:
user_name:
plainColumn: user_name_plain
cipherColumn: user_name
encryptorName: name-encryptor
This is about encryptors:
encryptors:
name-encryptor:
type: AES
props:
aes-key-value: 123456abc
Spring Boot configuration items
This part shows you the configuration items in Spring Boot:
- Enable a query with a cipher column or not: spring.shardingsphere.rules.encrypt.tables.<table-name>.query-with-cipher-column
- cipher column name: spring.shardingsphere.rules.encrypt.tables.<table-name>.columns.<column-name>.cipher-column
- query column name: spring.shardingsphere.rules.encrypt.tables.<table-name>.columns.<column-name>.assisted-query-column
- plaintext column name: spring.shardingsphere.rules.encrypt.tables.<table-name>.columns.<column-name>.plain-column
The following list introduces you to the algorithm configuration items in Spring Boot:
- Encryption algorithm name: spring.shardingsphere.rules.encrypt.tables.<table-name>.columns.<column-name>.encryptor-name
- Encryption algorithm type: spring.shardingsphere.rules.encrypt.encryptors.<encrypt-algorithm-name>.type
- Encryption algorithm property configuration: spring.shardingsphere.rules.encrypt.encryptors.<encrypt-algorithm-name>.props.xxx
And finally, this gives you the cipher query configuration items with Spring Boot:
- Enable a query with a cipher column or not. If there is a plaintext column, it's okay to query with that: spring.shardingsphere.rules.encrypt.queryWithCipherColumn
This part shows the configuration about encrypt in Spring Boot:
spring.shardingsphere.rules.encrypt.tables.t_user.columns.user_name.cipher-column=user_name
spring.shardingsphere.rules.encrypt.tables.t_user.columns.user_name.encryptor-name=name-encryptor
SpringNameSpace configuration items
This part will show the configuration items related to encrypt in SpringNameSpace.
This table shows encrypt rule configuration items. Let's first start with the rules by looking at <encrypt:rule />:
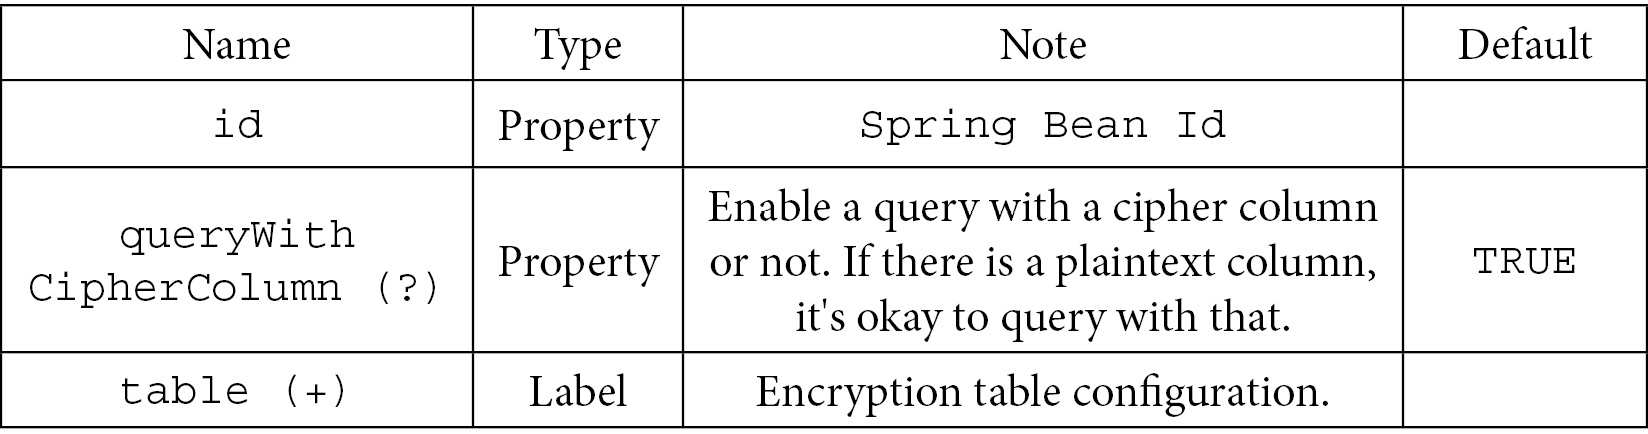
Table 7.38
Next, we can move to the table configuration items with <encrypt:table />:
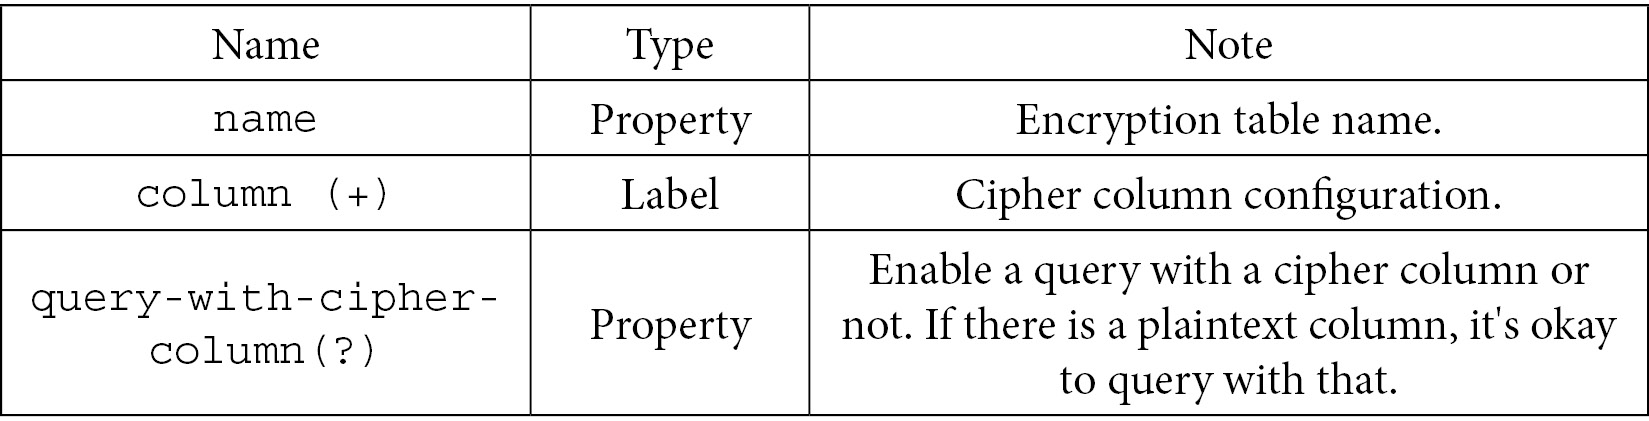
Table 7.39
The columns also have their dedicated configuration items with <encrypt:column />:
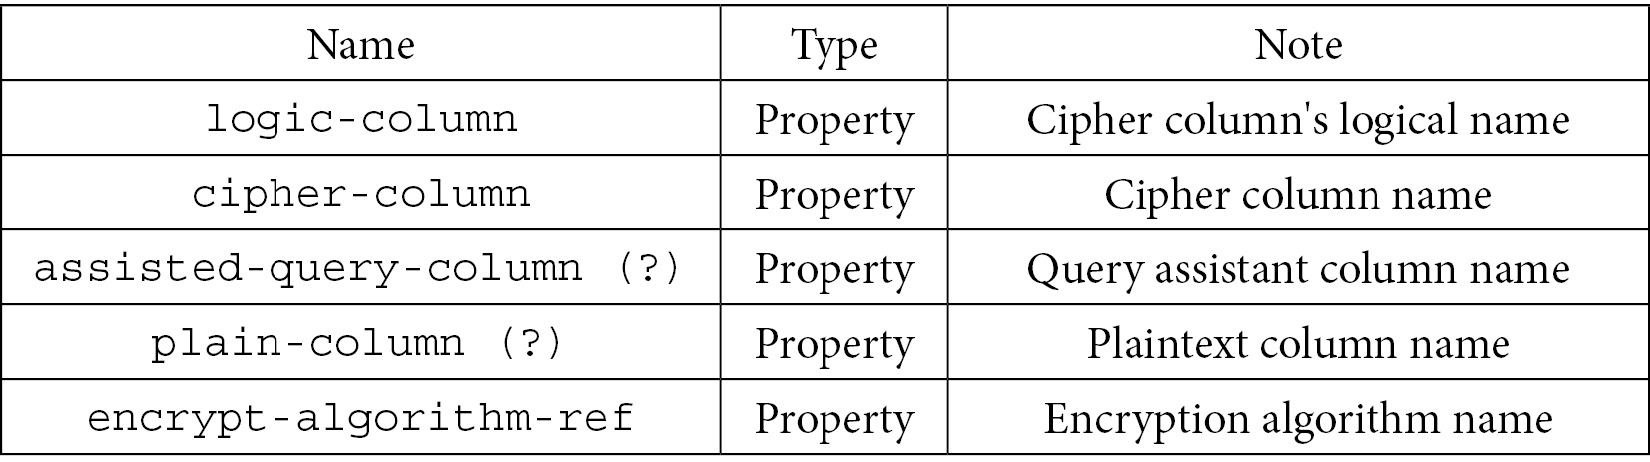
Table 7.40
Finally, let's look at the encryption algorithm's configuration items with <encrypt:encrypt-algorithm />:

Table 7.41
This part provides a demo of the encrypt rule in SpringNameSpace:
<encrypt:rule id="encryptRule">
<encrypt:table name="t_user">
<encrypt:column logic-column="user_name" cipher-column="user_name" plain-column="user_name_plain" encrypt-algorithm-ref="name_encryptor" />
</encrypt:table>
</encrypt:rule>
Configuring a shadow database
In this section, we will discuss how to use the rule configuration of a shadow database. When using Hint algorithms, you also need to turn on the sqlCommentParseEnabled SQL_PARSER-related configuration item to true.
Java configuration items
Here is the configuration item entry – org.apache.shardingsphere.shadow.api.config.ShadowRuleConfiguration:
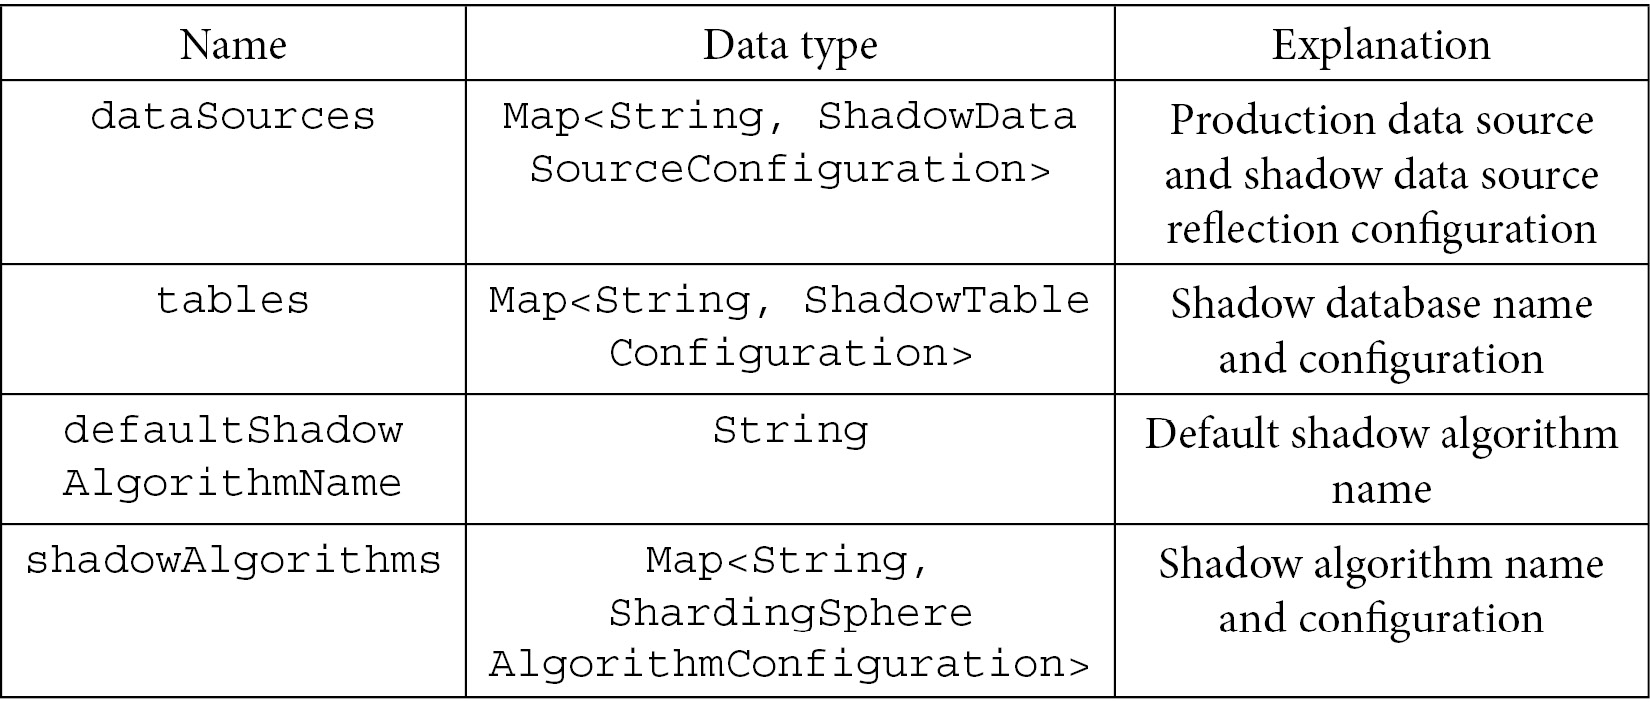
Table 7.42
As an example, let's create a data source with ShadowRule using Java code:
public DataSource getDataSource() throws SQLException {Map<String, DataSource> dataSourceMap = createDataSourceMap();
Collection<RuleConfiguration> ruleConfigurations = createRuleConfiguration();
return ShardingSphereDataSourceFactory.createDataSource(dataSourceMap, ruleConfigurations, properties);
}
YAML configuration items
If you are using YAML to configure your shadow database feature, you can refer to !SHADOW and the following list's configuration items:
- dataSources: Shadow database logic data source reflection configuration list
- tables: Shadow table configuration list
- defaultShadowAlgorithmName: Default shadow algorithm name (optional)
- shadowAlgorithms: Shadow algorithm configuration list
Here is a YAML configuration example for shadow data sources:
rules:
- !SHADOW
dataSources:
shadowDataSource:
sourceDataSourceName: ds
shadowDataSourceName: ds_shadow
Here are the configuration examples for shadow tables:
tables:
t_user:
dataSourceNames:
- shadowDataSource
shadowAlgorithmNames:
- user_id_insert_value_match-algorithm
Here are the configuration examples for shadow algorithms:
shadowAlgorithms:
user_id_insert_value_match-algorithm:
type: VALUE_MATCH
props:
operation: insert
column: user_id
value: 1
A Spring Boot example
This section introduces you to configuring ShardingSphere's Shadow DB feature while using Spring Boot. If you use Spring Boot, you can refer to the following example code.
Note that to be able to incorporate this code example, you will need to replace boilerplate values such as ds, ds_shadow, and user_id:
spring.shardingsphere.rules.shadow.data-sources.shadow-data-source.source-data-source-name=ds
spring.shardingsphere.rules.shadow.data-sources.shadow-data-source.shadow-data-source-name=ds_shadow
spring.shardingsphere.rules.shadow.tables.t_user.data-source-names=shadow-data-source
spring.shardingsphere.rules.shadow.tables.t_user.shadow-algorithm-names=user_id_insert_value_match-algorithm
spring.shardingsphere.rules.shadow.shadow-algorithms.user-id-insert-match-algorithm.type=VALUE_MATCH
spring.shardingsphere.rules.shadow.shadow-algorithms.user-id-insert-match-algorithm.props.operation=insert
spring.shardingsphere.rules.shadow.shadow-algorithms.user-id-insert-match-algorithm.props.column=user_id
spring.shardingsphere.rules.shadow.shadow-algorithms.user-id-insert-match-algorithm.props.value=1
SpringNameSpace configuration items
The following table provides you with the shadow database configuration items for SpringNameSpace:

Let's now look at a SpringNameSpace example, including the SpringNameSpace configuration items that we introduced in the previous table:
<shadow:shadow-algorithm id="user-id-insert-match-algorithm" type="VALUE_MATCH">
<props>
<prop key="operation">insert</prop>
<prop key="column">user_id</prop>
<prop key="value">1</prop>
</props>
</shadow:shadow-algorithm>
<shadow:rule id="shadowRule">
<shadow:data-source id="shadow-data-source" source-data-source-name="ds" shadow-data-source-name="ds_shadow"/>
<shadow:shadow-table name="t_user" data-sources="shadow-data-source">
<shadow:algorithm shadow-algorithm-ref="user-id-insert-match-algorithm" />
</shadow:shadow-table>
</shadow:rule>
<shardingsphere:data-source id="shadowDataSource" data-source-names="ds,ds_shadow" rule-refs="shadowRule">
Configuring ShardingSphere's modes
This section provides the basic operations' mode configurations. In addition to cluster deployment in a production scenario, a corresponding operation mode such as standalone mode for development and automation testing scenarios is also provided for engineers. The three operation modes provided by Apache ShardingSphere are memory mode, standalone mode, and cluster mode. Memory mode is not covered here, as it is the standard auto mode that ShardingSphere uses to run.
Java configuration items
The tables in this section will show you the configuration items for modes that you can configure.
The main class is ModeConfiguration:

Table 7.44
For Standalone mode, the main class is StandalonePersistRepositoryConfiguration:

Table 7.45
When it comes to Cluster mode, the main class is ClusterPersistRepositoryConfiguration:
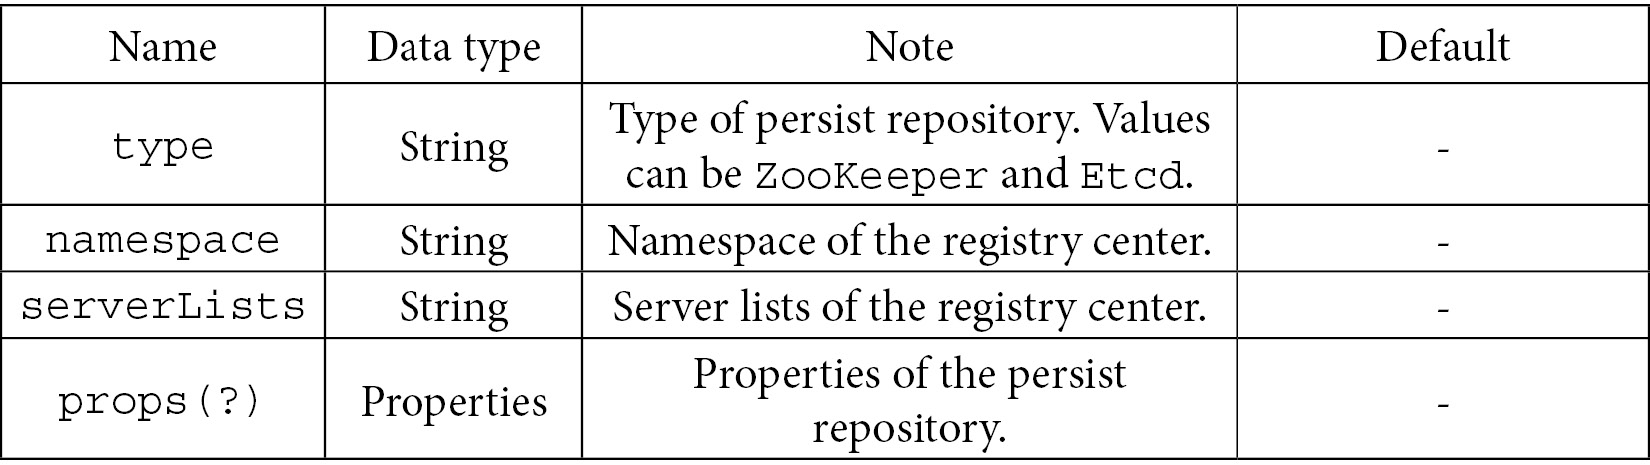
Table 7.46
A Java example
This part provides you with a demo of modes in Java.
The first example we provide here is code that you can refer to for configuring Standalone mode:
Standalone Mode
private ModeConfiguration getModeConfiguration(final ShardingType shardingType) { StandalonePersistRepositoryConfiguration standaloneConfig = newStandalonePersistRepositoryConfiguration("File", new Properties()); return new ModeConfiguration("Standalone", standaloneConfig, true);}
To configure Cluster mode, you can refer to the following code:
private ModeConfiguration getModeConfiguration(final ShardingType shardingType) { ClusterPersistRepositoryConfiguration clusterPersistRepositoryConfiguration = newClusterPersistRepositoryConfiguration("ZooKeeper", "governance", "127.0.0.1", newProperties()); return new ModeConfiguration("Cluster", clusterPersistRepositoryConfiguration, true);}
YAML configuration items
This section provides the configuration items to be used in case you prefer to utilize YAML:
- Memory Mode:
- Standalone Mode:
- Cluster Mode:
- mode: type: #: Type of mode configuration
- repository: type: #: Type of persist repository whose values can be ZooKeeper and etcd
- props: #: Properties of persist repository
- namespace: #: Namespace of registry center
- server-lists: #: Server lists of registry center
- overwrite: #: Whether to overwrite persistent configuration with local configuration
Now that you are aware of the configuration items, we provide you with a demo of mode configuration with YAML.
As with the previous example, we will start off with an example for Standalone mode:
Standalone Mode
mode:
type: Standalone
repository:
type: File
props: Properties of persist repository
path:
overwrite: true
Next, you can refer to the following example to configure Cluster mode with YAML:
// Cluster Mode
mode:
type: Cluster
repository:
type: ZooKeeper
props:
namespace: governance
server-lists: localhost:2181
overwrite: true
Spring Boot configuration items
This subsection introduces you to the configuration items to be used if you prefer Spring Boot:
- The following list introduces the main mode configuration items:
- spring.shardingsphere.mode.type: Type of mode configuration. Values can be Memory, Standalone, and Cluster.
- spring.shardingsphere.mode.repository: Persist repository configuration. Memory type does not need to persist and can be null. The Standalone type uses StandalonePersistRepositoryConfiguration. The Cluster type uses ClusterPersistRepositoryConfiguration.
- spring.shardingsphere.mode.overwrite: Whether to overwrite persistent configuration with local configuration.
- The following list introduces the configuration items for Standalone mode:
- spring.shardingsphere.mode.type: Type of mode configuration.
- spring.shardingsphere.mode.repository.type: Type of persist repository. Values can be File.
- spring.shardingsphere.mode.repository.props.path: Properties of the persist repository. The properties key can be path.
- spring.shardingsphere.mode.overwrite: Whether to overwrite persistent configuration with local configuration.
- The following list introduces the configuration items relevant to Cluster mode:
- spring.shardingsphere.mode.type: Type of mode configuration.
- spring.shardingsphere.mode.repository.type: Type of persist repository. Values can be ZooKeeper and etcd.
- spring.shardingsphere.mode.repository.props.namespace: Namespace of the registry center.
- spring.shardingsphere.mode.repository.props.server-lists: Server lists of the registry center.
- spring.shardingsphere.mode.repository.props.<key>=: Properties of the persist repository.
- spring.shardingsphere.mode.overwrite: Whether to overwrite the persistent configuration with local configuration.
This part provides you with a demo of configuring modes with Spring Boot.
The first example illustrates how to configure Standalone mode:
// Standalone Mode
spring.shardingsphere.mode.type=Standalone
spring.shardingsphere.mode.repository.type=File
spring.shardingsphere.mode.repository.props.path=
spring.shardingsphere.mode.overwrite=true
The second example presents you with code to configure Cluster mode:
// Cluster Mode
spring.shardingsphere.mode.type=Cluster
spring.shardingsphere.mode.repository.type=Zookeeper
spring.shardingsphere.mode.repository.props.namespace=governance
spring.shardingsphere.mode.repository.props.server-lists=localhost:2181
spring.shardingsphere.mode.overwrite=true
A SpringNameSpace example
This part provides a demo of configuring mode in SpringNameSpace. The first example introduces Standalone mode, while the second example introduces how to configure Cluster mode:
<!-- Standalone Mode -->
<shardingsphere:mode type="Standalone" repository-ref="standaloneRepository"overwrite="true"/>
<standalone:repository id="standaloneRepository" type="File">
<props>
<prop key="path"></prop>
</props>
</standalone:repository>
<!-- Cluster Mode -->
<shardingsphere:mode type="Cluster" repository-ref="clusterRepository" overwrite="true"/>
<cluster:repository id="clusterRepository" type="ZooKeeper" namespace="governance" server-lists="localhost:2181">
<props>
<prop key="max-retries">3</prop>
<prop key="operation-timeout-milliseconds">3000</prop>
</props>
</cluster:repository>
Props configuration for JDBC
This section introduces the props configuration for JDBC access, which includes optimization parameters for ShardingSphere internal functions and some dynamic switch configurations. With the optimization parameters in the props configuration, you can flexibly tune to achieve optimal performance on the JDBC access side, while with the dynamic switch configuration, you can quickly locate issues and improve problem-solving efficiency.
Java configuration items
Let's follow our usual flow and start with the Java configuration items first. You will find the items classified by common, optimized, or checked props:
- Common props: In the following table, the SQL props are presented with their types, descriptions, and default values. These will allow you to set the SQL properties:
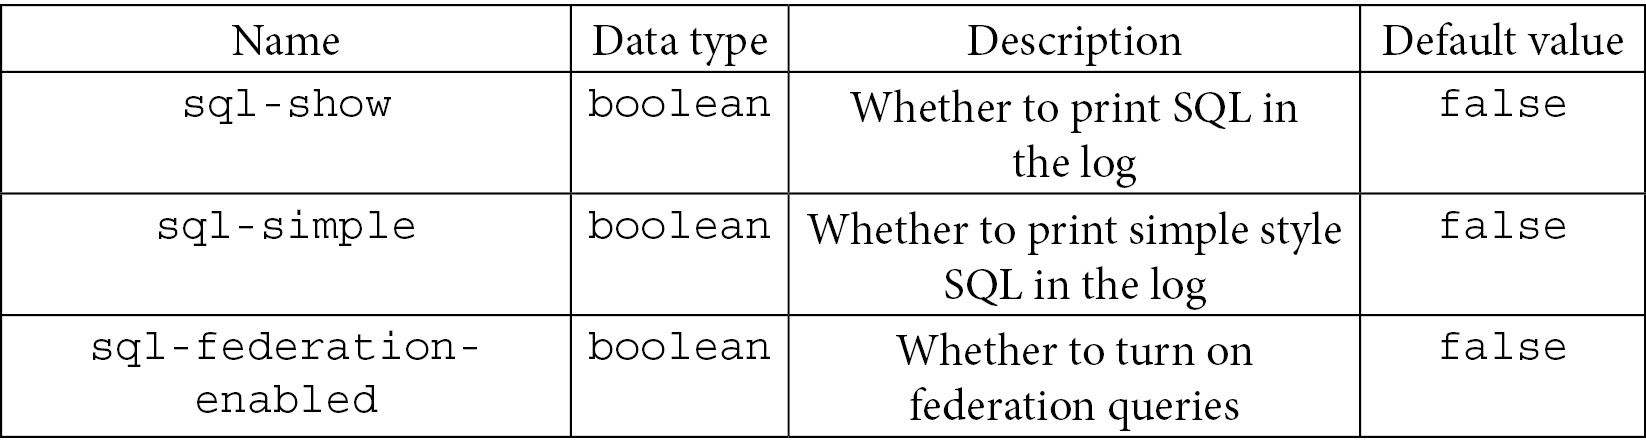
Table 7.47
- Optimized props: The following table shows you the optimization props. These will allow you to set the task-processing thread pool executor size and the maximum number of connections allowed for a single query request:

Table 7.48
- Checked props: This table details the configuration items for checked props to check shared metadata or duplicate tables:
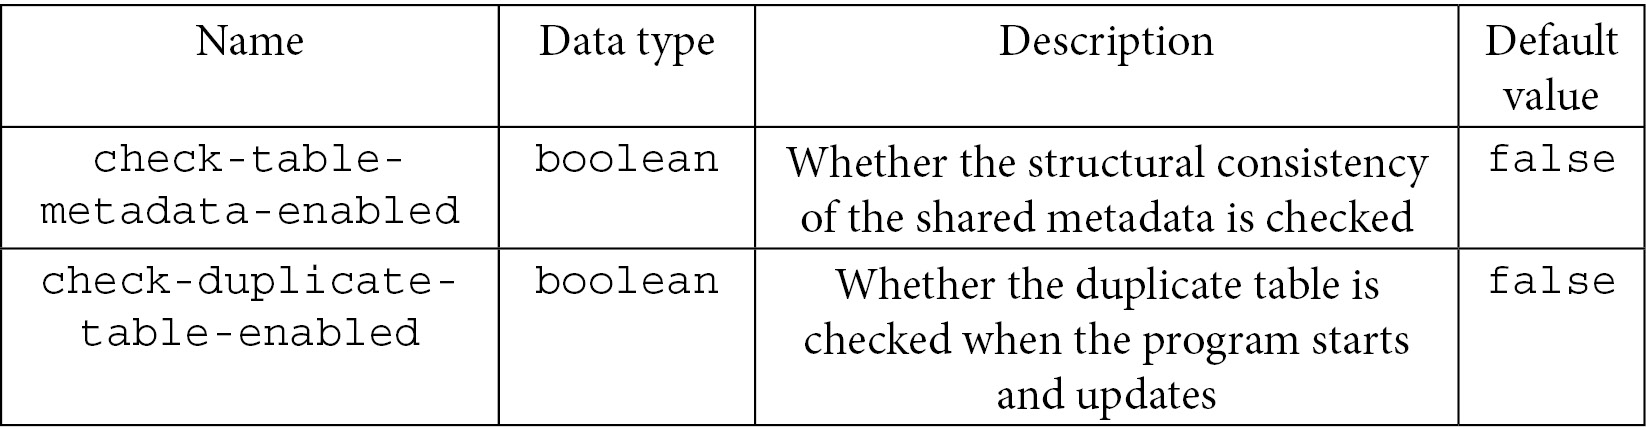
Table 7.49
Now that we have looked at the configuration items, let's use them in an example, as follows:
Java
public DataSource getDataSource() throws SQLException {Properties props = new Properties();
props.put("sql-show", false);// Add more props
return ShardingSphereDataSourceFactory.createDataSource(createDataSourceMap(), Collections.emptyList() props);
}
YAML configuration items
Please refer to the preceding section in this chapter.
The following code is an example of YAML:
YAML
props:
sql-show: false
# Add more props
Spring Boot configuration items
Please refer to the common props table in the preceding Java configuration items section. The configuration items are the same.
The following snippet is an example of Spring Boot:
SQL
spring.shardingsphere.props.sql-show=false
# Add more props
SpringNameSpace configuration items
Please refer to all the Java configuration items sections in this chapter.
The following snippet is an example of SpringNameSpace:
XML
<shardingsphere:data-source id="shardingDataSource" data-source-names="ds_0, ds_1" rule-refs="shardingRule">
<props>
<prop key="sql-show">false</prop>
<!-- Add more props -->
</props>
</shardingsphere:data-source>
Configuration – miscellaneous
This section discusses how to achieve rule configuration of data sharding based on read/write splitting. Please note that the sharding data source should be the one aggregated after read/write splitting.
Sharding, read/write splitting, and cluster configuration items
Configuration items are consistent with those used in each feature. For detailed configuration items, please refer to the following sections in this chapter:
- Sharding configuration
- Understanding read/write splitting configuration
- Configuring ShardingSphere's modes
The following example introduces the combination of sharding, read/write splitting, and Cluster mode configuration items. These steps will show you how to combine configurations for multiple features:
- Create a sharding configuration using the Java API:
public final class ShardingConfigurationCreator {
public static ShardingRuleConfiguration create() {
// Create sharding rule configuration , please refer to sharding.
}
}
- Create a read/write splitting configuration using the Java API:
public final class ReadwriteSplittingConfigurationCreator {
public static ReadwriteSplittingRuleConfiguration create() {
// Create read write splitting rule configuration , please refer to read/write splitting.
}
}
- Create a mode configuration using the Java API:
public final class ModeConfigurationCreator {
public static ModeConfiguration create() {
// Create mode configuration , please refer to cluster mode.
}
}
- Add the created sharding configuration, read/write splitting configuration, and mode configuration to the ShardingSphere data source:
public final class ShardingReadwriteSplittingClusterConfigurationCreator {
public DataSource create() throws SQLException {
return ShardingSphereDataSourceFactory.createDataSource(
ModeConfigurationCreator.create(), createDataSourceMap(),
Arrays.asList(ShardingConfigurationCreator.create(), ReadwriteSplittingConfigurationCreator.create()), createProperties());
}
}
Now that you have understood the basic concept for a multi-feature configuration, let's look at the different examples of configuration file structures in the following subsections.
A YAML example
The yaml file structure for configuring sharding and read/write splitting is as follows:
# Configure cluster mode, please refer to cluster mode.
mode:
type: Cluster
# Configure the required data source
dataSources:
- !SHARDING
# Configure sharding rules, please refer to sharding.
- !READWRITE_SPLITTING
# Configure read/write splitting rules, please refer to read/write splitting.
A Spring Boot example
The properties file structure for configuring sharding and read/write splitting is as follows:
# Configure cluster mode, please refer to cluster mode.
spring.shardingsphere.mode.type=Cluster
# Configure the required data source
spring.shardingsphere.datasource....
# Configure sharding rules, please refer to sharding.
spring.shardingsphere.rules.sharding.tables....
# Configure read/write splitting rules, please refer to read/write splitting.
spring.shardingsphere.rules.readwrite-splitting.data-sources....
A SpringNameSpace example
The xml file structure for configuring sharding and read/write splitting is as follows:
# Configure cluster mode, please refer to cluster mode.
<shardingsphere:mode />
# Configure the required data source
<bean id="demo_write_ds_0" />
# Configure read/write splitting rules, please refer to read/write splitting.
<readwrite-splitting:rule id="readWriteSplittingRule" />
# Configure sharding rules, please refer to sharding.
<sharding:table-rules>
Configuring sharding, encryption, and cluster mode
This section discusses how to use data sharding and data encryption properties together. Please note that you only need to use the logic table name for configuration when writing encryption rules.
Configuration items are consistent with those used in each feature. For detailed configuration items, please refer to the following sections in this chapter:
- Sharding configurations
- Understanding data encryption configuration
- Configuring ShardingSphere's modes
A Java example
Let's look at how to implement this multi-configuration with Java first. In the following steps, you can refer to this example to understand the logic to combine the configurations of multiple features:
- Create a sharding configuration using the Java API:
public final class ShardingConfigurationCreator {
public static ShardingRuleConfiguration create() {
// Create sharding rule configuration, please refer to sharding.
}
}
- Create a data encryption configuration using the Java API:
public final class EncryptRuleConfigurationCreator {
public static EncryptRuleConfiguration create() {
// Create data encryption rule configuration , please refer to encryption.
}
}
- Create a mode configuration using the Java API:
public final class ModeConfigurationCreator {
public static ModeConfiguration create() {
// Create mode configuration, please refer to cluster mode.
}
}
- Add the created sharding configuration, encryption configuration, and mode configuration to the ShardingSphere data source:
public final class ShardingEncryptionClusterConfigurationCreator {
public DataSource create() throws SQLException {
return ShardingSphereDataSourceFactory.createDataSource(
ModeConfigurationCreator.create(), createDataSourceMap(),
Arrays.asList(ShardingConfigurationCreator.create(), EncryptRuleConfigurationCreator.create()), createProperties());
}
Now that you have understood the basic principle for configuring sharding and data encryption together, we can move on to see their implementation with YAML, Spring Boot, and SpringNameSpace.
A YAML example
The yaml file structure for configuring sharding and encryption is as follows:
# Configure cluster mode, please refer to cluster mode.
mode:
type: Cluster
# Configure the required data source
dataSources:
- !SHARDING
# Configure sharding rules, please refer to sharding.
- !ENCRYPT
# Configure encrypt rules, please refer to data encryption.
A Spring Boot example
The properties file structure for configuring sharding and encryption is as follows:
# Configure cluster mode, please refer to cluster mode.
spring.shardingsphere.mode.type=Cluster
# Configure the required data source,
spring.shardingsphere.datasource....
# Configure sharding rules, please refer to sharding.
spring.shardingsphere.rules.sharding.tables....
# Configure encryption rules, please refer to data encryption.
spring.shardingsphere.rules.encypt.tables....
SpringNameSpace example
The xml file structure for configuring sharding and encryption is as follows:
# Configure cluster mode, please refer to cluster mode.
<shardingsphere:mode />
# Configure the required data source
<bean id="ds_0" />
# Configure encryption rules, please refer to data encryption.
<encrypt:rule id="encryptRule">
# Configure sharding rules, please refer to sharding.
Depending on your preferred method, you can easily combine the configuration of multiple ShardingSphere features simultaneously, as we saw from the previous examples.
Summary
Thanks to this chapter, you have now learned how to configure ShardingSphere-JDBC in multiple ways.
Depending on whether you prefer to work with Java, YAML, SpringNameSpace, or Spring Boot, you are now fully equipped to configure all of the features to match your preferences and requirements.
Understanding this chapter means that you have now mastered how to configure both ShardingSphere-Proxy and JDBC, giving you the power to either choose the client that you prefer or to deploy both for a hybrid architecture.
You may be wondering if that is too advanced, and that is exactly where the next chapter will take you – ShardingSphere's advanced usage and Database Plus.