Chapter 5: Exploring ShardingSphere Adaptors
If you have reached this chapter after reading this book in a linear fashion, you should start to feel confident in your understanding of Apache ShardingSphere and distributed database systems.
By now, you should have acquired an overview of ShardingSphere's architecture, the features that are essential for a distributed database, and the bonus features to improve security and performance.
Next, you will be diving deeper into the workings and differences between ShardingSphere-JDBC and ShardingSphere-Proxy.
In this chapter, we will cover the following topics:
- Differences between ShardingSphere-JDBC and ShardingSphere-Proxy
- ShardingSphere-JDBC
- ShardingSphere-Proxy
- Architecture introduction
By the end of this chapter, you will be fully capable of distinguishing between ShardingSphere-JDBC and ShardingSphere-Proxy and will have clarified which one better fits your requirements. Additionally, you will learn how to deploy not only each client but also gain an understanding of the architecture and be able to deploy both simultaneously in your environment.
Technical requirements
No hands-on experience in a specific language is required but it would be beneficial to have some experience in Java since ShardingSphere is coded in Java.
To run the practical examples in this chapter, you will need the following tools:
- JRE or JDK 8+: This is the basic environment for all Java applications.
- Text editor (not mandatory): You can use Vim or VS Code to modify the YAML configuration files.
- A 2 cores 4 GB machine with Unix or Windows OS: ShardingSphere can be launched on most OSs.
- 7-Zip or tar command: You can use these tools for Linux or macOS to decompress the proxy artifact
You can find the complete code file here:
https://github.com/PacktPublishing/A-Definitive-Guide-to-Apache-ShardingSphere
Differences between ShardingSphere-JDBC and ShardingSphere-Proxy
To respond to the complicated application scenarios of distributed database ecosystems, ShardingSphere provides two independent products: ShardingSphere-JDBC and ShardingSphere-Proxy.
We could also call them adaptors. In terms of the overall architecture, since ShardingSphere-JDBC and ShardingSphere-Proxy use the same pluggable kernel, they can both provide standard incremental functions such as data sharding, read/write splitting, distributed transaction, and distributed governance. At the same time, with different product positioning, the two products provide two different ways of using ShardingSphere.
The following table includes a comparison between the two options:

Table 5.1 – ShardingSphere-JDBC and ShardingSphere-Proxy comparison
ShardingSphere-JDBC is positioned as a lightweight Java architecture and works with any applications written in Java. It can provide incremental services in the JDBC layer of Java. We can refer to it as an enhanced JDBC driver that can support any database achieving the JDBC standard. Since ShardingSphere-JDBC directly accesses databases via the driver, its performance loss is negligible.
ShardingSphere-Proxy is positioned as a transparent database proxy. It supports heterogeneous languages through the encapsulation of database binary protocols. Currently, ShardingSphere-Proxy provides the MySQL and PostgreSQL versions, allowing users to directly use ShardingSphere-Proxy as a database. It is suitable for any client ends that are compatible with the MySQL and PostgreSQL database protocols, making it easier for DBAs and operation and maintenance personnel to manage distributed database services.
Now, let's dive deeper into the concepts and applications of both these adaptors in the following sections.
ShardingSphere-JDBC
ShardingSphere-JDBC is the first product of ShardingSphere that succeeded, with the first open source project by the name Sharding-JDBC being released in 2017.
The long-running open source project has been continuously improved and polished thanks to the power of the community. The architectural diagram of ShardingSphere-JDBC and its application is shown as follows:

Figure 5.1 – ShardingSphere's architectural diagram
To be able to use the most mature product in the ShardingSphere ecosystem, you only need JAR files as dependencies, without an additional deployment. It is fully compatible with JDBC and ORM.
In the next section, we will look into the development mechanism of ShardingSphere-JDBC, its applicability, and the ideal users that should use it. This way, you will be able to determine whether ShardingSphere-JDBC fits your requirements. If so, you will be able to refer to the quick start guide in the Differences between ShardingSphere-JDBC and ShardingSphere-Proxy section.
The ShardingSphere-JDBC development mechanism
The JDBC protocol is the basis of ShardingSphere-JDBC's implementation. Here, ShardingSphereDataSource is created through ShardingSphereDataSourceFactory and implements the DataSource and AutoCloseable interfaces, ensuring that ShardingSphere-JDBC can seamlessly connect to various components that are based on the JDBC protocol.
In ShardingSphereDataSource, a request needs to go through the process, as highlighted by the dotted line in the following diagram of the ShardingSphere-JDBC data route – SQL Parser | SQL Router | SQL Rewriter | SQL Executer | Result Merger:
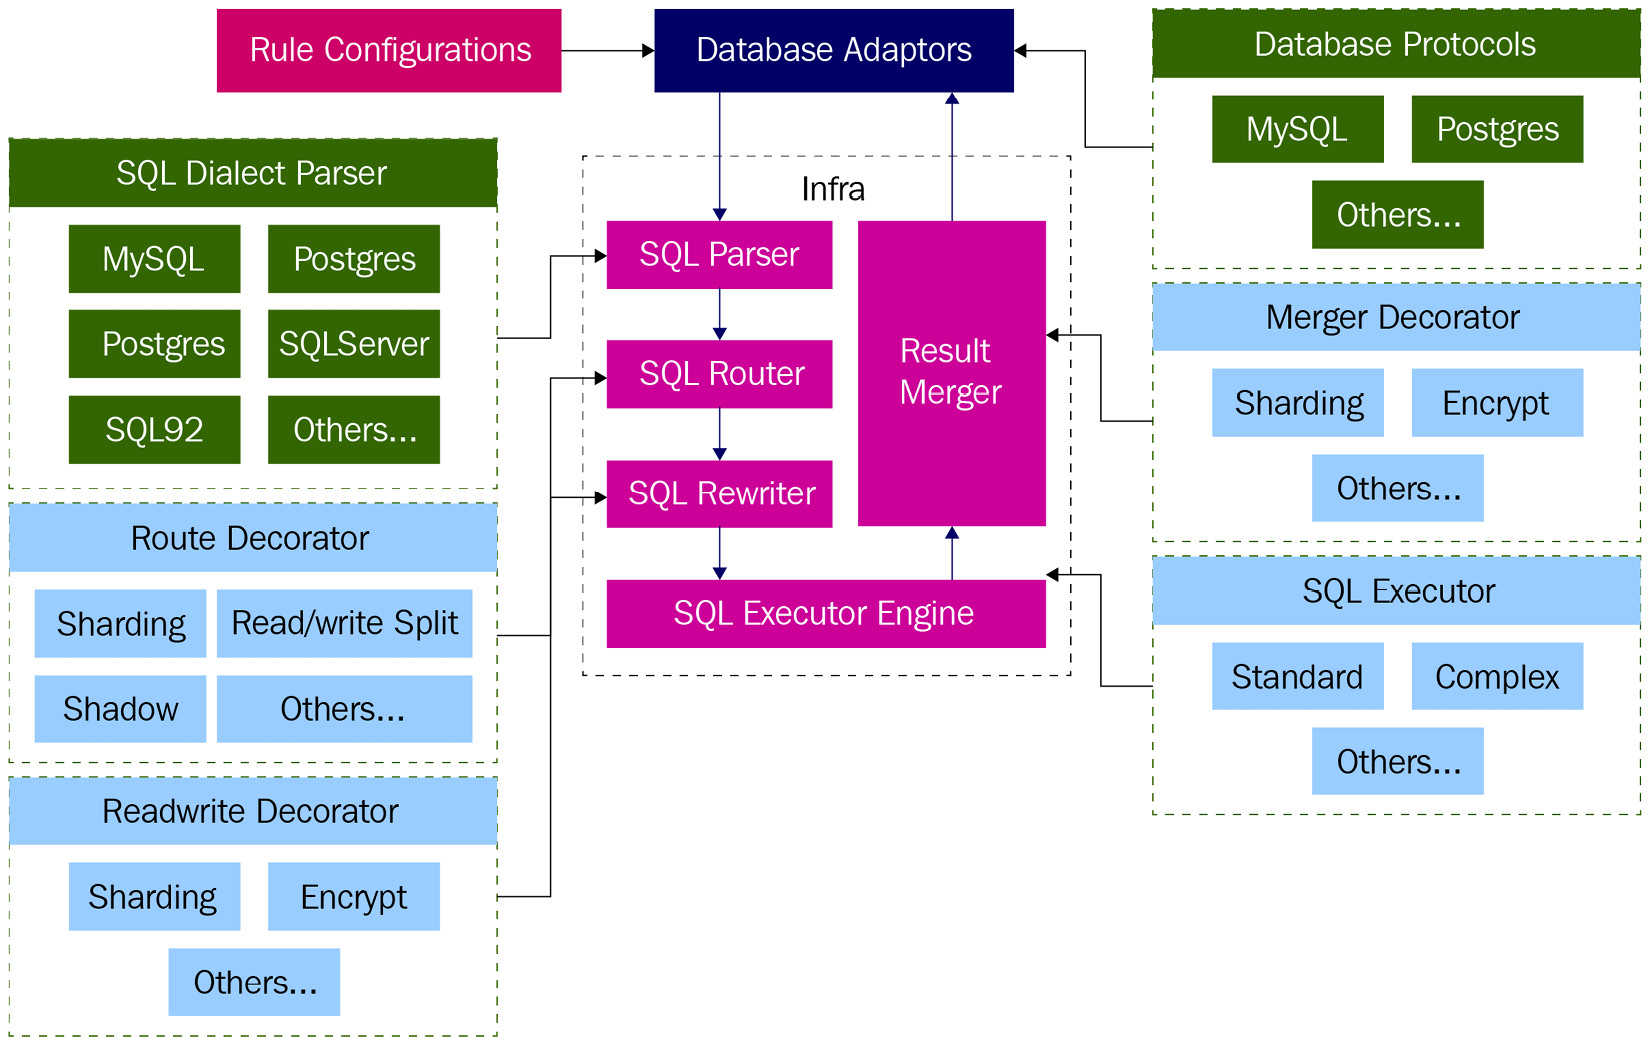
Figure 5.2 – ShardingSphere-JDBC data routing
The following list of steps details the flow of Figure 5.2, starting from when the SQL request is sent to when the merger engine combines the results of the execution engine:
- First, the SQL request sent to ShardingSphere-JDBC goes through the parser engine, where it will be parsed into an abstract syntax tree (AST) by ANother Tool for Language Recognition (ANTLR).
- Next, the router engine generates its routing path according to the context's sharding strategy.
- At this step, the rewriter engine rewrites the logical SQL into SQL that can be executed correctly in the real database.
- Then, the SQL request enters the execution engine. After automatically balancing resource control and execution efficiency, the engine executes the SQL request on the right database.
- According to the results given by the execution engine, the merger engine combines all of the result sets obtained by each data node into one result set and correctly returns it to the client side.
Understanding the mechanism allows you to develop a deep understanding of how things work. Developing this type of knowledge is essential for building transferrable skills that will benefit you in the long term. Now, let's explore who might need these skills by reviewing the various application scenarios in the next section.
Applicability and target users
ShardingSphere-JDBC completely adheres to the JDBC standard, so you can easily get started and implement features such as read/write splitting, sharding, encryption, and distributed transactions. ShardingSphere-JDBC is ideal for making these complex functions easier.
The target users of ShardingSphere-JDBC are developers. As long as you or any developer are familiar with JDBC and JDBC-based ORM tools, you can quickly get started with ShardingSphere-JDBC.
The following list includes examples of tools that can be smoothly connected to ShardingSphere-JDBC:
- JDBC-based ORM frameworks, such as JPA, Hibernate, Mybatis, and Spring JDBC Template
- Third-party database connection pools including DBCP, C3P0, BoneCP, and HikariCP
- JDBC-compliant databases, such as MySQL, PostgreSQL, Oracle, and SQL Server
Now that you are familiar with ShardingSphere's development mechanism and applicability, you might be wondering how to get started and how to deploy it.
In the following section, we provide you with a guide on the different methods that are at your disposal to deploy ShardingSphere-JDBC. Once done, you'll be ready to deploy ShardingSphere-JDBC. Note that in Chapter 8, Apache ShardingSphere Advanced Usage – Database Plus and Plugin Platform, we will teach you how to use it with a set of examples for the different ShardingSphere features.
Deployment and user quick start guide
It's very easy to get started with using ShardingSphere-JDBC. Perform the following steps:
- First, we add the dependency of ShardingSphere-JDBC into the Java project:
<dependency>
<groupId>org.apache.shardingsphere</groupId>
<artifactId>shardingsphere-jdbc-core</artifactId>
<version>5.0.0</version>
</dependency>
Note
You can replace the above with any version of ShardingSphere-JDBC if necessary.
- Then, we add config files such as resources/sharding-databases.yaml into the path:
mode:
type: Standalone
repository:
type: File
overwrite: true
dataSources:
ds_0:
dataSourceClassName: com.zaxxer.hikari.HikariDataSource
driverClassName: com.mysql.jdbc.Driver
jdbcUrl: jdbc:mysql://127.0.0.1:13306/demo_ds?server Timezone=UTC&useSSL=false&useUnicode=true&character Encoding=UTF-8
username: root
password:
ds_1:
dataSourceClassName: com.zaxxer.hikari.HikariDataSource
driverClassName: com.mysql.jdbc.Driver
jdbcUrl: jdbc:mysql://127.0.0.1:13307/demo_ds?server Timezone=UTC&useSSL=false&useUnicode=true&character Encoding=UTF-8
username: root
password:
- Next, we can use the following code to get DataSource:
DataSource dataSource = YamlShardingSphereDataSourceFactory.createDataSource(YamlDataSourceDemo.class.getResource(fileName).getFile())
After obtaining the DataSource object, we can operate ShardingSphere-JDBC in the same way as any other JDBC.
In this section, we have understood the internal processes of ShardingSphere-JDBC when a database is queried. If you are interested in a JDBC driver, you will find ShardingSphere-JDBC to be very friendly and to have a very flat learning curve. It is an important adaptor of the ShardingSphere ecosystem that merits being familiar with even if you do not plan on relying on it completely, as it can be integrated with ShardingSphere-Proxy for a hybrid architecture deployment.
In the next section, will look at ShardingSphere-Proxy and follow a similar pattern to the previous section. We will start by reviewing its mechanisms and then move on to its deployment and application scenarios.
ShardingSphere-Proxy
ShardingSphere-Proxy is a database proxy that is transparent to you or any user. It provides you with all the features of the Apache ShardingSphere ecosystem, such as sharding, read/write splitting, shadow database, data encryption/decryption, and distributed governance.
Unlike ShardingSphere-JDBC, ShardingSphere-Proxy implements some of the prevailing database-access protocols and, theoretically, can support all database clients that are based on the MySQL, PostgreSQL, and openGauss protocols. When you utilize ShardingSphere-Proxy, you will feel it effectively works in the same way as a database.
The following is ShardingSphere-Proxy's deployment overview diagram:

Figure 5.3 – The ShardingSphere-Proxy topography
As you can see, the proxy is positioned above multiple databases and below multiple applications. This is especially convenient if you plan on connecting multiple applications and database instances as, with the introduction of ShardingSphere-Proxy, your workflow will be greatly simplified. You won't need to deploy custom configurations for each application or database.
The ShardingSphere-Proxy development mechanism
ShardingSphere-Proxy implements MySQL, PostgreSQL, and openGauss database protocols, so it can parse the SQL and command parameters sent from the clients. Then, the ShardingSphere kernel routes and rewrites the SQL and uses the correct database driver to execute the actual SQL and parameters.
The database execution results are aggregated in ShardingSphere-Proxy and encapsulated in the protocol layer into a database network packet that is later returned to the client side, as shown in the following diagram:

Figure 5.4 – The ShardingSphere-Proxy query mechanism
As you can see from Figure 5.4, because of ShardingSphere-Proxy, the SQL query is handled and directed to the correct database thanks to the SQL executor.
Now that the development mechanism is clear, let's introduce you to ShardingSphere-Proxy's applicability and target users in the next section.
Applicability and target users of ShardingSphere-Proxy
The advantages of ShardingSphere-Proxy are listed as follows:
- Zero intrusion: Users operate ShardingSphere-Proxy in exactly the same way as they'd operate a database.
- Convenient for operations: Theoretically, any client side using the MySQL or PostgreSQL databases has support access to ShardingSphere-Proxy.
- Language-independent: As long as a programming language is driven by a MySQL, PostgreSQL, or openGauss database, ShardingSphere-Proxy is connectable. This means that all enhanced features placed above databases in the Apache ShardingSphere ecosystem, such as data sharding and read/write splitting, are adoptable.
When it comes to possible applications and the type of user toward which ShardingSphere-Proxy is directed, there is no better way to explain it than with examples. Let's consider the following scenarios:
- Scenario 1: Standalone databases have held up the process of enhancing application performance. If we don't modify the application, how can we break the bottleneck?
- Scenario 2: An application uses ShardingSphere-JDBC to shard data and then distribute that data into 10 database instances. Now its developer or DBA wants to simply collect some data (for example, the total data volume). How can the developer/DBA do that?
- Scenario 3: When Python or Golang developers want to use read/write splitting, data encryption, shadow databases, or other Apache ShardingSphere features, what should they do?
Now, if we assume that there is no ShardingSphere-Proxy, users may suggest the following list of respective solutions:
- Solution 1: To use ShardingSphere-JDBC, the user needs to add dependencies and adjust data sources. Since the premise is that the application cannot be changed, it's necessary to find a solution at the database layer or the layer above databases.
- Solution 2: Users familiar with Java (or other JVM languages) can write code to operate data through ShardingSphere-JDBC, or they can use scripts to loop through all databases.
- Solution 3: In this case, they have to find another possible solution.
There are many other issues that are caused by ShardingSphere-JDBC's limitations as an SDK. These exact reasons led to the drivers behind the creation of ShardingSphere-Proxy. Not only can it fix problems in many scenarios where ShardingSphere-JDBC would be ineffective, but it is also friendlier for developers (of Java or other languages) and database administrators.
Deployment and user quick start guide
Users can find all of the released versions of the ShardingSphere-Proxy binary packages published on the ShardingSphere website or Docker Hub.
Additionally, users can compile ShardingSphere-Proxy by themselves by downloading the source codes of the released versions or cloning source codes of the main branch in the GitHub repository.
Taking ShardingSphere-Proxy and PostgreSQL as an example, let's see how to quickly get started.
Downloading from the official website
You can download the binary package of ShardingSphere-Proxy by clicking on the following link:
https://shardingsphere.apache.org/document/current/en/downloads/
Here, we use version 5.0.0 for our ShardingSphere-Proxy deployment example:
- First, download ShardingSphere-Proxy's binary package. Then, unzip it and go to the following directory:
tar zxf apache-shardingsphere-5.0.0-shardingsphere-proxy-bin.tar.gz
cd apache-shardingsphere-5.0.0-shardingsphere-proxy-bin
Add an authority configuration in conf/server.yaml:
rules:
- !AUTHORITY
users:
- proxy_user@%:proxy_password
provider:
type: ALL_PRIVILEGES_PERMITTED
Add data sources in conf/config-sharding.yaml.
Note that no rule is required. Any SQL sent to proxy_db is directly routed to the configured data sources:
schemaName: proxy_db
dataSources:
postgres:
url: jdbc:postgresql://127.0.0.1:5432/postgres
username: postgres
password: postgres
connectionTimeoutMilliseconds: 30000
idleTimeoutMilliseconds: 60000
maxLifetimeMilliseconds: 1800000
maxPoolSize: 50
minPoolSize: 1
rules: []
- Start ShardingSphere-Proxy.
The script in the bin directory is used to start or end ShardingSphere-Proxy:
bin/start.sh
- Check whether ShardingSphere-Proxy has started successfully or not.
You can see the proxy logs in the logs/stdout.log file:
[INFO ] 2021-12-21 13:38:49.842 [main] o.a.s.p.i.BootstrapInitializer - Database name is 'PostgreSQL', version is '14.0 (Debian 14.0-1.pgdg110+1)'
[INFO ] 2021-12-21 13:38:50.026 [main] o.a.s.p.frontend.ShardingSphereProxy - ShardingSphere-Proxy start success
When ShardingSphere-Proxy successfully starts, you can connect a client, such as psql, to ShardingSphere-Proxy. The DistSQL statement, show schema resource, is executed as follows:
% psql -h 127.0.0.1 -p 3307 -U proxy_user -d proxy_db
Password for user proxy_user:
psql (14.0 (Debian 14.0-1.pgdg110+1))
Type "help" for help.
proxy_db=> show schema resources;
name | type | host | port | db | attribute
----------+------------+-----------+------+----------+--------------------------------------------------------------------------------------
-----------------------------------------------------------------------
postgres | PostgreSQL | 127.0.0.1 | 5432 | postgres |{"maxLifetimeMilliseconds":1800000,"readOnly":false,"minPoolSize":1,"idleTimeoutMilli
seconds":60000,"maxPoolSize":50,"connectionTimeout Milliseconds":30000}
(1 row)
The previous steps are a perfect example of a typical ShardingSphere-Proxy deployment. As you can see, the procedure is fairly simple and straightforward.
In the following section, we will check out the ShardingSphere-Proxy source code in case you are interested in learning how to build from source and how to execute it from Docker. As these sections are optional, you can skip them and directly move on to the Architecture introduction section.
Building from source (optional)
If you're interested in compiling source code, please refer to the Wiki section of Apache ShardingSphere's GitHub repository:
https://github.com/apache/shardingsphere/wiki
Perform the following steps:
- To get the source code of ShardingSphere, you can download it from https://shardingsphere.apache.org/document/current/en/downloads/.
Alternatively, you can clone the source code from our GitHub repository:
git clone --depth=1 https://github.com/apache/shardingsphere.git
- Enter the source code directory and execute it:
./mvnw clean install -Prelease -T1C -DskipTests -Djacoco.skip=true -Dcheckstyle.skip=true -Drat.skip=true -Dmaven.javadoc.skip=true -B
You should be able to find the binary package of ShardingSphere-Proxy ending with tar.gz in the shardingsphere-distribution/shardingsphere-proxy-distribution/target directory.
Now you have acquired ShardingSphere-Proxy's binary package. To start it, please follow the remaining steps, as described in the Downloading from the official website section.
Executing ShardingSphere-Proxy with a Docker image (optional)
You can find the Docker image of ShardingSphere-Proxy in Docker Hub (https://hub.docker.com/r/apache/shardingsphere-proxy). Perform the following steps:
- Get the latest ShardingSphere-Proxy Docker image, as follows:
docker pull apache/shardingsphere-proxy:latest
- Create the configuration directory.
If you choose the Docker image method to use Sharding-Proxy, you need to mount the directory where the config files are located, which is at /opt/shardingsphere-proxy/conf in the container.
- Create a directory to store the configuration:
mkdir -p $HOME/shardingsphere-proxy/conf
- Create server.yaml and configure the authority rules:
rules:
- !AUTHORITY
users:
- postgres@%:postgres
provider:
type: ALL_PRIVILEGES_PERMITTED
- Create config-sharding.yaml and configure the data sources.
Note that no rule is required. Any SQL sent to proxy_db is directly routed to the configured data source:
schemaName: proxy_db
dataSources:
postgres:
url: jdbc:postgresql://127.0.0.1:5432/postgres
username: postgres
password: postgres
connectionTimeoutMilliseconds: 30000
idleTimeoutMilliseconds: 60000
maxLifetimeMilliseconds: 1800000
maxPoolSize: 50
minPoolSize: 1
rules: []
- Create logback.xml as your log configuration.
By default, ShardingSphere-Proxy uses logback as a log implementation:
<configuration>
<appender name="console" class="ch.qos.logback.core.ConsoleAppender">
<encoder>
<pattern>[%-5level] %d{yyyy-MM-dd HH:mm:ss.SSS} [%thread] %logger{36} - %msg%n</pattern>
</encoder>
</appender>
<logger name="org.apache.shardingsphere" level="info" additivity="false">
<appender-ref ref="console" />
</logger>
<logger name="com.zaxxer.hikari" level="error" />
<logger name="com.atomikos" level="error" />
<logger name="io.netty" level="error" />
<root>
<level value="info" />
<appender-ref ref="console" />
</root>
</configuration>
- Start ShardingSphere-Proxy:
docker run --name shardingsphere-proxy -i -t -p3307:3307 -v $HOME/shardingsphere-proxy/conf:/opt/shardingsphere-proxy/conf apache/shardingsphere-proxy:latest
You can now connect the PostgreSQL client to ShardingSphere-Proxy. If you see the following output, that means that you have successfully started the ShardingSphere-Proxy container:
Starting the ShardingSphere-Proxy ...
The classpath is /opt/shardingsphere-proxy/conf:.:/opt/shardingsphere-proxy/lib/*:/opt/shardingsphere-proxy/ext-lib/*
Please check the STDOUT file: /opt/shardingsphere-proxy/logs/stdout.log
[INFO ] 2021-12-21 06:36:30.284 [main] o.a.s.p.frontend.ShardingSphereProxy - ShardingSphere-Proxy start success
Architecture introduction
Real transaction scenarios, in addition to Java, always require support for additional heterogeneous languages such as Go and Python. Nevertheless, these applications using different languages still need to access and manage the same distributed database service.
Although ShardingSphere-JDBC and ShardingSphere-Proxy are two independent products, the powerful design of ShardingSphere's architecture can support the mixed deployment of the two products through one registry center, and they can be online at the same time.
Figure 5.5 provides you with a graphical representation of a deployment architecture including both ShardingSphere-JDBC and ShardingSphere-Proxy; we interchangeably refer to this type of deployment as a mixed or hybrid deployment architecture:

Figure 5.5 – A mixed deployment topography
As you can see in the preceding diagram, we divide the deployed architecture into two layers. When the upper layer is running, we use ShardingSphere-JDBC to deploy Java applications through a decentralized architecture, developing high-performance, lightweight OLTP applications. The administration ends up in the lower layer use of ShardingSphere-Proxy and is independent of the application deployment cluster. While providing static access and making it easier for DBAs, operations, and maintenance personnel to dynamically manage database shards, it also supports heterogeneous languages and is suitable for OLAP applications.
Between ShardingSphere-JDBC and ShardingSphere-Proxy is their mutually managed lower-layer database cluster and mutually used RegistryCenter. The registry center ensures that ShardingSphere-JDBC and ShardingSphere-Proxy are online at the same time. They enjoy metadata information under the same logic database. When any application modifies the metadata information in the database cluster, the registry center will push modified metadata information to all application ends in real time, ensuring the consistency of data in the whole architecture.
In mixed deployment mode, ShardingSphere-Proxy, as the administration end, cannot only modify online metadata information such as sharding rules of the whole cluster without rebooting the application but also provide features such as a one-click circuit breaker instance and disabling the secondary database. This means a more convenient and subtle operation method for database traffic management.
Applicability and target users
With the development of database ecosystems, developers have more choices in terms of database services. Services including various distributed databases, NewSQL databases, and distributed database services based on the Apache ShardingSphere distributed database middleware can all meet your needs for data services.
In comparison to other products, Apache ShardingSphere is an ecosystem consisting of multiple adaptors, and ShardingSphere-JDBC and ShardingSphere-Proxy have the same kernel architecture and open ecosystem.
In terms of features, they can both use the incremental functions provided by Apache ShardingSphere based on underlying databases. Additionally, they can use any open ecosystem-based extended function provided by ShardingSphere-JDBC and ShardingSphere-Proxy in a transparent and undifferentiated way.
Users can acquire the same function no matter which way they choose to integrate. At the same time, the needs of different application scenarios, including OLTP applications that require high performance, OLAP applications, and operations and maintenance scenarios, can all be met through ShardingSphere.
In terms of deployment, if integrated through Java applications, ShardingSphere-JDBC can easily perform transparent operations such as data sharding and read/write splitting without a separate deployment service, allowing a faster project release. At the same time, application systems suitable for different scenarios can be flexibly built by a unified, online management configuration with the mixed deployment of ShardingSphere-Proxy.
Deployment and user quick start guide
A mixed deployment mode requires separate deployments of the ShardingSphere-Proxy and Java applications based on ShardingSphere-JDBC.
A mixed deployment mode requires ShardingSphere-JDBC and ShardingSphere-Proxy to use the same registry center. It needs a cluster mode, which requires the separate deployment of ZooKeeper or the etcd service.
- Add the following configuration in the ShardingSphere-Proxy server.yaml file and the ShardingSphere-JDBC configuration document (taking Spring Boot as an example):
- ShardingSphere-Proxy:
mode:
type: Cluster
repository:
type: ZooKeeper
props:
namespace: governance_ds
server-lists: localhost:2181
retryIntervalMilliseconds: 500
timeToLiveSeconds: 60
maxRetries: 3
operationTimeoutMilliseconds: 500
overwrite: false
- ShardingSphere-JDBC:
spring.shardingsphere.mode.type=Cluster
spring.shardingsphere.mode.repository.type=ZooKeeper
spring.shardingsphere.mode.repository.props.namespace= governance_ds
spring.shardingsphere.mode.repository.props.server-lists=localhost:2181
spring.shardingsphere.mode.overwrite=false
Note
To ensure that ShardingSphere-JDBC and ShardingSphere-Proxy manage the same cluster, the same namespace and server-lists details are required in the mode configuration.
- ShardingSphere-Proxy:
- The same logic database needs to be configured in ShardingSphere-JDBC and ShardingSphere-Proxy:
- In ShardingSphere-Proxy, we can specify the logic database by defining schemaname in the YAML document under the conf installation directory. A logic database could also be dynamically created through the CREATE DATABASE schemaname statement. Here, let's take a YAML configuration as an example:
schemaName: sharding_db
dataSources:
ds_0:
url: jdbc:mysql://127.0.0.1:3306/demo_ds_0?serverTimezone=UTC&useSSL=false
username: root
password:
connectionTimeoutMilliseconds: 30000
idleTimeoutMilliseconds: 60000
maxLifetimeMilliseconds: 1800000
maxPoolSize: 50
minPoolSize: 1
ds_1:
url: jdbc:mysql://127.0.0.1:3306/demo_ds_1?serverTimezone=UTC&useSSL=false
username: root
password:
connectionTimeoutMilliseconds: 30000
idleTimeoutMilliseconds: 60000
maxLifetimeMilliseconds: 1800000
maxPoolSize: 50
minPoolSize: 1
rules:
...
Note
The preceding configuration specifies that the name of a logic database managed by ShardingSphere-Proxy is sharding_db.
- The logic database used to configure applications in ShardingSphere-JDBC is sharding_db:
spring.shardingsphere.schema.name=sharding_db
spring.shardingsphere.mode.type=Cluster
spring.shardingsphere.mode.repository.type=ZooKeeper
spring.shardingsphere.mode.repository.props.namespace= governance_ds
spring.shardingsphere.mode.repository.props.server-lists=localhost:2181
spring.shardingsphere.mode.overwrite=false
- In ShardingSphere-Proxy, we can specify the logic database by defining schemaname in the YAML document under the conf installation directory. A logic database could also be dynamically created through the CREATE DATABASE schemaname statement. Here, let's take a YAML configuration as an example:
Deployment of ShardingSphere mixed mode can be achieved by launching the ShardingSphere-JDBC and ShardingSphere-Proxy applications, respectively.
Summary
In this chapter, we introduced the two Apache ShardingSphere ecosystem adaptors: JDBC and Proxy. A detailed explanation of the differences between the two adaptors was provided, followed by a deep dive into the mechanisms of each adaptor, an example of each deployment, and the respective application scenarios.
You were also introduced to the mixed deployment of both ShardingSphere JDBC and Proxy and how they can unlock numerous possibilities. Now that you have gained an overall understanding of both ShardingSphere JDBC and Proxy, along with how to deploy them, it is time for you to dive deeper into the inner workings of each.
The following chapters, 6 and 7, will show you how to use JDBC and Proxy, respectively, to take full advantage of all the features that Apache ShardingSphere has to offer.