
8
Win and Lose Conditions
Now that we have a basic gameplay experience, it’s time to make the game end with the outcomes of winning or losing. One common way to implement this is through separated components with the responsibility of overseeing a set of objects to detect certain situations that need to happen, such as the player life becoming 0 or all of the waves being cleared. We will implement this through the concept of managers, components that will manage and monitor several objects.
In this chapter, we will examine the following manager concepts:
- Creating object managers
- Creating game modes
- Improving our code with events
With this knowledge, you will be able to not only create the victory and lose conditions of the game, but also do this in a properly structured way using design patterns such as Singleton and Event Listeners. These skills are not only useful for creating the winning and losing code of the game but any code in general. First, let’s begin by creating managers to represent concepts such as score or game rules.
Creating object managers
Not every object in your Scene should be something that can be seen, heard, or collided with. Some objects can also exist with a conceptual meaning, not something tangible. For example, imagine you need to keep a count of the number of enemies: where do you save that? You also need someplace to save the current score of the player, and you may be thinking it could be on the player itself, but what happens if the player dies and respawns?
The data would be lost! In such scenarios, the concept of a manager can be a useful way of solving this in our first games, so let’s explore it.
In this section, we are going to see the following object manager concepts:
- Sharing variables with the Singleton design pattern
- Sharing variables in Visual Scripting
- Creating managers
We will start by discussing what the Singleton design pattern is and how it helps us simplify the communication of objects. With it, we will create manager objects that allow us to centralize information about a group of objects, among other things. Let’s start by discussing the Singleton design pattern.
Sharing variables with the Singleton design pattern
Design patterns are usually described as common solutions to common problems. There are several coding design decisions you will have to make while you code your game, but luckily, the ways to tackle the most common situations are well known and documented. In this section, we are going to discuss one of the most common design patterns, the Singleton, a convenient one to implement in simple projects.
A Singleton pattern is used when we need a single instance of an object, meaning that there shouldn’t be more than one instance of a class and that we want to be easily accessible (not necessarily, but useful in our scenario). We have plenty of cases in our game where this can be applied, for example, ScoreManager, a component that will hold the current score. In this case, we will never have more than one score, so we can take advantage of the benefits of the Singleton manager here.
One benefit is being sure that we won’t have duplicated scores, which makes our code less error prone. Also, so far, we have needed to create public references and drag objects via the editor to connect two objects, or look for them using GetComponent; with this pattern, however, we will have global access to our Singleton component, meaning you can just write the name of the component in your script and you will access it. In the end, there’s just one ScoreManager component, so specifying which one via the editor is redundant. This is similar to Time.deltaTime, the class responsible for managing time—we have just one time.
If you are an advanced programmer, you may be thinking about code testing and dependency injection now, and you are right, but remember, we are trying to write simple code so far, so we will stick to this simple solution.
Let’s create a Score Manager object, responsible for handling the score, to show an example of a Singleton by doing the following:
- Create an empty GameObject (GameObject | Create Empty) and call it
ScoreManager; usually, managers are put in empty objects, separated from the rest of the scene’s objects. - Add a script called
ScoreManagerto this object with anintfield calledamountthat will hold the current score. - Add a field of the
ScoreManagertype calledinstance, but add thestatickeyword to it; this will make the variable global, meaning it can be accessed anywhere by just writing its name:

Figure 8.1: A static field that can be accessed anywhere in the code
- In
Awake, check whether theinstancefield is notnull, and in that case, set thisScoreManagerinstance as the instance reference using thethisreference. - In the
elseclause of thenullcheckingifstatement, print a message indicating that there’s a secondScoreManagerinstance that must be destroyed:

Figure 8.2: Checking whether there’s only one Singleton instance
The idea is to save the reference to the only ScoreManager instance in the instance static field, but if by mistake the user creates two objects with the ScoreManager component, this if statement will detect it and inform the user of the error, asking them to take action. In this scenario, the first ScoreManager instance to execute Awake will find that there’s no instance set (the field is null) so it will set itself as the current instance, while the second ScoreManager instance will find the instance is already set and will print the message.
Remember that instance is a static field, shared between all classes, unlike regular reference fields, where each component will have its own reference, so in this case, we have two ScoreManager instances added to the scene, and they will share the same instance field.
To improve the example a little bit, it would be ideal to have a simple way to find the second ScoreManager in the game. It will be hidden somewhere in the Hierarchy and it may be difficult to find, but we fix this by doing the following:
- Replace
printwithDebug.Log.Debug.Logis similar toprintbut has a second argument that expects an object to be highlighted when the message is clicked in the console. In this case, we will pass thegameObjectreference to allow the console to highlight the duplicated object:

Figure 8.3: Printing messages in the console with Debug.Log
After clicking the log message, the GameObject containing the duplicated ScoreManager will be highlighted in the Hierarchy:

Figure 8.4: The highlighted object after clicking the message
- Finally, a little improvement can be made here by replacing
Debug.LogwithDebug.LogError, which will also print the message but with an error icon. In a real game, you will have lots of messages in the console, and highlighting the errors over the information messages will help us to identify them quickly:

Figure 8.5: Using LogError to print an error message
- Try the code and observe the error message in the console:

Figure 8.6: An error message in the console
The next step would be to use this Singleton somewhere, so in this case, we will make the enemies give points when they are killed by doing the following:
- Add a script to the
EnemyPrefab calledScoreOnDeathwith anintfield calledamount, which will indicate the number of points the enemy will give when killed. Remember to set the value to something other than0in the editor for the Prefab. - Create the
OnDestroyevent function, which will be automatically called by Unity when this object is destroyed, in our case, the enemy:

Figure 8.7: The OnDestroy event function
Consider that the OnDestroy function is also called when we change scenes or the game is quitting, so in this scenario, we might get points when changing scenes, which is not correct. So far, this is not a problem in our case, but later in this chapter, we will see a way to prevent this.
- Access the Singleton reference in the
OnDestroyfunction by writingScoreManager.instance, and add theamountfield of our script to theamountfield of the Singleton to increase the score when an enemy is killed:

Figure 8.8: Full ScoreOnDeath component class contents
- Select the
ScoreManagerin the Hierarchy, hit Play, and kill some enemies to see the score rise with every kill. Remember to set theamountfield of theScoreOnDeathcomponent of the Prefab.
As you can see, the Singleton simplified a lot the way to access ScoreManager and have security measures to prevent duplicates of itself, which will help us to reduce errors in our code. Something to take into account is that now you will be tempted to just make everything a Singleton, such as the player’s life or player’s bullets and just to make your life easier when creating gameplay mechanics such as power-ups.
While that will totally work, remember that your game will change, and I mean change a lot; any real project will experience constant change. Maybe today, the game has just one player, but maybe in the future, you want to add a second player or an AI companion, and you want the power-ups to affect them too, so if you abuse the Singleton pattern, you will have trouble handling those scenarios and many more. Maybe a future player companion will try to get the health pickup but the main player will be healed instead!
The point here is to try to use the pattern as few times as you can, in case you don’t have any other way to solve the problem. To be honest, there are always ways to solve problems without Singleton, but they are a little bit more difficult to implement for beginners, so I prefer to simplify your life a little bit to keep you motivated. With enough practice, you will reach a point where you will be ready to improve your coding standards.
Now, let’s discuss how to achieve this in Visual Scripting, which deserves its own section given that it will be a little bit different. You may consider skipping the following section if you are not interested in the Visual Scripting side of these scripts.
Sharing variables with Visual Scripting
Visual Scripting has a mechanism that replaces Singleton as a holder of variables to be shared between objects: the scene variables. If you check the left panel in the Script Graph editor (the window where we edit the nodes of a script) under the Blackboard panel (the panel that shows the variables of our object), you will notice it will have many tabs: Graph, Object, Scene, App and Saved. If you don’t see Blackboard panel, click the third button from left to right at the top-left part of the window, the button at the right of the i (information) button:

Figure 8.9: Blackboard (variables) editor in Script Graph
So far, when we created a variable in the Variables component of any object, we were actually creating Object Variables: variables that belongs to an object and are shared between all Visual Scripts in that one, but that’s not the only scope a variable can have. Here’s a list of the remaining scopes:
- Graph: Variables that can only be accessed by our current graph. No other script can read or write that variable. This is useful to save internal state, like private variables in C#.
- Scene: Variables that can be accessed by all objects in the current scene. When we change the scene, those variables are lost.
- App: Variables that can be accessed in any part of the game at any time. This is useful to move values from one scene to the other. For example, you can increase the score in one level and keep increasing it in the next, instead of restarting the score from 0.
- Saved: Variables whose values are kept between game runs. You can save persistent data such as the Player Level or Inventory to continue the quest, or simpler things such as the sound volume as set by the user in the Options menu (if you created one).
In this case, the Scene scope is the one we want, as the score we intend to increase will be accessed by several objects in the scene (more on that later) and we don’t want it to persist if we reset the level to play again; it will need to be set again to 0 in each run of the level and game.
To create scene variables, you can simply select the Scene tab in the Blackboard pane of the Script Graph editor, while you are editing any Script Graph, or you can also use the Scene Variables GameObject that was created automatically when you started editing any graph. That object is the one that really holds the variables and must not be deleted. You will notice it will have a Variables component as we have used before, but it will also have the Scene Variables component, indicating those variables are scene variables.
In the following screenshot, you can see how we have simply added the Score variable to the Scene Variables tab to make it accessible in any of our Script Graphs.

Figure 8.10: Adding scene variables to our game
Finally, for the score-increasing behavior, we can add the following graph to our enemy. Remember, as usual, to have the C# or the Visual Scripting version of the scripts, not both.

Figure 8.11: Adding score when this object is destroyed
At first, this script seems pretty similar to our C# version; we add our scoreToAdd variable of our object (Object scope) and then we add it to the whole scene’s score variable, as specified in the node. The main difference you can see is that here we are using the OnDisable event instead of OnDestroy. Actually, OnDestroy is the correct one, but in the current version of Visual Scripting there is a bug that prevents it from working properly, so I replaced it for now. The problem with OnDisable is that it executes whenever the object is disabled, and while the object is disabled before it is destroyed, it can also be disabled in other circumstances (for example, using Object Pooling, a way to recycle objects instead of destroying and instancing them constantly), but so far it is enough for us. Please consider trying first with OnDestroy when you try this graph to see if it runs properly in your Unity or Visual Scripting package version.
Something to highlight is the usage of the Has Variable node to check if the score variable exists. This is done because OnDisable can be executed either at the moment of the enemy being destroyed, or when the scene changes, which we will do later this chapter with the lose/win screens. If we try to get a scene variable at that moment, we risk getting an error ourselves if the Scene Variables object is destroyed before the GameMode object, given the change of scene involves destroying every object in the scene first.
As you may noticed by now, even if Visual Scripting is mostly extremely similar to C#, one has concepts to solve certain scenarios that the other doesn’t. Now that we know how to share variables, let’s finish some other managers that we will need later in the game.
Creating managers
Sometimes, we need a place to put together information about a group of similar objects, for example, EnemyManager, to check the number of enemies and potentially access an array of them to iterate over them and do something, or maybe MissionManager, to have access to all of the active missions in our game. Again, these cases can be considered Singletons, single objects that won’t be repeated (in our current game design), so let’s create the ones we will need in our game, that is, EnemyManager and WaveManager.
In our game, EnemyManager and WaveManager will just be used as places to save an array of references to the existing enemies and waves in our game, just as a way to know their current amount. There are ways to search all objects of a certain type to calculate their count, but those functions are expensive and not recommended for use unless you really know what you are doing. So, having a Singleton with a separate updated list of references to the target object type will require more code but will perform better. Also, as the game features increase, these managers will have more functionality and helper functions to interact with those objects.
Let’s start with the enemies manager by doing the following:
- Add a script called
Enemyto the Enemy Prefab; this will be the script that will connect this object withEnemyManagerin a moment. - Create an empty
GameObjectcalledEnemyManagerand add a script to it calledEnemiesManager. - Create a
publicstatic field of theEnemiesManagertype calledinstanceinside the script and add the Singleton repetition check inAwakeas we did inScoreManager. - Create a public field of the
List<Enemy>type calledenemies:

Figure 8.12: List of Enemy components
A list in C# represents a dynamic array, an array capable of adding and removing objects. You will see that you can add and remove elements to this list in the editor, but keep the list empty; we will add enemies another way. Take into account that List is in the System.Collections.Generic namespace; you will find the using sentence at the beginning of our script. Also, consider that you can make the list private and expose it to the code via a getter instead of making it a public field; but as usual, we will make our code as simple as possible for now:

Figure 8.13: Using needed to use the List class
Consider that List is a class type, so it must be instantiated, but as this type has exposing support in the editor, Unity will automatically instantiate it. You must use the new keyword to instantiate it in cases where you want a non-editor-exposed list, such as a private one or a list in a regular non-component C# class.
The C# list internally is implemented as an array. If you need a linked list, use the LinkedList collection type instead.
- In the
Startfunction of theEnemyscript, access theEnemyManagerSingleton and using theAddfunction of the enemies list, add this object to the list. This will “register” this enemy as active in the manager, so other objects can access the manager and check for the current enemies. TheStartfunction is called after all of theAwakefunction calls, and this is important because we need to be sure that theAwakefunction of the manager is executed prior to theStartfunction of the enemy to ensure that there is a manager set as the instance.
The problem we solved with the Start function is called a race condition, that is, when two pieces of code are not guaranteed to be executed in the same order, whereas Awake execution order can change due to different reasons. There are plenty of situations in code that this will happen, so pay attention to the possible race conditions in your code. Also, you might consider using more advanced solutions such as lazy initialization here, which can give you better stability, but again, for the sake of simplicity and exploring the Unity API, we will use the Start function approach for now.
- In the
OnDestroyfunction, remove the enemy from the list to keep the list updated with just the active ones:

Figure 8.14: The enemy script to register ourselves as an active enemy
With this, now we have a centralized place to access all of the active enemies in a simple but efficient way. I challenge you to do the same with the waves, using WaveManager, which will have the collection of all active waves to later check whether all waves finished their work to consider the game as won. Take some time to solve this; you will find the solution in the following screenshots, starting with WavesManager:
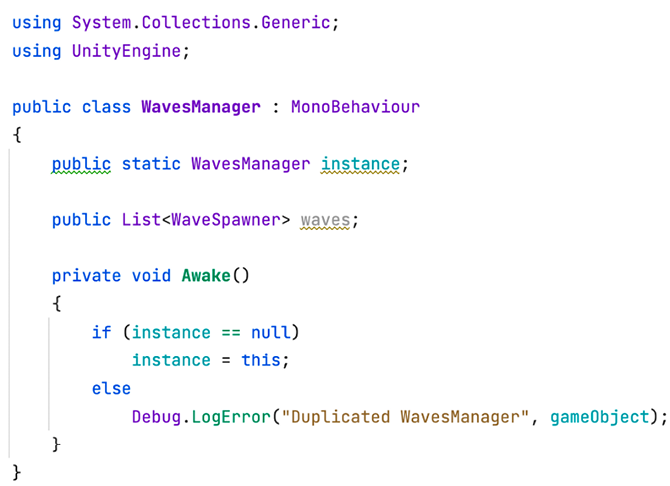
Figure 8.15: The full WavesManager script
You will also need the WaveSpawner script:

Figure 8.16: The modified WaveSpawner script to support WavesManager
As you can see, WaveManager is created the same way EnemyManager was, just a Singleton with a list of WaveSpawner references, but WaveSpawner is different. We execute the Add function of the list in the Start event of WaveSpawner to register the wave as an active one, but the Remove function needs more work.
The idea is to deregister the wave from the active waves list when the spawner finishes its work. Before this modification, we used Invoke to call the CancelInvoke function after a while to stop the spawning, but now we need to do more after the end time.
Instead of calling CancelInvoke after the specified wave end time, we will call a custom function called EndSpawner, which will call CancelInvoke to stop the spawner, Invoke Repeating, but also will call the remove-from-WavesManager-list function to make sure the removing-from-the-list function is called exactly when WaveSpawner finishes its work.
Regarding the Visual Scripting version, we can add two lists of GameObject type to the scene variables to hold the references to the existing waves and enemies so we can keep track of them. Just search "List of GameObject" in the search bar of the variable type selector and you will find it. In this case, the lists contain only GameObjects given that the Visual Scripting versions of WaveSpawner and enemy scripts are not types we can reference like C# ones. If you did both C# and Visual Scripting versions of these you will see you can reference the C# versions, but we are not going to mix C# and Visual Scripting as it is out of the scope of the book, so ignore them. Anyway, given how the Variables system of Visual Scripting works, we can still access variables inside if needed using the GetVariable node—remember the variables are not in the Visual Scripts but in the Variables node:

Figure 8.17: Adding lists to the Scene variables
Then, we can add the following to the WaveSpawner graph:

Figure 8.18: Adding elements to List
We used the Add List Item node to add our GameObject to the waves variable. We did this as the first thing to do in the On Start event node before anything. And to remove that wave from the active ones you will need to make the following change:

Figure 8.19: Removing elements from the List
We remove this spawner from the list using the Exit flow output pin of the For Loop, which is executed when the for loop finishes iterating.
Finally, regarding Enemy, you will need to create a new Enemy Script graph that will look similar:
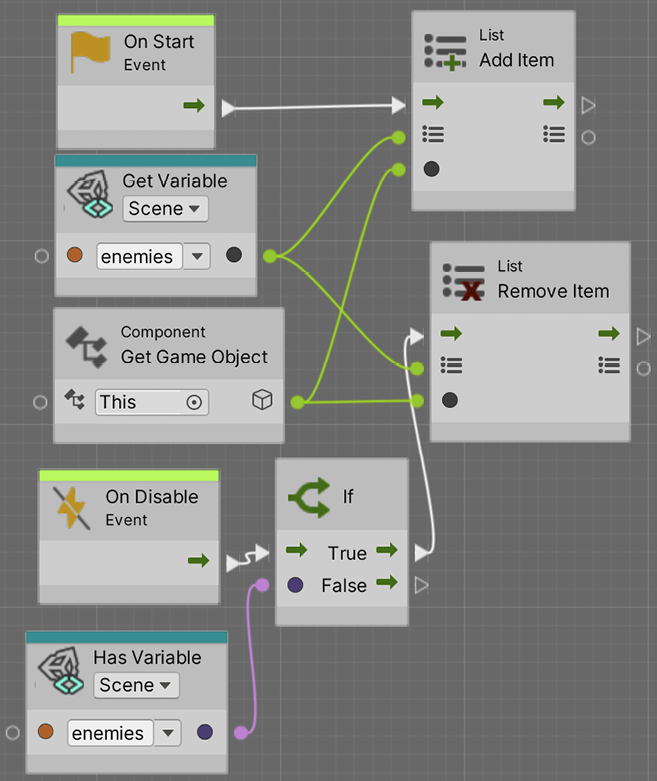
Figure 8.20: Enemy Adding and removing itself from the Lists
As you can see, we simply add the enemy on OnStart and remove it in OnDisable. Remember to try first using OnDestroy instead of OnDisable due to the bug we mentioned previously. You can check these changes by playing the game while having the Scene Variables GameObject selected and seeing how its value changes. Also remember the need to use the Has Variable node in case we are changing scenes.
Using Object managers, we now have centralized information about a group of objects, and we can add all sorts of object group logic here. We created the EnemiesManager, WavesManager, and ScoreManager as centralized places to store several game systems’ information, such as the enemies and waves present in the scene, and the score as well. We also saw the Visual Scripting version, centralizing that data in the Scene Variables object, so all Visual Scripts can read that data. But aside from having this information for updating the UI (which we will do in the next chapter), we can use this information to detect whether the victory and lose conditions of our game are met, creating a Game Mode object to detect that.
Creating Game Modes
We have created objects to simulate lots of gameplay aspects of our game, but the game needs to end sometime, whether we win or lose. As always, the question is where to put this logic, and that leads us to further questions. The main questions would be, will we always win or lose the game the same way? Will we have a special level with different criteria than “kill all of the waves,” such as a timed survival? Only you know the answer to those questions, but if right now the answer is no, it doesn’t mean that it won’t change later, so it is advisable to prepare our code to adapt seamlessly to changes.
To be honest, preparing code to adapt seamlessly to changes is almost impossible; there’s no way to have code that takes into account every possible case, and we will always need to rewrite some code sooner or later. We will try to make the code as adaptable as possible to changes; always doing that doesn’t consume lots of developing time and it’s sometimes preferable to write simple code fast than complex code slow that might not be necessary, and so we suggest you balance your time budget wisely.
To do this, we will separate the Victory and Lose conditions’ logic in its own object, which I like to call the “Game Mode” (not necessarily an industry standard). This will be a component that will oversee the game, checking conditions that need to be met in order to consider the game over. It will be like the referee of our game. The Game Mode will constantly check the information in the object managers and maybe other sources of information to detect the needed conditions. Having this object separated from other objects allows us to create different levels with different Game Modes; just use another Game Mode script in that level and that’s all.
In our case, we will have a single Game Mode for now, which will check whether the number of waves and enemies becomes 0, meaning that we have killed all of the possible enemies and the game is won. Also, it will check whether the life of the player reaches 0, considering the game as lost in that situation. Let’s create it by doing the following:
- Create an empty
GameModeobject and add aWavesGameModescript to it. As you can see, we gave the script a descriptive name considering that we can add other Game Modes. - In its
Updatefunction, check whether the number of enemies and waves has reached0by using theEnemyandWavemanagers; in that case, justprinta message in the console for now. All lists have aCountproperty, which will tell you the number of elements stored inside. - Add a
publicfield of theLifetype calledPlayerLifeand drag the player to that one; the idea is to also detect the lose condition here. - In
Update, add another check to detect whether the life amount of theplayerLifereference reached0, and in that case,printa lose message in the console:

Figure 8.21: Win and lose condition checks in WavesGameMode
- Play the game and test both cases, whether the player life reaches 0 or whether you have killed all enemies and waves.
Now, it is time to replace the messages with something more interesting. For now, we will just change the current scene to a Win Scene or Lose Scene, which will only have a UI with a win or lose message and a button to play again. In the future, you can add a Main Menu scene and have an option to get back to it. Let’s implement this by doing the following:
- Create a new scene (File | New Scene) and save it, calling it
WinScreen. - Add something to indicate that this is the win screen, such as simply a sphere with the camera pointing to it. This way we know when we changed to the win screen.
- Select the scene in the Project View and press Ctrl + D (Cmd + D on Mac) to duplicate the scene. Rename it
LoseScreen. - Double-click the
LoseScreenscene to open it and change the sphere to something different, maybe a cube. - Go to File | Build Settings to open the Scenes in Build list inside this window.
The idea is that Unity needs you to explicitly declare all scenes that must be included in the game. You might have test scenes or scenes that you don’t want to release yet, so that’s why we need to do this. In our case, our game will have WinScreen, LoseScreen, and the scene we have created so far with the game scenario, which I called Game, so just drag those scenes from the Project View to the list of the Build Settings window; we will need this to make the Game Mode script change between scenes properly. Also, consider that the first scene in this list will be the first scene to be opened when we play the game in its final version (known as the build), so you may want to rearrange the list according to that:

Figure 8.22: Registering the scenes to be included in the build of the game
- In
WavesGameMode, add ausingstatement for theUnityEngine.SceneManagementnamespace to enable the scene changing functions in this script. - Replace the console
printmessages with calls to theSceneManager.LoadScenefunction, which will receive a string with the name of the scene to load; in this case, it would beWinScreenandLoseScreen. You just need the scene name, not the entire path to the file.
If you want to chain different levels, you can create a public string field to allow you to specify via editor which scenes to load. Remember to have the scenes added to the Build Settings, if not, you will receive an error message in the console when you try to change the scenes:
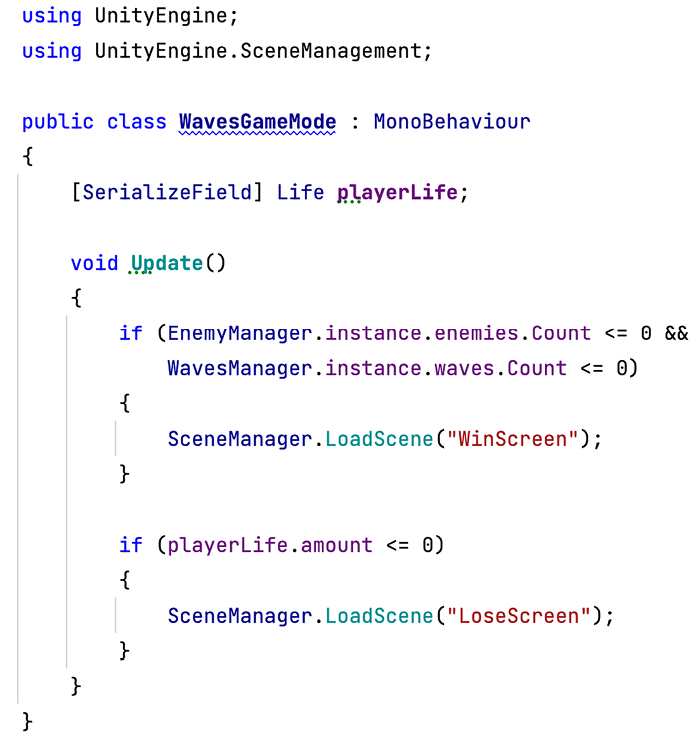
Figure 8.23: Changing scenes with SceneManager
Right now, we picked the simplest way to show whether we lost or won, but in the future, you may want something gentler than a sudden change of scene, such as maybe waiting a few moments with Invoke to delay that change or directly show the winning message inside the game without changing scenes. Bear this in mind when testing the game with people and checking whether they understood what happened when they were playing—game feedback is important to keep the player aware of what is happening and is not an easy task to tackle.
Regarding the Visual Scripting version, we added a new Script Graph to a separated object. Let’s examine it piece by piece to see it clearly. Let’s start with the win condition:

Figure 8.24: Win condition in Visual Scripting
Here, we are getting the Enemies list from the scene context (GetVariable node), and knowing that it contains a List, we are using the Count Items node to check how many enemies remain in this list. Remember we have a script that adds the enemy to the list when it’s spawned and removes it when it is destroyed. We do the same for the waves, so combine the conditions with an And node and connect it with an If to then do something (more on that in a moment).
Now let’s examine the Lose condition:

Figure 8.25: Lose condition in Visual Scripting
As the player’s life is not in the scene context (and shouldn’t be), and the player is a different GameObject from the one called GameMode (the one we created specifically for this script), we need a variable of type GameObject called player to reference it.
As you can see, we dragged our player to it in the Variables component. Finally, we used a GetVariable to access our player reference in the graph, and then another GetVariable to extract the life from it. We accomplished that by connecting the player reference to the GetVariable node of the life variable. Then we repeated this for the player’s base.
Finally, we load the scenes by doing the following:

Figure 8.26: Loading scenes in Visual Scripting
As you can see, we use the SceneManager LoadScene (SceneName) node to load the scenes. Notice how we load scenes with the postfix _VisualScripting given we have two versions of the scenes in our GitHub, the C# version and the Visual Scripting version.
Now we have a fully functional simple game, with mechanics and win and lose conditions, and while this is enough to start developing other aspects of our game, I want to discuss some issues with our current manager approach and how to solve them with events.
Improving our code with events
So far, we used Unity event functions to detect situations that can happen in the game such as Awake and Update. There are other similar functions that Unity uses to allow components to communicate with each other, as in the case of OnTriggerEnter, which is a way for the Rigidbody to inform other components in the GameObject that a collision has happened. In our case, we are using if statements inside the Update method to detect changes on other components, such as GameMode checking whether the number of enemies has reached 0. But we can improve this if we are informed by the Enemy manager when something has changed, and just do the check at that moment, such as with the Rigidbody telling us when collisions occur instead of checking for collisions every frame.
Also, sometimes, we rely on Unity events to execute logic, such as the score being given in the OnDestroy event, which informs us when the object is destroyed, but due to the nature of the event, it can be called in situations we don’t want to add to the score, such as when the scene is changed, or the game is closed. Objects are destroyed in those cases, but not because the player killed the enemy, leading to the score increasing when it shouldn’t. In this case, it would be great to have an event that tells us that life reached 0 to execute this logic, instead of relying on the general-purpose OnDestroy event.
The idea of events is to improve the model of communication between our objects, with the assurance that at the exact moment something happens, the relevant parts in that situation are notified to react accordingly. Unity has lots of events, but we can create ones specific to our gameplay logic. Let’s start by applying this in the score scenario we discussed earlier; the idea is to make the Life component have an event to communicate to the other components that the object was destroyed because life reached 0.
There are several ways to implement this, and we will use a little bit of a different approach than the Awake and Update methods; we will use the UnityEvent field type. This is a field type capable of holding references to functions to be executed when we want to, like C# delegates, but with other benefits, such as better Unity editor integration.
To implement this, do the following:
- In the
Lifecomponent, create apublicfield of theUnityEventtype calledonDeath. This field will represent an event where other classes can subscribe to it to be made aware whenLifereaches 0:

Figure 8.27: Creating a custom event field
- If you save the script and go to the editor, you can see the event in the Inspector. Unity events support being subscribed to methods in the editor so we can connect two objects together. We will use this in the UI scripting chapter, so let’s just ignore this for now:

Figure 8.28: UnityEvents showing up in the Inspector
You can use the generic delegate action or a custom delegate to create events instead of using UnityEvent, and aside from certain performance aspects, the only noticeable difference is that UnityEvent will show up in the editor, as demonstrated in step 2.
- When life reaches
0, call theInvokefunction of the event. This way, we will be telling any script interested in the event that it has happened:

Figure 8.29: Executing the event
- In
ScoreOnDeath, rename theOnDestroyfunction toGivePointsor whatever name you prefer; the idea here is to stop giving points in theOnDestroyevent. - In the
Awakefunction of theScoreOnDeathscript, get theLifecomponent usingGetComponentand save it in a local variable. - Call the
AddListenerfunction of theonDeathfield of theLifereference and pass theGivePointsfunction as the first argument. This is known as subscribing ourlistenermethodGivePointsto the eventonDeath. The idea is to tellLifeto executeGivePointswhen theonDeathevent is invoked. This way,Lifeinforms us about that situation. Remember that you don’t need to callGivePoints, but just pass the function as a field:

Figure 8.30: Subscribing to the OnDeath event to give points in that scenario
Consider calling RemoveListener in OnDestroy; as usual, it is convenient to unsubscribe listeners when possible to prevent any memory leak (reference preventing the GC to deallocate memory). In this scenario, it is not entirely necessary because both the Life and ScoreOnDeath components will be destroyed at the same time, but try to get used to this as a good practice.
- Save, select
ScoreManagerin the editor, and hit Play to test this. Try deleting an enemy from the Hierarchy while in Play mode to check that the score doesn’t rise because the enemy was destroyed for a reason other than their life becoming 0; you must destroy an enemy by shooting at them to see the score increase.
Now that Life has an onDeath event, we can also replace the player’s Life check from the WavesGameMode to use the event by doing the following:
- Create an
OnPlayerDiedfunction on theWavesGameModescript and move the loading of theLoseScreenscene fromUpdateto this function. You will be removing theifthat checks the life from theUpdatemethod, given that the event version will replace it. - In
Awake, add this new function to theonDeathevent of the player’sLifecomponent reference, calledplayerLifein our script:

Figure 8.31: Checking the lose condition with events
As you can see, creating custom events allows you to detect more specific situations other than the defaults in Unity, and keeps your code clean, without needing to constantly ask conditions in the Update function, which is not necessarily bad, but the event approach generates clearer code.
Remember that we can lose our game also by the player’s base Life reaching 0, so let’s create a cube that represents the object that enemies will attack to reduce the base Life. Taking this into account, I challenge you to add this second lose condition (player’s base life reaching 0) to our script. When you finish, you can check the solution in the following screenshot:

Figure 8.32: Complete WavesGameMode lose condition
As you can see, we just repeated the life event subscription, remember to create an object to represent the player’s base damage point, add a Life script to it, and drag that one as the player base Life reference of the Waves Game Mode. Something interesting here is that we subscribed the same function called OnPlayerOrBaseDied to both player Life and base Life onDeath events, given that we want the same result in both situations.
Now, let’s keep illustrating this concept by applying it to the managers to prevent the Game Mode from checking conditions every frame:
- Add a
UnityEventfield toEnemyManagercalledonChanged. This event will be executed whenever an enemy is added or removed from the list. - Create two functions,
AddEnemyandRemoveEnemy, both receiving a parameter of theEnemytype. The idea is that instead ofEnemyadding and removing itself from the list directly, it should use these functions. - Inside these two functions, invoke the
onChangedevent to inform others that the enemies list has been updated. The idea is that anyone who wants to add or remove enemies from the list needs to use these functions:

Figure 8.33: Calling events when enemies are added or removed
Here, we have the problem that nothing stops us from bypassing those two functions and using the list directly. You can solve that by making the list private and exposing it using the IReadOnlyList interface. Remember that this way, the list won’t be visible in the editor for debugging purposes.
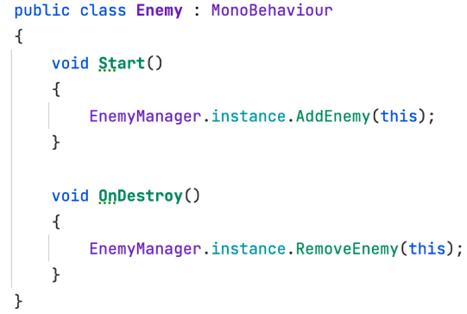
Figure 8.34: Making the Enemy use the add and remove functions
- Repeat the same process for
WaveManagerandWaveSpawner, create anonChangedevent, and create theAddWaveandRemoveWavefunctions and call them inWaveSpawnerinstead of directly accessing the list. This way, we are sure the event is called when necessary as we did withEnemyManager. Try to solve this step by yourself and then check the solution in the following screenshot, starting withWavesManager:
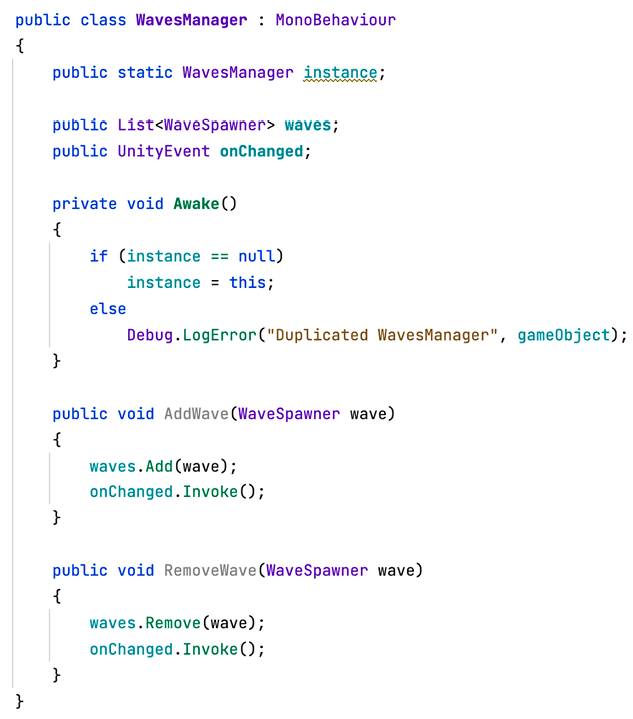
Figure 8.35: WaveManager OnChanged event implementation

Figure 8.36: Implementing the AddWave and RemoveWave functions
- In
WavesGameMode, renameUpdatetoCheckWinConditionand subscribe this function to theonChangedevent ofEnemyManagerand theonChangedevent ofWavesManager. The idea is to check for the number of enemies and waves being changed only when necessary. Remember to do the subscription to the events in theStartfunction due to the Singletons being initialized inAwake:

Figure 8.37: Checking the win condition when the enemies or waves amount is changed
Regarding the Visual Scripting version, let’s start checking the lose condition with events, checking first some changes needed in the Life Script Graph:
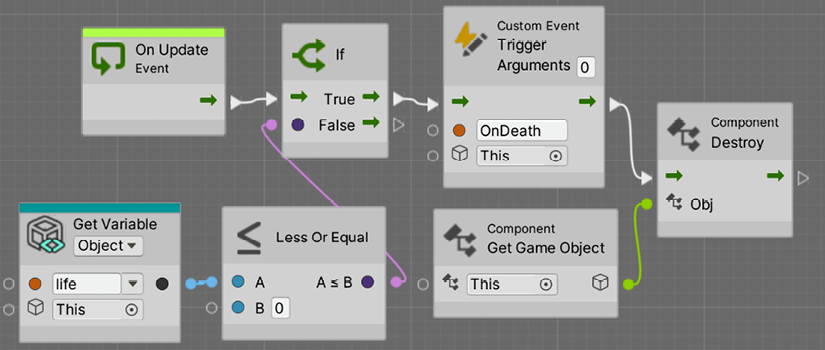
Figure 8.38: Triggering a Custom Event in our Life graph
First, after destroying the object when life reaches 0, we use the Trigger Custom Event node, specifying the name of our event is OnDeath. This will tell anyone waiting for the execution of the OnDeath event that we did. Remember, this is our Life Script Graph. Be sure to call destroy after triggering the event—while most of the time the order doesn’t matter, given that the destroy action doesn’t actually happen until the end of the frame, sometimes it can cause issues, so better be safe here. In this case, Game Mode should listen to the player’s OnDeath event, so let’s make the following change in our Game Mode Graph:

Figure 8.39: Listening to the OnDeath event of Player in Visual Scripting
We used the CustomEvent node connecting it to the player reference of our GameMode. This way we are specifying that if that player executes that event, we will execute the Load Scene node. Remember that the player reference is crucial to specify from whom we want to execute the OnDeath event, and remember that the Life Visual Graph will also be present in the enemies and we are not interested in them here. Also, remember to remove the If node and the condition nodes we used previously to detect this – the only If our Game Mode will have is the one for the win condition.
Essentially, we made any object with the Life script have an OnDeath event, and we made the GameMode listen to the OnDeath event of the player specifically.
We could also do events for enemies and waves, but that would complicate our graphs somewhat, given that we don’t have WaveManager or EnemyManager in the Visual Scripting versions. We could certainly create those to accomplish this, but sometimes the point of using Visual Scripting is to create simple logic, and these kinds of changes tend to make a graph grow quite a bit.
Another possible solution is to make the enemy and wave directly inform the Game Mode. We could use Trigger Custom Event in the enemies and waves, connecting that node to the Game Mode, to finally let the Game Mode have a Custom Event node from which to listen. The issue is that that would violate the correct dependencies between our objects; lower-level objects such as enemies and waves shouldn’t communicate with higher-level objects such as Game Mode. Essentially, Game Mode was supposed to be an overseer. If we apply the solution described in this paragraph, we won’t be able to have an enemy in another scene or game without having a Game Mode. So, for simplicity and code decoupling purposes, let’s keep the other conditions as they are—the more complex logic such as this will be probably handled in C# in full production projects.
Yes, using events means that we have to write more code than before, and in terms of functionality, we didn’t obtain anything new, but in bigger projects, managing conditions through Update checks will lead to different kinds of problems as previously discussed, such as race conditions and performance issues. Having a scalable code base sometimes requires more code, and this is one of those cases.
Before we finish, something to consider is that Unity events are not the only way to create this kind of event communication in Unity; you will find a similar approach called Action, the native C# version of events, which I recommend you look into if you want to see all of the options out there.
Summary
In this chapter, we finished an important part of the game: the ending, both by victory and by defeat. We discussed a simple but powerful way to separate the different layers of responsibilities by using managers created through Singletons, to guarantee that there isn’t more than one instance of every kind of manager and simplifying the connections between them through static access. Also, we visited the concept of events to streamline communication between objects to prevent problems and create more meaningful communication between objects.
With this knowledge, you are now able not only to detect the victory and lose conditions of the game but can also do it in a better-structured way. These patterns can be useful to improve our game code in general, and I recommend you try to apply them in other relevant scenarios.
In the next chapter, we are going to start Part 3 of the book, where we are going to see different Unity systems to improve the graphics and audio aspects of our game, starting by seeing how we can create materials to modify aspects of our objects, and create shaders with Shader Graph.
Join us on Discord!
Read this book alongside other users, Unity game development experts, and the author himself.
Ask questions, provide solutions to other readers, chat with the author via Ask Me Anything sessions, and much more.
Scan the QR code or visit the link to join the community.
