
Chapter 7: Deploying Windows Securely
Over the years, methods for deploying Windows have remained consistent, with little change to the overall approach. Before the advancement of unified endpoint management tools and Infrastructure as a Service (IaaS), companies were challenged with efficiently deploying devices with a consistent set of configurations to their users.
Historically, companies may have relied on Original Equipment Manufacturer (OEM) images, applied Group Policy, or built provisioning scripts to layer configurations onto devices. For many, the standard is to use imaging tools that allow companies to build and capture pre-configured images that could be pushed out to new devices or provisioned by a third-party partner or local IT company. While effective, these methods are time-consuming and resource-intensive, but still serve a valuable purpose for hardening Windows systems for deployment. Now, with the advancements in Azure AD and Intune, organizations can deploy Windows with very little or zero-touch provisioning using the Windows Autopilot service.
In this chapter, we're going to cover the tools that can be used to build and distribute a hardened Windows image. We will cover using the Windows Autopilot service for Windows clients, as well as deploying images for Azure Virtual Desktop and Windows 365 Cloud PC. It is important to understand the available tools for accomplishing these tasks since the approach may vary, depending on what types of resources your organization deploys.
In this chapter, we will cover the following topics:
- Device provisioning and upgrading Windows
- Building hardened Windows images
- Provisioning devices with Windows Autopilot
- Deploying images to Azure Virtual Desktop
- Deploying Windows 365 Cloud PC
Technical requirements
In this chapter, we will be referencing the following tools and services:
- Windows Assessment and Deployment Kit
- Windows Deployment Services (Windows Server roles and features)
- Microsoft Deployment Toolkit
Additionally, we will be covering the following tools that require additional licensing:
- Microsoft Intune licensing
- Windows Autopilot licensing
- Azure Virtual Desktop
- Windows 365 Cloud PC
Tip
Most Intune licenses also cover the use of System Center Configuration Manager and don't require a standalone purchase.
Device provisioning and upgrading Windows
It is strongly recommended that you update to the latest version of Windows as soon as possible. Windows 11 is rich with both hardware and security features, a great productivity tool for users, and is optimized for modern management, including support for bring your own device (BYOD) scenarios. BYOD has started to become a popular trend that's particularly aligned with the rapid adoption of remote work and can help significantly reduce costs and overheads for the IT department.
While this is an effective approach in some scenarios, it comes with unique challenges, including from a security lens and support and operational perspective. Depending on the organization's security and hardware requirements, it may not be suitable to support a BYOD program. Factors that may influence this decision could also include compliance requirements, the complexity of application configurations, and delivery, such as bandwidth requirements for large application payloads.
From a security perspective, you will not have as much fine-grained control over device security configurations and there may be other privacy and legal concerns if corporate data resides on users' devices. Until apps become more modernized and built with the appropriate app protection policy SDKs for modern management, it'll likely be necessary to enforce restrictions at the device level. This is where maintaining hardened images and purchasing certified hardware has a clear advantage in an enterprise scenario. Although maintaining images and deploying hardware comes with additional overheads and costs, MDM technologies such as Intune and Windows Autopilot have made these processes much lighter and more effective. Even if maintaining an image is still required due to heavy payloads from apps and policies, Intune and Autopilot can layer additional policies and enforce device configurations.
The decision of determining what provisioning model suits your needs depends on your deployment logistics, environment, and compliance requirements. Therefore, it's important to understand the technologies that are available to accomplish these tasks.
Upgrading Windows
When you're upgrading a major version of Windows, the two most common upgrade paths are known as in-place upgrades or migrations. For Windows clients, this can mean moving from Windows 7 or 8.1 to Windows 10/11 or converting an existing client into an Autopilot device. For Windows Server, upgrade options could also include rolling upgrades and license conversions to expand its feature set. In-place upgrades are supported for Windows Server and are typically limited to only one or two versions above the current version. However, it's worth noting that the migration path for Windows Server is typically recommended as the cleanest method. When you need to upgrade multiple assets, it's common to build a task sequence to assist with this process. Task sequences are a set of XML instructions that define a series of events to help automate the installation and upgrade process. They are created using tools such as MDT and orchestrate or sequence the installation of the device drivers, operating system, custom scripts, and software installations. Let's review the main upgrade paths.
In-place upgrades
With this option, Windows is upgraded from the source version to the desired version. Applications, settings, and user data are retained. Typically, these upgrades are managed by deploying task sequences using Windows Deployment Services or Configuration Manager, though they can also be controlled using Feature Updates in Intune, WSUS, or Windows Update. Manual options also exist when you're using an enterprise ISO, media creation tool, or Microsoft Update Assistant. With this upgrade option, a new operating system is installed on top of the existing one, which can cause some inconsistencies and challenges due to over-layering the operating system and setting translations. There may also be limitations that apply depending on the current source version and the target version you're looking to upgrade to.
Migration
With this option, Windows is completely reinstalled and can be migrated from basically any operating system, assuming there's support for the underlying hardware. The most common scenarios for migration include PC refresh or replacement or moving to new virtual machine hardware. Enterprise tools can be used to manage migrations such as in-place upgrades by using task sequence deployments. Applications, settings, and user data will need to be accounted for separately in this upgrade option as they will be deleted during the migration process. Use tools such as the User State Migration Tool (USMT) to migrate application and user data. If only user data is important, a cloud-based storage solution such as OneDrive can be used. For an overview of USMT, go to https://docs.microsoft.com/en-us/windows/deployment/usmt/usmt-overview.
Upgrading to Windows 11
Microsoft released Windows 11 for general availability on October 5, 2021, and recommends upgrading as soon as possible. Just like Windows 10, Windows 11 also supports both the in-place and migration upgrade path options and using similar methods to the ones we outlined previously. There may be some limitations if you're using the in-place path for versions before Windows 10 and it's worth understanding whether migration may the best option for you in this scenario. Windows 11 also has specific hardware compatibility requirements to support an upgrade. Specifics around system requirements can be found at https://www.microsoft.com/en-us/windows/windows-11-specifications.
For organizations that manage devices using Windows Updates for Business, notably with Intune, Windows 11 will not be pushed automatically like Feature Updates were in Windows 10. To accomplish this, use the Feature Updates for Windows 10 and later feature, and set Windows 11 as the feature update to deploy.
Tip
If you're using update rings to control Windows Update for Business settings, it is recommended that you set the feature update deferral window to 0 days if you're using Feature Updates to upgrade Windows.
After setting a feature update deployment, you can view its progress through the Reports feature in Intune:
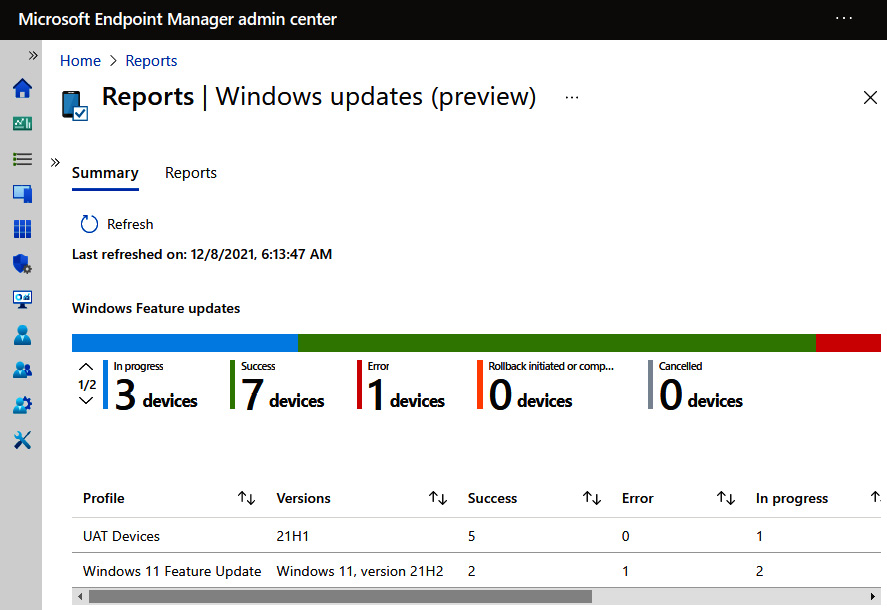
Figure 7.1 – Windows Feature Update report in Intune
To view the reports in the Microsoft Endpoint Manager (MEM) admin center, go to https://endpoint.microsoft.com, click on Reports, and choose Windows updates under Device management.
Microsoft has also prepared methods to determine the upgrade-readiness of your devices through various upgrade scripts and solutions in Azure, such as Endpoint Analytics or the Update Compliance solution in Log Analytics. Next, let's look at modern options for backing up user data and settings.
Backing up user data and settings
Many modern cloud-based storage solutions are available to help you securely back up and restore user data both automated and manually. Fortunately, with modern operating systems and application architectures, it's becoming a less common need to back up app data-specific settings for client applications. This helps simplify migrations, especially during a PC replacement scenario. With cloud-based storage, organizations can empower users to take ownership of their data and use cloud storage such as OneDrive for Business.
Using OneDrive for Business
The OneDrive client is part of the Microsoft 365 suite of applications and has been designed to run seamlessly on Windows for backing up and syncing user files. It has enhanced security controls to protect company-owned data, with the ability to restrict external sharing and work with information protection solutions to apply policies for sensitive information types, data retention, and data loss prevention. For additional information about how OneDrive safeguards data, go to https://support.microsoft.com/en-us/office/how-onedrive-safeguards-your-data-in-the-cloud-23c6ea94-3608-48d7-8bf0-80e142edd1e1?ui=en-us&rs=en-us&ad=us.
OneDrive's settings can also be controlled through Group Policy or Intune. Some settings that are worth noting for PC migrations include configuring known folder redirection to back up important folders such as your desktop, documents, and pictures. This will automatically back up common local locations where users save files, which may help you avoid a future headache. On company-owned devices, you can set which organization accounts are allowed to sync and prevent a user from syncing data to other accounts. For PC replacement scenarios, use the Files On-Demand feature to avoid users' data from automatically being downloaded once they've signed in to OneDrive.
Organizations can keep track of how users are handling OneDrive data by reviewing the audit logs in the Microsoft 365 Compliance Center and monitoring file usage using a cloud app security broker such as Defender for Cloud Apps. The following screenshot is of Microsoft Defender for Cloud Apps, where you can view details about the usage, files, and activities in OneDrive:
Figure 7.2 – OneDrive for Business activity in Defender for Cloud Apps
OneDrive is great for backing up user files, but let's look at another feature in Azure AD for backing up user-specific settings in Windows known as Enterprise State Roaming.
Enabling Enterprise State Roaming
Enterprise State Roaming is a feature of Azure Active Directory (AAD) joined Windows 10/11 devices that can synchronize specific settings such as theme, language preferences, and even mouse settings to the cloud. By configuring this feature, these preferences can roam with the user from device to device without them having to be backed up manually. Enterprise State Roaming is available for organizations with an Azure AD Premium or comparable license. To configure Enterprise State Roaming, log in to https://portal.azure.com, go to Azure Active Directory, and choose the Devices blade, as shown in the following screenshot:

Figure 7.3 – Enterprise State Roaming in Azure AD
When Enterprise State Roaming is enabled, the user's settings are backed up to Azure, where the data is encrypted both in transit and at rest using the Azure Rights Management service. The data is retained indefinitely and determined stale by Microsoft after a user's Azure AD account has been deleted.
To view what settings are synced on an Azure AD joined device on Windows 11, go to Settings, then Accounts, and choose Windows Backup. In the following screenshot, you can see that sync is disabled and is being managed by the organization through an MDM policy:
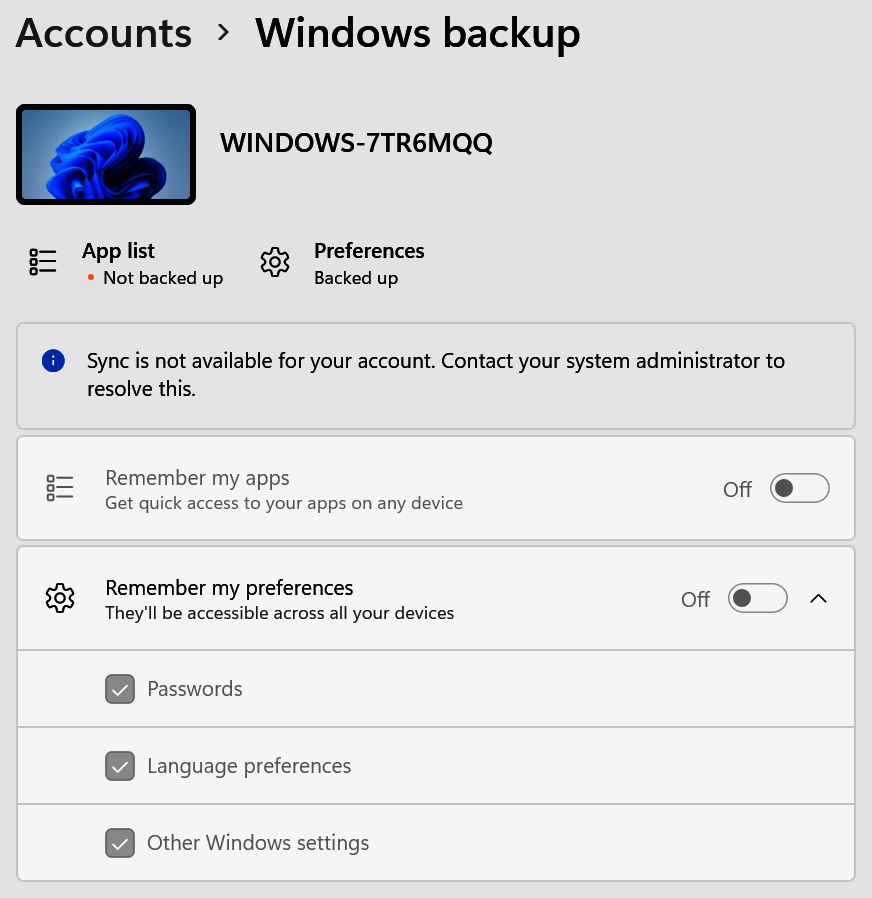
Figure 7.4 – Windows backup in Windows Settings
Tip
Be mindful of setting Enterprise State Roaming in BYOD scenarios. Setting this policy with MDM or GPO will override any personal settings and can potentially have unwanted effects on users' devices.
Next, let's look at backing up Microsoft Edge browser settings using Microsoft Edge enterprise sync.
Configuring Microsoft Edge enterprise sync
The Microsoft Edge chromium-based browser allows you to sync browser-specific settings across all devices where a user has logged in with an Azure AD account. Some settings that are supported include favorites, passwords, addresses, settings, extensions, history, and more. Microsoft Edge enterprise sync is available for Azure AD Premium license subscribers or equivalent and the policies can be configured through Group Policy and Intune. If you're using Intune App Protection policies to manage Microsoft Edge for iOS and Android, users can access some of the available settings, such as history and favorites, right from their mobile phone. This is an extremely convenient feature and a great way to be productive using the browser both on work and personal or company-owned devices.
Because Microsoft Edge is a chromium-based browser, many of the same security settings that are available in the Google Chrome security baselines also apply to Edge. An example of a few policies that can be configured for Microsoft Edge sync are as follows:
- Enabling sync and restricting sign-ins to certain domains
- Setting which data or sync types to disable, such as passwords, extensions, and open tabs
- Forcing sync and not requiring a user to consent
To view the configured settings in the Edge browser, go to edge://settings/profiles/sync. The Settings option that shows the briefcase icon depicts the settings that are managed by the policy, as shown in the following screenshot:
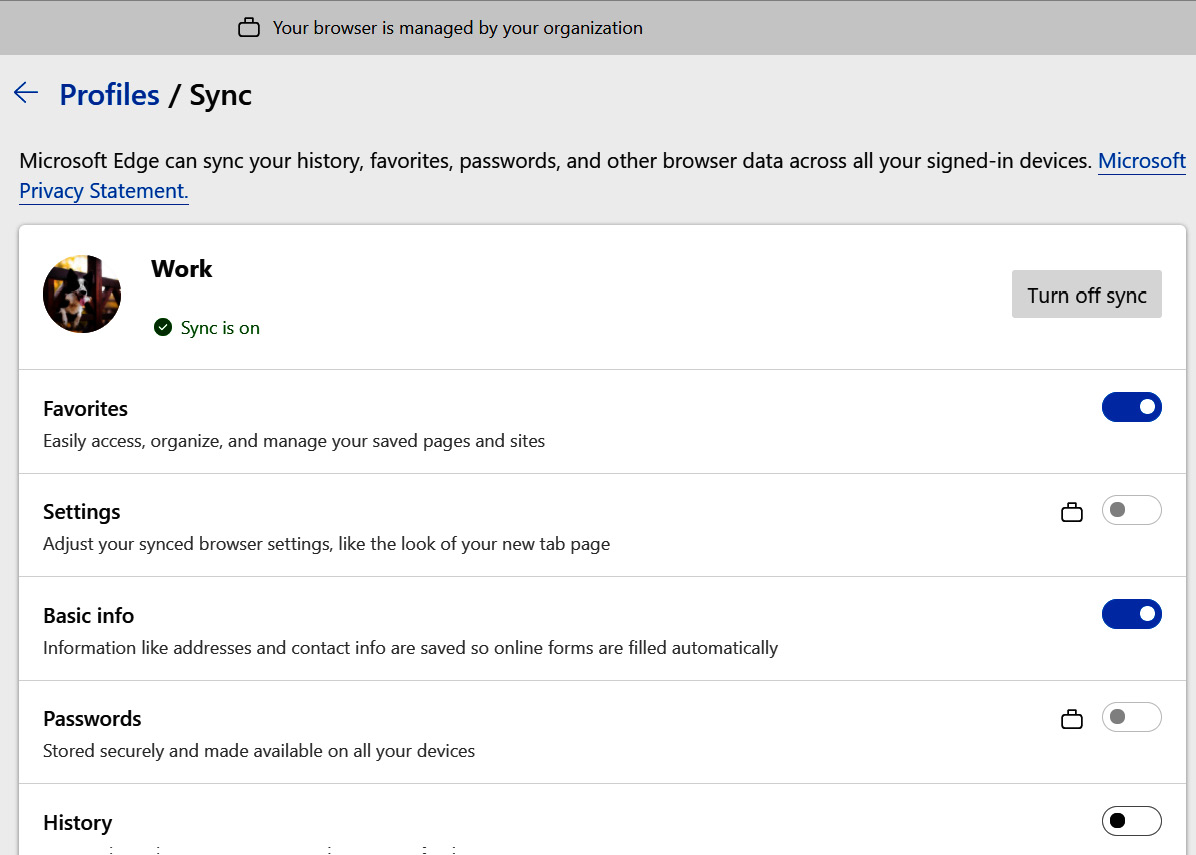
Figure 7.5 – Microsoft Edge sync settings
When combined with other cloud technologies such as Enterprise State Roaming for user preferences and OneDrive for Business for user files, these solutions cover a large percentage of the necessary user data and settings to account for during a migration. Once they have been configured, they also require little administrative effort to maintain and can significantly reduce the hands-on keyboard time a technician would need to spend with an end user during a PC replacement scenario.
These methods can significantly help in simplifying your upgrade deployments securely and cost-effectively. Next, let's discuss the tools we can use to build and deploy a hardened image.
Building hardened Windows images
Even with the increased adoption of the BYOD model and the advancement of self-provisioning technologies such as Windows Autopilot, building hardened images is still a relevant and effective method of device provisioning. Many organizations may have shifted to a lighter imaging process as these technologies can complement the traditional image deployment process and automate some provisioning tasks. Use cases for building and maintaining images still exist, whether it's for deploying laptops, workstations, or virtual desktops, and having a hardened image might be the best option for balancing security with ease of deployment. In the next few sections, we will provide an overview of the following device provisioning tools:
- Windows Assessment and Deployment Kit (Windows ADK)
- Windows Configuration Designer (WCD)
- Microsoft Deployment Toolkit (MDT)
- Windows Deployment Services (WDS)
Let's start by looking at Windows ADK.
Windows ADK
Windows ADK contains a variety of tools that can be used to build a custom Windows image. Some of the tools that are included with ADK are the Windows Configuration Designer, Deployment Image Servicing and Management tool (DISM), and the User State Migration Tool. Windows ADK is typically seen as a prerequisite for using the Microsoft Deployment Toolkit. Here is a list of what Windows ADK can do and why it's used:
- You can create custom boot images or WIM files using the Windows Preinstallation Environment (WinPE). WinPE is used for deployment and recovery and can later leverage a Preboot Execution Environment (PXE) or support boot from USB. Windows PE is now available as an add-on to the ADK.
- You can create an Unattended XML Windows Setup answer file. The answer file is used to automate the selection of options during the Windows setup process. Unattend XML can apply custom configurations and security features such as setting registry keys, disabling Windows features, and running custom scripts.
- You can back up user data with the USMT for migration or break-fix scenarios.
- You can create a reference hardened image that's used for deployment.
- You can create a Provisioning Package (PPKG) using Windows Configuration Designer. This can be applied after the image to enforce security settings, automate Azure AD Join, add certificates, install applications, and set network configurations such as Wi-Fi.
To download and install the latest ADK for Windows 11, go to https://docs.microsoft.com/en-us/windows-hardware/get-started/adk-install.
Next, let's look at Windows Configuration Designer, which helps configure shared devices or a smaller subset of devices that may not require you to maintain a fully customized image.
Windows Configuration Designer (WCD)
Windows Configuration Designer is an installation option of Windows ADK that's used to create provisioning packages for configuring clients through a friendly, easy-to-use interface. After selecting your project type and setting customization options using the tool, WCD exports the project as a provisioning package or PPKG file. Using a provisioning package may be useful for smaller organizations that don't have the resources, infrastructure, or skillset to build and deploy images at scale. They could also be useful for field IT to deploy shared devices, such as point of sale clients or kiosks. Provisioning packages can be applied directly to an out-of-the-box Windows installation or through the Accounts | Access work or school options in Windows settings. Some of the available configurations that can be set in WCD are as follows:
- Bulk MDM enrollment and Azure AD join
- Add applications
- Certificate enrollment
- Network profiles such as Wi-Fi and proxies
- Security restrictions such as password, device lock, encryption settings, update settings, and other privacy settings
- Customizations such as start tiles
If you're looking to automate Azure AD join through the provisioning package, a Device Enrollment Manager (DEM) account is required in Intune. To do this, log in to MEM at https://endpoint.microsoft.com, go to Devices, choose Enroll devices, and select Device enrollment managers. The following screenshot shows the available device enrollment managers in the Intune subscription. You can enroll up to 1,000 devices per account in a single AAD:
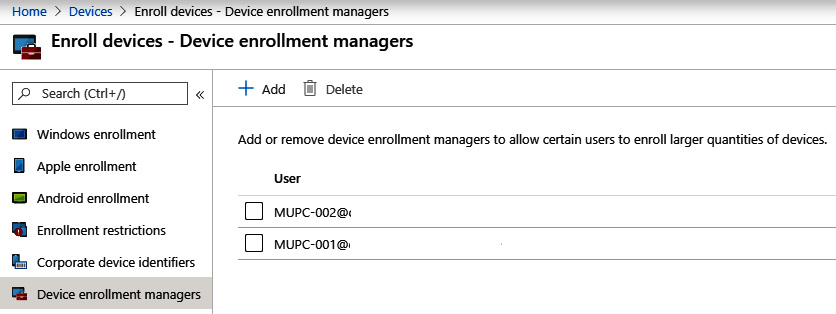
Figure 7.6 – Device enrollment managers in MEM
Tip
A DEM account must be assigned an Intune license to work properly.
To find out more about the DEM, go to https://docs.microsoft.com/en-us/mem/intune/enrollment/device-enrollment-manager-enroll.
To complete the Azure AD join process, WCD requires a token to be acquired using the DEM account. This will have a validity of 30 days. After the token expires, a new provisioning package must be created to successfully join the Azure AD client. In the following screenshot, you can see the Bulk AAD Token option. Clicking on Get Bulk Token brings up an AAD login page, where you can use one of the device enrollment manager accounts to acquire the AAD token:
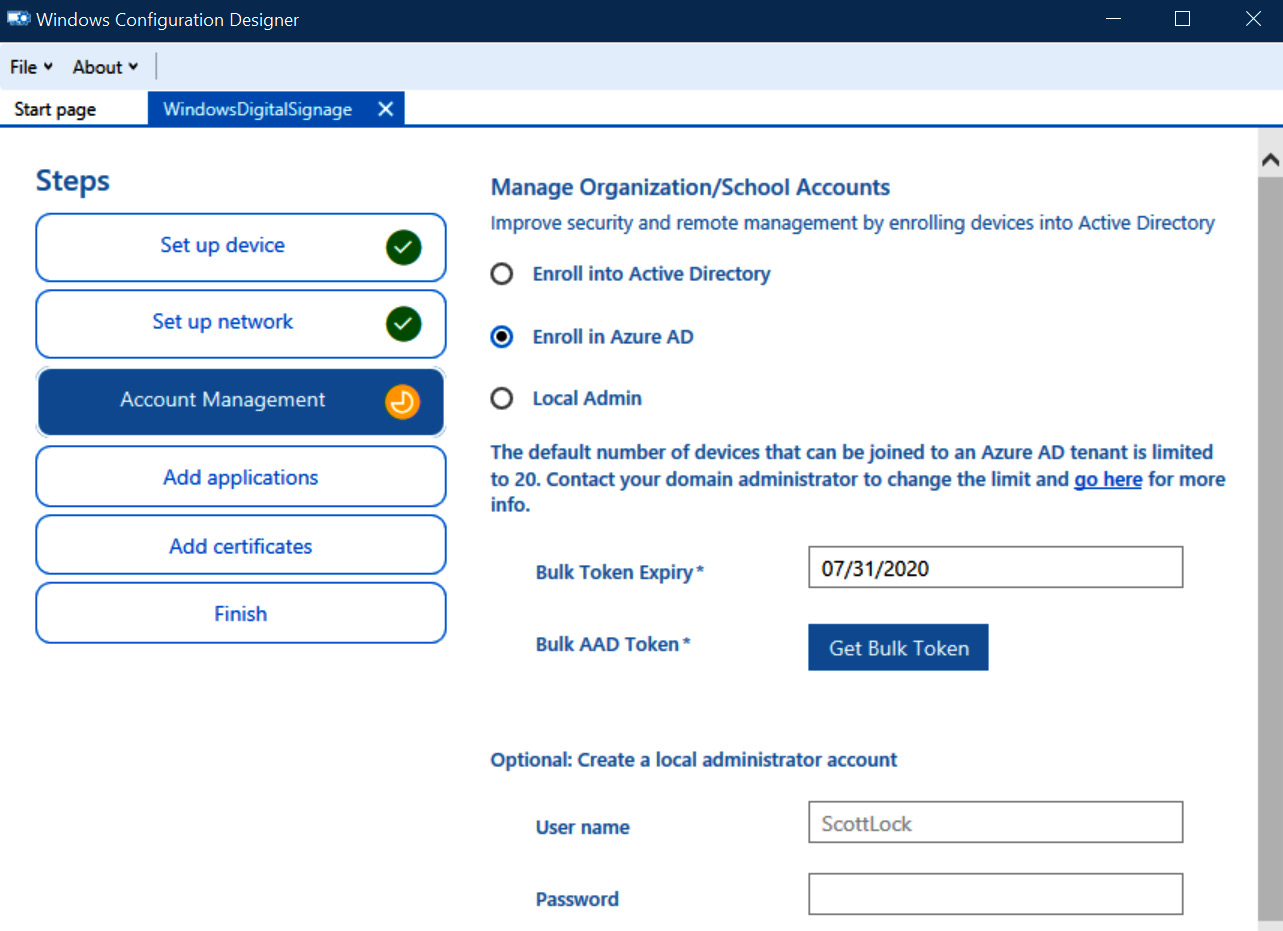
Figure 7.7 – WCD Azure AD token
For a full list of what can be configured in WCD, go to https://docs.microsoft.com/en-us/windows/configuration/provisioning-packages/provisioning-packages.
Now that we have covered the WCD tool, let's discuss Microsoft Deployment Toolkit (MDT). MDT is the recommended tool for building custom images and offers the greatest flexibility for applying baselines and maintaining images to be used for larger deployments.
Using MDT to build custom images
MDT is an enterprise standard for building boot images, automating deployments, and maintaining reference images. Using MDT, a task sequence is created to automate the installation of drivers, operating systems, applications, security configurations, and device settings. It is commonly used to create the process known as the Lite Touch Installation (LTI) method for Windows device provisioning, requiring little interaction by a technician. By integrating with Configuration Manager, this method can be taken a step further and almost fully automated using the Zero-Touch Installation (ZTI) method. For the LTI deployment model, boot media is created by using the Deployment Workbench application, which is mapped to a deployment share containing all the source files, drivers, and applications needed to build the image. Once the operating system, applications, and configurations have been set up, boot media is generated that can be used to deploy systems with a standalone USB or through network-based deployments. MDT comes with some default task sequence templates configured out of the box. Some of these include a Sysprep and Capture task sequence, Standard Client task sequence, Custom task sequence, Lite Touch OEM task sequence, Post OS Installation task sequence, Deploy to VHD task sequence, and Standard Client Upgrade task sequence.
Tip
System preparation (Sysprep) is the process of generalizing an operating system that's used to capture a reference image where computer-specific information is removed.
MDT helps reduce the complexity of using the standalone Windows ADK (which is a prerequisite to using MDT). The following features of MDT can be used when you're building a hardened image:
- Apply local Group Policy objects
- Support for PowerShell scripts
- Install applications such as Microsoft 365 Office Click-to-Run apps
- Enable BitLocker in the WinPE environment (offline BitLocker)
- Customize the Windows Recovery Environment (WindowsRE)
- Add or remove local administrators to/from devices
- Support for Windows clients, servers, and VHDs
- Add or remove Windows Server roles and features
- Support for UEFI and the GPT partition table
- USMT support to automate the process of backing up user data and settings
To learn more about getting started with MDT and information about the features listed here, go to https://docs.microsoft.com/en-us/windows/deployment/deploy-windows-mdt/get-started-with-the-microsoft-deployment-toolkit.
The following screenshot is of a task sequence in MDT. It contains the list of step-by-step instructions that were used during the LTI process to deploy the operating system and install various applications and customizations:
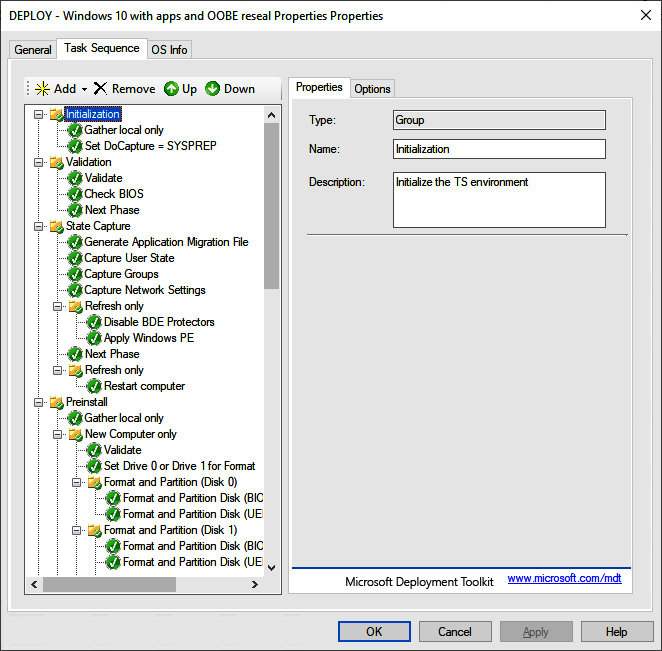
Figure 7.8 – Custom MDT task sequence
MDT can be used to deploy custom images over an Active Directory network with deployment share replication using Distributed File System Replication (DFSR). For more information on configuring an MDT deployment environment and DFS-R replication, go to https://docs.microsoft.com/en-us/windows/deployment/deploy-windows-mdt/deploy-a-windows-10-image-using-mdt.
MDT is a free tool that you can install from Microsoft, and the latest downloads can be found at https://docs.microsoft.com/en-us/configmgr/mdt/index?redirectedfrom=MSDN.
Now that we have covered MDT, let's discuss using Windows Deployment Services (WDS) to deploy an image.
Deploying images with WDS
WDS is a feature of Windows Server that's used to deploy customized or MDT-based images using network-based installation via PXE boot. To use the PXE method, you need a DHCP server role and a TFTP server on your network that's available to retrieve the boot images. Computers on the network listening for PXE can boot using the network adapter first in the boot order and initiate the image. WDS technology still exists but is not as heavily invested in today. If you're still using WDS, here are a few recommendations for securing your image deployments:
- Set a UDP port range to limit the communication protocols that are used to connect to WDS.
- Require that F12 is pressed to enter PXE boot.
- Use Active Directory authentication by specifying a domain controller to use for authentication and authorizing your WDS through DHCP.
- Use NTFS permissions on boot images and security groups on image groups to lock them down. Read and Execute are the only required permissions to deploy images.
- Require administrative approval to PXE from unmanaged AD computer objects using the pending device's snap-in.
- Specify the format of the computer name and organizational unit (OU) placement of the computer object in Active Directory. If necessary, use a staging OU that requires an administrator to move the PC object once the image is validated. This can also help prevent an overwrite of an already active and existing PC object.
WDS is a common method that's used by organizations to deploy images. Since it requires standalone infrastructure, additional upkeep and maintenance are required to keep it secure. It's important to note that Microsoft has deprecated some functionality in WDS with Windows Server 2022 and they recommend using alternatives to deploy Windows images, such as Configuration Manager. Workflows for Windows 11 and Windows Server that rely on boot.wim from installation media are now blocked, but PXE boot to custom boot images is still supported.
Next, let's look at deploying images with Configuration Manager.
MDT and Configuration Manager
MDT integration with Configuration Manager is commonly used in medium to large-sized organizations to support the deployment of operating systems and task sequences at scale. If you already have a Configuration Manager hierarchy deployed, depending on the architecture, your existing infrastructure may already be sufficient to support image deployments. Network-based installations can be supported by using distribution points that have been enabled for PXE support and using the Cloud Management Gateway for in-place upgrades over the internet. Support for task sequence deployments over the internet was introduced in version 2006. More information about these features can be found at https://docs.microsoft.com/en-us/mem/configmgr/osd/deploy-use/deploy-task-sequence-over-internet.
By integrating MDT with Configuration Manager, task sequences can be built directly in the console and then deployed to users and devices, just like any other software application, compliance policy, or configuration baseline. In addition to network-based installations, deployment methods include using Software Center and creating bootable media and standalone media. There is also no requirement that clients must have been previously managed by Configuration Manager or pre-imported if you're using bootable media or network-based options.
For backing up user state data, a task sequence leveraging the user state migration tool can grab the data and store it locally, remotely, or on a site server with the state migration point role enabled. Using this method and by creating a state migration point, the user data can then be restored on another computer by creating a computer association in the console. Computers, such as new hardware purchases, can be pre-staged or imported and associated with the user for PC replacement type scenarios. Once the task sequence starts on the new PC, the user state data can be restored automatically.
For more information on integrating MDT with Configuration Manager, go to https://docs.microsoft.com/en-us/windows/deployment/deploy-windows-cm/prepare-for-zero-touch-installation-of-windows-10-with-configuration-manager.
If you're using MDT and Configuration Manager to deploy images, the following recommendations are ways to protect your task sequences:
- Use security scopes and built-in security roles to define what objects administrators have access to. Security scopes can include boot images, driver packages, collection software updates, and applications, to name a few.
- Target only the necessary collections to receive your deployment.
- If you're leveraging PXE or media-based deployments, password-protect the task sequence.
- Modify the default permissions on deployment shares. This could be done to safeguard a user from accidentally kicking off a re-image if they unknowingly enter PXE.
MDT with Configuration Manager is a robust way to build and distribute images. Just like other on-premises tools, the underlying hardware and infrastructure require constant upkeep to ensure systems remain secure and run smoothly.
Next, let's discuss using the Windows Autopilot service and how it supports device provisioning by leveraging cloud technologies such as Azure AD and Intune.
Provisioning devices with Windows Autopilot
Windows Autopilot is used to automate and customize the device setup, deployment, and life cycle of a Windows client while minimizing the effort that's needed by IT staff in the device provisioning process. This is a fundamental change compared to the traditional model and enables a self-service scenario that can be fully completed by the end user without IT intervention. Imagine shipping a device directly from the supplier to the user, where they only need to turn it on and log in with their corporate credentials and be in a business-ready state. The remainder of the provisioning happens automatically over the internet, remains mostly transparent to the user, and can be used instead of a custom OEM image that's been pre-applied by a vendor.
For the Autopilot service to work, devices need to be registered in the service through your Azure AD tenant. This can be accomplished directly through your partnerships with device vendors or as a step by IT before shipping the device to the user. Once registered in the tenant, a profile is assigned to the device that determines the settings and configurations the user sees to control the onboarding process directly from the Windows Out Of Box Experience (OOBE). Windows Autopilot can help reduce costs and with features such as Autopilot reset, it can increase efficiencies compared to the traditional model. Registering the device into company management is simplified too through automating Azure AD join and automatic enrollment into Intune.
To use Windows Autopilot, you will need a supported version of Windows 10 or later, AAD, and Intune licenses. Windows Autopilot also supports hybrid domain join. For more information about the Windows Autopilot requirements, go to https://docs.microsoft.com/en-us/mem/autopilot/software-requirements.
First, let's look at the different deployment scenarios for Windows Autopilot.
Deployment scenarios
Windows Autopilot supports different deployment scenarios, including user-driven mode, self-deployment mode, pre-provisioned mode, and a reset feature called Windows Autopilot reset:
- User-driven mode is designed for the user self-service model requiring minimal IT interaction. A device can be shipped directly to the user, powered on, connected to a network, and fully provisioned by making a few selections in the OOBE menu.
- Self-deploying mode is useful for shared devices, kiosks, or digital signage. In self-deploying mode, all that is needed is an active network connection. The provisioning process will join the device to Azure AD and Intune, and then apply all the assigned policies, configurations, and applications through an enrollment status page.
Tip
Self-deploying mode requires the device to have a minimum of TPM 2.0, which supports TPM attestation to provision successfully and authenticate to Azure AD with a device token.
- Pre-provisioning is available in Windows 10, 1903, and later, and allows the IT department or vendor to pre-provision a device by installing targeted policies, settings, and applications before logging in as the user. Formerly called white glove, pre-provisioned mode gets the device into a business-ready state and helps minimize the wait time for application and policy payloads to be downloaded and installed after the user logs in for the first time. The requirements for pre-provisioning mode are similar to the ones for self-deploying mode and require a TPM 2.0 with attestation support and an ethernet connection to complete the setup.
- Windows Autopilot Reset can be used to reset the device and bring it back to a business-ready state by removing user-specific data and reapplying original device settings. This mode can be used to transfer assets to other associates and doesn't require IT to clear the device records in Azure AD and Intune or re-image the device. The Azure AD device identity and connection with Intune remains active and the next user that logs in will become the primary user.
Tip
Autopilot reset can be started locally by configuring a local policy and remotely through the Microsoft Endpoint Manager admin center.
Next, let's learn how to register a device with the Windows Autopilot service.
Registering devices with the Autopilot service
The first step to using Windows Autopilot is to register the device in your tenant by exporting the unique device identity, known as the hardware hash, and uploading it to the service. Once it's registered in your Azure AD tenant, an Autopilot profile is assigned to the device and a profile is assigned that drives the OOBE by pre-selecting options for the user. Registering the hardware to the Windows Autopilot service helps secure the device by creating an ownership association with your organization. This helps protect against theft and resale if the PC is stolen and wiped and comes back online. The registration process can be done manually, by an OEM, through a reseller or partner, or automatically for existing devices.
The Windows Autopilot cycle happens in three steps:
- Devices are registered to your organization by the IT department or through an OEM or vendor.
- Device profiles or Autopilot profiles are created and assigned to the devices.
- The device is powered on, connected to a network, and checks the Windows Autopilot deployment service for registration.
Collecting the hardware hash can be done automatically with Configuration Manager or by using the Get-WindowsAutoPilotInfo.ps1 script, which is located in the PowerShell gallery at https://www.powershellgallery.com/packages/Get-WindowsAutoPilotInfo/3.5.
After running the script locally on a device, a CSV file is generated that contains details about the manufacturer, model, and device serial number. The file can be imported manually into MEM or uploaded automatically through the scripted process using the online parameter and logging in with an account that has the appropriate permissions to import a device. This script can be used as a step during a task sequence installation to automate how the device hardware hash is collected and uploaded. The following screenshot shows an example of the CSV file that will be generated by the script:
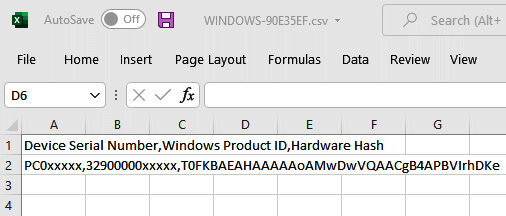
Figure 7.9 – Device hardware hash
To manually upload the hash into Intune, log in to Microsoft Endpoint Manager at https://endpoint.microsoft.com and choose Devices. Then, select Windows, select Windows enrollment, and click Devices under Windows Autopilot Deployment Program. Here, you can view your existing devices or import new ones. For more information on registering devices in the Windows Autopilot service, go to https://docs.microsoft.com/en-us/mem/autopilot/registration-overview.
Next, let's look at configuring an Autopilot profile to automatically provision a Windows device from OOBE.
Configuring an Autopilot profile
To configure an Autopilot profile and apply it to a device, a profile needs to be assigned to a device group, and the client needs to be added as a member after it's been registered. This membership assignment can be done manually or dynamically by using a dynamic group membership expression. After the device has been added, Intune will periodically evaluate the group memberships and apply any assigned profiles.
Tip
Autopilot registered devices have a Zero Trust Device ID (ZTDID) value assigned to them that can be used to dynamically add devices to a device group. You can also use the GroupTag operator in the script and assign a value for even greater flexibility.
For more information on creating a dynamic device group, go to https://docs.microsoft.com/en-us/mem/autopilot/enrollment-autopilot.
To create the deployment profile, go to the MEM admin center and choose Devices, select Windows, choose Windows Enrollment, and click Deployment profiles. Select the Create profile dropdown and choose Windows PC.
Give the profile a friendly name and description. Select Yes regarding Convert all targeted devices to Autopilot if you wish to automatically register any corporate-owned devices in the assigned device collection in the Autopilot service. Click Next to configure the OOBE settings. In the following screenshot, we have configured the OOBE experience to use user-driven mode, chosen the standard user account type, and selected Yes for Allow White Glove OOBE. Choosing Allow White Glove OOBE will add support for the pre-provisioning deployment mode:

Figure 7.10 – Autopilot deployment profile in Intune
A welcomed security feature of Windows Autopilot is the ability to allow a standard user to enroll in Azure Active Directory and Intune. Without it, the user must be a local device administrator.
After the OOBE settings have been selected, click Next to assign the profile to a device group. Once the profile has been assigned, you can view the status of the device and what profile was assigned to it through Windows Autopilot devices in MEM. It's important to note that the Autopilot profile must be assigned before the device comes online during OOBE for it to apply correctly. Otherwise, Windows will download a blank profile and none of your configurations will apply. From the MEM admin center, go to Devices, choose Windows, select Windows enrollment, and click Devices under Windows Autopilot Deployment Program. Search for the device by serial number to view the profile assignment status. In the following screenshot, the Profile status column shows as Assigned:
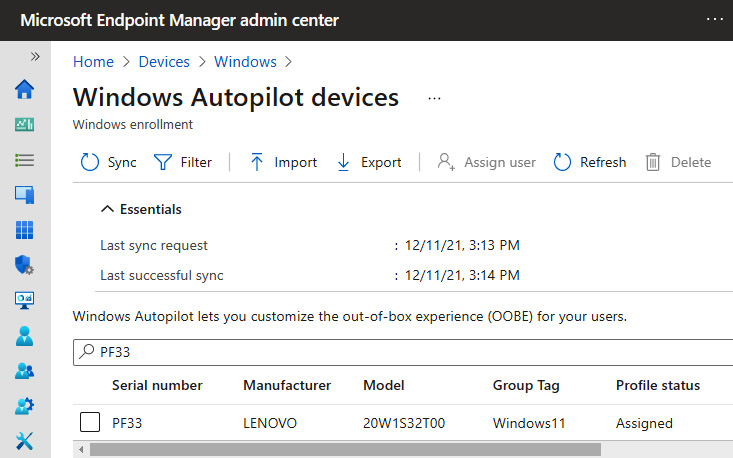
Figure 7.11 – Profile status
In the profile we created, White Glove OOBE was selected, enabling Windows Autopilot pre-provisioning mode. After confirming that the profile has been applied in the MEM admin center, the technician plugs the device into the power and hardwires Ethernet with internet connectivity. For Windows 11, if the language region on the Autopilot profile was left as the operating system's default, you should end up on the Azure AD sign-in screen. Press the Windows key five times to enter the additional configurations menu. Select Windows Autopilot provision and click Continue to begin the setup process:
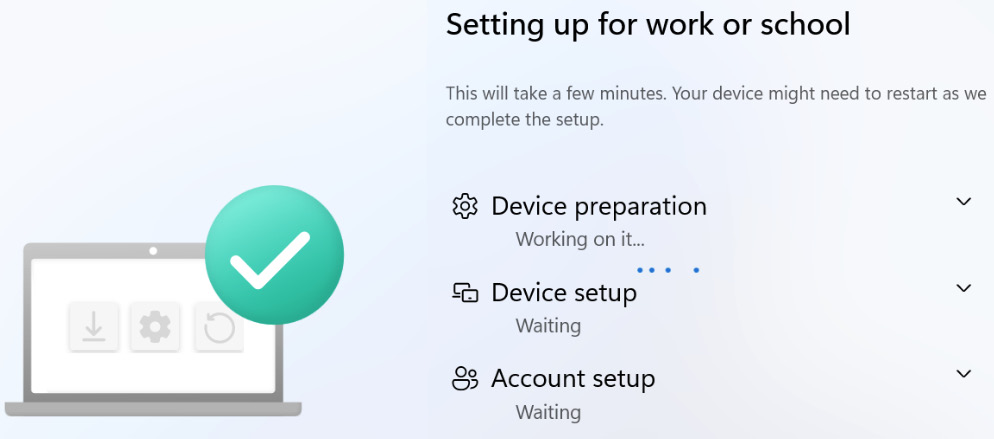
Figure 7.12 – Windows Autopilot pre-provisioning mode
With both pre-provisioning and the self-deploying mode, Autopilot relies on TPM attestation to confirm that the device is trusted by validating it against the device that's been registered with the Autopilot service in Azure AD. If this validation is successful, a device token will be issued, and the client can join Azure AD without the need to enter credentials.
For user-driven scenarios, you can configure an Enrollment Status Page (ESP) that will display the configuration process to the user, as shown in the preceding screenshot. This will allow you to set requirements to ensure the device is at a business-ready state before the user can access the desktop. A few options for the ESP include requiring the installation of specific applications, allowing users to collect troubleshooting logs if the enrollment fails, and actions to allow or block a user from continuing to the desktop if there are issues during the configuration process. To learn more about the ESP, go to https://docs.microsoft.com/en-us/mem/autopilot/enrollment-status.
For more information about configuring Windows Autopilot, go to the official documentation at https://docs.microsoft.com/en-us/mem/autopilot/windows-autopilot.
Next, let's look at deploying images for virtualized desktops running in Azure using the Azure Virtual Desktop service.
Deploying images to Azure Virtual Desktop
With the decreased costs of cloud computing, the adoption of remote work, and collaborating with business partners or vendors from all over the world, the virtualized desktop is a great solution for supporting your business needs. In Chapter 3, Hardware and Virtualization, we provided an overview of the features that are available when you're using Azure Virtual Desktop (AVD), including support for both Windows 11 multi-session persistent and non-persistent hosts. Let's review a few concepts for managing hosts in Azure and ways to build custom images that can be used for virtual machines that have been deployed to the AVD service.
There are many reference materials available on the internet, including dedicated groups and forums focused specifically on administering the Azure Virtual Desktop environment. If you're using the AVD service in your environment, you're strongly encouraged to join these groups as the technology is rapidly changing and can be highly complex. Staying up to date could offer opportunities to not only keep the environment secure but improve inefficiencies, provide a better experience for users, and ultimately save you money.
Managing hosts in AVD
The AVD administrative console can be found by logging into the Azure portal and searching for AVD. The structure of the AVD environment consists of the following resource types:
- Host pools
- Application groups
- Workspaces
Host pools contain the virtual machines that are deployed to make up the backend session hosts that a user connects to. When you're building your image, each virtual machine in the host pool should have the same images to maintain consistency. Host pools can contain multi-session hosts for pooled connections that have been load balanced across the hosts, or personal hosts that are dedicated and assigned to an individual user.
Application Groups contain the grouping of applications that are installed on the virtual machines in the host pools. The two main types are RemoteApp and Desktop. A RemoteApp group is used to publish applications individually for users to run instead of connecting to the full desktop experience. The Desktop app group grants access to the full desktop experience.
Workspaces contain collections of application groups (RemoteApp and Desktop app groups) and organize the resources in the Remote Desktop app that users can choose to connect to.
The following screenshot shows an example of both the RemoteApp and Desktop app groups being assigned to a workspace:
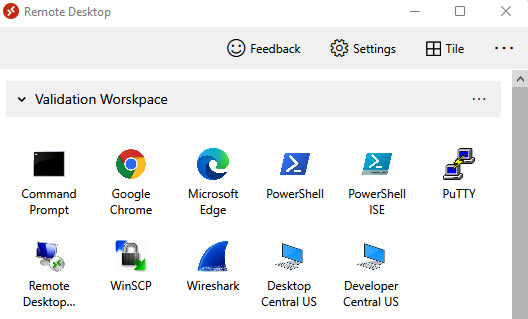
Figure 7.13 – Remote Desktop app for Azure Virtual Desktop
Next, let's look at the approach to building a master or golden image in Azure Virtual Desktop.
Building a master image
The master image, or golden image, acts as a base template that consists of the operating system and all the apps and configuration settings you want to use for your session host deployments. Azure has many pre-configured Windows multi-session images available in the marketplace, including images with Microsoft 365 apps already installed. Just like with Hyper-V and other virtual machines, the underlying image is created from a VHD file that is sysprepped, captured, and stored as an image resource in Azure and used for host deployments. Your master VHD image can be maintained directly on Azure VMs or downloaded and customized locally using tools such as Hyper-V or MDT to build customized task sequences. The high-level steps for creating a master image in Azure are as follows:
- Create the base template from an Azure VM. It is recommended that you start with one of the available multi-session host images from the marketplace.
- Create a snapshot of the VM in case you need to revert and make any changes.
- Customize the VM with apps and settings. Apply local security configurations and run security updates.
- Create another snapshot as a fallback if Sysprep fails.
- Sysprep the VM.
- Capture the VM as a managed image or use Azure Compute Gallery to provide replication for highly available images.
There is more than one way to maintain images for AVD and some of these include MDT, Configuration Manager, and using Azure VM Image Builder. Depending on which tool you use, the steps could vary. For more information about building images with Azure VM Image Builder, go to https://docs.microsoft.com/en-us/azure/virtual-machines/windows/image-builder-virtual-desktop.
Once the image has been created, it needs to be stored and available to deploy virtual machines. Let's learn how to use Azure Compute Gallery to store highly available images in Azure.
Replication with Azure Compute Gallery
Azure Compute Gallery is a solution in Azure that's used for storing and maintaining images. The gallery acts like a repository that organizes groups of image versions into image definitions. The gallery is highly available, uses premium storage, replicates globally, and allows images to be available for use across subscriptions and Azure AD tenants. The core concept of image management using the gallery consists of grouping images into image definitions. These definitions provide descriptive information about the collection, such as the operating system's type, VM generation, publisher, and SKU. For example, you may have various images for different lines of business where in each, you have different versions that include various flavors of apps or even different security patch levels for compatibility reasons. These versions are stored inside an image definition that can be used for cataloging purposes. Each image version contains the image source, which is typically a managed image, snapshot, or VHD, and virtual machines can be deployed directly from these versions across the replicated Azure regions. This is helpful for disaster recovery planning as only one image needs to be stored and it automatically replicates and is available in other Azure regions in the event of an outage. The following screenshot shows an image definition that contains different versions, the published date, the replicated regions, and the provisioning status:
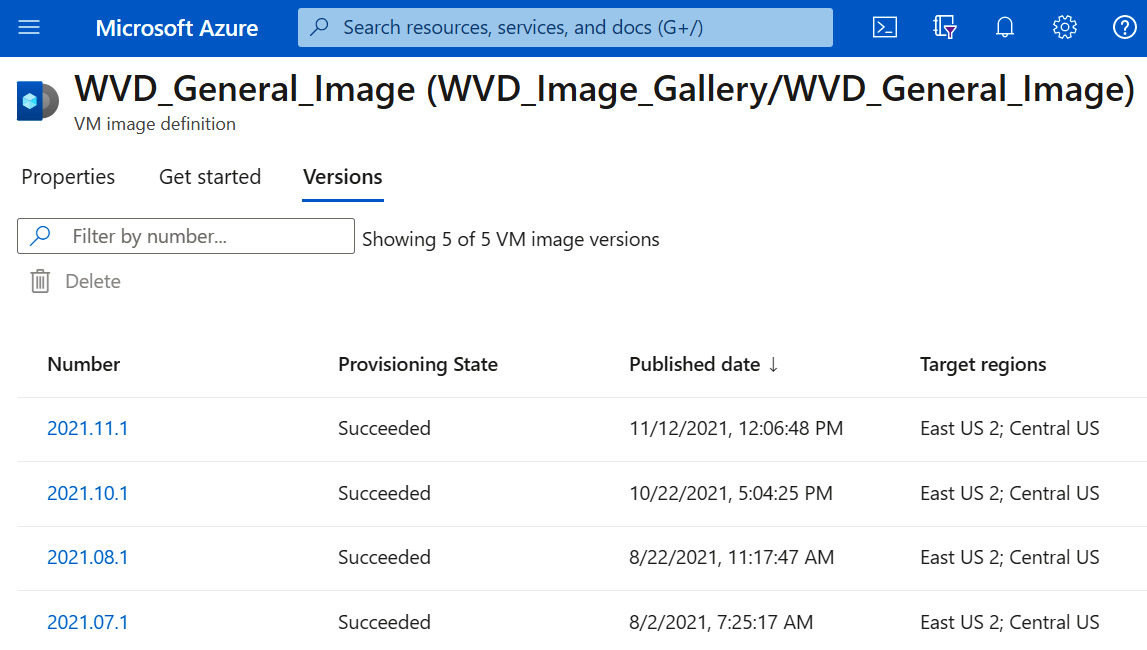
Figure 7.14 – Azure Compute Gallery
Once your image has been created and stored, there are a few methods that can be used for deployment. Let's look at some of the options that are available for deploying images to Azure Virtual Desktop.
Deploying images in Azure
As we mentioned earlier, host pools are the resources that contain a collection of virtual machines that users connect to when accessing VMs on the AVD service. To add virtual machines to an existing host pool, the golden image must contain the Azure Virtual Desktop Agent and a registration key must be generated to securely add the VM to the host pool. The full image deployment process can be automated end to end using the following methods:
- PowerShell using ARM templates
- Using a CI/CD pipeline with Azure DevOps
- The Azure portal through the AVD service
- Using templates in Azure
- Using Azure Compute Gallery and manually registering the VM
The following screenshot shows a session host deployment using the Azure portal. The image that's been selected from the dropdown is one from Azure Compute Gallery:
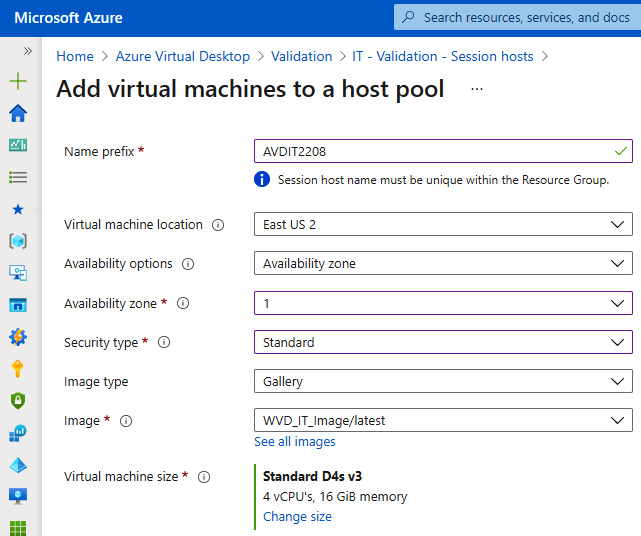
Figure 7.15 – Adding a session host to AVD
When you're deploying resources with ARM templates through PowerShell or Azure DevOps, the image reference is defined by the Azure resource ID of the image source. To get the image source resource ID, open Azure Compute Gallery, select your image definition, choose the target version, and click Properties. In the following screenshot, the imageReference parameter has the resource ID listed in the parameters.json file in Azure DevOps:
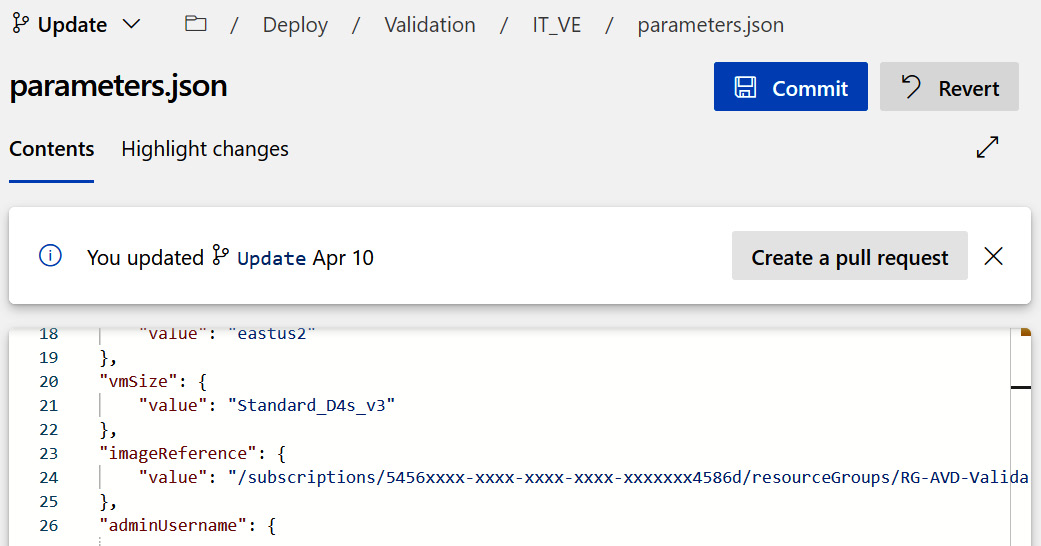
Figure 7.16 – Azure DevOps deployment for AVD
Deploying AVD can be highly complex and require a great understanding of how virtualization technologies work to be efficient. If you're considering deploying AVD in your environment, you are strongly encouraged to read the official documentation carefully to fully understand all the requirements. The official Microsoft documentation can be found at https://docs.microsoft.com/en-us/azure/virtual-desktop/.
Next, let's review another offering from Microsoft for streaming Windows in Azure using a simplified deployment model called Windows 365 Cloud PC.
Deploying Windows 365 Cloud PC
With the need to simplify technology for the consumer comes Windows 365 Cloud PC. In Chapter 3, Hardware and Virtualization, we introduced Windows Cloud PC with several benefits as to why you would want to adopt the technology. In short, Windows 365 Cloud PC is simple to set up, manage, and consume since it has security built into the service. It is considered a SaaS in which Microsoft manages the platform for you, taking away many of the complexities of managing traditional virtual platforms or physical devices.
Before we start deploying Windows 365 Cloud PC, it is important to ensure your security foundation is well defined and in place for your cloud PCs. Your Cloud PCs are no different from your end user devices, virtual desktops, and servers and should follow the same rigorous security standards as referenced in this book. Ensure your Cloud PCs have a security baseline defined and in place, they are part of your routine security and OS updates, endpoint protection is active, users are required to use MFA, Conditional Access policies are in place to tighten access controls, and compliance policies are enforced to ensure your Cloud PCs are healthy.
To get started with Windows 365 Cloud PC, the general requirements are as follows:
- Access to an Azure tenant with an active subscription.
- An active Intune and Azure AD tenant.
- On-premises Active Directory with Azure AD Connect to sync computer accounts.
- Intune device type enrollment restrictions are configured to allow the Windows MDM platform for corporate enrollment.
- Hybrid Azure AD join is configured.
- A virtual network (VNet) within Azure that acts as a gateway to the internet that can route to a DNS server for AD DS record resolution and allows direct access to your Domain Controller.
- A license for Windows, Intune, Azure AD, and Windows 365.
You can review the latest detailed requirements here: https://docs.microsoft.com/en-us/windows-365/enterprise/requirements.
To get started with Windows 365, you will need to assign the required licenses to your users. Once licensed, the next step is to create your on-premises network connection to allow your Cloud PCs to be provisioned, joined to your domain, and configured with connectivity to your internal network. To create the on-premises network connection, log in to https://endpoint.microsoft.com/. Then, browse to Devices > Windows 365 > On-premises network connection and click Create connection. Here, you can follow the steps to create and complete the on-premises network connection for your Cloud PCs.
Next, we will review the options for deploying images with your Windows 365 service.
Deploying customized or gallery images
When you're deploying your Cloud PCs with Windows 365, you have the option to use the Azure marketplace gallery images. Alternatively, if you prefer, you can use a custom-created image. You can use the same images that were created and replicated with Azure Compute Gallery, as we mentioned earlier in the Deploying images to Azure Virtual Desktop section. You need to meet the following requirements, regardless of whether you're using the Azure marketplace or a custom image:
- Windows 10 Enterprise 1909 or later (Excluding 2004) or Windows 11 Enterprise 212H
- A generation 2 virtual machine that has been generalized
- It must be a single-session VM as multi-session VMs are not supported at this time
- A default OS disk size of 64 GB
- Custom images must be replicated to Azure as managed images
You can view and create a marketplace gallery Cloud PC through a provisioning policy, or you can navigate directly to the marketplace in Azure by logging into https://portal.azure.com, searching for and accessing Marketplace, searching for Windows 365, selecting Windows 365 Enterprise – Cloud PC, and then clicking Windows 365 Enterprise – Cloud PC. From here, you will be provided with all the available Cloud PC images that can be deployed to the service:
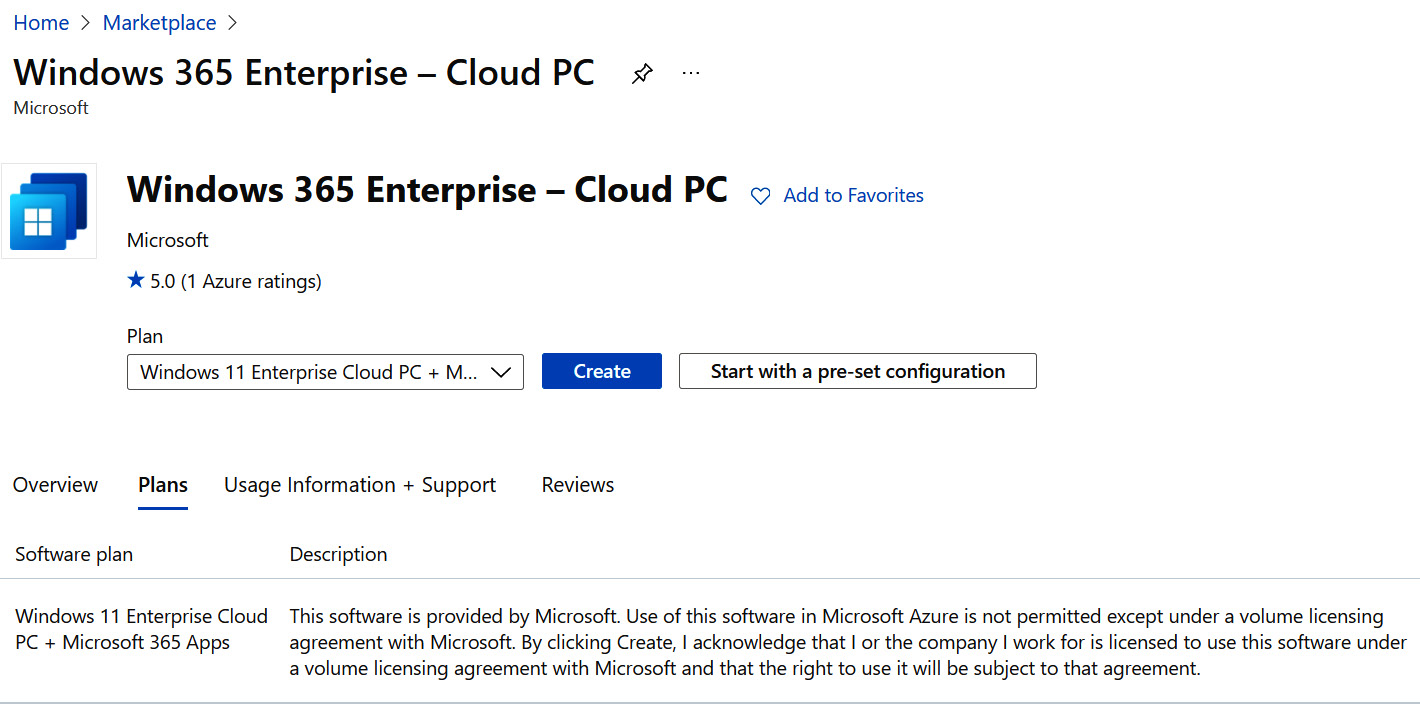
Figure 7.17 – Windows 365 Enterprise Cloud PC marketplace images
The available images include the option of an image with pre-installed Microsoft 365 apps fully optimized for Teams or an image with a vanilla or non-customized Windows installation.
If you would like to use a custom image, you will need to ensure the image meets the requirements provided earlier in this section. To add a custom image within Windows 365, log in to https://endpoint.microsoft.com/, browse to Devices > Windows 365 > Device images, and click on Add. When the image pane appears, enter the image's name, version, and the source of the image from the available custom images. Click Add to make the image available.
The following article provides details on creating a custom image within Azure: https://docs.microsoft.com/en-us/azure/virtual-machines/windows/capture-image-resource.
Now that the image is ready, the last step is to create a provisioning policy.
Provisioning policies for Cloud PC
Provisioning policies allow you to create Cloud PCs and user assignments. To create a provisioning policy, log in to https://endpoint.microsoft.com/, then browse to Devices > Windows 365 > Provisioning policies, and click Create policy. Then, complete the following steps:
- On the General page, enter your provisional policy's Name and Description and select your On-premises network connection. Then, click Next.
- Within the Image page, select whether you would like to use a gallery image or a custom image under Image type. Highlight the image you would like to use and click Next.
- Click Select groups to add the group you would like to include and apply the provisioning policy on the Assignments page. Click Next once all the groups have been selected. Only users with a Windows 365 license applied will receive a provisioned PC.
- On the Review + create page, ensure all the information is correct and click Create.
- You will now see the provisioning policy listed within the Provisioning policies section. It can take up to an hour for your provisioning policy to finalize and your Cloud PCs to be ready for your users to use. You can also edit or delete your provisioning policy.
Once the provisioning policy is complete and ready, your assigned users will be able to access their Cloud PC. Next, let's review the available options for users to access Cloud PCs.
Accessing Windows 365 Cloud PCs
There are two options available for accessing Cloud PCs:
- Via the web at http://windows365.microsoft.com
- Using the Microsoft Remote Desktop Client (MSRDC)
When you're accessing your Cloud PCs via the web, simply navigate to https://windows365.microsoft.com and follow the instructions to log in. Once you've logged in, you will be able to select your Cloud PC from within your browser. Here, you can also restart, rename, or troubleshoot your Cloud PC within the management console. To access your Cloud PC from a web browser, you will need to meet the following requirements:
- You will need a modern browser such as Microsoft Edge and Google Chrome
- You will need Windows OS, macOS, Chrome OS, or Linux OS
To use the Microsoft Remote Desktop client to access a Cloud PC, you will need to complete the following steps:
Tip
The Microsoft Remote Desktop client is a new remote desktop client for Windows. Remote Desktop Connection (MSTSC) is the client that is built into Windows.
- Download and install the Remote Desktop client from https://docs.microsoft.com/en-us/windows-server/remote/remote-desktop-services/clients/remote-desktop-clients.
- Once installed, you will need to open the Remote Desktop client and select Subscribe.
- Enter your Azure AD credentials.
- Double-click to launch your Cloud PC from the Remote Desktop client.
The Remote Desktop client can be downloaded using Windows Desktop, Microsoft Store, iOS, macOS, and Android. To find out more about the Windows 365 Cloud PC service, visit https://docs.microsoft.com/en-us/windows-365/enterprise/.
Summary
In this chapter, we provided an overview of Windows device provisioning and how to upgrade Windows. We reviewed the different upgrade paths, including in-place upgrades, migrations, and how to upgrade to Windows 11 using Intune Feature Updates. We also reviewed options for backing up user data and settings. Then, we covered the tools that are available for building hardened images, such as Windows ADK, WCD, MDT, WDS, and MDT with Configuration Manager.
Next, we learned how to provision devices with Windows Autopilot. This included an overview of the different deployment scenarios, how to register devices with the Autopilot service, and how to configure an Autopilot profile. Then, we reviewed managing hosts in Azure Virtual Desktop. This included building a master image, replicating those images with the Azure Compute Gallery, and using different methods to deploy them in Azure. We finished off this chapter by providing an overview of Windows 365 Cloud PC, including how to deploy customized or gallery images, provisioning policies for Cloud PC, and how to access your Cloud PC.
In the next chapter, we will discuss securing your Windows clients. We will cover how to stay updated using Windows Update for Business, enforce policies and configurations with Intune, and enable BitLocker encryption to prevent data theft. We will review how to configure biometric authentication and passwordless sign-in with Windows Hello for Business, how to approach deploying Windows security baselines, and how to configure many of the available Windows security features.