
Chapter 15: Securing Your Deployments
In this chapter, we'll talk about securing your complete deployment and release pipeline beyond code and dependencies, to be able to deliver your software in a fast but secure and compliant way to secure environments and meet regulatory requirements.
We will cover the following main topics in this chapter:
- Container and infrastructure security scanning
- Automating the infrastructure change process
- Source code and infrastructure integrity
- Dynamic application security testing
- Security hardening your release pipeline
Container and infrastructure security scanning
One of the most prominent hacks in the last years was SolarWinds, a software company that provides system management tools for network and infrastructure monitoring. Attackers managed to introduce a backdoor in the Orion software that got rolled out to over 30,000 clients and compromised them using this backdoor. Among the clients were the Department of Homeland Security and the Department of Treasury (Oladimeji S., Kerner S. M., 2021).
The SolarWinds attack is considered a software supply chain attack, and this is true for the customers of Orion that installed the compromised version. But the attack on Orion was far more sophisticated than just an update of an infected dependency; the attacker gained access to the SolarWinds network and managed to install a malware called Sunspot on the SolarWinds build servers. Sunspot inserted the backdoor Sunburst into the software builds of Orion by replacing a source file without tracing any build failures or other suspicious outputs (Eckels S., Smith J., & Ballenthin W., 2020).
The attack shows how deadly insider attacks are if your network is breached, and how important it is to secure your complete assembly line – not just the code, dependencies, and development environment. Build servers and all other systems included in the production of software must be kept secure.
Container scanning
Containers play an important part in every infrastructure today. They have a lot of advantages over classical virtual machines (VMs), but they also have their disadvantages. Containers need a new operational culture and existing processes, and practices might not be directly applicable (see Souppaya M., Morello J., & Scarfone K., 2017).
Containers consist of many different layers, and like software dependencies, these layers can introduce vulnerabilities. To detect these, you can use so-called container vulnerability analysis (CVA), also known as container security analysis (CSA).
GitHub does not have a built-in CVA tool, but nearly all solutions integrate very well into GitHub.
A very popular open source vulnerability scanner for container images and filesystems is grype (https://github.com/anchore/grype/) from Anchore (https://anchore.com/opensource/). It's really easy to integrate it into your GitHub Actions workflow:
- name: Anchore Container Scan
uses: anchore/[email protected]
with:
image: ${{ env.REGISTRY }}/${{ env.IMAGE_NAME }}debug: true
Another example of a CVA scanner is Clair (https://github.com/quay/clair), also an open source solution for static analysis of vulnerabilities in Docker and Open Container Initiative (OCI) containers. Clair can run as a container and store the scanning results in a Postgres database. See https://quay.github.io/clair/ for the complete documentation.
There are commercial container scanners that are normally part of more holistic security platforms. One example is Container Security from Aqua (https://www.aquasec.com/products/container-security/). The Aqua Platform (https://www.aquasec.com/aqua-cloud-native-security-platform/) is a cloud-native security platform for containerized, serverless, and VM-based applications. Aqua runs either as a SaaS or as a self-hosted edition.
Another example is WhiteSource (https://www.whitesourcesoftware.com/solution-for-containers/). They have the GP Security Scan Action in the GitHub marketplace to scan images before pushing them to GitHub packages (https://github.com/marketplace/actions/gp-security-scan).
Both are great solutions, but as they are not cheap and have a big overlap with GitHub's advanced security, I'll not cover them in more detail here.
Infrastructure policies
Not everything infrastructure-related are containers. There are far more things to consider from a security perspective, especially in the cloud.
If you are using cloud providers, it's worth looking at their security portfolio. Microsoft Azure, for example, contains Microsoft Defender for Cloud, a cloud security posture management (CSPM) tool to protect workloads across multi-cloud and hybrid environments and to find weak spots across your cloud configuration (https://azure.microsoft.com/en-us/services/defender-for-cloud). It supports Microsoft Azure, AWS, Google Cloud Platform, and on-premises workloads (using Azure Arc). Some of the capabilities in Microsoft Defender for Cloud are free for Microsoft Azure – but not all.
Microsoft Azure also contains Azure Policy (https://docs.microsoft.com/en-us/azure/governance/policy/), a service that helps you to enforce standards and assess compliance. It allows you to define certain rules as policy definitions and evaluate these policies on demand. This example is in a GitHub Action workflow that runs every morning at 8 am:
on:
schedule:
- cron: '0 8 * * *'
jobs:
assess-policy-compliance:
runs-on: ubuntu-latest
steps:
- name: Login to Azure
uses: azure/login@v1
with:
creds: ${{secrets.AZURE_CREDENTIALS}}- name: Check for resource compliance
uses: azure/policy-compliance-scan@v0
with:
scopes: |
/subscriptions/<subscription id>
/subscriptions/<...>
Together with the AI-powered security information and event management (SIEM) system called Microsoft Sentinel (https://azure.microsoft.com/en-us/services/microsoft-sentinel), this is a very powerful security toolchain. But whether it makes sense for you depends a lot on your setup. If your primary cloud provider is not Azure, your decision for CSPM and SIEM might look completely different, and the AWS Security Hub would make more sense for you.
A great open source tool to secure Infrastructure as Code (IaC) is Checkov (https://github.com/bridgecrewio/checkov) – a static code analysis tool that scans cloud infrastructure provisioned using Terraform, Terraform plan, CloudFormation, AWS Serverless Application Model (SAM), Kubernetes, Dockerfile, Serverless, or ARM templates, and detects security and compliance misconfigurations. It comes with over 1,000 built-in policies for the different platforms. It is really easy to use in GitHub, just use the Checkov GitHub Action (https://github.com/marketplace/actions/checkov-github-action) in your workflow and point it to the directory that contains your infrastructure:
- name: Checkov GitHub Action
uses: bridgecrewio/checkov-action@master
with:
directory: .
output_format: sarif
The action supports SARIF output and can be integrated into GitHub's advanced security:
- name: Upload SARIF file
uses: github/codeql-action/upload-sarif@v1
with:
sarif_file: results.sarif
if: always()
The results show up under Security | Code scanning alerts (see Figure 15.1):
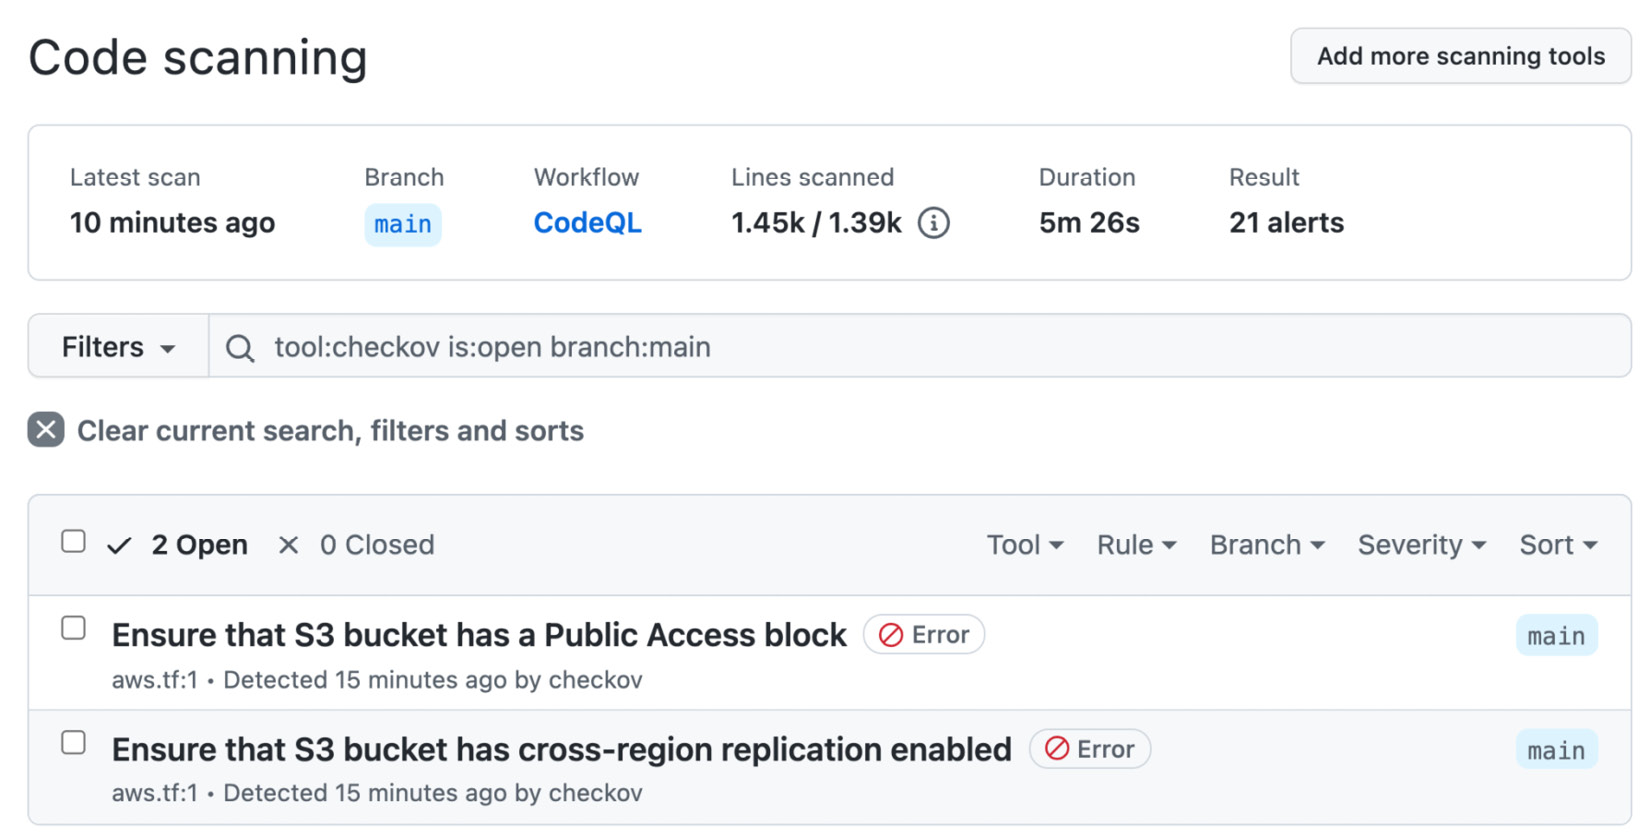
Figure 15.1 – Checkov results in GitHub
Checkov is great to check your IaC, but it does not check your infrastructure for changes. But if you have a solution such as Terraform or ARM, you can regularly run a validation in a workflow to check that nothing has changed.
Automate the infrastructure change process
Most IT organizations have a change management process in place to reduce operations and security risks. Most companies follow the Information Technology Infrastructure Library (ITIL). In ITIL, you have a Request for Change (RFC) that has to be approved by a Change-Advisory Board (CAB). The problem is that approvals by a CAB are related to a bad software delivery performance (see Forsgren N., Humble, J., & Kim, G., 2018).
From a security standpoint, change management and segregation of duties are important, and they are often also required for compliance. The key is again to rethink the underlying principles in a DevOps way.
With IaC and fully automated deployment, there is a complete audit trail for all infrastructure changes. If you have full control over the process, the best thing to do is to set up the CAB as CODEOWNERS for IaC files and do the approvals in pull requests. For simple standard changes on the application layer (for example, containers in a Kubernetes cluster), a peer review might be enough. For infrastructure changes on deeper levels with effects on networks, firewalls, or secrets, the number of reviewers will increase, and you can add specialists accordingly. These files normally also reside in other repositories and do not affect the developer velocity and slow down your releases.
If you are bound to a corporate process, this might not be so easy. In this case, you have to try to recategorize your changes to get most of them pre-approved and use peer reviews and automated checks for these changes for security reasons. Then, automate the process for higher-risk changes so that the information for the CAB is as complete and correct as possible to come to a fast approval (see Kim G., Humble J., Debois P. & Willis J., 2016, Part VI, Chapter 23).
Source code and infrastructure integrity
In manufacturing, it's a normal practice to provide a bill of materials (BOM) for a production order. A BOM is a list of raw materials, subassemblies, intermediate assemblies, subcomponents, and parts that have been used to manufacture the end product.
The same thing exists for software: the software bill of materials (SBOM), but it is still less common.
The SBOM
If you have a close look at software supply chain attacks such as the event-stream incident (see Thomas Claburn, 2018), you'll find that they inject malicious code in a release, so the source code in GitHub did not match the files that were included in the npm package. An SBOM can help here with the forensic and it can be used to compare the hashes of different versions.
In the SolarWinds attack (see the Crowdstrike blog, 2021) dependencies were not tempered. Instead, there was an additional process running that manipulated the file system during the execution of MsBuild.exe. To help prevent and investigate these kinds of attacks, you'll have to extend the SBOM to include details for all tools included in the build process and all the running processes on the build machine.
There are different common formats for SBOM:
- Software Package Data Exchange (SPDX): SPDX is an open standard for SBOM with origins in the Linux Foundation. Its origin was license compliance, but it also contains copyrights, security references, and other metadata. SPDX was recently approved as ISO/IEC standard (ISO/IEC 5962:2021), and it fulfills the NTIA's Minimum Elements For a Software Bill of Materials.
- CycloneDX (CDX): CDX is a lightweight open source format with origins in the OWASP community. It is optimized for integrating SBOM generation into a release pipeline.
- Software Identification (SWID) tags: SWID is an ISO/IEC industry standard (ISO/IEC 19770-2) used by various commercial software publishers. It supports automation of software inventory, assessment of software vulnerabilities on machines, detection of missing patches, targeting of configuration checklist assessments, software integrity checking, installation and execution whitelists/blacklists, and other security and operational use cases. It is a good format for doing the inventory of the software installed on your build machines.
There are different tools and use cases for each format. SPDX is generated by syft. You can use the Anchore SBOM Action (see https://github.com/marketplace/actions/anchore-sbom-action) to generate an SPDX SBOM for a Docker or OCI container:
- name: Anchore SBOM Action
uses: anchore/[email protected]
with:
path: .
image: ${{ env.REGISTRY }}/${{ env.IMAGE_NAME }} registry-username: ${{ github.actor }} registry-password: ${{ secrets.GITHUB_TOKEN }}The SBOM is being uploaded as a workflow artifact (see Figure 15.2):
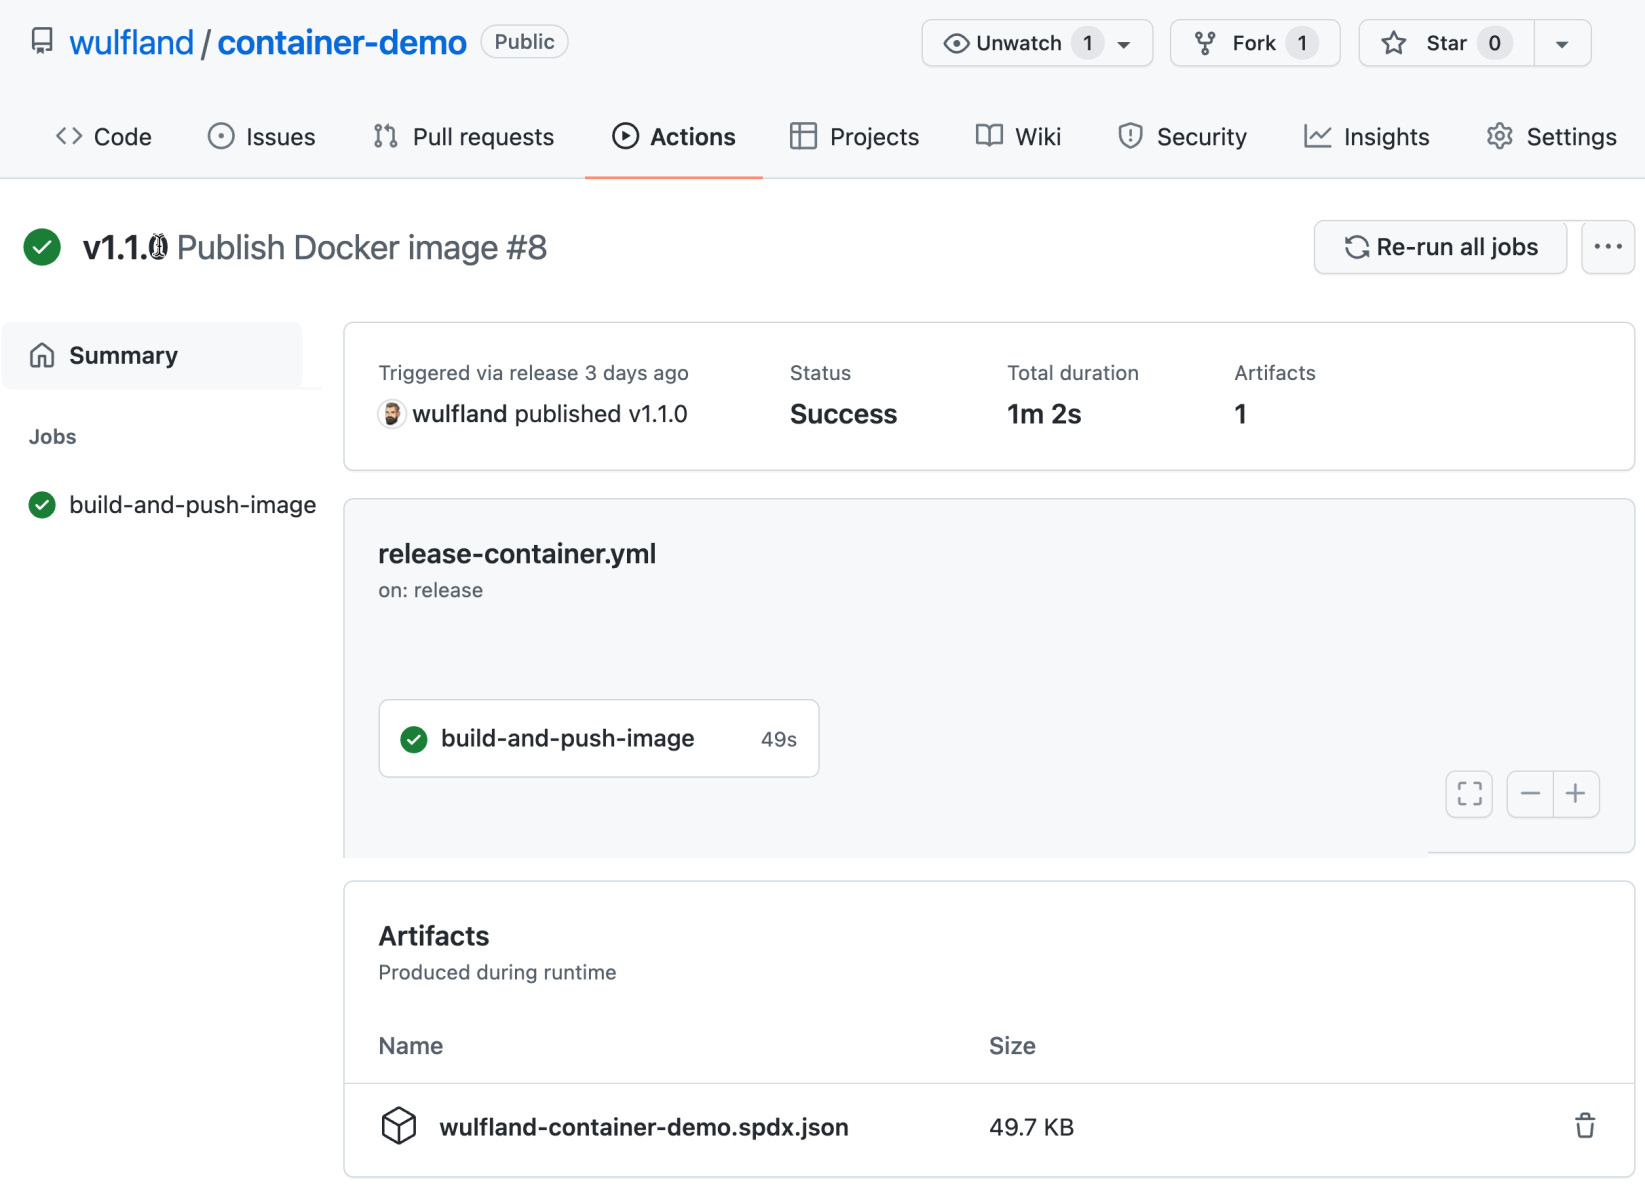
Figure 15.2 – SPDX SBOM uploaded as a build artifact
FOSSology (https://github.com/fossology/fossology) is an open source license compliance solution that also uses SPDX.
CDX (https://cyclonedx.org/) is more focused on application security. There are versions for Node.js, .NET, Python, PHP, and Go in the marketplace, but many more languages are supported using CLI or other package managers (such as Java, Maven, and Conan). The usage is simple. Here is an example of the action for .NET:
- name: CycloneDX .NET Generate SBOM
uses: CycloneDX/[email protected]
with:
path: ./CycloneDX.sln
github-bearer-token: ${{ secrets.GITHUB_TOKEN }}The SBOM does not get uploaded automatically, unlike the Anchore action; you would have to do that manually:
- name: Upload a Build Artifact
uses: actions/[email protected]
with:
path: bom.xml
CDX is also used in OWASP Dependency Track (see https://github.com/DependencyTrack/dependency-track) – a component analysis platform that you can run as a container or in Kubernetes. You can upload the SBOM directly into your DependencyTrack instance:
uses: DependencyTrack/[email protected]
with:
serverhostname: 'your-instance.org'
apikey: ${{ secrets.DEPENDENCYTRACK_APIKEY }}projectname: 'Your Project Name'
projectversion: 'main'
SWID tags are more used in Software Asset Management (SAM) solutions such as snow (https://www.snowsoftware.com/), Microsoft System Center, or ServiceNow ITOM. CDX and SPDX can use SWID tags if they are present.
If you want to learn more about SBOM, see https://www.ntia.gov/sbom.
If you are working completely on GitHub Enterprise Cloud and use the hosted runners, SBOM is not so important. All the relevant data is connected on GitHub anyway. But, if you are on GitHub Enterprise Server, have self-hosted runners, and other commercial software in your release pipeline that is not consumed by public package managers, an SBOM for all your releases can help to detect vulnerabilities, license issues, and help with the forensic in case of an incident.
Signing your commits
A discussion I often have is whether you should sign all your commits or not. Git is very powerful and gives you the possibility to alter existing commits. But this also means that the author of a commit is not necessarily the one that is committing the code. A commit has two fields: author and committer. Both fields get set to the values of user.name and user.email from git config plus a timestamp. If you rebase, for example, the committer changes to the current value, but the author stays the same. Both fields have absolutely nothing to do with the authentication to GitHub.
You can look up the email address of Linus Torvalds in the Linux repository, configure your local Git repository to use this email address, and commit it to your repository. The commit will appear as if the author was Linus (see Figure 15.3):
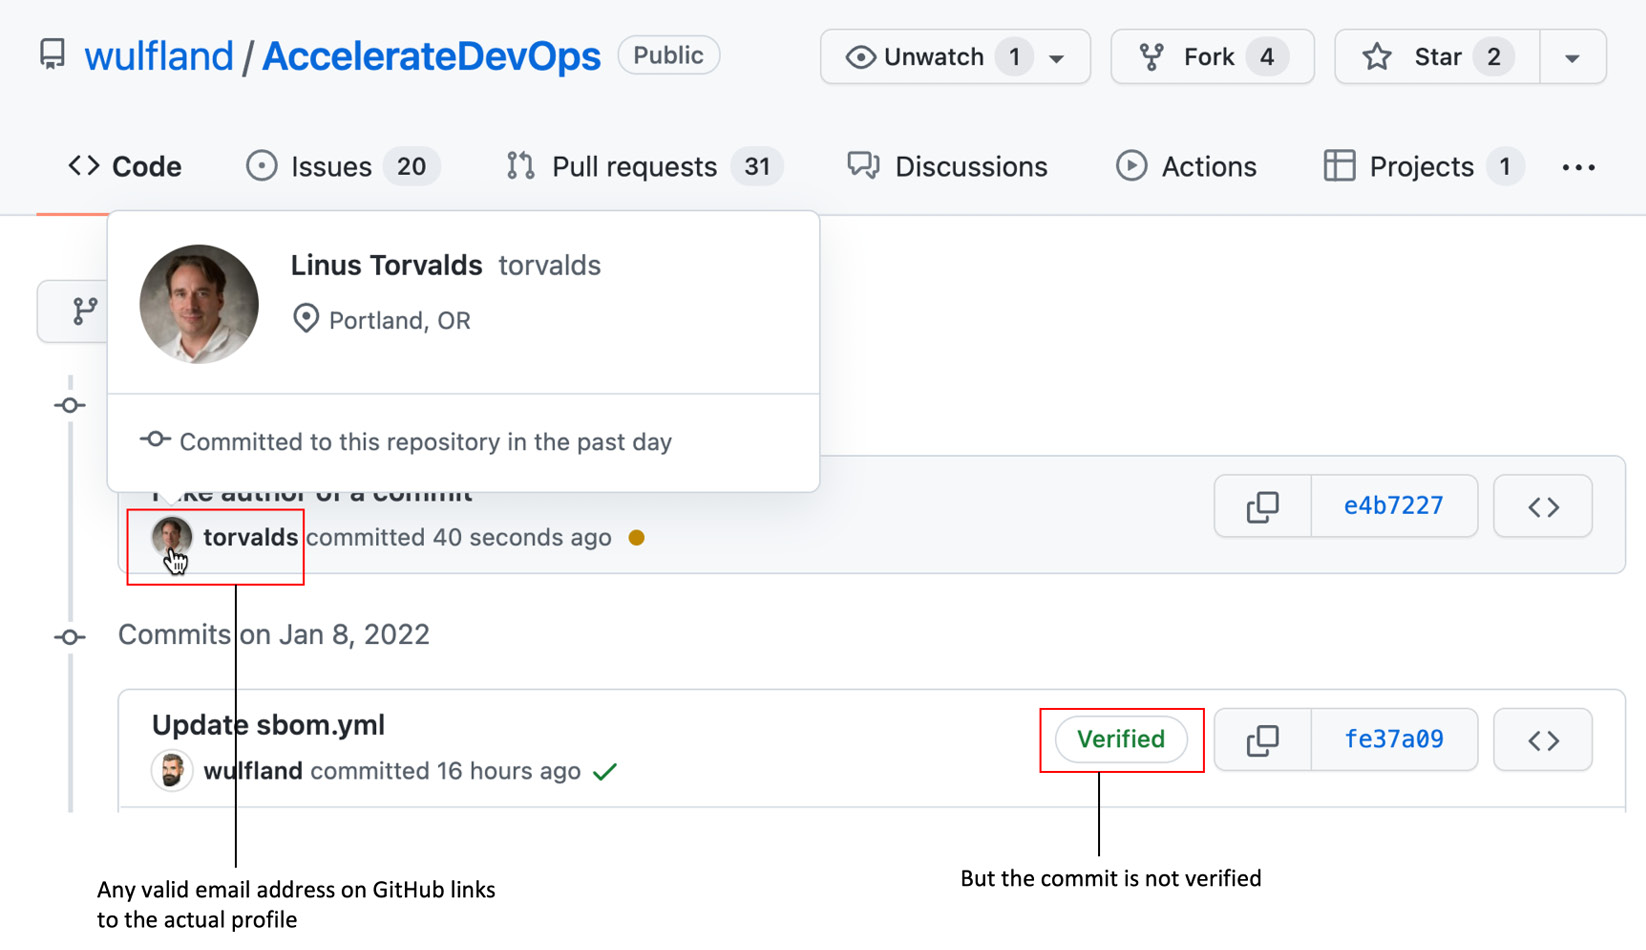
Figure 15.3 – A commit's author information is completely decoupled from the authentication
The link in the profile picture will also work and redirect you to the correct profile page. But the commit does not have a Verified badge unlike commits that you perform on the server either by modifying a file in the web UI or by using a pull request to merge your changes on the server. The verified badge shows that the commit was signed with a GNU Privacy Guard (GPG) key that contains a verified email address of your account (see Figure 15.4):
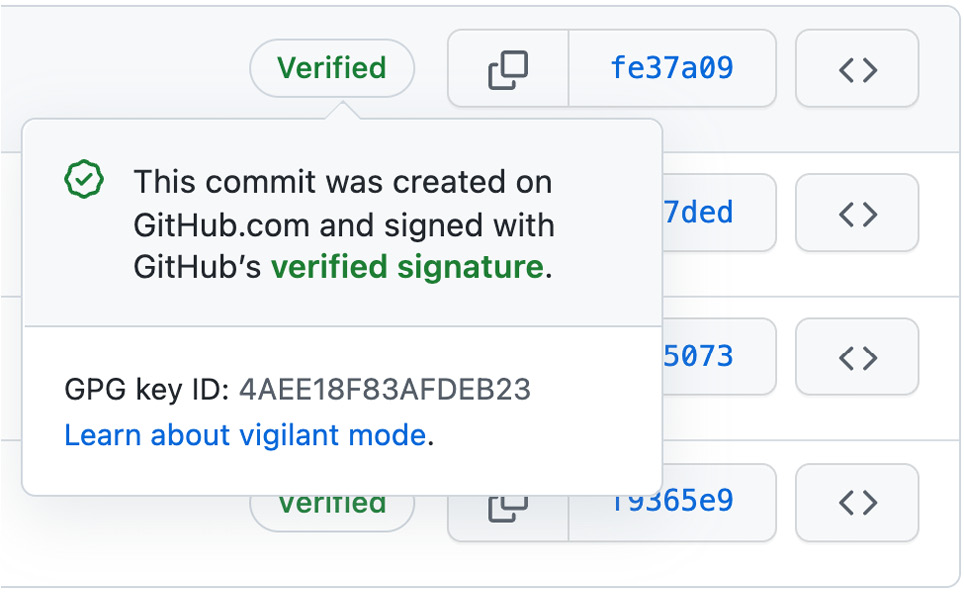
Figure 15.4 – Signed commits have a verified badge on GitHub
You can create a GPG key locally and sign your commits with it (git commit -S). You are, of course, completely free to set a name and email address in the key, they just must match the email and user configured in git config. The signature is valid as long as you don't modify the commit (see Figure 15.5):
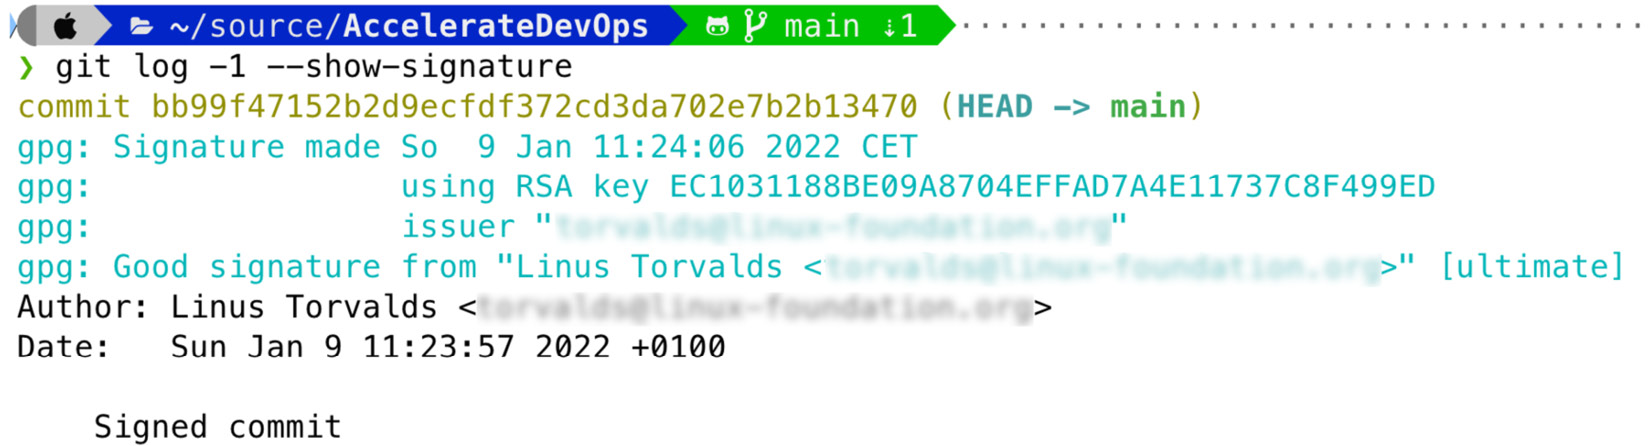
Figure 15.5 – Locally signed commits are valid if email and name match
But even if you upload the Pretty Good Privacy (PGP) key to your GitHub profile (https://github.com/settings/gpg/new), the commit will not be verified, as GitHub looks in the profile with the verified email address for the key (see Figure 15.6):
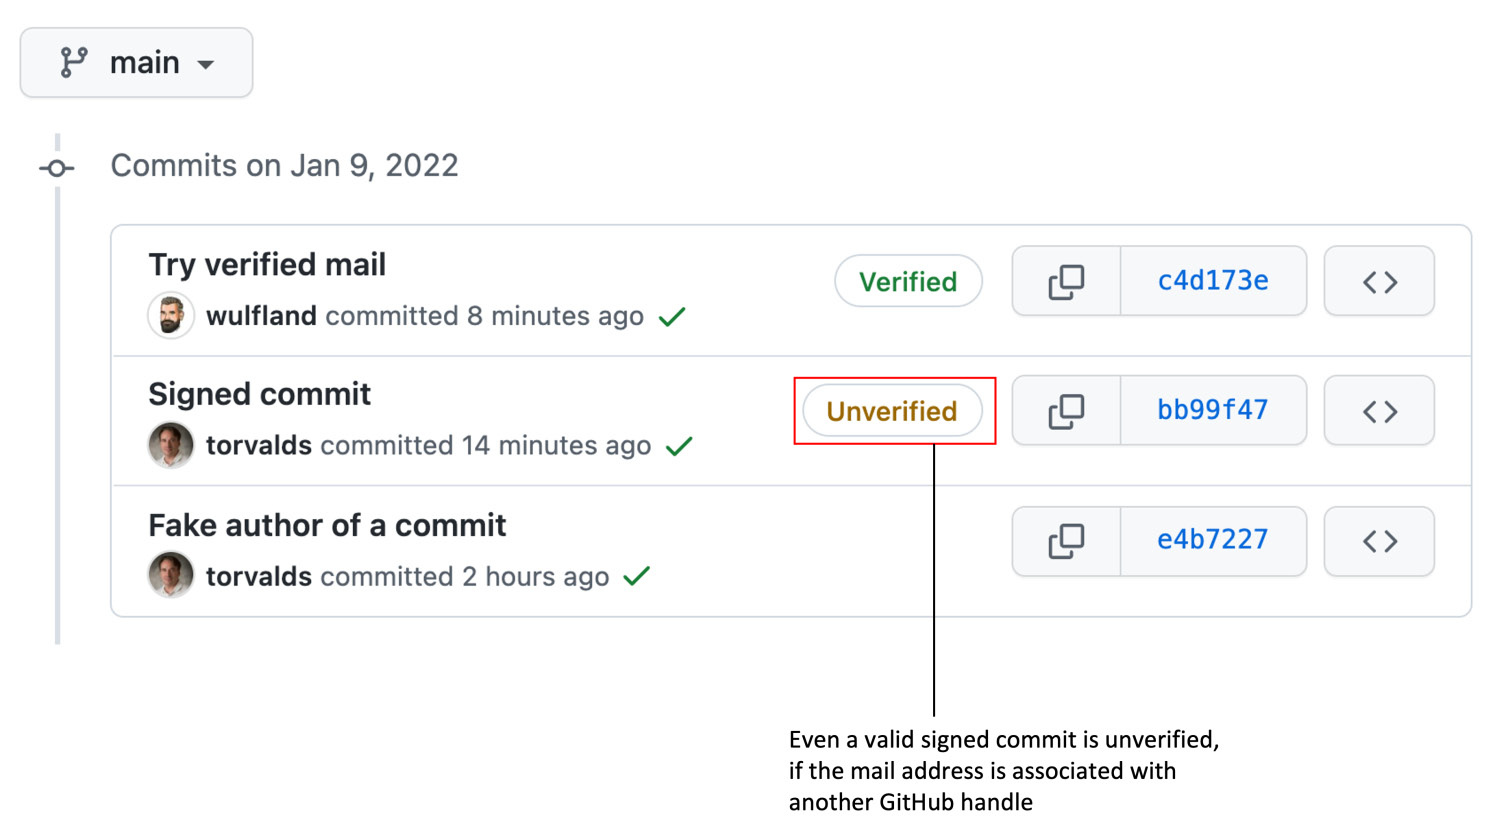
Figure 15.6 – Signed commits from another user are not verified
Does this mean you must sign all your commits locally? I believe not. The problem is that enforcing developers to sign all commits will slow you down. Many IDEs and tools do not support signing. Keeping the keys in sync, dealing with multiple email addresses – everything becomes more painful. It might work very well if all your developers work on corporate devices with the same email address. But this is normally not the case. People work remotely, on different machines, and in different environments, and they work on the same machine on open source software with a different email than on corporate code. The benefit is just not worth it. If an attacker has push permissions to your repository, the last thing you worry about is a faked email address.
What I recommend is the following:
- Pick a workflow that relies on pull requests and merge, squash, or rebase the changes on the server so that they get signed by default.
- If you need to ensure integrity for releases, sign your tags (git tag -S). Since Git is an SHA-1 or SHA-256-based tree, signing a tag will ensure that all parent commits have not been modified.
Instead of requiring your developers to sign all commits locally and slow your team down, invest in signing your code during the build process to ensure that nobody tampers with your files after the build process.
Signing your code
Signing your binaries is called code signing, even if you sign the binaries and not the code. You need a certificate from a trusted authority to do this. How you sign your code during the build process depends a lot on your language and how it gets compiled.
To sign your Apple XCode applications in GitHub Actions, you can use this documentation to install the base64 encoded certificate and publishing profile during your build: https://docs.github.com/en/actions/deployment/deploying-xcode-applications/installing-an-apple-certificate-on-macos-runners-for-xcode-development. Don't forget to clean this up on self-hosted runners that are shared with other teams. On GitHub-hosted runners, every build gets a clean environment anyway.
Depending on your code signing solution, you can find multiple actions in the marketplace for Authenticode and signtool.exe. But as all signing solutions are command-line based, you can pass your signing certificate to your workflow using the secret context as in the example for Apple.
Dynamic application security testing
To harden your application security, you can integrate dynamic application security testing (DAST) into your release workflow. DAST is black-box testing that simulates a real-world attack on the running application.
There are many commercial tools and SaaS solutions (such as Burp Suit from PortSwigger or WhiteHat Sentinel) but it's outside the scope of this book to analyze them.
There are also some open source solutions. One example is the Zed Attack Proxy (ZAP) (https://www.zaproxy.org/) from OWASP. It's a stand-alone application that runs on Windows, macOS, and Linux (see https://www.zaproxy.org/download/) and can be used to attack web applications. The application allows you to analyze a web application, intercept and modify traffic, and run an attack using the ZAP Spider against the website or parts of it (see Figure 15.7):
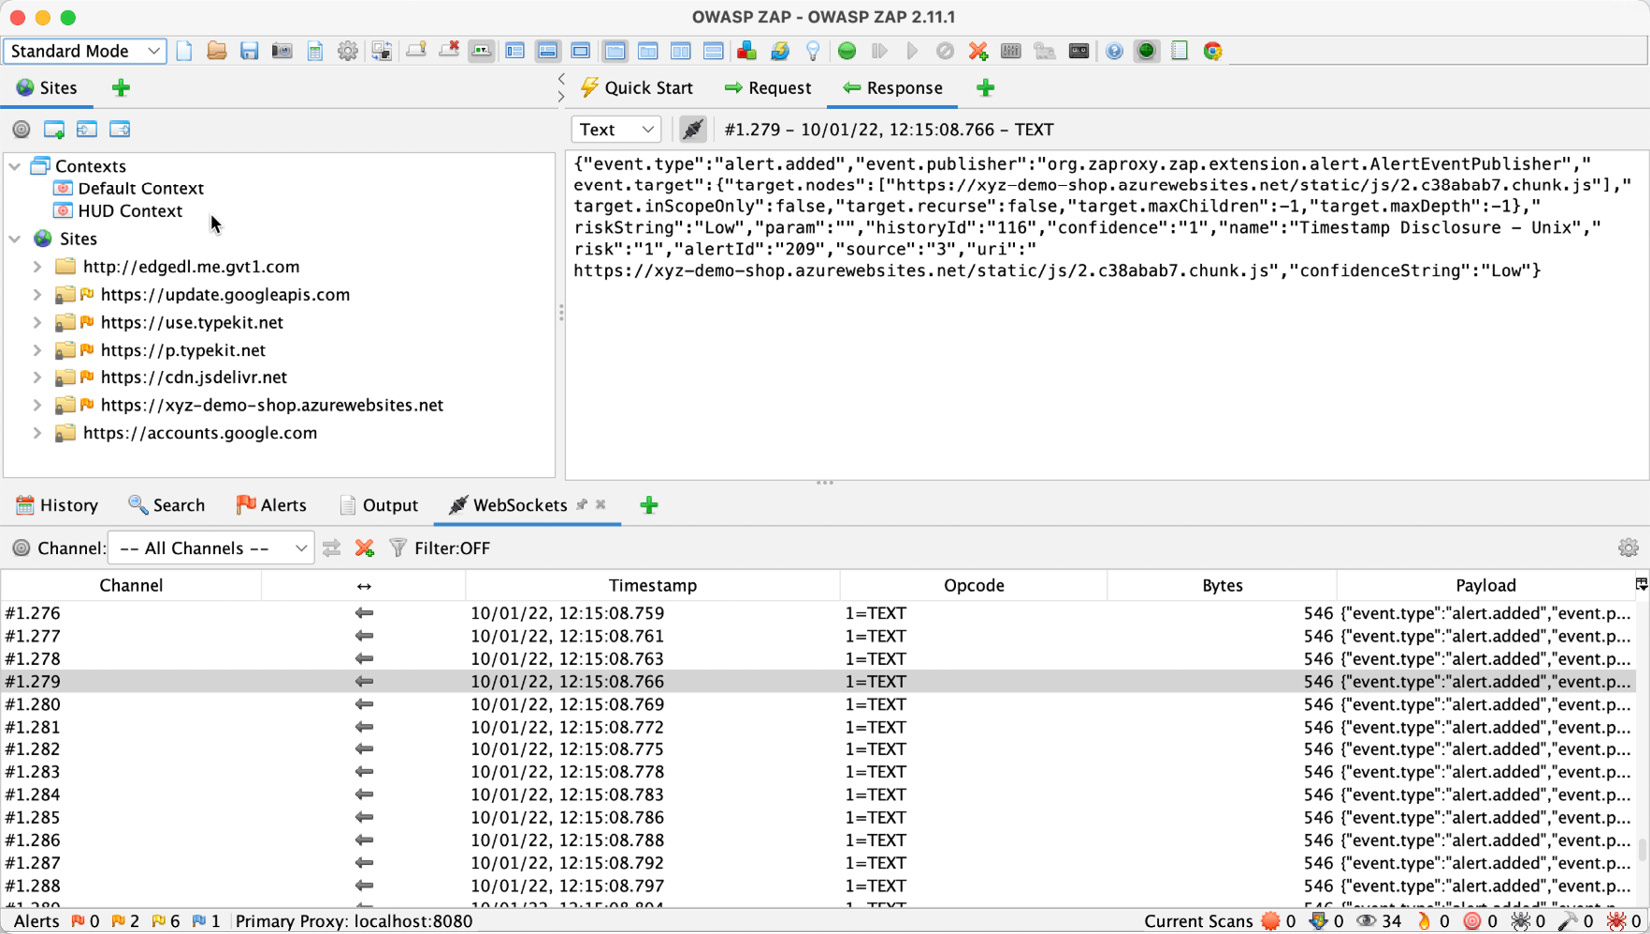
Figure 15.7 – The OWASP ZAP application
OWASP ZAP launches a browser and uses a heads-up display (HUD) to display controls on top of the website. You can use these controls to analyze the site, run attacks using the spider, or intercept requests without leaving the application (see Figure 15.8):
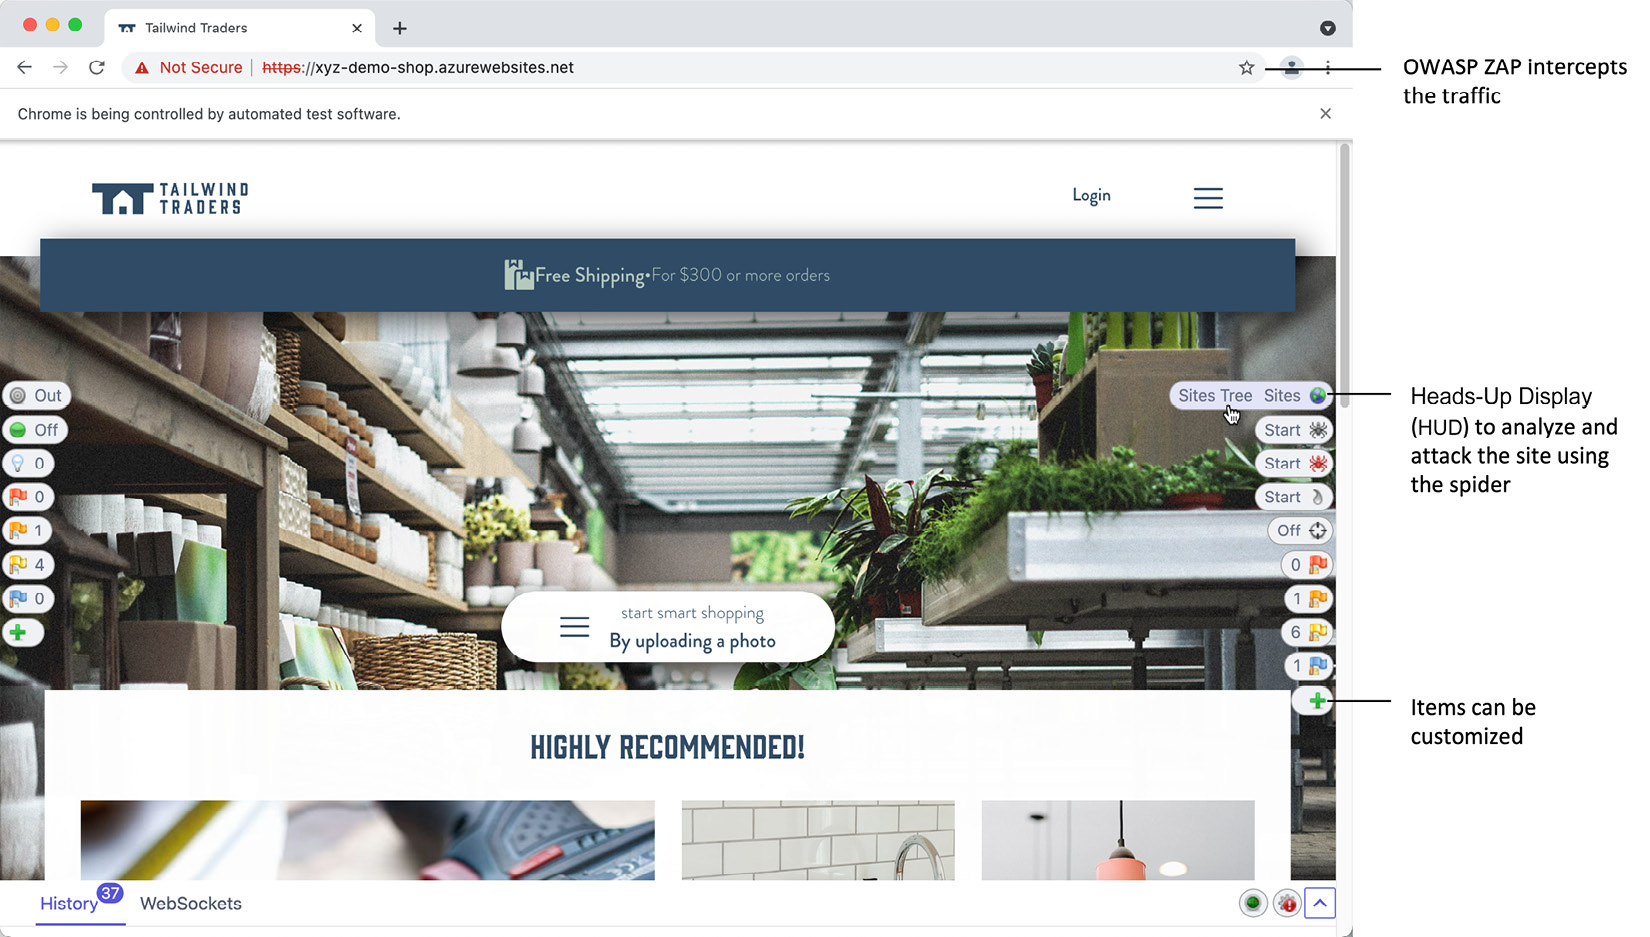
Figure 15.8 – The HUD displays controls on the website being attacked
Even if you are not a pen tester, as a web developer, it should be easy to get started and learn how to attack your site using OWASP ZAP. But to shift left security, you should integrate the scan into your workflow. OWASP ZAP has three Actions in the GitHub marketplace (see Figure 15.9):
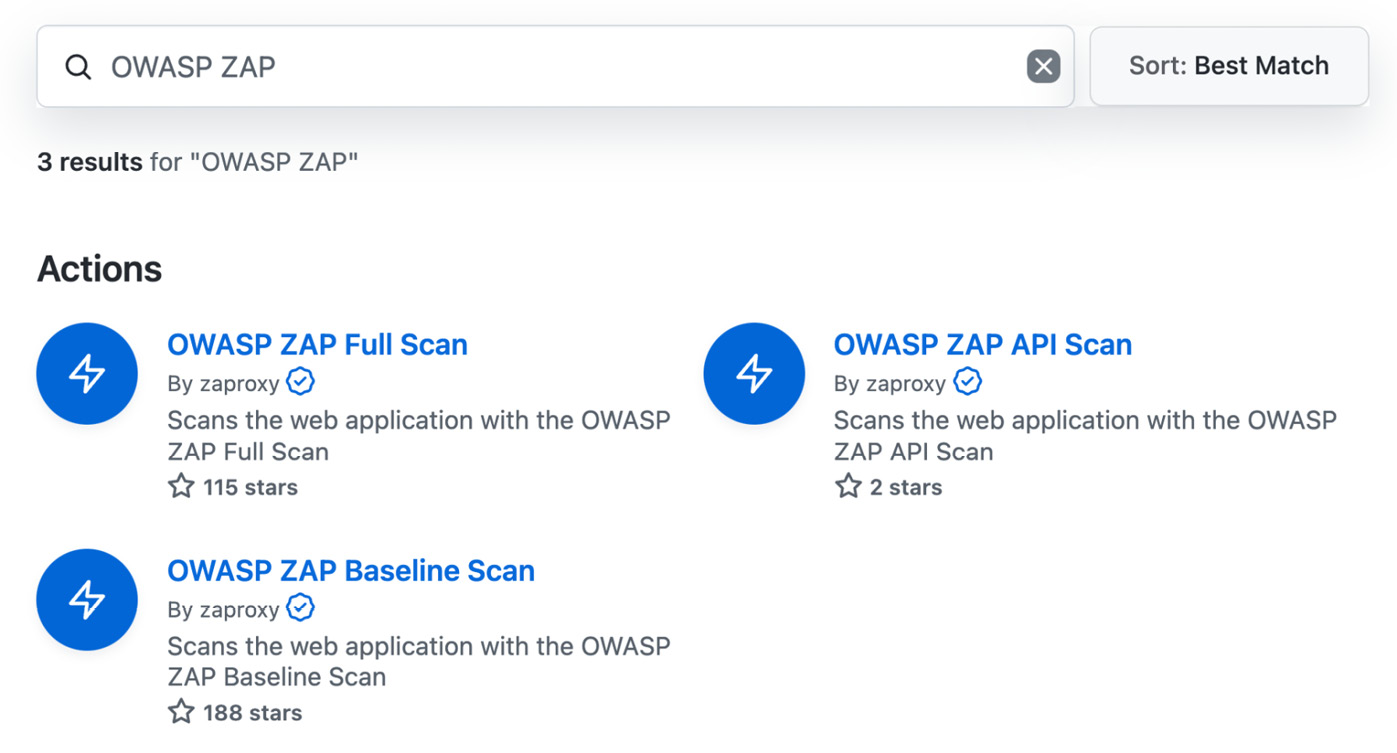
Figure 15.9 – Available OWASP ZAP Actions in the GitHub marketplace
The Baseline Scan is faster than the Full Scan. The API Scan can be used to scan an OpenAPI, SOAP, or GraphQL API. The usage of the Actions is straightforward:
- name: OWASP ZAP Full Scan
uses: zaproxy/[email protected]
with:
target: ${{ env.TARGET_URL }}The action uses GITHUB_TOKEN to write the results to a GitHub Issue. It also adds a report as a build artifact. The report is available as HTML, JSON, or Markdown (see Figure 15.10):

Figure 15.10 – Findings from OWASP ZAP scan
Of course, this is just suitable for web applications. There are other DAST tools used for other scenarios. But the example shows how easy it can be included in your pipeline. Most DAST tools are command-line tools or containers, or they already have integration such as OWASP ZAP.
Security hardening your release pipeline
CI/CD pipelines are complex and have a big surface to attack. Basically, release pipelines are remote code execution environments and should be treated like this with caution (see Haymore A., Smart I., Gazdag V., Natesan D., & Fernick J., 2022 for some attack examples).
Model your pipelines with caution and follow best practices, especially when you are building highly customized ones. It's better to ask for external help than to be sorry if it is too late.
Secure your runners
If you use GitHub-hosted runners, it's their job to keep them safe. The runners are ephemeral, and every execution starts in a clean state. But you execute code that can access your resources in GitHub, including secrets. Make sure to security-harden your GitHub Actions (see the Secure your Actions section) and limit permissions for GitHub_TOKEN (workflows should run with the least-possible privileges).
Self-hosted runners run in your environment, and you are responsible for keeping them safe! Here are some rules you should follow:
- Never use self-hosted runners for public repositories.
- Make your runners ephemeral (or at least clean up after each run and don't leave artifacts on disk or in memory).
- Keep your images lean and patched (only install the tools you need and keep everything up to date).
- Don't have universal runners for all teams and technologies. Keep the images separated and specialized.
- Keep runners in an isolated network (only allow runners to access the resources they need).
- Only run secure Actions.
- Include the runners in your security monitoring and check for unusual processes or network activity.
The best solution is to have a dynamically scaling environment (for example, a Kubernetes service) and run ephemeral runners with lean and patched images.
See Chapter 7, Running Your Workflows, for details on self-hosted and hosted runners.
Secure your Actions
GitHub Actions are very useful, but they are code you execute and grant access to your resources. You should be very careful what actions you use, especially in self-hosted runners. Actions from trusted sources, such as GitHub, Microsoft, AWS, or Google, are not the problems. But even they accept pull requests, so there is still a chance a vulnerability might slip through. Best practices for Actions are as follows:
- Always review the code of the Action. Also, look at the owner, number of contributors, number and dates of commits, number of stars, and all these kinds of indicators to see that the Action belongs to a healthy community.
- Always reference an Action by the explicit commit SHA. The SHA is immutable, whereas tags and branches might be modified and lead to new code getting executed by you without your knowledge.
- If you are working with forks, require approval for all outside collaborators and not just first-time contributors.
- Use Dependabot to keep your actions up to date.
If you are self-hosting your runners, you should even be more restrictive and limit the actions that can be used. There are two possibilities:
- Allow local actions only and create a fork from the action you have analyzed and reference the fork. This is extra work but gives you full control over the actions you use. You can add the actions to a local marketplace for easier discoverability (see Rob Bos, 2022).
- Allow select actions from GitHub and a list of specific allowed actions (whitelist). You can use wildcards to allow all actions from the same owner (for example, Azure/*). This option is less secure than option 1, but it is also less effort to maintain.
You can configure these options as enterprise policies or for each organization.
Actions are code from other people that you execute in your environment. They are dependencies that can break your ability to ship and introduce vulnerabilities. Ensure that your policies find the best balance for your needs between velocity and security.
Secure your environments
Use environment protection rules with required reviewers to approve releases before they get deployed to an environment (see staged deployments in Chapter 9, Deploy to Any Platform). This ensures that a release was reviewed before accessing the secrets of the environment and executing code.
Combine it with branch protection and code owners (see Chapter 3, Teamwork and Collaborative Development) by only allowing certain branches into your environment. This way, you are sure that necessary automated tests and approvals from code owners are in place when approving the deployment.
Use tokens when possible
Instead of using credentials stored as secrets to connect to a cloud provider – such as Azure, AWS, GCP, or HashiCorp – you can use OpenID Connect (OIDC). OIDC will exchange short-lived tokens to authenticate instead of credentials. Your cloud provider also needs to support OIDC on their end.
Using OIDC, you don't have to store cloud credentials in GitHub, you have more granular control over what resources the workflow can access, and you have rotating, short-lived tokens that will expire after the workflow run.
Figure 15.11 shows an overview of how OIDC works:
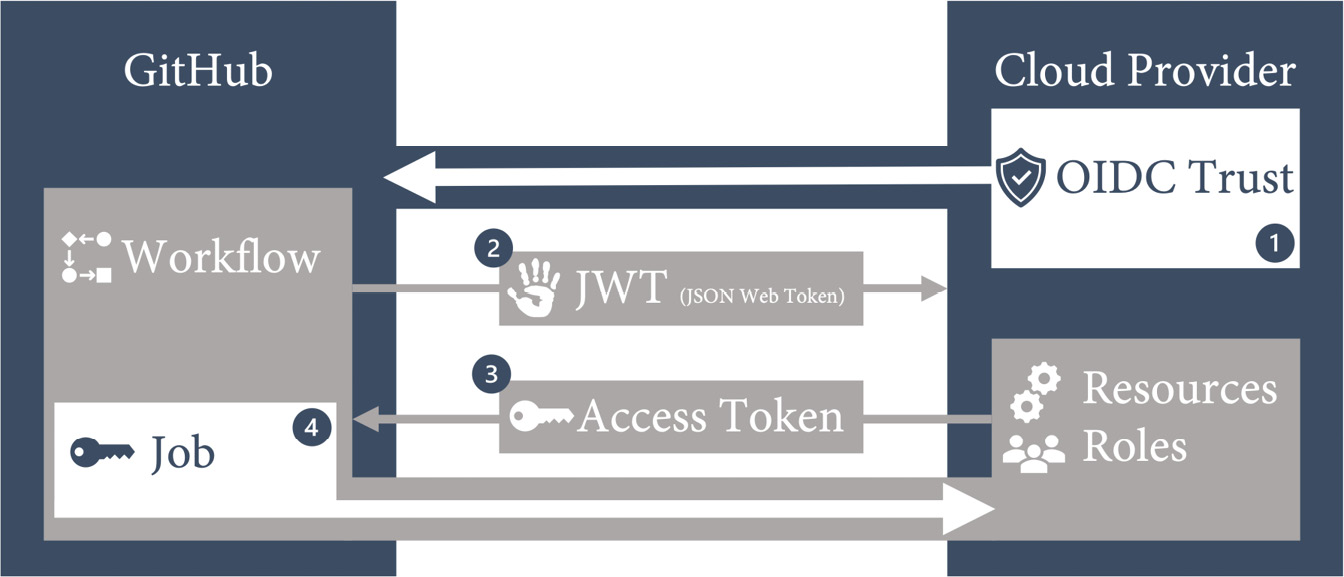
Figure 15.11 – OIDC integration with a cloud provider
The steps are as follows:
- Create an OIDC trust between your cloud provider and GitHub. Limit the trust to an organization and repository and further limit access to an environment, branch, or pull request.
- The GitHub OIDC provider auto-generates a JSON Web Token during a workflow run. The token contains multiple claims to establish a secure and verifiable identity for the specific workflow job.
- The cloud provider validates the claims and provides a short-lived access token that is available only for the lifetime of the job.
- The access token is used to access resources that the identity has access to.
You can use the identity to directly access resources, or you can use it to get credentials from a secure vault (such as Azure Key Vault or HashiCorp Vault). This way, you can safely connect to services that do not support OIDC and automated secret rotation using the vault.
In GitHub, you can find instructions on configuring OIDC for AWS, Azure, and GDP (see https://docs.github.com/en/actions/deployment/security-hardening-your-deployments). The steps are straightforward. In Azure, for example, you create an app registration in Azure Active Directory (AAD):
$ az ad app create --display-name AccelerateDevOps
Then, create a service principal using the app ID from the registration output:
$ az ad sp create --id <appId>
Then, you can open the app registration in AAD and add the OIDC trust under Certificates & secrets | Federated credentials | Add a credential. Fill out the form, as in Figure 15.12:
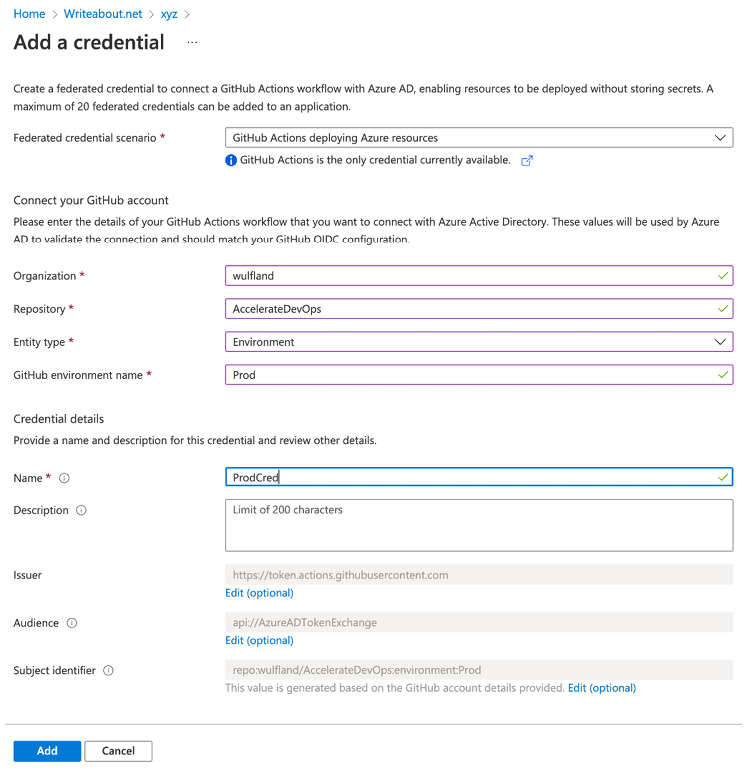
Figure 15.12 – Creating the OIDC trust for an app registration
Then, assign the service principal a role on the subscription level. Open the subscription in the portal. Under Access control (IAM) | Role assignment | Add | Add role assignment, follow the wizard. Select a role (for example, Contributor) and click Next. Select User, group, or service principal and select the service principal you created earlier.
In GitHub, your workflow needs write permissions for id-token:
permissions:
id-token: write
contents: read
In the Azure Login Action, use the client ID (appId), tenant ID, and subscription ID to retrieve the token from Azure:
- name: 'Az CLI login'
uses: azure/login@v1
with:
client-id: ${{ secrets.AZURE_CLIENT_ID }} tenant-id: ${{ secrets.AZURE_TENANT_ID }} subscription-id: ${{ secrets.AZURE_SUBSCRIPTION_ID }}After that, you can use the Azure CLI to access resources:
- run: az account show
You can also work with other Azure Actions and remove the authentication part, in this example, the publishing profile. They will use the access token form provided by the login action:
- name: Run Azure webapp deploy action using OIDC
uses: azure/webapps-deploy@v2
with:
app-name: ${{ env.APPNAME }}slot-name: Production
package: website
Every cloud provider is different, but the documentation should get you up and running quickly: https://docs.github.com/en/actions/deployment/security-hardening-your-deployments.
Collect security telemetry
To secure your entire pipeline from code to production, you need real-time insights on all levels. There are different monitoring solutions on different layers (see Figure 15.13):

Figure 15.13 – The different layers of monitoring
All these layers should report their data to your SIEM system to perform analytics and use AI to detect anomalies. Many organizations collect data on different levels but forget to include it in the monitoring due to different responsibilities. To security harden your releases, you should consider the following:
- Include all monitoring sources and events in your SIEM solution.
- Monitor the entire pipeline including your agents and test environments. Include all processes and network activity.
- Log deployment events with the according version. If new processes are suddenly running or ports are opened after a deployment, you want to be able to associate these changes with this deployment to facilitate forensics.
- Collect real-time application security data and display it on the dashboard of your engineers. This could include abnormal program termination, SQL injection attempts, Cross-site scripting (XSS) attempts, failed logins (brute force attacks), or DDoS attacks, but it depends a lot on your product. To detect SQL injection or XSS, you have to include extra logging before encoding user input if the input contains suspicious characters or elements.
The best way to create awareness is to see that the threat is real.
Case study
Until now, Tailwind Gears has paid an external company to perform security reviews of the architecture, help with threat modelling and a risk analysis, and perform security testing before major releases. They have never been breached and most of the investments so far went into network security. But now leveraging more and more cloud services, they've already been aware that they must do something to be able to detect, respond, and recover.
The IT department already started to use Splunk as their SIEM and ITIM solution and integrate more and more sources that feed data, but until now, the IT department could not be certain whether they would really detect an ongoing attack in real-time. Tailwind Gears decides to change the way they deal with security. They talk to their security partner, and they plan the first red team / blue team simulation. The scenario is an inside attacker to the web application of our DevOps pilot teams.
The simulation takes 3 days and the red team wins by finding two ways to compromise production:
- A spear phishing attack on a few developers in another team is successful and reveals the credentials of one of the developers. Using BloodHound, they find out that the developer has access to the former Jenkins server that now runs the GitHub Actions runner and has not yet been ported to the Kubernetes solution completely. The server does not have MFA enabled and mimikatz allows to capture the credentials of a test account. The test account has access to a test environment, and they can capture credentials of an admin account there that allows data extraction of the staging environment (that counts as production in the game).
- Since all developers have read access to all repositories, an analysis of the dependencies of the web application shows a dependency that is vulnerable to XSS and has not been patched yet. The component is a search control and allows the red team with the help of a frontend developer of another team to execute scripts in the context of other users. They open an issue in an internal GitHub repository and use the GitHub API to post a comment to the issue on each execution as proof.
The simulation results in many backlog items that will be addressed over the next weeks. Some things do not concern our DevOps teams, such as enabling MFA for all internal systems or regularly executing phishing simulations to create awareness among employees.
But many items also concern the teams. Tailwind Gears decides to bake security into the development process. This includes secret scanning, dependency management with Dependabot, and code scanning.
The team will also work together with the IT department to securely harden the release pipeline by moving the build server to Kubernetes, implementing security logging in the entire pipeline, and using OpenID Connect and a secure Key Vault for secret handling.
Everyone is looking forward to the next red team/blue team simulation in 3 months.
Summary
In this chapter, you've learned how to secure your release pipeline and deployments by scanning containers and IaC, ensuring consistency of code and configuration, and security-hardening the complete pipeline.
In the next chapter, we'll talk about the impact of your software architecture on your software delivery performance.
Further reading
These are the references from this chapter that you can also use to get more information on the topics:
- Kim G., Humble J., Debois P. & Willis J. (2016). The DevOps Handbook: How to Create World-Class Agility, Reliability, and Security in Technology Organizations (1st ed.). IT Revolution Press
- Forsgren N., Humble, J., & Kim, G. (2018). Accelerate: The Science of Lean Software and DevOps: Building and Scaling High Performing Technology Organizations (1st ed.) [E-book]. IT Revolution Press.
- Oladimeji S., Kerner S. M. (2021). SolarWinds hack explained: Everything you need to know. https://whatis.techtarget.com/feature/SolarWinds-hack-explained-Everything-you-need-to-know
- Sudhakar Ramakrishna (2021). New Findings From Our Investigation of SUNBURST. https://orangematter.solarwinds.com/2021/01/11/new-findings-from-our-investigation-of-sunburst/
- Crowdstrike blog (2021). SUNSPOT: An Implant in the Build Process. https://www.crowdstrike.com/blog/sunspot-malware-technical-analysis/
- Eckels S., Smith J. & Ballenthin W. (2020). SUNBURST Additional Technical Details. https://www.mandiant.com/resources/sunburst-additional-technical-details
- Souppaya M., Morello J., & Scarfone K. (2017). Application Container Security Guide: https://doi.org/10.6028/NIST.SP.800-190
- National Telecommunications and Information Administration (NTIA), Software Bill of Materials: https://www.ntia.gov/sbom
- Thomas Claburn (2018). Check your repos... Crypto-coin-stealing code sneaks into fairly popular NPM lib (2m downloads per week): https://www.theregister.com/2018/11/26/npm_repo_bitcoin_stealer/
- Haymore A., Smart I., Gazdag V., Natesan D., & Fernick J. (2022). 10 real-world stories of how we've compromised CI/CD pipelines: https://research.nccgroup.com/2022/01/13/10-real-world-stories-of-how-weve-compromised-ci-cd-pipelines/
- Rob Bos (2022). Setup an internal GitHub Actions Marketplace: https://devopsjournal.io/blog/2021/10/14/GitHub-Actions-Internal-Marketplace.html