
Chapter 9: Deploying to Any Platform
Now that you have learned how to use GitHub Actions as an automation engine and GitHub Packages to easily share code and containers, we can complete our Continuous Integration/Continuous Delivery (CI/CD) capabilities by automating deployments.
In this chapter, I'll show you how to easily deploy to any cloud or platform in a secure and compliant way.
In this chapter, we will cover the following main topics:
- Staged deployments
- Automating your deployments
- Infrastructure as Code
- How to deploy to Azure App Service
- How to deploy to AWS Elastic Container Service (ECS)
- How to deploy to Google Kubernetes Engine (GKE)
- Measuring success
CI/CD
CI means that every time you push code changes to your repository, the code is built and tested, and the output is packaged as a build artifact. In CD, you automatically deploy your build artifacts to your environments whenever a new build artifact is created.
When practicing CI/CD, the development and delivery phases are completely automated. The code is ready to be deployed to production at any time.
There are various definitions that distinguish between continuous delivery and continuous deployment (both CD) – but these definitions are not consistent in the literature and only add little to no value to the topic.
Staged deployments
A stage or tier is an environment in which a piece of software is deployed and executed. Typical stages include Development, Test, Staging (or Pre-Production), and Production. Typically, the Staging, or Pre-Production, stage is a complete mirror of the production environment, and sometimes, it is used for zero-downtime deployments by switching the two environments using load balancing. Typically, stages that are closer to production require manual approval before deployment.
If a company works with feature flags (please refer to Chapter 10, Feature Flags and the Feature Lifecycle) and CD, normally, the number of stages decreases. Instead of stages, we can talk about ring-based deployments or scaling units. The idea of ring-based deployments is that you have customers in different productions rings. You deploy your update to one ring and automatically monitor the system for unexpected exceptions or unusual metrics such as CPU or memory usage. Additionally, you can run automated tests in the production environment. If there are no errors, the release process is continuous and deploys to the next ring. When discussing ring-based deployments, often, we imply that no manual approval is involved. However, there can also be manual approval between the rings.
In GitHub, you can perform staged and ring-based deployments using Environments. You can view, configure, or create new ones in your repository under Settings | Environments.
For each environment, you can define the following:
- Required reviewers: These include up to five users or teams as manual approvers. One of these approvers must approve the deployment before it is executed.
- Wait timer: This refers to a grace period that the deployment will wait before executing. The maximum time is 43,200 minutes or 30 days. Additionally, you can use an API to cancel the deployment if you find any errors at a previous stage.
- Deployment branches: Here, you can restrict what branches are deployed to an environment. You can select all Protected branches or define your own pattern. The pattern can include wildcards (such as release/*).
- Environment secrets: Secrets in an environment override secrets from the repository or organization scope. The secrets are only loaded after the required reviewers have approved the deployment.
The configuration looks similar to Figure 9.1:
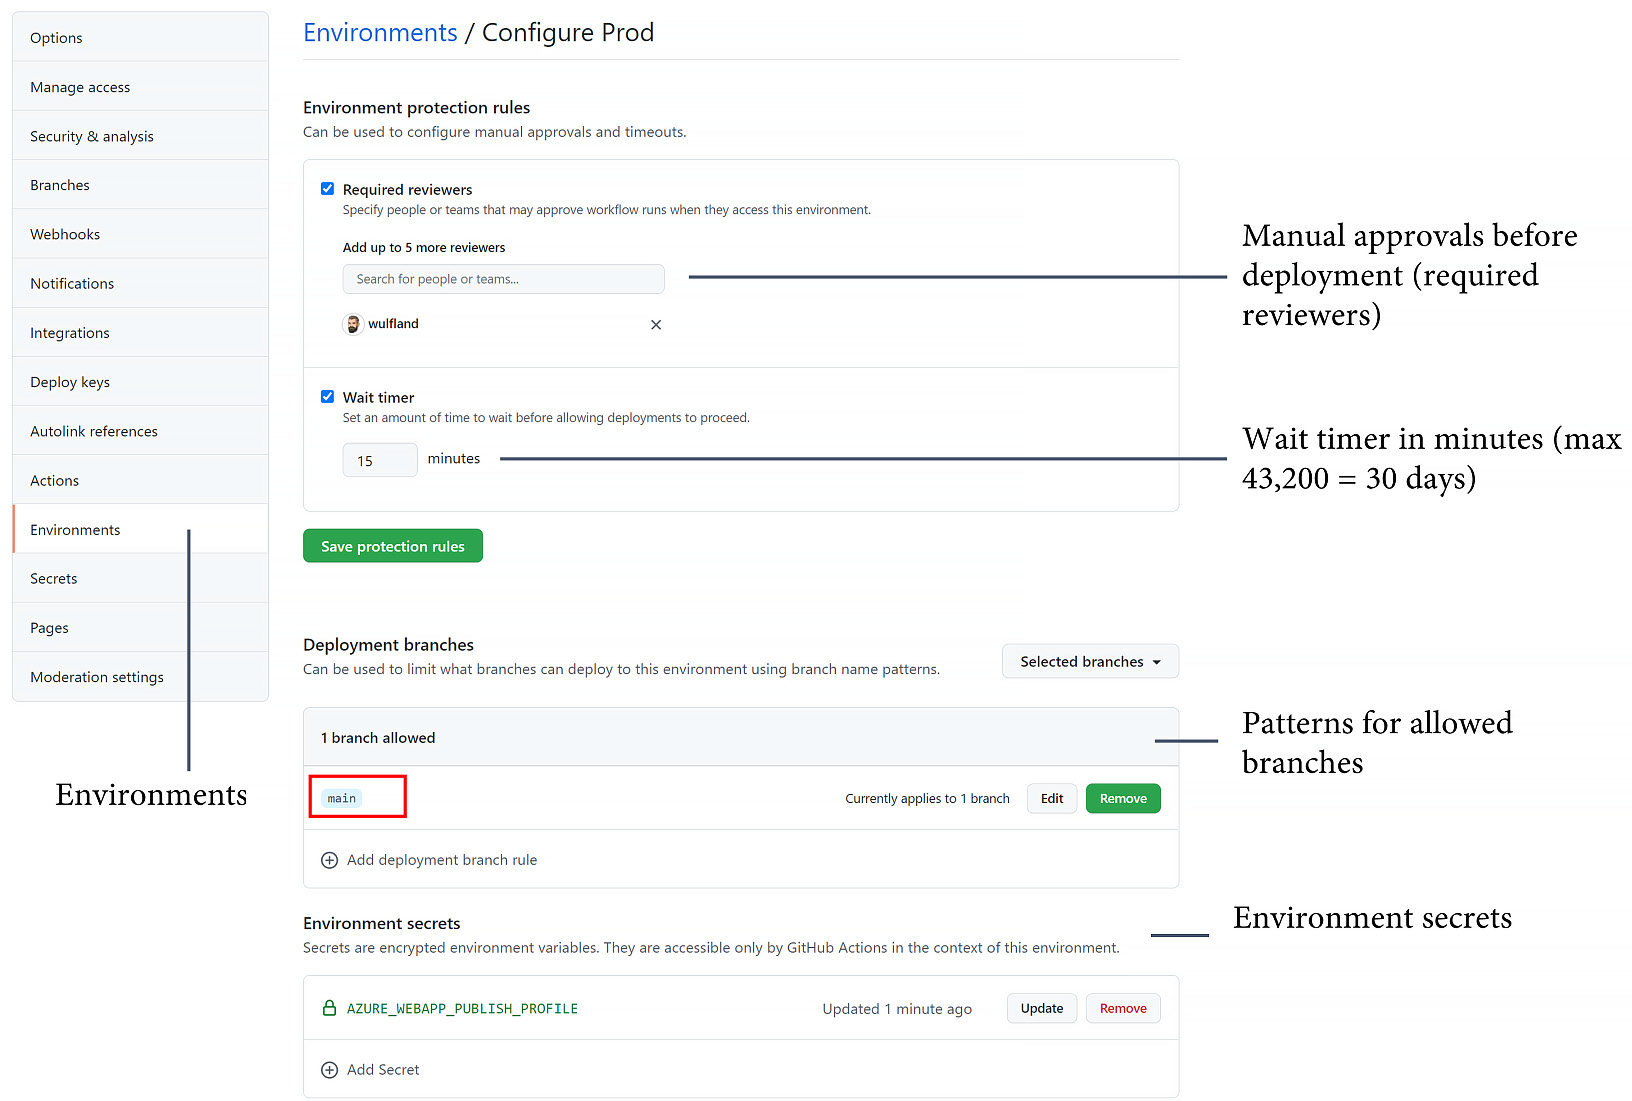
Figure 9.1 – Configuring an environment in GitHub
In the workflow file, you specify the environment at the job level:
jobs:
deployment:
runs-on: ubuntu-latest
environment: prod
Additionally, you can specify a URL that is then displayed on the overview page:
jobs:
deployment:
runs-on: ubuntu-latest
environment:
name: production
url: https://writeabout.net
With the needs keyword, you can define dependencies between jobs and, therefore, environments (see Figure 9.2):

Figure 9.2 – The overview page for staged deployments
The status of the environments is also displayed on the home page of the repository (see Figure 9.3):

Figure 9.3 – Environments on the home page
If you want to play around with the environments, you can run the Staged Deployment workflow in the fork of https://github.com/wulfland/AccelerateDevOps/ and add yourself as a required reviewer for some stages.
Automating your deployments
If I ask my customers whether they have automated their deployments, normally, the answer is yes. However, on closer look, automation means we have a script, or we have an answer file for an installer. That is only partial automation. As long as someone has to log in to a server, create accounts or DNS records, or manually configure a firewall, your deployment is not automated!
Humans make mistakes – machines do not! Make sure you automate all the steps of your deployment and not just the last steps. Since GitHub Actions is the perfect automation engine, it is a good practice to have a workflow execute all of your automated deployments.
How to deploy to Azure App Service
To get you started with automated deployments with GitHub Actions, I created three hands-on labs:
- Deploying to Azure App Service
- Deploying to AWS ECS
- Deploying to GKE
All hands-on labs assume that you have an account set up in the specified cloud. If you have a single-cloud strategy, you can simply jump to the hands-on step that's relevant for you and skip the others.
The step-by-step instructions for the hands-on lab are located in GitHub at https://github.com/wulfland/AccelerateDevOps/blob/main/ch9_release/Deploy_to_Azure_App_Service.md. It is recommended that you follow the steps there, as it provides links that are easy to copy and paste. Here, I will explain the background as a step-by-step guide with a focus on how to deploy the application.
Deployment of Azure resources
The deployment of the Azure resources takes place in the setup-azure.sh script. It creates a resource group, an app service plan, and an app service. You could easily execute the script in a workflow. After the deployment, we get the publish profile from the web app and store it inside a secret in GitHub. You can either get the publish profile in the Azure portal or from the Azure CLI:
$ az webapp deployment list-publishing-profiles
--resource-group $rgname
--name $appName
--xml
Deploying the application with GitHub Actions
The workflow consists of two jobs: Build and Deploy. The build job configures the runner for the correct NodeJS and .NET versions and builds the application. The following task uses dotnet publish to publish the website to a folder named publish:
- name: Build and publish with dotnet
working-directory: ch9_release/src/Tailwind.Traders.Web
run: |
dotnet build --configuration Release
dotnet publish -c Release -o publish
The next step uploads the artifact to GitHub so that it can be used in subsequent jobs. This allows you to publish the same package to multiple environments:
- name: Upload Artifact
uses: actions/upload-artifact@v2
with:
name: website
path: ch9_release/src/Tailwind.Traders.Web/publish
Additionally, you can see and inspect the artifact after the workflow has been completed (see Figure 9.4):
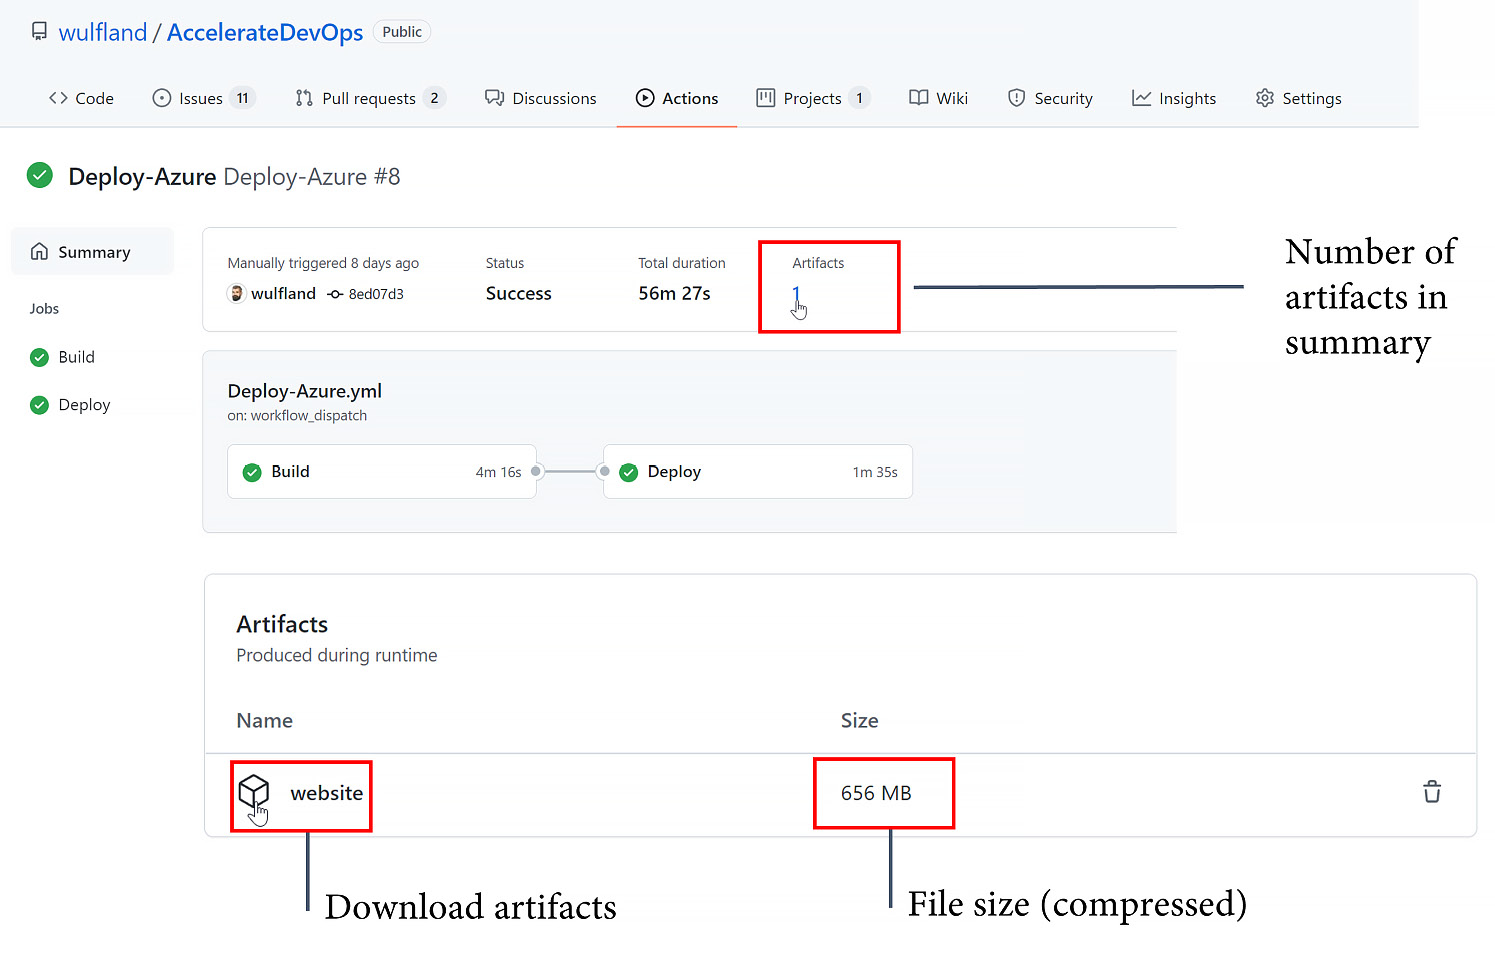
Figure 9.4 – Workflow artifacts
The Deploy job depends on Build and deploys to the prod environment. Within the environment, you set the secret and add a required reviewer:
Deploy:
runs-on: ubuntu-latest
environment: prod
needs: Build
The workflow downloads the artifact, named website, into a folder called website:
- uses: actions/download-artifact@v2
with:
name: website
path: website
Then, it uses the azure/webapps-deploy action to deploy the website using the publish profile:
- name: Run Azure webapp deploy action using publish profile credentials
uses: azure/webapps-deploy@v2
with:
app-name: ${{ env.appName }}slot-name: Production
publish-profile: ${{ secrets.AZUREAPPSERVICE_PUBLISHPROFILE }}package: website
The last step is just an example of how you could validate a deployment. Of course, you would have to curl a URL to a site that also targets the database:
u=https://${{ env.appName }}.azurewebsites.net/status=`curl --silent --head $u | head -1 | cut -f 2 -d' '`
if [ "$status" != "200" ]
then
echo "Wrong HTTP Status. Actual: '$status'"
exit 1
fi
If you complete the step-by-step guide in the hands-on lab, you will have a playground where you can add additional environments and deploy to different App Service deployment slots (for more information, please visit https://docs.microsoft.com/en-us/azure/app-service/deploy-staging-slots).
How to deploy to AWS ECS
We will deploy the same code to AWS – but this time, we will do so from a Docker container to ECS. ECS is a highly scalable container management service that allows you to run, stop, and manage containers on a cluster. You can find the step-by-step guide at https://github.com/wulfland/AccelerateDevOps/blob/main/ch9_release/Deploy_to_AWS_ECS.md.
Here are some additional notes and background information.
Deployment of AWS resources
I could not find an easy script in which I could deploy everything to AWS that did not also include some complex JSON. That's why I'm using the manual steps in the hands-on lab. First, you create an Elastic Container Registry (ECR) repository to which you can deploy the container. The secrets we use to deploy are called Access keys, and they consist of two values: Access Key ID and Secret Access Key.
After the first deployment, the container is in the registry, and you can use it together with the wizard to set up your ECS resources.
You have to extract your task definition and save it to the aws-task-definition.json file. The second time the workflow runs, it successfully deploys the container to ECS.
Deploying the container with GitHub Actions
I also split up the workflow into a Build stage and a Deploy stage. This enables you to easily add environments and more stages later. For this to work, you must pass the image name from the Build job to the Deploy job. To do this, you can use job outputs:
jobs:
Build:
runs-on: ubuntu-latest
outputs:
image: ${{ steps.build-image.outputs.image }}To configure the authentication, we use the configure-aws-credentials action with the Access Key ID and Secret Access Key values.
Note that GitHub masks part of the image name and does not pass it to the next job. To avoid this, you must prevent the configure-aws-credentials action from masking your account ID:
- name: Configure AWS credentials
uses: aws-actions/configure-aws-credentials@v1
with:
aws-access-key-id: ${{ secrets.AWS_ACCESS_KEY_ID }} aws-secret-access-key: ${{ secrets.AWS_SECRET_ACCESS_KEY }} aws-region: ${{ env.AWS_REGION }}mask-aws-account-id: no
The login to ECR returns the name of the registry that you use in the subsequent action:
- name: Login to Amazon ECR
id: login-ecr
uses: aws-actions/amazon-ecr-login@v1
In the next step, you build the image and push it to ECR. Additionally, you set the output for the next job:
- name: Build, tag, and push image to Amazon ECR
id: build-image
env:
ECR_REGISTRY: ${{ steps.login-ecr.outputs.registry }} IMAGE_TAG: ${{ github.sha }}working-directory: ch9_release/src/Tailwind.Traders.Web
run: |
imagename=$ECR_REGISTRY/$ECR_REPOSITORY:$IMAGE_TAG
echo "Build and push $imagename"
docker build -t $imagename .
docker push $imagename
echo "::set-output name=image::$imagename"
The next job depends on Build and runs on the prod environment:
Deploy:
runs-on: ubuntu-latest
environment: prod
needs: Build
Additionally, it has to configure the AWS credentials and then configure the aws-task-definition.json file using the image name that has been passed to the job access through the needs context:
- name: Fill in the new image ID in the ECS task definition
id: task-def
uses: aws-actions/amazon-ecs-render-task-definition@v1
with:
task-definition: ${{ env.ECS_TASK_DEFINITION }} container-name: ${{ env.CONTAINER_NAME }} image: ${{ needs.Build.outputs.image }}The last step is to deploy the container with the output of the previous task:
- name: Deploy Amazon ECS task definition
uses: aws-actions/amazon-ecs-deploy-task-definition@v1
with:
task-definition: ${{ steps.task-def.outputs.task-definition }} service: ${{ env.ECS_SERVICE }} cluster: ${{ env.ECS_CLUSTER }}wait-for-service-stability: true
If you perform the step-by-step guide, you have a staged working workflow that deploys to ECS. You can add more stages and run different versions of the container in different services.
How to deploy to GKE
We also deploy the same code to GKE. You can find the hands-on steps at https://github.com/wulfland/AccelerateDevOps/blob/main/ch9_release/Deploy_to_GKE.md.
Before you perform these hands-on steps, here are some details regarding what is happening.
Deployment of Google resources
The complete deployment happens in the setup-gke.sh script that you execute in Cloud Shell. The script creates a GKE cluster with one node. For testing purposes, this is enough:
gcloud container clusters create $GKE_CLUSTER --num-nodes=1
Additionally, the script creates an artifact repository for Docker containers and a service account to perform the deployments.
In Kubernetes, there is the concept of pods. These contain the containers and are deployed using deployments in a YAML file, which, in this case, is Deployment.yaml. The deployment defines the container and binds it to an image:
spec:
containers:
- name: $GKE_APP_NAME
image: $GKE_REGION-docker.pkg.dev/$GKE_PROJECT/$GKE_PROJECT/$GKE_APP_NAME:$GITHUB_SHA
ports:
- containerPort: 80
env:
- name: PORT
value: "80"
I use environment variables in the file and replace them with envsubst before passing them to the kubectl apply command:
envsubst < Deployment.yml | kubectl apply -f -
A service exposes the pods – in this case, to the internet. The service is deployed, in the same way, using the Service.yml file:
spec:
type: LoadBalancer
selector:
app: $GKE_APP_NAME
ports:
- port: 80
targetPort: 80
The deployment of the service takes some time. You might have to execute the following command multiple times:
$ kubectl get service
If you get an external IP address, you can use it to test your deployment (see Figure 9.5):

Figure 9.5 – Getting the external IP of the GKE LoadBalancer
The credentials of the service account are in the key.json file. You have to encode them and save them inside an encrypted secret in GitHub, named GKE_SA_KEY:
$ cat key.json | base64
The script has already done this. So, you can just copy the output and paste it to the secret.
Deploying the container with GitHub Actions
The deployment in the GitHub Actions workflow is straightforward. The authentication and setup of the gcloud CLI take place in the setup-gcloud action:
- uses: google-github-actions/[email protected]
with:
service_account_key: ${{ secrets.GKE_SA_KEY }} project_id: ${{ secrets.GKE_PROJECT }}export_default_credentials: true
The workflow then builds and pushes the container to the registry. It uses gcloud to authenticate to the Docker registry:
gcloud auth configure-docker
$GKE_REGION-docker.pkg.dev
--quiet
To deploy the new image to GKE, we authenticate using the get-gke-credentials action:
- uses: google-github-actions/[email protected]
with:
cluster_name: ${{ env.GKE_CLUSTER }} location: ${{ env.GKE_ZONE }} credentials: ${{ secrets.GKE_SA_KEY }}Following this, we just replace the variables in the deployment files and pass them to kubectl apply:
envsubst < Service.yml | kubectl apply -f -
envsubst < Deployment.yml | kubectl apply -f –
That's it. Following the hands-on steps, you should have a working copy of a deployment to GKE!
Deployments to Kubernetes
Deployments to Kubernetes can be very complex; however, this is beyond the scope of this book. There are different strategies that you can use: recreate, rolling updates (also known as ramped updates), blue/green deployments, canary deployments, and A/B testing. A good starting point is the official documentation, which can be found at https://kubernetes.io/docs/concepts/workloads/controllers/. Additionally, a useful visualization of the strategies along with practical examples of how to perform the deployments can be found at https://github.com/ContainerSolutions/k8s-deployment-strategies.
There are also many other tools that you can leverage when working with Kubernetes. For instance, Helm (https://helm.sh/) is a package manager for Kubernetes, and Kustomize (https://kustomize.io/) is a tool that can help you manage multiple configurations.
Infrastructure as code
Infrastructure as code (IaC) is the process of managing and provisioning all your infrastructure resources through machine-readable files. Often, these files are versioned and managed in Git-like code. In this case, it is often referred to as GitOps.
IaC can be imperative, declarative, or a mix of both. Imperative means the files are procedural, such as scripts, whereas declarative refers to a functional approach that describes the desired state in a markup language such as YAML or JSON. To get the full power of IaC, you should manage it in a way where you can also apply changes, not just complete provisioning and deprovisioning. This is often referred to as Continuous Configuration Automation (CCA).
Tools
There are many tools that you can use for IaC and CCA. For instance, there are cloud-specific tools such as Azure ARM, Bicep, or AWS CloudFormation. However, there are also many independent tools that you can use for on-premises infrastructure. Some of the most popular are listed as follows:
- Puppet: This was released by Puppet in 2005 (https://puppet.com).
- Chef: This was released by Chef in 2009 (https://www.chef.io).
- Ansible: This was released by RedHat in 2021 (https://www.ansible.com).
- Terraform: This was released by HashiCorp in 2014 (https://www.terraform.io).
- Pulumi: This was released 2017 by Pulumi (https://www.pulumi.com).
IaC and Multi-Cloud Deployments
Note that an IaC tool supporting multiple cloud providers does not mean it can deploy the same resources to multiple clouds! This is a common misconception. You still have to write cloud-specific automations. But you can use the same syntax and tooling.
This is just the tip of the iceberg. There are many tools on the market. The process of finding the best combination can be very complex and is beyond the scope of this book. If you have a single-cloud strategy, it's probably best if you just start with the cloud-native tools. If you have a complex environment with multiple clouds and on-premises resources and you want to manage them all with the same tooling, you must invest in doing a detailed analysis.
Best practices
Independent of the tool you are using, there are some things you should consider when implementing IaC:
- Store the configuration in Git and treat it like code using protected branches, pull requests, and code owners. Code owners are a great way to ensure compliance, particularly if you store it close to the application code.
- Execute the deployment using GitHub Actions. It's okay to publish the resources interactively while writing and debugging your IaC. However, once you are finished, you should have complete automated publishing that is done via a workflow. IaC is code, and, as with application code, deploying it from a developer machine comes with the risk of not being reproducible.
- Secrets and key management are the most critical parts of IaC. Make sure that you do not save them in the code but keep them in a secure place (such as GitHub Secrets). A vault such as Hashicorp Vault or Azure KeyVault allows for easy key rotation if one of your secrets is compromised. Additionally, it decouples your secure management from the provisioning of resources.
- When possible, use OpenID Connect (OIDC). This is to avoid using credentials to access cloud resources but short-lived tokens instead, which can also be rotated (for more information, please refer to https://docs.github.com/en/actions/deployment/security-hardening-your-deployments).
I use the cloud-native tools in this book. It is easier to transition from them to an IaC or CCA tool than vice versa.
Strategies
There are different strategies regarding how to organize your infrastructure code in a manageable, scalable, and compliant way. Essentially, it depends on your organizational structure and which one is the best for you. They are as follows:
- Central: The infrastructure resources live in central repositories, and feature teams can provision from there using a self-service (that is, triggering a workflow). This approach has the benefit of having all resources in one place, and the responsible unit will have strong control over it. The disadvantage is that it is not very flexible for developers and that the distance from the code to the infrastructure will impact the way the engineers treat the infrastructure.
- Decentral: The infrastructure resources live alongside the code. You can use templates (please refer to the Workflow templates section) to help engineering teams set up the infrastructure. Additionally, you can use CODEOWNERS and protected branches to require approval from a shared, responsible team. This approach is very flexible, but the control of costs and governance are more difficult.
You could deploy – or ensure the correct state of – the infrastructure with every build. But this would slow down build times and cost valuable build minutes. In most cases, it is preferable to deploy the resources in a separate workflow on demand.
- Templated: The team that is responsible for the shared infrastructure provides fixed templates that can be used by the feature teams. The templates could be Actions, that is, composite actions with preconfigured native actions or completely customized ones in Docker or JavaScript. Alternatively, you can use a reusable workflow (refer to the Reusable workflows section). In any case, the ownership of the reused workflow or action stays with the central team. This approach works well if you limit the number of allowed actions within your enterprise.
- Mixed: This is a mix of the preceding three strategies. For example, the test and development infrastructures could be decentralized, and production environments could be templated.
No matter which strategy you use, be intentional about it. The solution will greatly impact how your teams work together and how infrastructure is used in value delivery!
Workflow templates
Workflow templates are workflow files stored in a workflow-templates folder in the .github repository of an organization alongside a metadata file and an icon file (see Figure 9.6):
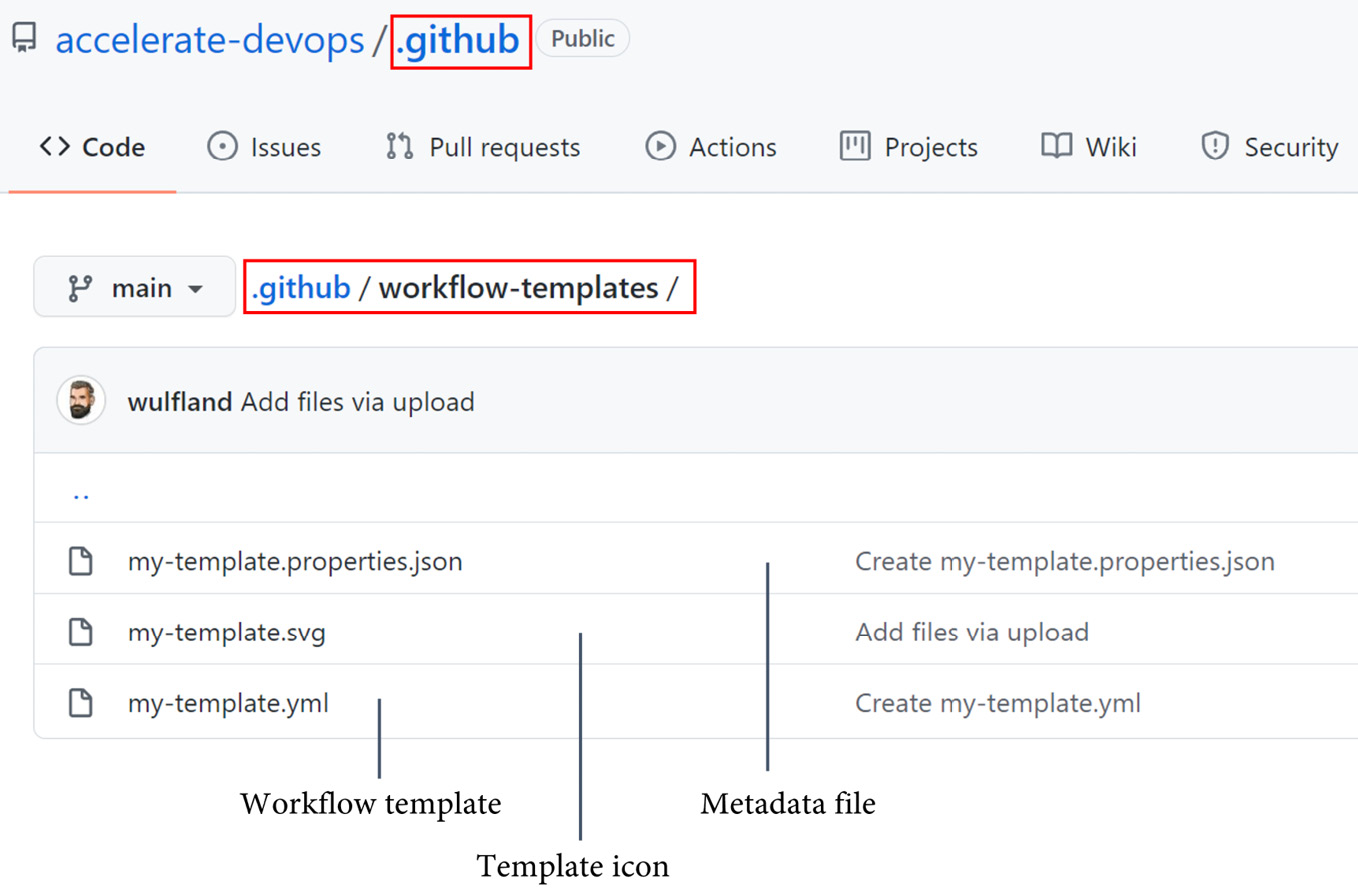
Figure 9.6 – Workflow templates for an organization
The template itself is a normal workflow file. You can use the $default-branch variable for triggers to filter by the default branch.
Along with the template, you need to save an icon in .svg format and a properties file. The properties file looks like this:
{"name": "My Workflow Template",
"description": "Description of template workflow",
"iconName": "my-template",
"categories": [
"javascript"
],
"filePatterns": [
"package.json$",
"^Dockerfile",
".*\.md$"
]
}
Here, the name, description, and iconName values are required. Note that the iconName value is without the extension. In the categories array, you can specify the coding languages that this workflow template is relevant for. The same is true for file patterns: you can specify patterns for certain files in the user's repository. The template will be displayed more prominently if the repository contains files that match a pattern.
Now if a user of the organization creates a new workflow, they are presented with the templates of the organization (see Figure 9.7):
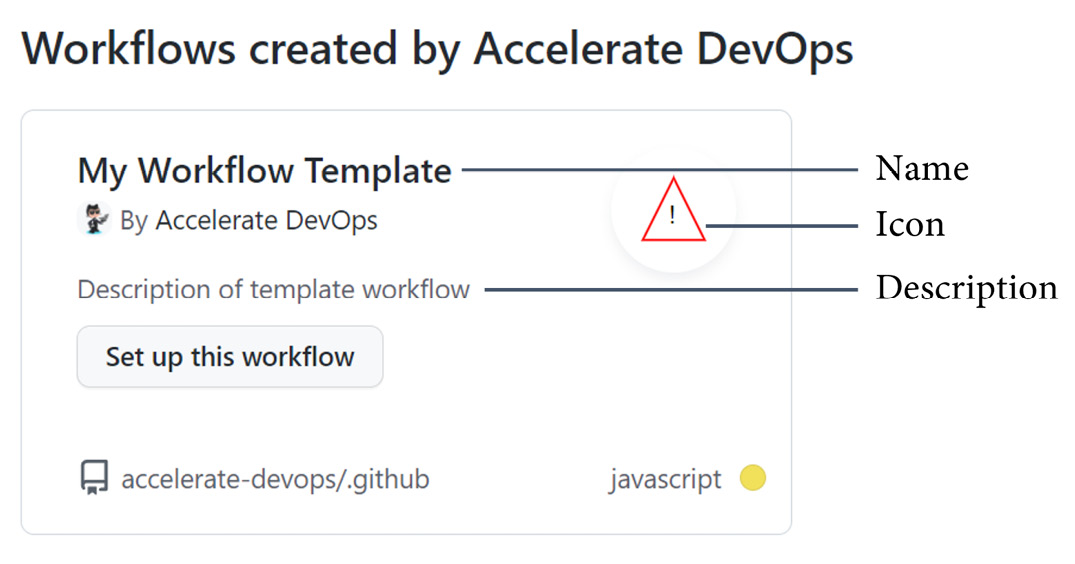
Figure 9.7 – Creating a workflow from a template
The template has been copied and can be modified! That's why workflow templates are not suitable for the templated strategy.
To learn more about workflow templates, please visit https://docs.github.com/en/actions/learn-github-actions/creating-workflow-templates.
Reusable workflows
A reusable workflow is a workflow that can be called by another workflow. A workflow must have the workflow_call trigger to be reusable:
on:
workflow_call:
You can define inputs that can be passed to the workflow. Inputs can be boolean, number, string, or a secret:
on:
workflow_call:
inputs:
my_environment:
description: 'The environment to deploy to.'
default: 'Prod'
required: true
type: string
secrets:
my_token:
description: 'The token to access the environment'
required: true
You can access the inputs in the reusable workflow using the inputs context (${{ inputs.my_environment }}) and the secrets using the secrets context (${{ secrets.my_token }}).
To use a reusable workflow, you have to reference the file in the following format:
{owner}/{repo}/{path}/{filename}@{ref}The workflow is called in a job, and you specify the inputs and secrets as follows:
jobs:
call-workflow-1:
uses: org/repo/.github/workflows/reusable.yml@v1
with:
my_environment: development
secrets:
my_token: ${{ secrets.TOKEN }}Reusable workflows are perfect to avoid duplication. Together with semantic versioning and tags, this is a great way to release reusable workflows to the teams in your organization.
To learn more about reusable workflows, please visit https://docs.github.com/en/actions/learn-github-actions/reusing-workflows.
Measuring success
In Chapter 1, Metrics that Matter, I introduced you to the Four Keys dashboard. This is a dashboard that displays the DORA metrics. If you deploy automatically to production, it's time to shift from surveys to real metrics. The dashboard is one way to do this.
To install the dashboard, follow the instructions at https://github.com/GoogleCloudPlatform/fourkeys/blob/main/setup/README.md.
First, create a project in Google Cloud with billing enabled and note the project ID (not the name!). Then, open Google Cloud Shell (located at https://cloud.google.com/shell), clone the repository, and execute the deployment script:
$ git clone
https://github.com/GoogleCloudPlatform/fourkeys.git
$ cd fourkeys
$ gcloud config set project <project-id>
$ script setup.log -c ./setup.sh
The script asks you some questions that you can use to tailor your deployment. If everything went well, you should see a nice dashboard in Grafana. To configure GitHub to send data to the event handlers in Google, you have to get the event handler endpoint and secret. Just execute the following two commands in Cloud Shell and copy the output:
$ echo $(terraform output -raw event_handler_endpoint)
> https://event-handler-dup4ubihba-uc.a.run.app
$ echo $(terraform output -raw event_handler_secret)
> 241d0765b5a6cb80208e66a2d3e39d254051377f
Now, head over to the repository in GitHub where you want to send data to the dashboard and create a webhook under Setting | Webhooks | Add webhook. Paste the URL of the event handler and the secret into the fields and select Send me everything. Click on Add webhook to start sending all the events to the event handler (see Figure 9.8):
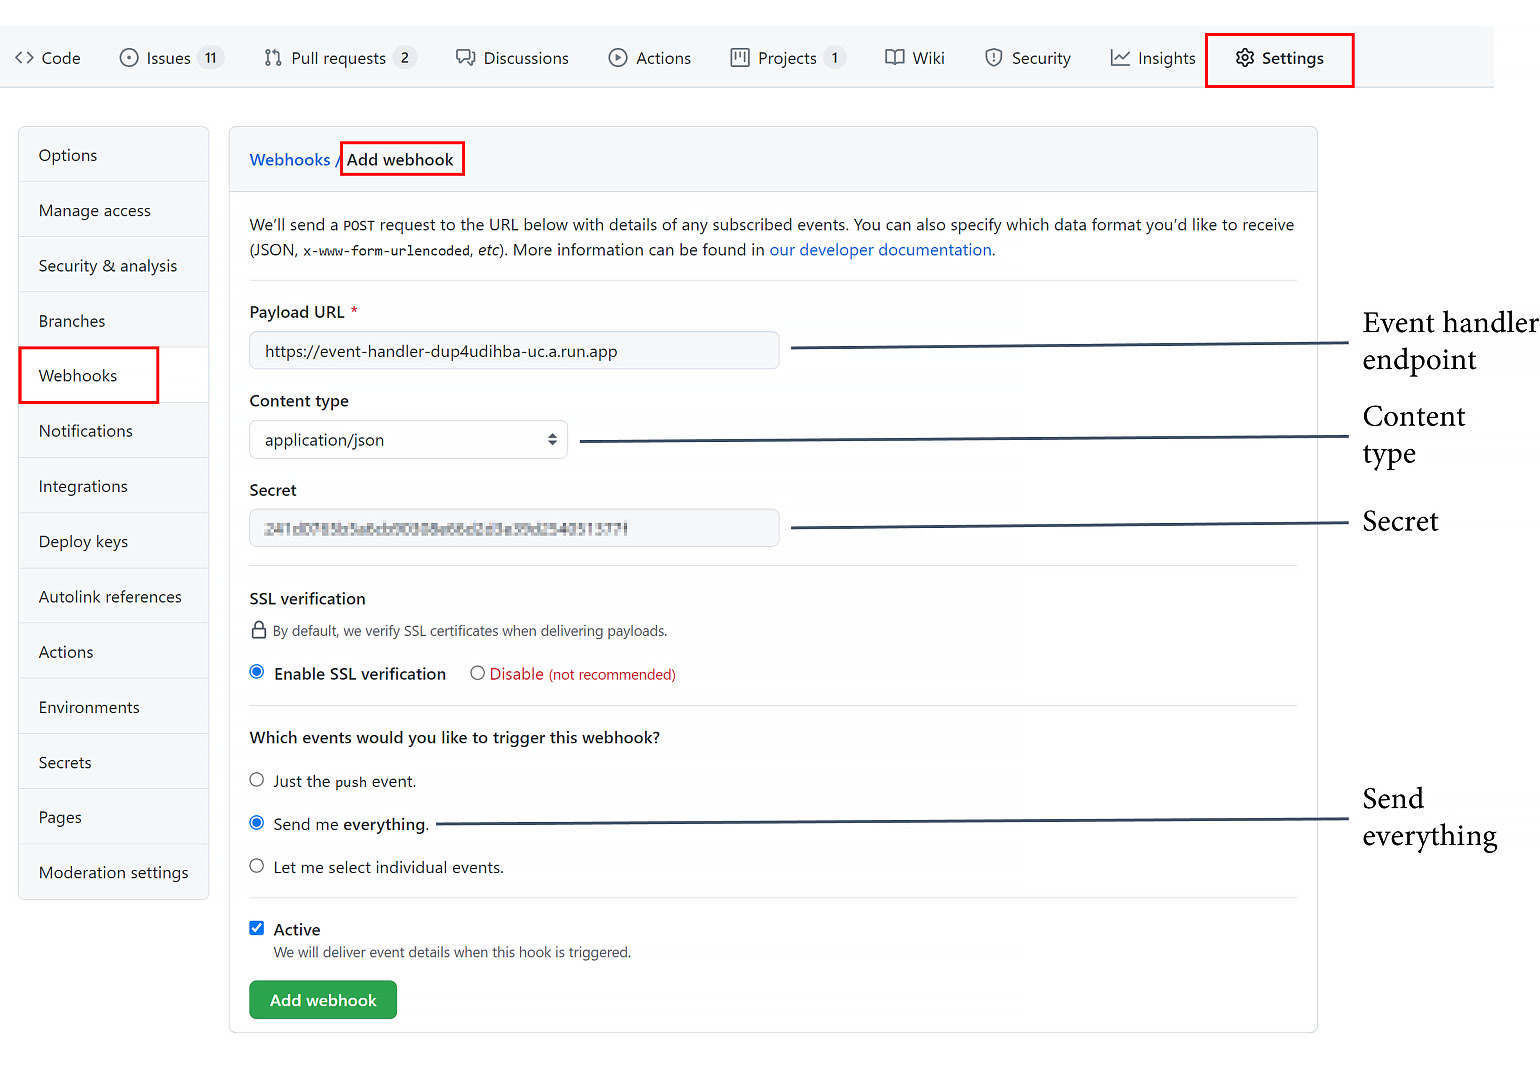
Figure 9.8 – Adding a webhook to send data to the four keys dashboard
Unfortunately, you can currently only send the deployment data to the dashboard. In previous versions, you were able to send individual events to the workflows.
To indicate a live-site issue, you must add a tag named Incident to an open issue. In the body, you add root cause: followed by SHA of the commit that caused the event.
The Four Keys dashboard is a nice way to view your DevOps metrics (see Figure 9.9):

Figure 9.9 – The Four Keys dashboard
However, don't forget that these are not metrics to compare teams with each other. Don't let the metrics be the goal!
Case study
With CI set up, the next thing our two pilot teams at Tailwind Gears need to do is automate the deployment and release processes of the software.
The first team runs some web applications that are still hosted on-premises. Instead of automating the on-premises deployment, the team moves the applications to a hosted Kubernetes service in the cloud. The cluster instances, network, and other cloud resources have already been set up by the IT department during the last sprints. Therefore, the team can easily transition the deployment to a staged deployment process. They deploy to a test instance and run all of the automated tests they have. They also add a test using curl, which calls a website that checks the database and backend accessibility to ensure everything is working as expected. If all tests pass, the deployment automatically deploys to production using a rolling update to ensure zero downtime for users.
Some of the code of the web applications, which contains shared concerns, needs to be adjusted to work in the cloud. This code is also contained in web applications from other teams. The team decides to move the code to GitHub Packages (NPM for the JavaScript and NuGet for .NET) with its own release cycle and semantic versioning to allow other teams, in the future, to reuse the code easily when they move to the cloud.
The second team produces software for hardware products that are used in machines for safety-critical functions. This means the development process is highly regulated. They are required to have end-to-end traceability for all changes they do. Since all the requirements were imported into GitHub issues and are linked using nested issues, this is not an issue. They just have to reference the lowest-level issue in the commit message. In addition to end-to-end traceability, there are some test documentations for different levels of requirements that are not yet automated. Plus there are some documents for risk management. To ensure all these criteria are met before releasing the product, required reviewers manually approve a release before deploying to production to ensure that all requirements are in place to be compliant. Together with protected branches and codeowners (the required documents were already converted into markdown), this reduces the effort of releasing a lot at once.
The installation of the binaries onto the hardware is performed by a custom tool that is owned by the company and runs on a machine in production. This tool is used to pick the binaries up from a file share. This was not optimal for end-to-end traceability and relied on log files. The deployment to test environments was performed manually, which means the way the binaries were distributed was not consistent. To address this, the team puts the binaries together with the tool in a Docker container and publishes the image to the container registry of GitHub Packages. The Docker image can then be used to transfer versions to test machines and during the assembly process in the same way.
Summary
In this chapter, you learned how to use GitHub environments to stage and protect your deployments and how to use GitHub Actions to deploy to any cloud or platform in a secure manner. I demonstrated how to use workflow templates and reusable workflows to help you collaborate on your IaC.
In the next chapter, you will learn how to optimize the rolling out of your features and the entire feature life cycle using FeatureFlags/FeatureToggles.
Further reading
Here is a list of references from this chapter that you can also use to gain more information about the topics we discussed:
- CI/CD: https://azure.microsoft.com/en-us/overview/continuous-delivery-vs-continuous-deployment/
- Deployment rings: https://docs.microsoft.com/en-us/azure/devops/migrate/phase-rollout-with-rings
- Deploying to Azure App Service: https://docs.github.com/en/actions/deployment/deploying-to-your-cloud-provider/deploying-to-azure-app-service
- Deploying to Google Kubernetes Engine: https://docs.github.com/en/actions/deployment/deploying-to-your-cloud-provider/deploying-to-google-kubernetes-engine
- Deploy to Amazon Elastic Container Service: https://docs.github.com/en/actions/deployment/deploying-to-your-cloud-provider/deploying-to-amazon-elastic-container-service
- Security hardening your deployments: https://docs.github.com/en/actions/deployment/security-hardening-your-deployments
- Kubernetes deployments: https://kubernetes.io/docs/concepts/workloads/controllers/
- Kubernetes deployment strategies: https://github.com/ContainerSolutions/k8s-deployment-strategies
- Helm: https://helm.sh/
- Kustomize: https://kustomize.io/
- Infrastructure as code: https://en.wikipedia.org/wiki/Infrastructure_as_code
- IaC and environment or configuration drift: https://docs.microsoft.com/en-us/devops/deliver/what-is-infrastructure-as-code
- Creating workflow templates: https://docs.github.com/en/actions/learn-github-actions/creating-workflow-templates
- Reusable workflows: https://docs.github.com/en/actions/learn-github-actions/reusing-workflows
- The four keys project: https://github.com/GoogleCloudPlatform/fourkeys/