
Chapter 20: GitHub – The Home for All Developers
In this chapter, I'll explain some of the basics of the GitHub platform. You'll learn about the different hosting options, pricing, and how you can integrate it into your existing toolchain.
The key topics are as follows:
- Hosting options and pricing
- GitHub Connect
- Hands-on – create your account on GitHub.com
- Enterprise Security
- GitHub Learning Lab
Hosting options and pricing
GitHub has many different licenses and hosting options. It is important to understand them to make the right choice for your enterprise.
Hosting options
GitHub (https://github.com) is hosted in data centers in the United States. You can sign up on GitHub for free and you'll get unlimited private and public repositories for free. Many of the features in GitHub are free for open source projects but not for private repositories.
For enterprises, you have different options to host GitHub (see Figure 20.1):
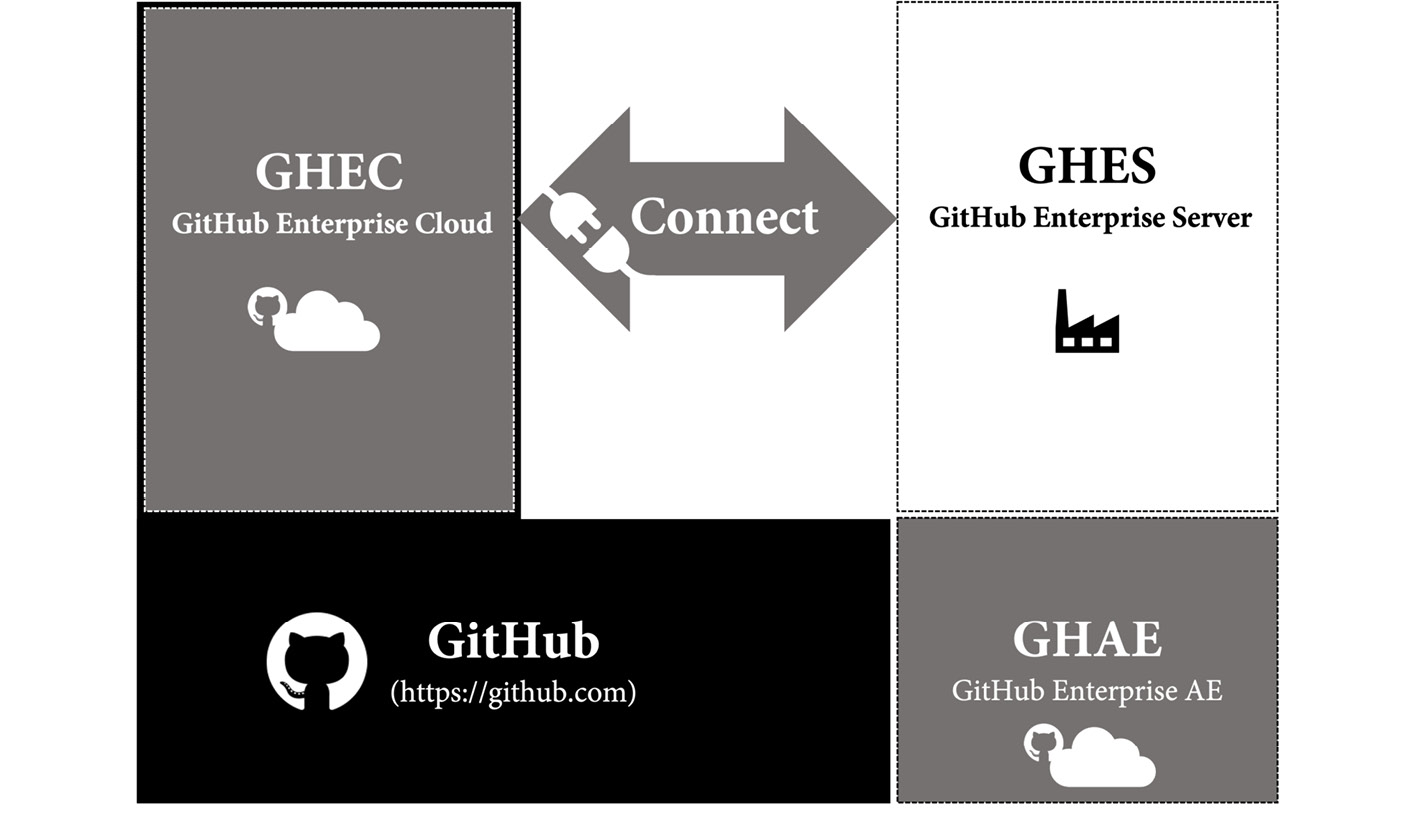
Figure 20.1 – Hosting options for GitHub Enterprise
GitHub Enterprise Cloud
GitHub Enterprise Cloud (GHEC) is a SaaS offering from GitHub and is completely hosted by GitHub in their cloud infrastructure in the United States. You can apply additional security and support single sign-on for your users. GHEC allows you to host private and public repositories so that you can host open source projects in the context of your enterprise.
GHEC is guaranteeing you an SLA of 99.9% monthly uptime, meaning a maximum downtime of 45 minutes per month.
GitHub Enterprise Server
GitHub Enterprise Server (GHES) is a system that you can host wherever you want. You can host it in your own data center or in a cloud environment such as Azure or AWS. You can use GitHub Connect to connect to GitHub.com – this allows you to share licenses and make use of open source resources on your server.
GHES is based on the same source as GHEC, so eventually, all features will come to the server a few months later. But there are some things provided in the cloud that you must take care of on GHES for yourself, for example, the runners in GitHub Actions. In the cloud you can leverage GitHub hosted runners; on GHES, you must build your own solution using self-hosted runners.
There are also managed services that offer to host GHES for you – for example, in an Azure data center in your region. This way, you have full data residency and don't have to manage the servers by yourself. Some also include offering to host managed GitHub Actions runners.
GitHub Enterprise AE
GitHub is building a service called GitHub Enterprise AE (GHAE). It is currently in private beta for customers with more than 500 seats and there is not yet a date when the service will be available publicly.
GHAE is a completely isolated, managed offering from GitHub in a Microsoft Azure region of your choice. This gives you full data residency and compliance.
For customers that need data residency and compliance, this will be a good option in the future, but for now, it is not clear when it will be available, what the pricing will be, and what the minimum number of seats will be.
GitHub Connect
The power of GitHub lies in its community and the value the community provides. To be able to leverage this on the server, you can connect your server to GitHub using GitHub Connect. You can activate each feature individually, as you can see in Figure 20.2:

Figure 20.2 – Configure GitHub Connect on GHES
The following is a list of the features:
- License sync: Manage license usage across your enterprise on multiple servers or organizations. This helps to ensure that one user only consumes one license, no matter where they sign in.
- Unified search: One option is to allow searching on the server and getting results for public repositories from GitHub.com. Additionally, you can allow searching on the server and finding private repositories that belong to your enterprise (of course, only when the user has access to the repositories).
- GitHub.com actions: To load public actions in workflows, you must enable this option. Without this, you must fork all actions to your server and reference them from there. You can still configure at the organization level what actions are allowed.
- Unified contributions: Without this option, users' contributions on the server will not show up in their public profile. No sensitive data is exposed with this option. Only the number of contributions – such as commits, issues, discussions, or pull requests – are sent to GitHub.com.
Pricing
The cost of GitHub is billed monthly per user, and it is built upon three different tiers, Free, Team, and Enterprise (see Figure 20.3):
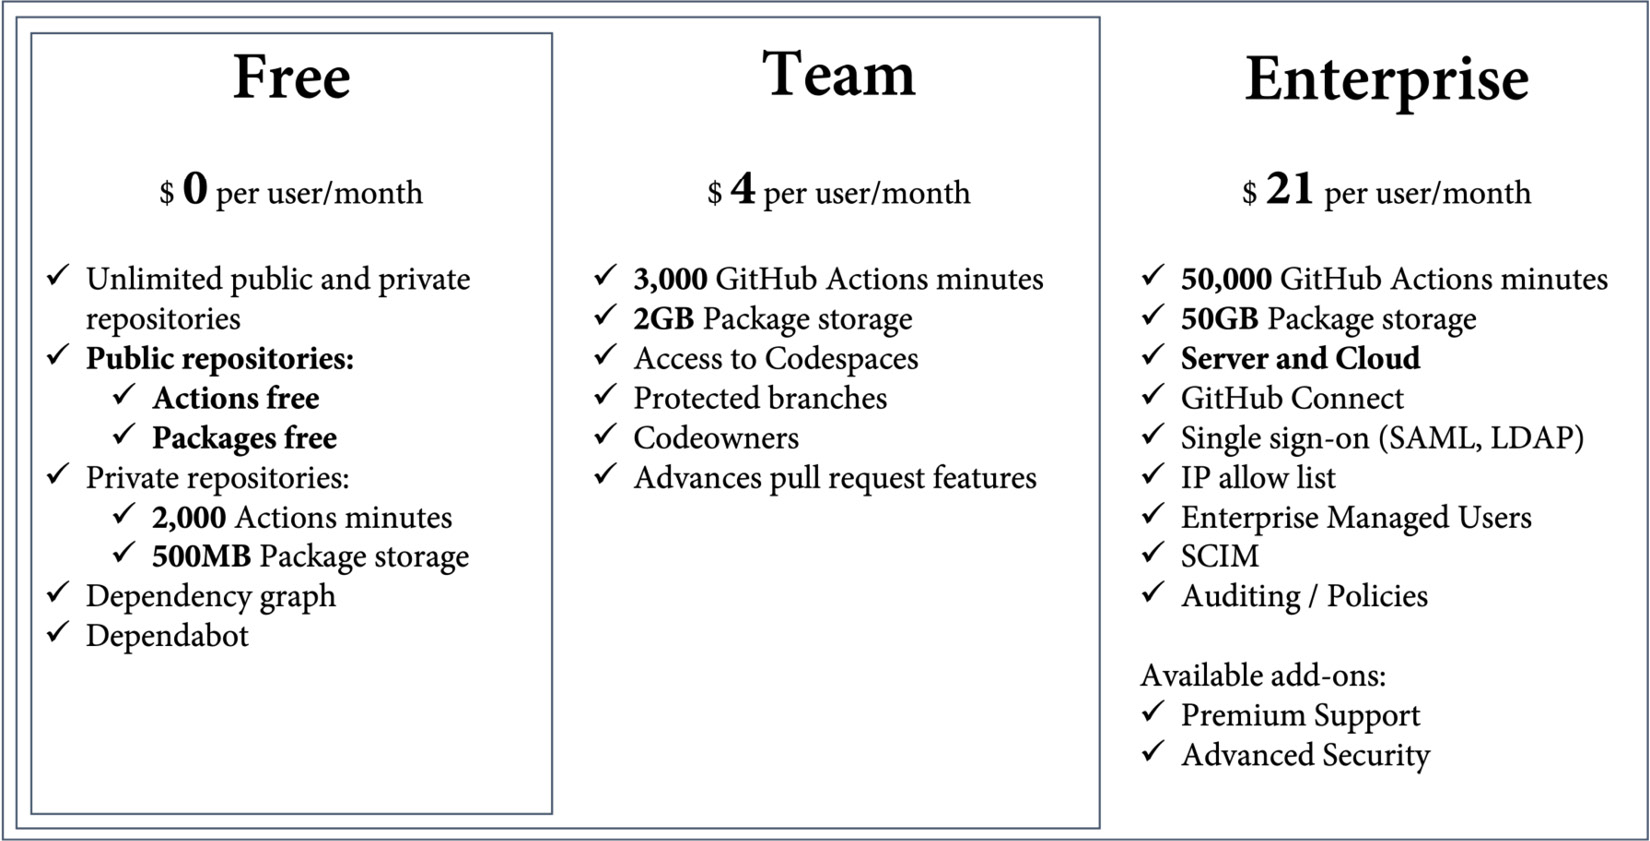
Figure 20.3 – Overview of GitHub pricing tiers
Public repositories – and therefore open source – are free and contain a lot of features for free, such as Actions, Packages, and many security features. Private repositories are free with limited functionality and 2,000 Action minutes and 500 MB of storage. The pricing for Actions was covered in depth in Chapter 7, Running Your Workflows.
If you really want to collaborate with GitHub in private repositories, you need at least the Team license. It includes protected branches, code owners, and other advanced pull request features. And you get access to Codespaces, but you must pay for them separately (see Chapter 13, Shift Left Security and DevSecOps, for the pricing of Codespaces). The team tier contains 3,000 Action minutes and 2 GB of storage for packages.
Free and Team are only available on GitHub.com. If you need GHEC, GHES, or GHAE, you must buy the GitHub Enterprise license. This license contains all the Enterprise features, such as single sign-on, user management, auditing, and policies, and it comes with 50,000 Action minutes and 50 GB of storage for packages. It also gives you the option to purchase additional add-ons such as Advanced Security or Premium Support.
Licenses are bought in blocks of 10 and can be paid monthly or yearly. If you want to use GitHub Advances Security or Premium Support, you must talk to the GitHub Sales team or a GitHub partner. They can give you a quote for that.
There are certain things that are paid on a per-use basis in addition to the license tiers, such as the following:
- Actions
- Packages
- Codespaces
- Marketplace pay-per-use apps
You can configure spending limits on the organization or enterprise level.
Hands-on – create your account on GitHub.com
Until now, I just assumed that you already have a GitHub account. With over 70 million users, chances are high that you do. If you have one, just skip this section and continue with enterprise security.
Signing up for GitHub is straightforward. It is designed like a wizard that looks like a console. The steps to create a new account are as follows:
- Visit https://github.com and click on Sign up.
- Enter your email address and click Continue or press Enter, as in Figure 20.4:
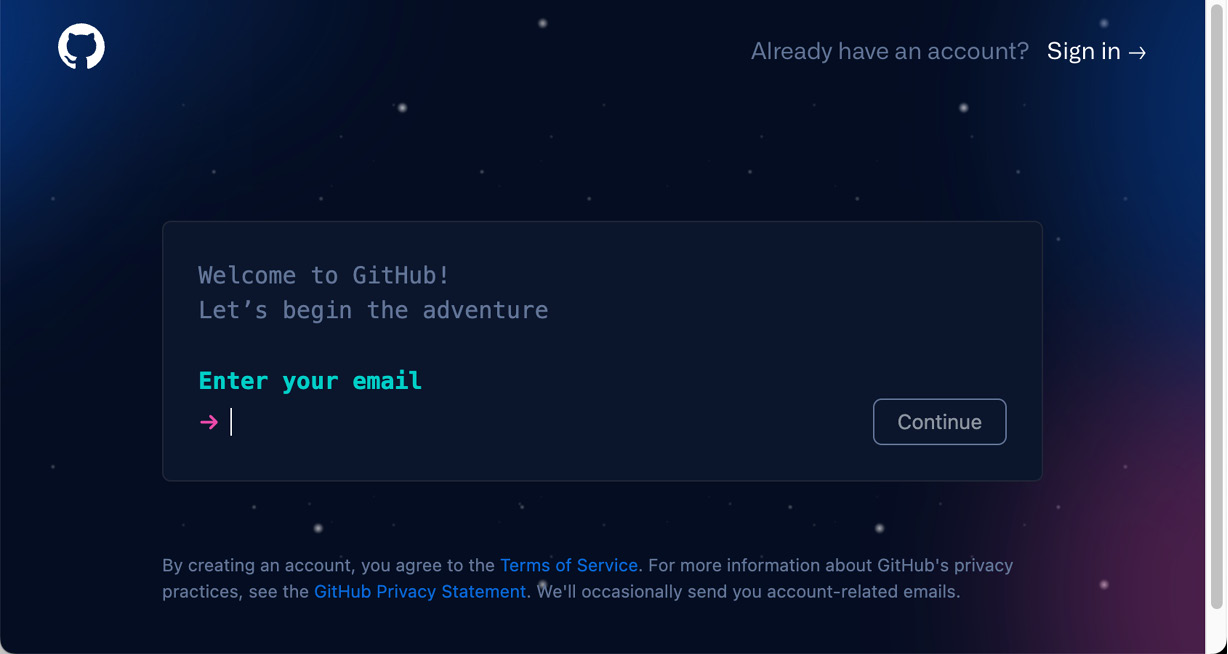
Figure 20.4 – Enter your email address
- Enter a strong password and click Continue.
- Enter a username. The username must be unique. GitHub will tell you whether your name is available or not, as in Figure 20.5:
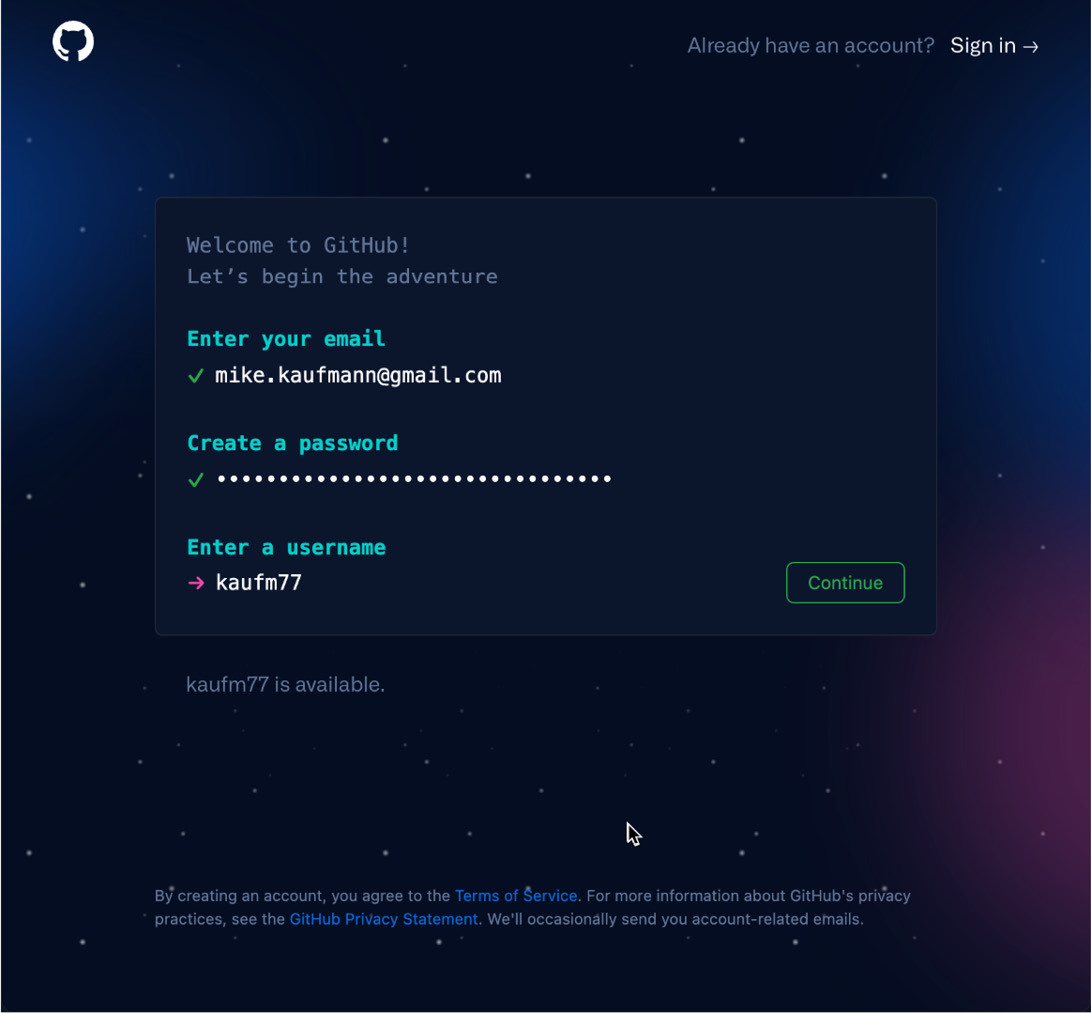
Figure 20.5 – Create a password and pick a unique username
Click Continue if you found a unique username.
- Now, you can opt in or out of email communication. Type y for yes or n for no, then click Continue or press Enter.
- Solve the captcha by clicking on the specified part of the image. Note that the captcha might appear in the preferred language of your browser (see Figure 20.6):

Figure 20.6 – Email communication and captcha
- Now, check your email account. You should have received a code that you can paste into the following fields (see Figure 20.7):
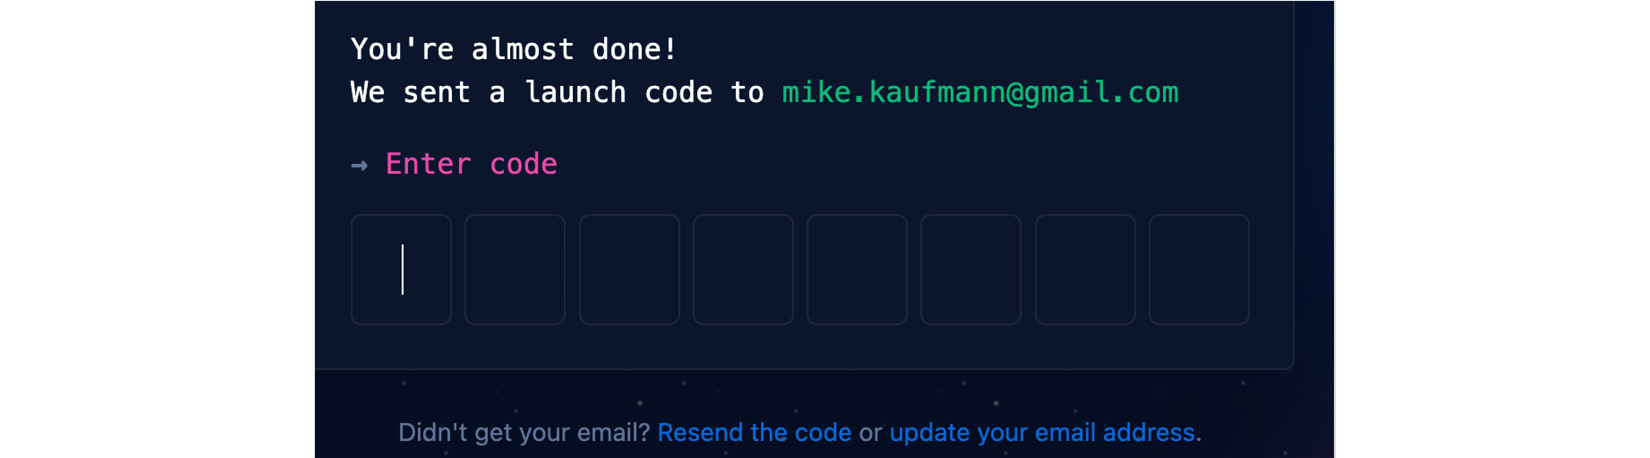
Figure 20.7 – Enter the code that was sent to your email address
- The next dialogs are to personalize your experience. You can skip them if you want.
- You can choose a free 30-day trial of GitHub Enterprise. This should give you enough time to try out all the features.
After you have successfully created your account, there are some steps you should do right away:
- Go to https://github.com/settings/security and check Enable two-factor authentication to secure your account.
- Fill in your profile at https://github.com/settings/profile and pick a good avatar.
- Select the theme of your choice at https://github.com/settings/appearance. You can choose a single light or dark theme, or you can choose to sync the theme with your system.
- Choose how to deal with your email address at https://github.com/settings/emails. You can choose to keep your email address private. GitHub will then use a special email address when performing web-based Git operations. The address has the following format: <user-id>+<user-name>@users.noreply.github.com. You have to configure this address locally if you want to block command-line pushes that contain your real email address:
$ git config --global user.email <email address>
Your GitHub account is now ready, and you can start creating repositories or contributing to open source projects.
Enterprise security
As an enterprise, you can use SAML single sign-on (SSO) with your identity provider (IdP) to protect your GitHub Enterprise resources. SSO can be configured in GHEC at the enterprise and organization levels. In GHES, it can only be configured for the entire server.
SAML SSO can be configured with every IdP that supports SAML – but not all support the System for Cross-domain Identity Management (SCIM). These are compatible: Azure AD (AAD), Okta, and OneLogin.
SAML authentication
Configuring SAML SSO in GitHub is straightforward. You can find the corresponding settings in the enterprise or organization settings under Authentication security (/settings/security) | SAML single sign-on. Here, you can find the consumer URL you will need to configure your IdP (see Figure 20.8):

Figure 20.8 – Configure SAML SSO in GitHub
The values for the fields must be configured in your IdP. Check their documentation for more information. In AAD, for example, you can find detailed instructions here: https://docs.microsoft.com/en-us/azure/active-directory/saas-apps/github-tutorial. You have to create a new Enterprise application in AAD. You can search the templates for GitHub and pick the corresponding one (for enterprise, organization, or server). See Figure 20.9 for the currently available templates:

Figure 20.9 – Enterprise application templates for GitHub in AAD
Assign users or groups to the application that you want to have access to GitHub. The important configuration happens in Set up single sign on (see Figure 20.10):
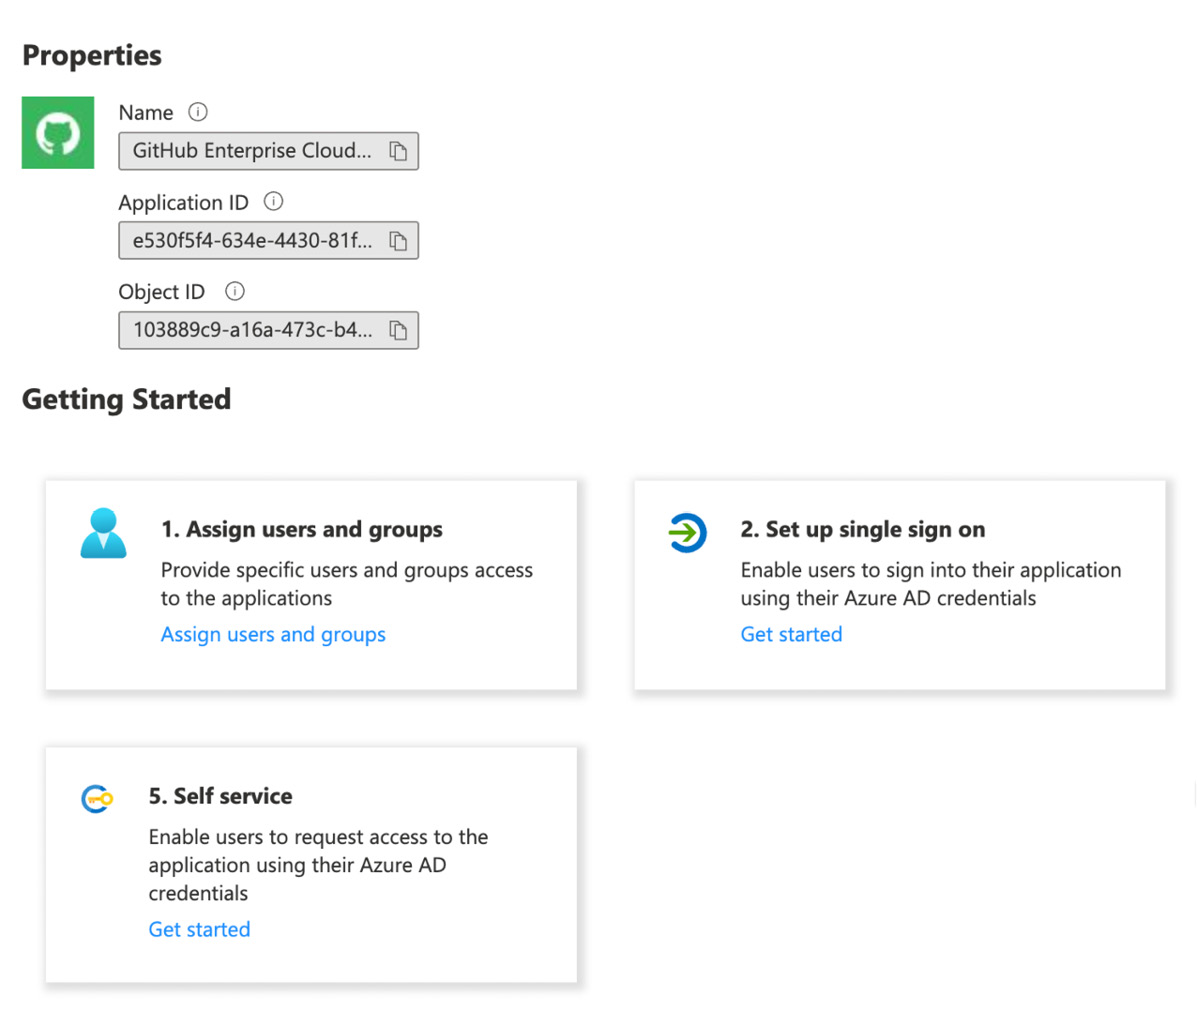
Figure 20.10 – Configuring your Enterprise application
Use the organization or enterprise URL as the identifier. You can use the first part of the URL you have seen in Figure 20.8, only without /saml/consume. Use this URL as Entity ID. Add /saml/consume for Reply URL and /sso for Sign on URL. The result should look like Figure 20.11:
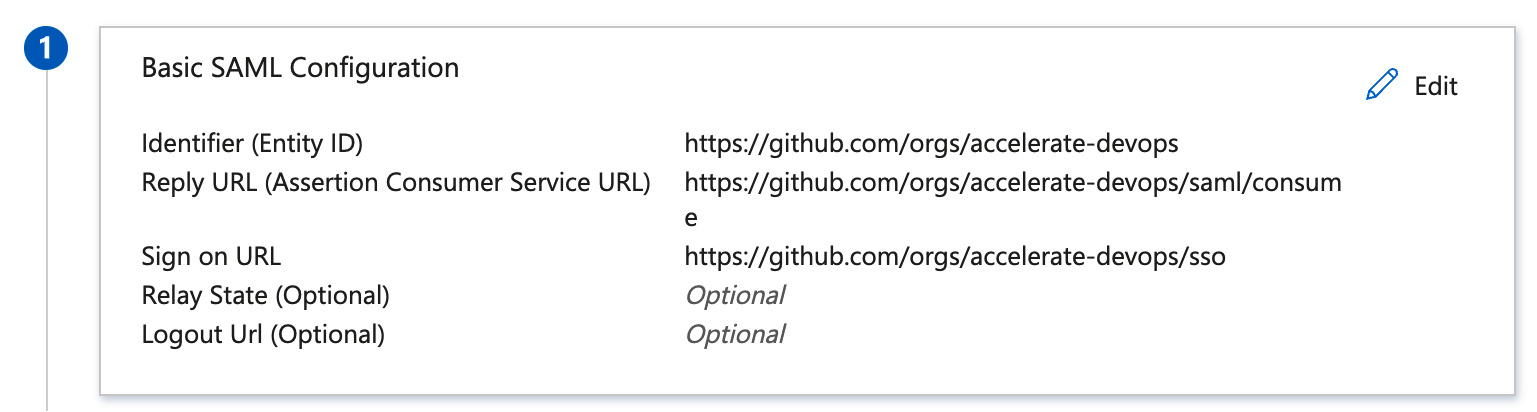
Figure 20.11 – Basic SAML configuration in AAD Enterprise application
The attributes and claims can be used to adjust the mappings for the fields in AAD. The default settings should work if your AAD was not customized (see Figure 20.12):
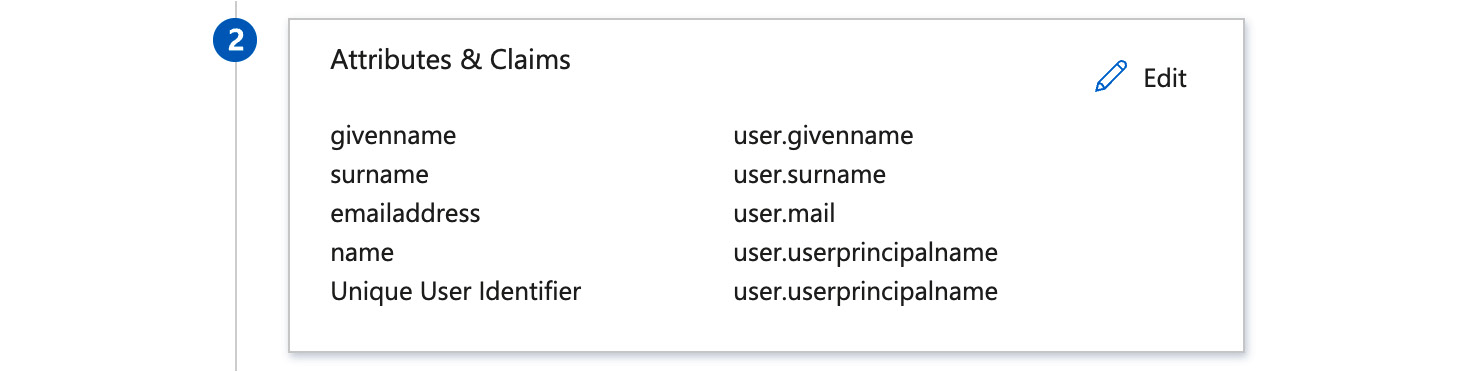
Figure 20.12 – Configure the attributes and claims for the SAML token
Download the Base64 certificate used to sign the SAML token (see Figure 20.13):

Figure 20.13 – Download the SAML signing certificate
Copy the Login URL and Azure AD Identifier URLs (see Figure 20.14):

Figure 20.14 – Get Login URL and Azure AD Identifier
You can now head back to GitHub and fill in the data. Then, paste the Login URL information into the Sign on URL field and the Azure AD Identifier URL into the Issuer field. Open the certificate in a text editor and paste the content in the Public certificate field. The result looks like Figure 20.15:

Figure 20.15 – Configure SAML SSO in GitHub
Click Test SAML configuration and log in with your AAD credentials. If everything was successful, you can check Require SAML authentication to enforce the access with SAML. GitHub will then check which users have not been granted access through the IdP and remove them after your confirmation.
Note that only authorized PAT tokens and SSH keys can access content that is protected by SSO. Each user must go to their PAT tokens/SSH keys and authorize them as in the example in Figure 20.16:

Figure 20.16 – Authorize a PAT token for SSO protected organizations
Of course, the configuration for every IdP is different, and the values vary slightly depending on whether you configure an enterprise, an organization, or a server. But with the documentation of your IdP, the setup should be straightforward.
SCIM
If you enable SAML SSO, users will not be automatically deprovisioned when you deactivate a user in your IdP. You can implement SCIM in GHEC to automatically add, manage, and remove access based on the information of your IdP.
SCIM is an API endpoint (see https://docs.github.com/en/enterprise-cloud@latest/rest/reference/scim) that is used by your IdP to manage the users in GitHub. Compatible IdPs are, for example, Azure AD, Okta, and OneLogin. To configure SCIM, you must follow the documentation of your IdP if they are compatible. Here is the tutorial for AAD: https://docs.microsoft.com/en-us/azure/active-directory/saas-apps/github-provisioning-tutorial.
Disable Third-Party Access Restrictions
Note that you have to disable third-party access restrictions in the settings of your organization before authorizing your IdP. You can do this under Settings | Third-party access | Disable access restrictions.
Automatic team synchronization
If you use SAML SSO on GHEC, you can set up team synchronization to automatically sync team membership with your IdP. Currently, team synchronization only supports AAD and Okta.
You can enable team synchronization in the settings of your organization under Authentication security (/settings/security). There, you can then see how many teams are synchronized and jump to the filtered audit log to see all relevant events (see Figure 20.17):

Figure 20.17 – Enabling team synchronization for an organization
Once enabled, you can create new teams and select one or more groups from your IdP that get synchronized with your team, as you can see in Figure 20.18:

Figure 20.18 – Creating teams with automatic synchronization
You can add these teams inside other teams (Parent team), but you cannot sync nested groups to GitHub.
Enterprise Managed Users
In GHEC, even if you set up SAML SSO for your enterprise or organization, every user still needs a user account on GitHub.com. The GitHub user account is basically the identity of the user, and the SAML authorization is the access granted to certain Enterprise resources. The user could contribute to open source and other organizations using their identity, and must authenticate using SSO to access Enterprise resources. But many organizations don't want that. They want complete control over the identity of their users. The solution for that is Enterprise Managed Users (EMU). With EMU, the identity of users gets completely managed in the IdP. A new user gets created if a user logs in for the first time using the identity from the IdP. This user cannot contribute to open source or be added as an outside collaborator to other repositories. Also, the contributions only count to the profile of that user.
EMU gives your enterprise a lot of control over the identities, but it comes with a lot of restrictions, as shown in the following examples:
- Users cannot collaborate on, star, watch, or fork repositories outside of the enterprise. They cannot create issues or pull requests, push code, comment, or add reactions to these repositories.
- Users are only visible to other members of the same enterprise, and they cannot follow other users outside of the enterprise.
- They cannot install GitHub Apps on their user accounts.
- Users can only create private and internal repositories.
These restrictions make a lot of things difficult. One of the main benefits of GitHub is its integration of open source repositories. But if EMU allows you to use the cloud instead of a server instance, it might be worth giving it a shot.
Currently, EMU-supported IdPs are AAD and Okta.
If you want to try EMU, you must contact GitHub's sales team and they will create a new enterprise for you.
To learn more about EMU, see https://docs.github.com/en/enterprise-cloud@latest/admin/identity-and-access-management/managing-iam-with-enterprise-managed-users/about-enterprise-managed-users.
Authentication with GHES
On the server, things work differently. You can configure SSO for SAML, LDAP, or CAS. The configuration is straightforward and not so different from GHEC. Users do not need a GitHub.com account; they can sign in directly to the server using the IdP, similar to EMU. But if GitHub Connect is configured, users can connect their GitHub account in User Settings | GitHub Connect and share the number of contributions with their public GitHub profile. This way, they can connect multiple corporate identities to their GitHub profile if they choose to do so.
The Audit API
GHEC, as well as GHES, supports audit logging. The log contains log entries for all security-relevant events. Each audit log entry shows applicable information about an event, such as the following:
- The enterprise or organization an action was performed in
- The user (actor) who performed the action
- The user affected by the action
- Which repository an action was performed in
- The action that was performed
- Which country the action took place in
- The date and time the action occurred
Figure 20.19 shows a sample audit log in GHEC at the enterprise level. You can search and filter the audit log. You can pick predefined filters and click on the title elements of the log entries to create a filter statement:
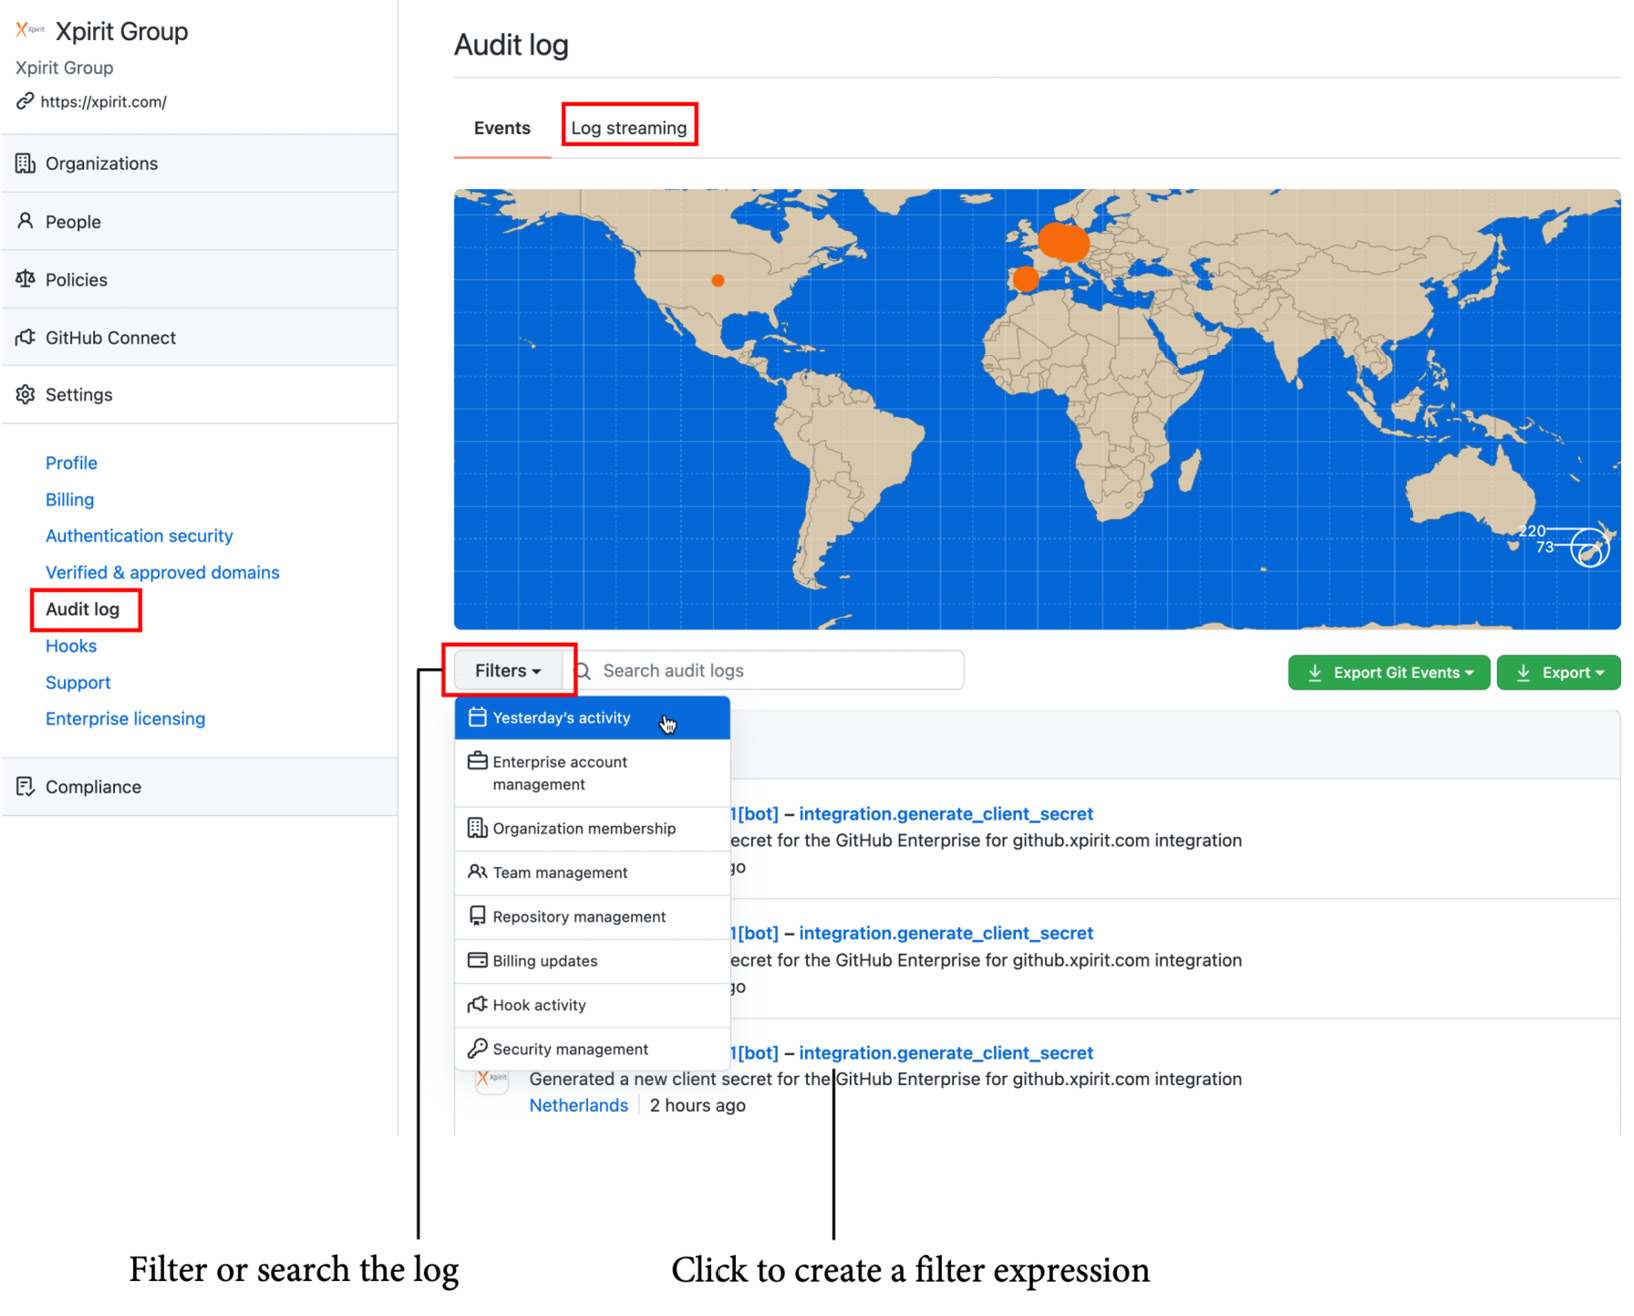
Figure 20.19 – The audit log of a GHEC instance
On GHEC, you can enable log streaming and configure automatic streaming of all events to one of the following targets:
- Amazon S3
- Azure Blob storage
- Azure Event Hubs
- Google Cloud Storage
- Splunk
You can forward the events with Azure Event Hubs to other tools such as Log Analytics or Sentinel.
You can also access the audit log using the audit log API. You can query the audit log using GraphQL or the REST API. The following example shows how you could retrieve all events for a specific date using the REST API:
$ curl -H "Authorization: token TOKEN"
--request GET
"https://api.github.com/enterprises/name/audit-log?phrase=created:2022-01-01&page=1&per_page=100"
For more information about querying audit logs using the API, see https://docs.github.com/en/enterprise-cloud@latest/admin/monitoring-activity-in-your-enterprise/reviewing-audit-logs-for-your-enterprise/using-the-audit-log-api-for-your-enterprise.
GitHub Learning Lab
One of the big advantages of GitHub is that most developers already know how it works. This means less time for training and onboarding. But, of course, there are still developers that are new to GitHub. GitHub offers the GitHub Learning Lab (https://lab.github.com/) for free. It contains many learning paths that use GitHub issues and a bot to provide you with a hands-on experience to learn GitHub.
There are also many free learning paths available on Microsoft Learn if you prefer this way of learning. Just go to Microsoft Learn and filter by product, GitHub: https://docs.microsoft.com/en-us/learn/browse/?products=github.
Summary
In this chapter, you learned about the different pricing and hosting options for GitHub. You learned about enterprise security and how you can integrate GitHub into your enterprise.
In the next chapter, I'll show you how you can migrate from your existing source control system or DevOps solution to GitHub.
Further reading
Use the following links to get more information on the topics:
- Pricing: https://github.com/pricing
- GitHub AE: https://docs.github.com/en/github-ae@latest/admin/overview/about-github-ae
- SCIM: https://docs.github.com/en/enterprise-cloud@latest/rest/reference/scim
- Enterprise Managed Users: https://docs.github.com/en/enterprise-cloud@latest/admin/identity-and-access-management/managing-iam-with-enterprise-managed-users/about-enterprise-managed-users
- Audit logs: https://docs.github.com/en/enterprise-cloud@latest/admin/monitoring-activity-in-your-enterprise/reviewing-audit-logs-for-your-enterprise/about-the-audit-log-for-your-enterprise
- GitHub Learning Lab: https://lab.github.com
- Microsoft Learn: https://docs.microsoft.com/en-us/learn