
Chapter 7: Running Your Workflows
In this chapter, I’ll show you the different options for running your workflows. We’ll investigate hosted and self-hosted runners, and I’ll explain how you can tackle hybrid-cloud scenarios or hardware-in-the-loop tests using the different hosting options. I’ll also show you how to set up, manage, and scale self-hosted runners, and I’ll show you how you can approach monitoring and troubleshooting.
The following are the core topics that we will cover in this chapter:
- Hosted runners
- Self-hosted runners
- Managing access with runner groups
- Using labels
- Scaling your self-hosted runners
- Monitoring and troubleshooting
Hosted runners
We already used hosted runners in the previous chapter. Hosted runners are GitHub-hosted virtual machines that can be used to run your workflows. The runners are available for Linux, Windows, and macOS operating systems.
Isolation and privileges
Each job in a workflow executes in a fresh instance of the virtual machine and is completely isolated. You have full admin access (passwordless sudo on Linux), and the user account control (UAC) is disabled on Windows machines. That means you can install any tools you might need in your workflow (this just comes with the price of build time).
The runner can also access user interface (UI) elements. This enables you to execute UI tests such as Selenium inside the runner without the need to do this through another virtual machine.
Hardware
GitHub hosts Linux and Windows runners on Standard_DS2_v2 virtual machines in Microsoft Azure. The hardware specifications for Windows and Linux virtual machines are as follows:
- 2-core CPU
- 7 GB of RAM
- 14 GB of SSD disk space
MacOS runners are hosted on GitHub's macOS cloud and have the following hardware specifications:
- 3-core CPU
- 14 GB of RAM
- 14 GB of SSD disk space
Software
In Table 7.1, you can see a list of the currently available images:

Table 7.1 – The currently available images for hosted runners
You can find the current list and all included software at https://github.com/actions/virtual-environments.
This is also the repository you can raise an issue in if you would like to request a new tool to be installed as a default tool. This repository also contains announcements about all major software updates on the runners, and you can use the watch feature of GitHub repositories to get notified if new releases are created.
Networks
The IP addresses that are used by the hosted runners change from time to time. You can get the current list using the GitHub API:
curl
-H "Accept: application/vnd.github.v3+json"
https://api.github.com/meta
More information on this can be found at https://docs.github.com/en/rest/reference/meta#get-github-meta-information.
You can use this information if you require an allow-list to prevent access to your internal resources from the internet. But remember that everyone can use the hosted runners and execute code! Blocking other IP addresses does not make your resources safe. Do not oppose internal systems to these IP addresses that are not secured in a way that you would trust them to be accessed from the public internet! This means the systems must be patched and have secure authentication in place. If this is not the case, you have to use self-hosted runners.
Note
If you use an IP address allow list for your GitHub organization or enterprise account, you cannot use GitHub-hosted runners and must instead use self-hosted runners.
Pricing
The usage of hosted runners is free for public repositories. Depending on your GitHub edition, you will have an allotted storage amount and monthly free build minutes (see Table 7.2):
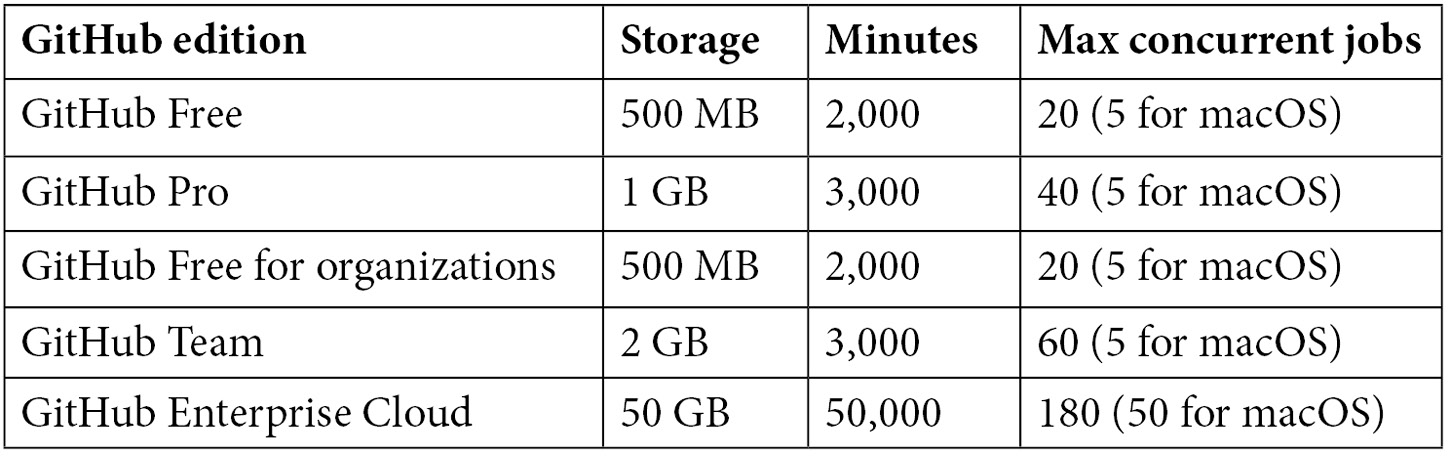
Table 7.2 – The included storage and build minutes for different GitHub editions
If you have purchased GitHub Enterprise through your Microsoft Enterprise Agreement, you can connect your Azure Subscription ID to your GitHub Enterprise account. This enables you to pay for extra GitHub Actions usage, in addition to what is included with your GitHub edition.
Jobs that run on Windows and macOS runners consume more build minutes than Linux! Windows consumes minutes with factor 2 and macOS with factor 10. That means using 1,000 Windows minutes would consume 2,000 of the minutes included in your account, whereas using 1,000 macOS minutes would consume 10,000 minutes included in your account.
That's because the build minutes are more expensive. You can pay for additional minutes on top of those included in your GitHub edition. These are the build minute costs for each operating system:
- On Linux: $0.008
- On macOS: $0.08
- On Windows: $0.016
Tip
You should use as much Linux for your workflows as possible and reduce macOS and Windows to a minimum to reduce your build costs. Linux also has the best starting performance.
The costs for additional storage are the same for all runners, which is $0.25 per GB.
If you are a monthly-billed customer, your account will have a default spending limit of $0 (USD). This prevents additional build minutes or storage from being used. If you pay by invoice, your account will have an unlimited spending limit by default.
If you configure a spending limit higher than $0, you will be billed for any additional minutes or storage beyond the included amounts in your account until the spending limit is reached.
Self-hosted runners
If you need more control than GitHub-hosted runners allow for hardware, operating systems, software, and network access, you can host the runners yourself. Self-hosted runners can be installed on physical machines, virtual machines, or in a container. They can run on-premises or in any public cloud environment.
Self-hosted runners allow for easy migration from other build environments. If you already have automated builds, you just install the runner on the machines and your code should build. But if your build machines are still the ped-like machines that are manually maintained – sometimes positioned physically beyond the desk of a developer – then this is not a permanent solution. Keep in mind that building and hosting a dynamically scaling environment needs expertise and costs money, whether it is hosted in the cloud or on-premises. So, if you can use hosted runners, it is always the easier option. However, if you need a self-hosted solution, make sure to make it an elastically scalable solution.
Note
Hosting your own runners enables you to build and deploy safely in your on-premises environment from within GitHub Enterprise Cloud. This allows you to run GitHub in a hybrid mode – that is, you can use GitHub Enterprise in the cloud together with hosted runners for basic automation and deployments to cloud environments, but use self-hosted runners to build or deploy applications that are hosted on-premises. This can be a cheaper and simpler solution than running GitHub Enterprise Server and the build environments for all of your builds and deployments yourself.
If you are depending on hardware to test your software (for example, when using hardware-in-the-loop tests), there is no way around using self-hosted runners. This is because there is no way to attach hardware to the GitHub-hosted runners.
The runner software
The runner is open source and can be found at https://github.com/actions/runner. It supports x64 processor architecture on Linux, macOS, and Windows. It also supports ARM64 and ARM32 architecture, but only on Linux. The runner supports many operating systems, including Ubuntu, Red Hat Enterprise Linux 7 or later, Debian 9 or later, Windows 7/8/10 and Windows Server, macOS 10.13 or later, and many more. For a complete list, see the documentation at https://docs.github.com/en/actions/hosting-your-own-runners/about-self-hosted-runners#supported-architectures-and-operating-systems-for-self-hosted-runners.
The runner auto-updates itself, so you don't have to take care of this.
Communication between the runner and GitHub
The runner software polls GitHub using HTTPS long polling over port 443, using an outbound connection. It opens a connection for 50 seconds and times out if no response is received.
You must ensure that the machine has appropriate network access to the following URLs:
github.com
api.github.com
*.actions.githubusercontent.com
github-releases.githubusercontent.com
github-registry-files.githubusercontent.com
codeload.github.com
*.pkg.github.com
pkg-cache.githubusercontent.com
pkg-containers.githubusercontent.com
pkg-containers-az.githubusercontent.com
*.blob.core.windows.net
You don't have to open any inbound ports on your firewall. All communication runs through the client. If you use an IP address allow list for your GitHub organization or enterprise, you must add the IP address range of your self-hosted runners to that allow list.
Using self-hosted runners behind a proxy server
If you need to run the self-hosted runner behind a proxy server, you can do so. But be aware that this can cause a lot of problems. The runner itself can communicate fine – however, package management, container registries, and everything that is executed by the runner and needs to access resources creates an overhead. If you can avoid this, I advise you to do so. But if you must run the workflows behind a proxy server, you can configure the runner with the following environment variables:
- https_proxy: This includes the proxy URL for HTTPS (port 443) traffic. You can also include basic authentication (such as https://user:[email protected]).
- http_proxy: This includes the proxy URL for HTTP (port 80) traffic. You can also include basic authentication (such as http://user:[email protected]).
- no_proxy: This includes a comma-separated list of hosts that should bypass the proxy server.
If you change the environment variables, you have to restart the runner for the changes to take effect.
An alternative to using environment variables is to use a .env file. Save a file with the name .env in the application folder of the runner. After that, the syntax is the same as the environment variables:
https_proxy=http://proxy.local:8081
no_proxy=example.com,myserver.local:443
Next, let's have a look at how to add self-hosted runners to GitHub.
Adding self-hosted runners to GitHub
You can add runners at different levels in GitHub: repository, organization and enterprise. If you add runners at the repository level, they are dedicated to that single repository. Organization-level runners can process jobs for multiple repositories in an organization and enterprise-level runners can be assigned to multiple organizations in your enterprise.
Installing the runner and registering it on your GitHub instance is easy. Just go to Settings | Actions | Runners at the level you want to add them. Then, select the operating system and processor architecture (see Figure 7.1):

Figure 7.1 – Installing a self-hosted runner
This generates a script for you that does the following:
- Downloads and unpacks the runner
- Configures the runner with the corresponding values
- Starts the runner
The first part of the script always creates a folder called actions-runner and then changes the working directory to that folder:
$ mkdir actions-runner && cd actions-runner
Downloading the latest runner package is done on Linux and macOS with the curl command and on Windows with Invoke-WebRequest:
# Linux and macOS:
$ curl -o actions-runner-<ver>.tar.gz -L https://github.com/actions/runner/releases/download/<ver>/actions-runner-<ver>.tar.gz
# Windows:
$ Invoke-WebRequest -Uri https://github.com/actions/runner/releases/download/<ver>/actions-runner-<ver>.zip -OutFile actions-runner-<ver>.zip
For security reasons, the hash of the downloaded package is validated to ensure the package has not been compromised:
# Linux and macOS:
$ echo "<hash> actions-runner-<ver>.tar.gz" | shasum -a 256 -c
# Windows:
$ if((Get-FileHash -Path actions-runner-<ver>.zip -Algorithm SHA256).Hash.ToUpper() -ne '<hash>'.ToUpper()){ throw 'Computed checksum did not match' }Then, the runner gets extracted from the ZIP/TAR file:
# Linux and macOS:
$ tar xzf ./actions-runner-<ver>.tar.gz
# Windows:
$ Add-Type -AssemblyName System.IO.Compression.FileSystem ; [System.IO.Compression.ZipFile]::ExtractToDirectory("$PWD/actions-runner-<ver>.zip", "$PWD")The configuration is done using the config.sh / config.cmd script and the URL and token are automatically created by GitHub for you:
# Linux and macOS:
$ ./config.sh --url https://github.com/org --token token
# Widows:
$ ./config.cmd --url https://github.com/org --token token
The configuration asks for the runner group (where the default is the Default group), the name of the runner (where the default is the machine name), and additional labels. Default labels are applied to describe the self-hosted status, the operating system, and the processor architecture (for example, self-hosted, Linux, and X64, respectively). The default working folder is _work and should not be changed. On Windows, you can also choose to run the action runner as a service. On Linux and macOS, you have to install the service using another script after the configuration:
$ sudo ./svc.sh install
$ sudo ./svc.sh start
If you don't want to run the runner as a service, you can run it interactively using the run script:
$ ./run.sh
$ ./run.cmd
If the runner is up and running, you can see it listed under Settings | Actions | Runners with its status and tags (see Figure 7.2):

Figure 7.2 – Self-hosted runners with their tags and status
Let's now learn how to remove these self-hosted runners from GitHub.
Removing self-hosted runners
If you want to reconfigure or remove a runner from GitHub, you have to use the config script with the remove option. If you open the details of the runner by clicking its name, you see a Remove button (see Figure 7.2). If you click this button, it generates the script and token for you.

Figure 7.3 – The runner details
The script looks like this for the different operating systems:
# Linux and macOS
./config.sh remove --token <token>
# Windows
./config.cmd remove --token <token>
Always remove the runners before destroying your machines! If you forget to do this, you can still use the Force remove this runner button in the Remove dialog. But this should only be used as a last resort.
Managing access with runner groups
If you register your runners at the organization or enterprise level, runner groups are used to control access to the self-hosted runners. Enterprise administrators can configure access policies that control which organizations in an enterprise have access to runner groups, and organization administrators can configure access policies that control which repositories in the organization have access to runner groups. Every enterprise and every organization has a default runner group named Default that cannot be deleted.
Note
A runner can only be in one runner group at a time.
To manage access, open Policies at the enterprise level or Settings at the organization level and locate Actions | Runner Groups in the menu. Here, you can create a new runner group or click on an existing one to adjust its access settings. Depending on whether your level is enterprise or organization, you can either allow access to specific organizations or repositories (see Figure 7.3):

Figure 7.4 – Options for runner groups
Warning
Access for public repositories is disabled by default. Leave this! You should not use self-hosted runners with public repositories! Forks may execute malicious code on your runners, so this is a risk. If you need self-hosted runners for a public repository, make sure to use ephemeral and hardened runners that don't have access to your internal resources. This might be the case if you need a special tooling for an open source project that takes too long to install on the hosted runners. But these are rare cases and you should try to avoid them.
When you register a new runner, you are asked for the name of the runner group. You can also pass this as an argument to the config script:
$ ./config.sh --runnergroup <group>
Now that we've learned to manage access with runner groups, we will learn to use labels.
Using labels
GitHub Actions matches your workflow with your runners by searching for the correct labels. The labels are applied when you register a runner. You can also pass them to the config script as an argument:
$ ./config.sh --labels self-hosted,x64,linux
You can later modify the labels and create new labels in the details of the runner by pressing the gear icon next to Labels (see Figure 7.4):
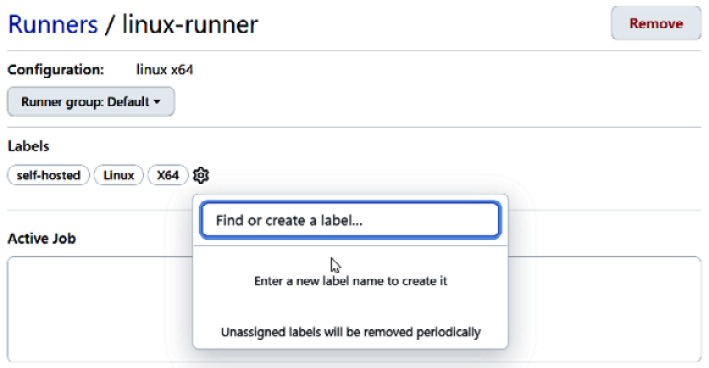
Figure 7.5 – Creating new labels for a runner
If your workflows have specific demands, you can create custom labels for them. An example of a custom label could be adding a tag for a tool such as matLab or necessary gpu access.
All self-hosted runners have the self-hosted tag by default.
To use the runners in your workflows, you specify the demands in the form of tags:
runs-on: [self-hosted, linux, X64, matlab, gpu]
This way, your workflow finds the corresponding runner that fulfills the necessary demands.
Scaling your self-hosted runners
Installing the action runner on existing build machines allows for easy migration to GitHub. But this is not a long-term solution! If you can't use the hosted runners, you should build an elastically scaling build environment yourself.
Ephemeral runners
If you build an elastic scaling solution for your build machines or container, you should use ephemeral runners. This means you use a virtual machine or Docker image from a blank image and install a temporary runner. Then, everything gets erased after the run. An elastic scaling solution with persistent runners is not recommended!
To configure your runner to be ephemeral, you pass the following argument to the config script:
$ ./config.sh --ephemeral
Scaling up and down with GitHub webhooks
To scale your virtual environments up and down, you can use GitHub webhooks. The workflow_job webhook gets called with the queued action key if a new workflow is queued. You can use this event to spin up a new build machine and add it to the pool of machines. The workflow_job webhook is called with the completed action if the workflow run has finished. You can use this event to clean up and destroy the machine.
For more information, see the documentation at https://docs.github.com/en/developers/webhooks-and-events/webhooks/webhook-events-and-payloads#workflow_job.
Existing solutions
Building an elastic virtual build environment in Kubernetes, AWS EC2, or OpenShift is beyond the scope of this book. GitHub does not provide a solution for this itself, but there are many open source solutions on GitHub that can save you a lot of time and effort if you want to utilize them. Johannes Nicolai (@jonico) has curated a matrix with all of the solutions out there. You can find the repository at https://github.com/jonico/awesome-runners. The matrix is more readable in the form of GitHub pages, so you might prefer to visit https://jonico.github.io/awesome-runners. The matrix compares the solutions based on their target platform, whether they have GitHub Enterprise support, their automatic scaling capabilities, their cleanup factors, and other criteria.
Tip
Keep in mind that building and running a scalable build environment with your custom images takes a lot of time and effort that can also be spent on other things. Using hosted runners is the cheaper and more sustainable solution. Make sure if you really need to make this investment in your own platform before doing so. Often, there are other options to hosting your own runners – such as bringing your own Docker images into GitHub Actions or using a bot to automate deployments to your on-premises resources.
Monitoring and troubleshooting
If you have problems with your self-hosted runners, there are several things that can help you when troubleshooting.
Checking the status of the runners
You can check the status of your runners under Settings | Actions | Runners. The status of a runner can be Idle, Active, or Offline. If the runner status is Offline, the machine could be down or not connected to the network, or the self-hosted runner application might not be running on the machine.
Reviewing the application log files
Log files are kept on the runner in the _diag folder in the runner's root directory. You can review the runner application log files in _diag. The application log filenames begin with Runner_ and have a UTC timestamp appended to them:
Runner_20210927-065249-utc.log
Reviewing the job log files
The job log files are also located in _diag. Each job has its own log. The application log filenames begin with Worker_ and also have a UTC timestamp appended:
Worker_20210927-101349-utc.log
Checking the service status
If your runner runs as a service, you can check the service status, depending on your operating system.
Linux
On Linux, you can get the name of your service from the .service file in your runner's folder. Use the journalctl tool to monitor the real-time activity of your runner service:
$ sudo journalctl -u $(cat ~/actions-runner/.service) -f
The configuration for your service can be checked and customized under /etc/systemd/systemd/:
$ cat /etc/systemd/system/$(cat ~/actions-runner/.service)
macOS
On macOS, you can use the svc.sh script to check the status of the service:
$ ./svc.sh status
The output of the preceding script contains the service name and the process ID.
To check the service configuration, locate the file in the following location:
$ cat /Users/<user_name>/Library/LaunchAgents/<service_name>
Windows
On Windows, you can use PowerShell to retrieve information about your service:
$ Get-Service "action*"
Use EventLog to monitor the recent activities of your service:
Get-EventLog -LogName Application -Source ActionsRunnerService
Monitoring the runner update process
The runner should update itself automatically. If this fails, the runner will not be able to run workflows. You can check its update activity in the Runner_* log files in the _diag directory.
Case study
The two pilot teams at Tailwind Gears start their first sprints on the new platform. The first thing they automate is the build process so that all of their pull requests can be built before merging. Tailwind Gears tries to use the GitHub-hosted runners as much as possible. Most of the software builds just fine. However, some of the code written in C uses an older compiler version and has some other dependencies installed on the current build machines. The code is currently built on two local Jenkins servers that are maintained by the developers themselves. These servers are also attached to hardware that is used for hardware-in-the-loop testing. For an easy transition, self-hosted runners are installed on these machines and the build runs fine. The IT department wants to get rid of the local servers anyway, so they work together with their GitHub partner to build an elastic, scalable, container-based solution that can run custom images that have access to the attached hardware.
Summary
In this chapter, you learned about two hosting options for running your workflows:
- GitHub-hosted runners
- Self-hosted runners
We explained how self-hosted runners allow you to run GitHub in a hybrid-cloud scenario. You learned how to set up self-hosted runners and where you can find information to help you build your own elastic scalable build environment.
In the next chapter, you will learn how you can manage your code dependencies using GitHub Packages.
Further reading
For more information about the topics in this chapter, you can refer to the following resources:
- Using GitHub-hosted runners: https://docs.github.com/en/actions/using-github-hosted-runners
- Hosting your own runners: https://docs.github.com/en/actions/hosting-your-own-runners
- awesome-runners – A curated list of awesome self-hosted GitHub Action runner solutions in a large comparison matrix: https://jonico.github.io/awesome-runners