
Chapter 13: Shift-Left Security and DevSecOps
The total number of losses caused by cyber-crimes that have been reported to the Internet Crime Complaint Center (IC3) of the Federal Bureau of Investigation (FBI) has increased to an all-time high, from 3.5 billion United States dollars (USD) in 2019 to 4.1 billion USD in 2020 (IC3, 2019 and 2020). This continues the trend with a strong increase over the last years (see Figure 13.1):
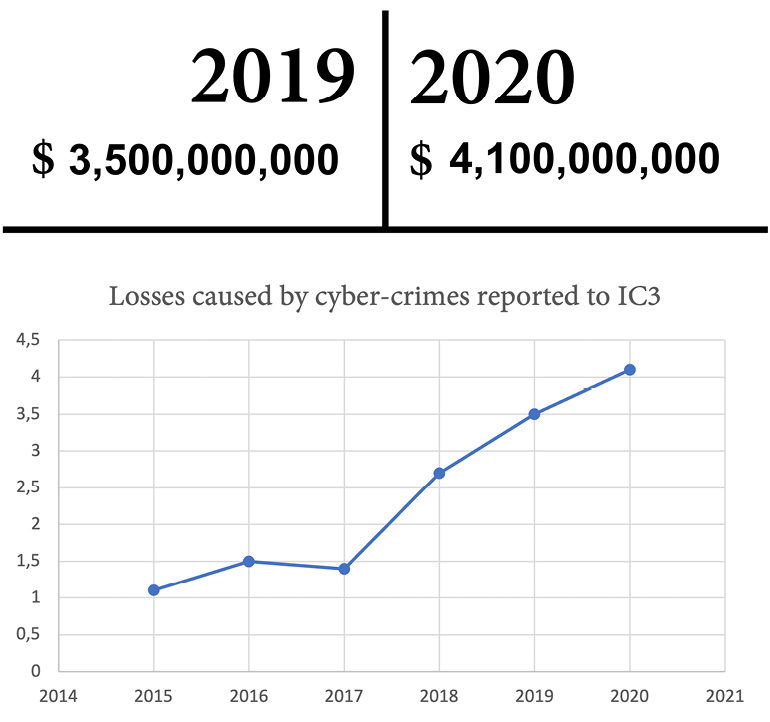
Figure 13.1 – Total losses caused by cyber-crimes reported to IC3
Among the affected companies are start-ups, as well as Fortune 500 enterprises. Affected are tech giants such as Facebook, Twitter, T-Mobile, and Microsoft, as well as public institutions such as San Francisco International Airport or security companies such as FireEye. No company can claim that cyber-crimes are not a threat to them!
In this chapter, we take a broader look at the role of security in development and how you can bake it into your process and enable a zero-trust culture.
These are the key points that we will cover in this chapter:
- Shift-left security
- Assume-breach, zero-trust, and security-first mindset
- Attack simulations
- Red team-blue team exercises
- Attack scenarios
- GitHub Codespaces
Shift-left security
In classical software development, security was handled downstream: when the software was ready to be released, a security department or external company would perform a security review. The problem with this approach is that it's hard to fix architectural problems at that point. In general, the later you fix a security vulnerability, the more expensive it gets; and if you don't fix vulnerabilities, the costs can be many millions, which can lead to bankruptcy for some companies. The earlier you fix a security vulnerability in the development life cycle, the cheaper it is (see Figure 13.2):
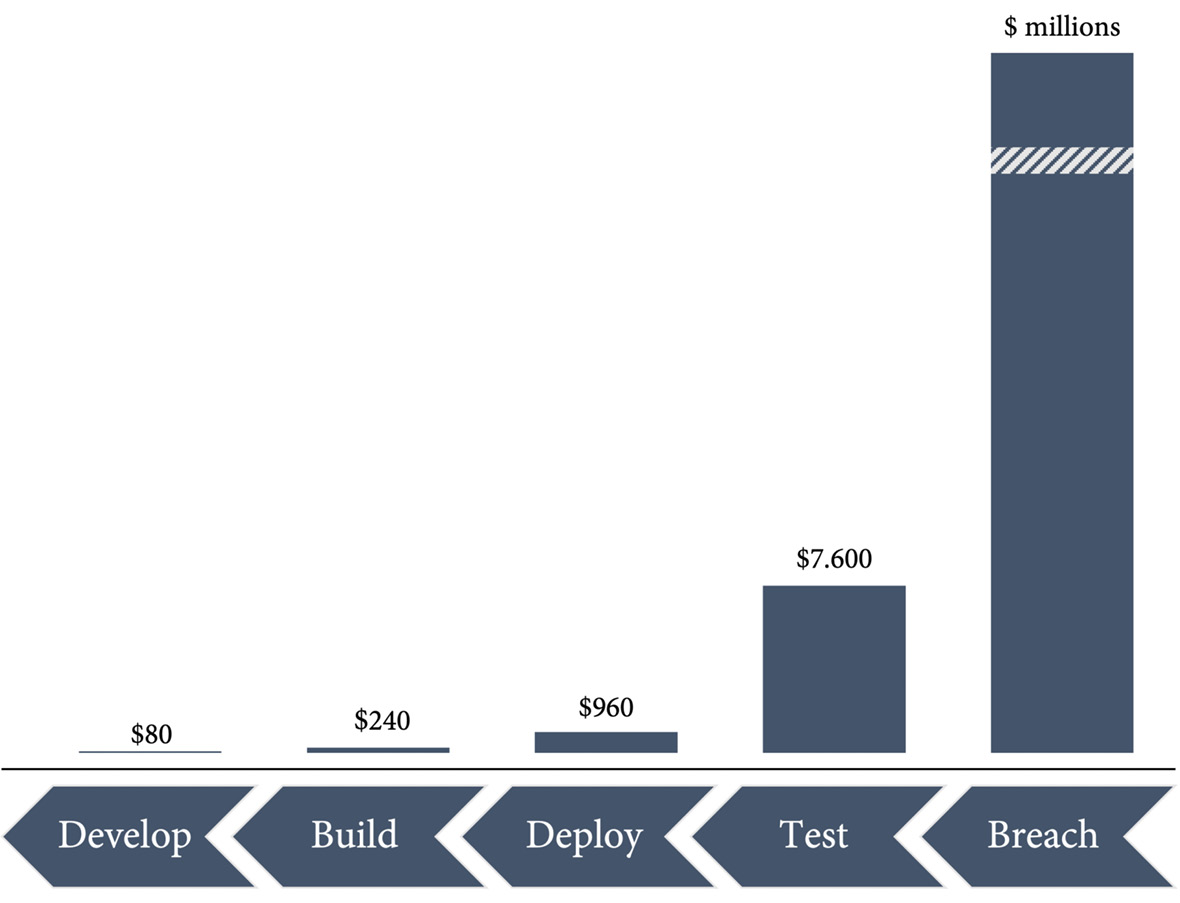
Figure 13.2 – Costs for fixing security vulnerabilities in the development life cycle
That's what we call shift-left security: baking security into the development life cycle and making it an essential part of all activities.
The problem is that there are not enough security specialists out there to put them in every engineering team. Shifting security left is about educating engineers and creating a security-first mindset.
Assume-breach, zero-trust, and security-first mindset
The classical approach to security was to prevent breaches. The most important measures were these:
- Layers of trust: The internal network was considered secure and protected with firewalls. Access to the network was only allowed by company-owned devices and virtual private network (VPN) tunnels. The public internet was not trusted—and in between were demilitarized zones (DMZs).
- Risk analysis: Risk analysis with threat modeling.
- Security reviews: Architecture and code reviews from security experts.
- Security testing: External security testing with a specific scope.
But with the prevent-breach approach, the question as to whether a company was already under attack could basically not be answered.
In an interview in 2012, General Michael Hayden, former director of the National Security Agency (NSA) and the Central Intelligence Agency (CIA), said the following:
This is the basis of the assume-breach paradigm: you are most probably already under attack, whether you know it or not. Always assume that you already have been breached. This way of thinking identifies gaps in the prevent-breach approach. How do you do the following?
- Detect attacks and penetrations?
- Respond to attacks?
- Recover from data leakage or tampering?
This shifts the measures for security and adds a completely new focus. With the assume-breach paradigm, you need the following:
- A central security monitoring or security information and event management (SIEM) system to detect anomalies.
- Ongoing live site testing of your incident response (IR) (fire drills).
- War games (red team-blue team simulations) to detect vulnerabilities, create awareness, learn to think like attackers, and train your responses.
- Live site penetration tests: Sophisticated attack simulations including phishing, social engineering, and physical security.
- Don't trust identities and devices, even when in your network (zero trust).
If your security is mainly based upon layers, once a hacker is inside your network—through phishing, social engineering, or a physical attack—it's child's play for them to advance. In a trusted network, you normally find unprotected file shares, unpatched servers without Secure Sockets Layer (SSL) protection, weak passwords, and single-factor authentication (SFA) in most systems. In a cloud-first world, this makes absolutely no sense.
With zero-trust access to your services, you always verify the identity—for example, with multi-factor authentication (MFA), you verify the device, access, and services involved in transactions. Figure 13.3 shows an example of how zero-trust access can be implemented for your services:
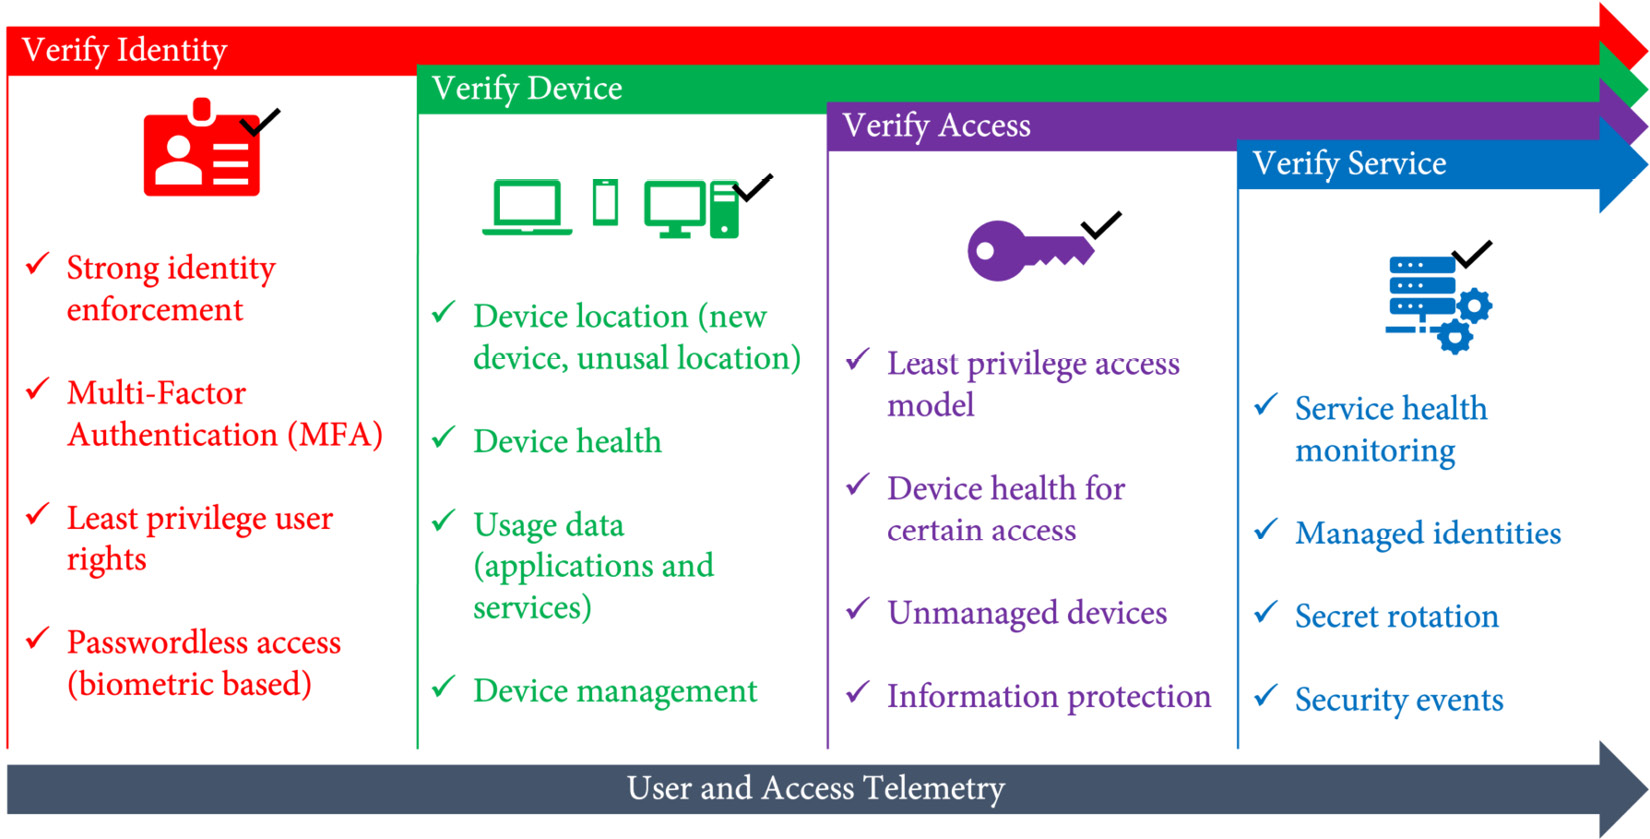
Figure 13.3 – Zero-trust access to your company services
If you are using software-as-a-service (SaaS) cloud services in your company, you're probably familiar with zero trust. You must authenticate using MFA but can trust your browser and device for more comfort. If you travel, you get notified or must approve your login attempts from an unusual location. If you install third-party apps, you must grant the apps permissions to access information, and you're probably not allowed to access highly confidential information from a public, not-trusted device.
Zero trust means applying the same principles to all your services, independently of whether you access them from within your internal network or not.
Attack simulations
To know what to do in case of an incident, you should regularly perform drills to practice your standard operating procedures (SOPs) for IR and improve your response times. As with fire drills in your offices, if you do not practice these drills, you don't know if your security measures will really work in the event of a real fire.
You should try to improve on the following metrics:
- Mean Time To Detect (MTTD)
- Mean Time To Recover (MTTR)
In such a drill, you would simulate an attack scenario, practice your IR process, and conduct a post-mortem with the learnings of the drill.
Here are some example attack scenarios:
- Service compromise
- Inside attacker
- Remote code execution
- Malware outbreak
- Customer data compromised
- Denial of service (DoS) attack
Practicing these drills will give you confidence that your SOPs work and let you react in case of a real incident quickly and efficiently.
Red team-blue team exercises
A special form of these drills is red team-blue team exercises, also known as war games, whereby two teams with insider know-how play against each other. The red team is the attacker and tries to access a production system or capture user data, and the blue team defends against the attack. If the blue team detects the attack and can prevent it, the blue team wins. If the red team has proof that they could access production or capture data, the red team wins.
Team constellation
The difference from a normal attack simulation is the insights the team has on your systems, so it's easier to find vulnerabilities. Red team-blue team simulations are the most sophisticated attacks with the most insights compared to all other efforts you can do to reduce your security risks (see Figure 13.4):
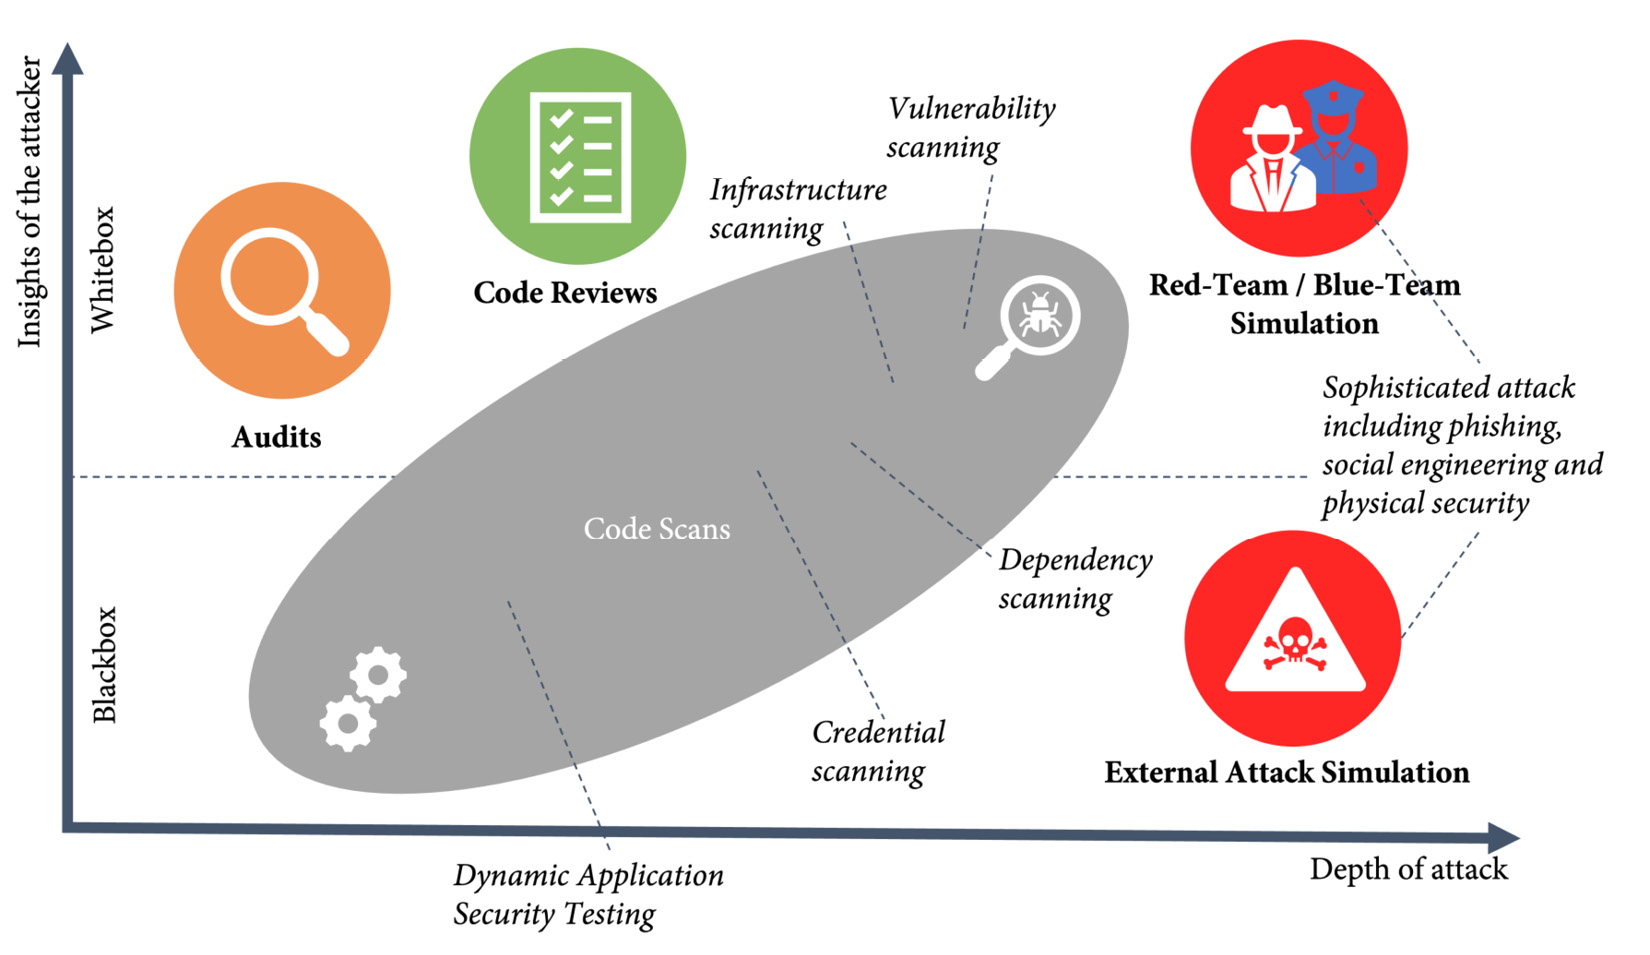
Figure 13.4 – Risk reduction by insights of the attacker and depth of the attack
The teams should be mixed from different organizational units. Do not just pick one team for red and one team for blue. The composition of the team is the key to a successful game.
For the red team, do the following:
- Use creative engineers from different teams that already have an interest in security.
- Add security experts with experience from within your organization, or get external support.
For the blue team, do the following:
- Take ops-minded engineers that are familiar with logging, monitoring, and site reliability.
- Add engineers that have knowledge of your network security and identity.
Both teams should have the possibility to ask experts for help. If, for example, the red team needs to write a Structured Query Language (SQL) statement to perform a sophisticated SQL injection attack, they can get help from the database administrator (DBA) team; or, when the blue team needs insider information on how an application works or it needs the application to log additional data, it can directly approach the team that builds and maintains the application.
Rules of the game
The main goal of the game is the learning of all participants—learning to think like an attacker, learning to detect and respond to an incident, and learning which vulnerabilities exist in the company that can be exploited. The second goal is fun. As with a hackathon, the exercise should be a team-building event that is fun for all that participate.
But to be successful without harming anyone, you need some ground rules for the game.
Duration
A red team-blue team exercise can last for days, weeks, or even months. Choose a period in which the attack can happen and the duration of the attack itself. A good starting point would be a 3-week period and a 3-day attack. Adjust the time to your needs.
Codex and rules
To make the exercise successful, you must establish some rules and a code of conduct that players must adhere to, as outlined here:
- Both teams may not cause real harm. This also means the red team should not do more than is necessary to achieve their goal, and physical attacks should follow common sense (do not harass or threaten anyone, don't steal keys or badges from your coworkers, and so on).
- Don't expose the names of persons compromised.
- Don't cause downtime for paying customers or breach their data!
- Compromised data must be stored encrypted and protected and not be exposed to real attackers.
- The security of the production system must not be weakened to expose customers to risk. If, for example, the red team could modify the source code to disable authentication for all production systems, then leave a comment in the code and claim victory when the deployment is done. However, you cannot disable authentication for the production system that real customers are using.
This might seem all obvious, but if you have competitive teams, they might get carried away with the game. It's better to state the obvious and lay out some ground rules.
Delivery items
At the end of the game, the teams deliver the following items:
- A backlog with vulnerabilities that must be fixed. Critical vulnerabilities must be fixed right away.
- A backlog with items to improve the forensic and analytic capabilities.
- An open report for the entire organization about the learnings from the exercise.
Remember to make this all blameless, and don't expose the names of people that have been compromised.
Where to start
I know a lot of people think that red team-blue team exercises are only suited to companies with a very high maturity level, but I believe red team-blue team exercises are a great way for each company to create awareness and to learn and grow, especially when they're still preventing breaches and consider their intranet safe. If your maturity level is not so high, attacks are much easier. If the maturity is very high, attacks need to be much more sophisticated, and it is a lot harder to perform successful attacks without causing real harm.
I would prefer red team-blue team exercises over normal attack simulations—they are more fun and a better way to learn. Get external help if you don't know where to start.
If you have many findings in your first game and it was really easy for the red team to win, you might want to consider doing the exercises more often. If not, once a year is a good rhythm I see companies doing successfully, but it depends a lot on your situation.
Just do your first exercise—the rest will follow automatically.
Attack scenarios
The first attack scenarios most people think of in the context of DevOps and DevSecOps are code execution on production systems using vulnerabilities such as SQL injection, cross-site scripting (XSS), or memory leaks such as buffer overflows. In Chapter 14, Securing Your Code, we'll have a closer look at how you can hunt for these kinds of vulnerabilities and how you can integrate this into your delivery pipeline.
But there are far easier attack scenarios, such as the following:
- Unprotected file shares and repositories
- Secrets in text files, config files, and source code (such as test accounts, personal access tokens (PATs), connection strings, and so on)
- Phishing attacks
Phishing attacks are an especially easy way to start an attack. According to a study from 2021, 19.8% of recipients of a phishing mail clicked on a link in an email, and 14.4% downloaded the attached document (see Terranova and Microsoft, 2021), and in companies that regularly do phishing campaigns, the numbers are more or less the same. At one of my customers, nearly 10% of employees who received an email during a phishing campaign entered their credentials in the login dialog that was displayed after they clicked the link in the phishing mail! And this was a company that had already been practicing phishing campaigns for years.
The problem with phishing is a psychological effect called priming. Even if you know in general what phishing attacks look like and the signs to look for to detect them, the moment you are expecting a mail or you think the mail belongs to some context you are in, the more likely you are not to look for those signs. A good example would be a phishing mail at the end of the month that claims to be from your human resources (HR) department and says there was a problem with the payment of your salary. Since it is the end of the month and you are expecting your salary, the mail does not seem strange. Maybe you had problems before. Maybe you just checked, and the money was not there yet. It also generates some urgency. If you are in a hurry, you may want to quickly solve this so that your salary comes on time. If you send a phishing mail such as this at the end of the month, chances are much higher that people will then click for the rest of the month. Another example is a shared document. If you were just on the phone with a colleague that said they'll share a file with you, you may just wonder why they're choosing this way, but you're not suspicious as you are expecting a file anyway. The more phishing mails you send, the higher the possibility someone has just the right context and that you will fall for it.
Once an attacker has managed to compromise the first victim and has company credentials or access to the victim's machine, the game changes completely. Now, the attack is performed by an inside attacker, and they can target specific people in the company from an internal address. This is called spear phishing and is extremely hard to detect.
A good target for spear phishing is administrators or engineers. If you don't practice least-privilege user rights, the attacker might already have access to a production system or is a domain administrator, and the game is over. But if they compromise a developer, they have also a variety of options, as outlined here:
- Development environments: Development environments are the dream of every attacker. Most developers work as local administrators, and you can already find a ton of tools preinstalled that help an attacker to progress. Chances are high they can find secrets in text files to access various systems. Or, as they are administrators, they can use a tool called mimikatz (see https://github.com/gentilkiwi/mimikatz/wiki) to read credentials from memory.
- Test environments: Many developers have access to test environments, often as administrators. Attackers can log in and use mimikatz to steal other credentials.
- Modify code: One line of code is usually enough to disable authentication. The attacker can try to modify code or change the version of a dependency to one with a known vulnerability that can be exploited.
- Execute scripts: If the developer can modify pipeline code or scripts that get executed during deployment, the attacker can insert code that gets executed during deployment.
That's why it is so important in engineering to be extra cautious when it comes to security. There is much more attack surface than in most other departments in an organization.
To get from one compromised account to the domain administrator or at least an administrator with production access, you can use a tool called BloodHound (https://github.com/BloodHoundAD/BloodHound). It supports Active Directory (AD) and Azure AD (AAD) and reveals all the hidden relationships: Who has a session on which machines? Who is a member of which group? Who is an administrator of a certain machine?
Both blue teams and red teams can use this tool to analyze relationships in an AD environment.
GitHub Codespaces
Since development environments are a big problem when it comes to security, it's a good idea to virtualize them and have a specific machine for each product. This way, you can implement least-privilege user rights and your engineers do not have to work with local administrator rights on their machines. You also can limit the number of tools that are needed for a specific product and minimize the attack surface.
Of course, you can use classical virtual desktop infrastructure (VDI) images for that, but you can also use a more lightweight option: dev containers (see https://code.visualstudio.com/docs/remote/containers, which is an extension for Visual Studio Code (VS Code) that is built on top of its client-server architecture). You can connect VS Code to a running container or instantiate a new instance. The complete configuration is stored in the repository (config as code), and you can share the same config for the dev container with your team.
A special form of dev containers is GitHub Codespaces, which is a virtual development environment hosted in Azure. You can pick different virtual machine (VM) sizes between 2-core/4 gigabytes (GB) random-access memory (RAM)/32 GB storage and 32 core/64 GB RAM/128 GB storage. The start time of the VM is blasting fast. The default image is more than 35 GB and starts in less than 10 seconds!
The base image contains everything necessary to develop with Python, Node.js, JavaScript, TypeScript, C, C++, Java, .NET, PHP: Hypertext Preprocessor (PHP), PowerShell, Go, Ruby, Rust, and Jekyll. It also includes a ton of other developer tools and utilities such as git, Oh My Zsh, GitHub command-line interface (GitHub CLI), kubectl, Gradle, Maven, and vim. Run devcontainer-info content-url inside your codespace and open the Uniform Resource Locator (URL) that it returns for a complete list of all preinstalled tools.
But you don't have to use the base image—you can completely customize your codespace using dev containers. You can work with a codespace using either VS Code in the browser, your local VS Code instance, or using Secure Shell (SSH) from a terminal. If you run your application inside the codespace, you can forward ports to test it from your local machine. Figure 13.5 shows the architecture of GitHub Codespaces:

Figure 13.5 – Architecture of GitHub Codespaces
You can open, for example, the https://github.com/wulfland/AccelerateDevOps repository in a new codespace under Code | Codespaces | New codespace (see Figure 13.6), if you have Codespaces enabled for your account. The repository does not have a dev container configuration, so it will load the default image:

Figure 13.6 – Opening a repository in a codespace
You can see in the preceding screenshot that I already have a codespace running on the main branch. Instead of creating a new one, I could also open the existing one. Pick the VM size (see Figure 13.7):
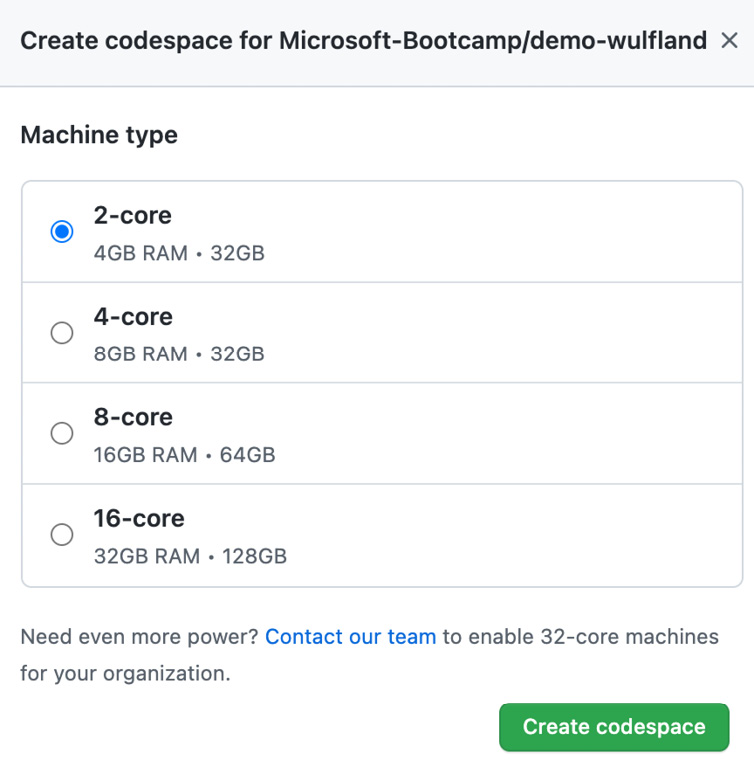
Figure 13.7 – Picking the VM size for your codespace
In the terminal, change the directory to ch9_release/src/Tailwind.Traders.Web and build and run the application with the following commands:
$ cd ch9_release/src/Tailwind.Traders.Web
$ dotnet build
$ dotnet run
This will start a web server listening on ports 5000 and 5001. Codespaces automatically detects this and forwards port 5000 to a local port. Just click Open in Browser to see the application that is running inside your codespace in your local browser (see Figure 13.8):

Figure 13.8 – Forwarding a port to your machine
You can also add ports that should be forwarded manually in the PORTS tab and change the visibility if you want to share a link with your coworkers—for example, to let them try a new feature (see Figure 13.9):

Figure 13.9 – Configuring port forwarding in your codespace
If you want more control over your development environment, you can create a dev container in your codespace. Open the Command Palette in VS Code by clicking the green Codespaces button in the bottom-left corner or by pressing Shift + Command + P on Mac or Ctrl + Shift + P on Windows. Select Codespaces: Add Development Container Configuration Files…. and follow the wizard to select languages and features that get installed. The wizard will create a .devcontainer folder in the root of your repository and, in it, two files: a devcontainer.json file and a Dockerfile file.
The Dockerfile file defines the container that is created when your codespace is initialized. The Dockerfile file can be really simple—it is enough if it contains a FROM clause that indicates from which base image it inherits.
In the devcontainer.json file, you can pass arguments to the image creation, you can define VS Code settings that are shared with all teammates, you can use VS Code extensions that are installed per default, and you can run commands that are run after the container was created (see Figure 13.10):

Figure 13.10 – Example Dockerfile file and devcontainer.json file
See https://code.visualstudio.com/docs/remote/devcontainerjson-reference for a complete reference on how you can customize your devcontainer.json file.
If you change either the Dockerfile file or the devcontainer.json file, you can rebuild the container by opening the Command Palette and executing Rebuild Container.
If you need secrets inside your codespace, you can create them—as with all other secrets—under Settings | Secrets | Codespaces (settings/secrets/codespaces) in the organization or repository level. Secrets are available as environment variables inside the codespace container. If you add a new secret, you have to stop the current codespace—a rebuild container is not enough.
Of course, GitHub Codespaces is not available for free—you have to pay for the uptime minutes of your instances. The minutes are reported to billing daily and billed monthly. The rate depends on the size of your VM (see Table 13.1):

Table 13.1 – Pricing for GitHub Codespaces
Additionally, you pay $0.07 per GB and month for the storage used.
Codespaces do not get terminated if you close your browser. If they are still running in the background, you can connect much faster, but you must still pay for them. The default idle timeout is 30 minutes, which is equivalent to $0.18 for the 4-core machine. That's really cheap, but it is still money. You should always stop your codespace if you don't need it anymore. You can change the default idle timeout under Settings | Codespaces.
GitHub Codespaces is not only great for security—it can also boost your onboarding time and productivity. GitHub itself uses it for its development, and it reduced onboarding time for new engineers from days to under 10 seconds! And that for a repository with almost 13 GB on disk that normally takes 20 minutes to clone (Cory Wilkerson, 2021).
Codespaces might not be suited for all products, but for web applications, it's the future, and it will revolutionize how we think of managing developer machines. It also helps you to close a security gap in your development pipeline—your local developer machines.
Summary
In this chapter, you've learned how important security is for your development process and how you can start to shift security left and implement an assume-breach and zero-trust culture. I introduced you to attack simulations and red team-blue team exercises to raise awareness for security, find vulnerabilities, and practice your IR.
I've also shown you how GitHub Codespaces can help you to reduce the risk of local development environments and make you more productive.
In the next chapter, you'll learn how to secure your code and your software supply chain.
Further reading
You can use the following references from this chapter to get more information on the topics covered:
- IC3 (2020). Internet Crime Report 2020: https://www.ic3.gov/Media/PDF/AnnualReport/2020_IC3Report.pdf
- IC3 (2019). Internet Crime Report 2019: https://www.ic3.gov/Media/PDF/AnnualReport/2019_IC3Report.pdf
- Data breaches in 2020: https://www.identityforce.com/blog/2020-data-breaches
- Data breaches in 2021: https://www.identityforce.com/blog/2021-data-breaches
- Terranova and Microsoft (2021). Gone Phishing Tournament – Phishing Benchmark Global Report 2021: https://terranovasecurity.com/gone-phishing-tournament/
- GitHub Codespaces: https://docs.github.com/en/codespaces/
- devcontainer.json reference: https://code.visualstudio.com/docs/remote/devcontainerjson-reference
- Introduction to dev containers: https://docs.github.com/en/codespaces/setting-up-your-project-for-codespaces/configuring-codespaces-for-your-project
- Cory Wilkerson (2021). GitHub's Engineering Team has moved to Codespaces: https://github.blog/2021-08-11-githubs-engineering-team-moved-codespaces/