
Chapter 3: Building the Edge
In this chapter, you will learn about edge solution concepts such as gateways and how AWS IoT Greengrass is used as a powerful edge appliance to interact with physical interfaces and leaf devices. The goal of this chapter is to start building proficiency with the use of IoT Greengrass for the writing and deploying of software components. This material is foundational to much of the book's hands-on projects and for understanding how we build solutions for the edge.
We will introduce you to the different protocols that IoT Greengrass can support out of the box and discuss commonly used protocols when building edge solutions. Additionally, we will review several security best practices for you to learn how to keep your edge workloads protected from threats and vulnerabilities. The chapter concludes with a hands-on activity to connect your first two device capabilities as components, whether using actual hardware or a pair of simulators.
In this chapter, we're going to cover the following main topics:
- Exploring the topology of the edge
- Reviewing common standards and protocols
- Security at the edge
- Connecting your first device – sensing at the edge
- Connecting your second device – actuating at the edge
Technical requirements
To complete the hands-on exercises in this chapter, you will need to have completed the steps in Chapter 2, Foundations of Edge Workloads such that your edge device has been set up with the IoT Greengrass Core software running and the greengrass-cli component installed.
You will want to clone the chapter's resources from the book's GitHub repository, for ease of use, if you haven't already done so. There is a step included in the Connecting your first device – sensing at the edge section that enables you to clone the repository at https://github.com/PacktPublishing/Intelligent-Workloads-at-the-Edge/tree/main/chapter3. You can perform this step now if you would like to browse the resources in advance:
git clone https://github.com/PacktPublishing/Intelligent-Workloads-at-the-Edge-
As a reminder, the hands-on steps for this book were authored with a Raspberry Pi and Sense HAT expansion board in mind. For those of you using other Linux-based systems for the edge device, alternate technical resources are included in the GitHub repository with guidance on how to substitute them.
Exploring the topology of the edge
Solutions built for the edge take on many shapes and sizes. The number of distinct devices included in a solution ranges from one to many. The network layout, compute resources, and budget allowed will drive your architectural and implementation decisions. In an edge machine learning (ML) solution, we should consider the requirements for running ML models. ML models work more accurately when they are custom built for a specific instance of a device, as opposed to one model supporting many physical instances of the same device. This means that as the number of devices supported by an edge ML workload grows, so too will the number of ML models and compute resources required at the edge. There are four topologies to consider when architecting an edge ML solution: star, bus, tree, and hybrid. Here is a description of each of them:
- Star topology: The Home Base Solutions (HBS) hub device and appliance monitoring kits represent a common pattern in edge ML solutions called star topology. The appliance monitoring kits are single-purpose devices that report telemetry back to the hub device. This creates several advantages in terms of cost optimization for the kits since they do not need to bundle all of the hardware that is necessary to independently communicate directly with a cloud solution. Nor do they require any compute power or local storage to run their own ML models. The hub device in the star topology acts as a server in the sense that it can exchange data with the kits and perform heavier compute and storage tasks on their behalf. Entities such as leaf devices or software components address other entities directly to send them messages, and they get routed to the right destination. The following diagram shows an example of the HBS product design operating in a star topology:
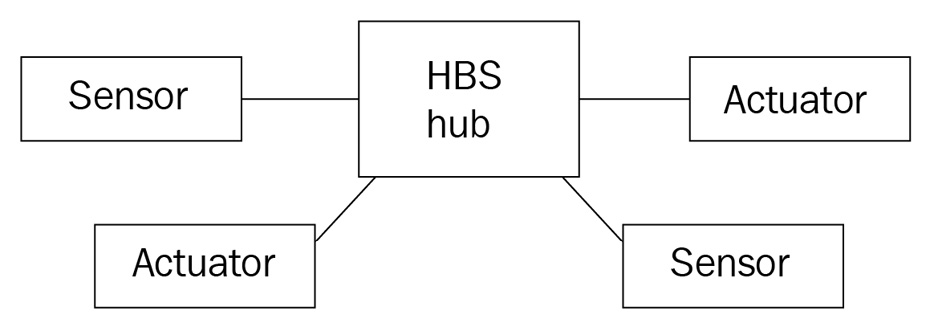
Figure 3.1 – An example of the star topology with hub and devices
- Bus topology: In a bus pattern, all of the nodes in the topology are connected to a single shared line, meaning a message published by one entity can be received by as many entities as are sharing the bus. The bus pattern comes from computer network history where devices are used to physically tap into the network line, expanding the bus with each device. While these days, we don't usually view this pattern as physically wired, there is a logical application of the bus pattern in edge ML solutions. In a decoupled solution, such as the one we are building, an entity such as a software component or leaf device can publish a message without addressing any other particular entity by using a topic address. A topic address doesn't strictly identify other entities; it is up to those other entities to subscribe to such topic addresses in order to get a copy of the message. In this way, the hub device is, technically, the center of a star-like topology; however, the way in which connected entities interact with each other is, in practice, more like a bus. The following diagram illustrates the bus concept for a parallel universe where HBS delivers the monitoring of industrial equipment with an equipment monitoring kit, a local server running ML inference, and an andon light all connected to a hub:
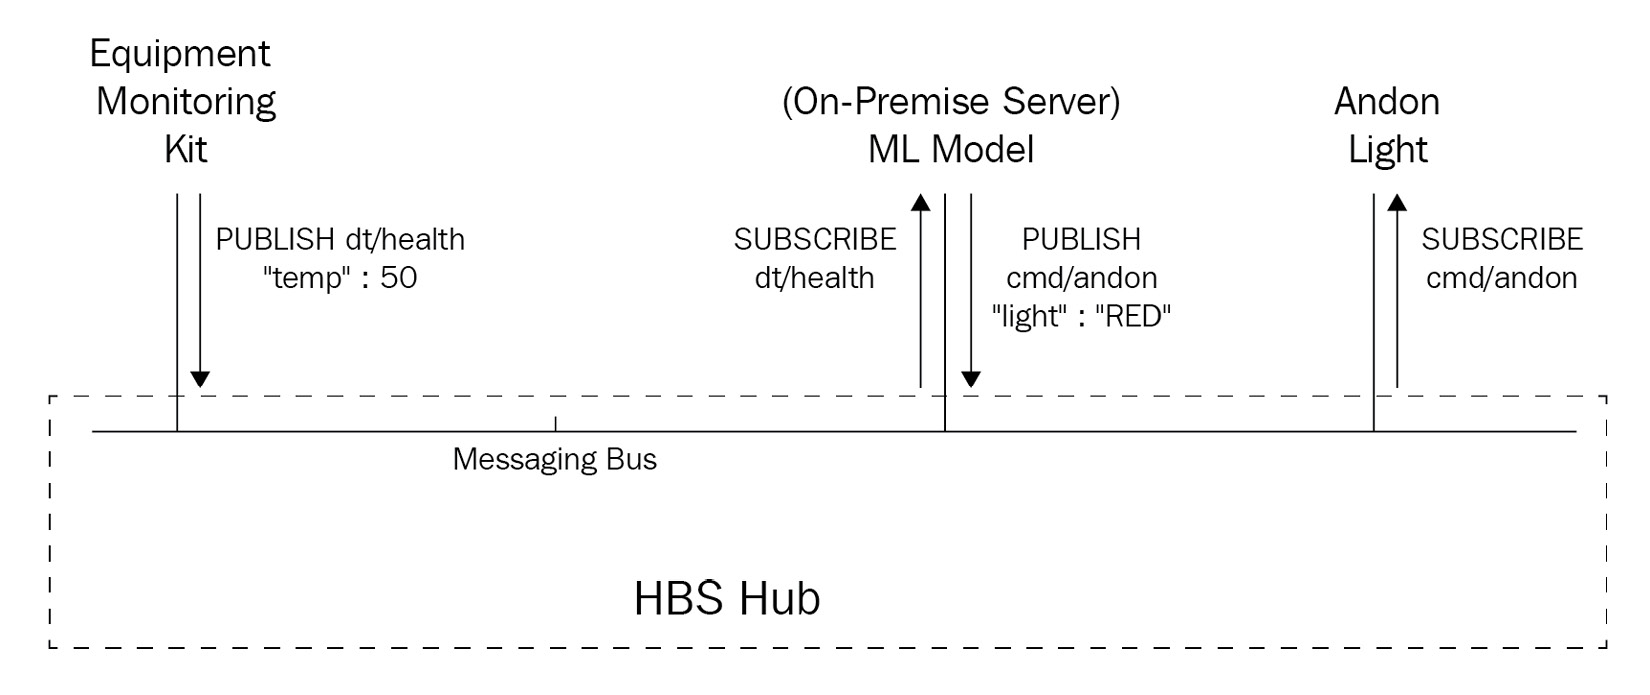
Figure 3.2 – An example of the logical bus topology
- Tree topology: While it is a good practice for any edge ML solution to functionally operate in isolation, we cannot ignore the benefits of bridging our solution to the wider network and cloud services. In a tree topology, our hub device is just one layer of nodes in a tree graph where a centralized service communicates with our fleet of hubs. Each hub is then responsible for a specific number of leaf devices and components running in a local star pattern. Managing our HBS product at scale requires us to think about the fleet in its entirety. The following diagram shows the relationship between a cloud service orchestrating our fleet, the fleet of HBS hub devices, and the local appliance monitoring kits supported per hub:

Figure 3.3 – An example of the tree topology for managing a fleet of connected hubs
- Hybrid topology: If our product design or hub device budget didn't allow running ML workloads at the edge and simply handled the cloud connectivity on behalf of the kits, this would necessitate a hybrid topology. In a hybrid topology, the hub might centralize just enough resources to establish the cloud connectivity and routes messages back and forth between the kits and the cloud service. Here, hybrid defines the additional topological complexity of running further compute workloads, such as our ML inference, in the cloud. In this scenario, the cloud-based ML workloads making inferences against incoming telemetry would require some subset of device messages to be transmitted to the cloud. Some scenarios might opt to reduce the bill of materials of the hub in favor of a cloud-based ML solution. This makes sense when the volume of traffic is on the lower end of the spectrum or when the number of ML workloads exceeds what is reasonable to run on a single gateway device. The following diagram shows a modified example of our fictional product design running as a hybrid:
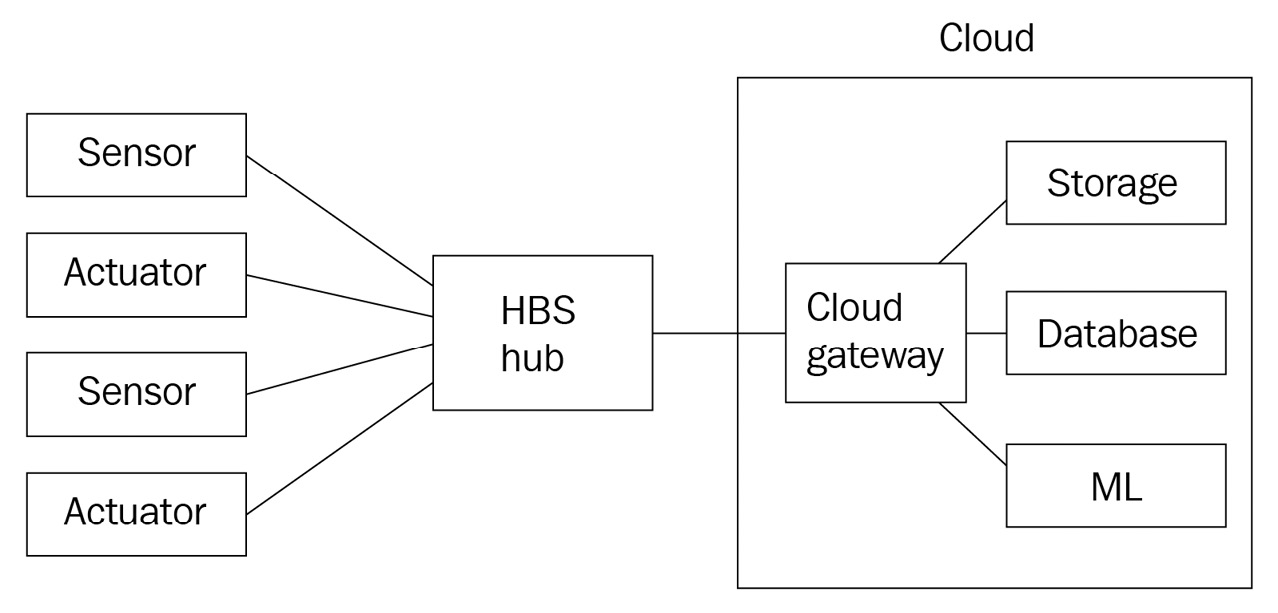
Figure 3.4 – An example of hybrid topology with remote compute and storage resources
There are two additional patterns that are common when studying network topologies, that is, the mesh and ring topologies:
- In a mesh topology, nodes can have one-to-many relationships with other nodes and exchange information through that network of connections to reach that information's destination:

Figure 3.5 – A mesh topology where a sensor on gateway 2 traverses the mesh to reach an actuator on gateway 5
- In a ring topology, nodes have at most two neighboring connections and exchange information through the ring until it reaches its destination:
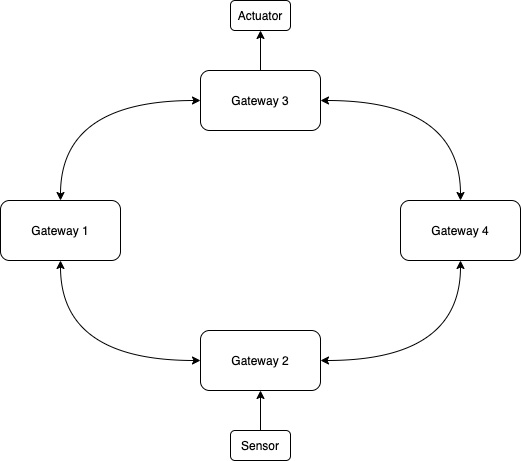
Figure 3.6 – A ring topology where a sensor reading from gateway 2 passes through adjacent gateways to reach an actuator at gateway 3
These patterns emphasize decentralization where nodes connect to each other directly. While these patterns have their time and place in the broader spectrum of IoT solutions, they are infrequently used in edge ML solutions where a gateway or hub device and cloud service are often best practices or outright requirements.
When deciding on a particular topology for your solution architecture, start by considering whether all devices at the edge are weighted equally or whether they will communicate with a central node such as a gateway. A consumer product design for an edge ML solution tends to use the star pattern when thinking about the edge in isolation. A good edge solution should be able to operate in its star pattern even when any external link to a larger tree or hybrid topology is severed. We use the star pattern to implement the HBS product since the hub device will run any and all ML runtime workloads that we require.
IoT Greengrass is designed to run as the hub of a star implementation and plug into a larger tree or hybrid topology connecting to the AWS cloud. Solution architects can choose how much or how little compute work is performed by the gateway device running IoT Greengrass. In the next section, we will review the protocols used to exchange messages at the edge and between the edge and cloud.
Reviewing common standards and protocols
Protocols define the specifications for exchanging messages with an edge solution. This means the format of the message, how it is serialized over the wire, and also the networking protocols for communicating between two actors in the solution. Standards and protocols help us to architect within best practices and enable quick decision-making when selecting implementations. Before diving into the common protocols that are used in edge solutions, first, let's review two architectural standards used in information technology and operations technology to gain an understanding of where IoT Greengrass fits into these standards. Using these as a baseline will help set the context for the protocols used and how messages traverse these models in an edge solution.
IoT Greengrass in the OSI model
The Open Systems Interconnection (OSI) model defines a stack of seven layers of network communications, describing the purpose and media used to exchange information between devices at each layer. At the top of the stack is layer seven, the application layer, where high-level APIs and transfer protocols are defined. At the bottom is layer one, the physical layer, where digital bits are transmitted over physical media using electricity and radio signals. The following is a diagram of the OSI model and shows how IoT Greengrass fits in with individual layers:
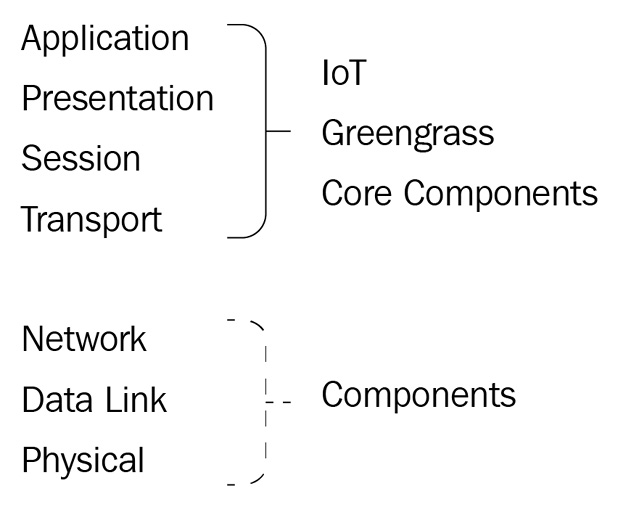
Figure 3.7 – An OSI model with an overlay of IoT Greengrass layer interactions
Here, you can observe that our runtime orchestrator, IoT Greengrass, operates from layer four to layer seven. There are high-level applications and transfer protocols used in the IoT Greengrass Core software to exchange application messages with the AWS cloud and local devices using protocols such as HTTPS and MQTT. Additionally, libraries bundled in the core software are responsible for the transport layer communications in the TCP/IP stack, but then further transmission throughout the OSI model is handed off to the host operating system.
Note that while the IoT Greengrass Core software operates from layer four to layer seven, the software components deployed to your edge solution might reach all the way down to layer one. For example, any sensors or actuators physically connected to the IoT Greengrass device could be accessed with code running in a component, usually with a low-level library API.
IoT Greengrass in ANSI/ISA-95
American National Standards Institute/International Society of Automation standard 95 (ANSI/ISA-95) defines the process in which to relate the interfaces between the enterprise and control systems. This standard is used in enterprise and industrial solution architectures. It describes another layered hierarchy; this one is for the level at which systems are controlled and suggests the time scale at which decisions must be made. The following diagram presents another frame of reference for how IoT Greengrass and an edge ML solution fit into a holistic picture:
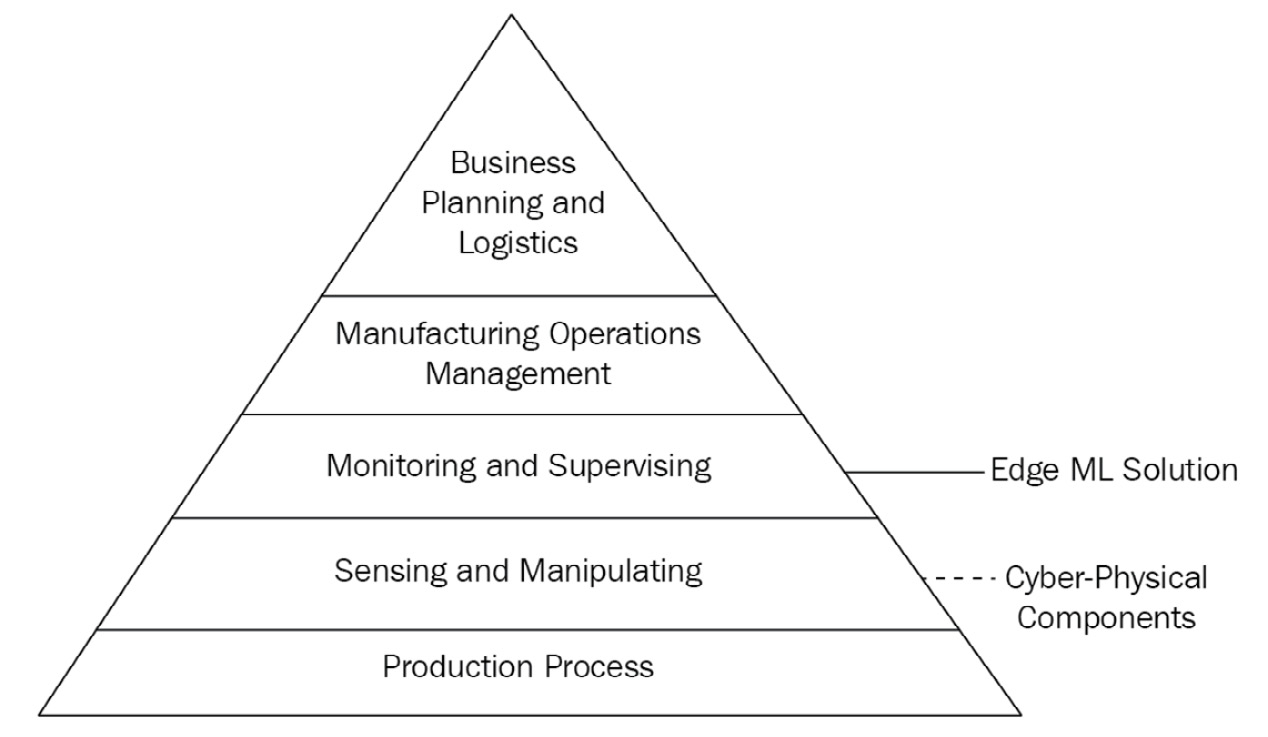
Figure 3.8 – The ISA-95 model with an overlay of IoT Greengrass layer interactions
Here, you can observe that IoT Greengrass primarily fits in layer three, the Monitoring and Supervising layer of control systems, to facilitate the upward aggregation of device telemetry, downward distribution of commands, and handle some decision making in a supervisory capacity. IoT Greengrass is useful in any kind of edge solution, be it consumer-grade products or to facilitate the operation of industrial machinery. While our HBS product example is not an industrial use case, the same pattern applies in that our hub device performs as a gateway for sensor monitoring equipment.
Now that you have a framework regarding how IoT Greengrass fits into these hierarchies, we can review common protocols that are used at the relevant layers.
Application layer protocols
Examples of application layer communications include requesting data from an API, publishing sensor telemetry, or sending a command to a device. This kind of data is relevant to the solution itself and the business logic in service of your solution's outcomes. For example, none of the other layers of the OSI model, such as the transport layer or the network layer, make decisions in the event that a deployed sensor is reporting the ambient temperature at 22°C. Only the running applications of your solution can use this data and send or receive that data by interacting with the application layer.
To communicate between the edge and the cloud, the most popular application layer protocol is HTTPS for request-response interactions. IoT Greengrass uses HTTPS to interact with AWS cloud services for the purposes of fetching metadata and downloading resources for your components, such as the component recipe and artifacts such as your code and trained ML models. Additionally, your custom components running at the edge might use HTTPS to interact with other AWS services, on-premises systems, and the APIs of other remote servers.
To exchange messages between the edge and the cloud, and within the edge solution, bi-directional messaging protocols (also called publish-subscribe or pubsub) are commonly used, such as MQTT or AMQP. The benefits of these kinds of protocols are listed as follows:
- They use stateful connections to minimize the frequency of handshake connections.
- Traffic can flow in either direction without one end or the other having to be responsible for initiating a new exchange.
- They offer minimal overhead per message making them ideal for constrained devices.
- Clients at the edge can initiate these connections, eliminating the need for inbound connections to be permitted by network firewall rules.
IoT Greengrass uses the MQTT protocol to open connections to the AWS IoT Core service in a client-broker model in order to pass messages from local devices up to the cloud, receive commands from the cloud and relay them to local devices, and synchronize the state after a period of disconnection. Additionally, IoT Greengrass can serve as the broker to other local devices that connect to it via MQTT. The following is a diagram of an IoT Greengrass device, such as the HBS hub device, acting as both the client and the broker:
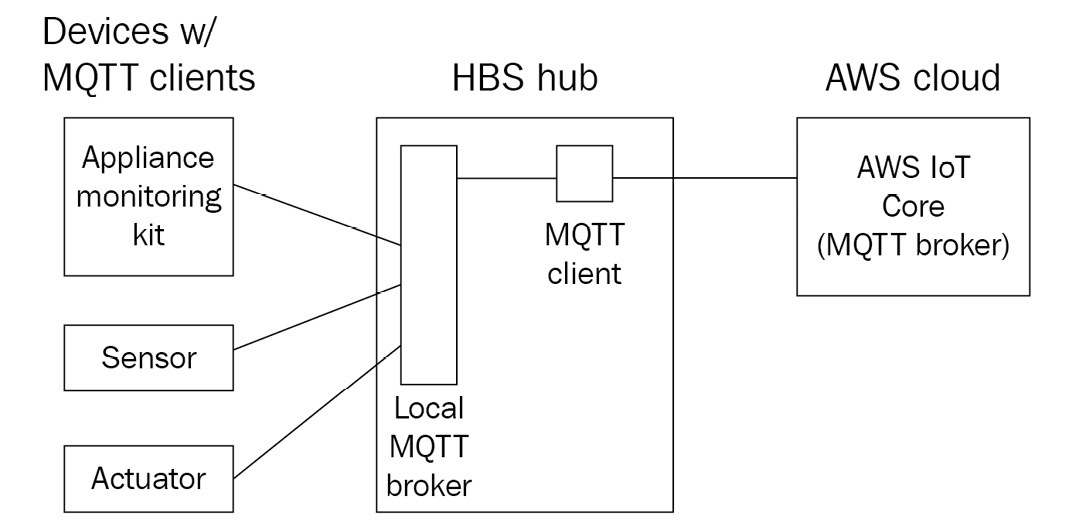
Figure 3.9 – The HBS hub acting as both a client to AWS IoT and a server to local devices
Next up are the message format protocols that describe the way data is structured as it is sent over the application layer protocols.
Message format protocols
If a messaging protocol such as MQTT specifies how connections are established and how messages are exchanged, a message format protocol specifies what the shape and content of an exchanged message are. You can consider a telephone as an analogy. The telephone handset represents how speech is sent in both directions, but the language being spoken by the participants at both ends must be understood in order for that speech to make sense! In this analogy, MQTT represents the telephone itself (abstracting away the public telephone exchange network), and the message format protocol is the language being spoken by the people on either end.
For any two participants exchanging data with each other, that data is either transmitted as binary or it will go through a process of serialization and deserialization. Common message format protocols used in edge solutions include JavaScript Object Notation (JSON), Google Protocol Buffers (protobuf), and Binary JSON (BSON). These formats make it easier for devices, edge components, and cloud solutions to interoperate. This is especially important in an architecture that is inclusive of mixed programming languages. The message format is a means of abstraction that is key to architecting solutions. By using a serializable message format protocol, the following diagram shows how a component written in Python can exchange messages with a component written in Java:
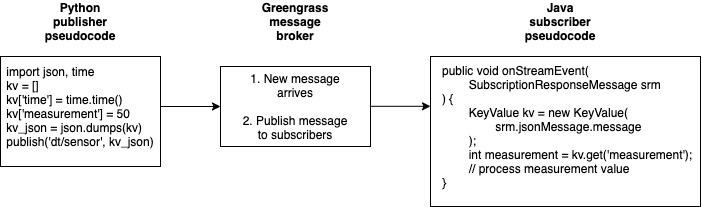
Figure 3.10 – An example of serialization/deserialization using Greengrass components
You could send all messages as binary data, but you would end up with an overhead in each recipient that would need to figure out what to do with that data or enact strict conventions for what can be sent. For example, a sensor device that only ever sends a numerical measurement in degrees centigrade could just send the value as binary data. If that system never changes, there's limited value to adding notation and serializing it. The recipient on the other end can be hardcoded to know what to do with it, thus saving overhead on metadata, structure, and bandwidth. This works for rigid, static systems and for cases where transmission costs must be the top priority for optimization.
Unstructured data such as images, video, and audio is commonly sent as binary payloads but with an accompanying header indicating what kind of data it is. In an HTTP request, the Content-Type header will include a value such as text/HTML or a MIME type such as video/MP4. This header tells the recipient how to process the binary payload of that message.
The interprocess communication (IPC) functionality that is provided by IoT Greengrass to components to enable the exchange of messages between them supports the JSON message format along with the raw binary format. In this chapter, you will build two components that use IPC to pass JSON messages from one component to the other.
Note
Since IoT Greengrass does not prescribe any particular protocol to interact with edge devices and systems, you can easily implement components that include libraries to interact with any device and any protocol.
The key takeaway regarding protocols is that we can use common protocols for the same, or similar, advantages as we use a good architecture pattern. They are battle-tested, well-documented, easy to implement, and prevent us from getting lost in the cycles of implementation details where our time would be better spent on delivering outcomes. In the next section, we will cover, at a high level, the security threats for an edge ML solution and some best practices and tools for mitigating them.
Security at the edge
With IoT security being a hot topic and frequently making headlines, security in your edge ML solutions must be your top priority. Your leadership at HBS will never want to see their company or product name in the news for a story concerning a hacked device. Ultimately, security is about establishing and maintaining trust with your customer. You can use a threat modeling exercise such as STRIDE to analyze atomic actors in your edge system such as end devices, gateways, and software components to reason about worst-case scenarios and the minimum viable mitigation to prevent them. In this section, we will cover common security threats and the best practices for mitigating them.
End devices to your gateway
Let's start with the terminal segment in our edge ML solution along with the appliance monitoring kit itself and its connection to the hub device. The worst-case scenario for this segment is that an unhealthy appliance is mistakenly reported as healthy. If a customer installs the product and it fails to do the one thing it advertises, this will lose all customer trust in the product. To mitigate this scenario, the sensor readings from the monitoring kit must be authentic. This means we must prevent the hub device from receiving false measurements from a spoofed kit.
Here, the best practice is to use some form of secret material that only the kit and the hub device understand. A secret can be a pre-shared key in a symmetrical cryptographic model, or it could be a public key and private key pair in an asymmetrical cryptographic model. If the kit can sign measurements sent to the hub device with a secret, then only the hub device can read them, and it will understand that it could only come from the device that it's paired with. Similarly, the monitoring kit would only act on messages, such as a request to update firmware, if those messages were signed by a secret it recognizes from the paired hub device.
A safe design pattern for our pairing process between the monitoring kit and hub device is to task the customer with a manual step, such as a physical button press. This is similar to the Wi-Fi pairing method called Wi-Fi Protected Setup (WPS). If the customer has to manually start the pairing process, this means it is harder for an attacker to initiate communication with either the kit or the hub. If an attacker has physical access to the customer's premises to initiate pairing with their own device, this would be a much larger security breach that compromises our future product.
IoT Greengrass provides a component called secret manager to help with this use case. The secret manager component can securely retrieve secret materials from the cloud through the AWS Secrets Manager service. You can build workflows into your edge solution, such as the monitoring kit pairing process, to establish a cryptographically verifiable relationship between your devices.
The gateway device
The following list of risks and mitigations focus on the gateway device itself, which runs the IoT Greengrass Core software:
- Secure connectivity to the cloud: So, how do you ensure that the connection between the core device and the cloud service, such as AWS IoT Core, is secure? Well, here, the worst-case scenarios are that the messages exchanged have been accessed, tampered with, or delivered to a spoofed endpoint. The best practice, and the one built into IoT Greengrass, is to use a public key infrastructure (PKI) and mutual validation. PKI implements asymmetrical cryptography by generating private keys and public certificates. A recipient uses the public certificate to validate that the messages from the sender are authentic. In a mutual validation model, both ends of a connection use this structure to prove the authenticity of the other during the handshake. Devices that include a Trusted Platform Module (TPM), which comes with a private key securely stored in it, can generate certificates for use in PKI without ever exposing the private key.
- Inbound network connections: Any device on a network could be susceptible to receiving incoming connection requests. The worst-case scenario is that an attacker gains remote access to a system and starts probing the system or executing code. The best practice for establishing connections is to refuse inbound-initiated connections and rely on outbound, client-initiated connections instead.
- Boot tampering: So, what happens if a device is physically modified between the point of manufacture and when a customer receives it? Well, malicious code could be loaded onto the device to be executed when it is received by the customer and added to the network. To prevent any tampering of the device, design your hardware platform with (or build on top of existing platforms that use) a TPM. A TPM can be used to validate that an encrypted disk has not been modified between boot sequences.
Edge components
Next, we will move on to the components that are running in your edge solution on the IoT Greengrass Core device:
- Component integrity on disk: So, what happens if an attacker can access the component artifacts after they are deployed to the core device? The worst-case scenario is that valuable intellectual property is stolen or modified to change component behavior. In IoT Greengrass, all component resources such as artifacts and recipes are stored on disk as root. The working directories that components use for file I/O belong to the default component system user in the IoT Greengrass configuration or the override user that has been specified during deployment. The best practice is to protect the root and component system user access by limiting additional system users beyond what is needed for the components of the solution. If additional system users are required to be on the device, they should not belong to the same groups as your component users or have permissions to escalate privilege to the root configuration.
- Component integrity in the cloud: So, what happens if an attacker modifies the component artifacts before they are retrieved by IoT Greengrass for a deployment? The worst-case scenario is that a tampered component uses the RequiresPrivilege flag and then has full access to the core device. IoT Greengrass prevents this attack by computing a digest (that is, a mathematical summation for asserting the authenticity of a payload) whenever you upload and register a component. The core device will validate the digest against the component artifacts and fail if an artifact has been tampered with.
- Model poisoning: So, what happens if an attacker compromises a model-backed decision-making process? For example, a camera feed using a local ML model to detect anomalous presence activity gets retrained with new data once a week. If an attacker understands the retraining loop, they can poison the training data over time with the intent of shifting the anomaly threshold to their advantage. To mitigate model poisoning, use human-in-the-loop validation to approve of new labeled data used in training. Human-in-the-loop validation means that you have a mechanism for your human experts to review unusual results, flagged results, or subsets of results as model quality assurance. Additionally, you can use a static approved training dataset to test later generations of models against their original success benchmark.
- IPC: When multiple components are deployed to an IoT Greengrass Core device, some of those components might need to exchange messages with each other over IPC. The worst-case scenario is that a subscribing component receives commands from a component that shouldn't be allowed to control it. Another scenario is that sensitive data is leaked to a component that isn't approved to have access to the data. IoT Greengrass provides a security control for the IPC functionality that allows you to specify explicit topics that components are allowed to use in publish and subscribe operations, respectively. A recommended practice is to design and document your topic tree, indicating which topics are sensitive. In this way, you can use automated review mechanisms to flag recipes in your development life cycle that use the * wildcard, or sensitive topics, for explicit approval.
So, this section covered a few high-risk security threats and the built-in mitigations provided by IoT Greengrass along with several best practices you can implement. Security at the edge is both complex and complicated. You can use threat modeling to identify the worst-case scenarios and best practices to mitigate those threats. In the next section, you will continue your journey as the HBS IoT architect by connecting two devices using components that deliver a simple sensor-to-actuator flow.
Connecting your first device – sensing at the edge
In this section, you will deploy a new component that delivers the first sensing capability of your edge solution. In the context of our HBS appliance monitoring kit and hub device, this first component will represent the sensor of an appliance monitoring kit. The sensor reports to the hub device the measured temperature and humidity of an attached heating, ventilation, and air conditioning (HVAC) appliance. Sensor data will be written to a local topic using the IPC feature of IoT Greengrass. A later section will deploy another component that consumes this sensor data.
If you are using a Raspberry Pi and a Sense HAT for your edge device, the temperature and humidity measurements will be taken from the Sense HAT board. For any other project configurations, you will use a software data producer component to simulate measurements of new data. Component definitions for both paths are available in the GitHub repository, in the chapter3 folder.
Both versions of the component have been written for the Python 3 runtime and defined using Python virtual environments to isolate dependencies. You will deploy one or the other using greengrass-cli to create a new local deployment that merges with the component. This chapter covers steps regarding how to install the component that reads from and writes to the Sense HAT. Any procedural differences for the data producer and consumer components are covered in the GitHub repository's README.md file.
Installing the sensor component
Installing this component is just like installing the com.hbs.hub.HelloWorld component from Chapter 2, Foundations of Edge Workloads. You will use the IoT Greengrass CLI to merge in a predefined component using the deployment command:
- On your hub device (Raspberry Pi), clone the Git repository that contains the book's companion resources:
cd ~/ && git clone https://github.com/PacktPublishing/Intelligent-Workloads-at-the-Edge-.git
- Change directory into the cloned folder for chapter3:
cd Intelligent-Workloads-at-the-Edge-/chapter3
- Create a deployment to include the com.hbs.hub.ReadSenseHAT component (or com.hbs.hub.ReadSenseHATSimulated if working on hardware other than a Raspberry Pi):
sudo /greengrass/v2/bin/greengrass-cli deployment create --merge com.hbs.hub.ReadSenseHAT=1.0.0 --recipeDir recipes/ --artifactDir artifacts/
- You can monitor the progress of the deployment in the log file:
sudo tail -f /greengrass/v2/logs/greengrass.log
- When the logs stop updating from the deployment, you can validate that the component was installed successfully:
sudo /greengrass/v2/bin/greengrass-cli component list
- You should observe the RUNNING status for com.hbs.hub.ReadSenseHAT.
Now that the component has been installed, let's review the component.
Reviewing the sensor component
Let's review some interesting bits from this sensor component so that you have a better idea of what's going on in this component. In this section, we will review a few highlights, starting with the recipe file.
IPC permissions
In the com.hbs.hub.ReadSenseHAT-1.0.0.json section, we are using a new concept in the configuration called accessControl. This configuration defines the features of IoT Greengrass that the component is allowed to use. In this case, the recipe is defining a permission to use IPC and publish messages to any local topic. The operation is aws.greengrass#PublishToTopic, and the resource is the * wildcard, meaning the component is permitted to publish to any topic. In a later section, you will observe a different permission defined here to subscribe to IPC and receive the messages being published by this component. Here is the relevant section of the recipe file showing the accessControl configuration:
com.hbs.hub.ReadSenseHAT-1.0.0.json
"ComponentConfiguration": {
"DefaultConfiguration": {
"accessControl": {
"aws.greengrass.ipc.pubsub": {
"com.hbs.hub.ReadSenseHAT:pubsub:1": {
"policyDescription": "Allows publish operations on local IPC",
"operations": [
"aws.greengrass#PublishToTopic"
],
"resources": [
"*"
]
}
}
}
}
},
In the preceding JSON snippet, you can see that the default configuration for this component includes the accessControl key. The first child of accessControl is a key that is used to describe which system permission we are setting. In this scenario, the permission is for the aws.greengrass.ipc.pubsub system. The next child key is a unique policy ID that must be unique across all of your components. The best practice is to use the format of component name, system name or shorthand, and a counter, all joined by colon characters. The list of operations includes just one permission for publishing messages, but it could also include the operation for subscribing. Finally, the list of resources indicates the explicit list of topics permitted for the preceding operations. In this scenario, we use the * wildcard for simplicity; however, a better practice for observing the principle of least privilege is to exhaustively enumerate topics.
Multiple life cycle steps
In the simple "Hello, world" component, there was just a single life cycle step to invoke the shell script at runtime. In this component, you can see that we are using two different life cycle steps: install and run. Each life cycle step is processed at a different event in the IoT Greengrass component life cycle:
- The Bootstrap step is evaluated when the component is first deployed or when a new version of the component is deployed. You should include instructions in the Bootstrap life cycle when you want Greengrass or the device to restart. This component doesn't require any restarts, so we exclude it from the recipe.
- The Install step will run each time the component is launched, for example, after any time the device restarts and Greengrass is restarting components. Here, you should include instructions that install or configure dependencies before your main component code starts.
- The Run step is only evaluated after the Bootstrap and Install scripts have been completed successfully. Use the Run step to run an application or one-off activity.
- Another kind of life cycle step is the Startup step and its matching Shutdown step. Use these steps to start and stop system background processes, services, and daemons. Note that you can only use either Run or Startup in a recipe, not both.
Note
The IoT Greengrass Core software supports multiple life cycle events in order to provide flexible use of the component recipe model and component dependency graph. A complete definition of these life cycle events can be found in the References section, which is at the end of the chapter. The Run, Install, and Startup life cycle events are the most commonly used in component recipes.
Let's take a closer look at the life cycle steps of this recipe:
com.hbs.hub.ReadSenseHAT-1.0.0.json
"Lifecycle": {
"Install": {
"RequiresPrivilege": true,
"Script": "usermod -a -G i2c,input ggc_user && apt update && apt upgrade -y && apt install python3 libatlas-base-dev -y && python3 -m venv env && env/bin/python -m pip install -r {artifacts:path}/requirements.txt"
},
"Run": {
"Script": "env/bin/python {artifacts:path}/read_senseHAT.py"
}
}
In this recipe, we use the Install step to make system-level changes that require escalated permissions, such as making sure Python is installed. The Install step uses pip to install any Python libraries defined by the requirements.txt file in our component artifacts. Finally, the Run step invokes Python to start our program.
Virtual environments
In this Python component, we are using a feature of Python 3 called virtual environments. A virtual environment allows you to specify an explicit version of the Python runtime to use when interpreting code. We use this to install any dependency libraries locally, so neither the dependencies nor runtime conflict with the system-level Python. This reinforces the best practice of applying isolation to our component. The relative invocation of env/bin/python is telling the script to use the virtual environment's version of Python instead of the one at the system level at /usr/bin/python.
This component uses a requirements.txt file to store information about the Python packages used and the versions of those packages to install. The requirements file is stored as an artifact of the component, along with the Python code file. Since it is an artifact, the command to pip must use the {artifacts:path} variable provided by IoT Greengrass to locate this file on disk.
We could achieve even better isolation for our component in one of two ways:
- System-level Python runtime management: We could use a more specific methodology to load Python runtimes onto the device and reference the version this component needs. There is a risk of using the system-level Python 3 runtime that the recipe installs in the Bootstrap script since another component could later install a different Python 3 runtime. The best practice would be to use further components as dependencies to install each specific runtime that our component requires access to. In this way, a component such as this one could depend on a component that installs Python 3.7 and another component could depend on a component that installs Python 3.9, without conflicting with each other.
- Containerization: Containers are a piece of technology used to enforce even stricter process and dependency isolation than a Python virtual environment. We could build and deploy our sensor component in a Docker container that includes the Python runtime, system packages, and Python libraries and perform any additional custom steps in a container environment before invoking our Python code. This would achieve the best level of isolation; however, it has the drawback of increased complexity to develop and requires more total disk space consumption to achieve that level of isolation. For a production environment, you, as the IoT architect, are responsible for making trade-offs on how much isolation is warranted for the additional overhead.
Since this HBS project is a prototype and we are using a Raspberry Pi device that comes with Python 3 preinstalled, it is within acceptable risk to simply ensure Python 3 is installed. A comprehensive isolation approach with containers for every component could fit, but the lighter-weight approach with Python virtual environments is sufficient at this prototype stage.
Permissions to Unix devices
The code that reads from your Sense HAT device uses the Sense HAT Python library to read values from the device files that the Unix kernel exposes as device interfaces. These device files, such as /dev/i2c-1 and /dev/input/event2, are restricted to system users in groups such as i2c and input. The root user has access to these devices and a Raspberry Pi, and so does the default pi user. Our default component user, ggc_user, is not in these groups; therefore, code run as ggc_user will not be able to access values from these device interfaces. There are three ways to resolve this issue, which are listed as follows:
- First, you could add ggc_user to the i2c and input groups using a system command such as usermod -a -G i2c,input ggc_user.
- Second, you could set the RequiresPrivilege flag in the component recipe's Run script to true.
- Third, you could override which system user the component should run at deployment time by adding the --runWith COMPONENT:posixUser=USERNAME flag. (This can be done with a configuration change in the deployment component in production components, which is covered in Chapter 4, Extending the Cloud to the Edge.)
The best practice is to update the groups that the ggc_user component user is in. This reduces how often we use privileged access in our IoT Greengrass components and maintains our isolation principle by bundling the requirement in our recipe file. Running the component as the pi user isn't bad; however, as a developer, you should not assume this user will exist on every device and have the necessary permissions just because they are operating system defaults. For convenience, here is another clip of the life cycle step that sets up our user permissions for ggc_user:
com.hbs.hub.ReadSenseHAT-1.0.0.json
"Lifecycle": {
"Install": {
"RequiresPrivilege": true,
"Script": "usermod -a -G i2c,input ggc_user && apt update && apt upgrade -y && apt install python3 libatlas-base-dev -y && python3 -m venv env && env/bin/python -m pip install -r {artifacts:path}/requirements.txt"
},
This covers the interesting new features used in the component recipe file. Next, let's take a deep dive into important bits of the code.
Logging
A critical part of monitoring your components is to log important events. These lines set up a logger object that you can use throughout your Python code. This should be standard in every application:
read_senseHAT.py
logger = logging.getLogger()
handler = logging.StreamHandler(sys.stdout)
logger.setLevel(logging.INFO)
logger.addHandler(handler)
When building Python applications for IoT Greengrass, you can copy lines such as these to Bootstrap logging. Note that your logger will capture logs at the INFO level or a level that is higher in criticality. Debug logs will not be captured unless you set the level to logging.DEBUG. You might set different levels of logs depending on where in the development life cycle you are, such as DEBUG in beta and INFO in production. You could set the logging level as a variable with component-level configuration and override it for a given deployment.
Reading from Sense HAT
Inside the build_message function is some simple code to initiate the Sense HAT interface and read values from its temperature and humidity sensors. These represent the values measured by our HBS appliance monitoring kit, attached to a fictional HVAC appliance:
Read_senseHAT.py
sense = SenseHat()
message = {}
message['timestamp'] = float("%.4f" % (time.time()))
message['device_id'] = 'hvac'
message['temperature'] = sense.get_temperature()
message['humidity'] = sense.get_humidity()
This code builds up a new object, called message, and sets child properties equal to the values we're getting from the Sense HAT library. The code also sets a simple device ID string, and generates the current timestamp.
Publishing a message
Next, we will cover the key lines of code inside the publish_message function:
read_senseHAT.py
publish_message = PublishMessage()
publish_message.json_message = JsonMessage()
publish_message.json_message.message = message
request = PublishToTopicRequest()
request.topic = topic
request.publish_message = publish_message
operation = ipc_client.new_publish_to_topic()
operation.activate(request)
future = operation.get_response()
try:
future.result(TIMEOUT)
logger.info('published message, payload is: %s', request.publish_message)
except Exception as e:
logger.error('failed message publish: ', e)
These lines of code prepare the message and the request that will be communicated to the IPC service of IoT Greengrass as a new publish operation. This code will look familiar in any later components that require you to publish messages to other components running on the HBS hub device.
Now that we have taken a tour of the sensor application source code, let's examine what values you are measuring in the log file.
Testing the sensor component
To inspect the values that you are sampling from the sensor, you can tail the log file for this component. If you are using the ReadSenseHATSimulated component, make sure you inspect that log file instead.
Tail the log file:
sudo tail -f /greengrass/v2/logs/com.hbs.hub.ReadSenseHAT.log
2021-06-29T01:03:07.746Z [INFO] (Copier) com.hbs.hub.ReadSenseHAT: stdout. published message, payload is: PublishMessage(json_message=JsonMessage(message={'timestamp': 1624928587.6789, 'device_id': 'hvac', 'temperature': 44.34784698486328, 'humidity': 22.96312713623047})). {scriptName=services.com.hbs.hub.ReadSenseHAT.lifecycle.Run.Script, serviceName=com.hbs.hub.ReadSenseHAT, currentState=RUNNING}
You should observe new entries in the log file with the temperature and humidity measurements sampled. These values are being logged and also published over IPC to any other components that are listening for them. You don't have any other components listening on IPC yet, so now is a great time to move on to your second component.
Connecting your second device – actuating at the edge
The previously deployed component acts as a sensor to read values from a fictional appliance monitoring kit and publishes those values over IoT Greengrass IPC on a local topic. The next step is to create an actuator component that will respond to those published measurements and act upon them. Your actuator component will subscribe to the same local topic over IPC and render the sensor readings to the LED matrix of your Sense HAT board. For projects not using the Raspberry Pi with Sense HAT, the simulation actuator component will write measurements to a file as a proof of concept.
Installing the component
Similar to the previous installation, you will create a deployment that merges with the new component. Please refer to the earlier steps for the location of the source files and validation steps that the deployment concluded. For projects not using the Raspberry Pi with the Sense HAT module, you will deploy the com.hbs.hub.SimulatedActuator component instead.
Create a deployment to include the com.hbs.hub.WriteSenseHAT component:
sudo /greengrass/v2/bin/greengrass-cli deployment create --merge com.hbs.hub.WriteSenseHAT=1.0.0 --recipeDir recipes/ --artifactDir artifacts/
Once deployed, you should start seeing messages appear on the LED matrix in the format of t: 40.15 h:23.79. These are the temperature and humidity values reported by your sensor component. The following photograph shows a snapshot of the LED matrix scrolling through the output message:
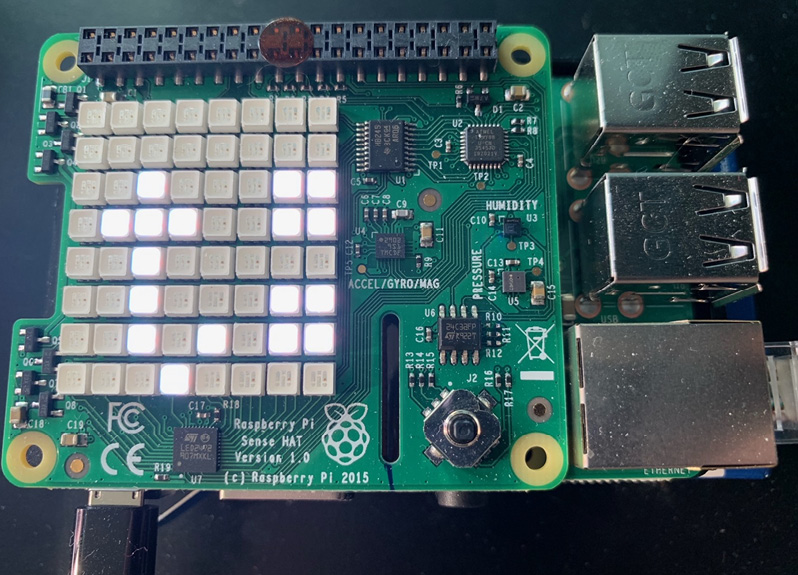
Figure 3.11 – A photograph of Sense HAT scrolling through reported sensor values
If, at any point, you get tired of seeing the scrolling messages on your device, you can simply remove the com.hbs.hub.WriteSenseHAT component with a new deployment, as follows:
sudo /greengrass/v2/bin/greengrass-cli deployment create --remove com.hbs.hub.WriteSenseHAT
Read on to learn how this component is structured.
Reviewing the actuator component
Let's review the interesting differences between this component and the sensor component.
Recipe file differences
Starting with the recipe file, there is only one key difference to observe. Here is a snippet of the recipe file that we'll review:
com.hbs.hub.WriteSenseHAT-1.0.0.json
"accessControl": {
"aws.greengrass.ipc.pubsub": {
"com.hbs.hub.WriteSenseHAT:pubsub:1": {
"policyDescription": "Allows subscribe operations on local IPC",
"operations": [
"aws.greengrass#SubscribeToTopic"
],
"resources": [
"*"
]
}
}
}
In the recipe for com.hbs.hub.WriteSenseHAT, the accessControl permission specifies a different operation, aws.greengrass#SubscribeToTopic. This is the inverse of what we defined in the sensor component (aws.greengrass#PublishToTopic). This permission allows the component to set up topic subscriptions on IPC and receive messages published by other IPC clients, such as the sensor component. The following diagram shows the contrast of IPC permissions between a publishing sensor and a subscribing actuator:
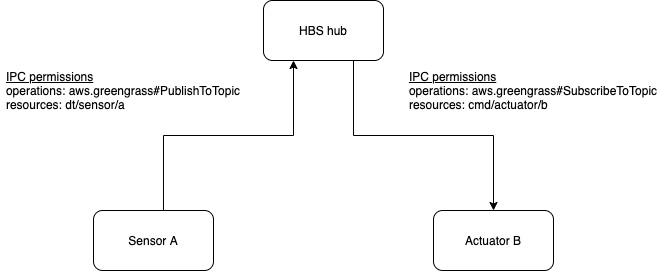
Figure 3.12 – IPC permissions for the sensor and the actuator
In addition to this, the resources list uses the * wildcard to indicate that the component can subscribe to any local topic. Following a principle of least privilege for a production solution, this list of resources would specify the explicit list of topics to which the component is allowed to publish or subscribe. Since this hub device is a prototype, the wildcard approach is acceptable. Each of the read and write components accept arguments to override the local topic used for your own experimentation (please check out the main() functions to learn more). Since any topic can be passed in as an override, this is another reason to use the wildcard resource with the component permissions. Recall that this is okay for developing and testing, but the best practice for production components would be to exhaustively specify the permitted topics for publishing and subscribing.
The remainder of the recipe file is essentially the same, with differences simply in the naming of the component and the Python file to invoke in the Run script. Also, note that we add a new user group to ggc_user; the video group enables access to the LED matrix. Next, let's review the interesting new lines of code from this component's Python file.
Receiving messages on IPC
The business logic for receiving messages over IPC and writing messages to the LED matrix is coded in scrolling_measurements.py. Here are a few important sections to familiarize yourself with:
scrolling_measurements.py
class StreamHandler(client.SubscribeToTopicStreamHandler):
def __init__(self):
super().__init__()
def on_stream_event(self, event: SubscriptionResponseMessage) -> None:
try:
message = event.json_message.message
logger.info('message received! %s', message)
scroll_message('t: ' + str("%.2f" % message['temperature']))
scroll_message('h: ' + str("%.2f" % message['humidity']))
except:
traceback.print_exc()
In this selection, you can observe that a new local class is defined, called StreamHandler. The StreamHandler class is responsible for implementing the behavior of IPC client subscription methods such as the following:
- on_stream_event is the handler defining what to do when a new message arrives.
- on_stream_error is the handler defining what to do when the subscription encounters an error.
- on_stream_close is the handler defining how to clean up any resources when the subscription is closed.
Since the sensor component is publishing messages in JSON format, you can see that it is easy to get the value of that payload with event.json_message.message. Following this, the on_stream_event handler retrieves the values for both the temperature and humidity keys and sends a string to the scroll_message function. Here is the code for that function:
scrolling_measurements.py
def scroll_message(message):
sense = SenseHat()
sense.show_message(message)
That's it! You can view how easy it is to work with the Sense HAT library. The library provides the logic to manipulate the LED matrix into a scrolling wall of text. There are additional functions in the library for more fine-grained control of the LED matrix if scrolling a text message is too specific an action. You might want to render a solid color, a simple bitmap, or create an animation.
Note
In this pair of components, the messages transmitted over IPC use the JSON specification. This is a clean default for device software that can use JSON libraries since it reduces the code we have to write for serializing and deserializing messages over the wire. Additionally, using JSON payloads will reduce code for components that will exchange messages with the cloud via the AWS IoT Core service. This service also defaults to JSON payloads. However, both the IPC feature of IoT Greengrass and the AWS IoT Core service support sending messages with binary payloads.
In the context of the HBS hub device and appliance monitoring kit, the Raspberry Pi and its Sense HAT board are pulling double duty when it comes to representing both devices in our prototype model. It would be impractical to ask customers to review scrolling text on a screen attached to either device. In reality, the solution would only notify customers of an important event and not signal each time the measurements are taken. However, this pattern of sensor and actuator communicating through a decoupled interface of IPC topics and messages illustrates a core concept that we will use throughout the rest of the edge solutions built in this book.
Summary
In this chapter, you learned about the topologies that are common in building edge ML solutions and how they relate to the constraints and requirements informing architectural decisions. You learned about the common protocols used in exchanging messages throughout the edge and to the cloud, and why those protocols are used today. You learned how to evaluate an edge ML solution for security risks and the best practices for mitigating those risks. Additionally, you delivered your first multi-component edge solution that maps sensor readings to an actuator using a decoupled interface.
Now that you understand the basics of building for the edge, the next chapter will introduce how to build and deploy for the edge using cloud services and a remote deployment tool. In addition to this, you will deploy your first ML component using a precompiled model.
Knowledge check
Before moving on to the next chapter, test your knowledge by answering these questions.
The answers can be found at the end of the book:
- What are three network topologies that are common in edge solutions? Which one is implemented by the HBS hub device and appliance monitoring kit?
- True or false: IoT Greengrass operates at the physical layer (that is, layer 1) of the OSI model.
- What is the benefit of using a publish/subscribe model to exchange messages?
- True or false: IoT Greengrass can act as both a messaging client and a messaging broker.
- Is a message such as {"temperature": 70} an example of structured data or unstructured data? Is it serializable?
- Is image data captured from a camera an example of structured data or unstructured data? Is it serializable?
- What do you think is the worst-case scenario if your home network router was compromised by an attacker but was still processing traffic as normal?
- What is a mitigation strategy for verifying authenticity between two network devices?
- Why is it important to protect root access via privilege escalation on a gateway device?
- Is there any downside to wrapping every edge component in a container?
- What functionality does IoT Greengrass provide to allow components to exchange messages?
- What is one way to make the sensor and actuator solution you deployed in this chapter more secure? (Hint: review the recipe files!)
- How might you redesign the sensor and actuator solution if you required a third component to interpret the sensor results before sending a message to the actuator?
References
Please refer to the following resources for additional information on the concepts discussed in this chapter:
- The STRIDE Threat Model: https://docs.microsoft.com/en-us/previous-versions/commerce-server/ee823878(v=cs.20)?redirectedfrom=MSDN
- OSI model: https://en.wikipedia.org/wiki/OSI_model
- ISA95, Enterprise-Control System Integration: https://www.isa.org/standards-and-publications/isa-standards/isa-standards-committees/isa95
- PEP 405 -- Python Virtual Environments: https://www.python.org/dev/peps/pep-0405/
- Open Container Initiative: https://opencontainers.org/
- Docker: https://www.docker.com/
- AWS IoT Greengrass component recipe reference: https://docs.aws.amazon.com/greengrass/v2/developerguide/component-recipe-reference.html