
4
Securing the Application
In this chapter, we’ll implement a security layer based on JSON Web Token (JWT), pronounced “jot,” to protect the HTTP API we developed in Chapter 3, Creating the HTTP API. We’ll start by learning about Quarkus security and its JWT-related extensions. We will also add the required dependencies and learn about what each of them provides. After that, we’ll implement the security for our task manager application. We’ll generate and configure the required key files, create an authentication and authorization service, and protect the HTTP endpoints.
By the end of this chapter, you should be able to provide a security layer for your Quarkus application based on JWT. You should also have a basic understanding of the Quarkus security module and how to generate your own JWTs.
We will be covering the following topics in this chapter:
- Using JWT security in Quarkus
- Implementing the task manager’s HTTP API security
Technical requirements
You will need the latest Java JDK LTS version (at the time of writing, Java 17). In this book, we will be using Fedora Linux, but you can use Windows or macOS as well.
You will need a working Docker environment to take advantage of Quarkus Dev Services. There are Docker packages available for most Linux distributions. If you are on a Windows or macOS machine, you can install Docker Desktop.
If you’re not using IntelliJ IDEA Ultimate edition, you’ll need a tool such as cURL or Postman to interact with the implemented HTTP endpoints.
You will need the OpenSSL command-line tool or an alternative to be able to generate the JWT signing keys.
You can download the full source code for this chapter from https://github.com/PacktPublishing/Full-Stack-Quarkus-and-React/tree/main/chapter-04.
Using JWT security in Quarkus
Quarkus has an extensive list of modules and extensions to provide a security layer for your application. Quarkus Security is the base module upon which the rest of the security extensions are built. You can choose from many of the supported authentication and authorization mechanisms: basic authentication, OpenID Connect, OAuth2, JWT, and so on. On top of that, Quarkus Security provides additional tools to improve the developer experience and testing utilities to enhance the overall application quality and reliability.
In this book, we’ll cover how to implement a JWT-based security authentication and authorization mechanism for Quarkus applications. In the What is Quarkus? section in Chapter 1, Bootstrapping the Project, we learned that Quarkus is based on a set of proven standards and libraries. This is also the case for JWT, which is based on the MicroProfile JWT RBAC security specification of the JWT standard and is provided by the SmallRye JWT implementation.
JWT
JSON Web Token (JWT) is an Internet Engineering Task Force (IETF)-proposed standard that can be used to represent and securely exchange claims between two parties. It is now one of the most widely adopted methods for authorization and information exchange, especially in microservice and distributed architectures, due to its self-contained and compact nature. A token is just a JSON object that contains a set of claims and is usually digitally signed or protected with a Message Authentication Code (MAC).
In general, you’ll want an external identity manager service such as Keycloak to perform the authentication and generate the JWTs for your application. In this case, you’d only need to configure your application’s authorization to verify the bearer token upon any received HTTP request to a secured endpoint. However, for the sake of completeness, in our task manager application, we’ll also implement an authentication mechanism that will generate JWTs too. Let us now see what the required dependencies are to support the generation and validation of JWTs in our application.
Adding the required dependencies
We will start by adding all the required dependencies and then analyze what each of the dependencies provides. Just like we did in the previous chapters, we’ll use the quarkus:add-extension Maven goal, which will automatically insert the required entries in the project’s pom.xml. You can now execute the following command in the project’s root to add the dependencies:
./mvnw quarkus:add-extension -Dextensions=smallrye-jwt,smallrye-jwt-buildOnce executed, you should see the following message:

Figure 4.1 – A screenshot of the execution result of the quarkus:add-extension command
Let us see what each of these dependencies provides.
SmallRye JWT
The execution of the quarkus:add-extension Maven goal should have added the following entry into your pom.xml:
<dependency>
  <groupId>io.quarkus</groupId>
  <artifactId>quarkus-smallrye-jwt</artifactId>
</dependency>
SmallRye JWT is an implementation of the Eclipse MicroProfile JWT RBAC security specification. Quarkus provides its own packaged extension of the SmallRye JWT dependency with build-time optimizations and improvements for native compilation. This dependency is primarily used for the parsing and optional decryption of the JWT and its signature verification.
Internally, Quarkus will automatically and transparently handle the bearer token authorization headers provided in the HTTP requests. It will verify the token’s signature, and deserialize it into an org.eclipse.microprofile.jwt.JsonWebToken instance. This instance will be used by Quarkus to determine the user’s authorized roles and will also be made available for injection.
SmallRye JWT build
After executing the ./mvnw quarkus:add-extension command, we should also be able to find the following dependency in our pom.xml:
<dependency>
  <groupId>io.quarkus</groupId>
  <artifactId>quarkus-smallrye-jwt-build</artifactId>
</dependency>
The SmallRye JWT build dependency provides us with an straightforward interface to generate a JWT, add some claims to it, and digitally sign it. We can use this to issue trusted JWTs for the users of our application once they’ve completed an authentication process. The users can, later on, use this token to be authorized when they interact with our application’s HTTP API using it as a bearer token in an authorization HTTP request header.
Now that we’ve learned about JWT and Quarkus security and added the required dependencies to our application, let us see how to implement the security layer.
Implementing the task manager’s HTTP API security
You should now be familiar with Quarkus security and JWT, and the project should contain the required dependencies. We can now start to implement and configure the task manager application’s security. We’ll start by generating the required key files to sign and verify the tokens.
Generating the key files
The JWT standard provides different methods to verify and trust the authenticity of the tokens and the integrity of the claims it contains. One of the most common approaches, and the one that we’ll be using in our application, is the usage of signed tokens. In our case, we’ll be using a private and public key pair to sign and verify the tokens.
In a distributed application, the authorization service holds the private key and uses it to issue the signed JWTs. The rest of the services have access to the public key and use it to verify the authenticity of these tokens. In our application, we’re going to perform both operations, the signing and issuing of the tokens when we receive authentication requests and their verification when we receive them in an HTTP authorization header.
Before generating the key files, we need to create a directory where we’ll store them. To create the directory, we right-click on the src/main/resources directory and click on the New submenu and the Directory menu entry.

Figure 4.2 – A screenshot of the IntelliJ File | New | Directory menu entry
In the modal dialog form, we will type the name of the new directory: jwt.

Figure 4.3 – A screenshot of the IntelliJ New Directory dialog
We can now navigate to the new src/main/resources/jwt directory in a terminal and issue the following command to generate the private key:
openssl genrsa -out rsa-private-key.pem 2048The command should complete successfully and a message like the following should be printed:
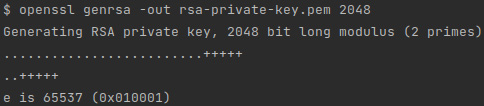
Figure 4.4 – A screenshot of the result of the command to generate the private key
Next, we need to convert the private key into PKCS#8 format to make it compatible with the SmallRye JWT build. We can achieve this by executing the following command:
openssl pkcs8 -topk8 -nocrypt -inform pem -in rsa-private-key.pem -outform pem -out private-key.pemThe command should complete successfully without printing any additional message.
The final step in the key generation phase would be to create the public key to verify the signed tokens. We need to execute the following command:
openssl rsa -pubout -in rsa-private-key.pem -out public-key.pemThe command should complete successfully and the following message should be printed:
Figure 4.5 – A screenshot of the result of the command to generate the public key
We have created the required key files to sign and verify the tokens. Let us now configure the application to use these files.
Configuring the application
SmallRye JWT needs some configurations defined to be able to load the newly generated key files. We need to add the following entries to the application.properties file:
smallrye.jwt.sign.key.location=jwt/private-key.pem
mp.jwt.verify.publickey.location=jwt/public-key.pem
mp.jwt.verify.issuer=https://example.com/issuer
Let us see what each of these configuration properties does:
- smallrye.jwt.sign.key.location
This is the property to define the location of the private key that will be used by SmallRye to sign the tokens issued from our authorization service. We’ll set the path of the PKCS #8-formatted private key we just generated.
- mp.jwt.verify.publickey.location
This is the property to define the location of the public key that will be used to verify the signatures of JWTs. For our application, we are going to set the local path of the public key we generated. However, this property can also point to a remote URL. This would be the case if you were using an external authorization service such as Keycloak.
- mp.jwt.verify.issuer
This is the configuration property to define the value to verify the iss (issuer) claim that should be included within the JWT. Like the public key location, this value can point to a remote URL in case our application uses an external authorization service.
The resulting application.properties file should now look like this:
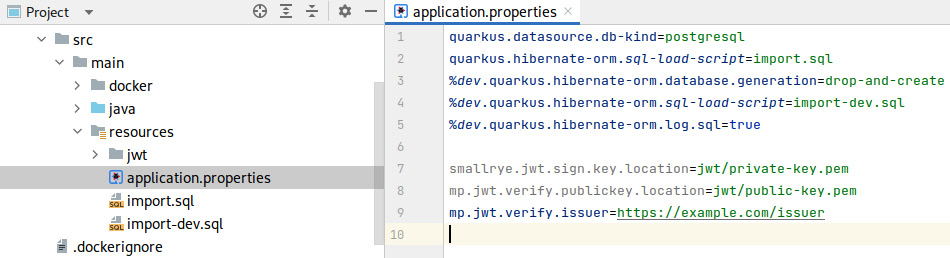
Figure 4.6 – A screenshot of the configured properties in the application.properties file
We have configured the application to make use of the generated keys. Let us now continue with the implementation of the authentication service.
Implementing the authentication service and login interface
Users will need to authenticate and obtain a valid JWT with the required claims to be able to consume our application’s HTTP API once it’s protected. We are now going to implement an authentication service to provide this functionality.
However, we’ll first add a utility method to the UserService class to verify that an authentication request password matches the one in the database. The next snippet contains the code we need to add to the UserService class:
public static boolean matches(User user, String password) {
  return BcryptUtil.matches(password, user.password);
}
This method checks that the provided plain text password matches the Modular Crypt-formatted bcrypt hashed password stored in the also provided User entity. The method returns true if the passwords match; else, it returns false.
We can now create the authorization service. First, we’ll create a new com.example.fullstack.auth package where we’ll host the related classes. In this package, we’ll add a new AuthRequest record that we’ll use to hold the login credentials provided by users logging into the application. In the following snippet, you will find the complete source code for this record:
package com.example.fullstack.auth;
public record AuthRequest(String name, String password) {
}
It's a very simple record that contains two fields: name and password. The record will be used to deserialize authentication requests. Let us now implement the AuthService class, which will hold the authentication and JWT generation logic.
AuthService
The AuthService class is the core class for the current chapter and contains the logic to authenticate the user and generate the JWTs with the user’s claims. We’ll create a new AuthService class in the com.example.fullstack.auth package; the following is the complete source code for this class:
package com.example.fullstack.auth;
import com.example.fullstack.user.UserService;
import io.quarkus.security.AuthenticationFailedException;
import io.smallrye.jwt.build.Jwt;
import io.smallrye.mutiny.Uni;
import org.eclipse.microprofile.config.inject.
    ConfigProperty;
import javax.enterprise.context.ApplicationScoped;
import javax.inject.Inject;
import java.time.Duration;
import java.util.HashSet;
@ApplicationScoped
public class AuthService {
  private final String issuer;
  private final UserService userService;
  @Inject
  public AuthService(
    @ConfigProperty(name = "mp.jwt.verify.issuer") String
      issuer, UserService userService) {
    this.issuer = issuer;
    this.userService = userService;
  }
  public Uni<String> authenticate(AuthRequest authRequest)
    {
    return userService.findByName(authRequest.name())
      .onItem()
      .transform(user -> {
        if (user == null || !UserService.matches(user,
            authRequest.password())) {
          throw new AuthenticationFailedException
            ("Invalid credentials");
        }
        return Jwt.issuer(issuer)
          .upn(user.name)
          .groups(new HashSet<>(user.roles))
          .expiresIn(Duration.ofHours(1L))
          .sign();
      });
  }
}
Just like we did for the rest of the task manager application services, we’ll annotate this class with the @ApplicationScoped annotation to define a singleton bean. The class constructor is annotated with the @Inject annotation to take advantage of constructor-based injection. In this case, the class has two dependencies: userService and issuer. Now, UserService will be used to retrieve the user information to complete the JWT. The issuer string parameter is annotated with the @ConfigProperty annotation. This annotation instructs Quarkus to inject a configuration value (in this case, mp.jwt.verify.issuer), which we provided in the application.properties file. The mp.jwt.verify.issuer property is used by SmallRye to verify the token issuer. However, since the value is available from the configuration, we’ll reuse it here for the token generation too.
The class contains a single method, authenticate, with a single parameter, AuthRequest. The method returns a Uni that emits an item containing the signed JWT or a failure if the user is not found or the password doesn’t match. The implementation starts by trying to find the requested user by name. The user is then checked asynchronously; if the user doesn’t exist (is null) or the passwords don’t match, an AuthenticationFailedException instance is thrown and will be emitted as a failure.
If the user exists and the passwords match, a JWT is created and signed using the SmallRye Jwt builder class. The JWT is built with the issuer (iss), the user principal name (upn), and the groups claim. The groups claim contains the user roles and will be used later on to check whether the user is authorized to perform any given operation.
We are also setting the expiration time for the token. In this case, we’re setting the token to expire after 1 hour of its creation. This means that the token will no longer be valid after this period and users will need to reauthenticate. In general, we would want to set a shorter lifetime and provide an additional refresh token. This token could be used by the users, or more specifically the frontend application, to transparently generate a new JWT without having to perform the login operation again. For this book, we won’t be covering this part, since from the backend perspective, it would be a similar operation to the one we just performed. You also have all of this functionality out of the box if you delegate the authentication services to a production-grade system such as Keycloak.
We have now covered the logic to authenticate the user and issue a JWT. Next, we will see how to consume the exposed service through the HTTP API.
AuthResource
The AuthResource class exposes an HTTP endpoint to enable users to authenticate and consume the AuthService authenticate method. Just like we did for the AuthService class, we’ll create a new AuthResource class in the com.example.fullstack.auth package. The following code snippet contains the source code for this class:
package com.example.fullstack.auth;
import io.smallrye.mutiny.Uni;
import javax.annotation.security.PermitAll;
import javax.inject.Inject;
import javax.ws.rs.POST;
import javax.ws.rs.Path;
@Path("/api/v1/auth")
public class AuthResource {
  private final AuthService authService;
  @Inject
  public AuthResource(AuthService authService) {
    this.authService = authService;
  }
  @PermitAll
  @POST
  @Path("/login")
  public Uni<String> login(AuthRequest request) {
    return authService.authenticate(request);
  }
}
The class is annotated with the @Path annotation to expose all of the authentication-related endpoints with the /api/v1/auth prefix. The AuthService bean instance is injected into the class via constructor-based injection so that it can be reused in the latter method.
The login(AuthRequest request) method exposes an endpoint that allows users to perform login HTTP POST requests at the /api/v1/auth/login path. This method delegates the call to the authenticate method in AuthService, which we already covered.
Notice that the method is annotated with an @PermitAll annotation, which we haven’t seen before. This annotation specifies that the endpoint can be consumed by any user regardless of its assigned roles. Since this is the authentication entry point for all users, it makes sense to keep it public and unchecked.
If we start the application via ./mvnw quarkus:dev, we should be able to test whether the endpoint works and generates JWTs. We can execute the following cURL command to retrieve a valid token:
curl -X POST -d'{"name":"user","password":"quarkus"}' -H "Content-Type: application/json" localhost:8080/api/v1/auth/loginIf everything goes well, a new token should be printed:

Figure 4.7 – A screenshot of the result of executing cURL to perform a valid login
cURL on Windows cmd.exe
If you are using cURL on Windows within the cmd.exe terminal, you might need to use double quotes instead of single quotes, and escape the ones within the data field. For example, the previous command should be invoked as curl -X POST -d"{""name"":""user"",""password"":""quarkus""}" -H "Content-Type: application/json" localhost:8080/api/v1/auth/login.
We can also check what happens if we provide an invalid password by executing the following command (note the -i flag to print the response headers):
curl -X POST -d'{"name":"user","password":"invalid"}' -H "Content-Type: application/json" -i localhost:8080/api/v1/auth/loginWe should now be able to see the unauthorized response code:

Figure 4.8 – A screenshot of the result of executing cURL to perform an invalid login
We have now implemented the authorization service and enabled users to log into the application. Let us now see how to get the currently logged-in user to be able to perform the user-specific operations.
Getting the logged-in user
In the UserService section in Chapter 3, Creating the HTTP API, we created a dummy implementation of the getCurrentUser method. Now that users can perform login operations and use the resulting tokens to provide a bearer token authorization header, we can provide the actual implementation.
We’ll start by adding an instance variable and constructor to the UserService class:
private final JsonWebToken jwt;
@Inject
public UserService(JsonWebToken jwt) {
  this.jwt = jwt;
}
This code instructs Quarkus to inject the JWT as a JsonWebToken instance variable to the UserService class bean. If the HTTP request contained a bearer token authorization header, Quarkus security will parse and verify the token.
Note
Despite injecting the JsonWebToken instance to an @ApplicationScoped annotated singleton bean, Quarkus will inject the actual JWT used in the current request.
We can now replace the getCurrentUser method with the following implementation:
public Uni<User> getCurrentUser() {
  return findByName(jwt.getName());
}
The method just retrieves the name from the Principal, which in this case represents a user, and tries to find a matching user in the database. With this new implementation, all of the user-scoped operations we implemented in the project and task services will now work as expected.
Now that we can retrieve the currently logged-in user, let us further improve the user service to allow for a specific password-change operation.
Letting users change their password
In the UserService section in Chapter 3, Creating the HTTP API, we provided an initial implementation of the update method. This implementation allows any authorized user to perform a complete modification of any of the user’s entity fields. Since we can now retrieve the current user, it makes sense to provide a password-change operation and restrict the update method to only allow modifications of some of the entity fields.
We’ll start by replacing the update method implementation with the following:
@ReactiveTransactional
public Uni<User> update(User user) {
  return findById(user.id).chain(u -> {
      user.setPassword(u.password);
      return User.getSession();
    })
    .chain(s -> s.merge(user));
}
We’ve added the user.setPassword(u.password); instruction to the chained lambda expression. This will overwrite any password value provided by the user’s request with the one in the database, preventing the current password from being modified.
We’ll now implement a specific changePassword method in the UserService class; the following snippet contains the code for the implementation:
public Uni<User> changePassword(String currentPassword,
  String newPassword) {
  return getCurrentUser()
    .chain(u -> {
      if (!matches(u, currentPassword)) {
        throw new ClientErrorException("Current password
          does not match", Response.Status.CONFLICT);
      }
      u.setPassword(BcryptUtil.bcryptHash(newPassword));
      return u.persistAndFlush();
    });
}
The method performs a write operation in the database. On this basis, we annotate it with the @ReactiveTransactional annotation to configure Quarkus to run the executed method in a reactive Mutiny transaction for its persistence.
The method’s signature contains two parameters: currentPassword and newPassword. The method returns a Uni that will emit an item with the modified User entity or a failure if the provided currentPassword doesn’t match the user’s password in the database.
The implementation starts by retrieving the currently logged-in user’s entity. It then checks whether the currentPassword argument matches the one in the database. If it doesn’t, ClientErrorException is thrown. When this exception is processed by Quarkus, a 409 Conflict status code will be returned in the HTTP response. If the password matches, the newPassword argument is hashed and set in the user entity, which is finally persisted in the database.
We can now expose the password-change operation in the HTTP API. However, we’ll first create a new PasswordChange record in the com.example.fullstack.user package with the following content:
package com.example.fullstack.user;
public record PasswordChange(String currentPassword, String
  newPassword) {
}
The record contains two fields: currentPassword and newPassword. The record will be used to deserialize the HTTP body of password-change requests.
We can now add a new changePassword method to the UserResource class to expose the password-change operation. The following code snippet contains the required code:
@PUT
@Path("self/password")
@RolesAllowed("user")
public Uni<User> changePassword(PasswordChange
  passwordChange) {
  return userService
    .changePassword(passwordChange.currentPassword(),
      passwordChange.newPassword());
}
The method is annotated with an @PUT operation, which indicates that this method should be used to respond to HTTP PUT requests. The method is also annotated with an @Path annotation with a self/password value; the resulting endpoint will be available at the /api/v1/users/self/password URL.
We covered most of these annotations before; however, note the new @RolesAllowed annotation. This annotation instructs Quarkus to restrict this endpoint to users who have the user role. If you recall, in the Loading the application’s initial data section in Chapter 2, Adding Persistence, we created two users: admin and user, both with the user role. In this case, both users would be able to invoke this method.
The method implementation delegates the call to the UserService changePassword method we just added.
If we start the application via ./mvnw quarkus:dev, we should be able to test whether the endpoint works and be able to change the user’s password. However, we first need a valid JWT; for this, we can use the cURL command we executed in the AuthResource section. Next, we can execute the following cURL command to change the password (you need to replace the $jwtToken with the one you retrieved):
curl -X PUT -d'{"currentPassword":"quarkus","newPassword":"changed"}' -H "Content-Type: application/json" -H "Authorization: Bearer $jwtToken" localhost:8080/api/v1/users/self/passwordIf everything goes well, you should be able to see a message similar to this one:
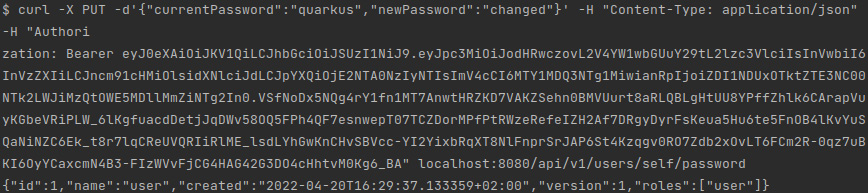
Figure 4.9 – A screenshot of the result of executing cURL to change the user password
If you repeat the command execution without any changes, it should fail since the password was modified and currentPassword won’t match the one in the database. In Chapter 5, Testing Your Backend, we’ll implement integration tests to verify all of these scenarios.
We’ve refactored the user entity update mechanism and provided and exposed a specific operation for users to change their passwords. Let us now see how to secure the rest of the application’s endpoints.
Securing the HTTP resources
Now that we have an authentication service in place and we’ve configured the application to use JWT authorization, we can secure the HTTP exposed resources. In the Letting users change their password section, we learned about the @RolesAllowed annotation and used it to annotate a method and restrict its invocation to users with the user role. This annotation can be specified at both a class level and a method level. When specified at a class level, it applies to all of the methods in that class. If the method is applied both at a class level and then in a specific method, the method annotation takes precedence over the other.
Let us annotate each of the resource classes and specific methods:
- ProjectResource
This class exposes endpoints to manage the user’s projects. We’ll annotate the class with @RolesAllowed("user") to only allow logged-in users with the user role to operate.
- TaskResource
This class exposes the functionality to manage the user’s tasks. Just like we did for the ProjectResource class, we’ll annotate it with @RolesAllowed("user").
- UserResource
This class exposes endpoints to deal mostly with the application’s user administrative tasks. In this case, we’ll also annotate the class with @RolesAllowed, but we’ll configure the admin role instead. The resulting class-level annotation should be @RolesAllowed("admin").
The getCurrentUser and changePassword methods are meant to be used by regular users. When we implemented the changePassword method, we already annotated the method with a specific @RolesAllowed("user") annotation. We’ll need to annotate the getCurrentUser method with this annotation too.
If we start the application via ./mvnw quarkus:dev, we should be able to test whether the annotations work and the endpoints are protected. Let’s try to retrieve the list of users by executing the following command:
curl -i localhost:8080/api/v1/usersWe should see an unauthorized response code:
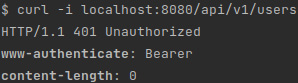
Figure 4.10 – A screenshot of the unauthorized result of executing cURL to retrieve the list of users
We have now protected the endpoints for the application and implemented a very basic role-based access control layer to protect our application by leveraging our own authorization and authentication service.
Summary
In this chapter, we learned how to implement a security layer in Quarkus using JWT. We learned how to generate and configure private and public key files to sign and verify JWTs. Then, we implemented an authentication service to generate and sign JWTs. We also refactored some of the user-related services and provided functionality for users to change their passwords. We also learned how to use annotations to restrict access to the HTTP API.
You should now be able to secure your Quarkus application by using its JWT extensions and provide role-based access control to specific areas of your application. In the next chapter, we’ll provide an introduction and overview of how to test Quarkus applications. We’ll also implement integration tests to verify the exposed application functionality.
Questions
- What is JWT?
- What key do we need to verify a JWT signature?
- How can you generate a JWT?
- Do we need to store a local copy of the configured keys?
- What annotation can we use to retrieve a configuration value in Quarkus?
- What takes precedence: an @RolesAllowed class or a method-level annotation?