
Chapter 10: Evolving AI Using ML-Agents
Machine Learning (ML) has evolved drastically over the last decade. It is no longer solely the domain of scientists or companies making headlines beating world chess champions. Now, we can easily write AI that can master most human components for a wide variety of games. We can even write AI that will learn how to play a game using information only available to a human player (MarI/O comes to mind, an ML algorithm that taught itself to play Super Mario). I remember, many years ago, spending months writing my own evolutionary learning algorithms to do something very similar to what you will accomplish in this very chapter (and hopefully it won't take months to complete!). The best news is, we don't have to write our own ML algorithms (although this is still possible if that's the route you want to take!). Instead, we will use ML-Agents to create an intelligent character (or Agent).
ML-Agents is short for Machine Learning Agents. It is an open source Unity package used to train intelligent Agents using evolutionary algorithms and reinforcement learning. An Agent can be trained over time to become significantly better at a designated task.
In this chapter, we will create an Agent that will teach itself how to navigate an environment, colliding with objects we mark as safe and avoiding objects that we designate as hazards. Along the way, we'll look at how to do the following:
- Create a simple environment for our AI Agent.
- Install ML-Agents and associated Python packages.
- Write a script that will spawn objects in the scene.
- Configure the parameters for the Agent's Artificial Neural Network (ANN).
- Assign rewards based on the Agent's behavior.
- Interpret the output of the learning algorithm to move the Agent around the environment.
- Use Python packages to train the Agent over time to become better at chasing down chicks and avoiding obstacles.
- Embed a model we trained so that the Agent moves around the environment performing as we would like without the need to tell the Agent what to do explicitly.
There is a lot to cover in this chapter, and some of the information can be quite complex. The goal here is not to provide an in-depth look at ML-Agents and ML in general, but to get you up and running as smoothly as possible so that you can start using ML-Agents in your own projects.
This chapter differs from the previous chapters on Finite State Machines (FSM) as we won't have to write the AI behavior we expect explicitly. We also won't be writing an attack or chase state. Instead, we will provide information about the Agent's environment and assign positive and negative rewards based on the Agent's behavior. The ML algorithm will use this information and adapt its behavior over time to increase the chance of obtaining a positive reward.
In an ideal world, we would be able to write one AI character that could adapt to any environment within a game and provide an engaging experience for the player. While we're a little way off from this ideal, the introduction of easy-to-use ML algorithms is a big step in the right direction, and by the end of this chapter, you'll see the possibilities offered by ML-Agents.
Technical requirements
This chapter assumes that you have not only completed the projects from the previous chapters but also have a good, basic knowledge of C# scripting generally, though not necessarily in Unity. In this chapter, you will use many of the assets from the project started in Chapter 8, Continuing with Intelligent Enemies, so you should read that chapter if you haven't already.
The starting project and assets can be found in the book's companion files in the Chapter10/Start folder. You can start here and follow along with this chapter if you do not have your own project already. The completed project is included in the Chapter10/End folder.
This chapter uses an asset from the Unity Asset Store, which, along with its author details, can be found at https://assetstore.unity.com/packages/3d/characters/meshtint-free-boximon-fiery-mega-toon-series-153958.
ML-Agents relies on a number of Python packages that require Python version 3.6.1 or higher.
Introducing ML-Agents
First released in September 2017, ML-Agents has rapidly evolved with the input from ML scientists, game developers, and the wider Unity fanbase due to its open source nature. This rapid progress can, at times, make it challenging to learn how to use it, with many tutorials quickly becoming outdated. However, with the release of version 1 of ML-Agents, these significant backward-incompatible updates should slow down as the project stabilizes. This means it is a great time to jump into the world of ML in Unity!
The ML-Agents toolkit consists of the following:
- The ML-Agents Unity package: This provides everything we need to implement an Agent inside the Unity environment.
- The mlagents Python package: Contains the ML algorithms that we will use to train the Agent.
- The mlagents_env Python package: Provides the functionality for Unity and the ML algorithms to talk to each other. mlagents relies on this.
- The gym_unity Python package: A wrapper to interface with OpenAI Gym.
Important Note
For our purposes, we only require mlagents and mlagents_env. Detailed instructions on how to install them are included in the Installing ML-Agents section.
We'll use the ML-Agents package to create a learning Agent in the Unity Editor. This process will be very similar to anything we do in Unity. We'll create a GameObject and write custom components to extend its functionality. Once we have created the Agent and are ready for training, we will then go outside the Unity Editor and run the mlagents Python package, which will use mlagents_env to talk to our Unity project and train the monster.
The learning algorithm works on a cycle with the following steps:
- Observation: The Agent records observations of its environment.
- Decision: Based on the observations, a decision is made and translated into the action vector.
- Action: We translate the result of the decision into an action. For our purposes, this will involve moving and rotating the Agent.
- Reward: Based on the action, we may assign a positive or negative reward.
Every loop through this cycle is called a simulation step. Multiple steps make up an episode. As we train our agent in the Training the Agent section, we'll progress through thousands of steps to achieve our goal. But that's getting ahead of ourselves. Before we start creating and training the Agent, let's take a sneak peek at the finished project so that we know where we're heading.
Setting the scene
In this chapter, we will create an Agent that will teach itself to move around the environment, avoiding rocks and eating food. We won't explicitly tell it what to do, only reward good behavior (eating the food) and punish bad behavior (eating/bumping into rocks). The Agent will then use this information to work out what to do.
We'll modify the world we created in the previous two chapters, creating a minimal version without the extra foliage and trees. For food, we'll modify the chick prefab we created in the previous chapters—the hunter will become the hunted.
As for the learning Agent, we'll use a new asset—a monster that fits the artistic style:
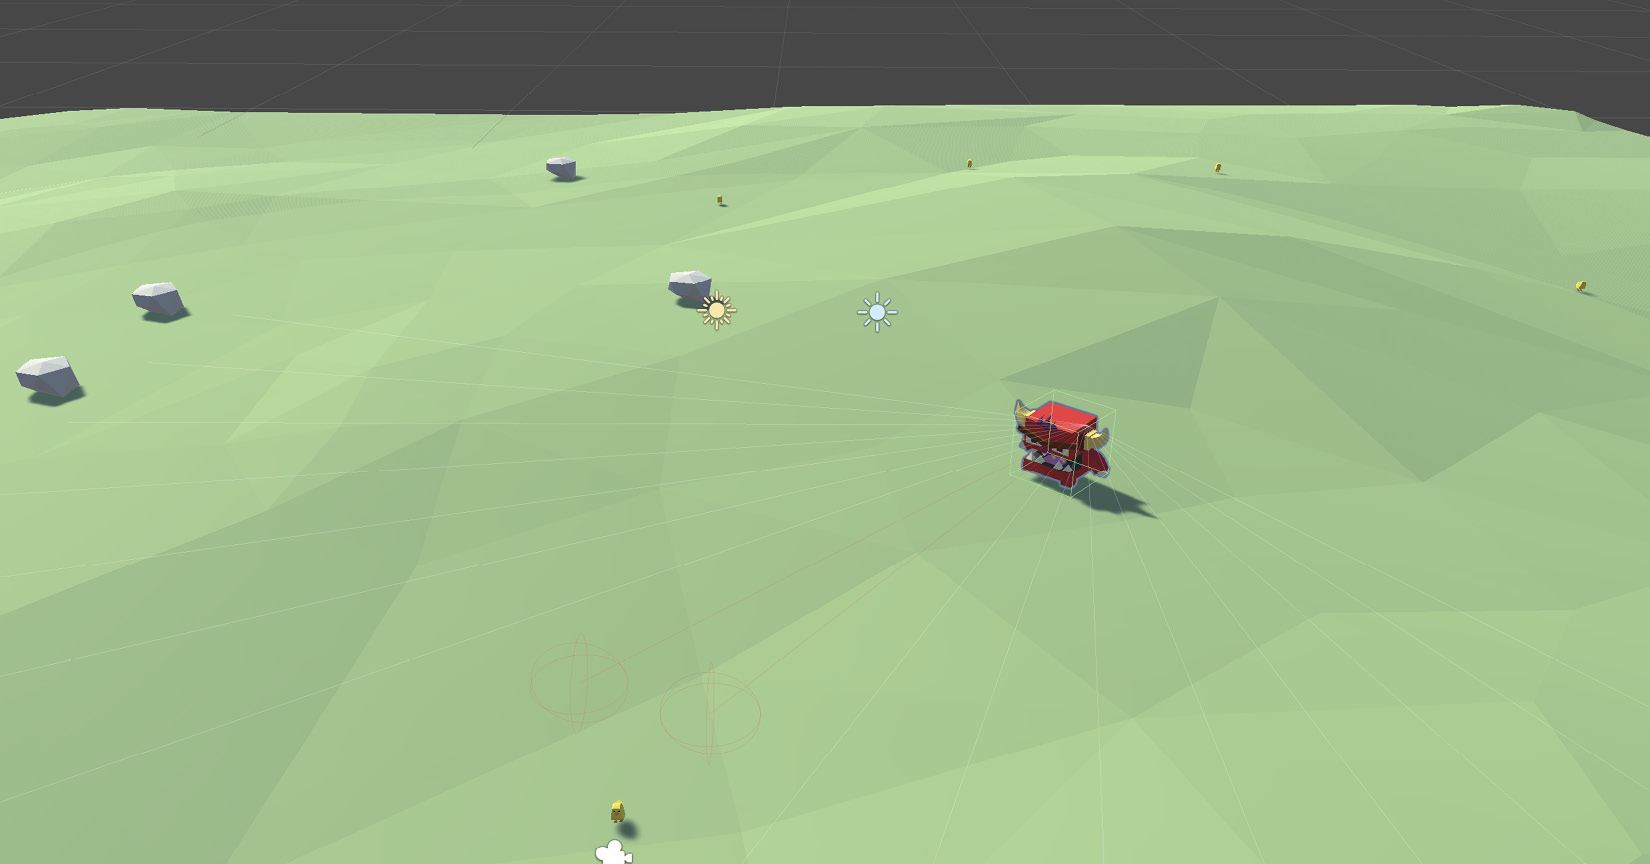
Figure 10.1 – The monster Agent hunting for food
In Figure 10.1, the monster is chasing a chick (that is, the "food"). There are several rocks randomly distributed in the environment, which the monster must learn to avoid.
We already have many of the assets we need, including the level, rock, and chick assets. We only need to import the monster asset for the learning Agent and the ML-Agents package. We'll start with the monster asset.
Importing assets
The monster asset is premade and available on the Unity Asset Store. We'll use the model provided in this package as our learning Agent.
The process of importing packages has been covered in detail in previous chapters and will only be outlined briefly here:
- Navigate to https://assetstore.unity.com/packages/3d/characters/meshtint-free-boximon-fiery-mega-toon-series-153958.
- Click the Add to My Assets button.
Tip
Many developers offer free assets on the Unity Asset Store from models such as a monster to full-blown games. It's worth exploring the store and adding any assets you think will be useful to your collection. The assets will then be available in the Package Manager from within Unity.
- In Unity, open the Package Manager window by selecting Window | Package Manager from the Application menu.
- Find the asset on the list. You may have to refresh the list by clicking on the refresh button at the bottom of the page.
- Click Import:

Figure 10.2 – Importing the monster assets
- In the window that appears, leave everything as default and once again click Import.
Unity will create a Meshtint Free Boximon Fiery Mega Toon Series folder in your Assets folder. This is almost everything we need to get started; there's just one thing left to install: the ML-Agents package itself. Let's do that now.
Installing ML-Agents
With the advent of ML-Agents v1.0, the process of installing ML-Agents has been improved significantly. However, there are still a few additional steps beyond installing the package through the Package Manager. We will cover them in detail in this section.
As outlined in the Introducing ML-Agents section, the ML-Agent toolkit consists of three components: the ML-Agents Unity package and three Python packages, called mlagents, mlagents_env, and gym_unity. If you're unfamiliar with Python, don't worry; we'll go step-by-step through how to install the packages here.
Important Note
As gym_unity is a wrapper to interface with OpenAI Gym, which we're not using, we won't be using the gym_unity Python package. For more information on OpenAI Gym, please see https://gym.openai.com.
From the components in the toolkit, we can start to understand how we'll train the Agent. We'll use the ML-Agents package to create a learning Agent in the Unity Editor. This process will be very similar to anything we do in Unity. We'll create a GameObject and write custom components to extend its functionality. Once we have created the Agent and are ready for training, we will then go outside the Unity Editor and run the mlagents package, which will use mlagents_env to talk to our Unity project and train the monster.
But we're getting ahead of ourselves again; before we can do any of that, we need to install the toolkit:
- Install Python 3.6.1 or higher from https://www.python.org/downloads/. The download instructions differ for each platform but are well documented online and can be installed using a traditional installation wizard.
Important Note
The Python installer will also install a tool called pip. We'll use pip to install the Python packages required by ML-Agents.
- Run pip3 install mlagents from the command line:

Figure 10.3 – Installing the mlagents Python package
This command will install the mlagents Python package, which is the package we will use to train our Agent. As you can see from Figure 10.3, this will also install any dependencies that mlagents requires, including the mlagents_env package.
- To test that the installation was successful, run mlagents-learn --help:
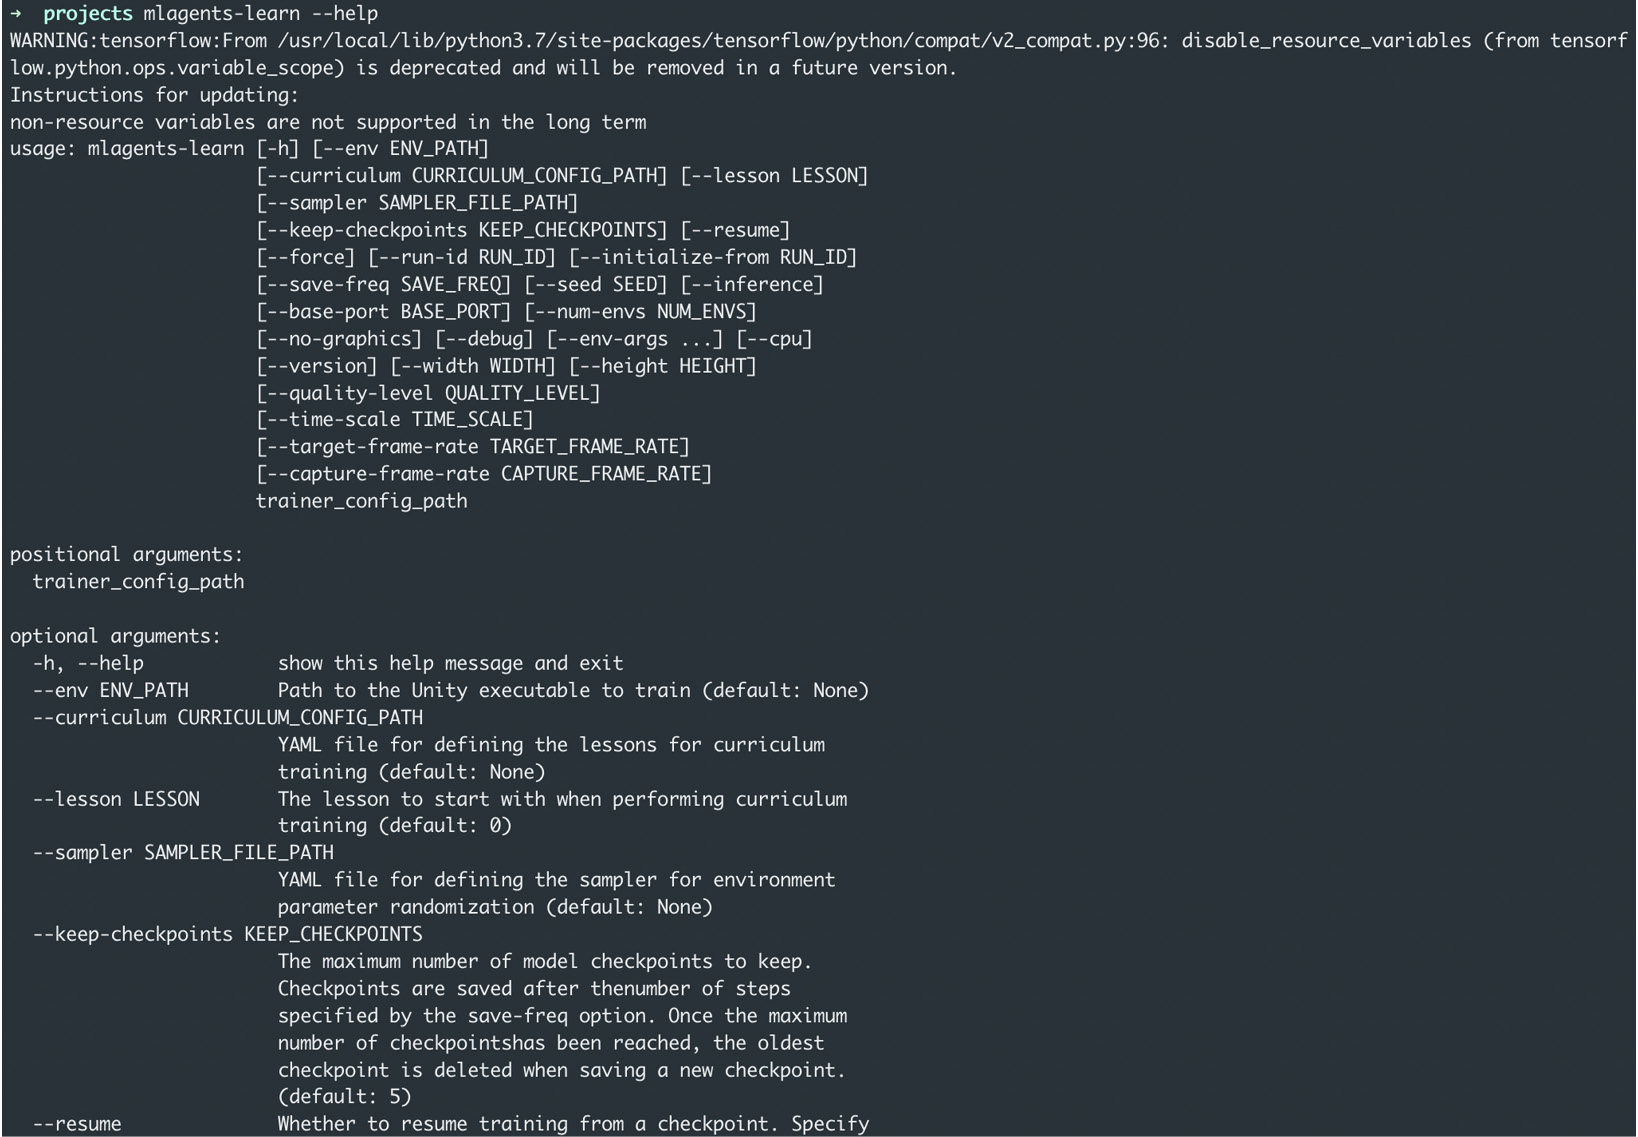
Figure 10.4 – Displaying the available parameters for the mlagents-learn command
This command will print the parameters we can use with the mlagents-learn command. Don't worry if the number of options feels overwhelming. In reality, we'll only need the one command, and we'll go through that in detail later in the chapter.
- In Unity, install the ML-Agents package using the Package Manager. Detailed information on the Package Manager can be found in Chapter 1, Unity Fundamentals.
Important Note
If ML-Agents is not in the package list, follow the instructions at https://github.com/Unity-Technologies/ml-agents/blob/master/docs/Installation.md to add it to the list of available packages.
And that's it for the setup; we've seen what we want to achieve and imported all the assets we need to reach that goal. Next, we will create an environment where the learning will take place.
Creating the environment
Before we dive into the world of ML, we need to create an environment to house the monster. In previous chapters, we created a level with trees, shrubs, and rocks. We'll use some of that here but will simplify it so that we can focus on training the Agent and not have to worry about level design:
- Duplicate the Demo scene in the Assets/Scenes folder.
- Rename the new scene ML Demo:

Figure 10.5 – The ML Demo scene in the Project panel
- Open the new scene by double-clicking on it.
- In the Hierarchy panel, delete Terrain_Objects, Toon_chick, Destination, and all of the ground objects apart from Ground_01. The Hierarchy should look the same as in Figure 10.6:

Figure 10.6 – The ML Demo scene in the Hierarchy panel
- Select Ground_01 and set its scale to 2, 2, 2.
- Select the Ground object (the parent of Ground_01) and assign it to the Ignore Raycast layer. In the popup, select Yes, change children:

Figure 10.7 – The Change Layer options
This will also set all child objects to the same layer:
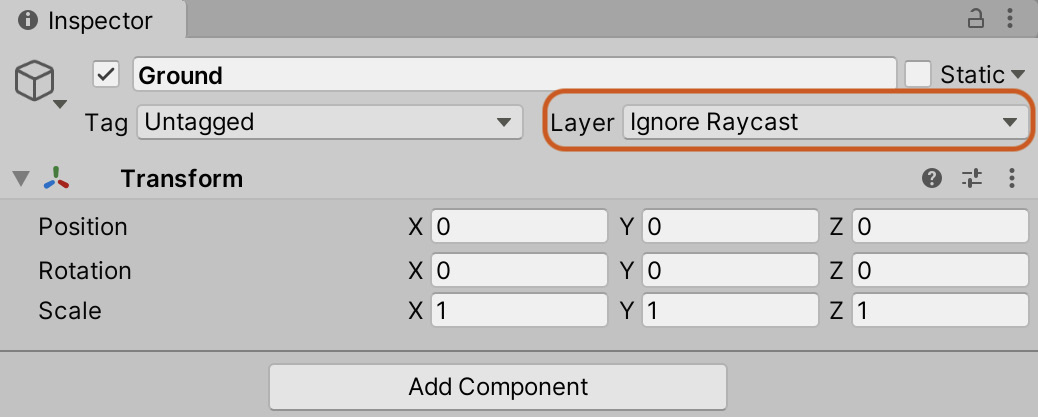
Figure 10.8 – The Ignore Raycast layer set for the Ground object and its children
- Create four new objects and add a Box Collider to each of them by selecting Component | Physics | Box Collider from the Application menu. These will become the wall of the level to keep the Agent within bounds.
- Adjust the scale of these objects to surround the ground object:

Figure 10.9 – The environment's walls
- Create and assign the Wall tag to each wall object. Creating tags is explained in Chapter 2, Creating a Collection Game.
- Drag the Boximon Fiery prefab to the scene. Located in the Assets/Meshtint Free Boximon Fiery Mega Toon Series/Prefabs folder, this prefab will be the learning Agent.
- Rename the object Agent and position it at point 0, 2, 0.
- Add Rigidbody and Box Collider components and configure them, as shown in Figure 10.10:

Figure 10.10 – Agent components
With the environment ready, the next step is to create the logic that will spawn the chick and rock objects before we start working on ML.
Spawning objects
The monster will interact with the environment by colliding with the level's walls, the chick, and the rock objects. When the monster collides with a chick or rock object, that object is removed from the environment, and a new object of the same type is spawned at a random location. We also need functionality to reset the environment by removing all spawned objects and re-adding them. However, before we can implement any of this, we need to create the rock and chick objects, so let's do that now.
Creating the prefabs
In this section, we'll create two prefabs: a chick and a rock. We'll base these prefabs on pre-existing assets and modify them to our needs. When we come to implement the ML algorithm, we will award the monster for eating chicks (sorry, chicks!) and penalize it for colliding with rocks:
- Drag the Toon Chick prefab from the Assets/ Meshtint Free chick Mega Toon Series/ Prefabs folder to the scene.
- Add Rigidbody, Box Collider, and Capsule Collider components. One collider will handle collisions with the environment, and the other will be much larger and will be used by our learning Agent to determine whether the chick can be seen.
- Configure them as shown in Figure 10.11:

Figure 10.11 – The chick's component configuration
- Create a new chick tag and assign it to the Toon Chick object. We'll assign unique tags to the chick and rock prefabs to differentiate them for the ML algorithm. For instance, we can tell the Agent that there is a rock in its sightline or that it just ate a chick.
- Drag the Toon Chick to the Assets/Prefabs folder. Create the folder if it doesn't exist.
- A message will appear asking whether you want to create an original prefab or a variant of this prefab. Select the Prefab Variant option:
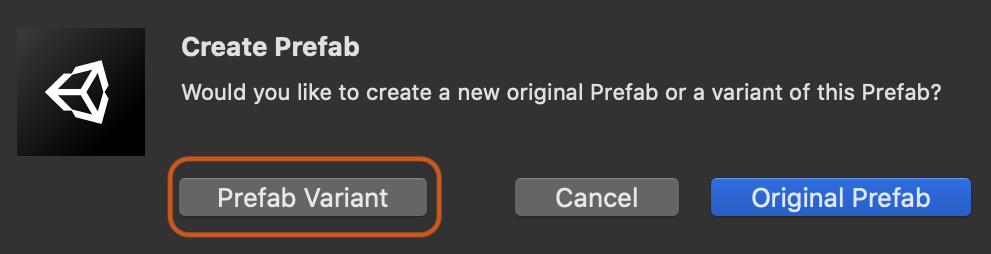
Figure 10.12 – Creating a Prefab Variant
Creating a Prefab Variant is similar to inheriting from a base class. The Prefab Variant is stored as a separate prefab but shares (or inherits) the properties of the original prefab. These properties can be overridden, or the variant extended by adding new components, differentiating it from the original. For the chick prefab, the animator and Mesh Renderer are the same as the original prefab, but we've added additional functionality in this variant with the addition of physics.
Important Note
All the data associated with the prefab is still stored with the original prefab asset. It's only the changes that are stored with the Prefab Variant. If you want to modify a property that should be applied to all the variants of the same prefab, you should modify the original prefab asset.
That's all for the chick object; next, we'll create the rock prefab:
- Drag the Rock_01 prefab from the Assets/NaturePackLite/Prefabs folder to the scene and call it Rock.
- Add Rigidbody and Capsule Collider components to the object.
- Configure the components as shown in Figure 10.13:
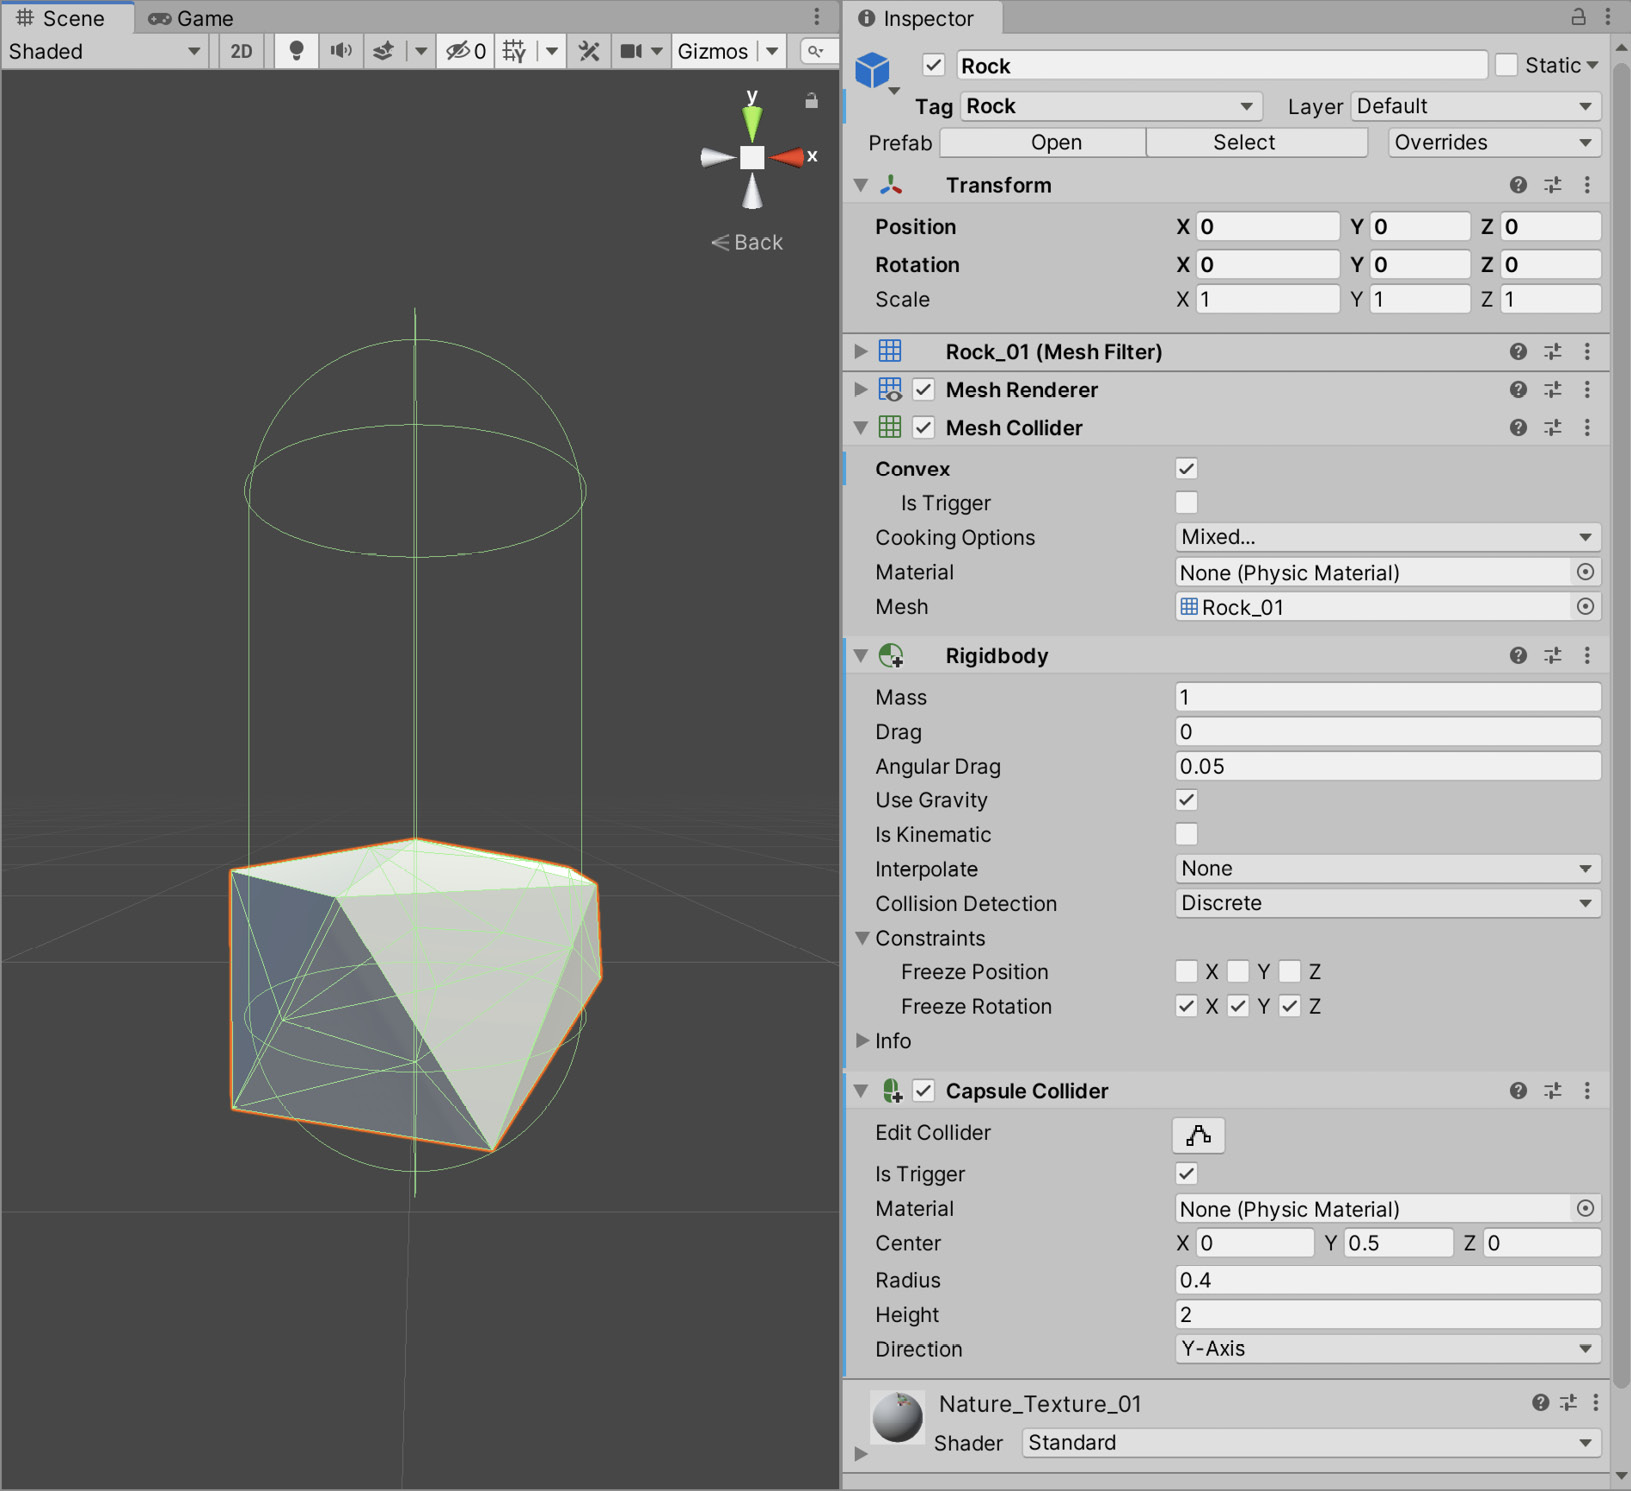
Figure 10.13 – The rock's component configuration
- Create and assign a Rock tag to the object.
- Drag the Rock_01 object to the Prefabs folder and once again select the Prefab Variant option as we're creating a variation of an existing prefab.
Now that we have our prefabs of both the chick and rock, we can write the code that will instantiate and position them in the environment.
Writing the spawn functionality
With the prefabs created, we could place a set number around the environment and attempt to train the Agent. However, in doing so, we would quickly realize that this will not work as we had hoped. The monster would collide with all of the objects in the scene before it learns not to, and as the objects don't re-spawn, the Agent will never learn to avoid the behavior we desire. There would not be enough data to train the Agent. As such, we must have a mechanic in place that spawns any chicks or rocks removed from the game. As we now have the rock and chick prefabs, we can create that functionality:
- Create a new script called ObjectSpawner:
public class ObjectSpawner : MonoBehaviour
{
public int NumOfEachPrefabToSpawn = 6;
public GameObject FoodPrefab;
public GameObject RockPrefab;
private IList<Transform> SpawnLocations = new List<Transform>();
private int CurrentIndex = 0;
void Awake()
{
foreach (Transform Child in transform)
{ SpawnLocations.Add(Child); }
SpawnLocations.Shuffle();
}
}
The following points summarize the code sample:
NumOfEachPrefabToSpawn defines how many of each prefab exists in the game at any one time. Once training has begun, you can tweak this number to see how it affects the speed at which the Agent learns.
A list of possible spawn locations is stored in the SpawnLocations variable . This list is populated in the Awake function by iterating over every child transform of the current GameObject. This list is then shuffled randomly by calling a C# extension that we will write shortly.
- Add a Reset function to the ObjectSpawner script:
public class ObjectSpawner : MonoBehaviour
{
public void Reset()
{
foreach (var SpawnedLoc in SpawnLocations)
{
if (SpawnedLoc.childCount > 0)
{ Destroy(SpawnedLoc.GetChild(0). gameObject); }
}
for (int i = 0; i < NumOfEachPrefabToSpawn; ++i)
{
SpawnFood();
SpawnRock();
}
}
}
The Reset function will be called by our Agent script (which we will write shortly). It removes any currently spawned objects by looping through all possible spawn locations and destroying any children. This works because when we spawn a prefab using the SpawnPrefab function, we add the prefab as a child of the spawn location, as you'll soon see.
- To complete the ObjectSpawner script, add the functions responsible for spawning the prefabs:
public class ObjectSpawner : MonoBehaviour
{
public void SpawnFood()
{
SpawnPrefab(FoodPrefab);
}
public void SpawnRock()
{
SpawnPrefab(RockPrefab);
}
private void SpawnPrefab(GameObject Prefab)
{
Instantiate(Prefab, SpawnLocations[CurrentIndex], false);
CurrentIndex = (CurrentIndex + 1) % SpawnLocations.Count;
}
}
The SpawnRock and SpawnFood functions will be called by our Agent script whenever one of those objects is removed from the game. This process ensures that there is always a set number of each object in the environment.
Important Note
As the SpawnLocations list has been shuffled, we can step through them sequentially, and the objects will still be spawned at a random location. If we didn't shuffle the list, the objects would be spawned in the order that we added locations to the SpawnedLocations list.
Once we've spawned an object, we increment the CurrentIndex by 1, and by using modulus, if we reached the end of the spawn location list, it wraps around to 0. This check ensures that we can continue to spawn objects continuously without hitting an IndexOutOfRange exception.
- In the ObjectSpawner class, we call Shuffle on the SpawnLocations list. This function is not included with the List class by default but is an extension that we need to write. Create a new class called Extensions to store this function:
using System.Collections.Generic;
public static class Extensions
{
public static void Shuffle<T>(this IList<T> ThisList)
{
var Count = ThisList.Count;
var Last = Count - 1;
for (var i = 0; i < Last; ++i)
{
var RandomIndex = UnityEngine.Random.Range(i, Count);
var Temp = ThisList[i];
ThisList[i] = ThisList[RandomIndex];
ThisList[RandomIndex] = Temp;
}
}
}
C# extension methods provide us with the ability to add functions to existing types without having to create a custom type. This is demonstrated perfectly with the Shuffle function. I could have created my own list class that implements the IList interface and add the Shuffle function that way, but instead, I can write an extension method that adds the functionality I require.
Important Note
An extension method is static but is called on an instance of an object.
The Shuffle function re-orders the elements in the list in a random manner. There are many resources written on the subject of random sorting, but for our purposes, this basic algorithm is all we need.
Important Note
Extensions are part of the C# language and are not specific to Unity.
With the script complete, we can add it to our scene:
- Back in the Unity Editor, create a new GameObject called Object Spawner and attach the ObjectSpawner script.
- Assign the previously created prefabs to the Food Prefab and Rock Prefab fields in the Inspector:

Figure 10.14 – Assigning prefabs to the Object Spawner component
- Create several empty objects and position them around the level, as shown in Figure 10.15. Make sure they are child objects of ObjectSpawner:
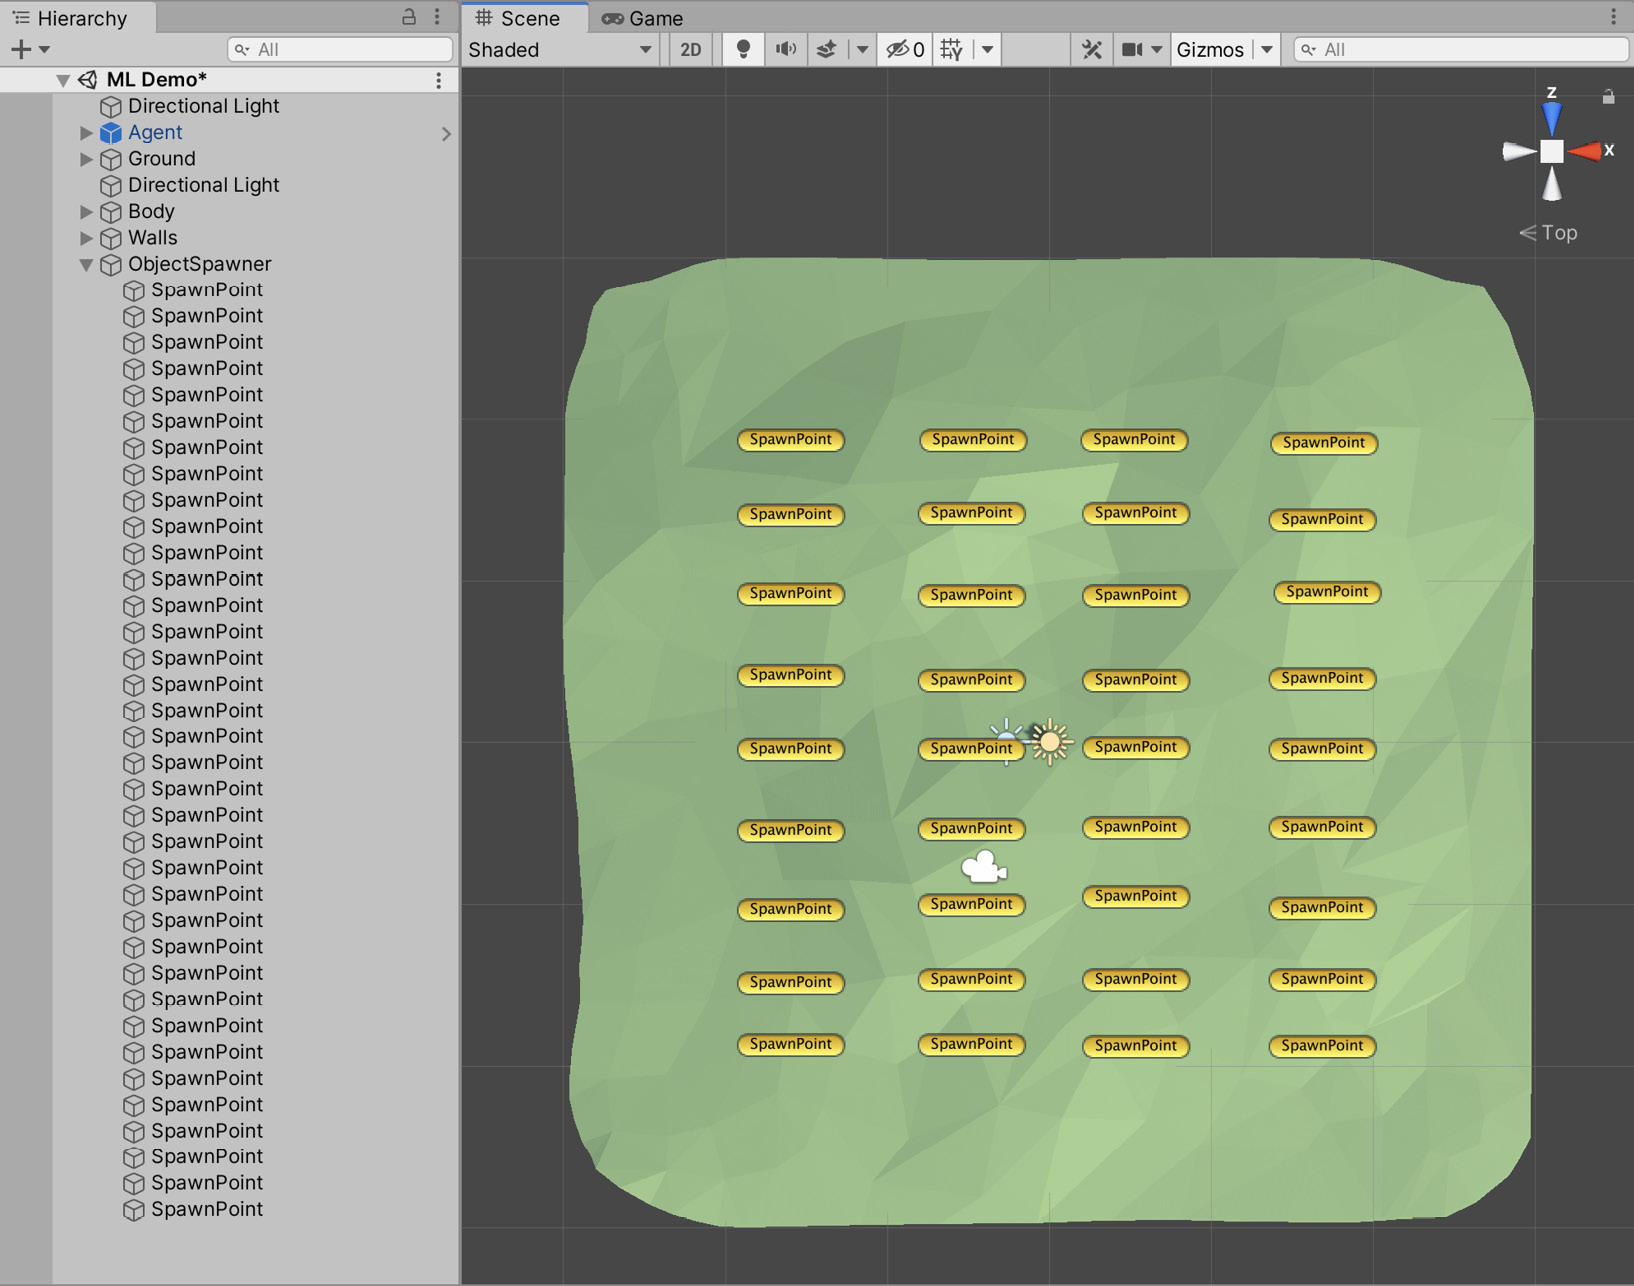
Figure 10.15 – Possible spawn locations
The ObjectSpawner script stores a list of Transform components. This list is populated by iterating over every child object of the ObjectSpawner parent object and storing their Transform components. Specifying every possible spawn location using GameObjects instead of spawning them at a random position provides greater control over where the objects can spawn, at the cost of the additional time required to create the spawn locations.
Tip
I've enabled the Icon option for the spawn points to make them visible to aid in positioning them in the environment. Instructions on how to do this can be found in Chapter 6, Continuing the 2D Adventure.
Having functionality to spawn objects continuously is vital for our learning Agent. The Agent will move around the environment and occasionally collide with the rocks and food we've spawned in the environment. These collisions will be random at first, but over time, as the Agent learns, they will move purposefully toward the chicks and avoid the rocks. When they do collide, the chick or rock object will be destroyed, and using the spawning functionality we wrote in this section, a new object of the same type will be added to the simulation. This consistent environment will help us control the learning process. However, we still want it to be dynamic, which is why we spawn the objects at (semi) random locations to ensure that the Agent is learning to avoid the objects and not, for example, specific parts of the map. Anyway, we're getting ahead of ourselves. We still are yet to create the learning Agent, so let's do that now.
Creating the Agent
The monster will be a learning Agent. Over time, it will get better at moving around the environment, avoiding rocks, and seeking out food. We've laid the groundwork to make this possible. It is now time to create and configure the Agent. Creating a learning Agent involves three steps:
- Configure behavior parameters: These parameters define what the output of the neural network will look like, among other things.
- Configure the input into the neural network: This is a crucial step. The input of the network can make a huge difference in how quickly our Agent will learn, and even what our Agent will learn.
- Write a script that will handle the output of the neural network: This step converts the output from the network into the Agent's movement.
We'll start by configuring the behavior parameters as the other two steps require this.
Configuring the Agent's behavior
Every learning Agent requires a Behavior Parameters component. This component defines, among other things, the size of the input and output of the learning algorithm.
We'll add one to the Agent object:
- Select the Agent object in the Hierarchy.
- Add the Behavior Parameters script, which is provided with the ML-Agents package. This script provides an interface to configure the neural network and to use a previously trained model (more on that later in the chapter).
- In the Inspector, set Behavior Name to Monster. This will be the name of the generated Agent model. More on this in the Training the Agent section.
- Under the Vector Observation heading, set Space Size to 0. The vector observation space is a collection of floating-point numbers that tell the Agent everything it needs to know about the world to make a decision. We've set this to 0 because we won't be providing any data manually. We will shortly be adding a perception component that automatically provides the data it gathers to the neural network.
- Under the Vector Action heading, set Space Type to Discrete (if not set already), Branches Size to 2, Branch 0 Size to 3, and Branch 1 Size to 3. The vector action space is the output of the learning algorithm. We'll use this output to move the Agent around the environment. There are two types: Discrete and Continuous. Discrete (the one we've selected) will return an array of integers. Branches Size defines the number of values it returns, and the individual branch sizes define the range of the integers. For example, our learning algorithm will return two values (Branch Size of 2), and both values will have three possible values in the range of 0 to 2 (as we set Branch 0 Size and Branch 1 Size to 3). Continuous returns an array of floating-point numbers.
- Ensure that Use Child Sensors is enabled. When enabled, the Agent will use any attached sensor components, which is exactly what we need, as you'll see shortly.
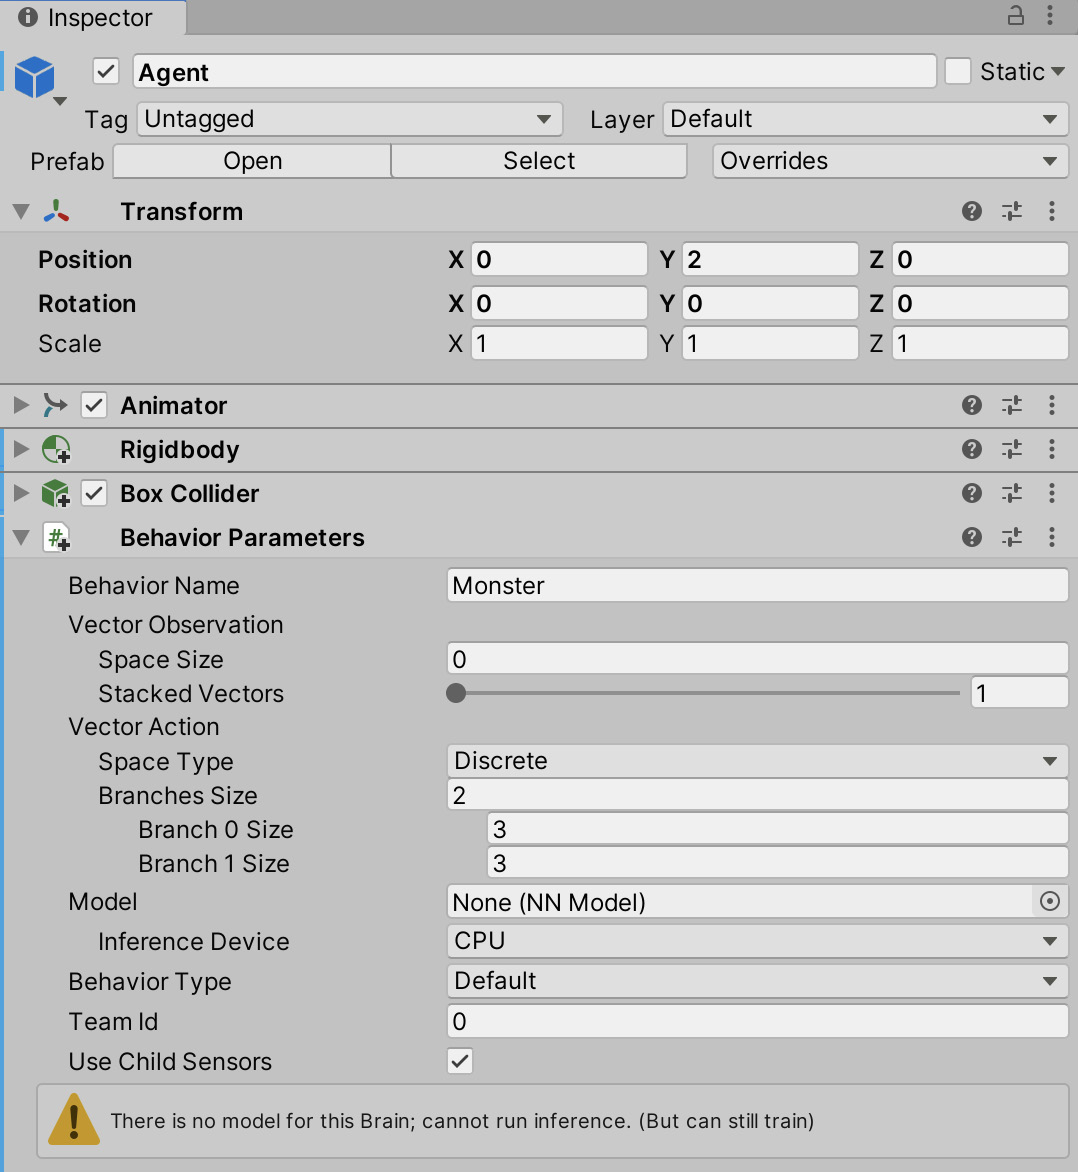
Figure 10.16 – The Agent's behavior parameters
You may have noticed the warning at the bottom of the component, stating that we cannot run inference as there is no model, but we can still train. This warning is alluding to the fact that we have not provided a model (as you can see in Figure 10.16, the Model field is set to None), so we will be unable to run inference. Inference is where our Agent can "infer" things about the environment using data from a pre-trained model. As we don't yet have a pre-trained model, this can be safely ignored. Later, in the Embedding the model section, we'll step through how to run inference.
Important Note
Unity uses a cross-platform inference library, which they have codenamed Barracuda. More information on this library can be found at https://docs.unity3d.com/Packages/[email protected]/manual/index.html.
The behavior type can be changed using the Behavior Type field. There are three choices: Default, Heuristic Only, and Inference Only. Default (which is what we've selected) will train the Agent if we connect the Python trainer or will attempt to perform inference using a pre-trained model. The Heuristic option will cause the Agent to use a heuristic function, which is beyond the scope of this chapter. The Inference Only option means the Agent will only ever perform inference use a pre-trained model. This last option would be the one to select when we want to release a game using a model that we've previously trained, and we no longer want that model to evolve.
As was alluded to earlier, the Use Child Sensors option is important. At the moment, by setting the observation space to 0, we have told the learning algorithm that we won't provide any input. However, without input, our Agent won't be able to make choices based on its environment. For example, it won't know that there's a chick within reach or that it's about to collide with a rock. ML-Agents provides several special sensor components that will automatically provide data on an Agent's environment. We'll configure one of those sensors next.
Defining the network's input
Defining the correct input into our Agent's neural network is crucial if we want the monster to learn from its environment. For example, we shouldn't expect the monster to evolve chick-seeking behavior if it is never told where the chicks are. We know that we want the Agent to avoid walls and rocks while eating chicks. Therefore, at a minimum, we need to tell the Agent's neural network where these objects are in relation to our Agent. To do this, we'll use a component provided with the ML-Agents package:
- Add the Ray Perception Sensor 3D component to the Agent object. This component will use raycasts to observe the environment:
Important Note
More information on raycasts can be found in Chapter 8, Continuing with Intelligent Enemies.
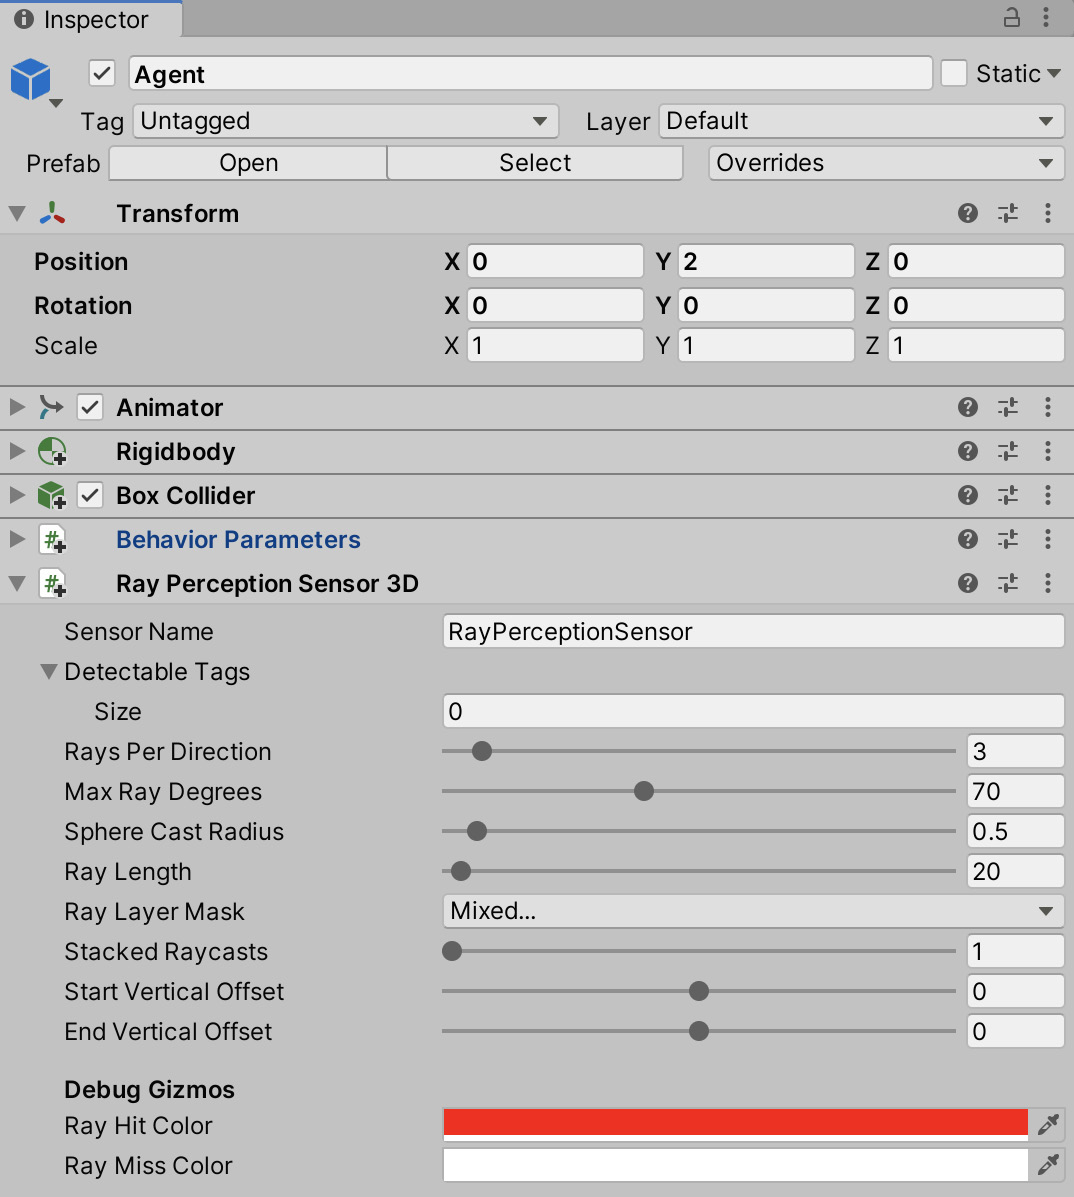
Figure 10.17 – Adding Ray Perception Sensor 3D to the Agent object
- Set Detectable Tags Size to 3 and the Rock, Chick, and Wall tags as elements 0, 1, and 2, respectively, as shown in Figure 10.18:

Figure 10.18 – Setting detectable tags
These tags define the objects we want to observe. Any objects with tags not on this list will be ignored.
- Set Rays Per Direction to 8 and Ray Length to 15. Be warned that Ray Per Direction is not the maximum number of rays. In fact, setting 8 here will result in a total of 17 rays being cast: 8 on the left, 8 on the right, and 1 center ray.
- Set Start Vertical Offset and End Vertical Offset to 0.5.
These settings add a vertical offset to the start and end position of the ray. By setting 0.5 here, we have raised the rays to around the monster's mouth level, as shown in Figure 10.19, so they collide with any objects that are on a slight hill:

Figure 10.19 – The monster's raycasts
These settings are shown in Figure 10.20:

Figure 10.20 – The Ray Perception Sensor 3D settings
The learning algorithm will be informed if any of the rays hit an object and what the object type is. This information will be numerical only. For example, in our level, the Agent has 17 rays, and we're interested in 3 tags. The input into the neural network will consist of an array of 17 numbers. Each number will have a range of 4, where one number represents no object hit, and the other three will represent an object with a specific tag hit.
Now that we've configured the behavior parameters and the input component, it's time to bring it all together and write the script that will respond to the output from the neural network and assign rewards based on the monster's behavior in that step.
Writing the Agent script
Every learning Agent requires an Agent script. This script will receive the output from the neural network and assign rewards for good behavior (positive reward) and bad behavior (negative reward). We'll add custom behavior by creating a script that inherits from Agent:
- Create a new script called MonsterAgent:
using UnityEngine;
using Unity.MLAgents;
public class MonsterAgent : Agent
{
}
Inheriting from the Agent class provides many useful helper functions. It is required for every learning Agent (although you may be able to get away with using the Agent class directly for very simple examples).
- Next, add the variables we need, as shown:
public class MonsterAgent : Agent
{
public float MoveSpeed = 1.0f;
public float TurnSpeed = 90.0f;
public float MaxVelocity = 10.0f;
private Rigidbody ThisRigidbody;
private ObjectSpawner SceneObjectSpawner;
void Awake()
{
ThisRigidbody = GetComponent<Rigidbody>();
SceneObjectSpawner = FindObjectOfType<ObjectSpawner>();
}
}
The following points summarize the code sample:
MoveSpeed, TurnSpeed, and MaxVelocity will be used shortly to move the Agent.
We store a reference to the Rigidbody component so that we can move the object based on the output from the neural network.
A reference to the ObjectSpawner class we wrote earlier in the chapter is stored so that we can reset the spawned items at the beginning of an episode.
- The Agent class provides an OnActionReceived function that we need to override:
public class MonsterAgent : Agent
{
…
public override void OnActionReceived(float[] VectorAction)
{
var MovementAction = (int)VectorAction[0];
var RotationAction = (int)VectorAction[1];
var MovementDir = Vector3.zero;
if (MovementAction == 1) {
MovementDir = transform.forward; } else if (MovementAction == 2) {
MovementDir = -transform.forward; }
var RotationDir = Vector3.zero; if (RotationAction == 1) {
RotationDir = -transform.up; }
else if (RotationAction == 2) {
RotationDir = transform.up; }
ApplyMovement(MovementDir, RotationDir);
}
}
The following points summarize the code sample:
OnActionReceived is called every time the Agent receives an action. The contents of VectorAction differ depending on whether the vector action space is Continuous or Discrete. In the Defining the network's input section, we defined our vector action space to be Discrete, have a size of 2, and each index to have a maximum value of 2.
We define the first index of the action space as MovementAction and the second index as RotationAction. This selection is entirely arbitrary. We could swap them around if we want, and the learning algorithm will adapt.
The values of MovementAction and RotationAction can be 0, 1, or 2 (as defined on the Behavior Parameters component). Consequently, we have three possible actions we can perform for both movement and rotation.
If MovementAction equals 1, we apply a forward force, moving the character forward. If MovementAction is 2, we add a backward force. If MovementAction is 0, no movement force is applied to the character.
It's a similar situation for RotationAction. When it is equal to 1, the character is rotated left, and if it is equal to 2, the character is rotated right. If RotationAction equals 0, no rotation is applied to this step.
- To apply the movement and rotational force, add an ApplyMovement function:
public class MonsterAgent : Agent
{
…
private void ApplyMovement(Vector3 MovementDir, Vector3 RotationDir)
{
ThisRigidbody.AddForce(MovementDir * MoveSpeed, ForceMode.VelocityChange);
transform.Rotate(RotationDir, Time. fixedDeltaTime * TurnSpeed);
if (ThisRigidbody.velocity.sqrMagnitude > MaxVelocity) {
ThisRigidbody.velocity *= 0.95f;
}
}
There's nothing new in this function. We use the provided MovementDir and RotationDir options to move and rotate the Agent. The maximum velocity of the Agent is clamped if it is greater than MaxVelocity.
Important Note
One thing worth noting is that the ML algorithm updates in time with FixedUpdate, rather than Update, so any movement we apply using the OnActionReceived function should use fixedDeltaTime.
- The training process is split into a number of episodes. Each episode ends when a specific condition is met, or a maximum number of simulation steps is reached. A simulation step is one pass through the learning algorithm. At the beginning of an episode, we want to reset the state of the simulation. Lucky for us, this is achieved easily by implementing the OnEpisodeBegin() function:
public class MonsterAgent : Agent
{
…
public override void OnEpisodeBegin()
{
SceneObjectSpawner.Reset();
ThisRigidbody.velocity = Vector3.zero;
transform.position = new Vector3(0, 2, 0);
transform.rotation = Quaternion.Euler(Vector3. zero);
}
}
At the start of each episode, the OnEpisodeBegin function is invoked. We use this function to reset the environment back to its initial state so that the learning can begin anew. To reset the state, we call the Reset function on the ObjectSpawner class, which destroys and re-adds the pre-determined number of chick and rock objects. We also stop the Agent's movement and reset its position and rotation. This function will be called automatically as we train our Agent.
The MonsterAgent script is almost complete. We've written the functionality to interpret the output of the learning Agent; we move the Agent based on that interpretation and reset the environment at the beginning of each episode. The last piece of functionality we need is to assign a reward. You may remember, from the Introducing ML-Agents section earlier in the chapter, that assigning a reward informs the learning algorithm when the Agent has done something we approve of, or if it is doing something we would rather it didn't. In our simulation, we will assign a positive reward for colliding with a chick, and a negative reward for colliding with rocks and walls.
- Add an OnCollisionEnter function to the MonsterAgent script:
public class MonsterAgent : Agent
{
…
void OnCollisionEnter(Collision OtherCollision)
{
if (OtherCollision.gameObject. CompareTag("chick"))
{
Destroy(OtherCollision.gameObject);
SceneObjectSpawner.SpawnFood();
AddReward(2f);
}
else if (OtherCollision.gameObject. CompareTag("Rock"))
{
Destroy(OtherCollision.gameObject);
SceneObjectSpawner.SpawnRock();
AddReward(-1f);
}
else if (OtherCollision.gameObject. CompareTag("Wall"))
{
AddReward(-1f);
}
}
}
The OnCollisionEnter function handles collisions with three objects: the chick, rock, and wall. Based on which object it collides with, it will add a positive or negative reward. The reward is a signal that the Agent has done something right (positive number) or something wrong (negative number). The size of the reward can be changed to create drastically different behaviors. For our Agent, we want to ensure that they seek out the chick objects, so we assign a reward value of 2 for every collision. The reward system can be difficult to get right, especially with complex simulations, and often requires trial and error.
As well as assigning rewards, when the Agent collides with a chick or rock object, it removes them from the simulation by calling the Destroy function and also requests that a replacement object is spawned in the scene using the ObjectSpawner class. By always replacing what we remove from the simulation, we ensure that there is a consistent number of good and bad objects in the scene.
- Add our newly created script to the Agent object.
Important Note
You may have noticed in the Inspector that there is a MaxStep field associated with the Monster Agent component that we did not write. This field is provided by the Agent class and inherited by the MonsterAgent class.
- Set Max Step to 5000. This variable controls the maximum number of simulation steps that can occur before the Agent's episode ends. Once this step count is reached, if no other action has ended the episode, the episode will end, and a new one will begin (which will lead to the OnEpisodeBegin function that we wrote earlier being called).
- Add the Decision Requester script to the Agent object, as shown in Figure 10.21:
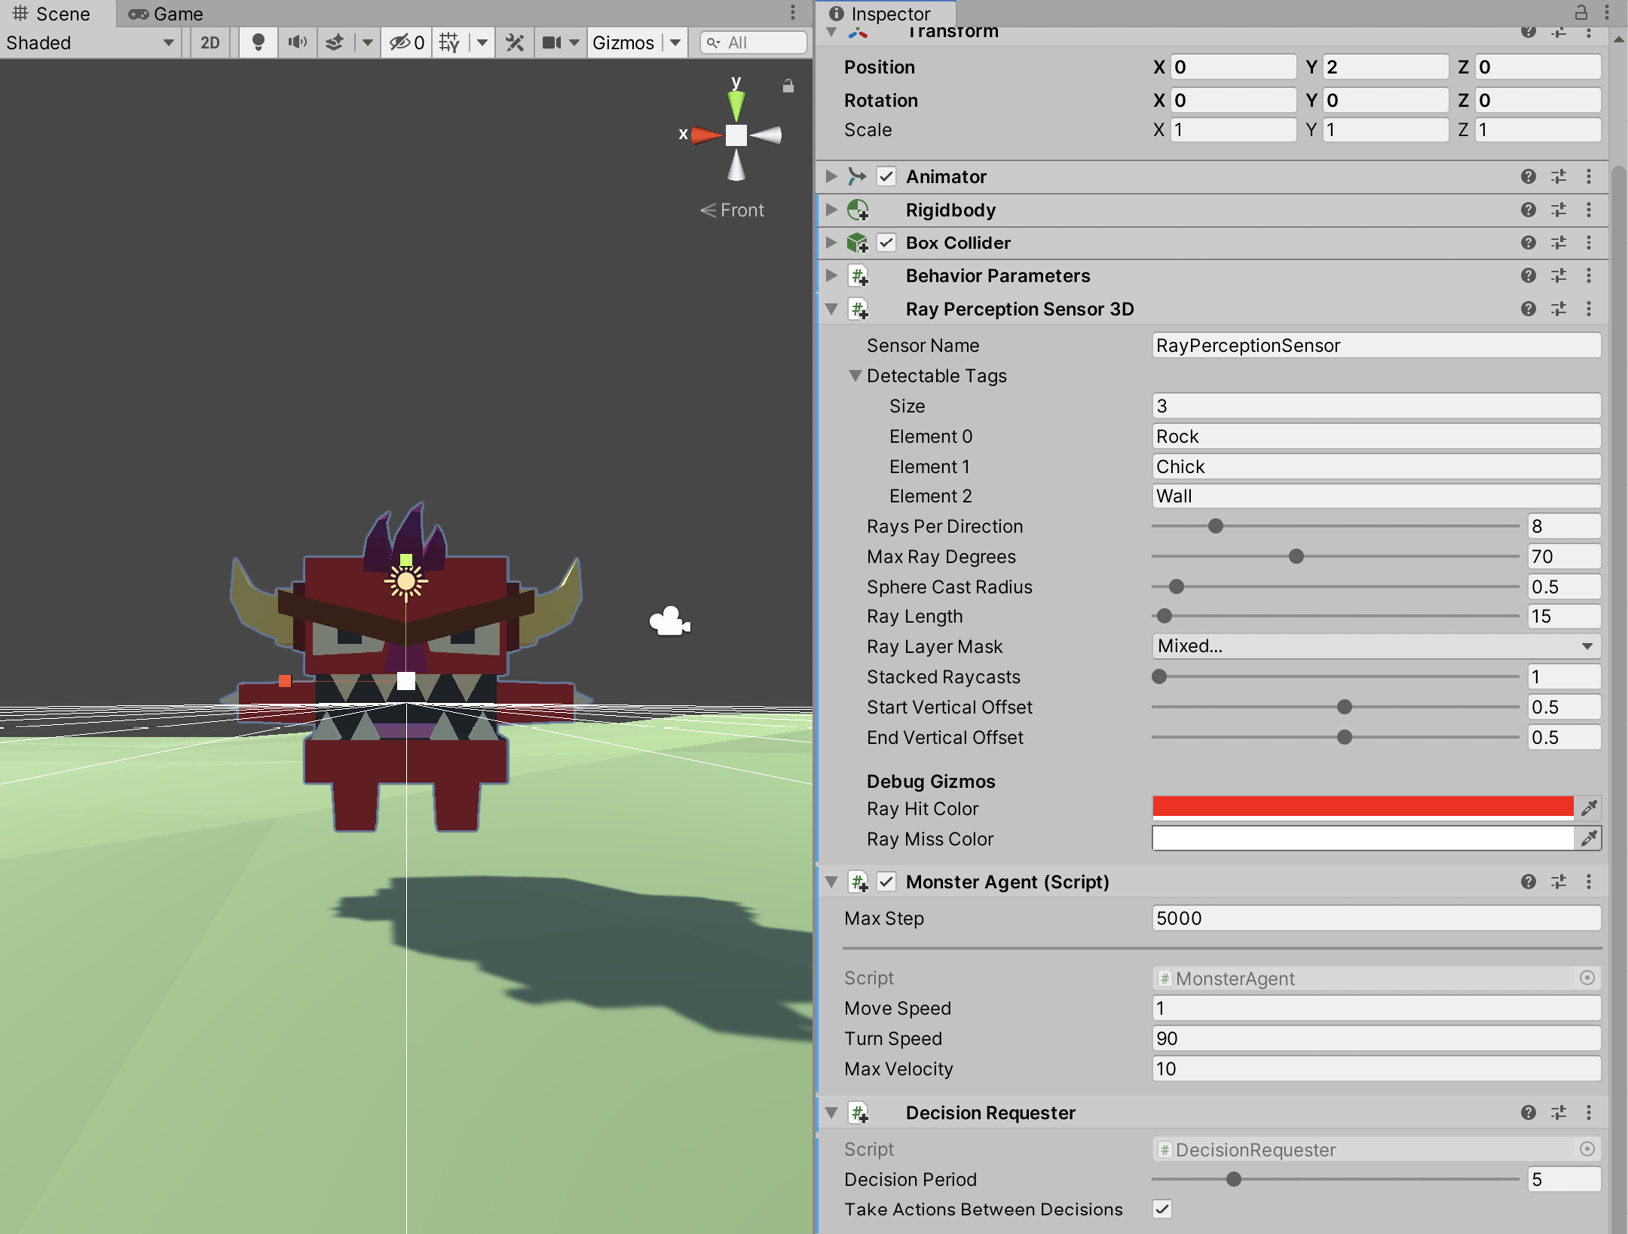
Figure 10.21 – Adding a Decision Requester component
As discussed in the Introducing ML-Agents section, the learning algorithm works on a cycle with the following steps:
- Observation: Our monster records observations of its environment using the Ray Sensor component.
- Decision: Based on the observations, a decision is made and translated into the action vector. This data is captured in the OnActionReceived function in MonsterAgentScript.
- Action: We translate the decision into an action. In the case of our monster, this action involves moving and rotating.
- Reward: Based on the action, we may assign a reward. If the action results in the monster colliding with a chick object, we assign a positive reward.
The Decision Requester component performs the second stage for us. It requests a decision to be made at regular intervals. If we did not use this component, we would have to call the Agent.RequestDecision function manually.
Wow, we've covered a lot in this section. Give yourself a pat on the back for making it this far! You've successfully created an Agent that is capable of learning. You've defined the input into the neural network using a Ray Perception Sensor component. Using this component, the Agent will be able to observe its environment using several raycasts. We've also defined the output of the neural network and wrote the functionality that responds to that output. By applying either a movement or rotational force, the Agent will move around the environment, colliding with objects. With the input and output defined, we then moved on to rewarding the monster for good behavior (and telling it off for bad behavior). By assigning a reward value whenever the monster collides with an object, our training algorithm can calculate how well the monster is doing. You've now created everything the monster needs to start learning.
So far, there hasn't been much action up to this point. There has been a fair amount of setup, and that's important in a project like this. But the good news is, it's time to take our little monster for a spin. We'll use everything we've created up to this point (the environment, the spawning functionality, and the learning agent) and bring it all together to train the Agent.
Training the Agent
The chapter has been building up to this point. You will shortly be able to see your work up to now translate into something tangible—a pre-trained model that can be reused in any of your projects. We've created a suitable environment, populated it with a never-ending supply of opportunities for the monster to do right or wrong (by colliding with the chick or rock, respectively), and configured the learning algorithm's input and how we respond to its output. Now it is time to run the learning process, and this is where the Python packages we installed in the Installing ML-Agents section come in handy (well, essential really; without them, the monster won't be learning anything!). However, before we can run the learning command, we need to create a settings file. This file will store all the settings related to training the Agent and can have a small effect on how our monster learns:
- In your file browser of choice, create a folder called config in the projects root folder.
- Inside that folder, create a new file called monster_config.yaml:

Figure 10.22 – Creating the settings file
- Open the file in your text editor of choice and add these settings:
default:
trainer: ppo
batch_size: 512
beta: 5.0e-3
buffer_size: 10240
epsilon: 0.2
hidden_units: 128
lambd: 0.95
learning_rate: 3.0e-4
learning_rate_schedule: linear
max_steps: 2.0e6
memory_size: 128
normalize: false
num_epoch: 3
num_layers: 2
time_horizon: 64
sequence_length: 64
summary_freq: 10000
use_recurrent: false
vis_encode_type: simple
reward_signals:
extrinsic:
strength: 1.0
gamma: 0.99
These settings can be quite technical in nature and are beyond the scope of this book. If you are interested in knowing what each setting is, you can find more information at https://github.com/Unity-Technologies/ml-agents/blob/master/docs/Training-Configuration-File.md.
Tip
If you would prefer not to type and add the settings manually, you can find the complete settings file in the Chapter10/End/config folder.
- Save and close the file.
Now that we have the settings file, we can start training our Agent:
- Open the command prompt.
- Navigate to the project folder. The command for this will differ depending on the location of the project on your drive. For me, the command would be as follows:
cd projects/Unity-2020-By-Example/Chapter10/End
- Run the command mlagents-learn config/monster_config.yaml --run-id=Monster:
mlagents-learn config/monster_config.yaml --run-id=Monster
mlagents-learn is the command being executed. We pass it the location of the settings file and also run-id. run-id should be unique for each type of Agent. If we wanted to train an Agent with a different type of behavior, we would pass a different run-id here.
When you run the command, you should receive output similar to what is shown in Figure 10.23:
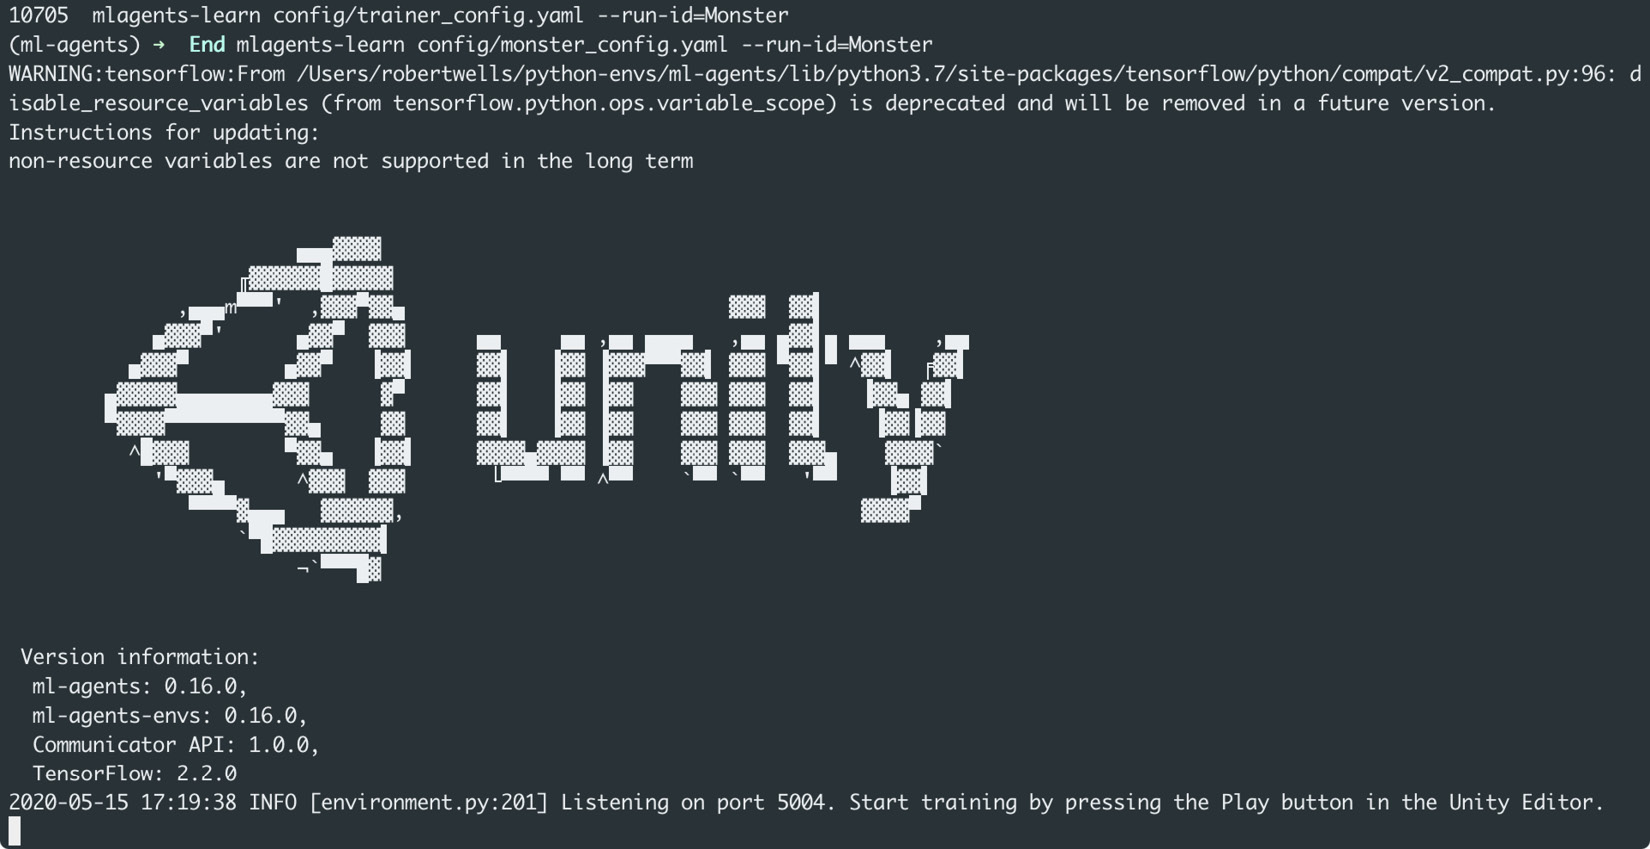
Figure 10.23 – Running the mlagents-learn Python command
- Follow the instructions provided and press the Play button in the Unity Editor.
Tip
If you want more information on what type of parameters mlagents-learn accepts, you can run the mlagents-learn –help command.
Once the game starts, the Agent will run around the environment. And I really mean run, as the Agent will move much quicker than it usually would. The speed increase is normal and decreases the time required for the Agent to learn. When we embed the model and are no longer running training, the Agent will move at a more reasonable speed.
As the monster moves around the environment, the rays it casts will turn from white to red, as shown in the following screenshot. A red ray signifies that it has hit an object with a tag that we are interested in, and a white ray means no object was hit:

Figure 10.24 – The Agent's raycast hitting objects in the environment
The training has now begun. Leave this running for a while and observe the output in the command prompt:

Figure 10.25 – Output showing the training progress
After every 10,000 steps, a summary is printed. As part of the summary, you get the Step count, the total time elapsed in seconds, the mean reward, and the standard deviation (Std) of the reward. As the training progresses, you want to make sure that the mean reward is trending upward. There may be an occasional dip between summaries, but a mean reward that is increasing over time shows that your Agent is learning. For example, in Figure 10.25, you can see that the monster starts with a mean reward of -17.667. A negative number tells us that the monster has performed more negative actions (colliding with a wall or rock) than positive actions (colliding with the chicks). You will notice that this number increases relatively quickly to reach 9.6; the monster now performs more positive than negative actions. Our little guy is learning!
Tip
The summary frequency can be configured in the monster_config.yaml file by altering the summary_freq field.
Every 50,000 steps, you'll see the output Saved Model. This file is the model the monster will use to run inference in the following Embedding the Model section.
- After sufficient time has passed, stop the game from running by once again pressing the Play button.
I find that around 1 hour is enough time to provide good results (a mean reward of nearly 100). When you do this, you'll see the following output in your command console:
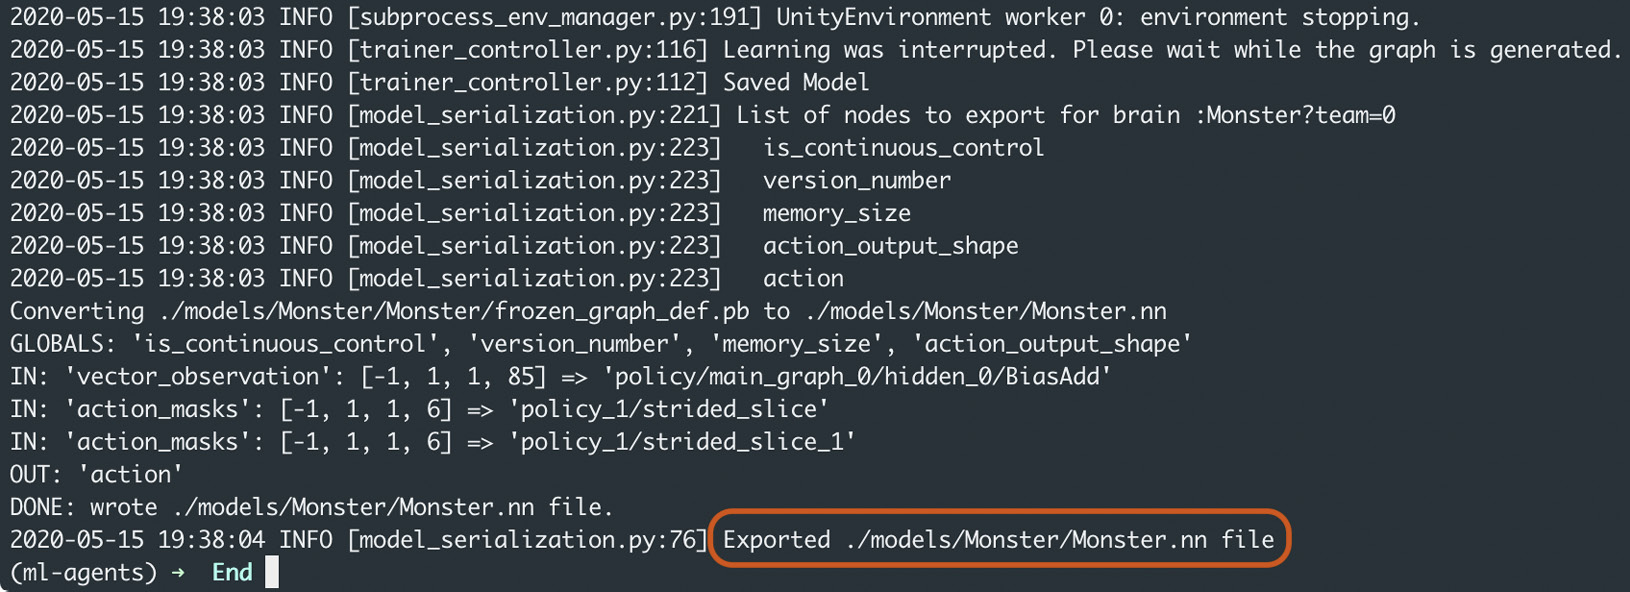
Figure 10.26 – The path to the trained model file
The path shown in the output is the path to the model file that represents the trained neural network for our monster. In the next section, we'll take advantage of the trained model. By embedding it in our Agent, we can take advantage of the trained network and have a functional AI that performs its role admirably without the need for hardcoding any behavior.
Embedding the model
In the last section, the neural network controlling the monster evolved to get better at navigating the environment and eating food. When we stopped the training, a .nn file was created. This file represents the trained neural network for the monster. We do not need to re-train the Agent; we can instead use this model to achieve the behavior we expect. We could even provide this model to any number of Agents (as long as they have the same configuration as our monster), and these new Agents would happily move around the environment, avoiding walls and rocks while chasing chicks. But that's getting ahead of ourselves. Let's first use the model with the original monster:
Locate the Monster.nn model exported in the previous section. As you can see from Figure 10.26, the path to my model is located in the <project root>/models/Monster folder.
- Drag this file into the Project panel in Unity to the Assets/Models folder (create the folder if it doesn't exist). Dragging the model into Unity imports it as an asset and creates a corresponding metafile. For more information on importing assets and metafiles, refer to Chapter 1, Unity Fundamentals:

Figure 10.27 – Importing the trained model
- Select Agent in the Hierarchy.
- Drag the Monster model to the Model field on the Behavior Parameters field in the Inspector:

Figure 10.28 – Embedding the trained model
The model we trained has now been embedded. You'll notice that the warning shown in Figure 10.16 is now gone. As we've selected the default behavior type, our Agent can now operate in two modes: the training mode, where we run the mlagents-learn command, or the inference mode, where it uses an already-trained model.
- Press the Play button to test the model. The Agent will move around at a more suitable speed (the game is no longer sped up as we are not training the Agent). Using the neural network from the model, it will infer what action to take at any time. It will actively seek out the chicks and avoid the walls and rocks:
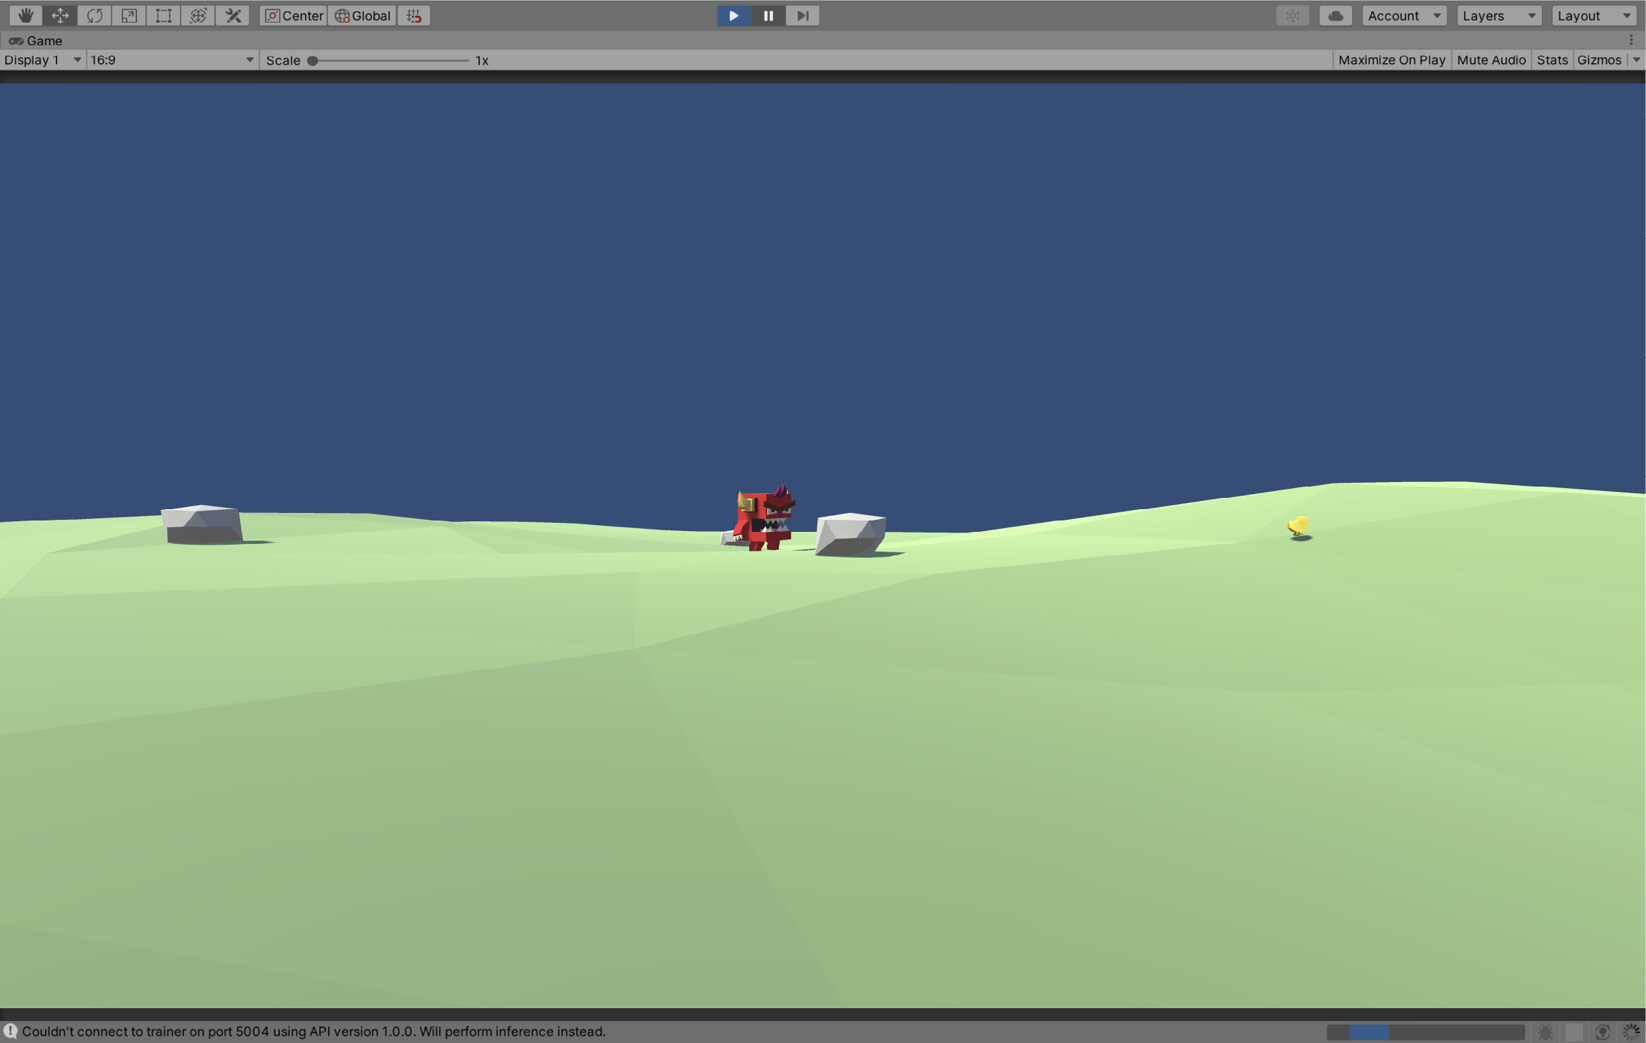
Figure 10.29 – The monster inferring behavior using the trained model
The Agent's ability at this point is down to how well the neural network has been trained.
Important Note
The monster is not being trained while running inference. If it is not performing adequately, you can redo the steps in the Training the Agent section.
And that's it! You've successfully trained an Agent and embedded that trained model so that it can be used by NPCs within your game. This model can be reused by any agent that has the same number of vector observations and actions. Feel free to play around with this. For example, what would happen if you duplicated the Monster object and assigned the same model to both of them? Or how about trying to introduce the monster to the FSM project completed in the previous chapter? Have the monster chase the chick, which in turn chases you. The opportunities are (almost) limitless.
Summary
By completing this chapter, you will have gained a good understanding of how to use the ML-Agents toolkit to create intelligent Agents to use in your games. We have created a monster that learns over time how to accomplish a task we set. The Agent will observe its environment using its ray sensors, and if it sees a chick, it will actively seek them out while avoiding any walls or rocks in its path. It does all of this without us ever having to write code that explicitly tells it what to do.
By adapting the input and rewards applied to the Agent, you can create drastically different AI. Want an Agent to race around a track instead? Add a reward for progressing around the track, while keeping the negative reward for hitting walls. How about making the monster shoots chicks instead of eating them? Give the little guy a gun and reward him for each projectile that hits its target. While I'm oversimplifying here – there will undoubtedly be a lot of tweaks and trial and error involved – hopefully, you can see the benefits of using ML-Agents in your own projects; and with Unity making ML so accessible to a wider audience, we will start to see even more novel uses in the future.
In this book, we have now seen two distinct methods of imbuing our game with AI characters: the FSM we started in Chapter 7, Creating Artificial Intelligence and ML-Agents. Both approaches have their pros and cons, and it is up to you to decide which (if any) approach is suitable for your project. In the next chapter, we will move away from AI and enter the world of virtual reality (VR). We'll look at how to set up VR, configuring input and creating a realistic environment complete with light probes.
Test your knowledge
Q1. The ML-Agents toolkit includes packages written in which language?
A. Rust
B. JavaScript
C. Python
D. Ruby
Q2. Each step of the learning algorithm goes through which cycle?
A. Observation-decision-action-reward
B. Decision-reward-action-observation
C. Observation-action-reward-decision
D. Action-observation-decision-reward
Q3. The command used to train an Agent is…
A. ml-agents –learn
B. mlagents-learn
C. ML-Agents learn
D. mlagents_env-learn
Q4. The name of the input vector into the ML algorithm is…
A. Vector Action
B. Observation List
C. Pre-Action Collection
D. Vector Observation
Q5. The name of the output from the ML algorithm is…
A. Vector Action
B. Post-Observation List
C. Vector Observation
D. Action List
Q6. The name of the function that is called at the beginning of each episode is…
A. ResetState
B. OnEpisodeBegin
C. SimulationStepComplete
D. EpisodeBegin
Q7. You can embed a generated model into a different Agent if…
A. The number of vector observations and actions are the same.
B. The name of the Agent is the same.
C. The agent has the same tag.
D. All of the above.
Further reading
The following resources include more information on the topics discussed in this chapter: