
Once you have named and opened your app, you will get a screen where Qlik Sense asks you to load your data:

The Get started screen
When you have this option before you, you can load data in several different ways. The Add data command to the left will start with a wizard that helps you define what you want to load. In the background, it adds code to a script that defines the load sequence. It will, however, never show the script.
This is different from Data load editor that will take you to a script editor, where you can change the script directly.
The easiest way is to use Add data dialog to the left. This will open the Add data dialog where you can define a data source; either a database table or a file, for instance, an Excel spreadsheet.

The Add data dialog
Use Connections for folders and connections that you have previously used, and use Connect my data if it is a new data source. In this dialog, you can select your database table or browse your way to a file containing a table.
Selecting a file will open a file wizard where you can tweak the details of how the file should be loaded so that you get the data you want, as shown in the following screenshot:
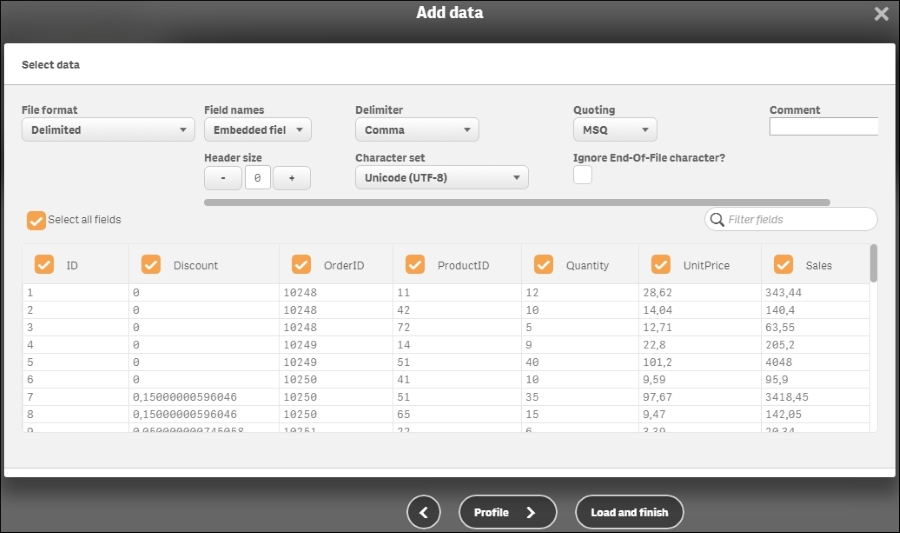
The file wizard
You can specify the file type, whether the file contains empty lines at the top (before the data starts), whether the first line contains the field names or not, and so on. Make sure you get all the settings right before you click on Load and finish. If it is the first table you load, you don't need to use the Profile button. The next section explains where we load additional tables.
Clicking on Load and finish will store your settings and load the data; if everything goes well, you will get a message that the data was loaded successfully. At this stage, you can either start to edit the sheet or close the dialog and perhaps load additional tables.
It is very common that you want to analyze data that is stored in several different tables. For example, you could have four tables: one table for the orders (one row per order), one table for the customers who placed the orders (one row per customer), one table for the order lines (one row per order line), and one table for the products (one row per product).
For such a case, the Orders table will contain a field that specifies the customer that placed the order—a customer ID. In the same way, the Order Lines table will contain a field that points out which order the record belongs to, an order ID, and another field that tells which product the record refers to, a product ID. Such fields are called keys, and Qlik Sense uses these to link the tables and make sense of the data.
This way, all four tables are linked logically, as shown in the following picture:

A simple data model made from four tables
To obtain this data model in your app, you need to repeat the procedure for loading data that we discussed previously for each additional table. You can then open the Add data dialog from one of the menus to the left in the toolbar. This will take you to the familiar file wizard shown in the previous section, where you can define the file properties of the additional table.
Optionally, you can also go through the profiling step, which helps you define the keys. The profiling looks at the field values and compares these with those of the previously loaded fields. When this is done, it suggests which fields to use (or not to use) as links, and renames these fields appropriately so that they become keys in your data model:

The profiling wizard
The next chapter will explain more in detail about data modeling and what you should think about when loading several tables.
On the screen where Qlik Sense asked you to load your data, there was a second option, Data load editor. Clicking on this option will open a new tab with a script editor, as shown in the following screenshot:

The Qlik Sense Data load editor
This editor is very similar to the QlikView script editor. It allows you to make very complex data transformations and basically load and transform any table. However, as with all powerful tools, it is also easy to make mistakes. Use it with caution.
When you define your data using the Add data command, the data load sequence will be stored in the load script as one or several Load statements. This means, these can be edited in Data load editor under the Auto-generated section, if you want to tweak them after they have been created. The section must, however, first be unlocked:

You can also create your script from scratch using Data load editor. If so, you must first create your data connections. These can be file folders, connections to regular databases, or connections to other data sources using other connectors.
This is how you do it: open the Data load editor from the initial dialog or the menu in the toolbar:

The Data load editor command
Now, you will have Data load editor open. To the right, you have the Data connections panel. If you click on the Create new connection button, you will open a menu, where you can choose the connection type and then specify the properties of the connection in the subsequent dialog:

Adding a data connection
If you want to create a database connection using Open Database Connectivity (ODBC), you should choose ODBC. This opens the ODBC connection dialog, where you can choose the data source to be used:

The ODBC connections dialog
The data sources that you see are the ones defined in the Windows operating system. This means if you do the development on a server, the list is limited to those defined by the server administrator.
Once you have created these connections, you will have them displayed in a list of data connections, as shown in the following screenshot:

The list of data connections
Database connections, for example, the ODBC connection in the preceding screenshot, have three icons. The left one creates a Connect statement, the middle one creates a Select statement, and the right one edits the connection itself. Folder connections only have two icons. The left one creates a Load statement and the right one edits the connection itself.
Hence, to create a Load statement, you should click on the left icon for a folder connection and find the file that contains the table. This way, you can create a script in very much the same way as you would in QlikView, if you are familiar with it.
When you have created the script, you need to run it to load the data. This is done by clicking on the Load data button in the toolbar of Data load editor.
As you have seen, Qlik Sense can, in addition to loading data from files, connect to databases using the ODBC and OLEDB interfaces. To see which databases you can connect to, you need to open Data load editor and click on Create new connection.
When you select OLEDB and then Select provider, you will see a list of the installed OLEDB providers. If your database isn't listed, you need to install the appropriate software from your database provider.
If you choose ODBC, you will see the defined data sources. However, you may still have drivers installed for which there are no data sources defined. To find out whether this is the case, you must open ODBC Administrator in Windows and look in the Drivers tab (as shown in the following picture). If your database isn't listed, you need to install the appropriate software from your database provider:

The Windows ODBC Administrator
Once the ODBC driver is installed, you need to define a data source. We recommend that you do this on the System DSN tab in ODBC Administrator. When this is done, the data source will appear in the Qlik Sense ODBC dialog.
You can also use custom connectors with Qlik Sense, such as the Salesforce connector (as shown in the next picture) that you can download from the Qlik download page. These should be put in C:Program FilesCommon FilesQlikCustom Data. They will then appear in your list of connectors:

The list of connectors, including two custom connectors