
Rancher is a relatively new player, at the time of writing this book, it has only just hit its 1.0 release. Rancher Labs (the developers) describe Rancher (the platform) as:
"An open source software platform that implements a purpose-built infrastructure for running containers in production. Docker containers, as an increasingly popular application workload, create new requirements in infrastructure services such as networking, storage, load balancer, security, service discovery, and resource management.
Rancher takes in raw computing resources from any public or private cloud in the form of Linux hosts. Each Linux host can be a virtual machine or a physical machine. Rancher does not expect more from each host than CPU, memory, local disk storage, and network connectivity. From Rancher's perspective, a VM instance from a cloud provider and a bare metal server hosted at a colo facility are indistinguishable." - http://docs.rancher.com/rancher/
Rancher Labs also provide RancherOS—a tiny Linux distribution that runs the entire operating system as Docker containers. We will look at that in the next chapter.
Rancher needs a host to run on, so let's launch a server in DigitalOcean using Docker Machine:
docker-machine create
    --driver digitalocean
    --digitalocean-access-token sdnjkjdfgkjb345kjdgljknqwetkjwhgoih314rjkwergoiyu34rjkherglkhrg0
    --digitalocean-region lon1
    --digitalocean-size 1gb
    rancher
Rancher runs as a container, so rather than using SSH to connect to the newly launched Docker host, let's configure our local client to connect to the host and then we can launch Rancher:
eval $(docker-machine env rancher)
docker run -d --restart=always -p 8080:8080 rancher/server
That's it, Rancher will be up and running shortly. You can watch the logs to keep an eye on when Rancher is ready.
First of all, check what the Rancher container is called by running the following command:
docker ps
In my case, it was jolly_hodgkin, so now run the following command:
docker logs -f <name of your container>

You should see a lot of log file entries scroll pass, after a while, logs will stop being written. This is a sign that Rancher is ready and you can log in to the web interface. To do this, run the following command to open your browser:
open http://$(docker-machine ip rancher):8080/
Once open, you should see something similar to the following screenshot:

As you can see, we have logged in straight. As this is available on a public IP address, we have better lock the installation down. This is why the red warning icon is next to Admin in the top menu is there.
As I don't have an Active Directory server configured, I am going to use GitHub to authenticate against my Rancher installation. Just like the installation itself, Rancher Labs have made this a really easy process. First of all, click on Admin in the top menu and then Access Control in the secondary menu, you will be taken to a screen that allows you to know everything you need in order to configure Rancher to use GitHub as its authentication backend.
For me, this screen looked similar to the following image:

As I have a standard GitHub account rather than the Enterprise installation, all I had to do was click on the link, this took me to a page where I could register my Rancher installation.
This asked for several pieces of information, all of which are provided on the following screen:

Once I filled in the information, I clicked on Register application button. Once the application had been registered, I was taken a page that gave me a Client ID and Client Secret:

I entered these parameters into appropriate boxes on my Rancher page and then clicked on Authenticate with GitHub. This prompted a pop-up window from GitHub asking me to authorize the application. Clicking the Authorize application button refreshed the Rancher screen and logged me in, as you can see from the following screenshot, my application is now secure:

Now that we have the authentication configured, you should probably log out and log back in just to double-check whether everything is working as expected before we move onto the next step. To do this, click on your avatar at the right-hand top of the page and click on Log Out.
You will be instantly taken to the following page:

Click on Authenticate with GitHub to log back in.
So, why did we log out and then logged back in? Well, next up, we are going to be giving our Rancher installation our DigitalOcean API key so that it can launch hosts, if we hadn't secured our installation before adding this API key, it would mean that anyone could stumble upon our Rancher installation and start launching hosts as they see fit. This, as I am sure you could imagine, could get very expensive.
Rancher supports three different schedulers, we have already looked at two of them in both this and the previous chapters. From our Rancher installation, we will be able to launch a Docker Swarm Cluster, Kubernetes cluster, and also Rancher cluster.
For this part of the chapter, we are going to be looking at a Rancher cluster. The scheduler that will be used here is called Cattle. It is also the default scheduler, so we do not need to configure it, all we need to do is add some hosts.
As mentioned in the previous section, we are going to launch our hosts in DigitalOcean; to do this, click on Add Host in the Adding your first Host section of the front page.
You will be taken to a page with several hosting providers listed at the top, click on DigitalOcean and then enter the following details:
- Quantity: I wanted to launch three hosts, so I dragged the slider to
3. - Name: This is how the hosts will appear in my DigitalOcean control panel.
- Description: A quick description to be attached to each host.
- Access Token: This is my API token, you should have yours from Chapter 2, The First-party Tools.
- Image: At the moment, only Ubuntu 14.04x64 is supported.
- Size: This is the size of the host you would like to launch. Don't forget, the bigger the host, the more money you will pay while the host is online.
- Region: Which DigitalOcean data center would you like to launch the hosts in?
I left the remainder of the options at their defaults:

Once I was happy with what I had entered, I clicked on Create button. Rancher then, using the DigitalOcean API, went ahead and launched my hosts.
To check the status of the hosts, you should click on Infrastructure in the top menu and then Hosts in the secondary menu.
Here, you should see the hosts you are deploying, along with their status, which is updating in real time. You should see messages saying the following:
Finally, all three of your hosts are shown as active:

There you have it, your first Cattle cluster. As you can see, so far it has been incredibly easy to install, secure, and configure our first cluster in Rancher. Next up, we need to deploy our containers.
As per the previous two schedulers, let's look at deploying our basic cluster application. To do this, click on the Applications tab in the top menu, and then click on Add Service. There is an option to Add From Catalog, we will be looking at this option when we have launched our own application.
On the Add Service page, enter the following information:
- Scale:
Always run one instance of this container on every host - Name:
MyClusterApp - Description:
My really awesome clustered application - Select Image:
russmckendrick/cluster - Port map: Add a port map for port
80just in the Private port box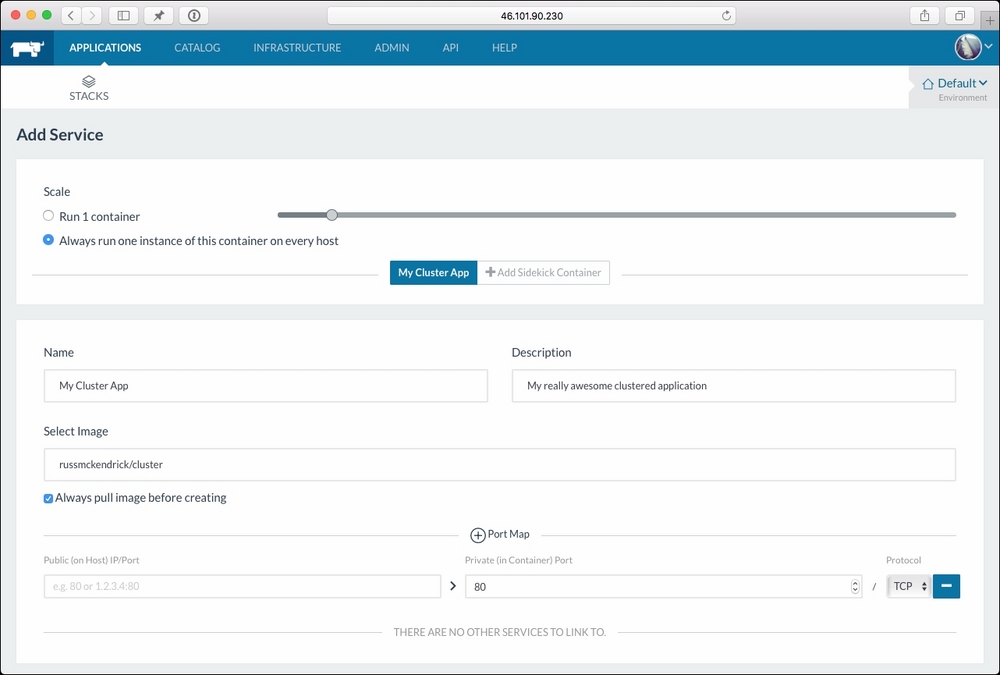
For now, leave the rest of the forms at their default values and click on the Create button.
After a few minutes, you should see that your service is active, clicking on the service name will take you a screen that gives you the details on all of the containers running within the service:

So, now that we have our containers running, we really need to be able to access them. To configure a load balancer, click on Stacks and then on the downward arrow on our default service:

Selecting Add Load Balancer from the drop-down menu will take you to a screen that looks similar to the one where we added our cluster application.
Fill in the following details:
- Scale:
Run 1 container - Name:
ClusterLoadBalancer - Description:
The Load Balancer for my clustered application - Listening Ports:
Source IP/Port 80 Default Target Post 80 - Target Service:
MyClusterApp
Click on the Save button and wait for the service to launch. You will be taken back to the list of services that you have launched, clicking on the information sign next to name of the load balancer will open an information pane at the bottom of the screen. From here, click on the IP address listed in the Ports section:

Your browser should open the now-familiar cluster application page.
Clicking on refresh a few times should change the host name of the container you are being connected to.
One of Rancher's strengths is that there are a lot of tasks, configuration, and process running in the background, which are all hidden by an intuitive and easy-to-use web interface.
To get an idea of what's going on, let's have a look around the interface. To start off with, click on Infrastructure in the top menu, and then click on Hosts.
As you can see, the running containers are now listed; alongside the containers for our Default stack, there is a network agent container running on each host:

These containers form a network between all three of our hosts using iptables, allowing cross-host connectivity for our containers.
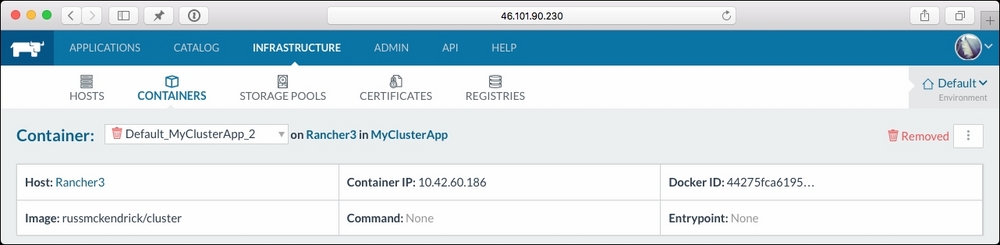
To confirm this, click on Containers button in the secondary menu. You will see a list of the currently running containers, this list should include three containers running our cluster application.
Make a note of the IP address for Default_MyClusterApp_2 (in my case, it's 10.42.220.91) and then click on Default_MyClusterApp_1.
You will be taken to a page that gives you real-time information about the CPU, memory, network, and storage utilization of the container:

As you can see, the container is currently active on my first Rancher host. Let's get a little more information about the container by connecting to it. At the top right-hand side of the page, where it says Running, there is an icon with three dots, click on that, and then select Execute Shell from the drop-down menu.
This will open a terminal within your browser to the running container. Try entering some commands such as the following:
ps aux
hostname
cat /etc/*release
Also, while we have the shell open, let's ping our second container that is hosted on another one of our hosts (make sure that you replace the IP address with the one made a note of):
ping -c 2 10.42.220.91
As you can see, although it is on a different host within our cluster, we are able to ping it without any problems:

Another feature that is useful is Health Check. Let's configure Health Check for our service and then simulate an error.
Click on Applications in the top menu, then on the + next to our Default stack, this will bring up a list of services that make up the stack. Click on the MyClusterApp service to be taken to the overview page.
From here, as we did to access the container shell, click on the icon with the three dots in the top right-hand side, next to where it says Active. From the drop-down menu, select Upgrade, this will take us to a stripped-down version of the page we filled in to create the initial service.
At the bottom of this page there are several tabs, click on Health Check and fill out the following information:
- Health Check:
HTTP Responds 2xx/3xx - HTTP Request:
/index.html - Port:
80 - When Unhealthy:
Re-create

Leave the rest of the settings as they are and then click on the Upgrade button. You will be taken back to the list of services that are in the Default stack, and next to the MyClusterApp service, it will say Upgrading.
During the upgrade process, Rancher has relaunched our containers with the new configuration. It did this one at a time, meaning that there would have been no downtime as far as people browsing our application would have been concerned.
You may also notice that it says there are six containers, and also that the stack is degraded; to resolve this, click on the MyClusterApp service in order to be taken to the list of containers.
As you can see, three of them have a state of Stopped. To remove them, click on the Finish Upgrade button, next to where it says Degraded, this will remove the stopped containers and return us to a stopped state.
So now that we have a health checking, make sure that each of our containers is serving a web page, let's stop NGINX from running and see what happens.
To do this, click on any of our three containers and then open a console by selecting Execute Shell from the drop-down menu.
As our container is running supervised to manage the processes within the container, all we need to do is run the following command to stop NGINX:
supervisorctl stop nginx
Then we need to kill the NGINX processes; to do this, find out the process IDs by running the following code:
ps aux
In my case, the PIDs were 12 and 13, so to kill them, I will run the following command:
kill 12 13
This will stop NGINX, but keep the container up and running. After a few seconds, you will notice that the stats in the background disappear:

Then your console will close, leaving you with something that looks similar to the following screenshot:
Going back to the list of containers for the MyClusterApp service, you will notice that there is a new Default_MyClusterApp_2 container running under a different IP address:

Rancher has done exactly as we instructed it to, if port 80 on any of our containers stops responding for more than six seconds, it has to fail three checks that are made every 2,000 ms, then remove the container, and replace it with a new one.
I am pretty sure that you would have clicked on the Catalog item in the top menu, this lists all the pre-built stacks that you can launch within Rancher. Let's look at launching WordPress using the catalog item. To do this, click on Catalog and scroll down to the bottom where you will see an entry for WordPress.
Click on View Details to be taken to a screen where you are able to add a WordPress stack. All it asks is for you to provide a Name and Description for the stack, fill these in, and click on Launch.
This will launch two containers, one running MariaDB and the other running the WordPress container. These containers use the same images from the Docker Hub that we have been launching throughout the book.
If you click on Stacks in the secondary menu and then expand the two stacks. Once the WordPress stack is active, you will be able to click on the information icon next to where it says wordpress. Like before, this will give the IP address where you can access your WordPress installation:

Clicking on it will open a new browser window and you will see a very familiar WordPress installation screen.
Again, Rancher did something interesting here. Remember that we have three hosts in total. One of these hosts is running a container that is acting as a load balancer for our ClusterApp, this is bound to port 80 on one of these hosts.
By default, the WordPress catalog stack launches the WordPress container and maps port 80 from the host to port 80 on the container. With no prompting from us, Rancher realized that one of our hosts already has a service bound to port 80, so it didn't even attempt to launch the WordPress container here, instead it chose the next available host without a service mapped to port 80 and launched our WordPress container there.
This is another example of Rancher doing tasks in the background to make the best use of the resources you have launched.
So far so good with Rancher, let's take a look at how we can add some shared storage to our installation. One of the things that DigitalOcean doesn't provide is block storage, because of which we will need to use a clustered filesystem, as we do not want to introduce a single point of failure within our application.
As you may have noticed when browsing the catalog, there are several storage items in there that we are going to be looking at GlusterFS to provide our distributed storage:

Once we have our Gluster cluster up and running, we will then use Convoy to expose it to our containers. Before we do this, we need to start GlusterFS. To do this, click on View Details on the Gluster FS catalog item.
You will be taken to a form that details exactly what is going to be configured and how. For our purpose, we can leave all the settings as they are and click on the Launch button at the bottom of the page.
It will take a few minutes to launch. When it has completed, you will see that a total of 12 containers have been created. Of these, six of them will be running and the other six will be marked as started. This is not anything to worry about, as they are acting as the volumes for the running containers:

Now that we have our Gluster FS cluster up and running, we need to launch Convoy and let it know about the Gluster FS cluster. Go back to the catalog page and click on View Details next to the Convoy Gluster FS entry.
As we kept of the default options and names selected when we launched the Gluster FS cluster, we can leave everything at the defaults here, all we have to do is select our Gluster FS cluster from the Gluster FS service drop-down menu.
Once you have made the selection and clicked on Launch, it won't take long to download and launch the convoy-gluster containers. Once completed, you should have four containers running. As you may have noticed, a new icon for System has appeared next to Stacks on the secondary menu, this is where you will find your Convoy Gluster stack:

So, we now have our distributed storage ready. Before we put it to use, let's look at one more catalog item.
We don't really want to store our database on a shared or distrusted filesystem, one of the other items in the catalog launches a MariaDB Galera Cluster.
The cluster will sit behind a load balancer, meaning that your database requests will always be directed to an active master database server. As earlier, click on View Details on the Galera Cluster item and then fill in the database credentials you wish the cluster to be configured with. These credentials are as follows:
- MySQL Root Password
- MySQL Database Name
- MySQL DB User
- MySQL DB Password
Once filled in, click on the Launch button. The cluster will take a few minutes to launch. Once launched, it will contain 13 containers, these make up the cluster and load balancer.
Now that we have our clustered filesystem configured, and also our clustered database, let's look at launching WordPress again.
To do this, click on Applications from the top menu, and then make sure that you are on the Stacks page, click on New Stack.
From here, give it the name WordPress and then click on Create, and now click on Add Service. You will need to fill in the following information:
- Scale:
Run 1 container (we will scale up later) - Name:
WordPress - Description:
My WordPress cluster - Select Image:
wordpress - Port Map:
Leave the public port blank and add 80 in the private port - Service Links: Destination Service should your
galera-lband thegalera-lb
We then need to enter the following details on the tabbed options along the bottom:
Command:
- Enviroment Vars: Add the following variables:
- Variable =
WORDPRESS_DB_HOST - Value =
galera-lb - Variable =
WORDPRESS_DB_NAME - Value = The name of the DB you created when setting up Galera
- Variable =
WORDPRESS_DB_USER - Value = The user you created when setting up Galera
- Variable =
WORDPRESS_DB_PASSWORD - Value = The password of the user you created when setting up Galera
- Variable =
Volumes:
- Add a volume as
wpcontent:/var/www/html/wp-content/ - Volume Driver: convoy-gluster
Then click on the Launch button. It will take a minute to download and start the container, once it has started, you should see the status change to Active. Once you have a healthy service, click on the drop-down menu next to Add Service and add a Load Balancer:
- Name:
WordPressLB - Description:
My WordPress Load Balancer - Source IP/Port:
80 - Default Target Port:
80 - Target Service:
WordPress
Once you have added the Load Balancer, click on the information icon next to the Load Balancer service to get the IP address, open this in your browser and then perform the WordPress installation, and add the featured image as we have done in other chapters.
Now we have a WordPress container up and running with a highly available database backend, which we can move between hosts maintaining the same IP address and content thanks to the load balancer and Gluster FS storage.
The last catalog item I thought I would cover is one of the DNS managers. What these items do is automatically connect with your DNS provider's API and create DNS records for each of the stacks and services you launch. As I use Route53 to manage my DNS records, I clicked on View Details on the Route53 DNS Stack on the catalog screen.
In the Configuration Options section, I entered the following information:
- AWS access key: My access key, the user must have permission to access Route53
- AWS secret key: The secret key that accompanies the preceding access key
- AWS region: The region I want to use
- Hosted zone: The zone I wanted to use was
mckendrick.io, so I entered that here - TTL: I left this as the default
299 seconds, if you want a quicker update to your DNS, you should set this to60 seconds
Then I clicked on the Launch button. After a few minutes, I checked the hosted zone in the Route53 control panel and the service had connected automatically and created the following records for stacks and services I already had running.
The DNS entries are formatted in the following way:
<service>.<stack>.<environment>.<hosted zone>
So in my case, I had entries for the following:
clusterloadbalancer.default.default.mckendrick.iomyclusterapp.default.default.mckendrick.io
As myclusterapp contained three containers, three IP addresses were added to the entry so that round robin DNS would direct traffic to each container:

Another good thing about the DNS catalog items is that they are automatically updated, meaning that if we were to move a container to a different host, the DNS for the container would automatically be updated to reflect the new IP address.
Another thing that you may have noticed is that when you go to add a stack, Rancher gives you two boxes where you can enter the content of a Docker and Rancher Compose file.
So far, we have been creating services manually using the web interface, for each of the stacks we have built up with way you have the option of viewing it as a configuration files.
In the following screenshot, we are looking at the Docker and Rancher compose files for our Clustered Application stack. To get this view, click on the icon to the left of where it says Active:

This feature allows you to ship your stacks to other Rancher users. The contents of the preceding files are given in the following so that you can try it on your own Rachner installation.
This is a standard version one Docker Compose file, there are Rancher settings passed as labels:
ClusterLoadBalancer:
  ports:
  - 80:80
  tty: true
  image: rancher/load-balancer-service
  links:
  - MyClusterApp:MyClusterApp
  stdin_open: true
MyClusterApp:
  ports:
  - 60036:80/tcp
  log_driver: ''
  labels:
    io.rancher.scheduler.global: 'true'
    io.rancher.container.pull_image: always
  tty: true
  log_opt: {}
  image: russmckendrick/cluster
stdin_open: trueThe Rancher Compose file wraps the containers defined in the Docker Compose file in Rancher services, as you can see where we are defining the health checks for both the Load Balancer and Cluster containers:
ClusterLoadBalancer:
  scale: 1
  load_balancer_config:
    haproxy_config: {}
  health_check:
    port: 42
    interval: 2000
    unhealthy_threshold: 3
    healthy_threshold: 2
    response_timeout: 2000
MyClusterApp:
  health_check:
    port: 80
    interval: 2000
    initializing_timeout: 60000
    unhealthy_threshold: 3
    strategy: recreate
    request_line: GET "/index.html" "HTTP/1.0"
    healthy_threshold: 2
    response_timeout: 2000
Rancher Compose is also the name of the command-line tool that can locally install to interact with your Rancher installation. As the command line duplicates the functionality, we have already covered, I won't be going into any detail about it here; however, if you would like give it a go, complete details about it can be found in the official Rancher documentation at http://docs.rancher.com/rancher/rancher-compose/.
The last task we are going to do using Rancher is to launch a Kubernetes cluster in DigitalOcean. As mentioned at the start of the chapter, Rancher not only manages its own Cattle clusters, but also Kubernetes and Swarm ones.
To create a Kubernetes cluster, click on the drop-down menu where it says Environment, underneath your avatar and click on Add Environment:
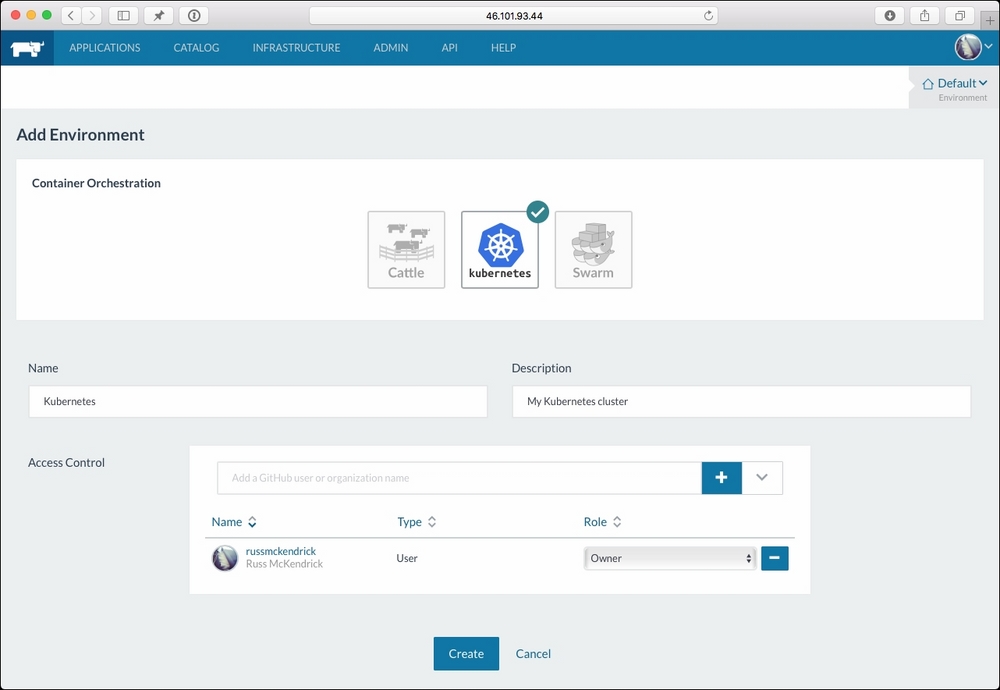
On the page, you will be asked which container-orchestration tool would you like to use for the environment, what it should be called, and finally who should be able to access it.
Select Kubernetes, fill in the remaining information, and click on the Create button. Once you have your second environment, you will be able to check between them on the Environment drop-down menu.
Similar to when we first launched Rancher, we will need to add some hosts that will make up our Kubernetes cluster. To do this, click on Add Host and then enter the details as done earlier, apart from this, time call them Kubernetes rather than Rancher.
You will then be taken to a screen that looks like the following screenshot:

It will take about 10 minutes to complete the installation. Once it has completed, you will be taken to a familiar-looking Rancher screen; however, you will now have Services, RCS, Pods, and kubectl listed in the secondary menu.
Clicking on kubectl will take you to a page that allows you to run kubectl commands in your browser and also you will get an option to download a kubectl config file so that you can interact with Kubernetes from your local machine as well:

Another thing you will notice is that a different catalog has been loaded, this is because Docker and Rancher Compose files won't work with Kubernetes:
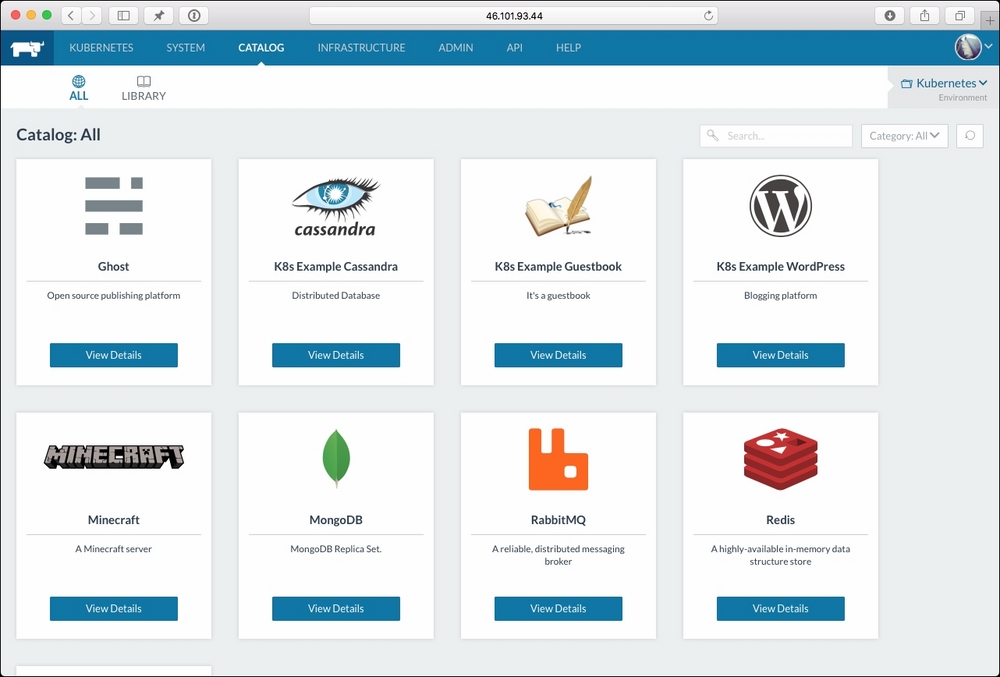
Feel free to launch services like we did in the first part of this chapter or use the catalog items to create a service.
At this point, you will have around seven instances launched in DigitalOcean. As we are coming to the end of this chapter, you should terminate all these machines so that you do not get charged for resources you are not using.
I would recommend doing this using the DigitalOcean control panel rather than through Rancher, that way you can be 100% sure that the Droplets have been successfully powered down and removed, meaning that you do not get billed for them.
As you have seen, Rancher is not only an incredibly powerful piece of open source software, it is also extremely user-friendly and well-polished.
We have only touched on some of the features of Rancher here, for example, you can split your hosts between providers to create your own regions, there is a full API that allows you to interact with Rancher from your own applications and also there is a full command-line interface.
For a 1.0 release, it is incredibly feature-rich and stable. I don't think I saw it having any problems during my time using it.
If you want a tool that allows you launch your own clusters and then give end users, such as developers, access to an intuitive interface, then Rancher is going to be a match made in heaven.