We can accelerate the process by cloning FilteredStatusReporting_Ch7 (use the Clone option on the menu for the integration in the Integrations view). Use the following details to create the new integration:
|
Properties |
Description |
|
Integration Name |
|
|
Identifier |
This will be proposed based on the connection name and there is no need to change unless you would like an alternate name |
|
Version |
|
|
Package Name |
|
|
Description |
The description should be: |
This should give us a new integration. We can now change this filter into a routed integration by clicking on the double down arrow (on the right-hand side below the integration name details) to show the filter information. In this view, you can click on the right-hand endpoints (as the upper half of the following screenshot shows). Currently in the filtered view, this shows a SOAP endpoint and a null or empty endpoint beneath the SOAP icon. Click on the lower endpoint, and you will be presented with the canvas with a source, but there is now an invoke connection on the canvas as you can see in the following screenshot:

You can tell which branch you are looking at any time based on the upper part of the preceding screenshot having the selected route shown in color rather than gray, not to mention in the color separator is the relevant filter expression (or Routing Expression) when no endpoint exists. You might want to switch back and forth to see.
To create the alternate route, we can add the FilteredFlightProgressReport_Ch7 connection to the invoke point on the canvas, and complete the configuration wizard with the following values given in the table:
|
Tab |
Question |
Action |
|
Basic Info |
Call your endpoint field? |
To keep it simple call it |
|
What does this end point do? |
Add the description: | |
|
Preview updated SOAP Adapter Runtime |
Click on Yes. | |
|
Operations |
Selected Port Type |
As we only have a single operation in the WSDL this tab will not offer any options. |
|
Selected Operation | ||
|
Request Object | ||
|
Disable SOAP Action Validation |
Set to Yes. Given what we want to achieve in this integration let's keep things simple. | |
|
Summary |
WSDL URL |
As we only have a single operation in the WSDL this tab will not offer any options. But should reflect the selected connector information. |
With the endpoint defined, we can now apply the mapping. For the FilteredFlightProgress bound flow, we can reuse the same mapping when we configured the filter mapping, but with one exception: to differentiate the calls we need to use a different literal (hard-coded) notes string. Thus, using the same technique as before, set the notes to have the value of a Not POS based position report. With that the mapping can be saved and exited.
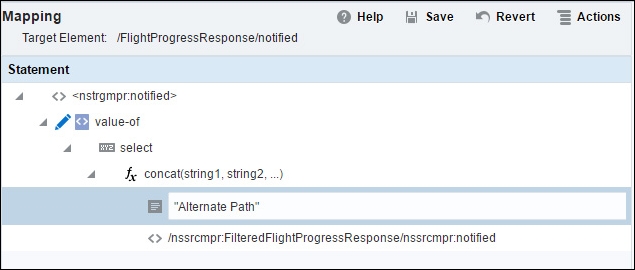
For the FlightProgressResponse bound mapping we can apply the same mapping values with one distinct difference. So we can see the response has come through the alternate path we will concatenate the response with a literal prefix string (of Alternate Path). As we have walked through the process of creating a more complex expression, rather than repeating the steps, you need to construct the mapping for the notified element, as given in the following screenshot:
With the endpoint and mapping established, the last step is to configure the routing condition itself. As with the filter this is expressed on the FilteredFlightProgress bound flow after the enrichment option. But rather than the funnel icon we get symbols indicating the addition of an expression (the branch) or define this as the path for everything excluded by the previous filter (E). The following image shows the appropriate icon and buttons associated with it:

For this example, we want to just set the path to be the Else route, so click on the E symbol. We should now have an integration that looks as follows:

Note in the previous screenshot that the Else branch is marked in the upper part of the screenshot, now with its endpoint.
We can now click on Save and exit this integration. Once back in the Integrations view, activate the integration, so we can test it.
Returning to SoapUI, we can use the Clone Request option to make a slightly modified integration call. We need to modify the call as we are triggering a different integration; therefore we need to correct the URL to point to this new integration, but all the values can remain the same.
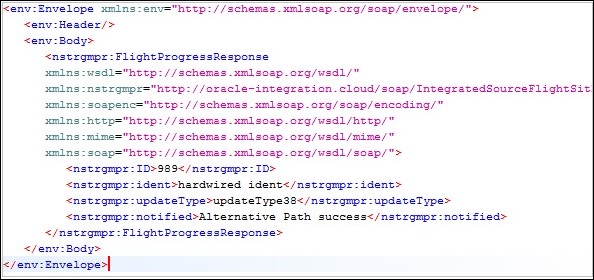
By sending this integration a message with the type set to POS, the response should remain the same as the filtered integration. But this time if we set type to be DEP again, we can see a similar result to the POS response, except the notified element reflects the constructed string. This is illustrated in the following screenshot: