With the connections defined we can start to create the filtered connection, which will look like:

It is worth noting that the integration is two-way; this is because we want to show a return value that clearly represents an outcome: having succeeded or failing to pass through the filter. But additionally, ICS will not allow one-way integrations to have a filter. You can verify this by creating a version of our source connection with a modified WSDL where, wsdl:message name="FlightInfoUpdateResponseMsg" and <wsdl:output> elements are removed, and then trying to construct the integration we are about to describe; you will then see that the option to incorporate a filter is not available.
This constraint is based on the possibility that, when filters are used for routes, one endpoint may return a result and the other does not, in which case what do you do? Enforcing a return solves the problem in terms of consistency, even if you then define the return value to be completely optional within the definition of the trigger endpoint.
As we have done in previous chapters, we need to create an integration using the Basic Map Data pattern. We can complete the creation process with the following details:
|
Properties |
Description |
|
Integration Name |
|
|
Identifier |
This will be proposed based on the connection name and there is no need to change unless you would like an alternate name |
|
Version |
|
|
Package Name |
|
|
Description |
The description should be: |
Completing these details by clicking on the Create button means that we now have the usual integration canvas to populate. We can start this by locating FlightStatusReport_Ch7 and dropping it on the Trigger pad on the canvas. We can then complete the configuration of the connection with the following details:
|
Tab |
Question |
Action |
|
Basic Info |
Call your endpoint field? |
To keep it simple call it |
|
What does this end point do? |
Add the description: | |
|
Preview updated SOAP Adapter Runtime |
Click on Yes. | |
|
Operations |
Selected Port Type |
As we only have a single operation in the WSDL this tab will not offer any options. |
|
Selected Operation | ||
|
Request Object | ||
|
Disable SOAP Action Validation |
Set to Yes. Given what we want to achieve in this integration let's keep things simple. | |
|
Summary |
WSDL URL |
As we only have a single operation in the WSDL this tab will not offer any options. But should reflect the selected connector information. |
Complete the wizard by clicking on the Done button. We can now set up the target side of the integration by dropping the FlightFlightProgressReport_Ch7 connection onto the Invoke pad on the canvas. Again we need to complete the wizard to define all the attributes of the connection, as shown in the following table:
|
Tab |
Question |
Action |
|
Basic Info |
Call your endpoint field? |
To keep it simple call it |
|
What does this end point do? |
Add the description: | |
|
Preview updated SOAP Adapter Runtime |
Click on Yes. | |
|
Operations |
Selected Port Type |
As we only have a single operation in the WSDL this tab will not offer any options. |
|
Selected Operation | ||
|
Request Object | ||
|
Disable SOAP Action Validation |
Set to Yes. Given what we want to achieve in this integration let's keep things simple. | |
|
Summary |
WSDL URL |
As we only have a single operation in the WSDL this tab will not offer any options. But should reflect the selected connector information. |
Complete the wizard by clicking on the Done button. With that we will have the basic integration defined. The next step is to define the mappings. Click on the mapping icon for the source to target flow to enter the Mapper screen. We can drag and drop to define the following mappings:
|
Source (FlightProgress) |
Target (FilteredFlightProgress) |
|
|
|
|
|
|
|
|
|
|
|
|
|
|
|
|
|
|
|
|
|
|
|
|
|
|
|
|
|
|
|
|
|
|
|
|
The last value on the target is called notes. We want to hard-code the value for this in the integration. Click on Notes and the Build Mappings screen will be displayed. In the Statement part of the screen, click where it says - Drag and drop or type here; we want to add the text, pos filtered. Then click on Save and Close. The text should now appear in the mapping for the target. We can now click on Save and then Exit Mapper.
We can now set up the response mapping (target to source) in the same way using the following mappings:
|
Source (FilteredFlightProgressResponse) and $SourceApplicationObject |
Target (FlightProgressResponse) |
|
|
|
|
|
|
|
|
|
|
|
|
The majority of the mapped values come from $SourceApplicationObject, so that they reflects the values sent rather than the hard-coded values in the mock. With the exception of notified, which will come from the Mockable endpoint as we are happy with this being hard wired and it will reflect that the invocation passed through the filter and reached the Mockable.io stub. As before, complete the mapping by clicking on Save and Exit Mapper. We now have an integration that could be executed, although no filtration would be applied. So let's now define the filter.
The filter point within the integration is represented by a funnel style icon on the request flow, as shown in the following icon:
Clicking on the Filter icon where no filter already exists will offer you an option to create the filter (if a filter exists then you would have the options to modify or delete the filter). The full set of filter editing options is shown in the following as follows:
The left icon represented edit, the middle icon represents clear expression - this is where the filter will remain, but the expression as you will see when we create it can be removed, and finally the filter can be completely removed.
As we have not yet created the filter we can click on the Filter icon. This will present us with the expression editor screen, which structurally looks a lot like the mappings editor, as you can see in the following screenshot:

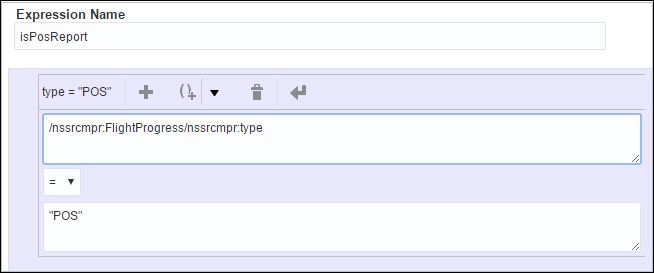
As we can see, the left-hand side represents the available inputs and functions, and the right-hand side represents the means to describe the expression, which will be used to define the expression. The outcome of any expression represented, as we can see, needs to be Boolean in nature, that is True or False. We can start by defining whether the type value is POS.
To do this, we need to select the type input from the left and drag and drop it into the top field of the condition. Between the fields is a drop-down list of Boolean operators (equals, greater than, and so on); for this expression we need the drop-down to have equals selected (=). The last step in defining the filter expression is to provide the value to match against; if we want to have the lower field, we need to define the value we want a match to. Thus, add "POS" (including the quotes). Finally, we also need to provide the expression with a simple name in the Expression Name field, so enter isPosReport.
The expression side of the Condition Builder should now look like:
Click the Save button. Before we leave the expression editor let's look at some of the other aspects of it. We can work with the raw XQuery expression by clicking on the Expression Mode button. Note in this view that the expression also has a simple summary shown. The expression mode is shown in the following screenshot:

Returning to the original condition view is done by clicking on the Condition Mode button. Upon returning to the condition view, you will see that it has collapsed our expression to the summary of the expression. Click on Expression Summary and the view will open up to the full expression. The reason for the collapse is that it is possible to build a series of expressions using the plus symbol (+), including the grouping of expressions using the (()+ ) symbol. Given we do not want the expression to be any more complex at this stage, we can click on the Exit Condition Builder button.
With the condition built back on the main integration screen, the top of the canvas area now shows the existence of the filter, as you can see in the following screenshot:

We can expand this view using the double down arrow above the expression bar on the right to view the filter, as shown in the following screenshot:

You can also hide the filter view with the up arrow as well. We now have to set the tracking details as we did with the previous integrations. We would recommend that you set the tracking fields to ID, ident, and type. With this completed, we can save the integration, exit, and, once back at the integrations view, activate the integration.
The last step before we can exercise the integration is to configure Mockable.io to consume and respond accordingly. Log back into your Mockable account and navigate to the list of SOAP mocks. We need to add a new mock endpoint by clicking on the + SOAP Mock button. We can then complete the details of the mock, as shown in the following table:
|
Properties |
Description |
|
Endpoint |
Add |
|
Headers |
No header information is required |
|
Response status |
This can be left with 200 - OK |
|
Content-Type |
|
|
Content-Encoding |
Should be the default, |
|
Response body |
In this field paste the contents of the |
|
Display Name |
This can be anything you like, but we have used |
|
Enable Request Logger |
This needs to be toggled on |
|
Set response delay |
This can be left with the |
With these values set, the mock should be saved and started using the buttons at the bottom of the mock setup. With that completed, we can go to the Request Inspector view by clicking on the button at the top of the page. The following screenshot reflects the configurations described in the preceding table:

With the integration complete and activated, the mock is ready and we can set up SoapUI and test the integration. To do this, we can use the Add WSDL function and supply the ICSBook-Ch7-FlightProgress-Source.WSDL file. With the WSDL added, a request will be created. You can either edit the values in the generated sample or paste the contents of ICSBook-Ch7-FlightProgress-SourceTestSample.xml into the value. Aside from using the correct data types, the crucial thing is the value provided for the type element.
For the first execution, this should be POS, which should allow the integration to pass through the filter. The path to the service is needed, which as you may recall can be retrieved from the information popup on the Integrations view once the integration has been activated. It should look something like:
https://XXXX.oraclecloud.com/integration/flowsvc/soap/FILTEREDSTATUSRE_CH7/v01/ where XXXX is the domain and data center part of the URL for your instance of ICS.
The final step is to set up the basic authentication in SoapUI as done previously and apply both the authentication and timeout into the payload. With this done, we can fire the integration test. The results returned should appear in the XML tab along the lines of:

Note how the values returned except the notified element correspond to what was sent, but the notified element is the same as to the mock. You can verify this by changing that part of the mock and executing the integration again. You can also verify what is going on by viewing the contents of the Request Inspector (make sure you have the view refreshed). We would recommend you change the ID each time you trigger the test so that in the monitoring it is easy to separate each execution. We will look at monitoring in depth in Chapter 12, Are My Integrations Running Fine, and What If They Are Not?
The next test we should do is for the filter to block the invocation of the mock. To do this, change the type element in the XML to have a value such as DEP (for departure) and then invoke the web call again. This time the response back to you will be a reflection of the request sent because the value was not what was wanted by the filter.