Now that we have created two connections, we can integrate our applications by creating the integration. From the Connections page of the developer portal, we can navigate to the Integrations page, to create our first integration by clicking the Integrations link in the menu at the left side of the page, as shown in the following screenshot:

Let's click the New Integration button. We are presented with a pop-up that gives us multiple patterns to create an integration as shown in the next screenshot. We discussed these integration patterns in Chapter 1, Introducing the Concepts and Terminology:

Select the Basic Map Data pattern for our first point-to-point integration. Before we can setup any integration, every creation starts with choosing a name, version, package name, and an optional description as shown in the following screenshot:

Create the integration with the details given in the following table:
|
Property |
Description |
|
Integration Name |
Enter integration name as |
|
Identifier |
This will be proposed based on the integration name and there is no need to change unless you would like an alternative name |
|
Version |
Enter version as |
|
Package Name |
Enter package name as |
|
Description |
Enter description as |
With the basic details for the integration completed we can now drag and drop our connections from the connector palette. For the Trigger, drag and drop the FlightAirlinesSOAP_Ch2 connector as shown in the following screenshot:

A pop-up is shown with tabbed panels; you can navigate through the steps using the Next and Back buttons. Complete the SOAP endpoint configuration using the following steps:
- In the Basic Info tab, call the endpoint:
Source. - Add the description:
receives SOAP request to get list of all airlines. - If there is an option to Preview updated adapter runtime set that to Yes:

- Click Next to go to the Operations tab.
As we only have a single operation in the WSDL, it selects this operation and its objects. If a WSDL has multiple port types and/or operations this step will give you the option to select the one you want to use. We will show this in Chapter 5, Going Social with Twitter and Google. This tab also gives you the choice disable SoapAction validation, which means the service can be called using a different SoapAction than defined in the WSDL, but we recommend keeping this option set to No, to not accept unknown actions as shown in the following screenshot:

- Click Next to go to the Summary tab.
- This tab shows the details of the configured endpoint:
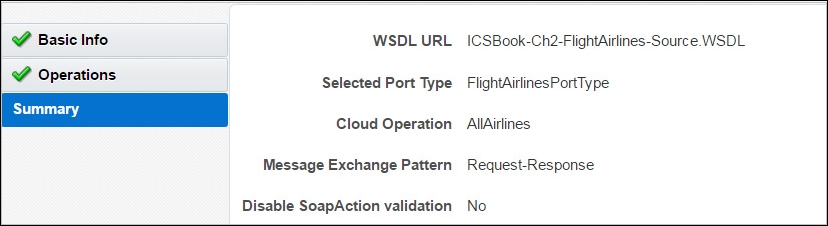
- Click Done to complete our endpoint configuration.
We can now define the other end of the integration by dropping the connector FlightAirlinesREST_Ch2 onto the Invoke target. A REST connector has many more options that we need to configure.
The resultant dialog can be completed with the following details (leave other fields default):
|
Tab |
Question |
Action |
|
Basic Info |
Call your endpoint field? |
Call it: |
|
What does this endpoint do? |
Add the description: | |
|
What is the endpoint's relative resource URI? |
Enter the URI: | |
|
What actions does the endpoint perform? |
Select the | |
|
Configure request and response payload |
Check option: Configure this endpoint to receive the response
| |
|
Configure request and response headers |
Keep both options unchecked |

|
Tab |
Section |
Action |
|
Response |
Select Response payload |
Pick: JSON Sample |
|
Enter sample JSON (click the inline link) |
|

|
Tab |
Section |
Action |
|
Summary |
Description |
The description we entered |
|
REST Service URI |
| |
|
Method |
| |
|
Response Media Type |
|