
In this chapter, we're going to tackle editing FeatureLayers, whether they come from an online or offline data source. The goal of this chapter is to provide you with the necessary know-how to add, update, and delete features. However, before you can accomplish these kinds of tasks, you will need to understand how to prepare the data to support your editing workflows. There will be a discussion on using online feature services, and then turning them into a local Runtime geodatabase. We will also discuss how to synchronize your edits when they are made, while connected or disconnected, and the following topics as well:
- Online versus offline editing
- Preparing for online or offline editing
- Adding features
- Editing features
- Deleting features
- Selecting features
- Committing edits
- Syncing edits
Editing is the process of making changes to features in a feature layer. This includes adding, updating, and deleting features. In a traditional database sense, this is the same as Create, Retrieve, Update, and Delete (CRUD) operations. Retrieving has already been discussed when we learned about finding and searching data in Chapter 7, Finding, Querying and Identifying Features, so here we will focus on Create, Update, and Delete.
When we talk about editing data, we are not only talking about creating, updating, and deleting the field values, but we are also talking about creating, updating, and deleting geometry. As we noted earlier, a feature has both attributes and geometry. You can't create a feature or graphic without geometry and expect it to show up on the map. However, you can create a feature or graphic with just geometry and no attributes. As we saw in Chapter 5, Geometry and Symbology, the feature or graphic must also have symbology in order for it to be seen. Once the data is on the map, you can do things such as moving a point or reshaping a polygon feature. Although you can make edits to graphics just like with features, we will only focus on features in this chapter because graphics are always temporary unless you develop your own means to persist them.
No matter whether you're working online or offline, you really need to understand the ArcGIS Runtime editing workflow so that you can get a sense of how it works. Here is a simplified diagram:
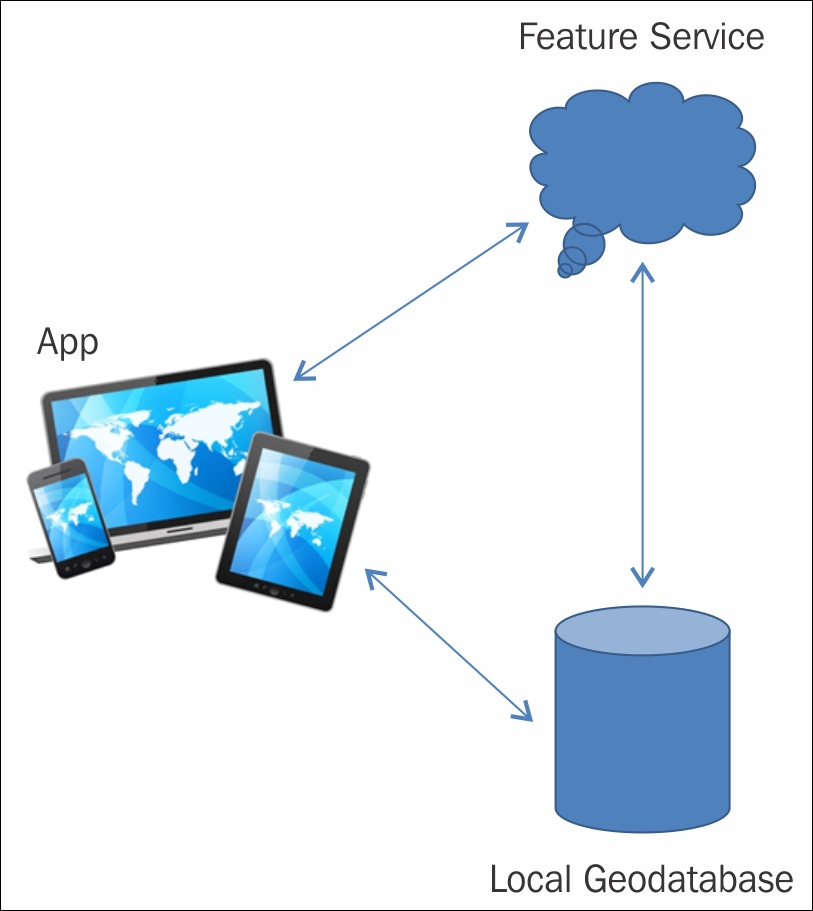
As shown in the diagram, Feature Service is required to conduct editing. Also, a Local Geodatabase (Runtime geodatabase) is required for storing local edits. Lastly, the App can interact with Feature Service and/or Local Geodatabase. The first thing that needs to be done is that a feature service must be created in ArcMap or Pro. If you plan to do only online editing, a local geodatabase is not required. You can make your edits and they will show up in the feature service as you work with the FeatureLayer class. If you plan to go offline, you can take your edits and put them locally on a device to make edits.
Once you are connected, you can then commit your edits back to the feature service. It's also possible to use both the feature service and Runtime geodatabase at the same time. For example, if you start online and then go offline, your edits will be stored in the Runtime geodatabase, and once you go back online, your edits can be synced with the feature service.
If you recall from earlier chapters, we used FeatureLayers to view and query data. If using a Runtime geodatabase, we have to access the feature table of FeatureLayer with GeodatabaseFeatureTable for the Runtime geodatabase. To use a feature service, we get a reference to its ServiceFeatureTable object. It's important to understand that you can take edits made to an offline Runtime geodatabase, and then synchronize those edits with the feature service the Runtime geodatabase was created from. However, this synchronization capability must be enabled when creating the feature service. The feature service must be created with ArcGIS Desktop 10.2.2 or higher.
Feature services can be created using one of the following approaches:
- ArcGIS Online (https://www.arcgis.com/home/)
- ArcGIS Server with or without Portal for ArcGIS
- ArcGIS for Developers (https://developers.arcgis.com/en/)
To create a feature service, go to this site. You will need to create an account if you haven't done so already. Then, you'll need to create a hosted feature service by clicking on Hosted Data, and then clicking on New Feature Service. After these initial steps, following the remaining steps listed on the site.
To learn more about feature services, navigate to http://server.arcgis.com/en/server/10.3/publish-services/linux/what-is-a-feature-service-.htm.
Once you have a feature service, you will also get a REST endpoint that you will use in ArcGIS Runtime. Also, if you plan to make the feature service synchronization enabled, you will need to turn on this capability when you create the service, or you will need to turn the capability on after the service has been created. Lastly, you can symbolize the features using an attribute, and then publish them so that your ArcGIS Runtime app can use them in an editing template. An editing template is one of the extra controls that comes with the runtime toolkit we used in Chapter 6, Displaying Information. See the TemplatePicker feature at https://github.com/Esri/arcgis-toolkit-dotnet.
Once you have a feature service, you will need to then generate a Runtime geodatabase from it so that you can make edits locally, and then synchronize them with the server. There are two ways to accomplish this:
- Using the ArcGIS REST API
- Using the ArcGIS Runtime API
Alternatively, you can create a read-only Runtime geodatabase using one of the following approaches:
- Using ArcGIS Desktop via
ArcMapto publish a read-only Runtime geodatabase - Using ArcGIS Desktop via the
Geoprocessingtool to publish a read-only Runtime geodatabase
With the ArcGIS Server REST API, the feature service has the ability to create a copy of itself using CreateReplica. For more information, navigate to http://resources.arcgis.com/en/help/rest/apiref/index.html?featureserver.html. After the edits are made, the feature service can be updated using SynchornizeReplica; refer to http://resources.arcgis.com/en/help/rest/apiref/index.html?featureserver.html.
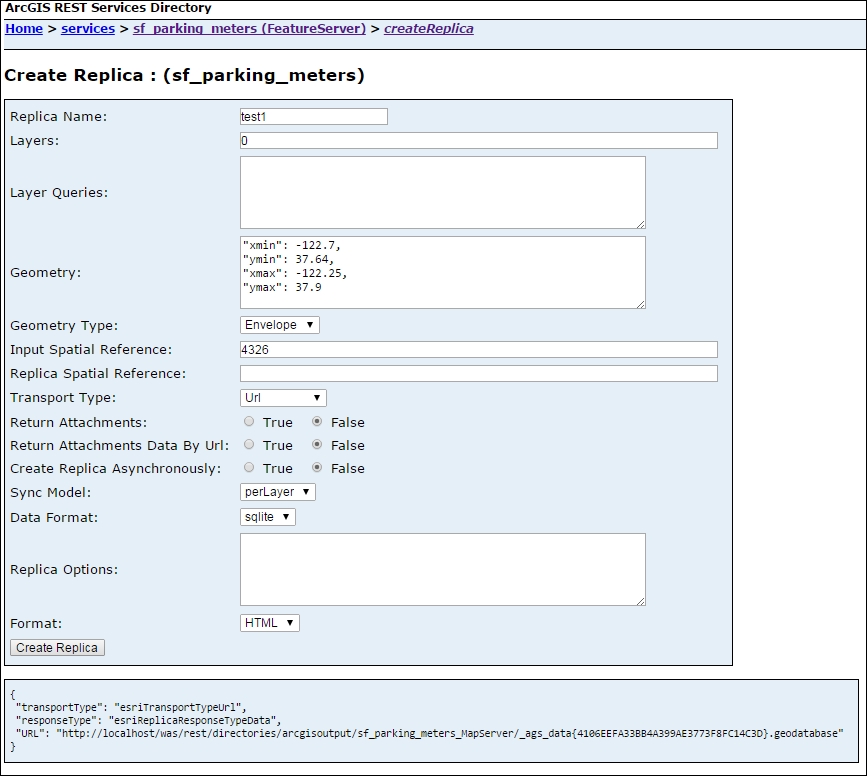
If you publish the San Francisco parking meters layer that comes with the book and make sure its synchronization is enabled, you could then go to this feature service's directory and perform the following steps to produce a Runtime geodatabase:
- Go to the feature service's location. For example, if your service is named
sf_parking_meters, navigate tohttp://localhost/was/rest/services/sf_parking_meters/FeatureServer. - Click on Create Replica at the bottom of the page.
- Give the replica a unique name in Replica Name.
- Specify the layers. In this case, only one layer is available in the feature service, so we specify
0. - Specify the layer's extent in the Geometry field, like this:
"xmin": -122.7,
"ymin": 37.64,
"xmax": -122.25,
"ymax": 37.9
- Set the spatial reference. With this data, the spatial reference is
4326. - Set Data Format to
sqllite. This is the Runtime geodatabase's format. - Click on Create Replica. The Runtime geodatabase will be created and the result will be shown below the Create Replica button.
- Once the operation is completed, the URL to the data source will be shown in the output. Copy the URL to another tab in your browser. In the following example, the URL is
http://localhost/was/rest/directories/arcgisoutput/sf_parking_meters_MapServer/_ags_data{4106EEFA33BB4A399AE3773F8FC14C3D}.geodatabase.
Press the Enter key in your browser and the Runtime geodatabase will be downloaded from the server. You can now use this Runtime geodatabase to perform edits on. You may want to rename the output file to something more useful for your app:
It should also be noted that this entire process can be automated using Python or JavaScript.
The second approach is to use the ArcGIS Runtime API. The general process when using the ArcGIS Runtime API is as follows:
- Generate the Runtime geodatabase.
- Make edits to the Runtime geodatabase.
- Synchronize.
- Unregister the Runtime geodatabase.
In this section, we'll discuss step 1. In the sections that follow, we'll cover steps 2, 3, and 4.
There are several classes involved in generating a Runtime geodatabase using the GenerateGeodatabaseParameters, GenerateGeodatabaseResult, and GeodatabaseSyncTask APIs. Here is an example of using the objects:
var syncTask = new GeodatabaseSyncTask(new Uri(this.URL));

// Get current viewpoints extent from the MapView
var currentViewpoint = this.mapView.GetCurrentViewpoint(ViewpointType.BoundingGeometry);
var viewpointExtent = currentViewpoint.TargetGeometry.Extent;

var options = new GenerateGeodatabaseParameters(new int[] { 0 },
    viewpointExtent)
{
    GeodatabasePrefixName = GDB_PREFIX,
    ReturnAttachments = false,
    OutSpatialReference = MyMapView.SpatialReference,
    SyncModel = SyncModel.PerLayer
};

var tcs = new TaskCompletionSource<GeodatabaseStatusInfo>();
Action<GeodatabaseStatusInfo, Exception>
    completionAction = (info, ex) =>
{
    if (ex != null)
        tcs.SetException(ex);
        tcs.SetResult(info);
};

var generationProgress = new Progress<GeodatabaseStatusInfo>();
generationProgress.ProgressChanged += (sndr, sts) => { ReportStatus(sts.Status.ToString()); };

// Starting GenerateGeodatabase
var result = await syncTask.GenerateGeodatabaseAsync(options,
    completionAction,
    TimeSpan.FromSeconds(3), generationProgress,
    CancellationToken.None);

// Waiting on geodatabase from server
var statusResult = await tcs.Task;

// Downloading Geodatabase…
var gdbPath = await DownloadGeodatabase(statusResult);

// Create local Feature Layers
This code segment creates a GeodatabaseSyncTask API with the feature service's URL, gets the extent of the map, and then sets up the parameters for generating the Runtime geodatabase. In this example, only the first layer is used when specifying the GenerateGeodatabaseParameters API. Also, GenerateGeodatabaseParameters is told to not return attached, and to use a synchronize model called PerLayer. The PerLayer model indicates that each layer will be synced individually. If the synchronization model is set to PerGeodatabase, all layers will be synced once the syncing process starts. A TaskCompletionSource instance is created next, which is called when the download finishes. Next, a Progress object is created with a GeodatabaseStatusInfo object. The GeodatabaseStatusInfo object simply lets you know the progress of the download process. After the Progress object is created, the GenerateGeodatabaseAsync object is started with GenerateGeodatabaseParameter, the TaskCompletionSource instance, the time span in which it is checked, the progress, and CancellationToken of None. Next, the task is awaited using tcs.Task. Finally, when the task is completed, the Runtime geodatabase is downloaded using this method:
private async Task<string> DownloadGeodatabase(GeodatabaseStatusInfo statusResult)
{
    var client = new ArcGISHttpClient();
    var gdbStream = client.GetOrPostAsync(statusResult.ResultUri, null);
    var gdbFolder = System.IO.Path.GetTempPath();
    var gdbPath = System.IO.Path.Combine(gdbFolder, statusResult.GeodatabaseName);

    if (!System.IO.Directory.Exists(gdbFolder))
        System.IO.Directory.CreateDirectory(gdbFolder);

    await Task.Run(async () =>
    {
        using (var stream = System.IO.File.Create(gdbPath))
        {
            await gdbStream.Result.Content.CopyToAsync(stream);
        }
    });

    return gdbPath;
}
The
ArcGISHttpClient class in Esri.ArcGISRuntime.Http is optimized to get data from the ArcGIS Server REST API. Once it is instantiated, you call GetOrPostAsync with the URI of
GeodatabaseStatusInfo to the service and it will return an HttpResponseMessage message stream (HttpResponseMessage). With this stream, you can create a geodatabase file and fill it with the content of the stream's contents. As a side note, Esri.ArcGISRuntime.Http allows you to write your own interfaces for interacting with ArcGIS Server.
To create a read-only Runtime geodatabase from ArcGIS Desktop, you will need perform the following steps:
- Add the layer to
ArcMapand set up required symbology. - In
ArcMap, click on Customize | ArcMap Options. - In the ArcMap Options dialog box, click on Sharing.
- Check the Enable ArcGIS Runtime Tools checkbox and click on OK.
- Click on File | Share As | ArcGIS Runtime Content.
- Specify the
Outputfolder below Save ArcGIS Runtime content to. - Click on Analyze to find any errors, and then resolve them.
- Click on Share. This will create the Runtime geodatabase file with the
.geodatabasefile extension.
This workflow is easy to execute and provides a simple way to generate a Runtime geodatabase if your users don't need to edit the data.
We will now generate a Runtime geodatabase using a Geoprocessing tool by performing the following steps:
- Create the map document using
ArcMapwith the feature layers. - In ArcToolbox, click on Data Management Tools | Package | Create Runtime Content.
- Fill in the tool's parameters and click on OK:
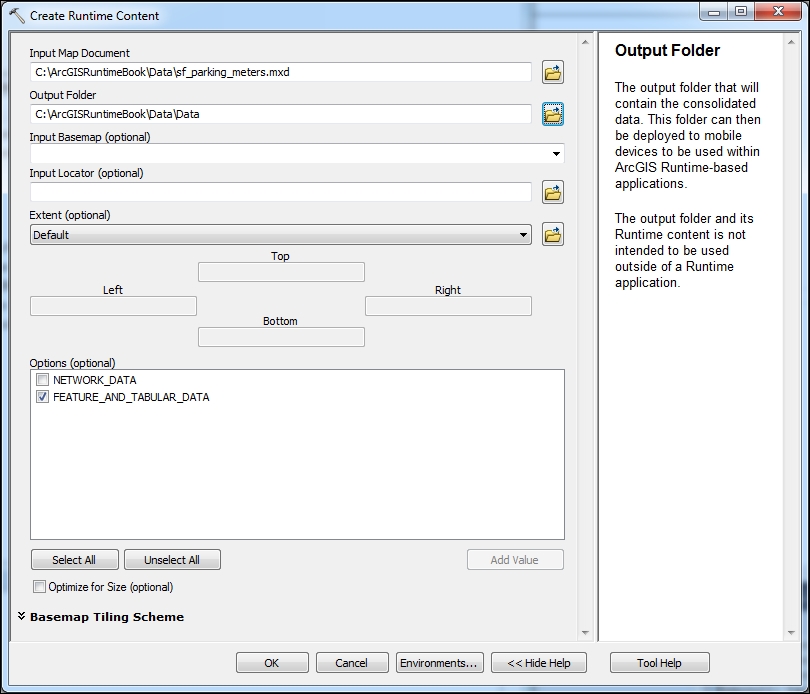
Once again, this will create a read-only Runtime geodatabase.