
Turning an ArcGIS Runtime app from 2D to 3D requires very little effort on your part. In fact, to go from 2D to 3D, you only have to know that there are equivalents of the MapView and
Map classes in 3D. They are called the SceneView and Scene objects, respectively. Therefore, all that is is necessary is to change the code to this:
<esri:MapView x:Name="MyMapView>
    <esri:Map x:Name="theMap" >

    </esri:Map>
</esri:MapView>
The preceding code is to be changed to this:
<esri:SceneView x:Name="MySceneView"
    <esri:Scene x:Name="theScene" >

    </esri:Scene>
</esri:SceneView>
That's it. All that changed is that we used a SceneView control instead of MapView and a Scene control instead of Map. That was pretty easy, right? However, if you run the app with just the preceding XAML code, you'd only see this:
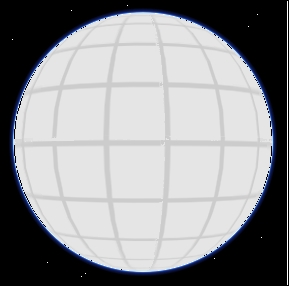
It's a globe, but it doesn't have any layers. The good news is that you can use all of the layers we've been using in 2D also. To do the same with code, we only need code similar to this:
// create a new SceneView
var mySceneView = new Esri.ArcGISRuntime.Controls.SceneView();

// create a new Scene
var myScene = new Esri.ArcGISRuntime.Controls.Scene();

var uri = new Uri("http://services.arcgisonline.com/arcgis/rest/services/World_Street_Map/MapServer");
var baseLayer = new ArcGISTiledMapServiceLayer(uri);
baseLayer.ID = "BaseMap";

// add the layer to the Scene
myScene.Layers.Add(baseLayer);

// add the Scene to the SceneView
mySceneView.Scene = myScene;

// add the SceneView to the grid
MyGrid.Children.Add(mySceneView);
Let's change the app we made in Chapter 3, Maps and Layers, and make it a 3D app:
- Make a new ArcGIS Runtime project, install
Json.NETand MVVM Light, and copy all code over from that project. Be sure to update all namespaces. - As you will recall, we made a custom behavior to change how the
MapViewclass worked. OpenMapViewBehavior.csand change the following code in the class to this:namespace Chapter4.Behaviors { public class SceneViewBehavior : Behavior<SceneView> { protected override void OnAttached() { base.OnAttached(); AssociatedObject.Loaded += AssociatedObject_Loaded; } void AssociatedObject_Loaded(object sender, RoutedEventArgs e) { SceneView sceneView = sender as SceneView; Messenger.Default.Send<SceneView>(sceneView); } } } - Rename the file from
MapViewBehavior.cstoSceneViewBehavior.cs. - Update the XAML's
MapViewtoSceneViewproperties andMaptoScene. - Update the XAML code in the
MainWindow.xamlfile ofSceneViewBehaviorlike this:<i:Interaction.Behaviors> <behave:SceneViewBehavior/> </i:Interaction.Behaviors> - In the
MainViewModel.csfile, update all references to theMapViewprivate member toSceneViewand change the reference ofMapViewtoSceneView. Remove theMapGridandInteractionOptionscode. They don't work in 3D. Make sure that each reference tothis.mapView.Mapis nowthis.sceneView.Scene. Remove the method namedSetInitialExtentbecause it won't work in 3D. - Comment out the
Zoommethod. Lastly, comment theZoomRelayCommandand any other code related to it. We're going to bring these lines back in the next section. - Comment out the
Zoombutton line in the XAML code. - Run the app. You will see a virtual globe.
Congratulations! You've written your first 3D app. What's more, you created a 3D app that follows the MVVM pattern. While it's true that it's that simple, there are some other things we really need to understand before we move forward. For example, there are many significant differences between navigating in 3D, some differences in layers, how we set the Viewpoint, how we create geometry, and so on. So let's learn a little more before we build a more substantial 3D app.
If you're new to 3D, the first challenge you will encounter is how to move around in the scene. Let's first cover these maneuvers with a mouse, so you can enhance your skills:
- To pan with your mouse, hold the left mouse button and drag. You can also use the Arrow keys.
- To zoom in, scroll the wheel forward on your mouse or hold the center button on your mouse if you have a three-button mouse. Use the + key to zoom in.
- To zoom out, do the opposite of zooming in. Use the – key to zoom out.
- To rotate, hold the right mouse button and drag.
You can't change the pitch, heading, or elevation with the mouse. However, you can do the following tasks with the keyboard:
- To change the pitch, use the W (tilt up), S (tilt down), or P (perpendicular to the surface) keys.
- To change the heading, use the A key to move west, the D key to move east, and the N key to set through north.
- Lastly, with the keyboard, use the U key to move up and the J key to move down.
If you have a touch-screen device, you can of course use gestures:
- To pan, use a single finger and drag, or you can flick.
- To pan and zoom, use multiple fingers (spread zoom in, pinch zoom out, drag pans, and pivot rotates).
- To change the heading and pitch, use multiple fingers (dragging up and down changes the pitch while dragging left or right changes the heading).
Lastly, to go into Fly mode, hold down Q and move the mouse in some direction, and this will allow you to pan and rotate based on the mouse position. As with driving a car, it takes a little getting used to, but before you know it, you'll master it.
When you're in 3D, it is very much like being in the world. Your eye is like a camera looking at a target. 3D works in very much the same manner. However, as we are working with the entire Earth, we have to move the camera at high altitudes (elevation) to see anything. See the following screenshot:
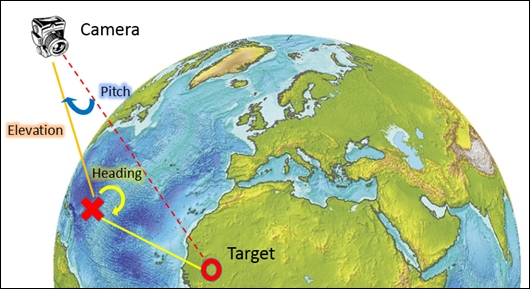
When viewing in 3D, you are the camera. The camera has an elevation above the surface of the Earth, a pitch, heading, and something it is looking at (target). This is always the case. The good news is that you can change any of these parameters by getting a reference to the camera of SceneView like this:
Camera camera = this.sceneView.Camera;
However, in order to do anything with the camera, we need to revisit the Viewpoint concept.
As you saw with the
MapView and Map classes, we could set the extent and scale, and then call SetViewAsync when we zoomed to Rome and everything worked perfectly. This is not the case with 3D. In 3D, there is no scale because we are dealing with the actual shape of the Earth in 3D. The scale is the same everywhere in 3D. Also, the extent doesn't apply either because the extent is a 2D concept. It's a rectangle laid on the flat Earth. With 3D, we're viewing from a camera. However, to make this easy to adjust and write code, Esri has transferred the Viewpoint concept over from 2D to 3D.
Let's add the Zoom to Italy button back to our code and XAML; but this time, replace the code with the following code:
public async void Zoom()
{
    // define a new camera over Italy
    var camera = new Camera(41.9, 12.5, 330.0, 180.0, 73.0);

    // create a ViewPoint with the camera, a target geometry
    // (Envelope), and rotation (same as camera heading)
    var viewPoint = new Viewpoint(camera, new Envelope(12.5,
        41.85,12.6, 41.95, SpatialReferences.Wgs84), 126.0);
    var animationDuration = new TimeSpan(0, 0, 2);

    await this.sceneView.SetViewAsync(viewPoint,
        animationDuration, true);
}
This new Zoom to Italy button now creates a new camera object with the latitude of 41.9, longitude of 12.5, altitude of 330, heading of 180, and of pitch of 73 degrees. The camera is looking due south. Next, a Viewpoint is created; but this time, we're using an envelope as a viewing frustum. See here:

The envelope acts as a viewing frustum, which now sets a rectangle by which we're looking through out into infinite space, except the envelope has been set on its edge, as shown in the illustration. Lastly, we created a TimeSpan object and set it to 2 seconds, and then called SetViewAsync again with the Viewpoint animation duration, and set lift off to true, which makes the camera appear to lift off like a missile as it starts the zoom operation. Pretty nice, huh?