
After the app has been developed and packaged, we want to be able to release it into the wild. There are many different Android app stores available, such as Google Play or Amazon Appstore.
To distribute our app through Google Play, we need to have created a developer account on the Google Play Developer Console (https://play.google.com/apps/publish). This only needs to be performed once, and involves a one-time fee of $25 USD.
If we are going to distribute paid apps or apps that have in-app billing, we need to link the developer account to a Google Wallet account (http://www.google.com/wallet/merchants.html). Google Wallet is only available in certain countries, so we need to ensure that we have created the merchant account in one of them (https://support.google.com/googleplay/android-developer/table/3539140).
Once we have signed the app package, we can prepare the Google Play app listing for the upload process as follows:
- When logged into the console, click on the Add new application button, enter the new app's title, and click on Prepare Store Listing:

The Add New Application dialog
- When the listing has been created, we upload the package to the Alpha channel. We first select the APK section on the left-hand side. Then, under the Alpha Testing tab, click on the Upload your first APK to Alpha button, which can be seen in the following screenshot:
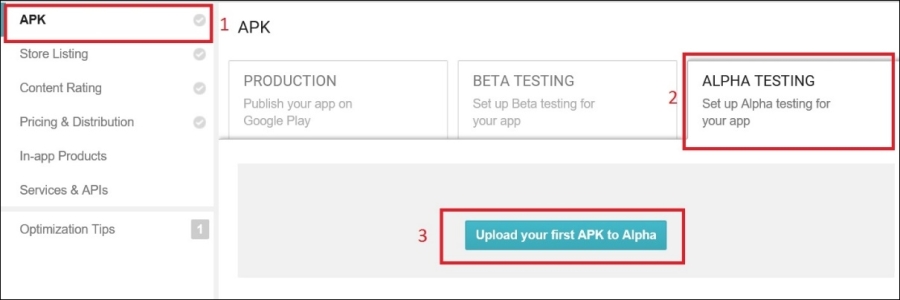
Uploading the first APK to Google Play
- In the dialog that appears, browse to and select the package that we just packaged using our IDE.

The upload APK dialog
- When the upload completes, we can select the package item in the list and review the details and add release notes.
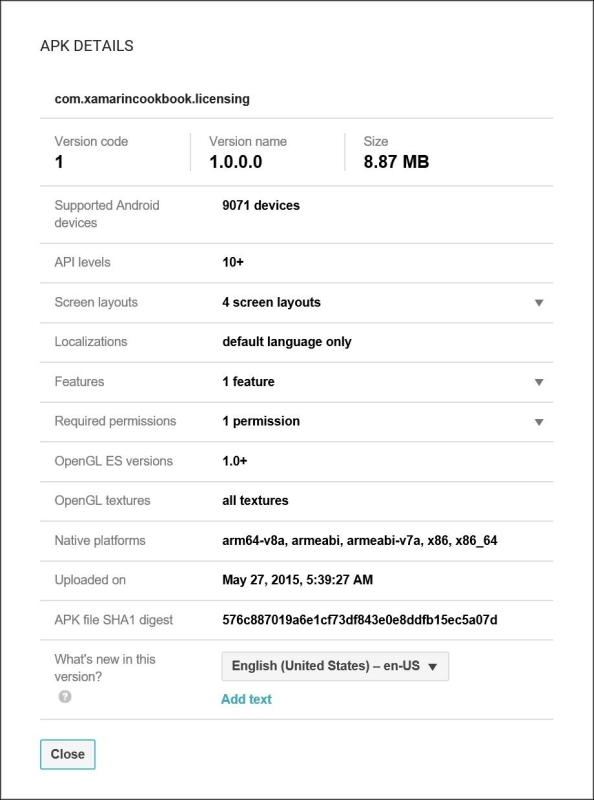
The APK details dialog
- After the APK has been uploaded, we now complete the fields required in the various sections. As we complete each section, we click on the Save draft button at the top of the page. Once all the required fields are completed in each section, the check mark next to the section turns green:
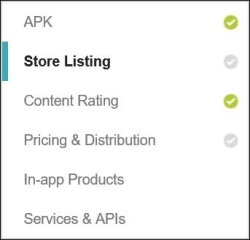
The Google Play package sections
- The first section after the APK section is Store Listing. All of these fields can be localized, and are used to describe the package as it appears in Google Play.
- One of the fields in the Store Listing section is New content rating. We specify a rating here by completing the questionnaire in the Content Rating section.
- The last section we need to complete is the Pricing & Distribution section. Here, we specify whether the app is paid or free, and which countries the app will be available in.
- Once all the fields are filled in, we can click on the Publish app button at the top of the page. It usually takes a few days before the app will appear on the store.
- If the button is not enabled, we can click on the Why can't I publish? link above the publish button:
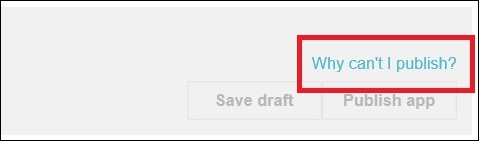
The link to view outstanding fields
- This will show a dialog that lists all the fields that still need completion:

The fields that still need to be completed
Google Play requires that there be metadata describing the app and its content. This is the app listing, which is used for categorization and filtering. This information ranges from the description and icon to the content rating and supported platforms.
When creating a store listing, we start off by specifying just the app title. The package name and version numbers are obtained from the upload package. Uploading of a package is performed on the APK section of the listing. Here, we specify the channel to which the app is to be released on, which should initially be one of the testing channels.
Testing channels are used to provide phased rollouts of new app versions to only a subset of the users. Then, based on those users' feedback, we can improve the package before we release it to everyone. This is important, as even though the app may run smoothly, the users may not enjoy some of the functionality.
After we have uploaded a package, we get the opportunity to review the package details. We do this to ensure that we have not accidentally included unnecessary permissions or features. Also, we can confirm that we are supporting the desired platforms and languages.
Another important thing that we can do is to add release notes. Release notes is a way in which we are able to advertise new features in our app, as well as point out any bug fixes.
Once the package has been uploaded, we complete the required fields in the various sections. As we complete each section, we save the changes using the Save draft button at the top of the page. As required fields are completed in each section, the check mark next to that section goes green. Once all the sections are green, we will be able to publish the app.
The first section after the APK section is Store Listing. All of these fields can be localized, and are used to describe the package as it will appear in Google Play. The first three fields are the textual descriptions of the app, the app title, a short description and a longer, full description.
The next set of fields are the graphic assets and video fields. These include the various screenshots, icons, and other promotional graphics. Screenshots can be provided for phones, tablets, and TVs. At least two screenshots are required, but we don't have to provide screenshots for all displays. Other graphics include a high resolution icon used on the website, along with some promotional graphics.
After the graphics, we fill in categorization fields. These are used when organizing the apps in Google Play. One of the fields here is New content rating, which we specify by completing the questionnaire in the Content Rating section.
The final fields in the Store Listing section are the contact details and any privacy policy information. Although optional, we should provide a privacy policy that discloses the ways in which our app gathers and manages user data.
The next section, Content Rating, is a questionnaire that Google uses to provide a rating of the app content. Then, consumers, such as parents, can decide whether an app is suitable for the intended audience.
Next, we will complete the Pricing & Distribution section. This section controls where and how the package is distributed to the many countries. Here is where we specify whether the app is a paid app or a free app. This is an important step as once the app is free, we cannot change it back to a paid app. If we select paid, we must enter a default price, and any specific regional prices.
After the pricing fields, we are provided a checklist with all the countries that we can distribute to. Here, we check all the countries in which we want our app to be available. If this is a paid app, we can adjust any local pricing here. Usually, we would want to distribute the app to as many regions as possible, but we may want to restrict the initial release to fewer regions.
The next group of fields is where we select the distribution areas, such as for Android Wear, TV, Auto, or work. And, we have to indicate that our app complies with the content guidelines and US export laws.
The last two sections, In-app Products and Services & APIs, are used when we are going to be adding in-app billing or licensing into the app. These are not required for many of the apps we will create, so we can skip them.
Once all the fields are filled in, our app is ready to be published. We can check whether the check marks next to each section are all green. If they aren't, or the Publish app button at the top of the page is disabled, we can click on the Why can't I publish? link above the publish button. This will show a dialog that lists all the fields that still need completion.
Finally, once all the requirements are met, we click on the Publish app button at the top of the page. Once we have published the app, it usually takes a few days before it will appear on the store. This is because Google will process the package to ensure that it conforms to their guidelines and does not infringe on any copyrights.