
OAuth2 specifies authorization flows for web applications. We can use it with Ember to secure our application and provide data to only those users that are authorized. In this recipe, we'll look at using OAuth2 with Ember Simple Auth (ESA), a robust add-on for Ember.
ESA will handle our client-side session and authentication and send the requests to the server. It's very customizable and extensible. Although it can be complicated, just like our last recipe, we'll create a protected students route that can be accessed by authorized users only.
For the purposes of this example, we'll need an OAuth2 server. Setting up an OAuth2 server is beyond the scope of this recipe. There are several OAuth2 libraries out there that you can use to set one up. I recommend the following:
- In a new Ember application, run the generator command to create the required files:
$ ember g adapter application
$ ember g component login-comp
$ ember g controller login
$ ember g controller students
$ ember g model student name:string age:number
$ ember g route students
$ ember g route application
$ ember g route login
$ ember g template index
$ ember install ember-simple-auth
This will generate the scaffolding that we need to begin our application. The last command installs the add-on for ESA.
- We'll begin by setting up the Ember Simple Auth authenticator and authorizer for OAuth2. We need to set this up so that a user can authenticate with the server. Create two new directories in the
appfolder calledauthenticatorsandauthorizers. - Add a new file called
oauth2-custom.jsto theauthenticatorsdirectory andapplication.jsto theauthorizersfolder. Add this code:// app/authenticators/oauth2-custom.js import Authenticator from 'ember-simple-auth/authenticators/oauth2-password-grant'; import Ember from 'ember'; export default Authenticator.extend({ makeRequest(url, data) { var client_id = '123'; var client_secret = 'secret'; data.grant_type = 'password'; return Ember.$.ajax({ url: this.serverTokenEndpoint, type: 'POST', data: data, dataType: 'json', contentType: 'application/x-www-form-urlencoded', crossDomain: true, headers: { Authorization: "Basic " + btoa(client_id + ":" + client_secret) } }); } });The
authenticatorsfile is used by ESA whenever a user logs in. We can overwrite anything in the authenticator if needed. ThemakeRequestmethod is used to send messages to the server. By default, ESA will make an HTTPPOSTrequest to/tokenwith the username and password in the form field. - Unfortunately, many OAuth2 servers require a header called
AuthorizationBasicwith a secret client ID and client secret when authenticating for the first time with a server. To fix this, we can extend themakeRequestmethod with our own Ajax request. This will be used when we log in:// app/authorizers/application.js import OAuth2Bearer from 'ember-simple-auth/authorizers/oauth2-bearer'; export default OAuth2Bearer.extend();
The
authorizersfile is used by ESA to tell which type of authentication we are using. In this example, we are using Oauth2 as defined byOAuth2Bearer.extend(). - Update the adapter and add the ESA data adapter mixin to the
application.jsfile in theadaptersfolder:// app/adapters/application.js import DS from 'ember-data'; import DataAdapterMixin from 'ember-simple-auth/mixins/data-adapter-mixin'; export default DS.RESTAdapter.extend(DataAdapterMixin, { namespace: 'api', authorizer: 'authorizer:application' });The adapter tells Ember to make all requests to the
/apinamespace. The ESADataAdapterMixinis used to define the authorizer that the application will use. In this case, all Ember Data requests will use the OAuth2 application authorizer that we defined earlier. In other words, any request sent to the server using Ember Data will include the session data token, if it exists. - Let's update our login-comp component template:
// app/templates/components/login-comp.hbs
<h2>Login page</h2>

<form {{action 'authenticate' on='submit'}}>
    {{input value=login placeholder='Login'}}<br>
    {{input value=password placeholder='Password' type='password'}}<br>
    <button type="submit">Login</button>
</form>
This will submit the
loginandpasswordto theauthenticateaction setup in our component. - Update the login page component with the
authenticateaction:// app/components/login-comp.js import Ember from 'ember'; export default Ember.Component.extend({ auth: Ember.inject.service('session'), login: null, password: null, actions: { authenticate() { this.get('auth').authenticate('authenticator:oauth2-custom', this.get('login'),this.get('password')).then(() => { alert('Thanks for logging in!'); this.get('transition')(); }, () => { alert('Wrong user name or password!'); }); } } });As we are using ESA, we have access to a
sessionservice. Thissessionservice has anauthenticatemethod that usesauthenticatorthat we created earlier. In the preceding code, we used thethis.get()method to getloginandpasswordfrom our template. We then called theauthenticatemethod on our service, passing in ourauthenticator.If the server returns a successful message, then we call
transition, a method that is passed to the component. If not, an alert box pops up telling the user that their login was not successful. - Add the login page component to the login template, and update the login controller:
// app/templates/login.hbs
{{login-comp transition=(action 'loggedIn')}}
This calls the login component and passes in the parent action,
loggedIn:// app/controllers/login.js import Ember from 'ember'; export default Ember.Controller.extend({ actions: { loggedIn(){ this.transitionToRoute('students'); } } });This action transitions the application to the
studentsroute. It's triggered only with a successful login. It's also the name of the action passed in the login page component. - Update the students controller, route, and template:
// app/templates/students.hbs
<h2>Students</h2>
{{#each model as |student|}}
    <h3>Student: {{student.name}} </h3>
    <h3>Age: {{student.age}} </h3>
{{/each}}


<button {{action 'logout'}}>Log Out</button>
The template displays the information from the server using the
eachhelper. Alogoutbutton action will log the user out:// app/controllers/students.js import Ember from 'ember'; export default Ember.Controller.extend({ auth: Ember.inject.service('session'), actions: { logout(){ this.get('auth').invalidate(); } } }); - The
logoutaction invalidates the session. Invalidating the session revokes the token so that it is no longer available:// app/routes/students.js import Ember from 'ember'; import AuthenticatedRouteMixin from 'ember-simple-auth/mixins/authenticated-route-mixin'; export default Ember.Route.extend(AuthenticatedRouteMixin,{ model(){ return this.store.findAll('student'); } });This route returns all the information for the
studentmodel. You'll notice thatAuthenticatedRouteMixinis added. This tells Ember to make this route available only if it's authenticated by the server. If it's not, it will route back to the application. - Add the application mixin to the application route:
// app/routes/application.js
import Ember from 'ember';

import ApplicationRouteMixin from 'ember-simple-auth/mixins/application-route-mixin';

export default Ember.Route.extend(ApplicationRouteMixin);
ESA's
ApplicationRouteMixinwill catch any errors and transition to the login route. - Update the index template with a link to the login route:
// app/templates/index.hbs
Hello! Want to login? Click {{#link-to 'login'}}here!{{/link-to}}
The
link-tohelper links to theloginroute. - Start the Ember server and OAuth2 server:
$ ember serve –-proxy http://localhost:3000The
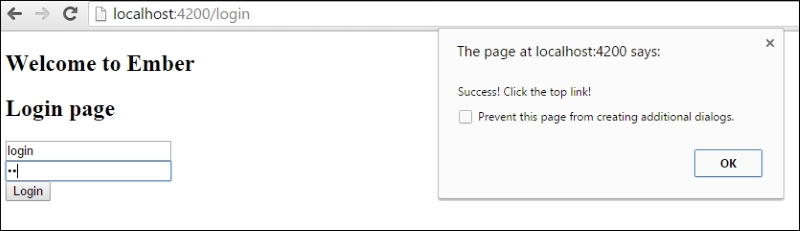
--proxyargument tells Ember to proxy all server requests tolocalhostat port3000. We'll assume, in this example, that the OAuth2 server is running on port3000in your local box.A successful login will look like this:
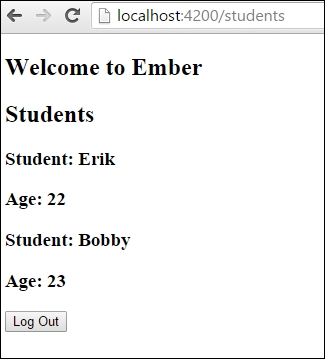
It will then redirect to the students route. This route will send a request to the server with an authorization bearer request with the correct token. It will receive the student data so that it can be displayed to the user:
Accessing this route without being logged in causes redirection to the login page.
The Ember Simple Auth add-on manages the session, authentication, authorization, persistence, and communication with a server. It has its own built-in session service that makes it easy to manage.
OAuth2 is a specification of a type of flow when doing authentication in web apps. As Ember is a single-page application, there is not much security on the application side. It must rely on a server to authenticate and manage tokens. ESA makes this possible by handling all the work needed to send and communicate with the server.