
Chapter 10. Web services, iteratees, and WebSockets
This chapter covers
- Accessing web services
- Using the iteratee library to deal with large responses
- Using WebSockets
- Creating custom body parsers
In previous chapters, we saw the elementary parts of a Play application. Your toolkit now contains all the tools you need to start building your own real-world applications. But there’s more to Play. Many web applications perform similar functionality, and Play bundles some libraries that make those functionalities easier to build, such as a cache, a library for making web service requests, libraries for OpenID and OAuth authentication, and utilities for cryptography and filesystem access.
Play also lays the foundation for the next generation of web applications, with live streams of data flowing between server and client and between multiple servers. Pages with live updates, chat applications, and large file uploads are becoming more and more common, and Play’s iteratee and WebSocket libraries give you the concepts and tools to handle such streams of data.
10.1. Accessing web services
Many of today’s applications not only expose web services, but also consume third-party web services. A large number of web applications and companies expose some or all of their data through APIs. Arguably the most popular in recent years are REST APIs that use JSON messages. For authentication, as well as HTTP basic authentication, OAuth is popular. In this section, we’ll look at how to use Play’s Web Service API to connect our application to remote web services.
10.1.1. Basic requests
As an example, we’ll connect our paperclip web shop to Twitter. We’ll build a page where the latest tweets mentioning paperclips are shown, as shown in figure 10.1.
Figure 10.1. Page showing tweets mentioning paperclips

Twitter exposes a REST API that allows you to search for tweets. This search API lives at http://search.twitter.com/search.json and returns a JSON data structure containing tweets.
We need to convert each tweet in this JSON structure to a Scala object, so we’ll create a new Tweet class for that. For this example, we’re only interested in the name of the person tweeting and the contents, so we’ll stick to a simple one:
case class Tweet(from: String, text: String)
We’ll also implement Reads[Tweet], so we can deserialize JSON into these objects:
implicit val tweetReads = (
      (JsPath  "from_user_name").read[String] ~
      (JsPath  "text").read[String])(Tweet.apply _)
The actual request to the Twitter API is performed using Play’s WS object. This is shown in a tweetList action in listing 10.1.
Listing 10.1. tweetList action

The WS.url method creates a WSRequestHolder object ![]() , which you can use to create a request in a method-chaining style. The get method on WSRequestHolder performs an HTTP GET request and returns a Future[Response]
, which you can use to create a request in a method-chaining style. The get method on WSRequestHolder performs an HTTP GET request and returns a Future[Response]![]() . Using the result method, we wait for it to be completed and extract the value
. Using the result method, we wait for it to be completed and extract the value ![]() .
.
Finally, the tweets are rendered with the following template:
Listing 10.2. Tweetlist template
@(tweets: Seq[Tweet])

@main("Tweets!") {
  <h1>Tweets:</h1>
  @tweets.map { tweet =>
  <ul>
    <li><span>@tweet.from</span>: @tweet.text
  </ul>
  }
}
This renders the tweets as shown in figure 10.1.
In our tweetList action, in listing 10.1, we used Await.result(response-Future, 10) to wait until the future is completed (or times out after 10 seconds) and then get the value out of it. But using the result method, which blocks, isn’t idiomatic use of a Future, so in the next section we’ll see how to improve the code.
10.1.2. Handling responses asynchronously
As we saw in chapter 3, we can return an asynchronous result in the form of an AsyncResult. This is preferable to blocking, because it allows Play to handle the response when the future is completed, instead of holding up one of a finite number of worker threads.
An AsyncResult can be constructed from a Future[Result]. This means that we don’t need to get the web service response out of the Future, but instead can use the map method to transform the Future[Response] into a Future[Result]. This is almost trivial, because we’ve already written code that creates a Result from the Response we get from the Twitter API. All we need to do is move this into a map call:
val resultFuture: Future[Result] = responseFuture.map { response =>
  val tweets = Json.parse(response.body).("results").as[Seq[Tweet]]
  Ok(views.html.twitterrest.tweetlist(tweets))
}
Finally, we can use this Future[Result] to construct an AsyncResult:
Async(resultFuture)
The Async method does nothing special; it just wraps the Future[Result] in an AsyncResult.
It’s common to not assign the Future[Result] to a variable, but to wrap the entire computation in an Async{} block instead, as in listing 10.3.
Listing 10.3. Completed Twitter API action method
def tweetList() = Action {
  Async {
    val results = 3
    val query = """paperclip OR "paper clip""""

    val responseFuture =
      WS.url("http://search.twitter.com/search.json")
        .withQueryString("q" -> query, "rpp" -> results.toString).get

    responseFuture.map { response =>
      val tweets = Json.parse(response.body).("results").as[Seq[Tweet]]
      Ok(views.html.twitterrest.tweetlist(tweets))
    }
  }
}
Looking at this code, you could be tempted to think that everything inside the Async{} block will be executed asynchronously, but that’s not the case. Remember, the Async doesn’t actually asynchronously execute its parameter. Instead, it just wraps its parameter in an AsyncResult and nothing more. The asynchronous part here is done by the get method that executes the HTTP request. Play’s WS library will perform the request asynchronously and return a Future to us.
In the next section, we’ll see how we can use the cache to reuse the responses from the WS library.
10.1.3. Using the cache
With our latest implementation of the tweetList method in listing 10.3, our application will call Twitter’s API every time this action method is executed. That’s not necessary and it’s not the best idea when thinking about performance. This is why we’re going to implement caching for the Twitter results.
Play provides an almost minimalist but useful caching API, which is intended as a common abstraction over different pluggable implementations. Play provides an implementation based on Ehcache, a robust and scalable Java cache, but you could easily implement the same API on top of another cache system.
For all cache methods, you need an implicit play.api.Application in scope. You can get one by importing play.api.Play.current. The Application is used by the caching API to retrieve the plugin that provides the cache implementation.
The cache abstraction is a simple key/value store; you can put an object into the cache with a string key, and optionally an expiration time, and get them out of the cache again:
Cache.set("user-erik", User("Erik Bakker"))
val userOption: Option[User] = Cache.getAs[User]("user-erik")
As you can see, the getAs method returns an Option, which will be a None if there’s no object with the given key in the cache, or if that object isn’t of the type that you specified.
A common pattern is to look for a value in the cache, and if it’s not in the cache, to compute it and store it in the cache and return it as well. Cache provides a getOrElse method that lets you do that in one go:
val bestSellerProduct: Product =
  Cache.getOrElse("product-bestseller", 1800){
    Product.getBestSeller()
}
This looks up the cached value for the product-bestseller key and returns it if found. If not, it’ll compute Product.getBestSeller() and cache it for 1800 seconds as well as return it. Note that with this method, there will always be a result available—either the cached or computed value—so the return type isn’t an Option, but the type of the value that you compute and cache.
Play additionally allows you to cache entire Actions. Our tweetList example lends itself well to that. You can use the Cached object to wrap an Action, as shown in listing 10.4.
Listing 10.4. Caching an entire action
def tweetList() = Cached("action-tweets", 120) {
  Action {
    Async {
      val results = 3
      val query = """paperclip OR "paper clip""""

      val responseFuture =
        WS.url("http://search.twitter.com/search.json")
          .withQueryString("q" -> query, "rpp" -> results.toString).get

      responseFuture.map { response =>
        val tweets =
          Json.parse(response.body).("results").as[Seq[Tweet]]
        Ok(views.html.twitterrest.tweetlist(tweets))
      }
    }
  }
}
Keep in mind that using this method means you can’t use any dynamic request data like query string parameters in your action method, because they’d be cached the first time, and subsequent requests to this action method with different parameters would yield the cached results.
Luckily, instead of specifying a literal string as a key, Play also allows you to specify a function that determines a key based on the RequestHeader of the request. You can use this to cache multiple versions of an action, based on dynamic data. For example, you can use this to cache a recommendations page for each user ID:
def userIdCacheKey(prefix: String) = { (header: RequestHeader) =>
  prefix + header.session.get("userId").getOrElse("anonymous")
}

def recommendations() =
  Cached(userIdCacheKey("recommendations-"), 120) {
    Action { request =>
      val recommendedProducts = RecommendationsEngine
        .recommendedProductsForUser(request.session.get("userId"))
      Ok(views.html.products.recommendations(recommendedProducts))
    }
}
The userIdCacheKey method, given a prefix, generates a cache key based on the user ID in the session. We use it to cache the output of the recommendations method for a given user.
In the next section, we’ll see some additional features of the WS library.
10.1.4. Other request methods and headers
As well as GET requests, you can of course use the WS library to send PUT, POST, DELETE, and HEAD requests.
For PUT and POST requests, you must supply a body:
val newUser = Json.toJson(Map(
  "name" -> "John Doe",
  "email" -> "[email protected]"))

val responseFuture =
  WS.url("http://api.example.com/users").post(newUser)
This will send the following HTTP request:
POST /users HTTP/1.1
Host: api.example.com
Content-Type: application/json; charset=utf-8
Connection: keep-alive
Accept: */*
User-Agent: NING/1.0
Content-Length: 47

{"name":"John Doe","email":"[email protected]"}
Play has automatically serialized our JSON object, and also provided a proper Content-Type header. So how exactly does Play determine how the body must be serialized, and how does it determine the proper Content-Type header? By now, you’re probably not surprised that Play uses implicit type classes to accomplish this.
The signature of the post method is as follows:
post[T](body: T)(implicit wrt: Writeable[T], ct: ContentTypeOf[T]):
  Future[Response]
You can post a body of any type T, as long as you also provide a Writeable[T] and a ContentTypeOf[T] or they’re implicitly available. A Writeable[T] knows how to serialize a T to an array of bytes, and a ContentTypeOf[T] knows the proper value of the Content-Type header for a T.
Play provides Writeable[T] and ContentTypeOf[T] instances for some common types, including JsValue. That’s how Play knows how to do an HTTP POST request with a JsValue body.
Headers can be added to a request using the withHeaders method:
WS.url("http://example.com").withHeaders(
  "Accept" -> "application/json")
Instead of manually typing the name of headers, it’s recommended that you use the predefined header names from play.api.http.HeaderNames:
import play.api.http.HeaderNames

WS.url("http://example.com").withHeaders(
  HeaderNames.ACCEPT -> "application/json")
This prevents potential spelling mistakes.
10.1.5. Authentication mechanisms
So far, we’ve conveniently dodged the topic of authentication—the Twitter search API works without it. In practice, though, you’ll often need to authenticate with web services. Two common methods (other than sending a special query-string parameter or header, which we already know how to do from the previous sections) are HTTP basic authentication and OAuth. Play’s WS library makes both easy to use.
We’ve seen that the WS.url method returns a WSRequestHolder, a class used to build requests. Methods like withQueryString and withHeaders return a new WSRequestHolder. This allows chaining of these methods to build a request. The methods we’ll use to add authentication to our request work the same way.
For HTTP basic authentication, use the withAuth method on WSRequestHolder:
import com.ning.http.client.Realm.AuthScheme

val requestHolder = WS.url("http://example.com")
  .withAuth("johndoe", "secret", AuthScheme.BASIC)
The withAuth method takes three parameters: a username, a password, and an authentication scheme of type com.ning.http.client.Realm.AuthScheme. AuthScheme is a Java interface in the Async HTTP Client, the HTTP client library that Play’s WS library uses under the hood. This allows for pluggable authentication schemes, and HTTP basic is one of several provided schemes. The AuthScheme interface is pretty big, because it allows for challenge/response type authentication methods, with interactions between server and client.
A popular standard for authenticating web requests is OAuth—services like Twitter and Facebook support OAuth authentication for their APIs. OAuth requests are authenticated using a signature that’s added to each request, and this signature is calculated using secret keys that are shared between the server that offers OAuth protected resources and a third party that OAuth calls the consumer. Also, OAuth defines a standard to acquire some of the required keys and the flow that allows end users to grant access to protected resources.
For example, if you want to give a third-party website access to your data on Facebook, the third party will redirect you to Facebook where you can grant access, after which Facebook will redirect you back to the third party. During these steps, secret keys are exchanged between the third party and Facebook. The third party can then use these keys to sign requests to Facebook.
Signing requests is only one part of OAuth, but it’s the only part we’ll be discussing in this section. We’ll assume that you’ve acquired the necessary keys from the web service you’re trying to access manually.
Play has a generic mechanism to add signatures to requests, and—at the time of writing—only one implementation, namely for OAuth. The OAuthCalculator can calculate signatures given a consumer key, a consumer secret wrapped in a ConsumerKey, and an access token and token secret wrapped in a RequestToken.
We’ll use these to post a new tweet to Twitter:
Listing 10.5. Signing a request with OAuth
val consumerKey = ConsumerKey(
  "52xEY4sGbPlO1FCQRaiAg",
  "KpnmEeDM6XDwS59FDcAmVMQbui8mcceNASj7xFJc5WY")

val accessToken = RequestToken(
  "16905598-cIPuAsWUI47Fk78guCRTa7QX49G0nOQdwv2SA6Rjz",
  "yEKoKqqOjo4gtSQ6FSsQ9tbxQqQZNq7LB5NGsbyKU")

def postTweet() = Action {

  val message = "Hi! This is an automated tweet!"
  val data = Map(
    "status" -> Seq(message))

  val responseFuture =
    WS.url("http://api.twitter.com/1/statuses/update.json")
    .sign(OAuthCalculator(consumerKey, accessToken)).post(data)

  Async(responseFuture.map(response => Ok(response.body)))
}
We create a ConsumerKey from the tokens Twitter provided during registration of our application. We also create a RequestToken from our access token credentials.
The Twitter status update API expects a body of type application/x-www-form-urlencoded, which is the same body format that a browser submits on a regular form submit. Play has a Writeable and a ContentTypeOf that encode a body of type Map[String, Seq[String]] as application/x-www-form-urlencoded, so we construct our body as a Map[String, Seq[String]].
We construct an OAuthCalculator and use that to sign the request. Finally, we post the request and map the response body into a result.
10.2. Dealing with streams using the iteratee library
Play’s iteratee library is in the play.api.libs.iteratee package. This library is considered a cornerstone of Play’s reactive programming model. It contains an abstraction for performing IO operations, called an iteratee. It’s likely that you’ve never heard of these iteratee things. Don’t fret: in this section we’ll explain what iteratees are, why and where Play uses them, and how you can use them to solve real problems.
We’ll start with a somewhat contrived example. Twitter not only offers the REST API that we saw in the previous section, but also a streaming API. You start out using this API much like the regular API: you construct an HTTP request with some parameters that specify which tweets you want to retrieve. Twitter will then start returning tweets. But unlike the REST API, this streaming API will never stop serving the response. It’ll keep the HTTP connection open and will continue sending new tweets over it. This gives you the ability to retrieve a live feed of tweets that match a particular search query.
10.2.1. Processing large web services responses with an iteratee
The way we used the WS library in section 10.1.1 is shown in figure 10.2.
Figure 10.2. Using the WS library

If the web service sends the response in chunks, the WS library buffers these chunks until it has the complete HTTP response. Only then will it give the HTTP response to our application code. This works fine for regular-sized HTTP responses.
The buffering strategy breaks down when trying to use the Twitter API. The HTTP response is infinitely long, and either we’ll get a time out from the library or at some point it’ll run out of memory trying to buffer the response. Either way, we won’t be able to do anything with the response if our strategy is to wait until it’s complete.
We need another approach, where we can start using parts of the response as soon as they arrive in our application, without needing to wait for the entire response. And this is exactly what an iteratee can do. An iteratee is an object that receives each individual chunk of data and can do something with that data. This is shown in figure 10.3.
Figure 10.3. Using the WS library with an iteratee to consume the response

If we use the WS library with an iteratee, the response chunks aren’t buffered in a buffer that’s outside our control. Instead, an iteratee that’s a part of our application code and fully under our control receives all the chunks. The iteratee can do anything it wants with these chunks, or, rather, we can construct an iteratee and make it do whatever we want with the chunks.
When dealing with the Twitter streaming API, we’d want to use an iteratee that converts the HTTP response chunks into tweet objects, and send them to another part of our application, perhaps to be stored in a database. When that HTTP response chunk is dealt with, it can be discarded, and no buffer will be filled and run out of space eventually.
Iteratees are instances of the Iteratee class, and they can most easily be constructed using methods on the Iteratee object. As a first and simple example, we’ll create an iteratee that logs every chunk to the console.
The Iteratee object contains many useful methods to create a simple Iteratee. We’ll use the foreach method:
val loggingIteratee = Iteratee.foreach[Array[Byte]] { chunk =>
  val chunkString = new String(chunk, "UTF-8")
  println(chunkString)
}
The foreach[A] method on the Iteratee object takes a single parameter, a function that takes a chunk of type A and returns an Iteratee[A, Unit]. When data is fed to this iteratee, the function we provided will be called for every chunk of data. In this case, we construct an iteratee that takes chunks of type Array[Byte]. For each chunk that’s received, a string is constructed and printed.
The Iteratee class has two type parameters. The first indicates the Scala type for the chunks that the iteratee accepts. In our loggingIteratee, the chunks are of type Array[Byte].
The second type parameter indicates the type of the final result that the iteratee produces when it’s done. The loggingIteratee doesn’t produce any final result, so its second type parameter is Unit. But you could imagine making an iteratee that counts all the chunks that it receives, and produces this number at the end. Or we could create an iteratee that concatenates all its chunks, like a buffer.
To create an iteratee that produces a value, we need another method, because the Iteratee.foreach method only constructs iteratees that produce nothing. We’ll see examples of value-producing iteratees later in this chapter.
If we want to connect to Twitter’s streaming API, we can use this loggingIteratee to print every incoming chunk from Twitter to the console. Of course, printing this to the console is generally not useful in a web application, but it’ll serve as a good starting point for us.
One of the streaming API endpoints that Twitter provides emits a small sample of all public Tweets, and it’s located at https://stream.twitter.com/1/statuses/sample.json. We can request it and use our loggingIteratee to deal with the response as follows:
WS.url("https://stream.twitter.com/1/statuses/sample.json")
  .sign(OAuthCalculator(consumerKey, accessToken))
  .get(_ => loggingIteratee)
The get method doesn’t accept the iteratee by itself, but wants a function Response-Headers => Iteratee. We’re currently not interested in the response headers, so we use an anonymous function that discards its parameter and returns our loggingIteratee. The Twitter response will never end, so once invoked, this piece of code will continue logging all received chunks to the console. This means that we only have to run it once. A natural place in a Play application for things that only need to run once is in the Global object. Listing 10.6 shows a full example:
Listing 10.6. Using Twitter’s streaming API with a simple logging iteratee
import play.api._
import play.api.mvc._
import play.api.libs.oauth.{ ConsumerKey, OAuthCalculator,
  RequestToken }
import play.api.libs.iteratee.Iteratee
import play.api.libs.ws.WS

object Global extends GlobalSettings {

  val consumerKey = ConsumerKey("52xEY4sGbpLO1FCQRaiAg",
    "KpnmEeDM6XDwS59FDcAmVMQbui8mcceNASj7xFJc5WY")

  val accessToken = RequestToken(
    "16905598-cIPuAsWUI47Fk78guCRTa7QX49G0nOQdwv2SA6Rjz",
    "yEKoKqqOjo4gtSQ6FSsQ9tbxQqQZNq7LB5NGsbyKU")

  val loggingIteratee = Iteratee.foreach[Array[Byte]] { chunk =>
    val chunkString = new String(chunk, "UTF-8")
    println(chunkString)
  }

  override def onStart(app: Application) {
    WS.url("https://stream.twitter.com/1/statuses/sample.json")
      .sign(OAuthCalculator(consumerKey, accessToken))
      .get(_ => loggingIteratee)
  }

}
When running an application with this Global object, your console will be flooded with a huge number of Twitter statuses.
The iteratee that we used is a special case, because it doesn’t produce a value. Something that doesn’t produce a value must have side effects in order to do something useful, and in this case the println method has a side effect. All iteratees created using Iteratee.foreach must similarly have a side effect in order to do something, since they don’t produce a value. This is similar to the foreach method on collections.
10.2.2. Creating other iteratees and feeding them data
So far, we haven’t created an iteratee that actually produces something; we’ve relied on side effects of the method we gave to foreach. In general, though, an iteratee can produce a value when it’s done.
The Iteratee object exposes more methods that we can use to create iteratees. Suppose we want to build an iteratee that accepts Int chunks, and sums these chunks. We can do that as follows:
val summingIteratee = Iteratee.fold(0){ (sum: Int, chunk: Int) =>
  sum + chunk
}
This works much like the fold method on any Scala collection. It takes two parameters: an initial value, in this case 0, and a function to compute a new value from the previous value and a new chunk. The iteratee that it creates will contain the value 0. When we feed it, say, a 5, it’ll compute a new value by summing its old value and the new 5, and then return a new iteratee with the value 5. If we then feed that new iteratee a 3, it’ll again produce a new iteratee, now with the value 8, and so forth.
The summingIteratee consumes chunks of type Int. But unlike the loggingIteratee that we saw before and that didn’t produce values, the summingIteratee does produce a value: the sum, with type Int. This is an iteratee of type Iteratee[Int, Int].
How could we test our Iteratee? Ideally, we’d like to feed it some chunks and verify that the result is indeed the sum of the chunks. It turns out that the Iteratee class has a counterpart: Enumerator. An enumerator is a producer of chunks. An Enumerator can be applied to an Iteratee, after which it will start feeding the chunks it produces to the Iteratee. Obviously, the type of the chunks that the enumerator produces must be the same as what the iteratee consumes.
Let’s create an enumerator with a fixed number of chunks:
val intEnumerator = Enumerator(1,6,3,7,3,1,1,9)
This creates an Enumerator[Int] that will produce eight chunks of type Int. We can apply an enumerator to this iteratee and then extract the sum as follows:
val newIterateeFuture: Future[Iteratee[Int, Int]] =
  intEnumerator(summingIteratee)
val resultFuture: Future[Int] = newIterateeFuture.flatMap(_.run)
resultFuture.onComplete(sum => println("The sum is %d" format sum))
We first apply this iteratee to our enumerator, which will give us a future of the new iteratee. Remember that an iteratee is immutable. It won’t be changed by feeding it a chunk. Instead, it’ll return a new iteratee with a new state. Or rather, it’ll return a future of a new iteratee, as computing the new state can be an expensive operation and is performed asynchronously. With a regular map, we’d get a Future[Future[Int]], but with flatMap, we get a Future[Int]. Finally, we register a callback with onComplete; this callback will be invoked when the future is completed, which is when the iteratee is done processing all the input.
There are a few more methods on the Iteratee object that create iteratees, including some variants of fold that make it easier to work with functions that return a future of a new state, instead of the new state immediately.
We constructed our intEnumerator with a fixed set of chunks. This doesn’t lend itself well to enumerators that need to stream a lot of data, or when the data isn’t fully known in advance. But there are more methods for constructing an Enumerator, to be found on the Enumerator object. We’ll run into a few of them in later sections.
Iteratees can also be transformed in various ways. For example, when using the mapDone method on an Iteratee, the result of the iteratee can be transformed. Together with fold, this allows for creating versatile iteratees easily: you pass some initial state to an iteratee, define what needs to happen on every chunk of data, and when all data is processed, you get a chance to construct a final result from the last state. We’ll see an example of this in section 10.4.4.
10.2.3. Iteratees and immutability
As mentioned before, the iteratee library is designed to be immutable: operations don’t change the iteratee that you perform it on, but they return a new iteratee. The same holds for enumerators. Also, the methods on the Iteratee object that create iteratees encourage writing immutable iteratees.
For example, the fold method lets you explicitly compute a new state, which is then used to create a new iteratee, leaving the old one unmodified. Immutable iteratees can be safely reused; the iteratee that you start with is never changed, so you can apply it to different enumerators as often as you like without problems.
The fact that the library is designed for making immutable iteratees doesn’t mean that every iteratee is always immutable. For example, here are both an immutable and a mutable iteratee that do the same thing: sum integers:
val immutableSumIteratee = Iteratee.fold(0){ (sum: Int, chunk: Int) =>
  sum + chunk
}

val mutableSumIteratee = {
  var sum = 0
  Iteratee.foreach[Int](sum += _).mapDone(_ => sum)
}
The first iteratee uses fold to explicitly compute a new state from the current state and a chunk. The second iteratee uses a captured variable and the foreach method that updates that captured variable as a side effect. Finally, the Unit result from the foreach is mapped to the sum.
If you apply these iteratees to an enumerator once, they’ll behave the same way. But afterward, the mutableSumIteratee will contain a reference to the sum variable, which won’t be zero anymore. If you apply mutableSumIteratee on an enumerator a second time, the result will be wrong!
As for other Scala code, immutable iteratees are preferable over mutable iteratees, but as for other Scala code, performance reasons sometimes force us to use a mutable implementation. And sometimes your iteratee interacts with external resources that make it next to impossible to make it immutable.
In the next section, we’ll see how we can use both iteratees and enumerators to implement bidirectional communication with web browsers.
10.3. WebSockets: Bidirectional communication with the browser
Until recently, the web only supported one-way communication: a browser requests something from a server and the server can only send something in response to such a request. The server had no way of pushing data to a client other than as a response to a request.
For many applications, this is problematic. The classic example is a chat application, where anybody can send a new message, which the server then broadcasts to many clients. Without special tricks, this kind of broadcasting is impossible for a web application, because it’s an action that’s initiated from the server, and not from the browser.
Various workarounds have been used in the past. The most basic approach is polling: the browser sends a request to the server to ask for new data every second or so. This is shown in figure 10.4.
Figure 10.4. Bidirectional communication using polling

When polling, the browser sends a request to the server at a regular interval requesting new messages. Often, the server will have nothing. When the browser wants to send data to the server, a new request is sent as well. In figure 10.4, we show the HTTP requests used between a client (Client A) and a server in a chat with a single other participant. As you can see, often a polling request is answered with no new message. A total of six requests are needed for this scenario with polling.
Polling requires a lot of resources: for a responsive feeling in a chat application, the minimum poll frequency is about a second. Even with a modest number of active users, this adds up to a large number of requests to the server every second, and the size of the HTTP headers in every request and response adds up to a fair amount of bandwidth usage.
A more advanced workaround is Comet, which is a technique to allow the server to push data to a client. With Comet, the browser starts a request and the server keeps the connection open until it has something to send. If the first message is sent by the server after 10 seconds, only a single request is needed with Comet, whereas 10 requests would’ve been used with polling. Comet implementations vary in the details: the server can keep the connection open after sending the first message, or it could close the connection after the response, in which case the client will need to establish a new Comet connection. The first variant is shown in figure 10.5.
Figure 10.5. Bidirectional communication using Comet

This figure shows the same scenario as figure 10.4, but with Comet instead of polling. A single connection is made to the server that’s used for all the messages from the server to the client. A new request is made every time the client wants to send something to the server. A total of three requests is needed for this scenario with Comet.
Recently, web browsers started supporting a new standardized protocol for bidirectional communication between browsers and servers called WebSocket. Like a regular HTTP request, a WebSocket request is still initiated by the browser, but it’s then kept open. While the connection is open, both the server and the browser can send data through the connection whenever they want.
A WebSocket request starts as a regular HTTP request, but the request contains some special headers requesting an upgrade of the protocol from HTTP to WebSocket. This is nice for two reasons: First, it works well through most firewalls, because the request starts out as a regular HTTP request. Second, a server can start interpreting the request as an HTTP request, and only later does it need to switch to WebSocket. This means that both protocols can be served on a single port. Indeed, the standard port for WebSocket requests is 80, the same as HTTP.
Using WebSocket, the chat application scenario is illustrated in figure 10.6.
Figure 10.6. Bidirectional communication using WebSocket

This figure shows the same scenario as figures 10.4 and 10.5, but with WebSockets. Here, only a single connection needs to be made. This connection is upgraded from HTTP to WebSocket and can then be used by both the client and the server to send data whenever they want. No additional requests are needed.
In the next section, we’ll see how we can use WebSockets from Play.
10.3.1. A real-time status page using WebSockets
Play has built-in support for WebSockets. From the application’s perspective, a WebSocket connection is essentially two independent streams of data: one stream of data incoming from the client and a second stream of data to be sent to the client. There’s no request/response cycle within the WebSocket connection; both parties can send something over the channel whenever they want. Given what we’ve discussed so far in this chapter, you can probably guess what Play uses for these streams of data: the iteratee library.
To handle the incoming stream of data, you need to provide an iteratee. You also provide an enumerator that’s used to send data to the client. With an iteratee and an enumerator, you can construct a WebSocket, which comes in the place of an Action.
As an example, we’ll build a status page for our web application, showing the real-time server load average. Load average is a common but somewhat odd measure of how busy a server is. In general, you could say that if it’s below the number of processors in your machine you’re good, and if it’s higher for longer periods of time, it’s not so good.
Our status page will open a WebSocket connection to our Play application, and every three seconds the Play application will send the current load average over the connection. A message listener on the status page will then update the page to show the new number. It will look like figure 10.7.
Figure 10.7. Status page showing load average

We’ll start with the client side part of it. The first thing we need is a regular HTML page, served by a regular Play action. This page will use JavaScript to open a WebSocket connection to the server. Opening a WebSocket connection with JavaScript is trivial:
var ws = new WebSocket("ws://localhost:9000/WebSockets/systemstatus");
Here we hardcoded the URL, but it’s better to use Play’s reverse routing. The full page of HTML and JavaScript looks like this:
Listing 10.7. Status page HTML and JavaScript

We wrap all our script code in a $ call ![]() , which makes jQuery execute it after the full HTML page is loaded. A WebSocket connection is opened, using the webSocketURL method on the route to get the proper WebSocket URL
, which makes jQuery execute it after the full HTML page is loaded. A WebSocket connection is opened, using the webSocketURL method on the route to get the proper WebSocket URL ![]() . The onmessage callback is used to install a message listener
. The onmessage callback is used to install a message listener ![]() . The message is an instance of MessageEvent; these objects have a data field that contains the data from the server, in this case the string containing the current load average number. We use
jQuery to update the page
. The message is an instance of MessageEvent; these objects have a data field that contains the data from the server, in this case the string containing the current load average number. We use
jQuery to update the page ![]() .
.
On the server, we create a WebSocket action as follows:
Listing 10.8. WebSocket action that sends load average every three seconds
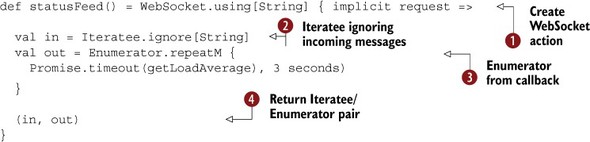
The WebSocket.using method ![]() is used to create a WebSocket action instead of a regular HTTP action. Its type parameter, String, indicates that each message that will be sent and received over this WebSocket connection is a String. Inside the method, we create an Iteratee. Since we’re not interested in any incoming messages in this particular example, we create one that ignores all messages
is used to create a WebSocket action instead of a regular HTTP action. Its type parameter, String, indicates that each message that will be sent and received over this WebSocket connection is a String. Inside the method, we create an Iteratee. Since we’re not interested in any incoming messages in this particular example, we create one that ignores all messages
![]() . Next, we create an Enumerator from a callback. This enumerator calls the getLoadAverage method (which we defined elsewhere) every three seconds, creating a stream with a message every three seconds
. Next, we create an Enumerator from a callback. This enumerator calls the getLoadAverage method (which we defined elsewhere) every three seconds, creating a stream with a message every three seconds ![]() . Finally, we return a tuple with the iteratee and the enumerator
. Finally, we return a tuple with the iteratee and the enumerator ![]() . Play will hook these up to the client for us.
. Play will hook these up to the client for us.
This WebSocket action is routed like a regular action in the routes file:
GET /WebSockets/statusFeed controllers.WebSockets.statusFeed()
In the next section, we’ll use our new knowledge of WebSockets to build a simple chat application.
10.3.2. A simple chat application
WebSockets form a bidirectional communication channel, so we can also send messages to the server. We’ll use this to build a minimal chat application.
Our chat application has a single chatroom that notifies users when someone joins or leaves and allows users to send a message to everybody in the room. It’s shown in figure 10.8.
Figure 10.8. WebSockets chatroom

For the status page we made earlier, we used Iteratee.ignore to create an iteratee that ignores all input. This time, we’ll need one that broadcasts everything that the user says to all other users in the channel.
There are two new issues for us here. First, we must learn how to send something to a user that’s connected through a WebSocket. Second, we need to be able to send something to all the users that are in the room.
So far, we’ve seen two types of enumerators. In section 10.2.2 we saw enumerators with a fixed set of chunks, and in listing 10.8 we saw enumerators that use a callback function in combination with a timeout to produce a stream of chunks. In our chat application we need to add chunks to enumerators after they’re created. This is because we need to provide an enumerator when the user connects, so Play can hook it up to the users’ WebSocket channel, but we want to send a message only when another user says something.
As we’re sending all messages to all connected users, ideally we want to create a single Enumerator that can be hooked up to all the connected users. Play allows you to make such an enumerator with Concurrent.broadcast. This method returns a tuple with an enumerator and a Channel. This channel is tied to the enumerator and allows you to push chunks into the enumerator:
val (enumerator, channel) = Concurrent.broadcast[String]
channel.push("Hello")
channel.push("World")
This solves our first issue, as we can now push chunks into an enumerator after it’s created. Our second issue was that we need to be able to send something to all the users in the room. That’s also solved, as we can hook up this same single enumerator to every user that connects.
Now suppose we want our application to keep a list of names of all the people who are connected. You might be tempted to just create a set of usernames on the controller, as in listing 10.9:
Listing 10.9. Unsafe: mutable state defined on the controller
object Chat extends Controller {
  var users = Set[String]()

  def WebSocket(username: String) = WebSocket.using[String] { request =>
    users += username

    ... // Create iteratee etc.
  }
}
This isn’t safe. Because multiple requests are executed concurrently, this leads to a race condition: two concurrent requests can both update the users value at the same time, causing a lost update.
The idiomatic way to solve this in Play is by using an Akka actor. An actor has private state, which is only accessible from within the actor. An actor also has a mailbox, a queue of messages to be processed, and it will process messages sequentially. Even if two messages are sent to an actor at the same time, they’ll be processed one after another by the actor. Furthermore, since the actor is the only one that accesses its private state, that state will never be concurrently accessed.
We’ll model the chatroom with an actor. We’ll also create three message types: Join, for when a new user enters the room; Leave, for when a user leaves; and Broadcast, for when a user says something:
case class Join(nick: String)
case class Leave(nick: String)
case class Broadcast(message: String)
Our actor will contain a collection of the users. This collection will never be accessed from outside the actor, and the actor only processes one message at a time, so no race condition can occur. The actor is also responsible for creating the iteratee and enumerator that are needed to set up the WebSocket connection. Our actor’s source code is shown in listing 10.10.
Listing 10.10. Chat application room actor


Our actor contains the set of nicknames of the people in the room ![]() . We create an enumerator and channel with Concurrent.broadcast
. We create an enumerator and channel with Concurrent.broadcast ![]() and implement the receive method of our actor
and implement the receive method of our actor ![]() . This method defines how each message is processed, and consists of a series of case statements that match the messages this
actor can handle. Our actor handles the three messages we defined earlier: Join, Leave, and Broadcast. When a Join message is processed, an Iteratee that sends a Broadcast message to the actor on every received message
. This method defines how each message is processed, and consists of a series of case statements that match the messages this
actor can handle. Our actor handles the three messages we defined earlier: Join, Leave, and Broadcast. When a Join message is processed, an Iteratee that sends a Broadcast message to the actor on every received message ![]() is created. When the WebSocket is disconnected, a Leave message is sent to the actor
is created. When the WebSocket is disconnected, a Leave message is sent to the actor ![]() . The nickname and enumerator are added to the map of users
. The nickname and enumerator are added to the map of users ![]() , and the iteratee and enumerator are returned to the sender of the Join message
, and the iteratee and enumerator are returned to the sender of the Join message ![]() , which will be our action method. If a user with this nickname was already in the room, we create an enumerator with an error
message and an iteratee that ignores any messages that the user sends
, which will be our action method. If a user with this nickname was already in the room, we create an enumerator with an error
message and an iteratee that ignores any messages that the user sends ![]() .
.
Now we need a controller that creates an instance of this actor and sends the appropriate message when a user tries to join the chatroom, as in listing 10.11:
Listing 10.11. Chat controller
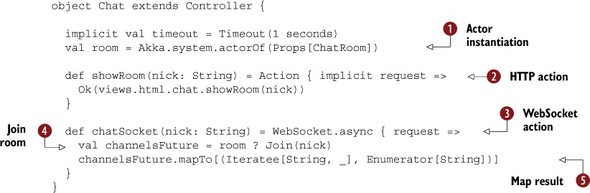
Our chat controller instantiates a chatroom ![]() and has two controller actions. The showRoom action
and has two controller actions. The showRoom action ![]() serves an HTML page that shows the chatroom and has the JavaScript required to connect to the WebSocket action. The chatSocket action
serves an HTML page that shows the chatroom and has the JavaScript required to connect to the WebSocket action. The chatSocket action ![]() is a WebSocket action that sends a Join message to the room actor, using the ? method
is a WebSocket action that sends a Join message to the room actor, using the ? method ![]() . This method is called ask, and the return type is Future[Any]. This future will contain what the actor sends back. We know that our actor returns a tuple with an iteratee and an enumerator,
so we use mapTo on the Future[Any] to cast this to Future[(Iteratee[String, _], Enumerator[String])
. This method is called ask, and the return type is Future[Any]. This future will contain what the actor sends back. We know that our actor returns a tuple with an iteratee and an enumerator,
so we use mapTo on the Future[Any] to cast this to Future[(Iteratee[String, _], Enumerator[String]) ![]() , which is also what WebSocket.async expects.
, which is also what WebSocket.async expects.
Let’s create some routes for our actions:
GET /room/:nick           controllers.Chat.room(nick)
GET /room/socket/:nick    controllers.Chat.chatSocket(nick)
Finally, we need the HTML to show the chatroom, and the JavaScript that connects to the WebSocket sends data when the user submits the form, and renders any messages received through the WebSocket. This HTML page is shown in listing 10.12.
Listing 10.12. Chatroom HTML page

This HTML page shows the chatroom and connects to the chatSocket action via WebSocket ![]() . It listens to incoming messages and renders them
. It listens to incoming messages and renders them ![]() . When the user submits the form, the message is sent to the server over the WebSocket connection
. When the user submits the form, the message is sent to the server over the WebSocket connection ![]() .
.
Now that you’ve seen how to establish WebSocket connections and how to work with iteratees and enumerators, you’re ready to build highly interactive web applications.
In the next section, we’ll see how we can reuse our knowledge of iteratees in another part of Play: body parsers.
10.4. Using body parsers to deal with HTTP request bodies
HTTP requests are normally processed when they’ve been fully received by the server. An action is only invoked when the request is complete, and when the body parser is done parsing the body of the request.
Sometimes, this isn’t the most convenient approach. Suppose, for example, that you’re building an API where users can store files. Now suppose that a user is uploading a very large file that will exceed the storage quota. It’s inconvenient for the user if they have to upload the entire file before the API will respond that it’s not allowed. It would be much better to get a rejection as soon as they start uploading.
This isn’t possible in an action, because it will only be invoked after the full file is uploaded. But you can do this in the body parser. In this section, we’ll show how body parsers work, how you can use and compose existing body parsers, and finally how you can build your own body parsers from scratch.
10.4.1. Structure of a body parser
A body parser is an object that knows what to make of an HTTP request body. A JSON body parser, for example, knows how to construct a JsValue from the body of an HTTP request that contains JSON data.
A body parser can also choose to return an error Result; for example, when the user exceeds the storage quota, or when the HTTP request body doesn’t conform to what the body parser expects, like a non-JSON body for a JSON body parser.
A body parser that constructs a type A can return either an A, if successful, or a Result, in case of failure. This is why its return type is Either[Result, A]. There’s a slight mismatch between what we informally call a body parser and what the BodyParser trait in Play is, though.
BodyParser is a trait that extends (RequestHeader) ? Iteratee[Array[Byte], Either[Result, A]]. So a BodyParser is a function with a RequestHeader parameter returning an iteratee. The iteratee consumes chunks of type Array[Byte] and eventually produces either a play.api.mvc.Result or an A, which can be anything. This iteratee does the actual parsing work. In informal contexts, it’s also common to call just this iteratee the body parser.
An Action in Play not only defines the method that constructs a Result from a Request[A], but it also contains the body parser that must be used for requests that are routed to this action. That’s usually not immediately visible, because we often use an apply method on the Action object that doesn’t take a body parser parameter. But the following two Action definitions construct the same Action:
Action { // block }
Action(BodyParsers.parse.anyContent) { // block }
The type of the body parser determines the type of the request that you’ll receive in the action method. The anyContent body parser is of type BodyParser[AnyContent], so your action will receive a Request[AnyContent], which means that the body field of the Request is of type AnyContent. AnyContent is a convenient one; it has the methods asJson, asText, asXml, and so on, which allow you to extract the actual body in the action method itself.
Other body parsers have other types. For example, the BodyParsers.parse.json body parser will result in a Request[JsValue], and then the body field of the Request is of type JsValue. If your action method is only supposed to accept JSON data, you can use this body parser instead of the anyContent one. This has the advantage that you don’t have to deal with the case of an invalid JSON body.
With the json body parser, a BadRequest response is sent back to the client automatically when the body doesn’t contain valid JSON. If you use the anyContent body parser, you need to check whether the Option[JsValue] that you get back from body.asJson is empty.
Figure 10.9 shows how Play uses body parsers in the request lifecycle.
Figure 10.9. Body parser in the request lifecycle
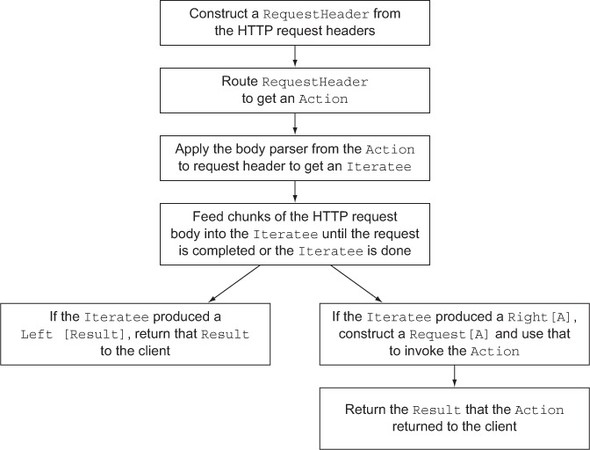
Play constructs a RequestHeader from an incoming HTTP request. The router selects the appropriate Action. The body parser is used to create an Iteratee that’s then fed the body of the HTTP request. When done, a Request is constructed that’s used to invoke the Action.
A body parser iteratee can also return a Result directly. This is used to indicate a problem, such as when the json body parser encounters an invalid Content-Type header or when the body isn’t actually JSON. When the body parser iteratee produces a Result, Play won’t construct a Request and won’t invoke the Action, but instead will return the Result from the body parser iteratee to the client.
10.4.2. Using built-in body parsers
So far, most of our actions have used the BodyParsers.parse.anyContent, because that’s the body parser that’s used when you don’t explicitly choose one. In chapters 7 and 8, we saw the multipartFormData and json body parsers. They produce a MultipartFormData and a JsValue respectively.
Play has many more body parsers, all available on the Bodyparsers.parse object. There are body parsers for text, XML, and URL-encoded bodies, similar to the JSON body parser we saw. All of them also allow you to specify the maximum body size:
def myAction = Action(parse.json(10000)) {
  // foo
}
This action will return an EntityTooLarge HTTP response when the body is larger than 10,000 bytes. If you don’t specify a maximum length, the text, JSON, XML, and URL-encoded body parsers default to a limit of 512 kilobytes. This can be changed in application.conf:
parsers.text.maxLength = 1m
Like the json body parser, the xml, text and urlFormEncoded body parsers use the Content-Type request header to check that the request has a suitable content type. If not, they return an error result. If you don’t want to check the header, that’s no problem. For all these body parsers, there are also body parsers whose names start with tolerant that parse the same way, but that don’t check the header. For example, you can use BodyParsers.parse.tolerantJson to parse a body as JSON regardless of the Content-Type header.
Suppose you’re building an API where people can upload a file. To store the file, you can use the temporaryFile body parser. This is a body parser of type BodyParser[TemporaryFile]. The request body will be of type play.api.libs.Files.TemporaryFile. If you want to store the file to a permanent location, you can use the moveTo method:
def upload = Action(parse.temporaryFile) { request =>
  val destinationFile = Play.getFile("uploads/myfile")
  request.body.moveTo(destinationFile)
  Ok("File successfully uploaded!")
}
We specify the temporaryFile body parser, and our request.body is therefore of type TemporaryFile. We also use the Play.getFile method to construct a java.io.File relative to the application root. This requires an implicit Application to be available, which you can get by importing play.api.Play.current.
If you don’t do anything with the TemporaryFile, the underlying temporary file will be automatically deleted when the TemporaryFile is garbage collected.
10.4.3. Composing body parsers
The built-in body parsers are fairly basic. It’s possible to compose these basic body parsers into more complex ones that have more complex behavior if you need that. We’ll do that in this section to build some body parsers that handle file uploads in various ways.
Play also has a file body parser that takes a java.io.File as a parameter:
def store(filename: String) = Action(
  parse.file(Play.getFile(filename))) { request =>
  Ok("Your file is saved!")
}
A limitation is that you can only use the parameters of the action method in your file body parser. In this example, that’s the filename parameter. The RequestHeader itself isn’t available, though you might want to use that to verify that the file has the proper content type.
Luckily, body parsers are simple and therefore easy to manipulate. The BodyParsers.parse object has a few helper methods to compose existing body parsers, and the BodyParser trait allows us to modify body parsers.
Suppose we want to make a body parser that works like the file body parser, but only saves the file if the content type is some given value. We can use the BodyParsers.parse.when method to construct a new body parser from a predicate, an existing body parser, and a function constructing a failure result:

We can use this body parser as follows:
def savePdf(filename: String) = Action(
  fileWithContentType(filename, "application/pdf")) { request =>
  Ok("Your file is saved!")
}
In this case, we did something before we invoked an existing body parser. But we can also use a body parser first, and then modify its result. Suppose you don’t want to store these files on the local disk, but in, say, a MongoDB cluster.
In that case, we can start with the temporaryFile body parser to store the file on disk and then upload it to MongoDB. The final result of our body parser could then be the object ID that MongoDB assigned to our file. Such a body parser can be constructed using the map method on an existing body parser:
def mongoDbStorageBodyParser(dbName: String) =
  parse.temporaryFile.map { temporaryFile =>
  // Here some code to store the file in MongoDB
  // and get an objectId
  objectId
}
We’ve mapped a BodyParser[TemporaryFile] into a BodyParser[String], where the string that’s produced is the MongoDB object ID assigned to the file that was uploaded. If you use this in an action, you have the MongoDB object ID immediately available:
val dbName = Play.configuration.getString("mongoDbName")
  .getOrElse("mydb")

def saveInMongo = Action(mongoDbStorageBodyParser(dbName)) {
  request =>
  Ok("Your file was saved with id %s" format request.body)
}
This ability to compose and adapt body parsers makes them really suitable for reuse. One limitation is that you can only adapt the final result of the body parsing. You can’t really change the actual processing of chunks of the HTTP request. In our MongoDB example, this means that we must first buffer the entire request into a file before we can store it in MongoDB.
In the next section, we’ll see how we can create a new body parser, which gives us the opportunity to work with the chunks of data from the HTTP request, and gives us even more flexibility in how to handle the request.
10.4.4. Building a new body parser
Building a completely new body parser isn’t something that you’ll regularly have to do. But it’s a great capability of Play, and the underlying reactive iteratee library is the reason why it’s possible and not very difficult.
In this section, we’ll build another body parser that allows a user to upload a file. This time, though, it won’t be stored on disk or in MongoDB, but on Amazon’s Simple Storage Service, better known as S3. Contrary to the MongoDB example of the previous section, we won’t buffer the full request before we send it to S3. Instead, we’ll immediately forward chunks of data to S3 as soon as the user sends them to us.
The strategy we’ll employ is to build a new body parser that creates a custom iteratee. The iteratee will forward every chunk it consumes to Amazon. This means that we must be able to open a request to Amazon, even before we have all the data, and push chunks of data into that request when they become available.
Unfortunately, Play’s WS library currently doesn’t support pushing chunks of data into a request body. We can imagine that in some future version of Play we’ll be able to use an enumerator for this. But for now we’ll need to use something else. Luckily, the underlying library that Play uses, Async HTTP Client (AHC), does support it. That library can, in turn, also use multiple implementations, called providers, and the Grizzly provider has a FeedableBodyGenerator, which is somewhat similar to the broadcast Enumerator that we’ve seen in Play, as it allows us to push chunks into it after it’s created. So we’ll use AHC with the Grizzly provider and a FeedableBodyGenerator.
Play itself uses AHC with a different provider, so we’ll need to create our own instance of AsyncHttpClient. We’ll copy the rest of the Play configuration, though:
private lazy val client = {
  val playConfig = WS.client.getConfig
  new AsyncHttpClient(new GrizzlyAsyncHttpProvider(playConfig),
    playConfig)
}
Amazon requires requests to be signed. When signing up for the service, you get a key and a secret, and together with some request parameters these need to be hashed. The hash is added to a request header, which allows Amazon to verify that the request comes from you. The signing isn’t complicated:
def sign(method: String, path: String, secretKey: String,
  date: String, contentType: Option[String] = None,
  aclHeader: Option[String] = None) = {
  val message = List(method, "", contentType.getOrElse(""),
    date, aclHeader.map("x-amz-acl:" + _).getOrElse(""), path)
    .mkString("
")

  // Play's Crypto.sign method returns a Hex string,
  // instead of Base64, so we do hashing ourselves.
  val mac = Mac.getInstance("HmacSHA1")
  mac.init(new SecretKeySpec(secretKey.getBytes("UTF-8"), "HmacSHA1"))
  val codec = new Base64()
  new String(codec.encode(mac.doFinal(message.getBytes("UTF-8"))))
}
Then we create a buildRequest method that constructs a request to Amazon and returns both this Request object and the FeedableBodyGenerator that we’ll need to push chunks into the request:
Listing 10.13. Amazon S3 uploading body parser, buildRequest method
def buildRequest(bucket: String, objectId: String, key: String,
  secret: String, requestHeader: RequestHeader):
  (Request, FeedableBodyGenerator) = {

  val expires = dateFormat.format(new Date())
  val path = "/%s/%s" format (bucket, objectId)
  val acl = "public-read"
  val contentType = requestHeader.headers.get(HeaderNames.CONTENT_TYPE)
    .getOrElse("binary/octet-stream")
  val auth = "AWS %s:%s" format (key, sign("PUT", path, secret,
    expires, Some(contentType), Some(acl)))
  val url = "https://%s.s3.amazonaws.com/%s" format (bucket, objectId)

  val bodyGenerator = new FeedableBodyGenerator()

  val request = new RequestBuilder("PUT")
    .setUrl(url)
    .setHeader("Date", expires)
    .setHeader("x-amz-acl", acl)
    .setHeader("Content-Type", contentType)
    .setHeader("Authorization", auth)
    .setContentLength(requestHeader.headers
      .get(HeaderNames.CONTENT_LENGTH).get.toInt)
    .setBody(bodyGenerator)
    .build()
  (request, bodyGenerator)
}
This method creates the request and the body generator and returns them.
Now we have all the ingredients to build our body parser:
Listing 10.14. Amazon S3 body parser


The S3Upload method creates a BodyParser that calls buildRequest to obtain a com.ning.http.client.Request and a FeedableBodyGenerator, and uses those to invoke S3Writer, which creates the body generator iteratee. S3Writer uses the Iteratee.fold method to create the iteratee ![]() . In general, the Iteratee.fold method takes an initial state and a function that consumes the chunk to calculate a new state. In our case, the initial state
is the bodyGenerator
. In general, the Iteratee.fold method takes an initial state and a function that consumes the chunk to calculate a new state. In our case, the initial state
is the bodyGenerator ![]() .
.
We wrap the bytes we received from our user into a ByteBufferWrapper, which we can then feed to the FeedableBodyGenerator ![]() . We don’t really calculate a new state, so we just return the same bodyGenerator as the “new state”
. We don’t really calculate a new state, so we just return the same bodyGenerator as the “new state” ![]() . We use mapDone
. We use mapDone ![]() to be able to do something when the iteratee completes (which happens when all the chunks of the HTTP request from our user
to our Play application are processed). We feed an empty chunk into the body generator
to be able to do something when the iteratee completes (which happens when all the chunks of the HTTP request from our user
to our Play application are processed). We feed an empty chunk into the body generator ![]() , and a Boolean indicating that this is the last chunk. Then we request the response
, and a Boolean indicating that this is the last chunk. Then we request the response ![]() . If the response status code is 200, the request was successful, and we return a Right
. If the response status code is 200, the request was successful, and we return a Right ![]() with the object ID in it. If the request failed, we pass on the response body that we received from Amazon
with the object ID in it. If the request failed, we pass on the response body that we received from Amazon ![]() .
.
Note that even though we like immutable iteratees, this one isn’t. It holds a reference to the HTTP request to Amazon, and that request is mutable (after all, we keep pushing new chunks into it).
10.5. Another way to look at iteratees
So far we’ve looked at iteratees as consumers and enumerators as producers of data. We know how to construct them, and how we can use them. What we’ve conveniently ignored is how they actually work. That’s not a problem; we’ve been able to do many interesting things with iteratees: process large results with the WS library, use WebSockets for bidirectional communication, and create custom body parsers. This is an important point to make: Play’s APIs that use iteratees and enumerators are easy to use and intuitive, and no further knowledge is needed to build powerful applications with this library.
There’s another way to look at iteratees. They’re finite state machines[1] with three distinct states: continue, done, and error. An iteratee usually starts in the continue state, which means that it’ll accept another chunk of data. Upon processing this data, it’ll produce a new iteratee that’s either in the continue state, or in the error or done state. If the iteratee is in the error or done state, it won’t accept any more chunks of data.
1 See Wikipedia’s entry on finite state machines: https://en.wikipedia.org/wiki/Finite-state_machine.
The enumerator can not only feed chunks of data into the iteratee, but also a special element that indicates the end of the stream: EOF (end of file). If an EOF element is received by the iteratee, it knows that the new iteratee it’ll produce must be in the done or error state, so that the produced value (or the error) can be extracted.
There’s more to explore. Enumerators (the producers of streams) and iteratees (the consumers of streams) have a cousin. This is the enumeratee, which can be considered as an adapter of streams. Enumeratees can sit between enumerators and iteratees and modify the stream. Elements of the stream can be removed, changed, or grouped.
In this book, we won’t explain how iteratees, enumerators, and enumeratees actually work under the hood. Because of their purely functional implementation, they aren’t intuitive for programmers without a functional programming background. But again, no knowledge of their internals is needed to use them. Their abstraction isn’t very complex, and they can be created using accessible methods on the Iteratee, Enumerator, and Enumeratee objects. They can also be transformed by familiar methods like map. Finally, Play’s APIs that use them are clear.
10.6. Summary
Play bundles some libraries that make it easier to deal with common tasks in web application programming. The web service API allows your application to talk to third-party web services and can help you with authentication. There’s a Cache API that allows you to cache arbitrary values and complete action results.
Iteratees have an implementation that’s hard to understand. But knowledge about their internals isn’t required to create, compose, and use them productively in a Play application. They can be used in the web service API when dealing with WebSockets and to create body parsers.
WebSockets offer bidirectional communication between servers and clients, and allow you to build highly interactive web applications. Body parsers help you deal with the HTTP request bodies thrown at your application. Many are available, and they can be composed to your liking.
And with that, we conclude this book. You’ve seen a reasonable part of Play, but only a very humble part of what you can build with Play. There’s a lot more for you to explore. We hope that you’ve gained the knowledge to confidently use Play for your next projects, and we wish you all the best!