
Chapter 7. Validating and processing input with the forms API
This chapter covers
- The main concepts of Play’s forms API
- How to process HTML form submits
- Generating HTML forms
- Parsing advanced types and building custom validations
A serious test of any web framework is the way it handles data thrown at it by clients. Clients can send data as a part of the URL (notably the query string), as HTTP request headers, or in the body of an HTTP request. In the latter case, there are various ways to encode the data; the usual ways are submitting HTML forms and sending JSON data.
When this data is received, you can’t trust it to be what you want or expect it to be. After all, the person using your application can shape a request any way they like, and can insert bogus or malicious data. What’s more, all (client) software is buggy. Before you can use the data, you need to validate it.
The data you receive is often not of the appropriate type. If a user submits an HTML form, you get a map of key/value pairs, where both the keys and values are strings. This is far from the rich typing that you want to use in your Scala application.
Play provides the so-called forms API. The term form isn’t just about HTML forms in a Play application; it’s a more general concept. The forms API helps you to validate data, manage validation errors, and map this data to richer data structures. In this chapter we’ll show you how to leverage this forms API in your application, and in the next chapter you’ll be able to reuse the concepts from this chapter for dealing with JSON.
7.1. Forms—the concept
In Play 2, HTML form processing is fundamentally different from how Play 1.x handles user data. In this section, we’ll quickly review the Play 1.x approach and then explain some issues with that method and how Play 2 is different. If you’re not interested in this comparison with Play 1.x, you can safely skip this section and continue with section 7.2.
7.1.1. Play 1.x forms reviewed
In Play 1.x, the framework helps you a great deal with converting HTML form data to model classes. Play 1 inspects your classes and can automatically convert submitted form data.
Suppose that you’re building a form that allows you to add new users to your application. You could model your user as follows in Java:
public class User {
  public String username;
  public String realname;
  public String email;
}
The actual HTML form where the user details can be entered would look similar to listing 7.1:
Listing 7.1. Play 1.x example: User creation HTML form
<form action="/users/create" method="POST">
  <p>
    <label for="username">Username</label>
    <input id="username" name="user.username" type="text">
  </p>
  <p>
    <label for="realname">Real name</label>
    <input id="realname" name="user.realname" type="text">
  </p>
  <p>
    <label for="email">Email</label>
    <input id="email" name="user.email" type="text">
  </p>
</form>
Suppose this HTML form posts the data to the following Play 1.x action method:
public static void createUser(User user) {
  ...
  render(user);
}
Here, you specify that this action method takes a User parameter, and Play will automatically instantiate a User object and copy the fields user.username and user.email from the HTTP request into the username and email fields of this User instance. If you want to add validation, the standard way is to add validation annotations to the model class:
public class User extends Model {
  @Required @MinLength(8)
  public String username;
  public String realname;
  @Required @Email
  public String email;
}
These annotations indicate that the username field is required, that it must be at least eight characters long, and that the email field must contain an email address. You can now validate a User by annotating the action method’s user parameter and using the validation object that’s provided by Play:
public static void createUser(@Valid User user) {
  if(validation.hasErrors()) {
    // Show and error page
  } else {
    // Save the user and show success page
  }
}
Though this method is concise and works well in many cases, there are some drawbacks. Using this method of validation, you can only have a single set of validation settings per class, but in practice, validation requirements regularly differ depending on the context. For example, if a user signs up, they’re required to enter their real name, but when an administrator creates a user account, the real name may be omitted.
There’s a difference between the hard constraints on the model as defined by the application, and the constraints on what the users of your application are allowed to submit, and the latter can vary between contexts.
Another problem is that you’re forced to have a default constructor with no parameter, so that Play 1.x can bind the HTTP request directly to the object. In many cases, this can result in objects that are in an illegal state. If a user submits an HTTP form that has no user.username field, the resulting User object’s username field will be null. This is likely to be illegal in your application.
You can prevent this from causing havoc in your application by consistently using the validation framework to prevent these illegal instances from floating through your application or being persisted, but it’s still better to avoid the construction of objects in an illegal state altogether.
In the next section, we’ll see how the approach to forms in Play 2 avoids these problems.
7.1.2. The Play 2 approach to forms
In Play 2, HTTP form data is never directly bound to your model classes. Instead, you use an instance of play.api.data.Form.
Listing 7.2 contains an example of an action method and a Form that you can use to validate and process the user-creation HTML form from listing 7.1. This example might seem daunting, but in the next section we’ll take it apart and see what’s going on.
Again, we need a model class for a user, and in Scala it could look like this:
case class User(
  username: String,
  realname: Option[String],
  email: String)
We can construct a form for this and an action method that uses this form as follows:
Listing 7.2. Play 2 Form to validate a request from the HTML form of listing 7.1

The userForm requires the username property to be not empty, and to be at least 8 characters. The realname property may be omitted or empty, and the email property is required and must contain an email address. The final two parameters, User.apply and User.unapply, are two methods to construct and deconstruct the values.
In the next section we’ll look at all the components of forms.
7.2. Forms basics
Play’s forms are powerful, but they’re built on a few simple ideas. In this section we’ll explore how forms are created and used in Play. We’ll start with mappings, as they’re crucial to understanding how forms work.
7.2.1. Mappings
A Mapping is an object that can construct something from the data in an HTTP request. This process is called binding. The type of object a mapping can construct is specified as a type parameter. So a Mapping[User] can construct a User instance, and a Mapping[Int] can create an Int. If you submit an HTML form with an input tag <input type="text" name="age">, a Mapping[Int] can convert that age value, which is submitted as a string, into a Scala Int.
The data from the HTTP request is transformed into a Map[String, String], and this is what the Mapping operates on. But a Mapping can not only construct an object from a map of data; it can also do the reverse operation of deconstructing an object into a map of data. This process is called, as you might have guessed, unbinding. Unbinding is useful if you want to show a form that has some values prefilled.
Suppose that you’re creating an edit form that lets you change some details of an existing user. This would involve fetching the existing user from the database and rendering an HTML form where each input element is populated with the current value. In order to do this, Play needs to know how a User object is deconstructed into separate input fields, which is exactly what a Mapping[User] is capable of.
Finally, a mapping can also contain constraints and give error messages when the data doesn’t conform to the constraints.
To generalize this, a mapping is an object of type Mapping[T] that can take a Map[String, String], and use it to construct an object of type T, as well as take an object of type T and use it to construct a Map[String, String].
Play provides a number of basic mappings out of the box. For example, Forms.number is a mapping of type Mapping[Int], whereas Forms.text is a mapping of type Mapping[String]. There’s also Forms.email, which is also of type Mapping[String], but it also contains a constraint that the string must look like an email address.
Play also allows you to create your own mappings from scratch or by composing existing mappings into more complex mappings.
7.2.2. Creating a form
We’ll start with a few basic Form definitions to get acquainted with how forms are generally used. Before using real user input data from an HTTP request, we’ll start with a plain old Map with String keys and values. Because request data is also put into a Map with a similar structure, this is very close to the real thing. We’ll mimic the data of a request to create a new product in our database:
val data = Map(
  "name" -> "Box of paper clips",
  "ean" -> "1234567890123",
  "pieces" -> "300"
)
All values in this map are strings, because that’s how values arrive from an HTTP request. In our Scala code, we want pieces to be an Integer. We’ll use a form to validate whether the pieces value resembles a number, and to do the actual conversion from String to Integer. Later in this section, we’ll also use a form to verify that the keys name and ean exist.
We’ve seen a couple of simple mappings, like Forms.number and Forms.string in section 7.2.1. These simple mappings can be composed into more complex mappings that construct much richer data structures than a single Int or String. One way to compose mappings is as follows:
val mapping = Forms.tuple(
  "name" -> Forms.text,
  "ean" -> Forms.text,
  "pieces" -> Forms.number)
We’ve constructed a value mapping with the tuple method. The type of mapping is play.api.data.Mapping[(String, String, Int)]. The type parameter—in this case a 3-tuple of a String, a String, and an Int—indicates the type of objects that this mapping can construct.
The Forms.tuple method doesn’t create mappings from scratch, but lets you compose existing mappings into larger structures. You can use the following Play-provided basic mappings to start composing more complex mappings:
- boolean: Mapping[Boolean]
- checked(msg: String): Mapping[Boolean]
- date: Mapping[Date]
- email: Mapping[String]
- ignored[A](value: A): Mapping[A]
- longNumber: Mapping[Long]
- nonEmptyText: Mapping[String]
- number: Mapping[Int]
- sqlDate: Mapping[java.sql.Date]
- text: Mapping[String]
So far, we’ve been fiddling with mappings, but we haven’t tried to actually use a mapping for its prime purpose: creating an object! To use a mapping to bind data, we need to do two things. First, we need to wrap the mapping in a Form, and then we have to apply the Form to our data.
Like Mapping, Form has a single type parameter, and it has the same meaning. But a form not only wraps a Mapping, it can also contain data. It’s easily constructed using our Mapping:
val productForm = Form(mapping)
This form is of type Form[(String, String, Int)]. This type parameter means that if we put our data into this form and it validates, we’ll be able to retrieve a (String, String, Int) tuple from it.
7.2.3. Processing data with a form
The process of putting your data in the form is called binding, and we use the bind method to do it:
val processedForm = productForm.bind(data)
Forms are immutable data structures, and the bind method doesn’t actually put the data inside the form. Instead, it returns a new Form—a copy of the original form populated with the data. To check whether our data conforms to the validation rules, we could use the hasErrors method. Any errors can be retrieved with the errors method.
If there are no errors, you can get the concrete value out of the form with the get method. Knowing this, you might be inclined to structure form handling similar to this:
if(!processedForm.hasErrors) {
  val productTuple = processedForm.get // Do something with the product
} else {
  val errors = processedForm.getErrors // Do something with the errors
}
This will work fine, but there are nicer ways to do this. If you take a better look at the processedForm value, you’ll find that it can be one of two things. It can either be a form without errors, or a form with errors. Generally, you want to do completely different things to the form depending on which of these two states it’s in. This is similar to Scala’s Either type, which also holds one of two possible types (see the Scala’s Either type sidebar). Like Either, Form has a fold method to unify the two possible states into a single result type. This is the idiomatic way of dealing with forms in Play 2.
Form.fold takes two parameters, where the first is a function that accepts the “failure” result, and the second accepts the “success” result as the single parameter. In the case of Form[T], the failure result is again a Form[T], from which the validation errors can be retrieved with getErrors. The success value is the object of type T that the form constructs when validation is successful. Using fold on our example form could look like this:
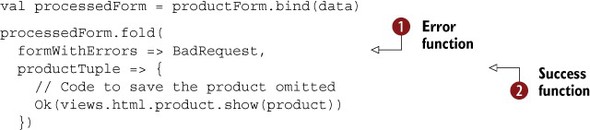
If the form has errors, the function passed as the first parameter to fold ![]() is called, with a Form[T] containing the errors as the parameter. If the form has no errors, the function passed as the second parameter
is called, with a Form[T] containing the errors as the parameter. If the form has no errors, the function passed as the second parameter ![]() is called, with the constructed value of type T.
is called, with the constructed value of type T.
Here, the result type of the fold method is play.api.mvc.SimpleResult, which is the common ancestor of BadRequest and Ok.
Like many other functional programming languages, Scala has an Either type to express disjoint types. It’s often used to handle missing values, like Option, but with the difference that although the “missing” value of Option is always None, in Either it can be anything. This is useful to convey information about why a value is missing.
For example, suppose that we’re trying to retrieve an object of type Product from a service, and that the service could either return an instance of Product, or a String with a message that explains why it failed. The retrieval method could have a signature like this:
def getProduct(): Either[String, Product]
Either is an abstract type, and there are two concrete classes that inherit from it: Left and Right. If the Either that you get back from this method is an instance of Left, it contains a String, and if it’s a Right, it’ll contain a Product. You can test whether you have a Left or Right with isLeft, and branch your code for each of the possibilities. But generally, at some point you’ll want to unify these branches and return a single return type. For example, in a Play controller, you can do what you want, but in the end you need to return a play.api.mvc.Result. The idiomatic way to do this is to use the Either.fold method.
The fold method of an Either[A, B] has the following signature:
def fold[C](fa: (A) => C, fb: (B) => C): C
fold takes two parameters: the first is a function of type (A) => C, and the second is a function of type (B) => C. If the Either is a Left, the first method will be applied to the value, and if it’s a Right, the second method will be applied. In both cases, this will return a C. In practice, application of an Either could look like this:

Here, getProduct returns an Either, and in the showProduct action method we fold the Either into a Result.
By convention, Left is used for the failure state, whereas Right is used for the success value. If you want to produce an Either yourself, you can use these case classes:
def getProduct(): Either[String, Product] = {
  if(validation.hasError) {
    Left(validation.error)
  } else {
    Right(Product())
  }
}
In practice, you’ll probably run into the need for an Either in cases where an Option doesn’t suffice anymore because you want to differentiate between various failures.
7.2.4. Object mappings
In the previous sections, we only worked with tuple mappings: mappings that result in a tuple upon successful data processing. It’s also possible to construct objects of other types with mappings.
To do so, we’ll have to provide the mapping with a function to construct the value. This is extremely easy for case classes, because they come with such a function out of the box: the apply method that’s created by the Scala compiler on the companion object. But suppose we have the case class Product, with the following definition:
case class Product(
  name: String,
  ean: String,
  pieces: Int)
We can create a mapping that constructs instances of Product as follows:
import play.api.data.Forms._

val productMapping = mapping(
  "name" -> text,
  "ean" -> text,
  "pieces" -> number)(Product.apply)(Product.unapply)
We’re using the mapping method on the play.api.data.Forms object to create the mapping. Note that we’ve imported play.api.data.Forms._ here, so we don’t have to prefix the mapping builders with Forms. Compared with Forms.tuple, the mapping method takes two extra parameters. The first one is a function to construct the object. Here it needs to be a function that takes three parameters with types String, String, Int, in that order, because those are the types that this mapping processes. We use the apply method of the Product case class’s companion object as this function because it does exactly what we need: it takes the three parameters of the proper type and constructs a Product object from them. This makes the type of this mapping Mapping[Product].
The second extra parameter (so the third parameter of mapping) needs to be a function that deconstructs the value type. For case classes, this method is provided by the unapply method, which for our Product has the type signature Product => Option[(String, String, Int)].[1]
1 You may wonder why the signature of unapply is Option[(String, String, Int)] instead of just (String, String, Int), since it seems plausible that unapplying will always work. Although this is true for a case class, the unapply method is used widely in other applications as well, where unapplying may not work.
Using our Mapping[Product], we can now easily create a Form[Product]:
val productForm = Form(productMapping)
If we now use fold on one of these forms, the success value is a Product:

This is the standard way in Play 2 to convert string typed HTTP request data into typed objects.
7.2.5. Mapping HTTP request data
So far, we’ve used a simple manually constructed Map[String, String] as data source for our form. In practice, it’s not trivial to get such a map from an HTTP request, because the method to construct it depends on the request body’s content type. Luckily, Form has a method bindFromRequest that takes a Request[_] parameter and extracts the data in the proper way:
def processForm() = Action { request =>
  productForm.bindFromRequest()(request).fold(
    ...
  )
}
As the request parameter to bindFromRequest is declared implicit, you can also leave it off if there is an implicit Request in scope:

The bindFromRequest method tries to extract the data from the body of the request and appends the data from the query string. Of course, body data can come in different formats. Browsers submit HTTP bodies with either an application/x-www-form-urlencoded or a multipart/form-data content type, depending on the form, and it’s also common to send JSON over the wire. The bindFromRequest method uses the Content-Type header to determine a suitable decoder for the body.
Now that you’re familiar with the basics of creating forms and binding data to forms, we’re ready to start working with real HTML forms in the next section.
7.3. Creating and processing HTML forms
So far, we haven’t shown any HTML in the Play 2 examples. In this section we’ll show you how to build the HTML for the forms. As in many other parts of the framework, Play doesn’t force you to create HTML forms in one particular way. You’re free to construct the HTML by hand. Play also provides helpers that generate forms and take the tedium out of showing validation and error messages in the appropriate places.
In this section, we’ll show you how to write your own HTML for a form, and then we’ll demonstrate Play’s form helpers.
7.3.1. Writing HTML forms manually
We’re going to create a form to add a product to our catalog, as shown in figure 7.1.
Figure 7.1. Add Product form
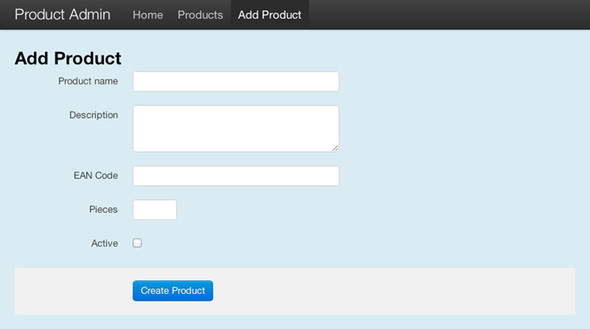
The form contains text inputs for the product’s name and EAN code, a text area for the description, a smaller text input for the number of pieces that a single package contains, and a check box that indicates whether the product is currently being sold. Finally, there’s a button that submits the form.
Here’s the model class:
case class Product(
  ean: Long,
  name: String,
  description: String,
  pieces: Int,
  active: Boolean)
The HTML page template is written as follows.
Listing 7.3. Add Product form simplified HTML
@()

@main("Product Form"){

  <form action="@routes.Products.create()" method="post">
    <div>
      <label for="name">Product name</label>
      <input type="text" name="name" id="name">
    </div>
    <div>
      <label for="description">Description</label>
      <textarea id="description" name="description"></textarea>
    </div>
    <div>
      <label for="ean">EAN Code</label>

      <input type="text" name="ean" id="ean">
    </div>
    <div>
      <label for="pieces">Pieces</label>
      <input type="text" name="pieces" id="pieces">
    </div>
    <div>
      <label for="active">Active</label>
      <input type="checkbox" name="active" value="true">
    </div>
    <div class="buttons">
      <button type="submit">Create Product</button>
    </div>
  </form>
}
This is a simplified version of the real HTML for the form in figure 7.1, excluding markup used to make it easier to style. But the important elements, the Form and input elements, are the same.
Now, we need a Form.
val productForm = Form(mapping(
  "ean" -> longNumber,
  "name" -> nonEmptyText,
  "description" -> text,
  "pieces" -> number,
  "active" -> boolean)(Product.apply)(Product.unapply))
The action method for displaying the form renders the template:
def createForm() = Action {
  Ok(views.html.products.form())
}
Listing 7.4 shows the action method that handles form submissions.
Listing 7.4. Action method create, which tries to bind the form from the request
def create() = Action { implicit request =>
  productForm.bindFromRequest.fold(
    formWithErrors => BadRequest("Oh noes, invalid submission!"),
    value => Ok("created: " + value)
  )
}
This is all we need! If we submit the form, our browser will send it to the server with a Content-Type of application/x-www-form-urlencoded. Play will decode the request body and populate a Map[String, String] that our Form object knows how to handle, as we saw in the previous section.
This serves fine as an illustration of processing manually created HTML forms, but writing forms this way isn’t convenient. The first part is easy: just write the input elements and you’re done. In a real application, much more is involved. We’ll also need to indicate which fields are required, and if the user makes a mistake, we’ll want to redisplay the form, including the values that the user submitted. For each field that failed validation, we’ll want to show an error message, ideally near that field. This can also be done manually, but it involves lots of boilerplate code in the view template.
7.3.2. Generating HTML forms
Play provides helpers, template snippets that can render a form field for you, including extra information like an indication when the value is required and an error message if the field has an invalid value. The helpers are in the views.template package.
Using the appropriate helpers, we can rewrite our product form as in listing 7.5:
Listing 7.5. Template that uses form helpers to generate an HTML form
@(productForm: Form[Product])

@main("Product Form") {
  @helper.form(action = routes.GeneratedForm.create) {

    @helper.inputText(productForm("name"))
    @helper.textarea(productForm("description"))
    @helper.inputText(productForm("ean"))
    @helper.inputText(productForm("pieces"))
    @helper.checkbox(productForm("active"))

    <div class="form-actions">
      <button type="submit">Create Product</button>
    </div>
  }
}
We created the form with the helper.form helper, and in the form we used more helpers to generate input fields, a text area, and a check box. These form helpers will generate the appropriate HTML.
We have to change our action method to add the productForm as a parameter to the template:
def createForm() = Action {
  Ok(views.html.products.form(productForm))
}
With this form, the template will output the HTML from listing 7.6.
Listing 7.6. HTML generated by form helpers for the product form
<form action="/generatedform/create" method="POST">

  <dl class="" id="name_field">
    <dt><label for="name">name</label></dt>
    <dd><input type="text" id="name" name="name" value=""></dd>
    <dd class="info">Required</dd>
  </dl>

  <dl class="" id="description_field">

    <dt><label for="description">description</label></dt>
    <dd><textarea id="description" name="description"></textarea></dd>
  </dl>

  <dl class="" id="ean_field">
    <dt><label for="ean">ean</label></dt>
    <dd><input type="text" id="ean" name="ean" value="123"></dd>
    <dd class="info">Numeric</dd>
  </dl>

  <dl class="" id="pieces_field">
    <dt><label for="pieces">pieces</label></dt>
    <dd><input type="text" id="pieces" name="pieces" value=""></dd>
    <dd class="info">Numeric</dd>
  </dl>

  <dl class="" id="active_field">
    <dt><label for="active">active</label></dt>
    <dd>
      <input type="checkbox" id="active" name="active" value="true"
        checked>
      <span></span></dd>
    <dd class="info">format.boolean</dd>
  </dl>

  <div class="form-actions">
    <button type="submit">Create Product</button>
  </div>

</form>
The helpers generated appropriate inputs for the fields in our form, and they even added extra info for some fields; “Required” for the required name field and “Numeric” for the fields that require a number. This extra information is deduced from the productForm definition, where we defined the required field as nonEmptyText and the numeric fields as number or longNumber.
Customize the info text
You can customize these info texts in your messages file. The key for the “Required” message is constraint.required, and the key for the “Numeric” message is format.numeric. You can find the message keys for constraints in the Scaladoc for the Constraints trait.
The format.boolean that’s generated at the check box field can be customized by adding a message with that key to the messages file of your application. Alternatively, you can change it by adding an extra parameter to the helper: @helper.checkbox(productForm("active"), '_help -> "Activated"). We’ll see more about this in section 7.3.3.
Not only does this save us a lot of typing, it also makes sure that the information we display for each field is always in sync with what we actually declared in our code.
Finally, we can reuse the exact same template to redisplay the form in case of validation errors. Recall that in the fold method of Form, we get the form back, but with the errors field populated. We can apply this template to this form-with-errors to show the form again with the previously entered values. To do so, we update our action to show the same template when validation fails:
def create() = Action { implicit request =>
  productForm.bindFromRequest.fold(
    formWithErrors => Ok(views.html.products.form(formWithErrors)),
    value => Ok("created: " + value)
  )
}
Suppose that we completely fill out the form, but we give a non-numeric value for the EAN code. This will cause validation to fail, and the form to re-render. Listing 7.7 shows the HTML.
Listing 7.7. Product form with validation errors and old values
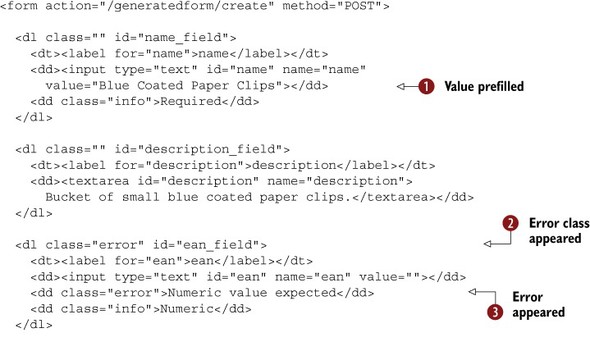

As you can see in the source, the form is re-rendered with the previous values prefilled ![]() . Also, the EAN field has an additional error class
. Also, the EAN field has an additional error class ![]() , and an additional HTML element indicating the error
, and an additional HTML element indicating the error ![]() .
.
Of course, this ability to show a form again with values prefilled is also useful in another scenario. If you’re creating an edit page for your object, you can use this to display a form with the current values prefilled. To preload a form Form[T] with an existing object, you can use the fill(value: T) method or the fillAndValidate(value: T). The latter differs from the former in that it also performs validation.
7.3.3. Input helpers
Play ships predefined helpers for the most common input types:
- inputDate— Generates an input tag with type date.
- inputPassword— Generates an input tag with type password.
- inputFile— Generates an input tag with type file.
- inputText— Generates an input tag with type text.
- select— Generates a select tag.
- inputRadioGroup— Generates a set of input tags with type radio.
- checkbox— Generates an input tag with type checkbox.
- textarea— Generates a textarea element.
- input— Creates a custom input. We’ll see more of that in section 7.3.4.
All these helpers share some extra parameters that you can use to influence their behavior: they take extra parameters of type (Symbol, Any). For example, you can write
@helper.inputText(productForm("name"), '_class -> "important",
  'size -> 40)
The notation '_class creates a Scala Symbol named _class, and similarly 'size creates a Symbol named size. By convention in the helpers, symbols that start with an underscore are used by the helper to modify some aspect of the generated HTML, whereas all symbols that don’t start with an underscore end up as extra attributes of the input element. The preceding snippet renders the HTML in listing 7.8.
Listing 7.8. Field with custom class and attribute

These are the extra symbols with underscores that you can use:
- _label— Use to set a custom label
- _id— Use to set the id attribute of the dl element
- _class— Use to set the class attribute of the dl element
- _help— Use to show custom help text
- _showConstraints— Set to false to hide the constraints on this field
- _error— Set to a Some[FormError] instance to show a custom error
- _showErrors— Set to false to hide the errors on this field
7.3.4. Customizing generated HTML
The HTML Play generates may not be what you—or your team’s front-end developer—had in mind, so Play allows you to customize the generated HTML in two ways. First, you can customize which input element is generated, in case you need some special input type. Second, you can customize the HTML elements around that input element.
To create a custom input element, you can use the input helper. Suppose we want to create an input with type datetime (which is valid in HTML 5, although poorly supported by browsers at the time of writing in 2013). We can do this:
@helper.input(myForm("mydatetime")) { (id, name, value, args) =>
  <input type="datetime" name="@name"
    id="@id" value="@value" @toHtmlArgs(args)>
}
Here, myForm is the name of the Form instance. We call the helper.input view with two parameters: the first is the Field that we want to create the input for, and the second is a function of type (String, String, Option[String], Map[Symbol,Any]) => Html. The helper.input method will invoke the function that you pass to it, with the proper parameters. We use the toHtmlArgs method from the play.api.templates .PlayMagic object to construct additional attributes from the args map.
Previously, we’ve only used the first parameter list of the input helpers. But they have an additional parameter list that takes an implicit FieldConstructor and a Lang. This FieldConstructor is responsible for generating the HTML around the input element. FieldConstructor is a trait with a single apply method that takes a FieldElements object and returns Html. Play provides a defaultFieldConstructor that generates the HTML we saw earlier, but you can implement your own FieldConstructor if you want different HTML.
A common case is when you’re using an HTML/CSS framework that forces you to use specific markup, such as Twitter Bootstrap 2. One of the Bootstrap styles requires the following HTML around an input element:
<div class="control-group">
  <label class="control-label" for="name_field">Name</label>
  <div class="controls">
    <input type="text" id="name_field">
    <span class="help-inline">Required</span>
  </div>
</div>
Additionally, the outer div gets an extra class error when the field is in an error state. We can do this with a custom FieldConstructor. The easiest way to return Html is to use a template:
Listing 7.9. FieldConstructor for Twitter bootstrap
@(elements: views.html.helper.FieldElements)

@import play.api.i18n._
@import views.html.helper._

<div class="control-group @elements.args.get('_class)
  @if(elements.hasErrors) {error}"
  id="@elements.args.get('_id).getOrElse(elements.id + "_field")" >
  <label class="control-label" for="@elements.id">
    @elements.label(elements.lang)
  </label>
  <div class="controls">
    @elements.input
    <span class="help-inline">
      @if(elements.errors(elements.lang).nonEmpty) {
        @elements.errors(elements.lang).mkString(", ")
      } else {
        @elements.infos(elements.lang).mkString(", ")
      }
    </span>
  </div>
</div>
Here, we extract various bits of information from the FieldElements object, and insert them in the proper places in the template.
Unfortunately, even though this template takes a FieldElements parameter and returns an Html instance, it doesn’t explicitly extend the FieldConstructor trait, so we can’t directly use the template as a FieldConstructor. Because there’s no way in Play to make a template extend a trait, we’ll have to create a wrapper that does extend FieldConstructor, and whose apply method calls the template. Additionally, we can make that wrapper an implicit value, so that we can simply import it to use it automatically everywhere a form helper is used. We create a package object that contains the wrapper as shown in listing 7.10.
Listing 7.10. The bootstrap package object with an implicit FieldConstructor

In our template, we only need to import the members of this package object, and our template will use the newly created field constructor as shown in listing 7.11.
Listing 7.11. Product form using custom FieldConstructor
@(productForm: Form[Product])

@import views.html.helper.bootstrap._

@main("Product Form") {
  @helper.form(action = routes.GeneratedForm.create) {

    @helper.inputText(productForm("name"))
    @helper.textarea(productForm("description"))
    @helper.inputText(productForm("ean"))
    @helper.inputText(productForm("pieces"))
    @helper.checkbox(productForm("active"))

    <div class="form-actions">
      <button type="submit">Create Product</button>
    </div>
  }
}
7.4. Validation and advanced mappings
So far we’ve only been using the built-in validation for mappings like Forms.number, which kicks in when we submit something that doesn’t look like a number. In this section, we’ll look at how we can add our own validations. Additionally, we’ll see how we can create our own mappings, for when we want to bind things that don’t have a predefined mapping.
7.4.1. Basic validation
Mappings contain a collection of constraints, and when a value is bound, it’s checked against each of the constraints. Some of Play’s predefined mappings come with a constraint out of the box; for example, the email mapping has a constraint that verifies that the value resembles an email address. Some mappings have optional parameters that you can use to add constraints—the text mapping has a variant that takes parameters: text(minLength: Int = 0, maxLength: Int = Int.MaxValue). This can be used to create a mapping that constrains the value’s length.
For other validations, we’ll have to add constraints to the mapping ourselves. A Mapping is immutable, so we can’t really add constraints to existing mappings, but we can easily create a new mapping from an existing one plus a new constraint.
A Mapping[T] has the method verifying(constraints: Constraint[T]*), which copies the mapping and adds the constraints. Play provides a small number of constraints on the play.api.data.validation.Constraints object:
- min(maxValue: Int): Constraint[Int]— A minimum value for an Int mapping
- max(maxValue: Int): Constraint[Int]— A maximum value for an Int mapping
- minLength(length: Int): Constraint[String]— A minimum length for a String mapping
- maxLength(length: Int): Constraint[String]— A maximum length for a String mapping
- nonEmpty: Constraint[String]— Requires a not-empty string
- pattern(regex: Regex, name: String, error: String): Constraint [String]— A constraint that uses a regular expression to validate a String
These are also the constraints that Play uses when you utilize one of the mappings with built-in validations, like nonEmptyText.
Using these constraints with the verifying method looks like this:
"name" -> text.verifying(Constraints.nonEmpty)
In practice, you often want to perform a more advanced validation on user input than the standard validation that Play offers. To do this, you need to know how to create custom validations.
7.4.2. Custom validation
In our product form, we’d like to check whether a product with the same EAN code already exists in our database. Obviously, Play has no built-in validator for EAN codes, and because Play is persistence-layer agnostic, it can’t even provide a generic unique validator. We’ll have to code the validator ourselves.
Creating a custom Constraint manually is clunky, but luckily Play’s verifying method on Mapping makes it easy. All you need to add a custom constraint to a Mapping[T] is a function T => Boolean—a function that takes the bound object and returns either true if it validates or false if it doesn’t.
So, if we want to add a validation to the mapping for the EAN number, which is of type Mapping[Int], that verifies that the EAN doesn’t exist in our database yet, we can define a method eanExists:
def eanExists(ean: Long) = Product.findByEan(ean).isEmpty
We can then use verifying to add it to our mapping:
"ean" -> longNumber.verifying(eanExists(_))
This copies our text mapping into a new mapping and adds a new constraint. The constraint itself checks whether we get a None from the Product.findByEan method, which indicates that no product yet exists with this EAN. Of course, we can use an anonymous function so we don’t have to define eanExists:
"ean" -> longNumber.verifying(ean => Product.findByEan(ean).isEmpty)
This can be made even more concise with the following notation:
"ean" -> longNumber.verifying(Product.findByEan(_).isEmpty)
If this validation fails, the error will be error.unknown, which isn’t particularly helpful for your users. You can add a custom validation message to a constraint that you build with verifying by giving a String as the first parameter:
"ean" -> longNumber.verifying("This product already exists.",
  Product.findByEan(_).isEmpty)
As this error string is passed through the messages system, you can also use a message key here, and write the error message itself in your messages file.
7.4.3. Validating multiple fields
So far we’ve seen how to validate a single field. What if we want to validate a combination of multiple fields? For example, in our product form, we might want to allow people to add new products to the database without a description, but not to make it active if there’s no description. This would allow an administrator to start adding new products even when no description has been written yet, but would prevent putting up those products for sale without a description. The constraint here depends both on the value of the description, and that of the “active” Boolean, which means we can’t simply use verifying on either of those.
Luckily, the mapping for the entire form that we composed with tuple or mapping is also just a Mapping[T], but with T being a tuple or an object. So this composed mapping also has a verifying method, which takes a method with the entire tuple or object as a parameter. We can use this to implement our new constraint, as in listing 7.12:
Listing 7.12. Form with validation on multiple fields
val productForm = Form(mapping(
  "ean" -> longNumber.verifying("This product already exists!",
    Product.findByEan(_).isEmpty),
  "name" -> nonEmptyText,
  "description" -> text,
  "pieces" -> number,
  "active" -> boolean)(Product.apply)(Product.unapply).verifying(
    "Product can not be active if the description is empty",
    product =>
      !product.active || product.description.nonEmpty))
This works as intended, but there’s one caveat: the validation error is never displayed in the HTML form. The top-level mapping doesn’t have a key, and the error has an empty string as key. If this top-level mapping causes an error, it’s called the global error, which you can retrieve with the globalError method on Form. It returns an Option[Error].
To display this error (if it exists) in our form, we must add something like the following snippet to the template that renders the form:

We use the map method ![]() on the Option[FormError] to display an error if it’s a Some. If the Option is a None, nothing will be displayed.
on the Option[FormError] to display an error if it’s a Some. If the Option is a None, nothing will be displayed.
Now you know how to add validation rules to your mappings; we’ll look at some more advanced mapping compositions in the next section.
7.4.4. Optional mappings
If you submit an HTML form with an empty input element, the browser will still include that element in the HTTP request, but send it with an empty value. If you bind such a field with a text mapping, you’ll get an empty string. In Scala, though, it’s more likely that you want an Option[String] with a None value if the user left an input empty. For these situations, Play provides the Forms.optional method, which transforms a Mapping[A] into a Mapping[Option[A]].
You can use that to create mappings like these:

Here, we defined a case class with an Option[Int] field ![]() , so we’ll need a mapping of type Mapping[Option[Int]]. We create that mapping by transforming a Mapping[Int] with the optional method into a Mapping[Option[Int]]
, so we’ll need a mapping of type Mapping[Option[Int]]. We create that mapping by transforming a Mapping[Int] with the optional method into a Mapping[Option[Int]]![]() . This new mapping will return a None if the value is an empty string, or when the age field is missing.
. This new mapping will return a None if the value is an empty string, or when the age field is missing.
7.4.5. Repeated mappings
Another common requirement is to bind a list of values—for example, adding a collection of tags to an object. If you have multiple inputs with names like tag[0], tag[1], and so forth, you can bind them as follows:
"tags" -> list(text)
This would require HTML input tag names like these:
<input type="text" name="tags[0]">
<input type="text" name="tags[1]">
<input type="text" name="tags[2]">
This list method transforms a Mapping[A] into a Mapping[List[A]]. Alternatively, you can use the seq method, which transforms to a Mapping[Seq[A]].
To display these repeated mappings with form helpers, you can use the @helper.repeat helper:
@helper.repeat(form("tags"), min = 3) { tagField =>
  @helper.inputText(tagField, '_label -> "Tag")
}
This repeat helper will output an input field for each element in the list, in the case that you’re displaying a form that’s prefilled. The min parameter can be used to specify the minimum number of inputs that should be displayed—in this case, three. It defaults to one, so you’ll see one input element for an empty form if you don’t specify it.
7.4.6. Nested mappings
Suppose you’re building a form, where you ask a person to supply three sets of contact details: a main contact, a technical contact, and an administrative contact, each consisting of a name and an email address. You could come up with a form like this:
val contactsForm = Form(tuple(
  "main_contact_name" -> text,
  "main_contact_email" -> email,
  "technical_contact_name" -> text,
  "technical_contact_email" -> email,
  "administrative_contact_name" -> text,
  "administrative_contact_email" -> email))
This will work, but there’s a lot of repetition. All contacts have the same mapping, but we’re writing it out in full three times. This is a good place to exploit the fact that a composition of mappings is in itself a mapping, so they can be nested. We could rewrite this form as follows:
val contactMapping = tuple(
  "name" -> text,
  "email" -> email)

val contactsForm = Form(tuple(
  "main_contact" -> contactMapping,
  "technical_contact" -> contactMapping,
  "administrative_contact" -> contactMapping))
The keys of the data that you bind to this form are of the form main_contact.name, main_contact.email, then technical_contact.text, technical_contact.email, and finally administrative_contact.text and administrative_contact.email. Starting from the root mapping, the keys are concatenated with dots. This is also the way you retrieve them when you display the form in the template:
@helper.inputText(form("main_contact.name"))
@helper.inputText(form("main_contact.email"))
Of course, you don’t have to give the nested mapping a name; you can also put it inline. Listing 7.13 shows an example of a mapping composed from nested tuple and object mappings.
Listing 7.13. Inline nested forms
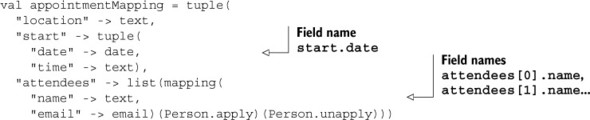
This mapping has type Mapping[(String, (Date, String), List[Person])].
Nesting is useful to cut large, flat mappings into richer structures that are more easy to manipulate and reuse. But there’s a more mundane reason to nest mappings if you have big forms—because both the tuple and mapping methods take a maximum of 18 parameters. Contrary to what you might think at first sight, they don’t have a variable length argument list—they’re overloaded for up to 18 parameters, with each their own type. This is how Play can keep everything type-safe. Every tuple method has a type parameter for each regular parameter. You never see them because they’re inferred by the compiler, but they’re there.
That means writing this,
tuple(
  "name" -> text,
  "age" -> number,
  "email" -> email)
is exactly the same as writing this:
tuple[String, Int, String](
  "name" -> text,
  "age" -> number,
  "email" -> email)
If you ever run into problems with this limit, you can probably work around it by structuring your forms into nested components. The limit of 18 fields is just for a single tuple or mapping; if you nest, you can process an arbitrary number of parameters.
Working around the 18-field limit in other ways
If it’s impossible for you to restructure your input, perhaps because the form that submits the data isn’t under your control, you could write multiple form mappings that each capture part of the data. This will make processing somewhat harder, because you’ll have to check each one for validation errors, and it’s much more cumbersome to create objects out of it, but it’s possible. Alternatively, you could choose another method altogether to process the request data; you’re not forced to use Play’s default method of dealing with forms.
7.4.7. Custom mappings
So far, we’ve seen how to use the simple mappings that Play provides, like Forms.number and Forms.text. We’ve also seen how we can compose these mappings into more advanced mappings that can create tuples or construct objects. But what if we want to bind simple things for which no mapping exists?
For example, we might have a date picker in our HTML form that we want to bind to a Joda Time LocalDate, which is basically a date without time zone information. The user enters the date as a string, such as 2005-04-01, and we want to bind that into a LocalDate instance. There’s no way to get this done by composing the built-in mappings only. But Play allows us to create our own mappings as well.
There are two ways to create a custom mapping: you can either transform an existing mapping or implement a new mapping from scratch. The first is by far the easier method, but it has its limitations. We’ll start with a transformation, and later in this section we’ll see how to implement a whole new mapping.
Transforming a mapping is a kind of post-processing. You can imagine that if you have a Mapping[String] and you also have a function String => T, that you can combine these to create a Mapping[T]. That’s exactly what the transform method on a Mapping does, with the caveat that you also need to provide a reverse function T => String, because mapping is a two-way process.
We can create a Mapping[LocalDate] by transforming a Mapping[String] as follows:

Here we use the LocalDate.parse method to create a String => LocalDate function and the LocalDate.toString method to create a LocalDate => String function. The transform method uses these to transform a Mapping[String] into a Mapping[LocalDate].
Though this is powerful and works just fine in many cases, you might already see a flaw in the way we use it here to transform to a LocalDate. The problem is that if we use transform, we have no way of indicating an error. The LocalDate.parse method will throw an exception if we feed it invalid input, and we have no nice way of converting that into a proper validation error of the mapping.
The transform method is therefore best used for transformations that are guaranteed to work. When that’s not the case, you can use the second, more powerful method of creating your own Mapping, which is also how Play’s built-in mappings are created.
This involves creating a mapping from a play.api.data.format.Formatter, which is a trait with the following definition:
Listing 7.14. Definition of Play’s Formatter trait
trait Formatter[T] {
  def bind(key: String, data: Map[String, String]):
    Either[Seq[FormError], T]

  def unbind(key: String, value: T): Map[String, String]

  val format: Option[(String, Seq[Any])] = None
}
Play’s Formatter trait has two abstract methods, bind and unbind, which we have to implement. Additionally, it has an optional format value, which we can override if we want. It’s probably clear what the intention of the bind and unbind methods is, but their signatures are advanced. Binding isn’t simply going from a String to a T: we start with both the key and the map that contains the data that we’re trying to bind. We don’t simply return a T either: we return either a sequence of errors or a T.
This Either return type solves the problem of passing error messages to the mapping when the parsing of a LocalDate fails. For the unbinding process, we can’t pass any error messages; a Formatter[T] is supposed to be able to unbind any instance of T.
Let’s reimplement the LocalDate mapper using a Formatter[LocalDate]:
Listing 7.15. LocalDate formatter

In the bind method, we extract the value from the Map ![]() . If we successfully retrieved the value, we try to parse it
. If we successfully retrieved the value, we try to parse it ![]() , and if that fails, we return an error message
, and if that fails, we return an error message ![]() . If the Option is a None, we return an error
. If the Option is a None, we return an error ![]() .
.
We’ve used two messages here that we have to add to our conf/messages file:
Listing 7.16. Messages file
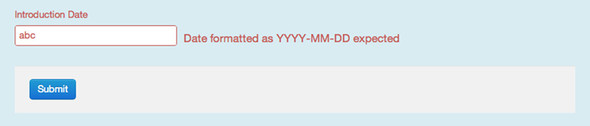
date.format=Date (YYYY-MM-DD)
error.date=Date formatted as YYYY-MM-DD expected
Now that we have a Formatter[LocalDate], we can easily construct a Mapping[LocalDate] using the Forms.of method:
val localDateMapping = Forms.of(localDateFormatter)
Because the parameter of the of method is implicit, and we’ve declared our localDateFormatter as implicit as well, we can leave it off, but we do have to specify the type parameter then. Additionally, if we have Forms._ imported, we can write this:
val localDateMapping = of[LocalDate]
Now that we have a Mapping[LocalDate], we can use it in a form:
val localDateForm = Form(single(
  "introductionDate" -> localDateMapping
))
The single method is identical to the tuple method, except it’s the one you need to use if you have only a single field.
And we can render the element in a template:
@helper.inputText(productForm("introductionDate"),
  '_label -> "Introduction Date")
This will render as in figure 7.2.
Figure 7.2. Form with custom LocalDate mapper

If we try to submit it with improper data, it’ll be rendered as in figure 7.3.
Figure 7.3. Form with custom LocalDate mapper and invalid input
The fact that you get access to the complete Map[String, String] makes custom mappings powerful. This also allows you to create a mapping that uses multiple fields. For example, you can create a mapping for a DateTime class that uses separate fields for the date and the time. This is useful, because on the front end, date and time pickers are often separate widgets.
7.4.8. Dealing with file uploads
File uploads are a special case, because the default form encoding won’t work. Files are uploaded with an HTML form, but their behavior is different from other form fields. Where you can redisplay a form that doesn’t validate with the previously filled-in values to your user, you can’t with a file input. With Play, uploaded files aren’t a part of a Form, but are handled separately using a body parser. In this section, we’ll quickly explain file uploads.
To upload a file with an HTML form, you need a form with multipart/form-data encoding, and an input with type file:
<form action="@routes.FileUpload.upload" method="post"
    enctype="multipart/form-data">
   <input type="file" name="image">
   <input type="submit">
 </form>
This form can be processed using the parse.multipartFormData body parser:
def upload() = Action(parse.multipartFormData) { request =>
  request.body.file("image").map { file =>
    file.ref.moveTo(new File("/tmp/image"))
    Ok("Retrieved file %s" format file.filename)
  }.getOrElse(BadRequest("File missing!"))
}
Here, request.body is of type MultipartFormData[TemporaryFile]. You can extract a file by the name of the input field—image in our case. This gives you a FilePart[TemporaryFile], which has a ref property, a reference to the TemporaryFile that contains the uploaded file. This TemporaryFile deletes its underlying file when it’s garbage collected.
Even though you don’t use forms for processing files, you can still use them for generating inputs and reporting validation errors. You can use the ignored mapping and a custom validation to validate file uploads with a form, as in listing 7.17:
Listing 7.17. Using the ignored mapping and custom validation to validate file uploads
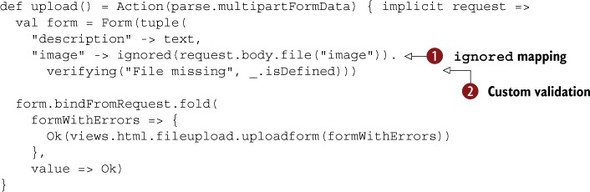
Here we used the ignored mapping ![]() , which ignores the form data but delivers its parameter as the value, in this case the request.body.file("image") value. This allows you to add some data to the constructed object that comes from some other source. Then we use a custom
validation
, which ignores the form data but delivers its parameter as the value, in this case the request.body.file("image") value. This allows you to add some data to the constructed object that comes from some other source. Then we use a custom
validation ![]() to verify whether the Option[FilePart] is defined. If not, no file was uploaded. Of course, you can add more advanced validations here as well.
to verify whether the Option[FilePart] is defined. If not, no file was uploaded. Of course, you can add more advanced validations here as well.
The type of the Form has become pretty awkward now: Form[(String, Option[play.api.mvc.MultipartFormData.FilePart[play.api.libs.Files.TemporaryFile]])], which would make the parameter declaration of your template very long. Luckily, in our template we don’t use the type of the Form, so we can declare it like this:
@(form: Form[_])
You can use the inputFile helper to generate an input. Don’t forget to also add the right enctype attribute to the form:
@helper.form(action = routes.FileUpload.upload,
  'enctype -> "multipart/form-data") {
  @helper.inputText(form("description"))
  @helper.inputFile(form("image"))
}
One problem that remains is how to create a page displaying the empty form. We’ve defined our Form inside the upload action, because it uses the Request, so we can’t readily use it in another action that displays the empty form. We can solve this issue in at least two ways. The first is to extract the form from the upload action and make a function that generates either an empty form, or a prefilled one given a Request. This is cumbersome, with little gain.
The easier way, which exploits the fact that we’ve used a wildcard type in the parameter declaration for our template, is to create a dummy form that we use to pass to the template:
def showUploadForm() = Action {
  val dummyForm = Form(ignored("dummy"))
  Ok(views.html.fileupload.uploadform(dummyForm))
}
This form does nothing, but it will allow us to invoke the template, which will nicely render an empty HTML form without errors. It’s not super neat, but it works, and you’ll have to decide for yourself whether you want to do this in order to be able to reuse form validation for forms with file uploads.
An alternative approach is to move the form to its own def that takes a request as a parameter:
def uploadForm(implicit request: RequestHeader) = Form(tuple(
  ...
  "image" -> ignored(request.body.file("image"))
  ...
))
That allows you to reuse it from multiple action methods as well.
In the next chapter we’ll look at how to process JSON and how we can reuse the forms API for more than just processing HTML forms.
7.5. Summary
Play has a forms API that you can use to validate and process your application’s user input. Data enters your application as String values, and it needs to be transformed to your Scala model objects. The process of converting String values to your model objects is called binding. With the forms API, data isn’t bound to a model object directly, but to a Form[T] instance, which can validate the data and report errors, or construct a model object of type T if the data validates.
A Form[T] is constructed using a Mapping[T]. Play provides simple mappings for types like strings, numbers, and Boolean values, and you can compose these to make more complex mappings. Custom mappings can be created by transforming existing mappings or by implementing a Formatter[T]. You can add validations to mappings with the verifying method.
Play provides form helpers, which are small templates that help you generate HTML forms from a Form definition. You can customize the generated HTML by implementing a custom FieldConstructor.
In the next chapter, we’ll show you how to use JSON in your application.