
Chapter 8. Building a single-page JavaScript application with JSON
This chapter covers
- Defining a RESTful web service
- Sending JSON to the web browser
- Parsing JSON from an HTTP request
- Converting between JSON data and Scala objects
- Validating JSON data
- Authenticating JSON web service requests
In this chapter, we’re going to reimplement part of the sample application from chapter 2 using a more modern JavaScript client application architecture that allows you to make more responsive web applications with richer and more interactive user interfaces.
We’re going to use Play to build the server for a JavaScript application that runs in the browser. Instead of using view templates to generate HTML on the server and send web pages to the browser, we’re going to send raw data to the web browser and use JavaScript to construct the web page.
Our goal is to reimplement the product list application so that we can edit product information in place by editing the contents of an HTML table, and have changes saved to the server automatically, without submitting a form.
Figure 8.1 shows a table of products that allows us to edit values by clicking and typing, adding uncoated to the first product’s description in this case.
Figure 8.1. Editing the first row of a table of products

To implement this, we need to use a combination of JavaScript to handle user interaction in the web browser, Ajax to interact with the server, and a server that provides access to product data. There’s more than one way to do this, and we’re going to implement it in a single-page application.
8.1. Creating the single-page Play application
As JavaScript in the web browser has become more powerful, it’s increasingly common to implement a web application’s entire user interface layer in a JavaScript client application. This takes advantage of increasingly rich APIs and improved JavaScript runtime performance, and reduces the amount of data that has to be sent between client and server. When done well, this can result in web applications with richer and more responsive user interfaces and better user experiences.
This approach is referred to as a single-page application architecture when the server only ever provides one HTML document, together with JavaScript code that handles interaction with the server and the user interface (see figure 8.2). There are no links to other pages, or form requests that would cause the page to be reloaded. Instead, the JavaScript application modifies the contents of the initially loaded page.
Figure 8.2. Single-page JavaScript application architecture
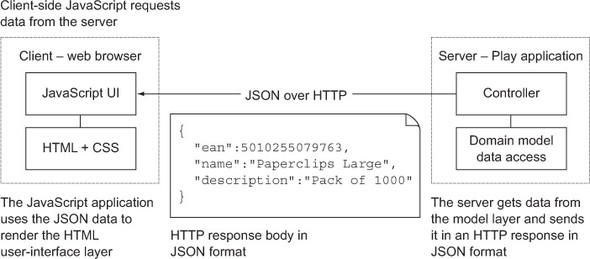
In a single-page application architecture, the server-side application only provides a data access layer, which is accessible via a RESTful web service interface. The JavaScript application that runs in the browser is then a web service client.
In this architecture, the server application interacts with the client by exchanging data in JSON (JavaScript Object Notation) format. Although it may at first seem that Play doesn’t provide any particular support for this architecture, it turns out that the two key ingredients are there.
To build an effective web service, you need fine control over the HTTP interface. As we already saw in chapter 4, Play provides flexible control over URLs, request parameters, and HTTP headers. Using these features is a key part of the web service design and implementation.
The second thing you need is fine control over parsing and generating the JSON data. Play includes a JSON library that provides a convenient way to do just that.
The combination of Play’s HTTP API and the JSON library makes implementing the server-side interface for a JavaScript client application a straightforward alternative to using server-side templates to generate HTML.
8.1.1. Getting started
To get started, we’re going to create a new Play application like we did in chapter 2 and reuse some elements we created earlier. As before, we’ll start by creating a new simple Scala application:
play new json
Then remove files that we’re not going to use:
cd json
rm app/views/main.scala.html
rm public/images/favicon.png
You can also remove configuration cruft: edit conf/application.conf and delete every line except the application.secret property, near the top.
8.1.2. Adding stylesheets
Next, copy the Twitter Bootstrap CSS (see section 2.1.2):
cp ~/bootstrap-2.0.2/docs/assets/css/bootstrap.css public/stylesheets
Replace the contents of public/stylesheets/main.css with Twitter Bootstrap overrides:
Listing 8.1. Override Twitter Bootstrap—public/stylesheets/main.css
body { color:black; }
body, p, label { font-size:15px; }
.screenshot { width: 800px; margin:20px; background-color:#D0E7EF; }
.navbar-fixed-top, .navbar-fixed-bottom { position:relative; }
.navbar-fixed-top .navbar-inner { padding-left:20px; }
.navbar .nav > li > a { color:#bbb; }
.screenshot > .container { width: 760px; padding: 20px; }
table { border-collapse: collapse; width:100%; position:relative; }
td { text-align:left; padding: 0.3em 0; border-bottom: 1px solid white;
 vertical-align:top; }
tr:hover td, tr:focus td { background-color:white; }
tr:focus { outline:0; }
td .label { position:absolute; right:0; }
This gives us the look and feel that you can see in this chapter’s screenshots.
8.1.3. Adding a simple model
As in section 2.1.4, we’re going to use a simplified model layer that contains static test data and doesn’t use persistent storage. If you prefer, you can use a persistent model based on the examples in chapter 5.
Add the following model class and Data Access Object to the models package.
Listing 8.2. The model—app/models/Product.scala


The only addition to the version in section 2.1.4 is the save method, which takes a product instance as a parameter and replaces the product that has the same unique EAN code. Note that this means you can’t save a product with a modified EAN code: attempting this will either result in a “Product not found” error or replace one of the other entries.
8.1.4. Page template
The last step in creating our single-page application is to add its page template. This is a slightly simplified version of the layout template from section 2.1.6, without any template parameters.
Listing 8.3. The application’s single-page template—app/views/index.scala.html


The addition to the earlier template is an HTML script element for our application’s client-side script. This refers to a products.js file, which we haven’t created yet.
We have the same containerdiv element as before, which is where we’re going to put the page content.
8.1.5. Client-side script
Teaching client-side JavaScript programming isn’t the goal of this chapter, so the implementation is going to be as simple as possible. To keep the code short, we’re going to use CoffeeScript, which Play will compile to JavaScript when the application is compiled.
For now, just create an empty app/assets/javascripts/products.coffee file. We’ll add to this file as we build the application.
Let’s continue and add some data from the server.
8.2. Serving data to a JavaScript client
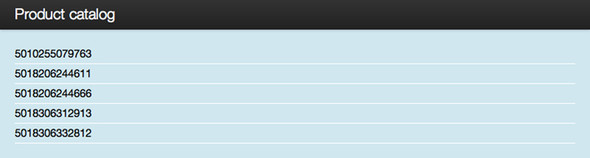
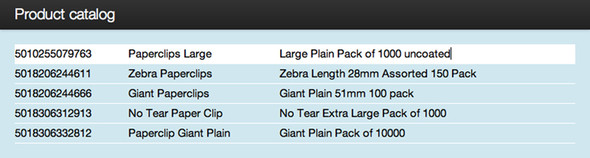
In this section, we’ll add dynamic data from the server to our web page: a table of products that shows each product’s EAN code (see figure 8.3).
Figure 8.3. A list of product EAN codes fetched from a web service URL and rendered in JavaScript

Architecturally speaking, this means implementing a RESTful web service that serves the product data to the JavaScript client. We’re using “RESTful” in a loose sense here, mostly to emphasize that we’re not talking about a web service implemented using SOAP. In particular, instead of sending data wrapped in XML, we send JSON data.
8.2.1. Constructing JSON data value objects
JSON is the data format of choice for many modern web applications, whether it’s used for external web services or communicating between browser and server in your own application. JSON is a simple format, and all common programming languages and frameworks have tools to help you both generate and parse JSON. Play is no exception. Play comes with a simple but useful JSON library that simplifies some JSON tasks for you.
Serving a JSON response
Our first task is to implement an HTTP resource that returns a list of product EAN codes. In JSON format, this is an array of numbers, which will look like this:
[5010255079763,5018206244611,5018206244666,5018306312913,5018306332812]
To do this, create a new controller that defines a list method.
Listing 8.4. list action returns a JSON array—app/controllers/Products.scala

There isn’t much code here because we cheated. We used Play’s built-in JSON library to serialize the list of numbers to its default JSON representation. Instead of formatting the numbers as a string ourselves, we used the toJson method to format the list. This formats each number as a string, and formats the list with commas and square brackets.
Also, because we return a JsValue result, Play will automatically add a Content-Type: application/json HTTP response header.
Defining the web service interface
Before we can see the result, we must define an HTTP route by replacing the conf/routes file to add a /products URL that we can send an HTTP request to.
Listing 8.5. HTTP routes configuration—conf/routes

To test this, let’s use cURL (see section 4.6.1) on the command line to see the raw output:
$ curl --include http://localhost:9000/products
HTTP/1.1 200 OK
Content-Type: application/json; charset=utf-8
Content-Length: 71

[5010255079763,5018206244611,5018206244666,5018306312913,5018306332812]
As you can see, Play has automatically set the response content type to application/json. This works because we converted the list of EAN codes using the toJson method, which returns a play.api.libs.json.JsValue. When you construct a response, Play sets the content type according to the type of the object used for the response, as we saw in section 4.6.4, Setting the Content Type.
Working with the JSON objects in Scala
The play.api.libs.json.JsValue type represents any kind of JSON value. But JSON is made of different types. The JSON specification lists strings, numbers, Booleans, objects, arrays, and nulls as possible values.
Play’s JSON library is located in play.api.libs.json, and it contains case classes for each of JSON’s types:
- JsString
- JsNumber
- JsBoolean
- JsObject
- JsArray
- JsNull.
Each of these classes is a subtype of JsValue. They have sensible constructors: a JsString takes a String as a parameter and a JsNumber takes a BigDecimal. Because Scala provides implicit conversions for Long, Int, Double, and Float, you can create a JsNumber from whatever number you have. JsBoolean takes a Boolean, and JsArray takes a Seq[JsValue]. Finally, a JsObject can be constructed from a sequence of key/value tuples: Seq[(String, JsValue)].
You can construct complex JSON structures by combining these case classes. When you’re done, you can convert to a JSON string representation using the toJson method we saw earlier.
You can easily construct simple JSON object structures:
import play.api.libs.json._
val category = JsString("paperclips")
val quantity = JsNumber(42)
JsObject and JsList take sequences of JsValue as parameters, so you can also construct large, nested JSON objects, as in listing 8.6:
Listing 8.6. Nested JSON structure constructed from JSON library case classes
val product = Json.obj(
  "name" -> JsString("Blue Paper clips"),

  "ean" -> JsString("12345432123"),
  "description" -> JsString("Big box of paper clips"),
  "pieces" -> JsNumber(500),
  "manufacturer" -> Json.obj(
    "name" -> JsString("Paperclipfactory Inc."),
    "contact_details" -> Json.obj(
      "email" -> JsString("[email protected]"),
      "fax" -> JsNull,
      "phone" -> JsString("+12345654321")
    )
  ),
  "tags" -> Json.arr(
    JsString("paperclip"),
    JsString("coated")
  ),
  "active" -> JsBoolean(true)
)
Remember, a -> b constructs the tuple (a, b), so we’re really passing a list of tuples to JsObject and JsArray.
Generating strings from JSON values
When you return JSON from a controller action, you pass the JsValue to the result directly. Sometimes you just want to end up with a String that contains JSON that you can send to the client. But String values are hard to manipulate, and it’s not convenient to construct JSON String instances manually, so you need another approach.
You can get the String representation using the method Json.stringify as follows:
val productJsonString = Json.stringify(product)
Now productJsonString is a String with the following contents (except for the whitespace we’ve added for readability):
{
  "name" : "Blue Paper clips",
  "ean" : "12345432123",
  "description" : "Big box of paper clips",
  "pieces" : 500,
  "manufacturer" : {
    "name" : "Paperclipfactory Inc.",
    "contact_details" : {
      "email" : "[email protected]",
      "fax" : null,
      "phone" : "+12345654321"
    }
  },
  "tags" : [
    "paperclip",
    "coated"
  ],
  "active" : true
}
Play also overrides the JsValue.toString method with one that calls Json.stringify, so alternatively you can use product.toString to get a string representation of our JSON.
If you have an Option value in your Scala code, it’s not obvious how it should be serialized to JSON. A common practice is to serialize to null if the Option is empty, and to the inner value’s serialization if it’s defined. For example, you could serialize an optional description of type Option[String] as follows:
description.map(JsString(_)).getOrElse(JsNull)
Fetching JSON data from the client
To continue with our example, we now need to update our client to populate the empty page with the JSON data that the controllers.Products.list action returns.
First, we’re going to add an element to our HTML page that we’ll use as a placeholder for the data from the server. Replace the containerdiv element with the following:
Listing 8.7. HTML table element data placeholder—app/views/index.scala.html

To fetch the data from the server-side “product list” resource, the client-side JavaScript will need to know the product list’s URL. In this example, we’re using reverse routing to generate the URL (/products) from the action name and store it in an HTML5 data attribute in the generated view template.
We could insert the data directly into the containerdiv element, creating the table dynamically, but then we’d have to hardcode the product list URL. That would also be a good approach, if you prefer to create a greater separation between client server, and use a documented HTTP API between the two. But defining a public API isn’t necessary if there’s precisely one server and one client.
The next step is to add the missing JavaScript, which we’re writing as CoffeeScript. Don’t worry if you don’t know CoffeeScript; there isn’t much of it and it looks a bit like Scala sometimes.
Edit the empty app/assets/javascripts/products.coffee file you created earlier, and add the following contents.
Listing 8.8. Client application to load data from the server—products.coffee
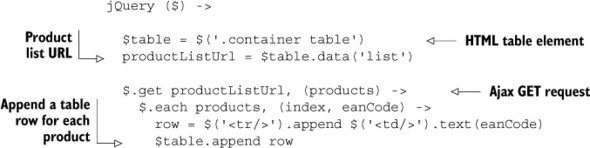
This code uses jQuery to run when the page has loaded and sends an Ajax GET request to the /products resource (the product list). The second parameter to the jQuery $.get function is a callback function that will be called when the request is complete. This loops over the resulting products array of EAN codes and adds a table row for each one.
The resulting table has five rows and one column of EAN codes, as shown in figure 8.4.
Figure 8.4. A table that consists of a single column of EAN codes
8.2.2. Converting model objects to JSON objects
The next step in our example is to fill in the table columns with the products’ names and descriptions. This will allow us to show the complete product table, shown in figure 8.5.
Figure 8.5. Product details fetched by one additional GET request per table row

In the previous example, we only fetched a list of numbers from the server, in JSON format. This time we’ll need to format instances of our models.Product case class as JSON.
This also illustrates a common technique in single-page application architecture: the first JSON request doesn’t fetch all of the data used on the page. Instead, the JavaScript first requests an outline of the product list and will then use this data to request additional information for each product, with one request per product.
This may seem inefficient for this small example, with so little data, but it’s a useful technique for progressively loading a large amount of data for a more complex application.
Returning a model object in JSON format in HTTP response
Each row will be populated with data from a new product details resource, which will return details of a single product in JSON format, such as the following.
Listing 8.9. Desired output—JSON representation of a Product object
{
  "ean" : 5010255079763,
  "name" : "Paperclips Large",
  "description" : "Large Plain Pack of 1000"
}
In the conf/routes file, add the route definition after the product list route:
GET /products/:ean controllers.Products.details(ean: Long)
Add the corresponding action method in the controller.
Listing 8.10. Output product details in JSON format—app/controllers/Products.scala

The idea is that this gets an Option[Product] from the model and returns a response with the product in JSON format, or a NotFound error response if there’s no such product.
Unfortunately, this doesn’t work because Play’s JSON library doesn’t know how to convert our product type into JSON.
We could use the earlier approach of creating a JsValue structure using the various JSON type constructors, but it’s a lot of work to wrap every string that you’re outputting as JSON into a JsString and every number into a JsNumber. Working with Option values is especially cumbersome.
Luckily, there’s better way: we need a JSON formatter.
JSON formatters
As you’ve already seen, Play’s Json class has a toJson method that can automatically serialize many objects to JSON:
val jsonString = Json.toJson("Johnny")
val jsonNumber = Json.toJson(Some(42))
val jsonObject = Json.toJson(
  Map("first_name" -> "Johnny", "last_name" -> "Johnson")
)
Here, we use toJson on a String, on an Option[Int], and even on a Map[String, String].
How does this work? Surely the toJson method isn’t some huge method that has serialization implementations for an immense range of types. Indeed it doesn’t. What’s really going on here is that the type signature of the toJson method looks like this:
def toJson[T](object: T)(implicit writes: Writes[T]): JsValue
The toJson function takes the object that you’re serializing as its first parameter. It also has a second, implicit, parameter of type Writes[T], where T is the type of the object you’re serializing. Writes[T] is a trait with a single method, writes(object: T): JsValue, which converts an object of some type to a JsValue. Play provides implementations of Writes for many basic types, such as String, Int, and Boolean.
Play also provides implicit conversions from Writes[T] to Writes[List[T]], Writes[Set[T]], and Writes[Map[String, T]]. This means that if a Writes implementation is available for a type, implementations will be automatically available for lists and sets of that type, and for maps from strings to that type.
For the simple types, the Writes implementations are very simple. For example, this is the one for Writes[String]:
implicit object StringWrites extends Writes[String] {
  def writes(o: String) = JsString(o)
}
Of course, we can also write Writes implementations for our classes.
Adding a custom JSON formatter
Our example uses the following Product class:
case class Product(ean: Long, name: String, description: String)
We can create a Writes[Product] implementation that constructs a Map from the Product instance and converts it to a JsValue:
Listing 8.11. Writes[Product] implementation
import play.api.libs.json._
implicit object ProductWrites extends Writes[Product] {
  def writes(p: Product) = Json.obj(
    "ean" -> Json.toJson(p.ean),
    "name" -> Json.toJson(p.name),
    "description" -> Json.toJson(p.description)
  )
}
We’ve created an object that extends the Writes trait for the type Product, with a writes method that uses Json.toJson for each property.
We made the object implicit, so that it can be used as an implicit parameter to the Json.toJson method when we try to serialize a Product instance. This means that with this Writes implementation in scope, it’s trivial to serialize a Product instance: Json.toJson(product) produces the JSON output we originally wanted (as shown earlier in listing 8.9):
{
  "ean" : 5010255079763,
  "name" : "Paperclips Large",
  "description" : "Large Plain Pack of 1000"
}
There’s a better way to implement this Writes[Product]. We can use JsPath to describe the same structure.
Listing 8.12. Writes[Product] implementation using JsPath
import play.api.libs.json._
import play.api.libs.functional.syntax._

implicit val productWrites: Writes[Product] = (
  (JsPath  "ean").write[Long] and
  (JsPath  "name").write[String] and
  (JsPath  "description").write[String]
)(unlift(Product.unapply))
A JsPath expression represents a “path” into a JSON structure, by analogy with XPath, which does the same for XML. Let’s break this down.
JsPath "ean" is a JsPath expression that corresponds to a JSON object’s top-level ean property. If you type this into the Scala console, you’ll see that its toString implementation returns /ean, which is a familiar representation.
(JsPath "ean").write[Long] uses the JsPath.write method to create a formatter using this path with a value of type Long. You can try this out on the Scala console:
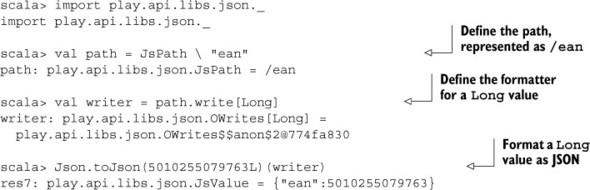
Finally, our formatter in listing 8.12 uses the and operator to combine the formatters, and unlift to change the unapply function’s return type to what’s required here. The details of the API for combining formatters like this and the reason why unlift is required are more complicated, but you can safely ignore that for now.
This Writes[Product] example is a common case: you need a JSON formatter for a case class whose properties’ types all have formatters defined. In this case, we can use a helper function that defines a default case class formatter at runtime, which gives the same output as the previous example:
import play.api.libs.json._
import play.api.libs.functional.syntax._
implicit val productWrites = Json.writes[Product]
But this approach is usually less useful in practice, because you usually end up wanting to control how fields are included in the JSON representation.
Using an alternative formatter
One nice property of using separate Writes implementations for serialization is that it decouples the object from its JSON representation. With some other serialization methods, certain annotations are added to the class that you want to serialize, which defines the way objects of that type are serialized.
With Play’s approach, you can define multiple JSON representations for a type, and pick one according to your needs. This is useful when you have properties, such as a product’s cost price, that you don’t want to expose in an external API. You can choose to omit properties from the JSON serialization.
If you’re also building an administrative interface that should show all of the product properties, you can create another JSON representation of the same Product model class, including a new price property of type BigDecimal. This would be another Writes implementation:
Listing 8.13. Alternative Writes[Product] that exposes purchase_price
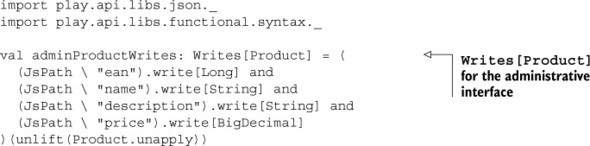
This Writes implementation is similar to the one in listing 8.11, but this time with the price property added. Here we didn’t make the object implicit, because that would cause ambiguity with the other Writes[Product] implementation. We can use this one by specifying it explicitly:
val json = Json.toJson(product)(AdminProductWrites)
Note that this Writes implementation shows how it’s handy to import Json._, so you can use toJson without a Json. prefix.
Using a custom formatter
Now that we have a custom formatter, we can use it in our controller to format Product objects as JSON.
Add the whole implicit object ProductWrites definition (listing 8.11) to the Products controller class (app/controllers/Products.scala) as a class member between the action methods. Now the call to Json.toJson(product) in the details action will work, and you can view the JSON output at http://localhost:9000/products/5010255079763.
We need to construct this URL in our example, so add another data attribute to the table element in the view template. We’ll use 0 as the placeholder for the EAN code and replace it later.
Listing 8.14. HTML table element data placeholder—app/views/index.scala.html
![]()
Finally, add some more CoffeeScript to send an additional GET request for each EAN code, to fetch product details and add two more cells to each table row.
Listing 8.15. Client that adds product details to each row—products.coffee

Now we can reload the page and see the full table, which is the result of six Ajax requests for JSON data: one for the list of EAN codes and one for each of the five products (figure 8.6).
Figure 8.6. Complete product details table

Now that we’ve populated our table, let’s make it editable by using Ajax to send JSON data back to the server.
8.3. Sending JSON data to the server
So far, we’ve looked at how to use JSON to get data from the server on a web page, but we haven’t made it editable yet. We wrote a Play application that serves data in JSON format to a JavaScript client that renders the data as HTML. In this section, we’ll work in the opposite direction and send edited data back to the server.
To do this, we’ll make minimal changes to our client application, and focus on the server-side HTTP interface.
8.3.1. Editing and sending client data
The usual way to make data editable on a web page is to use an HTML form that submits form-encoded data to the server. For this example, we’re going to cheat by using the HTML5 contenteditable attribute to make the table cells directly editable.
When an HTML5 element has the contenteditable attribute, you can just click the element to give it focus and start editing its text content. Figure 8.7 shows what happens if you click the first row and type uncoated at the end of the description: CSS styling sets the background color to white, and a text caret appears at the insertion point.
Figure 8.7. Editing a table cell’s contents using the HTML5 contenteditable attribute
This way, we don’t need to make any changes to the page’s HTML structure, and we can use client-side JavaScript to encode and send the data to the server.
To edit data in the web page and submit the changes to the server, we have to add some more code to our CoffeeScript file to handle changes to editable content.
Listing 8.16. Make the table editable and update via the server—products.coffee


There’s only one change in the first half of this example, up to the call to loadProductTable()—we add the HTML contenteditable attribute to each HTML tr element as we create it.
The second half of the code saves the contents of a table row to the server in a saveRow function that we attach to the tr element’s blur event, which happens when the table row loses focus.
Four things in the saveRow function are important for the server-side HTTP interface:
- The URL is the same as the URL we fetch one product’s details from; for example, http://localhost:9000/products/5010255079763.
- The HTTP request method is PUT.
- A response with an HTTP success status contains a message in the response body.
- An HTTP failure response contains a message in the response body or status text.
As you’d expect, we can implement this API specification in our Play application, in a similar way to how we’ve built the application so far. This time, we’re starting from the HTTP interface.
8.3.2. Consuming JSON
The first step in consuming JSON in our application is to receive it from the client in an incoming HTTP request. First, this means adding a new route configuration. Add the following line to the conf/routes file, after the other products routes:
PUT /products/:ean controllers.Products.save(ean: Long)
Add the corresponding action method in the controller.
Listing 8.17. Controller action to save product details—Products.scala

This save action method is like the details action we saw earlier, but in reverse. This time we start with a product in JSON format, contained in the HTTP PUT request body, and we parse the JSON into a models.Product instance.
As before, Play’s JSON library doesn’t know how to convert JSON to our product type, so we have to add a custom parser. This means adding an implementation of the Reads[Product] trait to go with the Writes[Product] implementation we’ve already added.
Add the following Reads[Product] implementation (listing 8.18) to the Products controller class (app/controllers/Products.scala), right after ProductWrites.
Listing 8.18. Reads[Product] implementation
import play.api.libs.functional.syntax._

implicit val productReads: Reads[Product] = (
  (JsPath  "ean").read[Long] and
  (JsPath  "name").read[String] and
  (JsPath  "description").read[String]
)(Product.apply _)
This uses JsPath expressions with the and operator to combine readers for the three fields, just like the Writes[Product] implementation in listing 8.12.
Now the call to JsValue.as[Product] in the save action will work. As with ProductWrites, this parser is declared implicit, so it’ll be used automatically. Also, you can see how the implementation uses the Product case class’s apply method to construct a Product instance from the JSON data. We’ll see more about Reads in section 8.3.4.
Now if you edit a product description, as shown in figure 8.7, the updated product details will be sent to the server, the save action method will save the product and return a plain text response with the body Saved, and the CoffeeScript client’s jqxhr.done callback will add a success label to the page, as shown in figure 8.8.
Figure 8.8. Displaying a label to indicate a successful Ajax request

We also have to handle errors. You may recall that the model’s save function throws an exception if the given product’s ID isn’t found:
def save(product: Product) = {
  findByEan(product.ean).map( oldProduct =>
    this.products = this.products - oldProduct + product
  ).getOrElse(
    throw new IllegalArgumentException("Product not found")
  )
}
When this happens, the Products.save controller action returns a BadRequest ("Product not found") result, and the client’s jqxhr.fail callback adds an error label to the page, as shown in figure 8.9.
Figure 8.9. Displaying a label to indicate a server-side error

8.3.3. Consuming JSON in more detail
Now that we’ve seen how to consume JSON in our example single-page application, let’s see how this works in more detail.
Consuming JSON is a two-step process. The first step is going from a JSON string to JsValue objects. This is the easiest step; you do it with the Json.parse method:
import play.api.libs.json._
val jsValue: JsValue = Json.parse("""{ "name" : "Johnny" }""")
Often, you don’t even need to manually perform this step. If a request has a JSON body and a Content-Type header with value of application/json, Play will do this for you automatically. Then you can immediately get a JsValue object from the request:
def postProduct() = Action { request =>
  val jsValueOption = request.body.asJson
  jsValueOption.map { json =>
    // Do something with the JSON
  }.getOrElse {
    // Not a JSON body
  }
}
This example uses the default body parser, the AnyContent parser. This parser will look at the Content-Type header and parse the body accordingly. The request.bodyasJson method returns an Option[JsValue], and it’s a Some when the request has application/json or text/json as the request content type.
In this case, we’ll have to deal with the case of a different content type ourselves. If you’re only willing to accept JSON for an action, which is common, you can use the parse.json body parser:
def postProduct2() = Action(parse.json) { request =>
   val jsValue = request.body
   // Do something with the JSON
 }
This body parser will also check for a JSON content type, but it’ll return an HTTP status of 400 Bad Request if the content type is wrong. If the content type is right, and parsing succeeds, the request.body value is of type JsValue and you can use it immediately.
Sometimes you have to deal with misbehaving clients that send JSON without proper Content-Type headers. In that case, you can use the parse.tolerantJson body parser, which doesn’t check the header, but just tries to parse the body as JSON.
Now that we have a JsValue in hand, we can extract data from it. JsValue has the as[T] and asOpt[T] methods, to convert the value into an object of type T or Option[T] respectively:
val jsValue = JsString("Johnny")
val name = jsValue.as[String]
Here, we try to extract a String type out of a JsValue, which works, because the JsValue is in fact a JsString. But if we try to extract an Int from the same JsValue, it fails:
val age = jsValue.as[Int] // Throws play.api.libs.json.JsResultException
If we’re unsure about the content of our JsValue, we can use asOpt instead. This will return a None if deserializing the value causes an exception:
val age: Option[Int] = jsValue.asOpt[Int] // == None
val name: Option[String] = jsValue.asOpt[String] // == Some("Johnny")
But a better solution is usually to use the JsValue.validate method, which uses an implicit Reads[T] to return a JsResult[T]:
val age = jsValue.validate[Int] // == JsError
val name = jsValue.validate[String] // == JsSuccess(Johnny,)
The benefit of this approach is that when parsing fails, the JsError result gives you access to the parsing errors.
Of course, often you’ll be dealing with more complex JSON structures. There are three methods for traversing a JsValue tree:
- —Selects an element in a JsObject, returning a JsValue
- \—Selects an element in the entire tree, returning a Seq[JsValue]
- apply—Selects an element in a JsArray, returning a JsValue
The and \ methods each have a single String parameter to select by property name in a JsObject; the apply method has a Int parameter to select an element from a JsArray. So with the following JSON structure,
import Json._
val json: JsValue = toJson(Map(
  "name" -> toJson("Johnny"),
  "age" -> toJson(42),
  "tags" -> toJson(List("constructor", "builder")),
  "company" -> toJson(Map(
    "name" -> toJson("Constructors Inc.")))))
you can extract data with a combination of , \, apply, as, and asOpt:

Here, we extract elements from the top-level object as String ![]() or Option[Int]
or Option[Int]![]() . We can traverse deeper in the object by using the method multiple times
. We can traverse deeper in the object by using the method multiple times ![]() . We use the apply method, using () as a shortcut for apply, to extract an element from a list
. We use the apply method, using () as a shortcut for apply, to extract an element from a list ![]() . Finally, we use the \ method and map to get a list of Strings from multiple locations in the JSON structure
. Finally, we use the \ method and map to get a list of Strings from multiple locations in the JSON structure ![]() . This last one will contain both Johnny and Constructors Inc.
. This last one will contain both Johnny and Constructors Inc.
If you try to select a value that doesn’t exist in a JsValue with the method, or if you use it on a non-JsValue, or if you use the apply method with an index larger than the largest index in the array, no exception will be thrown. Instead, an instance of JsUndefined will be returned. This class is a subtype of JsValue, and trying to extract any value out of it with asOpt will return a None. This means you can safely use large expressions on a JsValue, and as long as you use asOpt at the end to extract the value, no exception will be thrown, even if elements early in the expression don’t exist.
For example, we can do the following on the json value from listing 8.19:
(json "company" "address" "zipcode").asOpt[String]
Even though the address property doesn’t exist, we can still call ("zipcode") on it without getting an exception.
Of course, you can also use pattern matching to extract values from a JsValue:
(json  "name") match {
  case JsString(name) => println(name)
  case JsUndefined(error) => println(error)
  case _ => println("Invalid type!")
}
If the JsValue is a JsString, the content will be printed. If it’s a JsUndefined, an error will be printed (for example, 'name' is undefined on object: {"age":42}, if json is a JsObject without a name property), and on any other type, a generic error will be printed.
8.3.4. Reusable consumers
In the JSON Formatters section in 8.2.2, we saw how Play uses the Writes[T] trait to reuse JSON serialization definitions, and how the Json.toJson method takes one of these Writes[T] implementations as an implicit parameter to serialize an object of type T. A similar trait exists for the reverse operation. This is the Reads[T] trait that we’ve already encountered in section 8.3.2.
The Reads[T] trait has a single method, reads(json: JsValue): JsResult[T], which deserializes JSON into a JsSuccess that wraps an object of type T or a JsError that gives you access to JSON parsing errors, following the pattern of Scala’s Either[Error, T].
With an implicit Reads[T] in scope, we can use the as[T], asOpt[T], and validate[T] methods that we’ve seen in the previous section. Again, Play provides a variety of Reads implementations. So the following expression,
jsValue.as[String]
has the same value as this one:
jsValue.as[String](play.api.libs.json.Reads.StringReads)
Again, like Writes, Play provides implicit conversions from a Reads[T] to a Reads[Seq[T]], Reads[Set[T]], Reads[Map[String, T]], and a couple of others.
Of course, you can also implement Reads yourself. Let’s use a variation of the Product class we used earlier:
case class PricedProduct(
  name: String,
  description: Option[String],
  purchasePrice: BigDecimal,
  sellingPrice: BigDecimal)
Now suppose we have the following JSON structure that we want to deserialize into such a Product:
val productJsonString = """{
  "name": "Sample name",
  "description": "Sample description",
  "purchase_price" : 20,
  "selling_price": 35
}"""
We can write an object that implements Reads[Product], like we did earlier in listing 8.18:
Listing 8.19. Reads[Product] implementation
import play.api.libs.json._
import play.api.libs.functional.syntax._
implicit val productReads: Reads[PricedProduct] = (
  (JsPath  "name").read[String] and
  (JsPath  "description").readNullable[String] and
  (JsPath  "purchase_price").read[BigDecimal] and
  (JsPath  "selling_price").read[BigDecimal]
)(PricedProduct.apply _)
We’ve made the object implicit so we can use it as an implicit parameter to the JsValue.as method. Now we can use as to deserialize a JsValue into a Product:
val productJsValue = Json.parse(productJsonString)
val product = productJsValue.as[PricedProduct]
We now have a server-side HTTP interface that can receive and parse the data the client sends, so we’re going to need to validate that data. In the same way that we validated HTML form data in chapter 7, we need to validate JSON data.
8.3.5. Combining JSON formatters and consumers
It’s common to both serialize and deserialize a type to and from JSON. You can create a single class or object that implements both Reads[T] and Writes[T]. Play even provides a shortcut for that: the trait Format[T] extends both Reads[T] and Writes[T].
Instead of the previous example of a JSON consumer in listing 8.19, we can define a Format[PricedProduct] implementation, using JsPath’s format and formatNullable methods, as shown in the following listing.
Listing 8.20. Format[Product] implementation
import play.api.libs.json._
import play.api.libs.functional.syntax._
implicit val productFormat = (
  (JsPath  "name").format[String] and
    (JsPath  "description").formatNullable[String] and
    (JsPath  "purchase_price").format[BigDecimal] and
    (JsPath  "selling_price").format[BigDecimal]
  )(PricedProduct.apply, unlift(PricedProduct.unapply))
We can use this the same way as both Reads[PricedProduct] and Writes[PricedProduct] to serialize and deserialize values to and from JSON.
Another way to do the same thing is to create a Format[PricedProduct] implementation from previously defined Reads[PricedProduct] and Writes[PricedProduct] implementations (listings 8.18 and 8.12):
implicit val productFormat = Format(productReads, productWrites)
Finally, you can also use the following syntax to define the Format at compile time, although this will fail if any of the properties don’t have a formatter defined:
implicit val productFormat = Json.format[PricedProduct]
At first glance, this looks like the same kind of automatic JSON parsing and formatting that Java libraries such as Jackson and Gson perform using runtime reflection. But this is something far more special that its creator[1] calls JSON inception. Because it’s implemented with Scala macros, this feature avoids the need for runtime reflection or bytecode enhancement and—most importantly—it’s type-safe and will generate compilation errors if our PricedProduct type has any fields that can’t be formatted as JSON. Finally, note that you can also create Reads and Writes the same way:
1 Pascal Voitot, a.k.a. @mandubian
import play.api.libs.json._
implicit val productReads = Json.reads[PricedProduct]
implicit val productWrites = Json.writes[PricedProduct]
You’ve now seen how to parse and generate valid JSON. You’re ready to deal with invalid JSON using validation.
8.4. Validating JSON
Suppose you’re building a JSON REST API that’s accessible to the public. Even though you document and publish the JSON representations you expect to receive, it’s still better to give your users detailed error messages if the JSON isn’t what you expect, instead of a generic error message.
As well as generating and parsing JSON, Play’s JSON library also does advanced JSON validation and error reporting. You do this by adding validation rules to your Reads implementations. Let’s look at an example.
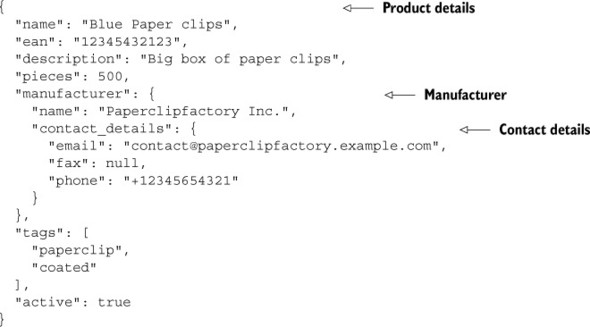
Suppose you have the JSON structure in listing 8.21.
Listing 8.21. Sample product JSON structure
The first step is to define a Reads[Product] implementation for the whole structure.
8.4.1. Mapping the JSON structure to a model
In our model, this corresponds to the following classes: a product, which includes a manufacturer, which in turn includes contact details.
Listing 8.22. Corresponding model class structure
case class Contact(email: Option[String], fax: Option[String],
  phone: Option[String])

case class Company(name: String, contactDetails: Contact)

case class Product(ean: Long, name: String,
  description: Option[String], pieces: Option[Int],
  manufacturer: Company, tags: List[String], active: Boolean)
Using the same syntax as in the previous section, we can add a Reads[Product] implementation, which delegates to a Reads[Company] implementation, as shown in the next listing.
Listing 8.23. JSON parser definitions
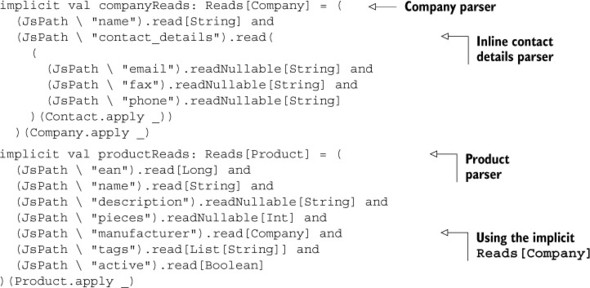
The definition is straightforward. Note that we can choose to define a separate Reads implementation for each type, as we do here for Product and its nested Company (the manufacturer), or to inline a nested Reads implementation, as for the Contact.
8.4.2. Handling “empty” values
In the previous example, listing 8.22, you may have spotted that the case class properties that are Option types use JsPath.readNullable instead of JsPath.read. This allows the Reads implementation to handle JSON input that omits these fields.
In general, empty values are a special case to consider when parsing JSON, as the possible cases are different than with HTML form data. Consider the difference between the following three JSON objects:
{ "name": "Blue Paper clips", "description": "" }
{ "name": "Blue Paper clips", "description": null }
{ "name": "Blue Paper clips" }
In JSON, an “empty” string value can be an empty string (""), null, or the field can be omitted entirely.
In a REST API, setting the value to null could mean “remove the existing value,” whereas omitting the field could mean “keep the existing value.” This means we potentially have to differentiate between the different cases.
The JSON API uses a nullable[T] to handle the JsNull case, such as our example’s description: Option[String] property. This is essentially,
def nullable[T](implicit rds: Reads[T]): Reads[Option[T]] = Reads(js =>
  js match {
    case JsNull => JsSuccess(None)
    case js => rds.reads(js).map(Some(_))
  }
)
This means that the "description": null JSON is parsed as a None in our example.
8.4.3. Adding validation rules and validating input
Once you have a Reads implementation, you can add validation rules, as follows.
Listing 8.24. Reads[Company] and Reads[Product] with validation rules
implicit val companyReads: Reads[Company] = (
  (JsPath  "name").read[String] and
  (JsPath  "contact_details").read(

    (
      (JsPath  "email").readNullable[String](email) and
      (JsPath  "fax").readNullable[String](minLength[String](10)) and
      (JsPath  "phone").readNullable[String](minLength[String](10))
    )(Contact.apply _))
  )(Company.apply _)

implicit val productReads: Reads[Product] = (
  (JsPath  "ean").read[Long] and
  (JsPath  "name").read[String](minLength[String](5)) and
  (JsPath  "description").readNullable[String] and
  (JsPath  "pieces").readNullable[Int] and
  (JsPath  "manufacturer").read[Company] and
  (JsPath  "tags").read[List[String]] and
  (JsPath  "active").read[Boolean]
)(Product.apply _)
The syntax is readable: this adds email address and minimum length validations to the fields. But the API is more complex: JsPath.readNullable (and JsPath.read) have an optional (implicit) parameter that provides the Reads implementation to be used. In this case, email—like the other validating parsers in play.api.libs.json.ConstraintReads—also performs validation.
Now we can validate our input. The code is almost the same as the save method in listing 8.17, but this time we call the JsValue.validate method.
Listing 8.25. Controller action to validate and save product details—Products.scala
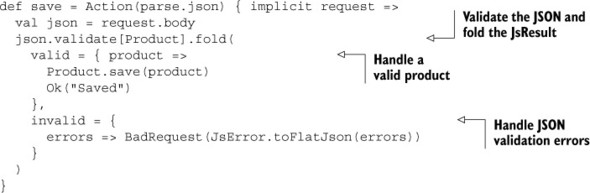
What happens here is that validation returns a JsResult that contains either the parsed Product or a list of play.api.data.validation.ValidationError instances. Because this is a JSON API, we return the validation errors as a JSON string.
8.4.4. Returning JSON validation errors
For example, suppose we submit the following JSON request body:
{
  "name": "Blue",
  "ean": 5010255079763,
  "pieces": 500,
  "manufacturer": {

    "name": "Paperclipfactory Inc.",
    "contact_details": {
      "email": "contact..."
    }
  },
  "active": true
}
This fails validation with the following JSON result, which is generated by the JsError .toFlatJson helper.
{
  "obj.manufacturer.contact_details.email" : [
    { "msg" : "validate.error.email", "args" : [] }
  ],
  "obj.name" : [
    {"msg" : "validate.error.minlength", "args" : [5] }
  ],
  "obj.tags" : [
    {"msg" : "validate.error.missing-path", "args" : [] }
  ]
}
But you may be implementing a JSON API that requires errors in a particular simplified JSON format, such as the following:
[
  {
    "path" : "/manufacturer/contact_details/email",
    "errors" : ["validate.error.email"]
  },
  { "path" : "/name", "errors" : ["validate.error.minlength"] },
  { "path" : "/tags", "errors" : ["validate.error.missing-path"] }
]
Making this change is just a question of adding the following Writes and passing the validation errors to Json.toJson instead of JsError.toFlatJson.
Listing 8.26. Formatting JSON validation errors for a JSON response
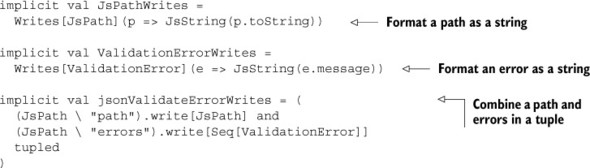
Note that these Writes are defined differently than in the case class example we saw earlier. For a JsPath and a ValidationError, we just want a string in each case, so we take advantage of the option to provide a transformation function that takes an instance of a path or error and returns a JsString. The third formatter combines these using the JsPath syntax and the and operator we saw earlier, but then formats the combination as a tuple, so the final result is a Writes[(JsPath, Seq[ValidationError])].
8.4.5. Alternative JSON libraries
Now you know all that you need to start dealing with JSON in your Play application. Of course, it’s possible that you don’t like this approach to JSON with type classes, and prefer JSON libraries that do more for you, such as JSON libraries that are based on reflection.
Other JSON libraries can automatically serialize and deserialize objects, without the need for explicit implementations of Writes and Reads traits, at the cost of coupling a single JSON representation to a class. In practice, this is often not flexible enough and introduces the need for intermediate classes—Data Transfer Objects whose structure resembles the JSON that you want to serialize or deserialize, which in turn creates the need to write code that converts between these value objects and your real domain objects. One such library is Jerkson; it’s possible to use Jerkson directly, or you can use any other JSON library that you like.
So far in this chapter, we’ve covered a lot more about JSON than about the HTTP API that our application’s JSON web service provides, mainly because it’s not that different from previous chapters. Now it’s time to return to a specific aspect of the HTTP API.
8.5. Authenticating JSON web service requests
The previous sections show how to use Play to build a stateless web service that sends and receives JSON data instead of HTML documents and form data. Although this is everything you need to build a JavaScript-based single-page web application, one special case deserves consideration: authenticating web service requests.
Authentication means identifying the “user” who’s sending the request, by requiring and checking valid credentials, usually username and password. Authentication is usually used for authorization—restricting access to resources depending on the authenticated user.
In a conventional web application, authentication is usually implemented by using an HTML login form to submit credentials to a server application, which then maintains a session state that future requests from the same user are associated with. In our JSON web service architecture, there are no HTML forms, so we use different methods to associate authentication credentials with requests.
Authentication isn’t built in
Web service authentication is an example of something that’s not implemented in Play—there are no included libraries to handle authentication for you. This is partly because there’s more than one way to add authentication to an HTTP API, and different APIs and clients will have different requirements. Also, implementing authentication directly in your application doesn’t require much code, as you’ll see in this chapter.
8.5.1. Adding authentication to action methods
The simplest approach is to perform authentication for every HTTP request, before returning the usual response or an HTTP error that indicates that the client isn’t authorized to access the requested resource. This means that our application remains stateless, but also that every HTTP request must include valid credentials.
Composing actions to add behavior
To perform authentication for every request, we want a way to add this additional behavior to every action method in our controller class. A good way to do this is to use action composition.
You may recall from chapter 4 that an action method returns a play.api.mvc.Action, which is a wrapper for a function from a request to a result.
def action = Action { request =>
  Ok("Response...")
}
Note that this, and the code listings that follow, are all helper methods in a controller class. Create a new Play Scala application and add these three methods to the file app/controllers/Application.scala.
We can add authentication using basic action composition that replaces the standard Action generator with our own version. This means defining an AuthenticatedAction function that returns a new action to perform authentication, and which behaves like a normal action if authentication succeeds.
def index = AuthenticatedAction { request =>
  Ok("Authenticated response...")
}
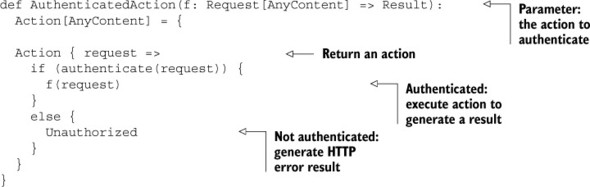
The outline of the AuthenticatedAction is to use the request to call a Boolean authenticate function and delegate to the wrapped action if authentication succeeds, or return an HTTP Unauthorized result otherwise.
Listing 8.27. Action helper that performs authentication
We can test this using cURL (see section 4.6.1) on the command line. If the authenticate method returns true, we get the expected success HTTP response:
$ curl --include http://localhost:9000/
HTTP/1.1 200 OK
Content-Type: text/plain; charset=utf-8
Content-Length: 25

Authenticated response...
If the authenticate method returns false, we get the “not authorized” HTTP error response:
$ curl --include http://localhost:9000/
HTTP/1.1 401 Unauthorized
Content-Length: 0
This works, but if authentication fails, we have no way of adding a useful error message to the HTTP Unauthorized response, because we won’t know whether the credentials were missing or the password was just wrong.
Extracting credentials from the request
The previous example supposed that the authentication method would take a play.api .mvc.Request parameter, extract the credentials, and perform authentication. It’s better to separate these steps, so we can report errors in different steps separately.
First, we’ll extract the code to get username and password credentials from the request, so we can extract that from our action helper.
Listing 8.28. Helper function to extract credentials from a request query string

What this helper function does is simple, but it has a complicated return type that nests an Either inside an Option, because there are several cases:
- If the query string doesn’t contain a user parameter, the function returns None (no credentials).
- If the query string contains both user and password parameters, the function returns a pair (the credentials).
- If the query string contains a user parameter but no password, the function returns a BadRequest (HTTP error).
This approach means that we can add proper error handling to AuthenticatedAction, without using lots of if statements.
Listing 8.29. Updated action helper that extracts credentials before authentication

The action helper handles several cases, which we can now demonstrate. First, we can add credentials to our request.
$ curl --include "http://localhost:9000/?user=peter&password=secret"
HTTP/1.1 200 OK
Content-Type: text/plain; charset=utf-8
Content-Length: 25

Authenticated response...
If the password is missing, we get an error message from the readQueryString function (listing 8.28).
$ curl --include "http://localhost:9000/?user=peter"
HTTP/1.1 400 Bad Request
Content-Type: text/plain; charset=utf-8
Content-Length: 22

Password not specified
If the credentials are missing entirely, we get a different error message from the action helper (listing 8.29).
$ curl --include http://localhost:9000/
HTTP/1.1 401 Unauthorized

Content-Type: text/plain; charset=utf-8
Content-Length: 34

No user name and password provided
As well as better error messages, another advantage of our updated action helper is that we changed the authenticate method to use username and password parameters, making it independent of how these credentials are retrieved from the request. This means we can add another approach to reading credentials.
8.5.2. Using basic authentication
A more standard way to send authentication credentials with an HTTP request is to use HTTP basic authentication, which sends credentials in an HTTP header.
HTTP basic authentication is a simple way for web services to request authentication for clients, and for clients to provide credentials with HTTP requests.
A server requests basic authentication by sending an HTTP 401 Unauthorized response with an additional WWW-Authenticate header. The header has a value like Basic realm="Product catalog". This specifies the required authentication type and names the protected resource.
The client then sends a new request with an Authorization header and credentials encoded in the value. The header value is the result of joining a username and a password into a single string with a colon, and encoding the result using Base64 to generate an ASCII string. For example, a username peter and password secret are combined to make peter:secret, which is encoded to cGV0ZXI6c2VjcmV0. This process is then reversed on the server.
Basic authentication should only be used on trusted networks or via an encrypted HTTPS connection, because otherwise the credentials can be intercepted.
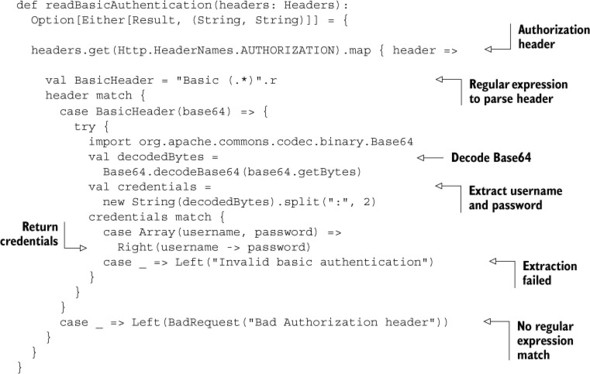
To add basic authentication to our example, we need a helper function that returns the same combination of errors or credentials as the readQueryString function (listing 8.28), so we can use it the same way. This version is longer, because as well as reading the HTTP header, we have to decode the Base64-encoded header value.
Listing 8.30. Helper function to extract credentials from basic authentication headers
To use the new helper, we can just add it to the line in our AuthenticatedAction helper (listing 8.29) that gets credentials from the request, so that it gets used if the attempt to read credentials from the query string returns None.
val maybeCredentials = readQueryString(request) orElse
  readBasicAuthentication(request.headers)
Now we can use basic authentication in our request:
$ curl --include --user peter:secret http://localhost:9000/
HTTP/1.1 200 OK
Content-Type: text/plain; charset=utf-8
Content-Length: 25

Authenticated response...
If we send an invalid basic authentication header, with an x instead of a Base64-encoded username and password pair, then we get a sensible error message.
$ curl -i --header "Authorization: Basic x" http://localhost:9000/
HTTP/1.1 400 Bad Request
Content-Type: text/plain; charset=utf-8
Content-Length: 28

Invalid basic authentication
Finally, we can improve the error response when there are no credentials by adding a response header that indicates that basic authentication is expected. In the AuthenticatedAction helper (listing 8.29), replace the line Unauthorized("No user name and password provided") with an error that includes a WWW-Authenticate response header:
val authenticate = (HeaderNames.WWW_AUTHENTICATE, "Basic")
Unauthorized.withHeaders(authenticate)
The response now includes a WWW-Authenticate header when we don’t provide any credentials:
$ curl --include http://localhost:9000/
HTTP/1.1 401 Unauthorized
WWW-Authenticate: Basic
Content-Length: 0
8.5.3. Other authentication methods
Using query string parameters or basic authentication to send authentication credentials to the server is a start, but it’s not necessarily what we want to use for all requests. Web services often use one of two alternatives:
- Token-based authentication— Providing a signed API key that clients can send with requests, either in a custom HTTP header or query string parameter
- Session-based authentication— Using one method to authenticate, and then providing a session identifier that clients can send, either in an HTTP cookie or an HTTP header
Both approaches are similar: a previously authenticated user is provided a token that can be used instead of a username and password when making web service requests.
The API key in the first option is usually provided in advance as part of registering for the service, instead of being served by the web service itself. The key remains valid for some time, typically months.
Session-based authentication is different in that the token (the session ID) is obtained by logging in to an authentication web service that maintains the session on the server. The session is only temporary, and typically expires after some minutes.
In a Play application, you can implement both approaches in the same way that we implemented authentication in the previous section. All you need is an additional method, in each case, that reads the credentials—the authentication token—from the HTTP request. In the case of an API key, you can then use this to look up the corresponding username and password for authentication. For session-based authentication use the token to indicate that authentication has already succeeded.
8.6. Summary
In this chapter, we saw how to define the RESTful web service that a single-page JavaScript web application interacts with by sending and receiving data in JSON format.
This chapter showed how to send data in JSON format by converting domain model objects to JSON format to send to the client, and also to receive data from the client by parsing the JSON data that the client sends back and converting the result to Scala objects.
The finishing touches were to validate the JSON data that we receive from the client and to authenticate requests.
Along the way, we also saw that Play’s support for JavaScript asset compilation can be useful while implementing the client. Even more importantly, you can use CoffeeScript—“JavaScript without the fail.”[2]
2 From the title of the presentation by Bodil Stokke—http://bodil.org/coffeescript/.
In the next chapter, we’re going to look at how to structure Play applications into modules.