
Chapter 14
Integrating SQL Script in VBA Code
Introduction
Why SQL? We have demonstrated in this book how much of SQL script writing can be done through the Access query grid. In fact, the query grid is so easy to use that Microsoft has incorporated it into SQL Server and is indicating that it is going to be the major way most future SQL will be done. Despite this trend, there is much still going for raw, text-based SQL. For starters, SQL is far easier to handle and manipulate than query grids. It also provides a degree of functionality that is not available to the query grid developer. In this chapter we will show how SQL is critical for Visual Basic development. The next chapter will continue this theme with a demonstration of how the coding of web Active Server pages can be enhanced using SQL.
Definitions
Recordset — A collection of records in Visual Basic programming.
VBA — Visual Basic for Applications. The flavor of Visual Basic incorporated in Access and in much of the Microsoft Office suite.
This chapter will assume that you are familiar with Access programming and that you know your way around modules and basic Visual Basic code. It also assumes that you have a good understanding of items and properties of those items. In particular, we will be concentrating on the properties of forms and combo boxes and how you can set some of these properties dynamically using code. Before some of you begin to panic, we promise to keep things as simple as possible to make our points. On the other hand, if you have made it this far, you have a desire to learn SQL, and what better reason for this than to improve your Visual Basic programming ability?
Fixed Queries vs. “On-the-Fly ” Queries
The first reason for developing queries dynamically rather than building them in the query grid and storing them is a simple matter of logistics and aesthetics. Access is a very powerful program. It permits the user to develop queries to do just about anything. Unfortunately, as powerful as the query development tools are, the management and organization of the queries leaves much to be desired. To see how far we should have come in Access, we need to go back to the early days of DOS. In those early days, all files on storage media were kept in a single list on the media. In the case of floppy disks, each floppy would have a single directory and all files would be in the directory. While simple and straightforward, the lone directory could have hundreds of files, which in turn could be associated with multiple applications. It was the responsibility of the operator to know which files were associated with each application and to keep things straight. Generally the operator did not keep up with this responsibility, which resulted in chaos.
This problem was alleviated with the introduction of cascading directory trees. With directories, files could be grouped and put together with related files separate from nonrelated files. For example, a data directory could be set up to contain data. A template directory could be set up to hold all the templates associated with a program. Finally, a program directory could be set up to contain the actual program files. Directories could be placed in other directories, establishing a hierarchal system to manage all files on the media.
Unfortunately, Access has never gotten past the initial stage of putting forms in one container, modules in a second container, tables in a third container, and so on. There is no provision to group queries based on function or tables based on contents. The net effect is that if you have a hundred queries, they will all be in a single list. There could be a dozen queries that are performing similar tasks, but just like in the early days of computers, there is no real way to organize the queries other than by careful user-managed naming conventions. Until Access provides a better way of organizing queries, one of the tricks that the programmer can implement is to reduce the number of needed queries, thereby simplifying the organization of the remaining queries.
Now, some astute reader will be remarking at this point “What about groups?” While groups are a convenient way to organize objects, they are really only shortcuts and only provide a visual link to the object. In some ways they actually make things messier since you not only still have all the original objects in a single long list but now you have multiple virtual copies of the object.
This is where SQL enters the picture. One of the easiest ways to avoid having queries appear in the list of queries is to build the queries dynamically in code rather than by having each query stored in the query list. By entering query operations as inline code rather than as separate, unique queries, you have fewer queries, which are far easier to manage.
This is just the first of many reasons for building queries dynamically in code and creating them on the fly rather than to have them permanently saved in the query list. But this is by far the most important reason. We will introduce a few more reasons as this chapter progresses.
The following shows a simple example of this (see Figure 14-1).

Figure 14-1
Using our earlier example of the Customers table (last accessed in Chapter 10), let’s first add a few records to the table to give us a larger number of records with which to work. This will provide us with additional filtering capabilities and show off a few additional features of filter parameters. (Note that we’ve skipped record 7 to separate the new ones a bit.)
INSERT INTO Customers
VALUES (8, 'Henry', 'George', '1000 East West St',
        'Jacksonville', 'FL', 32211, 904, '444-2323'),

INSERT INTO Customers
VALUES (9, 'Alice', 'George', '1000 East West St',
        'Jacksonville', 'FL', 32211, 904, '444-2323'),
INSERT INTO Customers
VALUES (10, 'Bill', 'George', '1812 Hemingway',
        'Jacksonville', 'FL', 32213, 904, '421-3246'),

INSERT INTO Customers
VALUES (11, 'Mary', 'Wilson', '13120 N 15th East',
        'Ogden', 'UT', 84102, 919, '321-9443'),
Now that we have added these records, assume that you want to display only those people who are in Florida. One method of addressing this requirement is to build and save a special query where the state equals Florida. A second method of doing this is to build the recordsource for the form using the Query Builder, which is accessed with the builder button (the ellipsis that appears to the right of the drop-down arrow). Using the Query Builder you can select the recordsource as the Customers table and add your filter for the state (Florida) as shown in Figure 14-2.
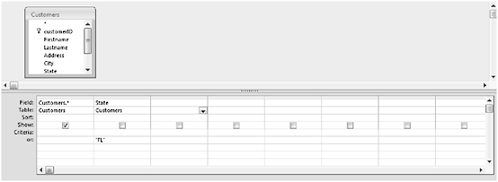
Figure 14-2
What happens when you save this query is interesting. Access evaluates what you have entered in the query grid and automatically saves it in the recordsource as an SQL query.
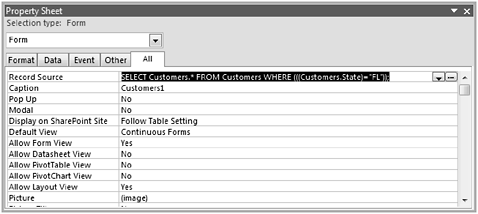
Figure 14-3
This brings up several other possible uses for Access SQL. The first is that you can type the SQL directly into the recordsource instead of going to the Query Builder, as shown in Figure 14-3. Sometimes this is a far faster way of entering the recordsource. Second, if you have a form that already has the recordsource that you want to use for your current form, copy the SQL code from the first form and paste it into the second form. This is often much quicker than building a query from scratch.
Note: The concept of viewing the query as an SQL statement also gives the designer a great degree of flexibility that does not exist in the query grid. If you wish to take a recordsource from one form and copy it to another form but have the additional complication of having the recordsource being a different but similar table, you can copy the SQL string into a text editor such as Microsoft Word. You can then use search and replace to change the initial table to the new table using the global search and replace feature. This is extremely useful if you have a very complex query and don’t wish to recreate everything. A quick search and replace followed by cutting and pasting the result back into Access completes the operation. Unfortunately, Access does not have a convenient way of doing this. The Access text editing capabilities are more primitive than even those of Notepad. And while it is possible to get a larger window for viewing your SQL (the Zoom window, accessed by pressing the Shift+F2 keyboard shortcut) the larger window is still relatively small and provides no functionality except data entry.
Note: Microsoft has an interesting feature in the Zoom window that significantly improves its usefulness. You can select your font in the Zoom window so you are not limited to a microscopic font size. You can select the font to be any font on your computer at any size; however, the larger the font, the less you can see on the screen. Refer to Figure 14-4.

Figure 14-4
Filtered Recordsets for Forms
Now that we have shown that the record source of a form is just an SQL statement, we can make the leap to dynamically set up the query as needed. Dynamic queries are extremely useful when working with a filtered recordset in a form or report.
Just like with every other task in Access, there are many ways to filter a recordset. First, you can enter the filter when opening a form. We will demonstrate this with the frmCustomers form in the sample database we’ve been using (see Figure 14-5). Selecting a record on the Customers form, then pressing either of the “Open with” buttons on the form will open the frmTransactions form to show the transactions for that customer. If there is only one transaction, frmTransactions will only have one record to display. If there is more than one transaction, the user is able to move forward and backward through the records.

Figure 14-5
So much for the overview — now we will get into the fun stuff! The first button, Open with filter, is the equivalent of setting the filter parameter of the recordset to the entered value. Take a look at the code behind this button:
Private Sub cmdOpenFilter_Click()
    DoCmd.OpenForm "frmTransactions", , , "customerID= " &
          CustomerID
End Sub
In effect, this code opens the frmTransactions form and sets the Filter property of the form. In the example above, when the user selects the customer with the ID of 1, the filter string “customerID =1” is placed into the Filter property (see Figure 14-6).
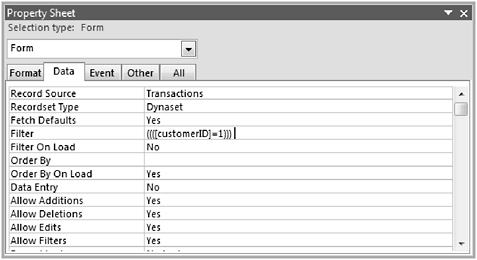
Figure 14-6
The one problem with this approach is that you generally want to allow the user to perform additional filters with the data. If the user enters a new filter via the Filter button or through “filter by form,” the new filter will overwrite the one you had carefully built and will change the list of records displayed with no obvious way to get back to the initial filter set. For example, selecting “filter by selection” when the date sold of 2/8/2008 is selected produces the filter shown in Figure 14-7. You get the records that you want but you have to tread on shaky ground.

Figure 14-7
If the user removes the filter to try to go back to the full set of pertinent records, the results (Figure 14-8) are not what is expected. The resulting display will have all the records, not just the ones that meet your original customer filter.
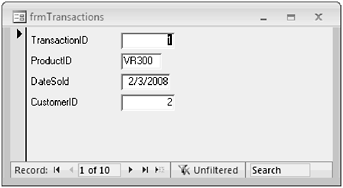
Figure 14-8
Let’s take a step back for a moment and look at this problem in a bit more detail. You really don’t want the user to be able to view the full set of records, no matter what filters he chooses to set up. You want the user to only have access to the records you want him to see. This is best accomplished by setting the recordsource of the form to a recordset that only has the values that you want.
Looking at the properties of our form, notice that the Recordset property is either a table or a query expressed as an SQL statement. We have the ability to change this property and when doing so we can change the collection of records that the form uses. We do this by opening the form, then setting the Recordsource property to a filtered query. Since the form is not filtered by the use of the Filter property, clearing the filter will not affect our dataset. The user is limited to the records we give him permission to view in the recordsource.
Private Sub cmdOpenRecord_Click()
    DoCmd.OpenForm "frmTransactions"
    Forms![frmtransactions].RecordSource = "SELECT * FROM
           Transactions WHERE customerID =" & CustomerID
End Sub
We can see this in the Immediate window in Visual Basic (Figure 14-9). Note that the recordset has a filter applied and the filter for the form is blank.
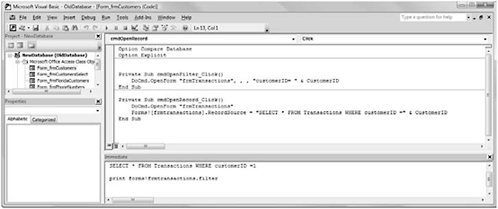
Figure 14-9
Filtered Recordsets for Combo Boxes
The second place that dynamic recordsets are commonly used is in combo boxes. In many cases you may want the combo box to have varying data depending upon the value of an option group. Take a look at the next form from the sample database, frmSelectCustomer (Figure 14-10).

Figure 14-10
In this example, we want the contents of the combo box to be sorted by the selected option. We also want the combo box to reflect the choice of the option group. We do this by setting the Rowsource property of the combo box programmatically during the after update event based on the value of the option box. Depending upon the option selected, the program will set up the rowsource to sort by the selected field (Figure 14-11).

Figure 14-11
Private Sub selectBy_AfterUpdate()
If selectBy = 1 Then
    selectCustomer.RowSource = "SELECT Lastname, Firstname,
          PhoneNumber, CustomerID FROM Customers ORDER BY lastname"
ElseIf selectBy = 2 Then
    selectCustomer.RowSource = "SELECT Firstname, Lastname,
          PhoneNumber, CustomerID FROM Customers ORDER BY firstname"
Else
    selectCustomer.RowSource = "SELECT PhoneNumber, Lastname,
          Firstname, CustomerID FROM Customers ORDER BY phonenumber"
End If
End Sub
Examine the difference in the combo box when different options are selected. The differences in the values for the combo box are a direct result of the SQL that is placed behind the rowsource of the combo box (Figure 14-12).
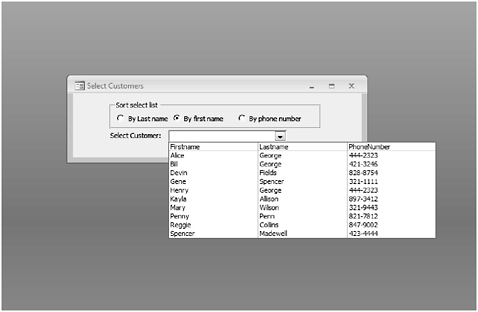
Figure 14-12
Recordsets for Subforms
The third major use of dynamic SQL statements in code is the building of the recordsource for subforms. There are three major reasons for using SQL to change the recordsource of subforms. The most common reason is identical to that of filtered recordsets for forms — it gives you control of the recordset and eliminates the possibility of the user disturbing your filter through manual action.
The second reason for using SQL to change the recordsource of a subform parallels the idea of dynamically changing the rowsource of a combo box. Sometimes the programmer needs to have different data in the subform based on other decisions made on the form. If the visual appearance of the subform does not need to change to reflect the different data, it is often advantageous to save time and effort by using one subform designed to hold both types of data and just changing the recordsource of the subform. Look at the following form, frmPhoneNumbers (Figure 14-13).

Figure 14-13
Depending upon the user’s selection of customer phone numbers, employee phone numbers, or a combination of the two, the appropriate code is built and saved as the recordsource of the subform. This is far simpler and easier to maintain than it would be if there were three subforms, one for each of the options. Using this approach, if you need to change the layout of the subform or add additional information to it, you will only have to do your changes in one spot rather than three.
Let’s examine the code behind this form. The key to this example is the code behind the AfterUpdate event for the option box.
Private Sub selectBy_AfterUpdate()
Dim srceStr As String
Select Case selectBy
    Case 1:
        srceStr = "SELECT firstname, lastname, phonenumber FROM
                   Customers"
    Case 2:
        srceStr = "SELECT firstname, lastname, phonenumber FROM
                   Employees"
    Case 3:
        srceStr = "SELECT firstname, lastname, phonenumber FROM
                   Customers UNION"&_
                  " SELECT firstname, lastname, phonenumber FROM
                    Employees"
End Select
[PhoneNumbers].Form.RecordSource = srceStr
End Sub
In this example, we first defined a variable to hold the SQL string. We could just set the recordsource directly to the string, but adding the intermediate variable is a good idea, as it helps facilitate debugging mistakes in the SQL code. It is far easier to debug the SQL statement if we have it in a variable that can be pasted and analyzed in the debug window. The Microsoft content pop-up generally is not big enough to hold the entire SQL string and it goes away before you can really tell what has happened. The more complex the SQL, the more we are inclined to use the temporary variable. Anyway, as an indication that something is happening when the code executes, you will note that the number of records in the recordset changes to reflect the counts for the two groups of phone numbers and the combined list of phone numbers.
In the dataset for this example, if you select the Customer button, the resulting form displays 10 records (see Figure 14-14).
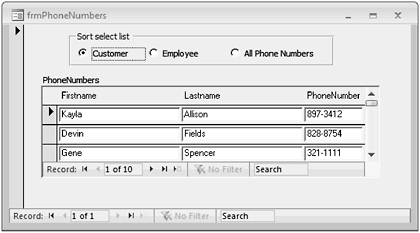
Figure 14-14
If we instead select the Employee button, the form displays five records (see Figure 14-15).

Figure 14-15
Finally, if the All Phone Numbers button is selected, the number of records increases to 16 (see Figure 14-16).
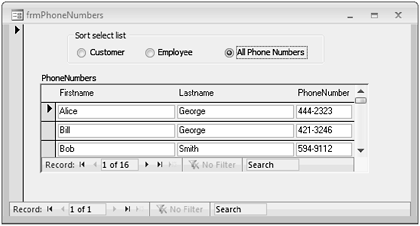
Figure 14-16
The real power to this approach is evident the moment you need to modify the layout of the subform. If you need to increase the width of the Lastname field, you can do it in one place. If you had three subforms, you would have to carefully resize each of the Lastname fields in each of the forms to ensure that they are the same size and carefully move the PhoneNumber fields so each is in the correct location. Otherwise, the form would “jump” on the screen as the different options were selected. It is far simpler to have a single form.
There is one other reason for not including the recordsource of a subform at form construction time but instead setting it during the running of the form — speed. If a form has multiple subforms on it, there will be a certain amount of processing time needed to fill each of the subforms. The more subforms on the main form and the more record searching that is required to calculate the form, the more time it takes for the form to be displayed. If instead of filling in all the recordsources of the subforms when the form is opened, the recordsource subform is filled only when actually needed, there is a perception by the viewer that the form is running faster. This is most noticeable when one has multiple tabs on a form where each tab contains a subform. If a tab is not selected while the user is viewing the form, any calculation on that tab will just be unnecessary overhead. Unfortunately there is the other side of the coin. If the user needs to constantly swap between tabs, there is the additional overhead of filling in the subform information. Of course, if you really want to totally optimize the program to get every bit of advantage out of the code, you can set the program so the recordset is loaded only the first time a tab is opened. Subsequent tab selection can then use the previously created subform. It is more work, but it will give you the fastest performance.
Report Filters
The single most important use of embedded SQL is the flexibility it provides in filtering reports. Since it is common to have many reports based on a similar set of filter parameters, it is often a good idea to have one standard form where the user can select the filters before the report is run. When the report is run, the SQL string can be constructed based on the filters established on the form. This concept is far easier to observe than it is to describe, so let’s take this one step at a time. Begin by looking at the frmReportFilter form. This form is used by several reports to build the generic filtered recordsource for the reports. Looking at the basic form shown in Figure 14-17, you will see that it is user friendly and guides the user through the possible options.
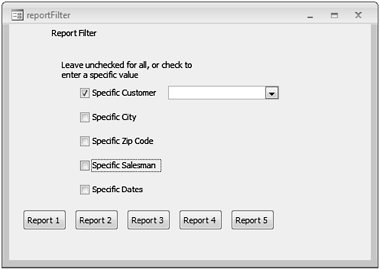
Figure 14-17
As the user selects the parameter to filter by, the corresponding field for the filter appears on the form for data entry.
When all the filters are selected, the user chooses the appropriate report. Using Report 1 as an example, we now get to examine the code behind the button.
Private Sub cmdReport1_Click()
On Error GoTo Err_cmdReport1_Click
    Dim stDocName As String
    Dim filter As String
    Dim rptSource As String

    filter = buildfilter()
    rptSource = "SELECT * FROM qrySalesComposite " & filter
    stDocName = "rptSalesComposite"
    DoCmd.OpenReport stDocName, acViewDesign
    Reports.rptSalesComposite.RecordSource = rptSource
    DoCmd.OpenReport stDocName, acPreview
Exit_cmdReport1_Click:
    Exit Sub
Err_cmdReport1_Click:
    MsgBox Err.Description
    Resume Exit_cmdReport1_Click
End Sub
The first thing you will note is that the majority of the processing for this button occurs in the buildfilter function. Generally, the block of code used to build the filter is very generic and called from several places. Rather than duplicating the code over and over, we have placed it in a function for convenience and have it returned to our main functions as a string. We have also placed the names of the recordsource and the filter into local string variables so we can verify them during the debug process.
The real meat of the operation occurs in the buildfilter function.
Private Function buildfilter() As String
Dim filt As String
filt = ""
If customerFiltered = True Then
    filt = "customerID="&customerFilter
End If
If cityFiltered = True Then
    If filt <> "" Then filt = filt & " AND"
    filt = filt & "city = '" & cityFilter&"'"
End If
If zipCodeFiltered = True Then
    If filt <> "" Then filt = filt & " AND"
    filt = filt & "zipcode = '" & zipCodeFilter & "'"
End If
If salesmanFiltered = True Then
    If filt <> "" Then filt = filt & " AND"
    filt=filt&"ID="&salesmanFilter
End If
If dated = True Then
    If filt <> "" Then filt = filt & " AND"
    filt = filt & "dateSold > #" & startdate&"#AND
           dateSold < #" & stopdate & "#"
End If
If filt <> "" Then
    filt = " WHERE " & filt
End If
buildfilter = filt
End Function
The buildfilter function is fairly straightforward. The function goes through each of the possible filter check boxes to see if the box is checked and if a filter is to occur. If checked, the code fragment is built for that specific conditional. Look at the first possible filter, which is Customer. If the user has opted to filter by customer, that customer name is appended to the filter string as "customerID = " followed by the ID of the customer. This process is repeated for each of the other possible filters. Also of interest here is the way the AND operator is added to the filter string. If something exists before the current conditional, the program inserts the " AND" operator. If there is nothing before the current condition, there is no need for the " AND" so it is not inserted.
One of the major potential trouble areas is determining when the special delimiters for strings and dates are needed and how to construct them. The process is identical for strings and dates and is illustrated with the date filter fragment above. In our case, we want the date to be between a start date and a stop date. The user enters two dates in the filter form and it is then the program’s job to parse that into a valid string. The first step is to build the start date by setting up the conditional "dateSold = " followed by the date. Dates have to be preceded by the # sign. It is put inside the quotes since it is to be part of the filter string, so the string becomes "dateSold = #". To this we append the date from the text box, startdate. This value is currently a string that we want to append to our current string, so we now have "dateSold = #" & startdate. We finish off this filter fragment with a final "#" also expressed as a string, giving us the final "dateSold = #" & startdate & "#". Note that the startdate is not included in quotes since we want the value of the field startdate, not the word “startdate.” Also note that the string concatenation symbol (&) is preceded and followed by a space while the # symbols are not. Let’s put this through a manual code-generation process using the date 2/5/2008. Plugging in all the values and evaluating it produces the string "startdate = #2/5/2008#".
The same approach is used for strings to be inserted, but the # character is replaced by the single quote ('). If we were to use the salesman’s last name instead of the ID value, that string would be "lastname = '" & lastname & "'".
Note: If you haven’t guessed, things can get very hairy if you use the #, quote, or double quote characters in field names. In those cases you have to go through the very careful gyrations of making sure the code knows how to process the characters correctly. It can easily become a mess if you are not careful. One database that we inherited used the fieldname “father’s name.” We spent several hours figuring out why the filter was not working properly before we realized that the quote was fouling up how the string was being handled. Sure, you can use paired double quotes, but in this case a bit of planning at the start can save you many hours of grief later.
Note: One of the more unusual errors that popped up was when we used the last name rather than the index in a dynamic SQL query. Everything went fine until we had the name O’Brian. Access decided that the single quote in the name was a string delimiter and the programming went crazy. Besides being faster, these problems do not occur when you use indexes.
Summary
This chapter showed how SQL can be used within Access and how the developer can use SQL to simplify code development and improve ease of use.